Spring Boot 集成 MyBatis 快速入门(注解版 与 xml 配置版)
目录环境准备新建项目pom. xml默认结构Mysql 数据库全局配置文件DomainmyBatis 注解版 CRUD@MapperUserControllerCRUD 测试MyBatis 自动配置原理自定义 MyBatis 配置@MapperScan 批量扫描2、本文将新建一个 Web 项目,介绍 Spring Boot 整合 MyBat......
本文环境:java jdk 1.8 + Spring boot 2.1.3 + Thymeleaf + mysql-connector-java:8.0.5+ myBatis 3.5.4
本文源码:thymeleafapp: thymeleafapp 模板引擎练习
Spring Boot 2.x 集成 MyBatis (注解版)
环境准备与配置
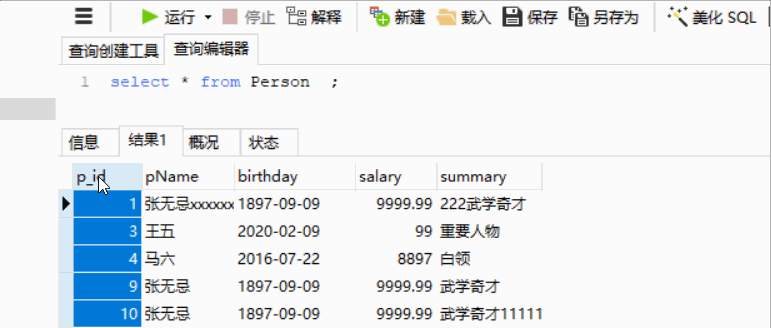
1、建表:在 Mysql 数据库中的 test 数据库下新建 person 表,脚本如下:
-- 新增 person 表
DROP TABLE IF EXISTS person;
CREATE TABLE person (
  pId int(11) NOT NULL AUTO_INCREMENT,
  pName varchar(18) NOT NULL,
  birthday date NOT NULL,
  salary float(10,2) DEFAULT NULL,
  summary varchar(256) DEFAULT NULL,
  PRIMARY KEY (pId)
) ENGINE=InnoDB AUTO_INCREMENT=5 DEFAULT CHARSET=utf8;

-- ----------------------------
-- Records of person
-- ----------------------------
INSERT INTO person VALUES ('1', '张三', '2021-03-21', '7867.00', '重要人物');
INSERT INTO person VALUES ('2', '李四', '2010-05-17', '6878.00', '重要人物');
INSERT INTO person VALUES ('3', '王五', '2020-02-09', '99.00', '重要人物');
INSERT INTO person VALUES ('4', '马六', '2016-07-22', '8897.00', '白领');
2、pom.xml 依赖如下:源码 pom.xml · 汪少棠/thymeleafapp - Gitee.com ,其中 MyBatis 官方提供的适配 Spring Boot 的依赖如下:
<!-- 引入 myBatis,这是 MyBatis官方提供的适配 Spring Boot 的,而不是Spring Boot自己的-->
<!-- https://mvnrepository.com/artifact/org.mybatis.spring.boot/mybatis-spring-boot-starter -->
<dependency>
	<groupId>org.mybatis.spring.boot</groupId>
	<artifactId>mybatis-spring-boot-starter</artifactId>
	<version>2.1.2</version>
</dependency>
3、全局配置文件:
#页面日期传入后台时,指定格式化
spring:
  mvc:
    date-format: yyyy-MM-dd HH:mm:ss

  #数据库配置
  datasource:
    username: root
    password: root
    url: jdbc:mysql://localhost:3306/test?characterEncoding=UTF-8&serverTimezone=UTC
    driver-class-name: com.mysql.cj.jdbc.Driver
src/main/resources/application.yml · 汪少棠/thymeleafapp - Gitee.com
- 高版本的 mysql 驱动(如 mysql-connector-java:8.0.16)的 driver-class-name 值中间带 cj、url 值必须带时区 serverTimezone,如:
- url: jdbc:mysql://127.0.0.1:3306/test?characterEncoding=UTF-8&serverTimezone=UTC
- driver-class-name: com.mysql.cj.jdbc.Driver
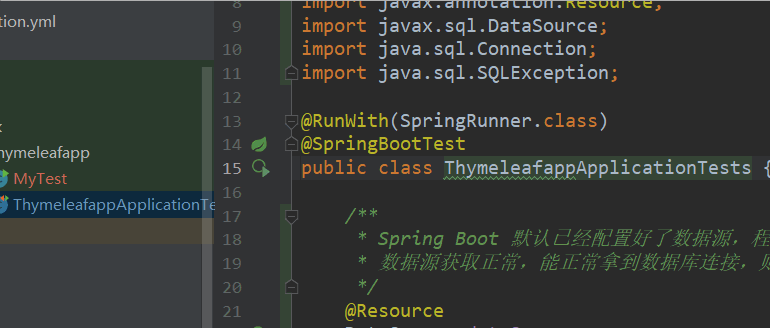
4、数据源测试:因为 Spring Boot 已经配置了默认的数据源 HikariDataSource ,所以此时就可以测试一下获取数据源:
@RunWith(SpringRunner.class)
@SpringBootTest
public class ThymeleafappApplicationTests {
    /**
     * Spring Boot 默认已经配置好了数据源,程序员可以直接 DI 注入然后使用即可
     * 数据源获取正常,能正常拿到数据库连接,则说明数据库连接成功
     */
    @Resource
    DataSource dataSource;
    @Test
    public void contextLoads() throws SQLException {
        System.out.println("数据源>>>>>>" + dataSource.getClass());
        Connection connection = dataSource.getConnection();
        System.out.println("连接>>>>>>>>>" + connection);
        System.out.println("连接地址>>>>>" + connection.getMetaData().getURL());
        connection.close();
    }
}
src/test/java/com/wmx/thymeleafapp/ThymeleafappApplicationTests.java · 汪少棠/thymeleafapp - Gitee.com
5、新建 POJO:创建 Person Java Bean 实体来封装数据,到此环境准备完毕,之后就使用 MyBatis 操作数据库即可。
import java.time.LocalDateTime;
/**
 * @author wangmaoxiong
 * @version 1.0
 * @date 2020/5/9 15:56
 */
public class Pserson {
    private Integer pId;
    private String pName;
    private LocalDateTime birthday;
    private Float salary;
    private String summary;

   //省略 getter、settter 方法未粘贴

}
src/main/java/com/wmx/thymeleafapp/pojo/Person.java · 汪少棠/thymeleafapp - Gitee.com
MyBatis 注解版 CRUD
1、新建 @Mapper 注解标识的接口,接口中方法上面使用 @Insert、 @Delete、@Update、@Select 注解编写操作数据库增删改查的 Sql。
import com.wmx.thymeleafapp.pojo.Person;
import org.apache.ibatis.annotations.*;
import java.util.List;
/**
 * @author wangmaoxiong
 * @version 1.0
 * @date 2020/5/9 16:02
 * </p>
 * @Mapper 注解表示本类是一个 MyBatis 的 Mapper(映射).
 * 1、以前 Spring 整合 mybatis 时,一个 POJO 对应 MyBatis一个操作数据库的 xml 文件, xml 文件又指向一个 mapper 接口.
 * 2、现在 Spring Boot 则省略了 xml 文件这一环节,直接将 sql 写在了接口上.
 */
@Mapper
public interface PersonMapper {
    /**
     * 根据用户 id 查询
     *
     * @param pId
     * @return :返回查询结果,不存在时返回 null
     * @Select :等价于以前 xml 形式时的 <select 标签,sql写法仍然和以前一样
     */
    @Select(value = {"select * from Person where pId=#{pId}"})
    Person findPersonById(Integer pId);
    /**
     * 查询所有用户
     *
     * @return :返回查询结果
     * @Select :等价于以前 xml 形式时的 <select 标签,sql写法仍然和以前一样
     */
    @Select(value = {"select * from Person"})
    List<Person> findAllPersons();
    /**
     * 根据用户 id 删除用户
     *
     * @return :返回操作的行数,也可以不返回
     */
    @Delete("delete from Person where pId = #{pId}")
    Integer deletePersonById(Integer pId);
    /**
     * 添加用户
     *
     * @param Person :因为主键 pId 自增,所以没设值
     * @return
     */
    @Insert("insert into Person(pName,birthday,salary,summary) values(#{pName},#{birthday},#{salary},#{summary})")
    Integer addPerson(Person Person);
    /**
     * 根据用户 pId 修改用户
     *
     * @param Person
     * @return
     */
    @Update("update Person set pName=#{pName},birthday=#{birthday},salary=#{salary},summary=#{summary} where pId=#{pId}")
    Integer updatePerson(Person Person);
}
src/main/java/com/wmx/thymeleafapp/mapper/PersonMapper.java · 汪少棠/thymeleafapp - Gitee.com
2、省略业务层,直接编写控制层调用 Mapper 层操作数据库:
@RestController
public class PersonController {
@Resource
private PersonMapper personMapper;
/**
* 根据用户 id 查询----直接将结果返回给用户页面
* http://localhost:8080/person/1
*
* @param pId
* @return
*/
@GetMapping("/person/{pId}")
public Person findPersonById(@PathVariable("pId") Integer pId) {
Person person = personMapper.findPersonById(pId);
return person;
}
/**
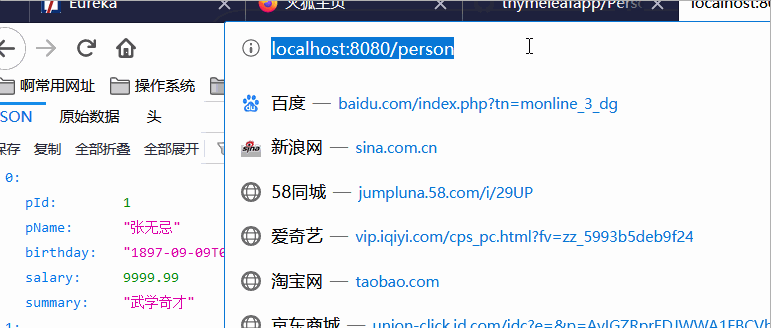
* 查询所有用户----直接将结果返回给用户页面
* http://localhost:8080/person
*
* @return
*/
@GetMapping("/person")
public List<Person> findAllPersons() {
List<Person> personList = personMapper.findAllPersons();
return personList;
}
/**
* 添加用户: http://localhost:8080/person/add
* {"pName":"张无忌","salary":9999.99,"birthday":"1897-09-09T12:00:11","summary":"武学奇才"}
*
* @param person
* @return
*/
@PostMapping("/person/add")
public String addPerson(@RequestBody Person person) {
Integer integer = personMapper.addPerson(person);
return String.valueOf(integer);
}
/**
* 修改用户:http://localhost:8080/person/update
* {"pId":1,"pName":"张无忌","salary":9999.99,"birthday":"1897-09-09T12:00:11","summary":"武学奇才"}
*
* @param person
* @return
*/
@PostMapping("/person/update")
public String updatePerson(@RequestBody Person person) {
Integer integer = personMapper.updatePerson(person);
return String.valueOf(integer);
}
/**
* 删除用户: http://localhost:8080/person/del/2
*
* @param pId
* @return
*/
@GetMapping("/person/del/{pId}")
public String deletePerson(@PathVariable("pId") Integer pId) {
Integer integer = personMapper.deletePersonById(pId);
return String.valueOf(integer);
}
}
src/main/java/com/wmx/thymeleafapp/controller/PersonController.java · 汪少棠/thymeleafapp - Gitee.com
MyBatis 自动配置原理 与 自定义配置
1、MyBatis 自动配置在 org.mybatis.spring.boot.autoconfigure.MybatisAutoConfiguration 类下,它会自动注入数据源(DataSource) 创建 MyBatis 的 SqlSessionFactory,核心源码如下:
 @Bean
    @ConditionalOnMissingBean
    public SqlSessionFactory sqlSessionFactory(DataSource dataSource) throws Exception {
        SqlSessionFactoryBean factory = new SqlSessionFactoryBean();
        factory.setDataSource(dataSource);
        factory.setVfs(SpringBootVFS.class);
        if(StringUtils.hasText(this.properties.getConfigLocation())) {
            factory.setConfigLocation(this.resourceLoader.getResource(this.properties.getConfigLocation()));
        }

        org.apache.ibatis.session.Configuration configuration = this.properties.getConfiguration();
        if(configuration == null && !StringUtils.hasText(this.properties.getConfigLocation())) {
            configuration = new org.apache.ibatis.session.Configuration();
        }

        if(configuration != null && !CollectionUtils.isEmpty(this.configurationCustomizers)) {
            Iterator var4 = this.configurationCustomizers.iterator();

            while(var4.hasNext()) {
                ConfigurationCustomizer customizer = (ConfigurationCustomizer)var4.next();
                customizer.customize(configuration);
            }
        }

        factory.setConfiguration(configuration);
        if(this.properties.getConfigurationProperties() != null) {
            factory.setConfigurationProperties(this.properties.getConfigurationProperties());
        }

        if(!ObjectUtils.isEmpty(this.interceptors)) {
            factory.setPlugins(this.interceptors);
        }

        if(this.databaseIdProvider != null) {
            factory.setDatabaseIdProvider(this.databaseIdProvider);
        }

        if(StringUtils.hasLength(this.properties.getTypeAliasesPackage())) {
            factory.setTypeAliasesPackage(this.properties.getTypeAliasesPackage());
        }

        if(StringUtils.hasLength(this.properties.getTypeHandlersPackage())) {
            factory.setTypeHandlersPackage(this.properties.getTypeHandlersPackage());
        }

        if(!ObjectUtils.isEmpty(this.properties.resolveMapperLocations())) {
            factory.setMapperLocations(this.properties.resolveMapperLocations());
        }

        return factory.getObject();
    }

    @Bean
    @ConditionalOnMissingBean
    public SqlSessionTemplate sqlSessionTemplate(SqlSessionFactory sqlSessionFactory) {
        ExecutorType executorType = this.properties.getExecutorType();
        return executorType != null?new SqlSessionTemplate(sqlSessionFactory, executorType):new SqlSessionTemplate(sqlSessionFactory);
}2、自定义 MyBatis 配置,MybatisAutoConfiguration 类中创建 SqlSessionFactory 时使用了 ConfigurationCustomizers(配置定制器) ,所以如果想要修改 myBatis 配置,只需自己创建此组件然后添加到容器中即可。
3、下面以一个需求为例进行说明,手动修改数据库的 pId 字段名称为 "p_id",然后 Person 对象仍然使用 pId 属性,此时 mybatis 会因为两者名称不一致而匹配不上值。
4、可以使用 ConfigurationCustomizers 自定义配置即可解决,ConfigurationCustomizers 配置定制器中有其许多配置项, configuration.setMapUnderscoreToCamelCase(true) 表示将 将映射下划线设置为大小写。
import org.apache.ibatis.session.Configuration;
import org.mybatis.spring.boot.autoconfigure.ConfigurationCustomizer;
import org.springframework.context.annotation.Bean;
/**
 * @author wangmaoxiong
 * @version 1.0
 * @date 2020/5/9 16:02
 * MyBatis 配置类
 */
@org.springframework.context.annotation.Configuration
public class MybatisConfig {
    /**
     * 将组建添加到容器中
     * @return
     */
    @Bean
    public ConfigurationCustomizer configurationCustomizer() {
        return new ConfigurationCustomizer() {
            @Override
            public void customize(Configuration configuration) {
                /**setMapUnderscoreToCamelCase(boolean mapUnderscoreToCamelCase)
                 * 将映射下划线设置为大小写,无论是数据库字段还是实体的属性,当出现下划线时,自动转为驼峰命名
                 * 默认为 false.
                 */
                configuration.setMapUnderscoreToCamelCase(true);
            }
        };
    }
}
src/main/java/com/wmx/thymeleafapp/config/MybatisConfig.java · 汪少棠/thymeleafapp - Gitee.com
@MapperScan 批量扫描 Mapper
1、@Mapper 注解直接写在目标 Mapper 接口上,表名本接口是 MyBatis 的 Mapper。
2、@MapperScan 注解可以指定自动扫描哪些路径下的接口作为 MyBatis 的 Mapper,此时接口上可以不需要再写 @Mapper,因为会自动帮它们加上。
3、@MapperScan 通常放在应用启动类上即可,value 是一个数组,可以扫描多个路径。
| @MapperScan(value = "com.wmx.hb.mapper") 扫描指定包(包括其下任意级次的子包)中的接口 @MapperScan(value = "com.wmx.*.mapper") 一个 * 代表一个层级包 @MapperScan(value = "com.wmx.**.mapper.**") 两个 * 代表任意层级包 @MapperScan(value = "com.wmx.**.mapper") 等价 com.wmx.**.mapper.** @MapperScan(value = "com.wmx.**") 扫描 com.wmx 包(包括其下任意级次的子包)中的接口 @MapperScan(value = "com.wmx") 等价 com.wmx.** |
import org.mybatis.spring.annotation.MapperScan;
import org.springframework.boot.SpringApplication;
import org.springframework.boot.autoconfigure.SpringBootApplication;
/**
 * @MapperScan : 作用是扫描某些包下面所有的类作为 Mapper 类
 * 1)value是一个数组,可以扫描多个路径
 * 2)被扫描的包(com.lct.wmx.mapper)中的类(接口)上可以不用再写 @Mapper,因为全部会自动为它们添上
 * 3) @MapperScan 的位置通常放在应用启动类上
 */
@MapperScan(value = {"com.lct.wmx.mapper"})
@SpringBootApplication
public class HippoApplication {
    public static void main(String[] args) {
        SpringApplication.run(HippoApplication.class, args);
    }
}
src/main/java/com/wmx/thymeleafapp/ThymeleafappApplication.java · 汪少棠/thymeleafapp - Gitee.com
Spring Boot 2.x 集成 MyBatis (xml配置)
| 1、除了使用 @Mapper 注解的方式,也可以使用 MyBatis xml 文件配置的方式。实际开发中可以同时存在 myBatis 的 注解方式与配置方式,如 User 实体可以使用 注解方式进行 CRUD,Party 实体可以使用 配置方式进行 CRUD。 |
| 2、如果不想使用注解版在接口方法上直接写 SQL 的方式,而是想使传统的 xml 文件配置的方式,则可以考虑 xml 配置方式。 |
| 3、虽然直接在接口上使用注解方式写 SQL 看起来很高级,但实际生产中却推荐使用 xml 文件配置的方式,因为对于维护起来更加方便,只需要直接修改一下 xml 文件即可,而如果是写死在源码中,则还需要重新打包或者替换 .class 文件才行. |
1、Mysql 数据库中建表脚本:src/main/resources/sql/dept_and_emp.sql · 汪少棠/thymeleafapp - Gitee.com
2、新建 POJO 实体:src/main/java/com/wmx/thymeleafapp/pojo/Dept.java · 汪少棠/thymeleafapp - Gitee.com
3、设置实体类对应的面向对象操作的 Mapper 接口:src/main/java/com/wmx/thymeleafapp/mapper/DeptMapper.java · 汪少棠/thymeleafapp - Gitee.com
4、启动类上添加 @MapperScan 注解扫描 Mapper 接口:src/main/java/com/wmx/thymeleafapp/ThymeleafappApplication.java · 汪少棠/thymeleafapp - Gitee.com
5、提供 MyBatis 操作数据库的 Mapper 接口对应的 xml 文件:src/main/resources/myBatis/mapper/DeptMapper.xml · 汪少棠/thymeleafapp - Gitee.com
MyBatis 的 sql 对应的 xml 文件头信息可以从 myBatis 官网 获取,官网示例内容如下所示:
<?xml version="1.0" encoding="UTF-8" ?>
<!DOCTYPE mapper
  PUBLIC "-//mybatis.org//DTD Mapper 3.0//EN"
  "http://mybatis.org/dtd/mybatis-3-mapper.dtd">
<mapper namespace="org.mybatis.example.BlogMapper">
  <select id="selectBlog" resultType="Blog">
    select * from Blog where id = #{id}
  </select>
</mapper>
6、MyBatis 核心配置文件 mybatis-config.xml:src/main/resources/myBatis/mybatis-config.xml · 汪少棠/thymeleafapp - Gitee.com
可以进官网参考。
7、Spring Boot 全局配置文件指定 mybatis 配置文件路径:
#指定 myBatis 核心配置文件与 Mapper 映射 xml 文件
mybatis:
  config-location: classpath:mybatis/mybatis-config.xml
  mapper-locations: classpath:mybatis/mapper/*.xml
上面只是常用的两个选项,更多配置选项可以从 org.mybatis.spring.boot.autoconfigure.MybatisProperties 中查看,也可以从 myBatis 官方文档 进行查看,官网示例内容如下所示:
# application.yml
mybatis:
    type-aliases-package: com.example.domain.model
    type-handlers-package: com.example.typehandler
    configuration:
        map-underscore-to-camel-case: true
        default-fetch-size: 100
        default-statement-timeout: 30
...
8、编写控制器层调用 Mapper 接口:src/main/java/com/wmx/thymeleafapp/controller/DeptController.java · 汪少棠/thymeleafapp - Gitee.com

为开发者提供学习成长、分享交流、生态实践、资源工具等服务,帮助开发者快速成长。
更多推荐


 5
5 0
0- 0


 已为社区贡献13条内容

所有评论(0)