vue element-ui+springboot 的图片上传及展示
vue +springboot 图片上传
问题
搜索了很多 图片上传的方式 ,但只看到单一的图片的上传方案,
但是我需要将图片和表单中其他数据 ,如 名称,描述 等一起 保存到数据库中
该项目为 本地项目,前后端分离 ,前端8080 端口,后端 8081端口
1. 效果
思路:
1. 首先图片上传 调用 upload方法 ,后端处理后 将图片 url 返回给前端
2. 前端将 后端返回的url 图片 赋值 给 表单中的对应字段
3. 将全部的表单数据 保存数据库中
以表单形式上传至后端,将表单信息 (包括图片url)保存到数据库
图片展示效果
2. 前端代码
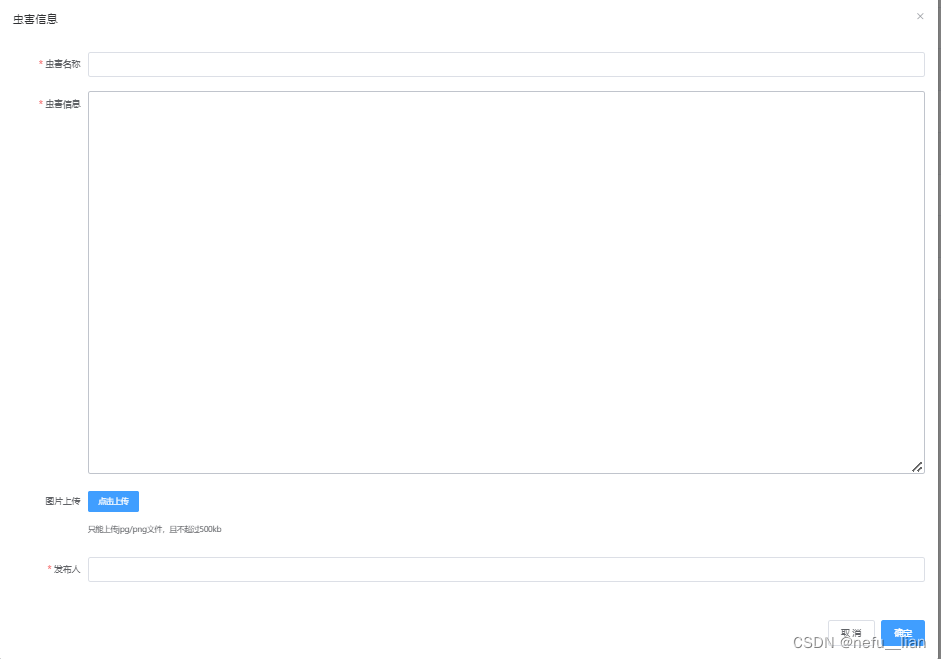
只给出主要的代码,当 新增表单信息时 通过 el-upload 组件进行图片上传,
action 中为向后端发起请求路径,当上传成功 :on-success=“handleAvatarSuccess” ,调用handleAvatarSuccess方法,
将后端返回的图片的url 地址 赋值 给editForm.img 属性, 点击确定会调用 submitForm(‘editForm’) 方法,将 表单信息发送到后端, 在全部存储到数据库
<el-dialog
        title="虫害信息"
        :visible.sync="dialogVisible"
        width="1500px"
        :before-close="handleClose">

      <el-form :model="editForm" :rules="editFormRules" ref="editForm">
        <el-form-item label="虫害名称" prop="title" label-width="120px">
          <el-input v-model="editForm.title" autocomplete="off"></el-input>
        </el-form-item>


        <el-form-item label="虫害信息"  prop="message" label-width="120px"  >
          <el-input type="textarea" v-model="editForm.message" autocomplete="off" :rows="20" style="font-size:20px"></el-input>
        </el-form-item>

        <el-form-item label="图片上传"  prop="img" label-width="120px">
          <el-upload
              class="upload-demo"
              action="http://localhost:8081/sys/express/upload"
              :on-preview="handlePreview"
              :on-remove="handleRemove"
              :before-remove="beforeRemove"
              :on-success="handleAvatarSuccess"
              :limit="1"
              :on-exceed="handleExceed"
              :file-list="fileList">
            <el-button size="small" type="primary">点击上传</el-button>
            <div slot="tip" class="el-upload__tip">只能上传jpg/png文件,且不超过500kb</div>
          </el-upload>
        </el-form-item>

        <el-form-item label="发布人"  prop="username" label-width="120px">
          <el-input v-model="editForm.username" autocomplete="off"></el-input>
        </el-form-item>
      </el-form>
      <div slot="footer" class="dialog-footer">
        <el-button @click="resetForm('editForm')">取 消</el-button>
        <el-button type="primary" @click="submitForm('editForm')">确定</el-button>
      </div>

    </el-dialog>

methods:{

submitForm(formName) {
      this.$refs[formName].validate((valid) => {
        if (valid) {
          console.log(this.editForm.img)
          this.$axios.post('/sys/pest/'+(this.editForm.id?'update':'save'),this.editForm)
              .then(res=>{
                // 消息框提示操作成功
                this.$message({
                  showClose: true,
                  message: '恭喜你,操作成功',
                  type: 'success',
                  //关闭时的回调函数, 参数为被关闭的 message 实例
                  onClose:()=>{
                    this.getPestList()
                  }
                })
              })
          this.resetForm('editForm')
          this.dialogVisible=false;
        } else {
          console.log('error submit!!');
          return false;
        }
      });
    },
     handleRemove(file, fileList) {
      console.log(file, fileList);
    },
    handlePreview(file) {
      window.open(file.response.url)
      console.log(file);
    },
    handleExceed(files, fileList) {
      this.$message.warning(`当前限制选择 1个文件,本次选择了 ${files.length} 个文件,共选择了 ${files.length + fileList.length} 个文件`);
    },
    beforeRemove(file, fileList) {
      return this.$confirm(`确定移除 ${ file.name }?`);
    },
    handleAvatarSuccess(res, file) {
      this.editForm.img = res.url
    }
}
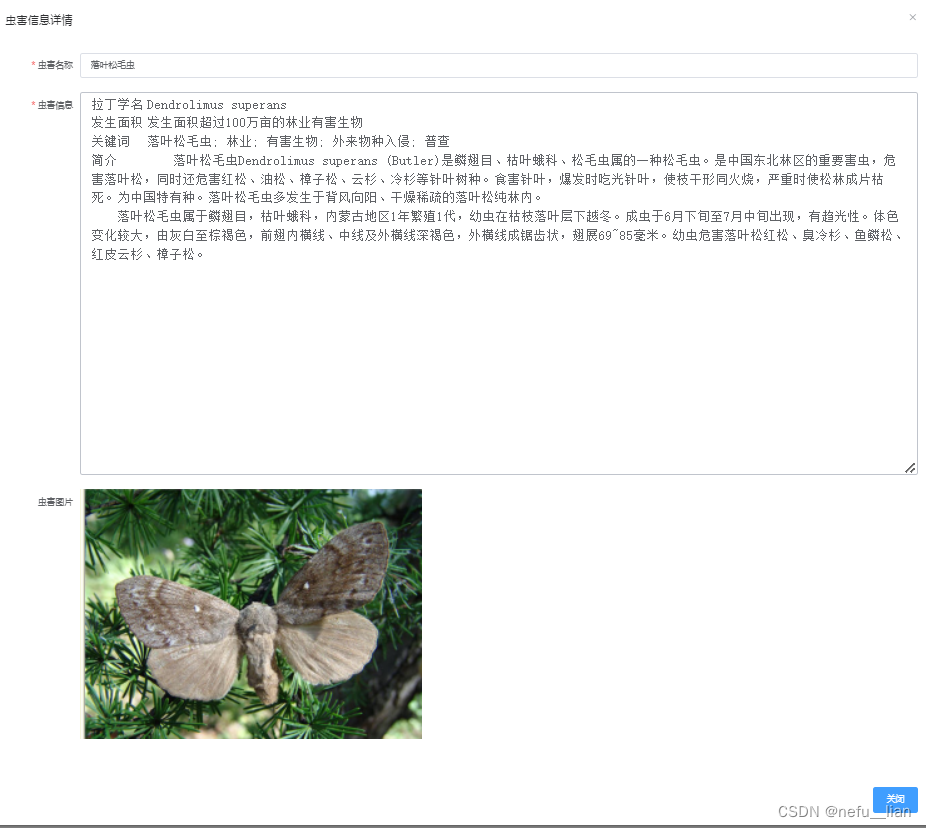
展示界面 (主要展示 后端传来的 数据,以表单形式展示)
<el-dialog
        title="虫害信息详情"
        :visible.sync="expressDialogVisible"
        width="1500px">

      <el-form :model="expressForm" :rules="expressFormRules" ref="expressForm">
        <el-form-item label="虫害名称" prop="title" label-width="120px">
          <el-input v-model="expressForm.title" autocomplete="off"></el-input>
          <!--          <el-alert-->
          <!--              title="初始密码为888888"-->
          <!--              :closable="false"-->
          <!--              type="info"-->
          <!--              style="line-height: 12px;"-->
          <!--          ></el-alert>-->
        </el-form-item>
        <el-form-item label="虫害信息"  prop="message" label-width="120px"  >
          <el-input type="textarea" v-model="expressForm.message" autocomplete="off" :rows="20" style="font-size:20px"></el-input>
        </el-form-item>
        <el-form-item label="虫害图片"  prop="img" label-width="120px"  v-if="expressForm.img!=null" >
          <el-image
              v-model="expressForm.img"
              :src="expressForm.img"
             ></el-image>
        </el-form-item>
      </el-form>
      <div slot="footer" class="dialog-footer">
        <!--        <el-button @click="resetForm('editForm')">取 消</el-button>-->
        <el-button type="primary" @click="cancalexpressForm('expressForm')">关闭</el-button>
      </div>


    </el-dialog>
3. 后端代码
当前端通过 el-upload 上传图片, 根据请求路径 由@RequestMapping 匹配到 fileupload 方法,
filePath 为本地项目 resource 目录的地址 ,UUID 处理图片名称,变为唯一名称,生成url 后 返回给前端,前端完成 url 值赋值 到表单。
之后前端再 提交表单数据 到后端 ,由PestController 处理后, 保存到数据库中
@RestController
@RequestMapping("/sys/express")
public class ExpressInfoController extends BaseController {

    @PostMapping("/upload")
    public Map<String,Object> fileupload(MultipartFile file, HttpServletRequest req) {
        Map<String, Object> result = new HashMap<>();

        // 放在本地项目 目录
        String filePath="D:\\idea-workspace\\vueadmin-back\\src\\main\\resources\\static\\img";
        File folder = new File(filePath);

        if (!folder.exists()) {
            folder.mkdirs();
        }
        // 生成新的文件名
        String oldName = file.getOriginalFilename();
        String newName = UUID.randomUUID().toString() + oldName.substring(oldName.lastIndexOf("."));
        // System.out.println(oldName);
        //System.out.println(newName);
        try {
            // 保存文件到指定路径
            file.transferTo(new File(folder, newName));
            String url = req.getScheme() + "://" + req.getServerName() + ":" + req.getServerPort()+"/img/"  + newName;

            System.out.println(url);
            result.put("status", "OK");
            result.put("name", oldName);
            result.put("url", url);

        } catch (IOException e) {
            result.put("status", "ERROR");
            result.put("msg", e.getMessage());
        }
        return result;
    }

}
@RestController
@RequestMapping("/sys/pest")
public class PestController extends BaseController {

    @PostMapping("/save")
    public Result save(@RequestBody ExpressInfo expressInfo){
        expressInfo.setCreated(LocalDateTime.now());
        expressInfo.setUpdated(LocalDateTime.now());
        expressInfo.setStatu(Const.STATUS_ON);
        expressInfoService.save(expressInfo);
        return Result.success(expressInfo);
    }

    @PostMapping("/update")
    public Result update(@RequestBody ExpressInfo expressInfo){

        expressInfo.setUpdated(LocalDateTime.now());
        expressInfoService.updateById(expressInfo);

        return Result.success(expressInfo);
    }

}
4. 数据库表
CREATE TABLE `express_info` (
  `id` bigint NOT NULL AUTO_INCREMENT,
  `type` int DEFAULT NULL,
  `title` varchar(100) DEFAULT NULL,
  `message` varchar(10000) DEFAULT NULL,
  `img` varchar(100) DEFAULT NULL,
  `username` varchar(100) DEFAULT NULL,
  `created` datetime DEFAULT NULL,
  `updated` datetime DEFAULT NULL,
  `statu` int DEFAULT NULL,
  PRIMARY KEY (`id`)
) ENGINE=InnoDB AUTO_INCREMENT=16 DEFAULT CHARSET=utf8mb4 COLLATE=utf8mb4_0900_ai_ci

5. 其他注意事项
- 前后端 分离 ,请求的跨域处理
- 图片url 保存到数据库,图片实际保存在本地项目的 目录下, 注意开启静态资源的访问权限 (拦截器中设置,或者 我是在spring security 中 设置的请求白名单)
- 添加图片上传后,发现回显不了,404,发现网站上也不显示图片,查看数据库、存储路径都是正确的,在重启服务器后照片又显示了。
问题原因:
由于spring启动后会将项目资源打包,但我们在运行中添加的照片并不会放在打包的资源里面,所以访问不到图片,而在重新启动项目后,又重新将资源打包,其中就包含了新加入的照片,所以可以访问。
配置虚拟路径访问后,就直接读取的本地的照片,所以可以显现出来了
// 问题2 配置白名单
package com.ljw.config;

@Configuration
@EnableWebSecurity     // 开启Security 的安全策略
@EnableGlobalMethodSecurity(prePostEnabled = true)  // 在post 请求前进行权限校验
public class SecurityConfig extends WebSecurityConfigurerAdapter {

    @Autowired
    LoginFailureHandler loginFailureHandler;
    @Autowired
    LoginSuccessHandler loginSuccessHandler;
    @Autowired
    CaptchaFilter captchaFilter;

    @Bean
    JwtAuthenticationFilter jwtAuthenticationFilter() throws Exception {
        JwtAuthenticationFilter jwtAuthenticationFilter
                 = new JwtAuthenticationFilter(authenticationManager());
        return jwtAuthenticationFilter;
    }

    @Autowired
    JwtAuthenticationEntryPoint jwtAuthenticationEntryPoint;

    @Autowired
    JwtAccessDeniedHandler jwtAccessDeniedHandler;

    @Bean
    BCryptPasswordEncoder bCryptPasswordEncoder(){
        return new BCryptPasswordEncoder();
    }

    @Autowired
    UserDetailServiceImpl userDetailService;

    @Autowired
    JwtLogoutSuccessHander jwtLogoutSuccessHander;


    // 请求白名单
    private  static  final  String[] URL_WHILELIST={
      "/login","/logout",
      "/captcha","/favicon.ico","/test/**","/sys/express/upload",
       "/img/**","/static/**"
    };

    protected void configure(HttpSecurity http) throws Exception {

       http.cors().and().csrf().disable()
               // 登录配置
        .formLogin()
                             // 登录成功或者失败后,对应进行回调
               .successHandler(loginSuccessHandler)
               .failureHandler(loginFailureHandler)

               // 退出登录 配置
         .and()
               .logout()
               .logoutSuccessHandler(jwtLogoutSuccessHander)

              // 禁用session
         .and()
                              //设置无状态的连接,即不创建session
               .sessionManagement()
               .sessionCreationPolicy(SessionCreationPolicy.STATELESS)
             // 配置拦截规则
         .and()
                              // 除了 白名单的请求 放过,其他正常拦截
               .authorizeRequests()
               .antMatchers(URL_WHILELIST).permitAll()
               .anyRequest().authenticated()
             // 异常处理器
         .and()
               .exceptionHandling()
               .authenticationEntryPoint(jwtAuthenticationEntryPoint)       // 认证失败 异常处理入口
               .accessDeniedHandler(jwtAccessDeniedHandler)            // 配置 权限不足 处理器

             // 配置自定义的过滤器
          .and()
               .addFilter(jwtAuthenticationFilter())
               .addFilterBefore(captchaFilter, UsernamePasswordAuthenticationFilter.class)  // 登录验证码过滤器

        ;
    }


    /**
     * 配置
     * 将 userDetailService的实现类 注入到 security 中
     * @param auth
     * @throws Exception
     */
    @Override
    protected void configure(AuthenticationManagerBuilder auth) throws Exception {
        auth.userDetailsService(userDetailService);
    }
}
//  问题1 跨域
// 问题3 虚拟路径配置   addResourceHandlers()
@Configuration
public class CorsConfig implements WebMvcConfigurer {

    private CorsConfiguration buildConfig() {
        CorsConfiguration corsConfiguration = new CorsConfiguration();
        corsConfiguration.addAllowedOrigin("*");
        corsConfiguration.addAllowedHeader("*");
        corsConfiguration.addAllowedMethod("*");
        corsConfiguration.addExposedHeader("Authorization");
        return corsConfiguration;
    }

    @Bean
    public CorsFilter corsFilter() {
        UrlBasedCorsConfigurationSource source = new UrlBasedCorsConfigurationSource();
        source.registerCorsConfiguration("/**", buildConfig());
        return new CorsFilter(source);
    }

    @Override
    public void addCorsMappings(CorsRegistry registry) {
        registry.addMapping("/**")
                .allowedOrigins("*")
//          .allowCredentials(true)
                .allowedMethods("GET", "POST", "DELETE", "PUT")
                .maxAge(3600);
    }


// 图片访问 虚拟路径配置
    @Override
    public void addResourceHandlers(ResourceHandlerRegistry registry) {
        registry.addResourceHandler("/img/**")
                .addResourceLocations("file:D:\\idea-workspace\\vueadmin-back\\src\\main\\resources\\static\\img\\");
    }
}

为开发者提供学习成长、分享交流、生态实践、资源工具等服务,帮助开发者快速成长。
更多推荐


 14
14 0
0- 0


 已为社区贡献1条内容

所有评论(0)