SpringBoot + Vue实现博文上传+展示+博文列表
ok,又到了水文时间了,那么今天带来的是这个WhiteHole的最新的开发进度,也就是实现了我们的博文的基本功能。那么之后比较重大的功能就是我们的消息系统+流量统计(文章,问答之类的数据信息)其他的什么社区,社区管理什么的和我们先前的业务是类似的。所以的话这里就不想复述了,因为意义不大,那部分的话基本上技术没什么难的就是基本的CURD+调用微服务。实话实说,这部分的开发对我来说其实就是繁琐,其实很
前言
ok,又到了水文时间了,那么今天带来的是这个WhiteHole的最新的开发进度,也就是实现了我们的博文的基本功能。那么之后比较重大的功能就是我们的消息系统+流量统计(文章,问答之类的数据信息)其他的什么社区,社区管理什么的和我们先前的业务是类似的。所以的话这里就不想复述了,因为意义不大,那部分的话基本上技术没什么难的就是基本的CURD+调用微服务。实话实说,这部分的开发对我来说其实就是繁琐,其实很简单,当然要考虑的东西不少。然后的话还有咱们的后台管理系统,这部分用户端做的差不多了,这个后台的其实也快,无法也是CURD+一些高权限的操作。现阶段的代码还是一个初级阶段,后面把组件上齐了,咱们还会在修改说明的。
那么这次的话也是我们尽可能完整一点。
不过的话也是有部分内容重复的,所以请先阅读这篇文章:
Vue整合Markdown组件+SpringBoot文件上传+代码差异对比
实现效果
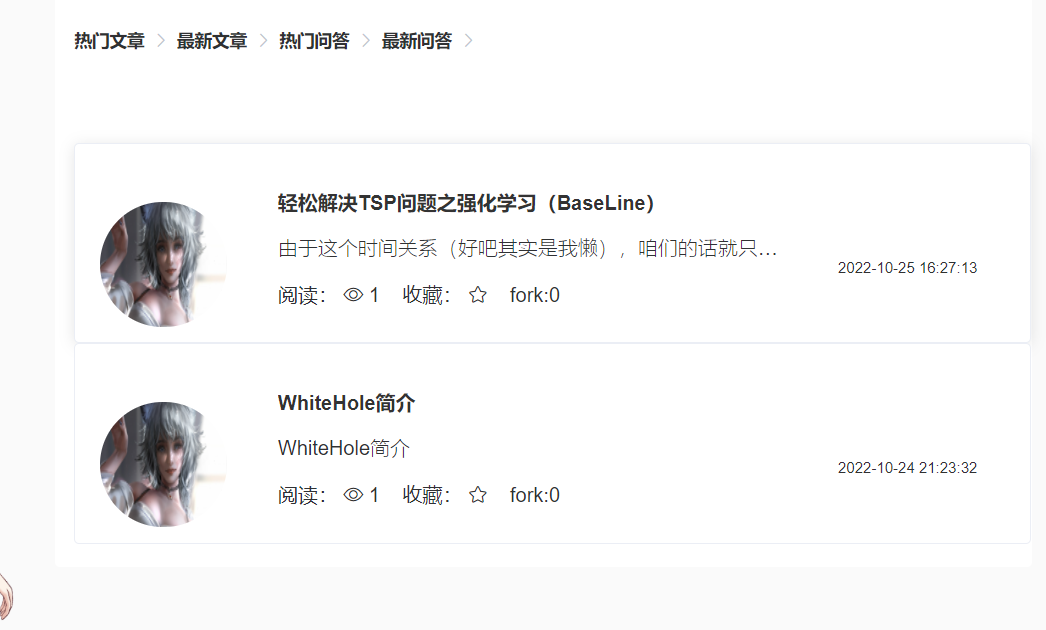
博文列表
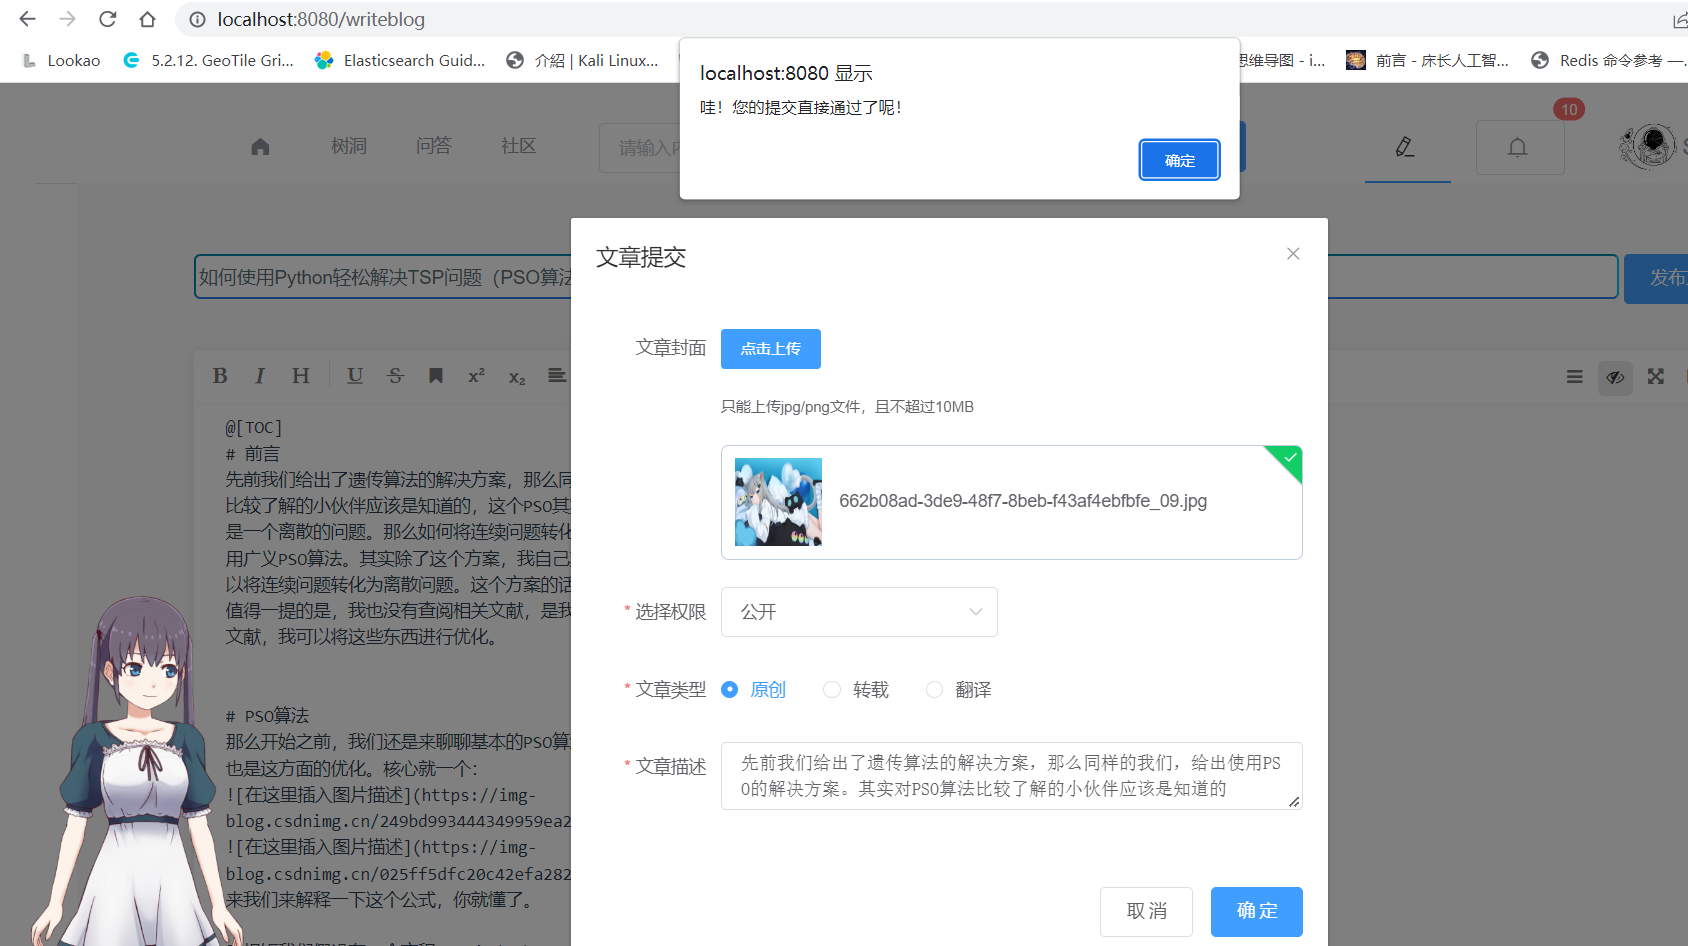
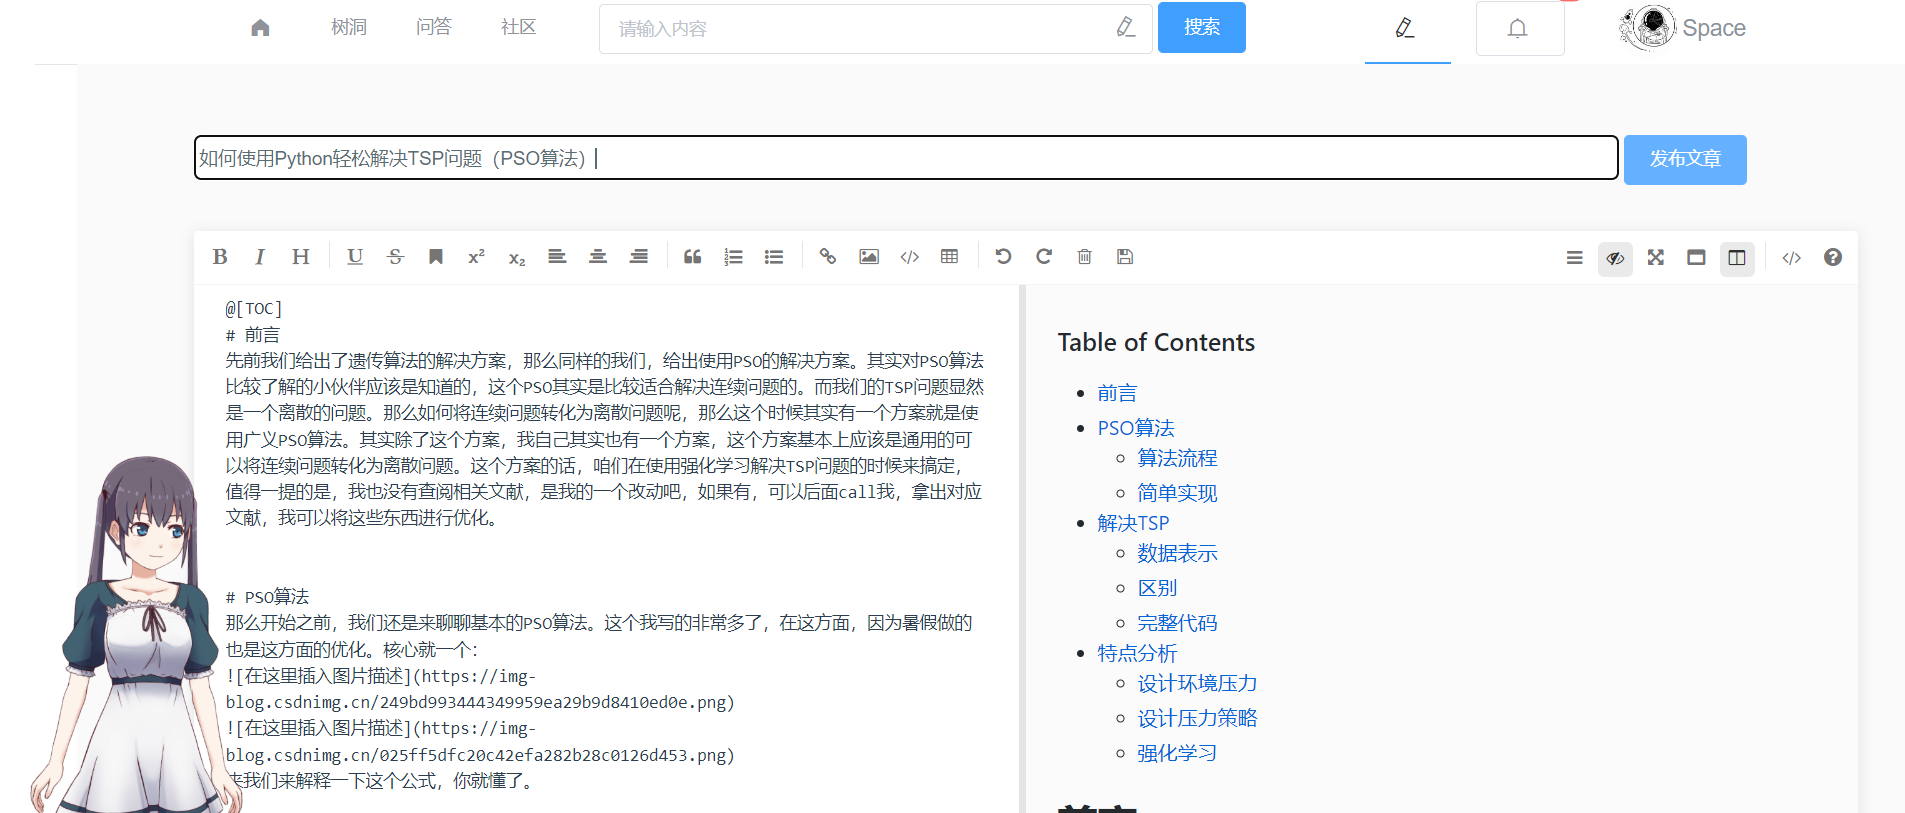
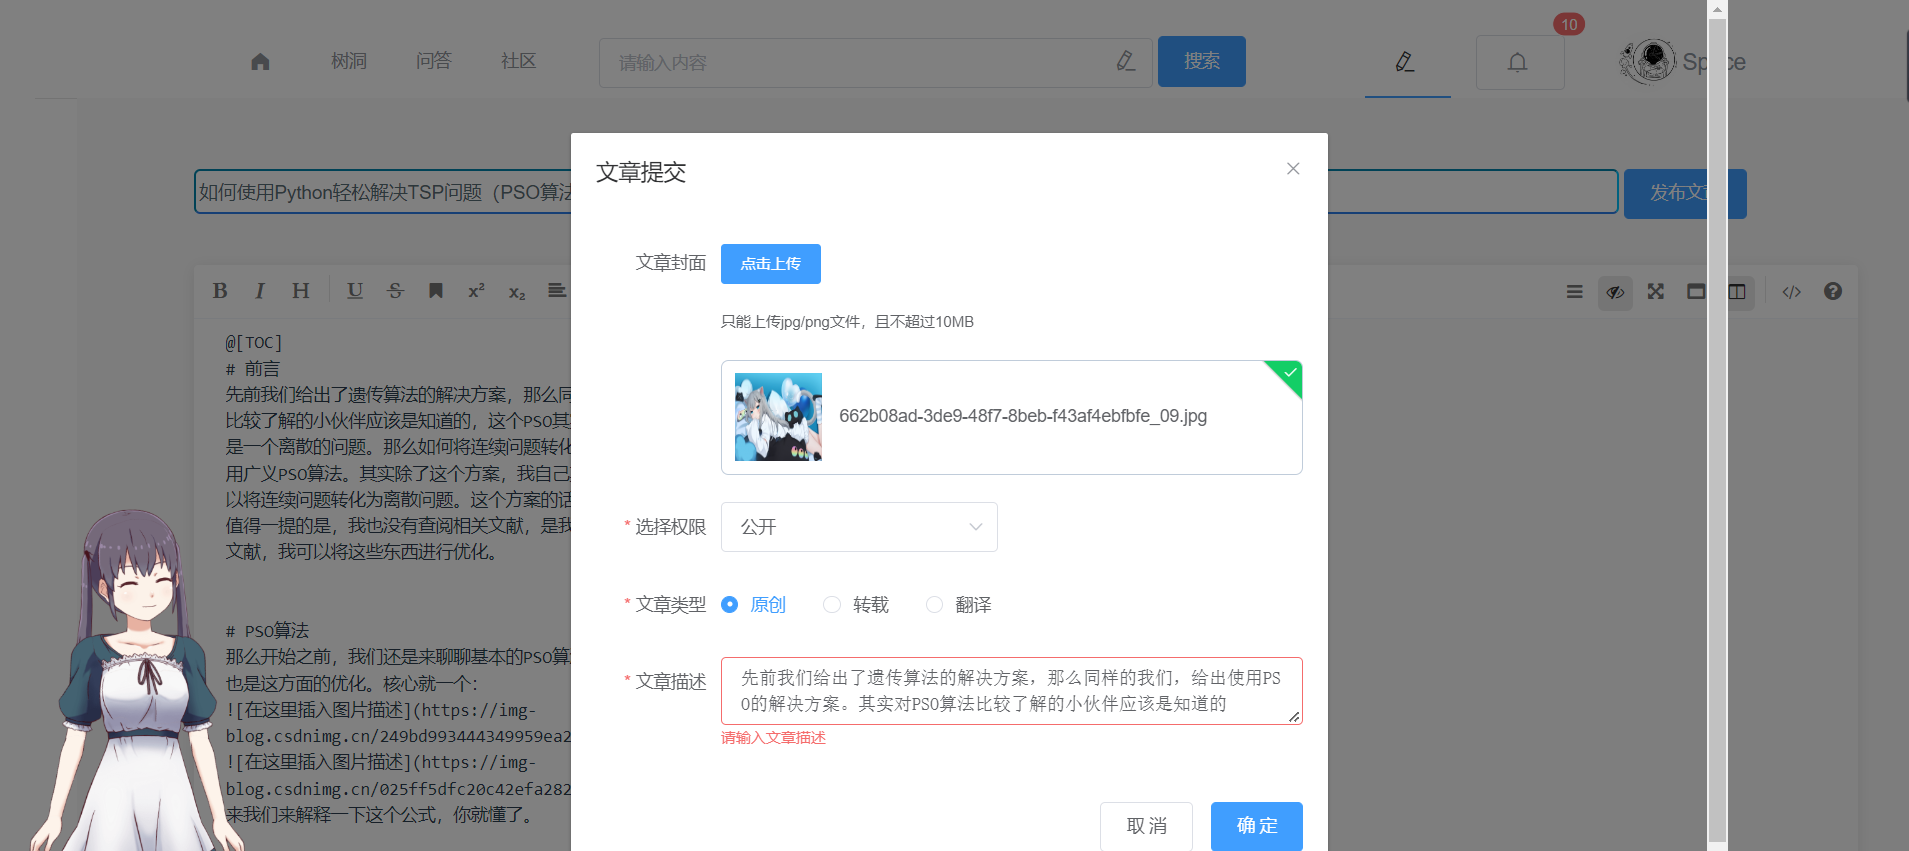
文章编辑
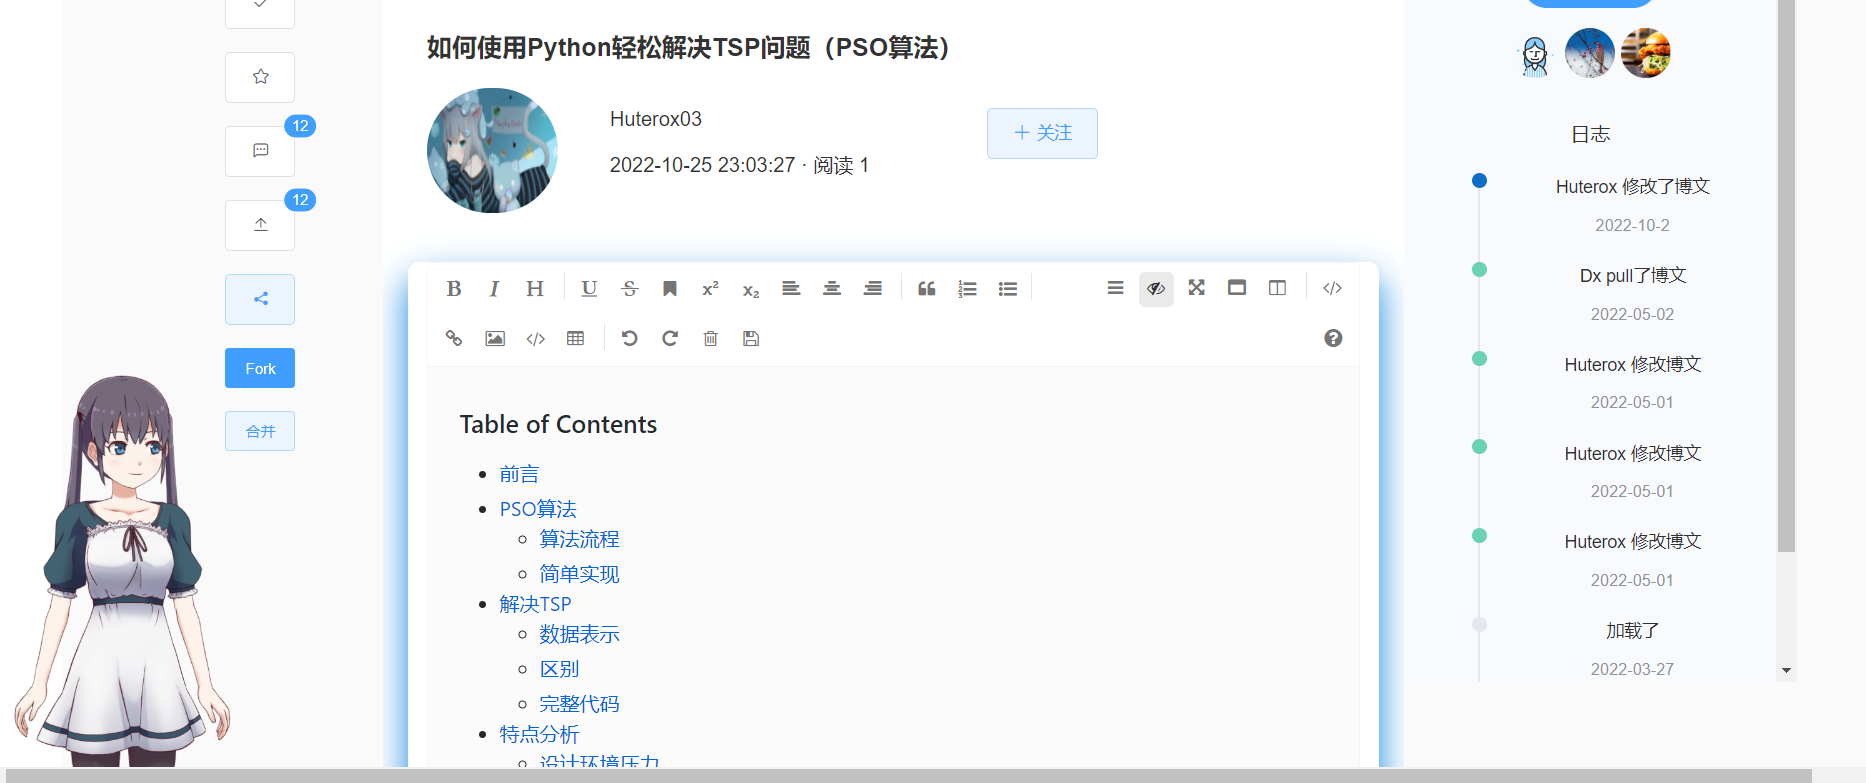
文章显示
其实这里的实现逻辑和先前的那个很像,区别就是说,但是先前的话也是没有说完整,那么现在的话我们说仔细一点,完整的前端代码+后端的主要业务代码。
博文列表
首先来说的是我们的一个博文的列表。
先说一下我们的这个博文的这个数据表:

我们这边是将内容和我们的blog分开的。因为我们这边要实现很多的操作,比如文章的fork,合并修等等。
前端
我们先来看到前端的完整的代码,这里的话我就直接给出我这个显示的列表的代码。这里的前端的所有的代码都是没有封装的,好处是方便修改,方便理解。坏处是,不方便调用,但是不好维护,所以的话,不去封装了,开发完再说,还有很多的辅助功能没做呢。
那么我们就来看看吧:
<template>
<div style="width: 100%">
<el-empty
image="/static/image/empty.gif" :image-size="600" description="暂时木有找到博文~"
v-if="isEmpty"
>
</el-empty>
<br>
<br>
<div v-if="!isEmpty" style="width: 100%;margin-left: 1%" class="main">
<el-card shadow="hover" v-for="(message,index) in Messages" :key="index">
<div style="height:100px">
<div style="width:14%;height: 100%;border-radius: 100px;display:inline-block;">
<el-image
style="width:100%;height: 100%;border-radius: 100px"
v-bind:src="message.blogimg"
class="image"
/>
</div>
<div style="display:inline-block;margin-left: 5%;width: 60%">
<p class="message" style="font-weight:bold">
<router-link class="alink" :to="{ path: '/blogshow',query:{'blogid':message.blogid}}">
{{message.blogTitle}}
</router-link>
</p>
<p style="font-weight: lighter" class="message">
{{message.info}}
</p>
<p class="message">
阅读:
<i class="el-icon-view"></i>
{{message.viewNumber}}
收藏:
<i class="el-icon-star-off"></i>
{{message.collectNumber}}
fork:{{message.forkNumber}}
</p>
</div>
<div style="width:18%;height: 100%;
display:inline-block;
"
>
<p style="text-align: center;font-size: 8px">{{message.createTime}}</p>
<br><br>
</div>
</div>
<br>
</el-card>
</div>
<br>
<div class="footer" style="margin: 0 auto;width: 100%;">
</div>
</div>
</template>
<script>
export default {
name: "lastArticle",
data(){
return{
isEmpty: true,
total: 0,
page: 1,
limit: 10,
Messages:[
{
userid: null,
info: null,
blogid: null,
contentid: null,
blogTitle: null,
userNickname: null,
userImg: null,
createTime: null,
viewNumber: null,
likeNumber: null,
collectNumber: null,
status: null,
level: null,
forkNumber: null,
blogimg: null
},
]
}
},
methods:{
getDataList(){
//这里客户端自己进行一个缓存
let pageSession = sessionStorage.getItem("lastHomeBlogListPageSession");
let total = sessionStorage.getItem("lastHomeBlogListTotal");
if(pageSession && total){
this.Messages = JSON.parse(pageSession);
this.total = parseInt(total);
this.isEmpty = (this.total === 0);
}else {
this.axios({
url: "/blog/blog/home/last",
method: 'get',
}).then((res) => {
res = res.data;
if (res.code === 0) {
//这个就是我们的默认展示图片
let image_base_user = "https://cube.elemecdn.com/6/94/4d3ea53c084bad6931a56d5158a48jpeg.jpeg";
let image_base_blog = "https://whiteholecloud-dev.oss-cn-shanghai.aliyuncs.com/2022-09-25/8cee84b4-1d03-483f-8376-14d419d84ca5_03.jpg"
//同样的拿到数据后需要临时保存
let page = res.page;
this.total = page.totalCount;
this.Messages = page.list
this.isEmpty = (this.total === 0);
for (let i=0;i<this.Messages.length;i++)
{
if(!this.Messages[i].userImg){this.Messages[i].userImg=image_base_user;}
if(!this.Messages[i].blogimg){this.Messages[i].blogimg=image_base_blog}
}
//存储临时缓存
sessionStorage.setItem("lastHomeBlogListPageSession", JSON.stringify(this.Messages));
sessionStorage.setItem("lastHomeBlogListTotal",page.totalCount);
} else {
this.$message.error(res.msg);
}
});
}
}
},
created() {
this.getDataList();
},
}
</script>
<style scoped>
.message{
width: 25em;
overflow: hidden;
text-overflow:ellipsis;
white-space: nowrap;
}
.alink{
text-decoration: none;
color: #333333;
}
</style>
我们这边的话,为了防止客户端的数据丢失以及降低我们的服务端的压力,所以的话做一个缓存,当然我们服务端还是有哨兵的,双重限流嘛。
后端接口
之后的话,就是接口的实现,这个其实相当简单,查表就好了,当然我们这边 还要做一个缓存,这个缓存的话就是直接使用SpringCache来做的。
首先是我们的接口:
    @RequestMapping("/last")
    @Cacheable(value={"homePageBlog:lastHomePageList"},key = "#root.methodName")
    public R lastHomePageList() throws Exception {
        return blogHomePageService.lastBlogList();
    }
之后的话是我们的实现类:
   @Override
    public R lastBlogList() throws Exception {
        HashMap<String, Object> params = new HashMap<>();
        //组装请求博文列表所需要的数据,当访问的为内部接口时,所有的参数均为Map形式
        params.put("page","1");
        params.put("limit","10");
        params.put("accurate","single");
        //此时指定HoleNULL,那么这个key不参与查询,但是需要进行占位,不能为空
        params.put("table_name","HoleNULL");
        params.put("key","1");
        params.put("order","desc");
        params.put("status","1");
        params.put("level","1");
        PageUtils page = blogService.queryPage(params);
        return R.ok().put("page", page);
    }
这里的话我们重写了这个queryPage的方法来实现分页。
public class BlogServiceImpl extends ServiceImpl<BlogDao, BlogEntity> implements BlogService {

    /**
     *
     * 在所有的基础方法当中我们做出如下约定,(因为有大量的请求是需要使用到分页查询的,并且这个方法相当重要)
     * key,表示需要模糊查询或者精确查询的值,和 accurate 相互配合。
     * accurate表示改查询需要进行精确查询 当accurate=single 表示精确查询,需要指定
     * table_name 还有order:desc,asc当为many,表示需要更加复杂的查询,此时需要附带 accurate_query 即查询QueryWrapper
     * 所有的附加值都需要具备
     * 最后必须参数为
     * 'page': 第几页
     * 'limit':每页多少,
     * 此外对于用户端的查询,需要指明status,和 level否则处理将失败
     * */

    @Override
    public PageUtils queryPage(Map<String, Object> params) throws Exception {
        String key = (String) params.get("key");
        String accurate = (String) params.get("accurate");
        IPage<BlogEntity> page_params = new Query<BlogEntity>().getPage(params);
        QueryWrapper<BlogEntity> blogEntityQueryWrapper = new QueryWrapper<>();
        if(key!=null){
            if(accurate==null){
                //此时表示只有key,没有accurate,说明是后台管理系统在调用
                blogEntityQueryWrapper.like("userid",key).or().
                        like("blogid",key).or().
                        like("user_nickname",key).or().
                        like("blog_title",key);
            }else {
                //此时有accurate说明是用户端在调用
                if(accurate.equals("single")){
                    String table_name = (String) params.get("table_name");
                    String order = (String) params.get("order");
                    Integer status = Integer.valueOf((String) params.get("status"));
                    Integer level = Integer.valueOf((String) params.get("level"));
                    if(table_name.equals("HoleNULL")){
                        blogEntityQueryWrapper.eq("status",status)
                                .eq("level",level);
                    }else {
                        blogEntityQueryWrapper.eq(table_name,key)
                                .eq("status",status)
                                .eq("level",level);
                    }

                    if(order.equals("desc")){
                        blogEntityQueryWrapper.orderByDesc("blogid");
                    }

                }else if(accurate.equals("many")){
                    Object accurate_query = params.get("accurate_query");
                    QueryWrapper<BlogEntity> deserialize = (QueryWrapper<BlogEntity>) SerializeUtil.deserialize(accurate_query.toString());
                    blogEntityQueryWrapper = deserialize;
                }
            }
        }
        IPage<BlogEntity> page = this.page(
                page_params,
                blogEntityQueryWrapper
        );

        return new PageUtils(page);
    }

}
这些代码后面在做一个映射封装。
这里的话还有我们的R类:
public class R extends HashMap<String, Object> {
	private static final long serialVersionUID = 1L;

	public R() {
		put("code", 0);
		put("msg", "success");
	}

	public static R error() {
		return error(HttpStatus.SC_INTERNAL_SERVER_ERROR, "未知异常,请联系管理员");
	}

	public static R error(String msg) {
		return error(HttpStatus.SC_INTERNAL_SERVER_ERROR, msg);
	}

	public static R error(int code, String msg) {
		R r = new R();
		r.put("code", code);
		r.put("msg", msg);
		return r;
	}

	public static R warn() {
		R r = new R();
		r.put("code", 1);
		r.put("msg", "warning");
		return r;
	}

	public static R ok(String msg) {
		R r = new R();
		r.put("msg", msg);
		return r;
	}

	public static R ok(Map<String, Object> map) {
		R r = new R();
		r.putAll(map);
		return r;
	}

	public static R ok() {
		return new R();
	}

	public R put(String key, Object value) {
		super.put(key, value);
		return this;
	}
}
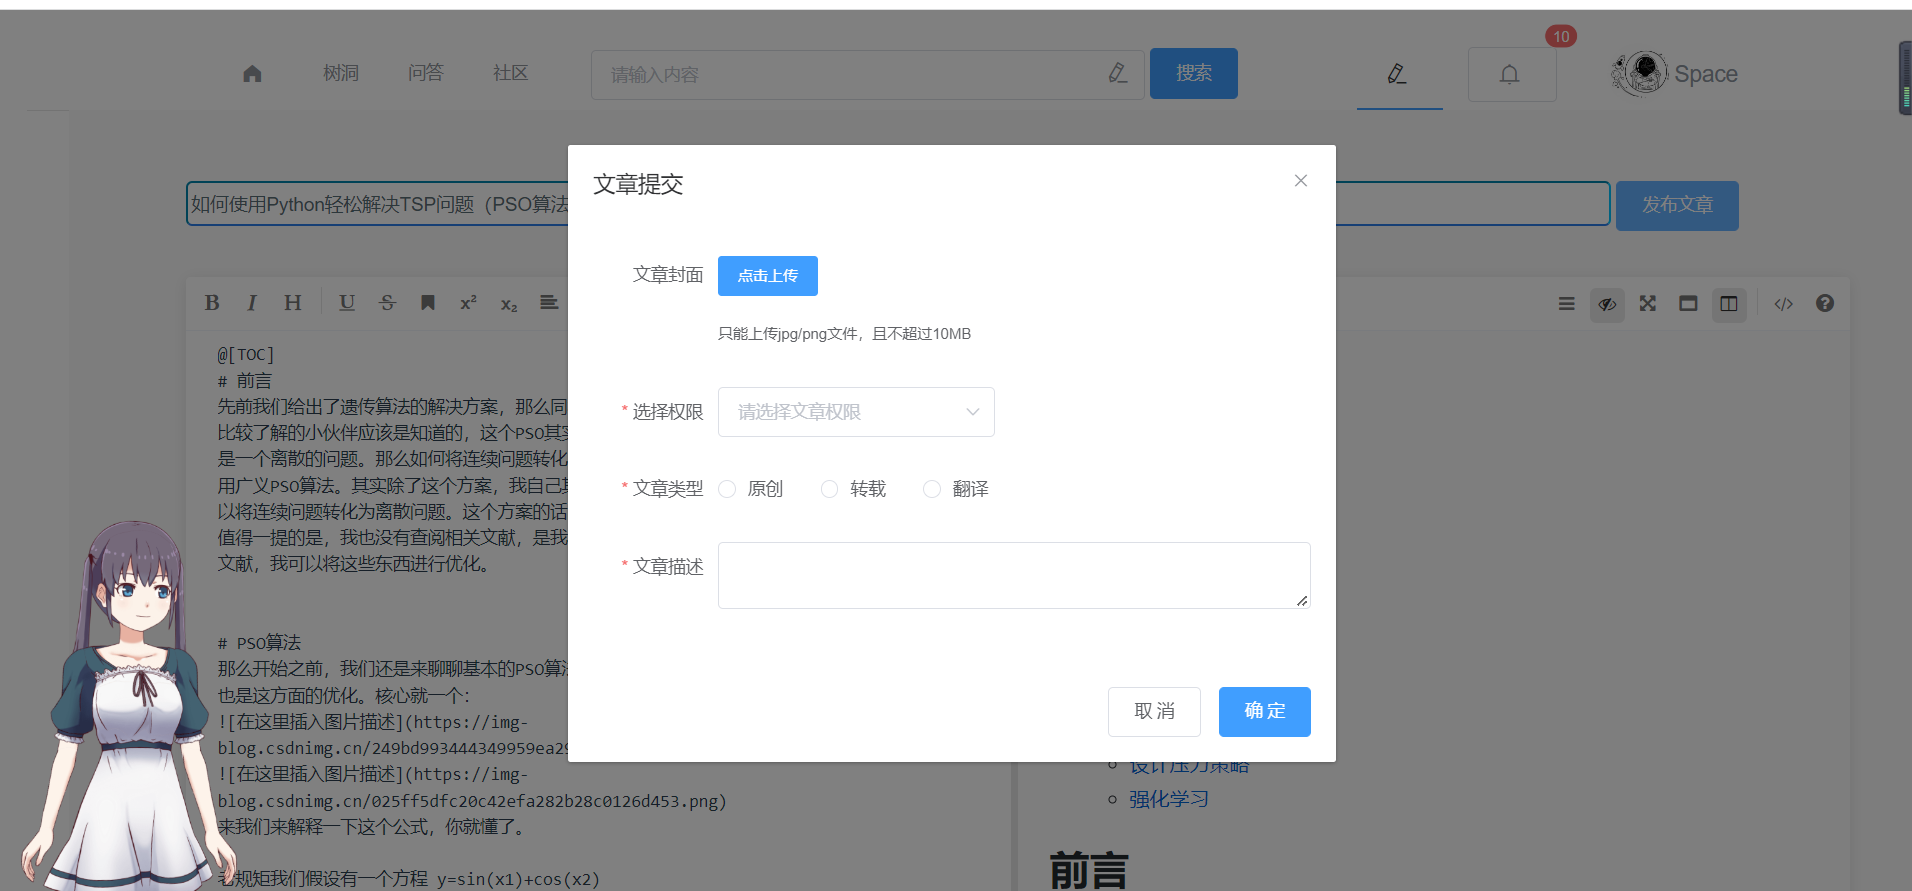
博文上传
ok,我们的博文的列表搞定了。
那么就是我们的博文上传了。
这里也是分前后端的。
前端
我们先来看到我们的前端的实现。
这个前端的实现的话,也是,直接看就好了。
<template>
  <div id="main">
    <div>
      <div>
        <input type="text" v-model="form.title" placeholder="请输入文章标题" required>
        <el-button @click="submitForm" type="primary">发布文章</el-button>
      </div>

      <br>
      <br>

      <mavon-editor
        v-model="form.value"
        ref="md"
        @imgAdd="imgAdd"
        @change="change"
        style="min-height: 800px;width: 100%"
      />
    </div>

    <el-dialog
      style="width:80%;margin: 0 auto"
      title="文章提交"
      :visible.sync="dialogFormVisible"
    >

      <el-form :model="ruleForm"
               :rules="rules"
               ref="ruleForm"
               label-width="100px"
               class="demo-ruleForm">

        <el-form-item label="文章封面" >

          <signle-upload :urlpolicy="this.urlPol" v-model="ruleForm.url" v-on:urlImg="urlImg"></signle-upload>
        </el-form-item>
        <el-form-item label="选择权限" prop="level">
          <el-select v-model="ruleForm.level" placeholder="请选择文章权限">
            <el-option label="私密" :value=0></el-option>
            <el-option label="公开" :value=1></el-option>
          </el-select>
        </el-form-item>

        <el-form-item label="文章类型" prop="type">
          <el-radio-group v-model="ruleForm.type">
            <el-radio :label="1">原创</el-radio>
            <el-radio :label="2">转载</el-radio>
            <el-radio :label="3">翻译</el-radio>
          </el-radio-group>
        </el-form-item>
        <el-form-item label="文章描述" prop="desc">
          <el-input type="textarea"
                    v-model="ruleForm.desc"
                    aria-placeholder="请输入文章描述10-150个字符~"
          >
          </el-input>
        </el-form-item>
      </el-form>

      <div  style="margin: 0 auto" slot="footer" class="dialog-footer">
        <el-button @click="dialogFormVisible = false">取 消</el-button>
        <el-button type="primary"
                   @click="submit"
                   v-loading.fullscreen.lock="fullscreenLoading"
        >
          确 定
        </el-button>
      </div>
    </el-dialog>
  </div>
</template>
<script>
import signleUpload from "../../components/upload/signleUpload";
import { mavonEditor } from 'mavon-editor'     //引入mavon-editor组件
import 'mavon-editor/dist/css/index.css'
import {getUUID} from "../../components/upload/uuid";       //引入组件的样式
export default {
  // 注册
  name: "writeblog",
  components: {
    mavonEditor,
    signleUpload,
  },
  data() {
    return {
      urlPol:"/third-part/oss/blogFaceImgPolicy",
      userid: null,
      loginToken: null,
      dialogFormVisible: false,
      fullscreenLoading: false,
      form: {
        value:'', // 输入的markdown
        html:'',    // 及时转的html
        title: '',
      },
      ruleForm: {
        blogImg: '',
        level:'',
        desc: '',
        type:'',
      },
      dataObj: {
        policy: '',
        signature: '',
        key: '',
        ossaccessKeyId: '',
        dir: '',
        host: '',
      },
      rules: {
        desc: [
          { required: true, message: '请输入文章描述', trigger: 'blur' },
          { min: 1, max: 150, message: '长度在 10 到 150 个字符', trigger: 'blur' }
        ],
        level:[
          { required: true, message: '请选择文章权限', trigger: 'blur' },
        ],
        type: [
          { required: true, message: '请选择文章类型', trigger: 'change' }
        ],

      }
    }
  },
  created() {

    let loginToken = localStorage.getExpire("LoginToken");
    let userid = localStorage.getExpire("userid");
    if(loginToken==null && userid==null) {
      alert("检测到您未登录,请先登录")
      this.$router.push({path: "/login"});
    }else {
      this.userid=userid;
      this.loginToken = loginToken;
    }
  },
  methods: {
    urlImg(val){
      this.ruleForm.blogImg=val;
    },
    toOss(pos,$file){
      let formData = new FormData();
      Object.keys(this.dataObj).forEach(key => {
        formData.append(key, this.dataObj[key]);
      });
      formData.append('file',$file)
      this.axios({
        url: this.dataObj.host,
        method: 'post',
        data: formData
      }).then((res) => {
        let imgpath = this.dataObj.host + '/' + this.dataObj.key;
        //把这个给到我们的编辑器
        this.$refs.md.$img2Url(pos,imgpath)
      })
    },
    imgAdd(pos, $file){
      /**
       * 上传图片到OSS服务里面
       * */
      let filename = $file.name
      let _self = this;
      // 获取认证码
      this.axios
        .get('/third-part/oss/blogWriteImgPolicy')
        .then(response => {
          response = response.data;
          _self.dataObj.policy = response.data.policy;
          _self.dataObj.signature = response.data.signature;
          _self.dataObj.ossaccessKeyId = response.data.accessid;
          _self.dataObj.key = response.data.dir +getUUID()+"_"+filename;
          _self.dataObj.dir = response.data.dir;
          _self.dataObj.host = response.data.host;
          //推送到OSS
          this.toOss(pos,$file);
        }).catch(function (error) {
        alert(error)
        console.log("出错了...",err)
      })
    },
    // 所有操作都会被解析重新渲染
    change(value, render){
      this.form.html = render;
    },
    // 提交
    submit(){
      this.fullscreenLoading = true;
      //将Markdown文档提交到服务器
      let flag = true;
      if(!this.form.value){
        flag = false;
      }else {
        if(this.form.value.length<100){
          flag = false;
          alert("博文的编辑不能少于100个字符呦~")
        }
      }
      if(!this.ruleForm.desc){
        flag = false
      }else {
        if(this.ruleForm.desc.length<10){
          flag = false;
          alert("博文的描述不能低于10个字符呦~")
        }else if (this.ruleForm.desc.length>150){
          flag = false;
          alert("博文的描述不能高于于150个字符呦~")
        }
      }
      if(!this.form.title){
        flag = false;
      }else {
        if(this.form.title.length<4){
          flag = false;
          alert("标题不能低于4个字符!");
        }else if(this.form.title.length>100){
          flag = false
          alert("标题不能高于100个字符!");
        }
      }
      if(flag){
        //此时对用户回答进行提交
        this.axios({
          url: "/blog/blog/up/blogUp",
          method: 'post',
          headers: {
            "userid": this.userid,
            "loginType": "PcType",
            "loginToken": this.loginToken,
          },
          data:{
            "userid": this.userid,
            "blogTitle": this.form.title,
            "info": this.ruleForm.desc,
            "context": this.form.value,
            "level": this.ruleForm.level,
            "blogtype": this.ruleForm.type
          }
        }).then((res)=>{
          res = res.data;
          if(res.code===0){
            alert(res.msg)
          }else {
            this.$message.error(res.msg);
          }
          this.fullscreenLoading = false;
          this.editFlag = false;
        });
      }else {
        this.fullscreenLoading = false;
        alert("您还未编写对应内容!")
      }

    },
    submitForm() {
      let flag = true;
      if(!this.form.value){
        flag = false;
        alert("博文内容为空!")
      }else {
        if(this.form.value.length<100){
          flag = false;
          alert("博文的编辑不能少于100个字符呦~")
        }
      }
      if(!this.form.title){
        flag = false;
        alert("博文标题为空!")
      }else {
        if(this.form.title.length<4){
          flag = false;
          alert("标题不能低于4个字符!");
        }else if(this.form.title.length>100){
          flag = false
          alert("标题不能高于100个字符!");
        }
      }
      if(flag){
        this.dialogFormVisible = true;
      }else {
        this.dialogFormVisible = false;
      }
    },
  },
}
</script>
<style scoped>
#center {
  margin-top: 5%;
  width: 96%;
  height: 96%;
  border: 1px;
}

img {
  margin: auto;
  margin-left: 30%;
  height: 40%;
  width: 40%;
  position: relative;
  top: 10%;
}

input {

  width: 85%;
  height: 30px;
  border-width: 2px;
  border-radius: 5px;
  border-color: #00c4ff;
  border-bottom-color: #2C7EEA;
  color: #586e75;
  font-size: 15px;

}
#main{
  width: 90%;
  margin: 0 auto;
}
</style>
这边前端的话其实很眼熟是吧,这边的区别的话,其实就是咱们的文件上传的一个组件。这个组件的话是这样的:
<template>
  <div>
    <el-upload
      :action="dataObj.host"
      :data="dataObj"
      list-type="picture"
      :multiple="false" :show-file-list="showFileList"
      :file-list="fileList"
      :before-upload="beforeUpload"
      :on-remove="handleRemove"
      :on-success="handleUploadSuccess"
      :on-preview="handlePreview">
      <el-button size="small" type="primary">点击上传</el-button>
      <div slot="tip" class="el-upload__tip">只能上传jpg/png文件,且不超过10MB</div>
    </el-upload>
    <el-dialog :visible.sync="dialogVisible">
      <img width="100%" :src="fileList[0].url" alt="">
    </el-dialog>
  </div>
</template>
<script>
import {getUUID} from "./uuid";
import axios from "_axios@0.26.1@axios";
export default {
  name: 'singleUpload',
  props: {
    urlpolicy: String,
    value: String
  },
  computed: {
    imageUrl() {
      return this.value;
    },
    imageName() {
      if (this.value != null && this.value !== '') {
        return this.value.substr(this.value.lastIndexOf("/") + 1);
      } else {
        return null;
      }
    },
    fileList() {
      return [{
        name: this.imageName,
        url: this.imageUrl
      }]
    },
    showFileList: {
      get: function () {
        return this.value !== null && this.value !== ''&& this.value!==undefined;
      },
      set: function (newValue) {
      }
    }
  },
  data() {
    return {
      dataObj: {
        policy: '',
        signature: '',
        key: '',
        ossaccessKeyId: '',
        dir: '',
        host: '',
        // callback:'',
      },
      dialogVisible: false
    };
  },
  methods: {
    emitInput(val) {
      this.$emit('input', val)
    },
    handleRemove(file, fileList) {
      this.emitInput('');
    },
    handlePreview(file) {
      this.dialogVisible = true;
    },
    beforeUpload(file) {

      let _self = this;
      return new Promise((resolve, reject) => {
        // 请求后端(请求地址和后端访问地址一样)
        let urlPol = _self.urlpolicy;
        if(!urlPol){
          urlPol = '/third-part/oss/policy'
        }
        axios
          .get(urlPol)
          .then(response => {
            console.log("这是什么${filename}");
            response = response.data;
            _self.dataObj.policy = response.data.policy;
            _self.dataObj.signature = response.data.signature;
            _self.dataObj.ossaccessKeyId = response.data.accessid;
            _self.dataObj.key = response.data.dir +getUUID()+"_${filename}";
            _self.dataObj.dir = response.data.dir;
            _self.dataObj.host = response.data.host;
            resolve(true);
          })
          .catch(function (error) {
            alert(error)
            console.log("出错了...",err)
            reject(false);
          })
      });
    },
    handleUploadSuccess(res, file) {
      console.log("数据获取为",this.dataObj)
      console.log("上传成功...")
      let url = this.dataObj.host + '/' + this.dataObj.key.replace("${filename}",file.name);
      this.showFileList = true;
      this.fileList.pop();
      this.fileList.push(
        {
          name: file.name,
          url: url
        }
      );
      this.$emit('urlImg',url)
      this.emitInput(this.fileList[0].url);
    }
  }
}
</script>
<style>

</style>
那么这边的话,我们就完成了我们的前端。
之后是后端。
后端
我们的后端分几个部分,首先是我们的这个获取OSS签名,但是这个的话,我们前面说过,这里不重复,那么之后的话,我们这边来看到这个接口:
@RestController
@RequestMapping("/blog/up")
public class BlogUpController {

    @Autowired
    BlogUpService blogUpService;
    @PostMapping("/blogUp")
    @NeedLogin
    public R blogUp(@Validated @RequestBody UpBlogEntity upBlogEntity){
        return blogUpService.blogUp(upBlogEntity);
    }


}
登录验证
那么我们这边的话,有一个自定义注解:
@Target(ElementType.METHOD)
@Retention(RetentionPolicy.RUNTIME)
public @interface NeedLogin {
    String value() default "";
}
/**
 * 负责专门校验,用户有没有登录用的
 * 1. 当前主要负责校验token是否合法
 * */
@Component
@Aspect
@Slf4j
public class VerificationAspect {

    @Autowired
    RedisUtils redisUtils;

    @Pointcut("@annotation(com.huterox.common.holeAnnotation.NeedLogin)")
    public void verification() {}

    /**
     * 环绕通知 @Around ,当然也可以使用 @Before (前置通知)  @After (后置通知)就算了
     * @param proceedingJoinPoint
     * @return
     * 我们这里再直接抛出异常,反正有那个谁统一异常类
     */

    @Around("verification()")
    public Object verification(ProceedingJoinPoint proceedingJoinPoint) throws Throwable{

        RequestAttributes requestAttributes = RequestContextHolder.getRequestAttributes();
        ServletRequestAttributes servletRequestAttributes = (ServletRequestAttributes) requestAttributes;
        assert servletRequestAttributes != null;
        HttpServletRequest request = servletRequestAttributes.getRequest();

        //正常逻辑是先进行伪参数验证这里先不做

        //分登录的设备进行验证
        String loginType = request.getHeader("loginType");
        String userid = request.getHeader("userid");
        String tokenUser = request.getHeader("loginToken");
        String tokenKey = RedisTransKey.getTokenKey(userid + ":" + loginType);
        if(tokenUser==null || userid==null || loginType==null){
            throw new BadLoginParamsException();
        }
        if(redisUtils.hasKey(tokenKey)){
            if(loginType.equals(LoginType.PcType)){
                Object o = redisUtils.get(tokenKey);
                LoginToken loginToken = JSON.parseObject(o.toString(), LoginToken.class);
                if(!loginToken.getPcLoginToken().equals(tokenUser)){
                    throw new BadLoginTokenException();
                }
            }else if (loginType.equals(LoginType.MobileType)){
                Object o = redisUtils.get(tokenKey);
                LoginToken loginToken = JSON.parseObject(o.toString(), LoginToken.class);
                if(!loginToken.getMobileLoginToken().equals(tokenUser)){
                    throw new BadLoginTokenException();
                }
            }
        }else {
            throw new NotLoginException();
        }

        return proceedingJoinPoint.proceed();
    }
}
这个玩意的原理很简单就是看用户携带的token和我们redis里面的对不对得到,正常情况下,如果用户恶意修改token,校验都是过不了的,除非我服务器有内鬼。
之后的话这里还定义了几个异常。
public class NotLoginException extends RuntimeException{
    public NotLoginException(){}
    public NotLoginException(String message){
        super(message);
    }
}
都是Runtime异常,这里就不复述了。
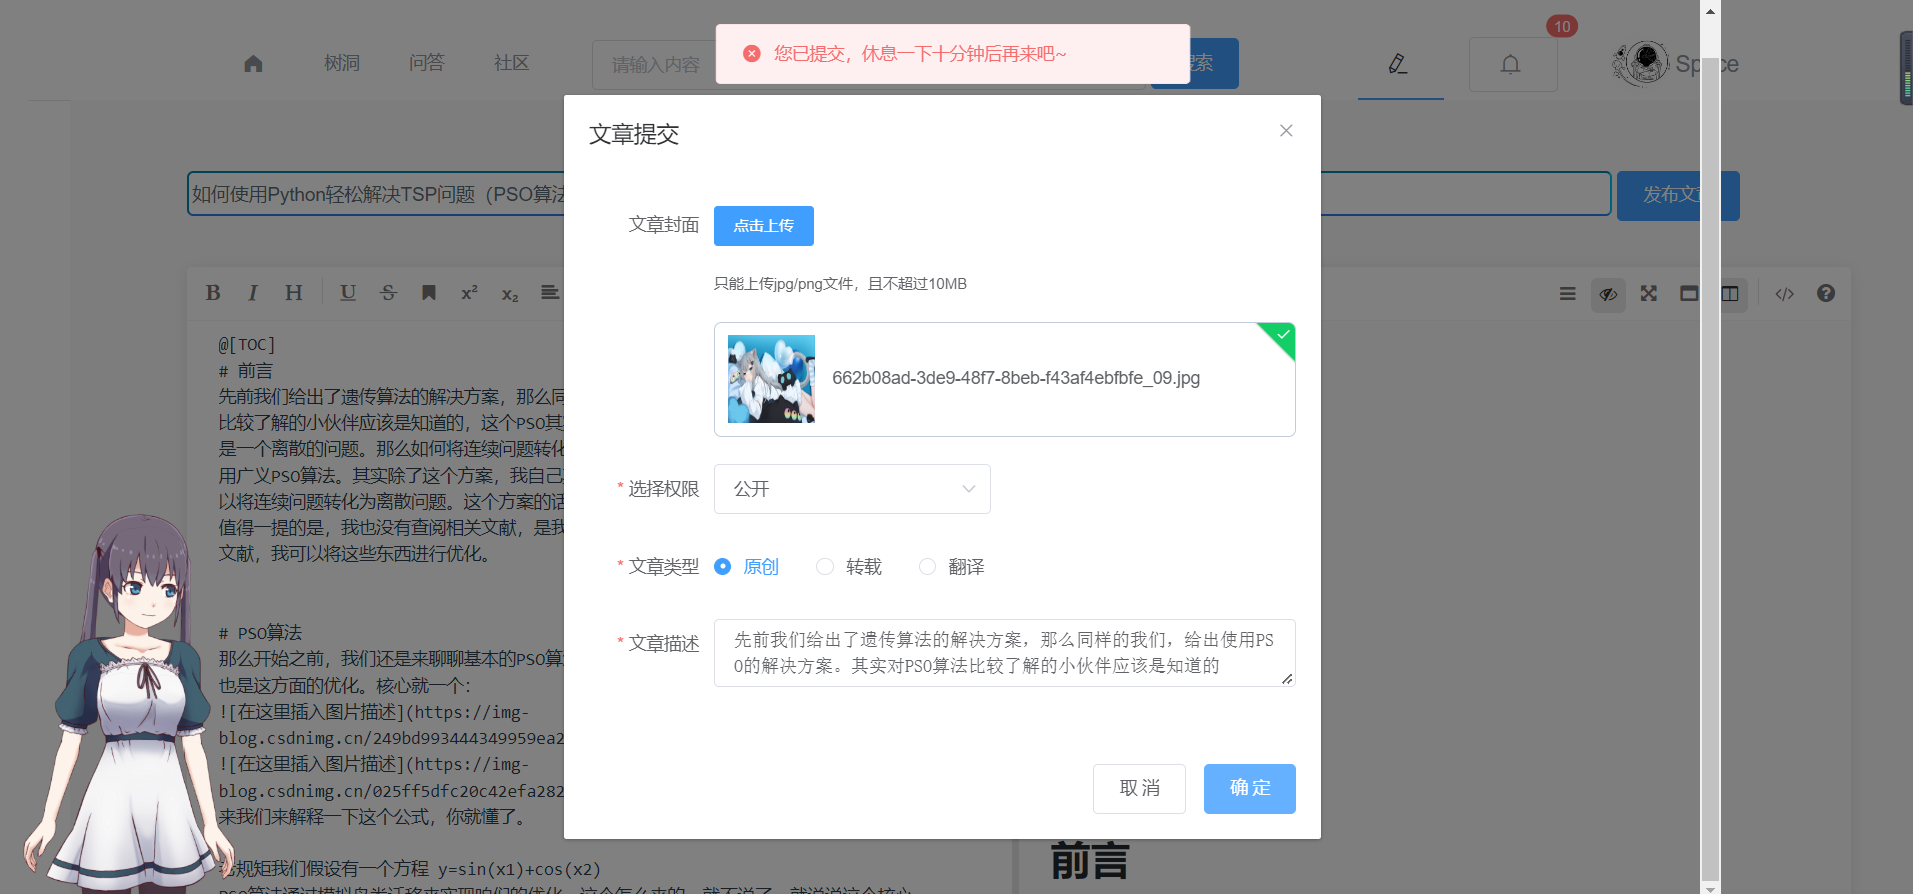
博文上传
之后的话,我们就可以上传了。
首先是我们和前端交互的数据请求类。
@Data
@AllArgsConstructor
@NoArgsConstructor
public class UpBlogEntity {

    @NotEmpty(message = "userid不能为空")
    private String userid;
    @NotEmpty(message = "quizTitle不能为空")
    @Length(min = 10,message="长度不能低于10个字符")
    private String blogTitle;
    //文章的Markdown文档
    @NotEmpty(message = "context不能为空")
    @Length(min = 100,message="长度不能低于10个字符")
    private String context;
    @Length(min = 4,max = 100,message="长度不能低于10个字符")
    private String info;
    @NotNull
    private Integer level=1;
    @NotNull
    private Integer blogtype=1;
}
之后的话就是我们的实际业务了。
   @Override
    public R blogUp(UpBlogEntity entity) {
        String userid = entity.getUserid();
        String backMessage = "success";
        //接口限流
        if(redisUtils.hasKey(RedisTransKey.getBlogUpKey(entity.getUserid()))){
            return R.error(BizCodeEnum.OVER_UPBLOG.getCode(), BizCodeEnum.OVER_UPBLOG.getMsg());
        }
        R info = feignUserService.info(userid);
        String userString = FastJsonUtils.toJson(info.get("user"));
        UserEntity user = FastJsonUtils.fromJson(userString, UserEntity.class);
        if(user!=null){
            String context = entity.getContext();
            String blogInfo = entity.getInfo();
            /**
             * 先对context和bloginfo进行校验,是否为存在不友好的信息
             * */
            int countContext = wordFilter.wordCount(context);
            int countInfo = wordFilter.wordCount(blogInfo);
            int status = 1;
            //博文的摘要过滤,只要摘要没有过,直接先打回去!
            if(countInfo>=blogInfo.length()*threshold){
                return R.error(BizCodeEnum.BAD_BLOGINFO.getCode(),BizCodeEnum.BAD_BLOGINFO.getMsg());
            }
            //博文内容的过滤
            if(countContext>=context.length()*threshold){
                return R.error(BizCodeEnum.BAD_CONTEXT.getCode(),BizCodeEnum.BAD_CONTEXT.getMsg());
            }else if (countContext>0&&countContext<context.length()*threshold){
                backMessage="哇!您的提交直接通过了呢!";
            }else {
                status = 2;
                context = wordFilter.replace(context, '*');
                backMessage="您的提问已提交,正在等待审核哟!";
            }
            //预存储content
            ContentEntity contentEntity = new ContentEntity();
            contentEntity.setContent(context);
            contentEntity.setVersion("1.0");
            contentEntity.setCreateTime(DateUtils.getCurrentTime());
            contentService.save(contentEntity);
            Long contentid = contentEntity.getContentid();
            //预存储博文
            BlogEntity blogEntity = new BlogEntity();
            blogEntity.setBlogTitle(entity.getBlogTitle());
            blogEntity.setLevel(entity.getLevel());
            blogEntity.setBlogtype(entity.getBlogtype());
            //查询用户的头像信息
            R RHeadImg = feignHeadimgService.headimg(userid);
            String headImgString = FastJsonUtils.toJson(RHeadImg.get("headimg"));
            final HeadimgEntity headimg = FastJsonUtils.fromJson(headImgString, HeadimgEntity.class);
            if(headimg!=null){
                blogEntity.setUserImg(headimg.getImgpath());
            }
            blogEntity.setCreateTime(DateUtils.getCurrentTime());
            blogEntity.setUserNickname(user.getNickname());
            blogEntity.setUserid(userid);
            blogEntity.setStatus(status);
            blogEntity.setInfo(blogInfo);
            blogService.save(blogEntity);
            Long blogid = blogEntity.getBlogid();

            //完成正式存储
            contentEntity.setBlogid(blogid);
            blogEntity.setContentid(contentid);
            blogService.updateById(blogEntity);
            contentService.updateById(contentEntity);
            /**
             * 更新用户日志
             * */
            LogActicleEntity logActicleEntity = new LogActicleEntity();
            logActicleEntity.setAction(1);
            logActicleEntity.setUserid(userid);
            logActicleEntity.setArticleid(blogEntity.getBlogid());
            logActicleEntity.setArticleTitle(blogEntity.getBlogTitle());
            logActicleEntity.setCreteTime(blogEntity.getCreateTime());
            feignLogActicleService.save(logActicleEntity);
            /**
             * 设置标志
             */
            redisUtils.set(RedisTransKey.setBlogUpKey(entity.getUserid())
                    ,.1,10, TimeUnit.MINUTES
            );
        }else{
            return R.error(BizCodeEnum.NO_SUCHUSER.getCode(),BizCodeEnum.NO_SUCHUSER.getMsg());
        }
        return R.ok(backMessage);
    }
这里的话基本上都是调用dao或者是远程的微服务进行存储,没啥亮点。之后的话就是上seate。搞分布式事务。
博文显示
终于到了这里了,这个部分其实也不难,还是我们的前端(这里的话还有些接口,我就不说了,重点是加载文章内容)
前端
来看到我们的前端。
<template>
<div style="width: 85%;margin: 0 auto">
<el-container>
<el-container>
<el-aside width="10%">
<div>
<br><br>
<div>
<el-badge :value="Blog.likeNumber" class="item" type="primary">
<el-button size="big" icon="el-icon-check"></el-button>
</el-badge>
</div>
<br>
<div>
<el-badge :value="Blog.collectNumber" class="item" type="primary">
<el-button size="big" icon="el-icon-star-off"></el-button>
</el-badge>
</div>
<br>
<div>
<el-badge :value="12" class="item" type="primary">
<el-button size="big" icon="el-icon-chat-dot-square"></el-button>
</el-badge>
</div>
<br>
<div>
<el-badge :value="12" class="item" type="primary">
<el-button size="big" icon="el-icon-upload2"></el-button>
</el-badge>
</div>
<br>
<div>
<el-button class="share-button" icon="el-icon-share" type="primary" plain></el-button>
</div>
<br>
<div>
<el-tooltip class="item" effect="dark" placement="top-start">
<div slot="content">
Fork是对文章的最高礼遇<br>
因此fork/取消都需要在<br>
十分钟后通过冷静期后进行操作
</div>
<el-button v-if="!status.isfork" size="small" type="primary" @click="forkBlog" plain>
<p>Fork</p>
</el-button>
<el-button v-else type="primary" @click="forkBlog" size="small">Fork</el-button>
</el-tooltip>
</div>
<br>
<div>
<el-button @click="goMerge" type="primary" plain size="small" >
<span>合并</span>
</el-button>
</div>
</div>
</el-aside>
<el-main>
<div style="width: 100%" class="show">
<div style="width: 96%;margin: 0 auto">
<br>
<p style="font-size: 20px;font-weight: bold">{{Blog.blogTitle}}</p>
<div style="height:100px">
<!-- <el-avatar shape="circle" style="display:inline-block;"-->
<!-- :size="100" src="/static/temporary/headpic.jpg">-->
<!-- </el-avatar>-->
<div style="width:14%;height: 100%;border-radius: 100px;display:inline-block;">
<el-image
style="width:100%;height: 100%;border-radius: 100px"
:src="Blog.userImg"
class="image"
/>
</div>
<div style="display:inline-block;margin-left: 5%;vertical-align:top">
<p>{{Blog.userNickname}}</p>
<p class="message">
{{Blog.createTime}} · 阅读 {{Blog.viewNumber}}
</p>
</div>
<div style="display:inline-block;vertical-align:top">
<p>
<el-button @click="focusOn" v-if="focusOnFlag===false" icon="el-icon-plus" type="primary" plain >
<span>关注</span>
</el-button>
<el-button @click="focusOn" v-else icon="el-icon-check" type="primary" plain >
<span>已关注</span>
</el-button>
</p>
</div>
</div>
<br>
</div>
</div>
<!-- 文章的主体内容,这部分的话应该是markdown插件去渲染的-->
<div class="showblog">
<hr style="margin:0px;background-color:#eee;height:0.5px;border:none;" />
<div style="width: 96%;margin: 0 auto">
<mavon-editor
class="md"
:boxShadow="false"
:value="Blog.content"
:subfield="false"
defaultOpen="preview"
:toolbarsFlag="true"
/>
</div>
</div>
<!-- 评论部分-->
<div class="showcom">
<comment_article></comment_article>
</div>
</el-main>
<el-aside width="25%" style="height: 600px" class="el-aside-right">
<div class="show">
<p>
<el-tooltip content="参与文章Pull,并通过作者审核后可上榜" placement="bottom" effect="light">
<el-button icon="el-icon-trophy" type="primary" round size="big">贡献墙</el-button>
</el-tooltip>
</p>
<div>
<el-avatar src="https://cube.elemecdn.com/0/88/03b0d39583f48206768a7534e55bcpng.png"></el-avatar>
<el-avatar src="https://fuss10.elemecdn.com/e/5d/4a731a90594a4af544c0c25941171jpeg.jpeg"></el-avatar>
<el-avatar src="https://shadow.elemecdn.com/app/element/hamburger.9cf7b091-55e9-11e9-a976-7f4d0b07eef6.png"></el-avatar>
</div>
</div>
<div class="show">
<p>日志</p>
<el-timeline v-if="Message.length>0" v-infinite-scroll="load"
v-bind:infinite-scroll-distance="long"
infinite-scroll-disabled="busy"
class="infinite-list">
<el-timeline-item
v-for="(message, index) in Message"
:key="index"
:color=message.color
:timestamp="message.data"
>
{{message.content}}
</el-timeline-item>
</el-timeline>
</div>
</el-aside>
</el-container>
</el-container>
</div>
</template>
<script>
import comment_article from "../../components/comment/comment_article";
export default {
name: "blogshow",
components:{
comment_article
},
data(){
return{
myuserid: null,
loginToken: null,
blogid: null,
focusOnFlag:false,
long: 2,
status:{
isCollect: true,
isLike: true,
isfork: true,
},
Blog:{
userid: null,
blogid: null,
content: null,
blogTitle: null,
userNickname: null,
userImg: null,
createTime: null,
viewNumber: null,
likeNumber: null,
collectNumber: null,
forkNumber: null,
blogtype: null,
blogimg: null
},
Message: [
{
//颜色由后端传递
content: 'Huterox 修改了博文',
data: '2022-10-2',
color:'#0f6cc9'
}, {
content: 'Dx pull了博文',
data: '2022-05-02',
color:'#69d3b4'
},
{
content: 'Huterox 修改博文',
data: '2022-05-01',
color:'#69d3b4'
},
{
content: 'Huterox 修改博文',
data: '2022-05-01',
color:'#69d3b4'
},
{
content: 'Huterox 修改博文',
data: '2022-05-01',
color:'#69d3b4'
},
],
}
},
created(){
this.blogid= this.$route.query.blogid;
this.Blog = JSON.parse(sessionStorage.getItem("blog:"+this.blogid));
if(!this.Blog){
this.getBlog(this.blogid)
}
//判断用户是否登录
let loginToken = localStorage.getExpire("LoginToken");
let myuserid = localStorage.getExpire("userid");
if(loginToken==null && myuserid==null) {}
else {
this.myuserid = myuserid;
this.loginToken = loginToken;
this.getStatus();
}
},
methods:{
getStatus(){
//如果登录了,就看看这个篇博文和用户的关系
let loginToken = localStorage.getExpire("LoginToken");
let myuserid = localStorage.getExpire("userid");
if(loginToken!=null && myuserid!=null){
this.myuserid = myuserid;
this.loginToken = loginToken;
this.axios({
url: "/blog/blog/bloginfo/status",
method: 'post',
headers: {
"userid": myuserid,
"loginType": "PcType",
"loginToken": loginToken,
},
data:{
"userid":this.myuserid,
"blogid":this.Blog.blogid,
}
}).then((res)=>{
res = res.data;
if(res.code===0){
this.status = res.status
}else {
this.$message.error(res.msg);
}
});
}
},
forkBlog(){
/**
* 判断用户有没有登录,如果没有那就提示一下
*
* */
let loginToken = localStorage.getExpire("LoginToken");
let myuserid = localStorage.getExpire("userid");
if(loginToken==null && myuserid==null) {
this.$message.warning("您还未登录");
}else {
this.myuserid = myuserid;
this.loginToken = loginToken;
//这里开始进行我们的逻辑
this.axios({
url: "/blog/blog/fork/blogFork",
method: 'post',
headers: {
"userid": this.myuserid,
"loginType": "PcType",
"loginToken": this.loginToken,
},
data:{
"userid":this.myuserid,
"blogid":this.Blog.blogid,
"blogUserid":this.Blog.userid,
"blogTitle": this.Blog.blogTitle,
"blogUserNickname":this.Blog.userNickname,
"blogImg": this.Blog.blogimg
}
}).then((res)=>{
res = res.data;
if(res.code===0){
this.getStatus();
this.$message.success(res.msg);
}else {
this.$message.error(res.msg);
}
});
}
},
getBlog(blogid){
this.axios({
url: "/blog/blog/bloginfo/blogById",
method: 'get',
params: {
'blogid': blogid,
}
}).then((res) => {
res = res.data;
if (res.code === 0) {
//这个就是我们的默认展示图片
let image_base_user = "https://cube.elemecdn.com/6/94/4d3ea53c084bad6931a56d5158a48jpeg.jpeg";
//同样的拿到数据后需要临时保存
this.Blog = res.blog
if(!this.Blog.userImg){this.Blog.userImg=image_base_user;}
sessionStorage.setItem("blog:"+this.blogid, JSON.stringify(this.Blog));
this.$router.go(0);
} else {
this.$message.error(res.msg);
this.$router.go(-1);
}
});
},
goMerge(){
this.$router.push({path:'/blogshowMerge',query: {id:'1'}})
},
focusOn(){
this.focusOnFlag=!this.focusOnFlag;
if(this.focusOnFlag){
alert("关注成功")
}else {
alert("取关成功")
}
},
load () {
//这部分让你的axios去动态加载
let temp=[
{
content: '加载了',
data: '2022-03-27',
},
{
content: '加载了',
data: '2022-03-27',
}
]
for (let i = 0; i < temp.length; i++) {
this.Message.push(temp[i])
}
},
}
}
</script>
<style lang="stylus" scoped>
.show{
margin: 20px auto;
width: 90%;
border: 0px solid #81badc;
transition: all 0.9s;
border-radius: 10px;
}
.show:hover{
box-shadow: 0px 15px 30px rgb(12, 132, 224);
margin-top: 10px;
}
.showblog{
margin: 20px auto;
width: 100%;
border: 0px solid #81badc;
transition: all 0.9s;
border-radius: 10px;
}
.showblog:hover{
box-shadow: 0px 15px 30px rgb(12, 132, 224);
margin-top: 10px;
}
.showcom{
margin: 20px auto;
width: 100%;
border: 0px solid #81badc;
transition: all 0.9s;
border-radius: 10px;
}
.showcom:hover{
box-shadow: 0px 15px 30px rgb(12, 132, 224);
margin-top: 20px;
}
.el-header, .el-footer {
text-align: center;
}
.el-aside-right {
background-color:#f9fafc;
color: #333;
text-align: center;
line-height: 30px;
}
.el-main {
background-color: white;
color: #333;
}
body > .el-container {
margin-bottom: 40px;
}
.el-container:nth-child(5) .el-aside,
.el-container:nth-child(6) .el-aside {
line-height: 260px;
}
.el-container:nth-child(7) .el-aside {
line-height: 320px;
}
</style>
这里面的刷新有点问题,这里在我们的项目里面,所以的话有些东西只能先这样写了。不然有bug,问题在我们的项目里面,改的话后面再说,也是个小问题。
后端
首先是我们的返回类:
@Data
@AllArgsConstructor
@NoArgsConstructor
public class BlogBody implements Serializable {
    private static final long serialVersionUID = 1L;
    /**
     * 这边的话userid啥的都是指文章的作者
     * */
    private String userid;
    private Long blogid;
    private String content;
    private String blogTitle;
    private String userNickname;
    private String userImg;
    private String createTime;
    private Integer viewNumber;
    private Integer likeNumber;
    private Integer collectNumber;
    private Integer forkNumber;
    private String blogtype;
    private String blogimg;

}
这个就是我们的返回类
那么我们要做的其很简单,组合就好了。
    @Override
    public R blogById(Long blogById) {
        BlogEntity blog = blogService.getById(blogById);
        ContentEntity content = contentService.getOne(new QueryWrapper<ContentEntity>().eq("blogid", blog.getBlogid())
                .orderByDesc("contentid")
                .last("limit 0,1")
        );
        if(blog==null){
            return R.error(BizCodeEnum.NO_SUCHBLOG.getCode(),BizCodeEnum.NO_SUCHBLOG.getMsg());
        }
        if(content==null){
            return R.error(BizCodeEnum.NO_SUCHCONTENT.getCode(), BizCodeEnum.NO_SUCHCONTENT.getMsg());
        }
        BlogBody blogBody = new BlogBody();
        BeanUtils.copyProperties(blog,blogBody);
        blogBody.setContent(content.getContent());
        blogBody.setBlogtype(BlogType.BLOGTYPE.get(blog.getBlogtype()));
        return R.ok().put("blog",blogBody);
    }
总结
到月末了,冲个活动业绩,下个月更新超过5篇算我输(狗头)

为开发者提供学习成长、分享交流、生态实践、资源工具等服务,帮助开发者快速成长。
更多推荐


 6
6 0
0- 0


 已为社区贡献8条内容

所有评论(0)