简单易学,springboot多模块
简单详细的springboot多模块案例
环境:
IDEA 2021.2
Java 8
Mysql 8.0.13
Maven 3
这是springboot多模块的简单案例,项目包含一个父模块module和四个子模块base,dao,service,web
一.创建父模块
1.项目创建


2.删除不需要的文件

红框部分保留,其余的都删除
删除后的结构

3.修改pom
    <!-- 声明子模块 -->
    <modules>
        <module>base</module>
        <module>dao</module>
        <module>service</module>
        <module>web</module>
    </modules>

报红是正常的,因为我们还未创建对应的子模块
二.创建base模块
1.建base模块
鼠标点击module,右键,New->Module


2.删除不需要的文件

删除红框文件
删除后

3.加入实体类Student
Student.class
package module.base;

/**
 * @author LHZ
 * @Date 2021/11/17 16:06
 */
public class Student {

    /**
     * 姓名
     */
    private String name;

    /**
     * 年龄
     */
    private Integer age;

    public String getName() {
        return name;
    }

    public void setName(String name) {
        this.name = name;
    }

    public Integer getAge() {
        return age;
    }

    public void setAge(Integer age) {
        this.age = age;
    }

    @Override
    public String toString() {
        return "Student{" +
                "name='" + name + '\'' +
                ", age=" + age +
                '}';
    }
}
三.创建dao模块
1.建dao模块
鼠标点击module,右键,New->Module


2.删除base文件
操作和base一样
3.修改pom(dao)
    <!--   dao依赖base模块 -->
    <dependency>
        <groupId>module</groupId>
        <artifactId>base</artifactId>
        <version>0.0.1-SNAPSHOT</version>
        <scope>compile</scope>
    </dependency>
    <!--  mybatis依赖  -->
    <dependency>
        <groupId>org.mybatis.spring.boot</groupId>
        <artifactId>mybatis-spring-boot-starter</artifactId>
        <version>2.2.0</version>
    </dependency>

    <!--  mysql依赖  -->
    <dependency>
        <groupId>mysql</groupId>
        <artifactId>mysql-connector-java</artifactId>
        <scope>runtime</scope>
    </dependency>
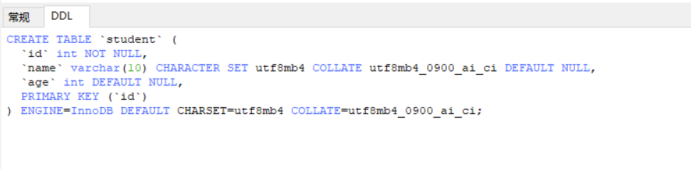
4.添加数据库和数据库表
使用navicat在test库下创建student表
结构如下

5.编写dao和xml
StudentDao.class
package module.dao;

import module.base.Student;
import org.apache.ibatis.annotations.Mapper;

/**
 * @author LHZ
 * @Date 2021/11/17 16:08
 */
@Mapper
public interface StudentDao {

    /**
     * 模拟查询
     * @return
     */
    Student query();

}
StudentDao.xml
<?xml version="1.0" encoding="UTF-8"?>
<!DOCTYPE mapper PUBLIC "-//mybatis.org//DTD Mapper 3.0//EN" "http://mybatis.org/dtd/mybatis-3-mapper.dtd">
<mapper namespace="module.dao.StudentDao">

    <!--  模拟查询  -->
    <select id="query" resultType="module.base.Student">
        select * from student
        where name = 'john'
    </select>

</mapper>
结构如下

四.创建service模块
1.2.与上一个相同
3.修改pom
<!--   service依赖dao模块 -->
<dependency>
	<groupId>module</groupId>
	<artifactId>dao</artifactId>
	<version>0.0.1-SNAPSHOT</version>
	<scope>compile</scope>
</dependency>

4.创建service相关class
StudentService.class
package module.service;

import module.base.Student;

/**
 * @author LHZ
 * @Date 2021/11/17 16:11
 */
public interface StudentService {

    /**
     * 模拟查询
     * @return
     */
    Student query();

}
StudentServiceImpl.class
package module.service.Impl;

import module.base.Student;
import module.dao.StudentDao;
import module.service.StudentService;
import org.springframework.beans.factory.annotation.Autowired;
import org.springframework.stereotype.Service;

/**
 * @author LHZ
 * @Date 2021/11/17 16:12
 */
@Service("StudentService")
public class StudentServiceImpl implements StudentService {

    @Autowired
    private StudentDao studentDao;

    /**
     * 模拟查询
     * @return
     */
    @Override
    public Student query() {
        return studentDao.query();
    }
}
结构如下

五.创建web模块
1.修改pom
		<!--   web依赖service模块 -->
		<dependency>
			<groupId>module</groupId>
			<artifactId>service</artifactId>
			<version>0.0.1-SNAPSHOT</version>
			<scope>compile</scope>
		</dependency>

		<!--   web网页依赖 -->
		<dependency>
			<groupId>org.springframework.boot</groupId>
			<artifactId>spring-boot-starter-web</artifactId>
		</dependency>

2.加controller类
StudentController.class
package module.web;

import module.base.Student;
import module.service.StudentService;
import org.springframework.beans.factory.annotation.Autowired;
import org.springframework.web.bind.annotation.GetMapping;
import org.springframework.web.bind.annotation.RestController;

/**
 * @author LHZ
 * @Date 2021/11/17 16:18
 */

@RestController
public class StudentController {

    @Autowired
    private StudentService studentService;

    @GetMapping("query")
    private Student query(){
        return studentService.query();
    }

}
3.将配置文件后缀改为yml,加入以下内容
#  端口
server:
  port: 8080

#数据库
spring:
  datasource:
    # url
    url: jdbc:mysql://localhost:3306/test
    # 账户名
    username: root
    # 密码
    password: 123456
    # 驱动
    driver-class-name: com.mysql.cj.jdbc.Driver


#xml文件的位置
mybatis:
  mapper-locations: classpath:mapper/*.xml
4.将WebApplication启动类move到module
右键WebApplication -> Refactor -> Move

选…弹出下面的窗口,选择module

Refactor

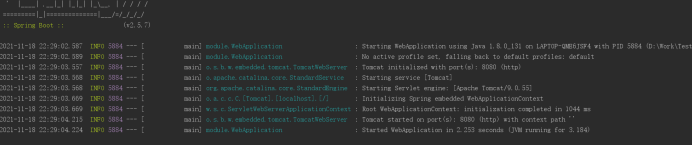
5.启动程序
6.测试(网页输入http://localhost:8080/query)

至此,项目就结束了,感谢您的耐心观看。
每天进步一点点,开心也多一点点

为开发者提供学习成长、分享交流、生态实践、资源工具等服务,帮助开发者快速成长。
更多推荐


 0
0 0
0- 0


 已为社区贡献1条内容

所有评论(0)