SpringBoot视图技术4:使用Thymeleaf完成数据的页面展示
本文主要介绍:如何使用Thymeleaf在html页面上显示动态数据,也介绍了如何使用BootStrap文档中现成的HTML、CSS、JS进行前端开发
使用Thymeleaf完成数据的页面展示
概括
Thymeleaf是一种用于Web和独立环境的现代服务器端的Java模板引擎。
本文主要介绍:如何使用Thymeleaf在html页面上显示动态数据,也介绍了如何使用BootStrap文档中现成的HTML、CSS、JS进行前端开发
一、步骤截图
1. 创建SpringBoot项目,引入Thymeleaf依赖
Web场景依赖和Thymeleaf场景依赖

//thymeleaf场景依赖
<dependency>
    <groupId>org.springframework.boot</groupId>
    <artifactId>spring-boot-starter-thymeleaf</artifactId>
</dependency>
2. 配置Thymeleaf模板的参数

# THYMELEAF (ThymeleafAutoConfiguration)
# 开启模板缓存(默认值: true )=> 修改:开发中关闭模板页面缓存
spring.thymeleaf.cache=false
# 模板编码
spring.thymeleaf.encoding=UTF-8
# 要运⽤于模板之上的模板模式。另⻅ StandardTemplate-ModeHandlers( 默认值: HTML5)
spring.thymeleaf.mode=HTML5
# 在构建 URL 时添加到视图名称前的前缀(默认值: classpath:/templates/ )
spring.thymeleaf.prefix=classpath:/templates/
# 在构建 URL 时添加到视图名称后的后缀(默认值: .html )
spring.thymeleaf.suffix=.html
3. Controller层(Web控制层)
Controller层请求处理类:接收请求,跳转页面
突然想到访问的顺序

4. 创建模板页面并引入静态资源文件
写完配置文件,先写静态html文件(html+css+js),然后写Controller类(访问路径,携带参数,跳转页面),然后再在html中加入动态数据
① xmlns:th="http://www.thymeleaf.org"用于引入Thymeleaf模板引擎
② th:href和th:src分别引入样式文件和图片
@{}:是链接URL表达式
③ th:text => 用于指定标签显示的文本内容
${} => 变量表达式,主要用于获取上下文中的变量值
④ 引入静态资源文件后,就可以展示一个静态页面了,如果想让页面显示动态的数据,就需要页面从后端获取数据,使用变量表达式: ${ }
<!DOCTYPE html>
<!--xmlns:th="http://www.thymeleaf.org"用于引入Thymeleaf模板引擎-->
<!--th标签是Thymeleaf模板提供的,但使用这种Thymeleaf模板页面不是一个标准的Html5页面了-->
<!--如果想使用Thymeleaf进行纯html5开发,要使用data-th-*替代th:*,替代后不需要引入模板引擎,但是没有快捷提示,所以不推荐-->
<html lang="en" xmlns:th="http://www.thymeleaf.org">
<head>
    <meta charset="UTF-8">
    <title>用户登录页面</title>
    <!--th:href和th:src分别引入样式文件和图片-->
    <!--@{}:是连接URL表达式-->
    <!--直接从静态资源文件夹static下的目录和文件开始写即可,不需要写static-->
    <!--引入css以后,就可以运行文件,访问到一个静态页面了-->
    <link rel="stylesheet" th:href="@{/login/css/bootstrap.css}">
</head>
<body>
<!--用户登录的form表单-->
<form style="text-align: center">
    <div class="form-group">
        <label for="exampleInputEmail1">Email address</label>
        <input type="email" class="form-control" id="exampleInputEmail1" aria-describedby="emailHelp">
        <small id="emailHelp" class="form-text text-muted">We'll never share your email with anyone else.</small>
    </div>
    <div class="form-group">
        <label for="exampleInputPassword1">Password</label>
        <input type="password" class="form-control" id="exampleInputPassword1">
    </div>
    <div class="form-group form-check">
        <input type="checkbox" class="form-check-input" id="exampleCheck1">
        <label class="form-check-label" for="exampleCheck1">Check me out</label>
    </div>
    <button type="submit" class="btn btn-primary">Submit</button>
</form>
<!--引入后台动态传递过来的当前年份-->
<!--th:text => 用于指定标签显示的文本内容-->
<!--${} => 变量表达式,主要用于获取上下文中的变量值-->
<p style="text-align: center">
    <!--    这句表示:如果没有获取到currentYear变量,则显示2018,如果有,就显示后端传递过来的值-->
    @<span th:text="${currentYear}">2018</span>
    -<span th:text="${currentYear}+1">2019</span>
</p>
</body>
</html>
4.1 使用BootStrap中提供的组件进行开发
4.1.1 引入CSS和JS到项目中
BootStrap是Twitter推出的一个用于前端开发的开源工具包(组件库),是一套用于 HTML、CSS 和 JS 开发的开源工具集。
按照这个步骤进行操作:
- 打开BootStrap官网,打开最新版的BootStrap v4中文文档

- 点击“下载BootStrap”

- 点击"下载BootStrap生产文件"

- 将下载好的CSS和JS赋值到项目的resource/static目录(静态资源文件目录) 下


- 下载JQuery,打开文档,点击“快速入门”,往下滑,找到图片所示这里,复制这个链接并打开,复制里面的内容


- 把复制的内容粘贴到(新建一个js文件,名为jquery.min.js)jquery.min.js中

- 别忘了下载完毕后,需要在html中引入css文件
注意:文件路径从static下一级开始写
<link rel="stylesheet" th:href="@{/login/css/bootstrap.css}">

- 如果想使用别的网站中的css文件,就按这样打开,找到需要的文件进行复制

4.1.2 使用组件库中提供的html进行开发
目的:编写html5
在bootstrap官网上打开“bootStrap v4文档”,点击“快速入门”,点击“组件”

二、测试结果
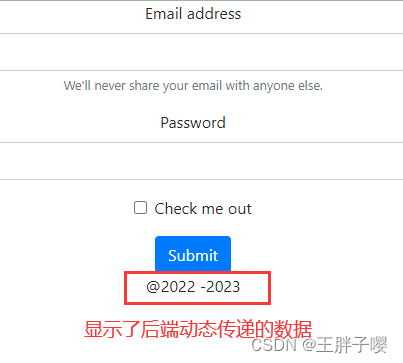
html页面中写的数据是2018-2019

运行主程序启动类,并在浏览器中访问http://localhost:8080/toLoginPage

三、整体代码
目录结构

1. 配置Thymeleaf模板的参数
全局配置文件中
# THYMELEAF (ThymeleafAutoConfiguration)
# 开启模板缓存(默认值: true )=> 修改:开发中关闭模板页面缓存
spring.thymeleaf.cache=false
# 模板编码
spring.thymeleaf.encoding=UTF-8
# 要运⽤于模板之上的模板模式。另⻅ StandardTemplate-ModeHandlers( 默认值: HTML5)
spring.thymeleaf.mode=HTML5
# 在构建 URL 时添加到视图名称前的前缀(默认值: classpath:/templates/ )
spring.thymeleaf.prefix=classpath:/templates/
# 在构建 URL 时添加到视图名称后的后缀(默认值: .html )
spring.thymeleaf.suffix=.html
2. Html文件
写完配置文件,先写静态html文件(html+css+js),然后写Controller类(访问路径,携带参数,跳转页面),然后再在html中加入动态数据
<!DOCTYPE html>
<!--xmlns:th="http://www.thymeleaf.org"用于引入Thymeleaf模板引擎-->
<!--th标签是Thymeleaf模板提供的,但使用这种Thymeleaf模板页面不是一个标准的Html5页面了-->
<!--如果想使用Thymeleaf进行纯html5开发,要使用data-th-*替代th:*,替代后不需要引入模板引擎,但是没有快捷提示,所以不推荐-->
<html lang="en" xmlns:th="http://www.thymeleaf.org">
<head>
    <meta charset="UTF-8">
    <title>用户登录页面</title>
    <!--th:href和th:src分别引入样式文件和图片-->
    <!--@{}:是连接URL表达式-->
    <!--直接从静态资源文件夹static下的目录和文件开始写即可,不需要写static-->
    <!--引入css以后,就可以运行文件,访问到一个静态页面了-->
    <link rel="stylesheet" th:href="@{/login/css/bootstrap.css}">
</head>
<body>
<!--用户登录的form表单-->
<form style="text-align: center">
    <div class="form-group">
        <label for="exampleInputEmail1">Email address</label>
        <input type="email" class="form-control" id="exampleInputEmail1" aria-describedby="emailHelp">
        <small id="emailHelp" class="form-text text-muted">We'll never share your email with anyone else.</small>
    </div>
    <div class="form-group">
        <label for="exampleInputPassword1">Password</label>
        <input type="password" class="form-control" id="exampleInputPassword1">
    </div>
    <div class="form-group form-check">
        <input type="checkbox" class="form-check-input" id="exampleCheck1">
        <label class="form-check-label" for="exampleCheck1">Check me out</label>
    </div>
    <button type="submit" class="btn btn-primary">Submit</button>
</form>
<!--引入后台动态传递过来的当前年份-->
<!--th:text => 用于指定标签显示的文本内容-->
<!--${} => 变量表达式,主要用于获取上下文中的变量值-->
<p style="text-align: center">
    <!--    这句表示:如果没有获取到currentYear变量,则显示2018,如果有,就显示后端传递过来的值-->
    @<span th:text="${currentYear}">2018</span>
    -<span th:text="${currentYear}+1">2019</span>
</p>
</body>
</html>
3. Controller层:请求处理类
package com.wpz.controller;

import org.springframework.stereotype.Controller;
import org.springframework.ui.Model;
import org.springframework.web.bind.annotation.GetMapping;

import java.util.Calendar;

/**
 * @author 王胖子
 * @version 1.0
 * 访问控制类LoginController:用于前端页面中数据 动态替换的效果测试
 */
//1. @Controller标识该类为Controller类
@Controller
public class LoginController {
    //toLoginPage():获取并封装当前年份,跳转到登录页login.html
    //- toLoginPage()方法向登录页面login.html跳转时,携带了表示当前年份信息的currentYear
    //- model可以携带数据(HttpServletRequest也可以)
    //2. 浏览器访问的路径"/toLoginPage"
    @GetMapping("/toLoginPage")
    public String toLoginPage(Model model){
        //3. model参数携带数据:添加属性currentYear,并为其赋值->(Calendar对象获取当前年份)
        model.addAttribute("currentYear", Calendar.getInstance().get(Calendar.YEAR));
        //4. 携带信息,跳转到登录页(路径prefix和suffix已经在全局配置文件中配置)
        return "login";
    }
}
更多推荐
 已为社区贡献2条内容


所有评论(0)