Springcloud之OAuth2
springcloud之OAuth2
OAuth2是一个开放的标准,协议。即允许用户让第三方应用访问某一个网站上存储的用户私密资源(照片,头像等)。这个过程中无需将用户名和密码提供给第三方应用。在互联网中,我们最常见的OAuth2的应用就是各种第三方通过QQ授权,微信授权,微博授权等登录了。
OAuth2协议一共支持4中不同的授权模式。
- 授权码模式
常见的第三方平台登录功能基本上都使用这种模式。 - 简化模式
简化模式不想要客户端服务器(第三方应用服务器)参与,直接在浏览器中向授权服务器申请令牌。 - 密码模式
密码模式是用户把用户名,密码直接告诉客户端,客户端使用这些信息向授权服务器申请令牌。这需要用户对客户端高度信任。 - 客户端模式
客户端模式是指客户端使用自己的名义而不是用户的名义向服务器申请授权。
OAuth2的重要参数
①response_type
code:表示要求返回授权码。token:表示直接返回令牌
②client_id
客户端身份标识
③client_secret
客户端密钥
④redirect_uri
重定向地址
⑤scope
表示授权的范围。read:只读权限,all读写权限
⑥grant_type
表示授权的方式。AUTHORIZATION_CODE(授权码),PASSWORD(密码),CLIENT_CREDENTIALS(品正式),REFRESH_TOKEN(更新令牌)
⑦state
应用程序传递的一个随机数,用来防止CSRF攻击。
授权码模式
它是安全系数最高的,当然也最复杂,比较常用的一种方式。使用网上的图。掘金原作者连接
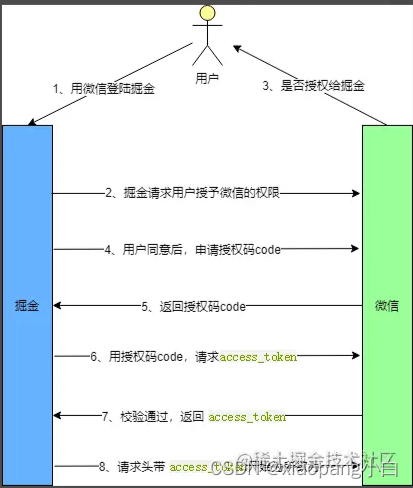
用户选择通过微信登录掘金,掘金会向微信发起授权请求,微信询问用户是否同意授权(一个弹窗)。reponse_type为code要求返回授权码。scope参数表示本地授权范围为只读权限,redirect_rui重定向地址。
https://wx.com/oauth/authorize?
  response_type=code&
  client_id=CLIENT_ID&
  redirect_uri=http://juejin.im/callback&
  scope=read
用户同意授权后,微信根据redirect_uri重定向并带上授权码。
http://juejin.im/callback?code=AUTHORIZATION_CODE
当掘金拿到授权码(code)时,带授权码和密钥等参数向微信申请令牌。grant_type表示本次授权为授权码方式:AUTHORIZATION_CODE,获取令牌要带上客户端密钥CLIENT_SECRET,和上一步得到的授权码code。
https://wx.com/oauth/token?
 client_id=CLIENT_ID&
 client_secret=CLIENT_SECRET&
 grant_type=authorization_code&
 code=AUTHORIZATION_CODE&
 redirect_uri=http://juejin.im/callback
最后微信收到请求后向redirect_uri地址发送JSON数据,其中的ACCESS_TOKEN就是令牌。
 {
  "access_token":"ACCESS_TOKEN",
  "token_type":"bearer",
  "expires_in":2592000,
  "refresh_token":"REFRESH_TOKEN",
  "scope":"read",
  ....
  }
隐藏式模式
有一些应用时没有后端的,纯前端应用,就无法用到授权码模式。令牌的申请和存储都需要在前端完成,跳过了授权码这一步。
前端应用直接获取token,response_type设置为token,要求直接返回令牌,跳过授权码。微信授权通过后重定向到指定的redirect_uri。
https://wx.com/oauth/authorize?
  response_type=token&
  client_id=CLIENT_ID&
  redirect_uri=http://juejin.im/callback&
  scope=read
密码式模式
密码式模式,就是用户直接输入自己的用户名,密码。直接去申请令牌,请求响应的json结果中返回token。grant_type为password表示密码式授权。
这种方式缺点式非常明显的,就是非常危险。如果采取此方式授权,该应用一定是可以高度信任的。
凭证式模式
凭证式和密码式很相似,主要使用与那些没有前端的命令行应用。可以用最简单的方式获取令牌,在请求响应json结果中返回token。grant_type为client_credentials表示凭证式授权,client_id和client_secret用来识别身份。
https://wx.com/token?
  grant_type=client_credentials&
  client_id=CLIENT_ID&
  client_secret=CLIENT_SECRET
令牌过期处理
token是具有失效性的,一旦过期就需要重新获取,但是重走一边验证流程,不仅麻烦,而且用户体验也不好。
一般在颁发令牌的时候会一次发两个令牌,一个令牌用来请求API,另一个令牌负责更新refresh_token。grant_type为refresh_token请求为更新令牌,参数refresh_token是用于更新令牌的令牌。
https://wx.com/oauth/token?
  grant_type=refresh_token&
  client_id=CLIENT_ID&
  client_secret=CLIENT_SECRET&
  refresh_token=REFRESH_TOKEN
自定义授权服务
项目引入spring-cloud-starter-oauth2。
增加配置类AuthrizationServer 继承 AuthorizationServerConfigurerAdapter。
@Configuration
public class AccessTokenConfig {
    @Bean
    TokenStore tokenStore() {
        return new InMemoryTokenStore();
    }
}
@EnableAuthorizationServer
@Configuration
public class AuthorizationServer extends AuthorizationServerConfigurerAdapter {
    @Autowired
    TokenStore tokenStore;
    @Autowired
    ClientDetailsService clientDetailsService;

    @Bean
    AuthorizationServerTokenServices tokenServices() {
        DefaultTokenServices services = new DefaultTokenServices();
        services.setClientDetailsService(clientDetailsService);
        services.setSupportRefreshToken(true);
        services.setTokenStore(tokenStore);
        services.setAccessTokenValiditySeconds(60 * 60 * 2);
        services.setRefreshTokenValiditySeconds(60 * 60 * 24 * 3);
        return services;
    }

    @Override
    public void configure(AuthorizationServerSecurityConfigurer security) throws Exception {
        security.checkTokenAccess("permitAll()")
                .allowFormAuthenticationForClients();
    }

    @Override
    public void configure(ClientDetailsServiceConfigurer clients) throws Exception {
        clients.inMemory()
                .withClient("javaboy")
                .secret(new BCryptPasswordEncoder().encode("123"))
                .resourceIds("res1")
                .authorizedGrantTypes("authorization_code","refresh_token")
                .scopes("all")
                .redirectUris("http://localhost:8082/index.html");
    }

    @Override
    public void configure(AuthorizationServerEndpointsConfigurer endpoints) throws Exception {
        endpoints.authorizationCodeServices(authorizationCodeServices())
                .tokenServices(tokenServices());
    }
    @Bean
    AuthorizationCodeServices authorizationCodeServices() {
        return new InMemoryAuthorizationCodeServices();
    }
}
- TokenStore实例,是指生成的Token要往那里存储。
- 自定义授权服务配置类要标注@EnableAuthorizationServer注解,开启授权服务的自动化配置。
- 在自定义配置授权配置类中,重写三个configure方法
①AuthorizationServerSecurityConfigurer用来配置令牌端点的安全约束。也就是这个端点谁能访问,谁不能访问。checkTokenAccess是指一个Token校验的端点。这个端点我们设置为可以直接访问。
②CientDetailsServiceConfigurer用来配置客户端的详细信息。授权服务主要做两方面的校验,一方面是校验客户端,另一方面是校验用户。这里面配置的就是校验客户端。客户端的信息主要包含客户端id,secret,资源id,授权类型,授权范围以及重定向uri。授权类型就文章最开头介绍的四种。这四种之中不包含refresh_token这种类型。在实际操作中,refresh_token也被算作一种。线上经常用数据库存储客户端信息。
③AuthorizatinServerEndPointsConfigurer用来配置令牌的访问端点和令牌的服务。authorizationCodeServices用来配置授权码的存储。TokenServices用来配置令牌的存储,即access_toke的存储位置。授权码是用来获取令牌的,使用一次就失效。令牌是用来获取资源的。 - tokenServices。这个bean是用
来配置Token的一些基本信息。例如Token是否支持刷新,Token的存储位置,Token的有效期以及刷新Token的有效期等等。刷新Token的有效期是指,当Token快要过期的时候,我们需要获取一个新的Token,在获取新的Token的时候,需要有一个凭证信息,这个凭证信息不是旧的Token,是另外一个refresh_token。这个refresh_token也是有有效期的。线上常用的时JWTtokenStore或者redistokenStore。
自定义资源服务器
晚上资源服务器大多都是和授权服务器放在一起的。如果项目比较小,这样做没问题。如果是一个大的项目,这种做法就不合适了。
资源服务器哟过来存放我们用户的资源,例如头像,opendi等信息。用户从授权服务器拿到access_token之后,接下来就可以通过access_token来资源服务器请求数据。
和授权服务一样,引入OAuth2的依赖。自定义一个资源配置类,继承ResourceServerConfigurerAdapter。注解@EnableResourceServer
开启资源服务的自动配置。
@Configuration
@EnableResourceServer
public class ResourceServerConfig extends ResourceServerConfigurerAdapter {
    @Bean
    RemoteTokenServices tokenServices() {
        RemoteTokenServices services = new RemoteTokenServices();
        services.setCheckTokenEndpointUrl("http://localhost:8080/oauth/check_token");
        services.setClientId("javaboy");
        services.setClientSecret("123");
        return services;
    }
    @Override
    public void configure(ResourceServerSecurityConfigurer resources) throws Exception {
        resources.resourceId("res1").tokenServices(tokenServices());
    }

    @Override
    public void configure(HttpSecurity http) throws Exception {
        http.authorizeRequests()
                .antMatchers("/admin/**").hasRole("admin")
                .anyRequest().authenticated();
    }
}
- tokenServices我们配置一个RemoteTokenServices的实例。这是因为资源服务和授权服务是分开的,资源服务如果和授权服务放到一起,就不需要配置RemoteTokenServices。
- RemoteTokenServices我们配置了access_token校验地址,client_id,client_secret三个信息。当用户来资源服务器请求资源时,会带着一个access_token,通过这里的配置,就能够校验这个token是否正确。
- 最后配置一下资源的拦截规则,写法和spring security差不多。
在资源服务器中我们定义两个测试接口:
@RestController
public class HelloController {
    @GetMapping("/hello")
    public String hello() {
        return "hello";
    }
    @GetMapping("/admin/hello")
    public String admin() {
        return "admin";
    }
}
自定义第三方应用
通过spingboot快速构建一个web应用。定义一个回调接口,接受授权返回的code。
前端代码:
<a href="http://localhost:8080/oauth/authorize?client_id=testOne&response_type=code&scope=all&redirect_uri=http://localhost:8082/index.html">第三方登录</a>
后端代码:
@Controller
public class HelloController {
    @Autowired
    RestTemplate restTemplate;

    @GetMapping("/index.html")
    public String hello(String code, Model model) {
        if (code != null) {
            MultiValueMap<String, String> map = new LinkedMultiValueMap<>();
            map.add("code", code);
            map.add("client_id", "testOne");
            map.add("client_secret", "123");
            map.add("redirect_uri", "http://localhost:8082/index.html");
            map.add("grant_type", "authorization_code");
            Map<String,String> resp = restTemplate.postForObject("http://localhost:8080/oauth/token", map, Map.class);
            String access_token = resp.get("access_token");
            System.out.println(access_token);
            HttpHeaders headers = new HttpHeaders();
            headers.add("Authorization", "Bearer " + access_token);
            HttpEntity<Object> httpEntity = new HttpEntity<>(headers);
            ResponseEntity<String> entity = restTemplate.exchange("http://localhost:8081/admin/hello", HttpMethod.GET, httpEntity, String.class);
            model.addAttribute("msg", entity.getBody());
        }
        return "index";
    }
}
如果code不为空,我们就做两个操作。
①根据拿到的code,去请求授权服务http://localhost:8080/oauth/token地址去获取Token,返回的数据结构如下:
{
    "access_token": "e7f223c4-7543-43c0-b5a6-5011743b5af4",
    "token_type": "bearer",
    "refresh_token": "aafc167b-a112-456e-bbd8-58cb56d915dd",
    "expires_in": 7199,
    "scope": "all"
}
access_token 就是我们请求数据所需要的令牌,refresh_token 则是我们刷新 token 所需要的令牌,expires_in 表示 token 有效期还剩多久。
②接下来我们拿到access_token,去请求资源服务器,然后将获取到的用户信息放入到model中。
Security的基础了解
Security的基础组件
- SecurityContextHolder
用来存储安全上下文信息,Spring Security校验之后,验证信息存储在SecurityContext。Authentication对象会放在SecurityContext里面。SecurityContextHolder是对SecurityContext操作的静态工具类。
public interface SecurityContext extends Serializable {
 // 获取Authentication对象
 Authentication getAuthentication();

 // 放入Authentication对象
 void setAuthentication(Authentication authentication);
}
public class SecurityContextHolder {

 public static void clearContext() {
  strategy.clearContext();
 }

 public static SecurityContext getContext() {
  return strategy.getContext();
 }

  public static void setContext(SecurityContext context) {
  strategy.setContext(context);
 }

}
- Authentication
在Security领域,用户密码等都不叫用户密码,叫做Authentication。Authentication在spring security中是最高级别的身份的抽象。在进入security领域前,得把信息封装成Authentication。定义了认证对象的数据形式。
public interface Authentication extends Principal, Serializable {

 Collection<? extends GrantedAuthority> getAuthorities();
 Object getCredentials();
 Object getDetails();
 Object getPrincipal();
 boolean isAuthenticated();
 void setAuthenticated(boolean isAuthenticated) throws IllegalArgumentException;
}
①getAuthorizaties:获取用户权限,一般情况下获取到的是用户的角色信息。
②getCredentials:获取证明用户认证的信息,通常情况下获取到的是密码等信息。
③getDetails:获取用户的额外信息。用户表中的信息。
④getPrincipal:获取用户身份信息,在未认证情况下获取到的是用户名,在已认证的情况下获取的是UserDetails。
⑤isAuthenticated:获取当前Authentication是否已认证。
⑥setAuthenticated:设置当前Authentication是否已认证。
- AuthenticationManager
该组件是用来校验Authentication,常见实现类有providerManager。在代码层面,providerManager将校验的工作交给另一个组件AuthenticationProvider来完成。providerManager中维护一个list,通过遍历找到支持当前Authentication认证的authenticationprovider,交给其进行认证。用于校验Authentication,返回一个认证完成后的Authentication对象。
public interface AuthenticationManager {
 // 认证方法
 Authentication authenticate(Authentication authentication)
   throws AuthenticationException;
}
定义了一个认证的方法,它将一个未认证的Authentication传入,返回一个已认证的Authentication。默认使用的实现类是ProviderManager。
- AuthenticationProvider
就是真正对Authentication进行校验的组件。 - UserDetails
UserDetails是从数据层获取的用户信息封装。 - UserDetailsService
DaoAuthenticationProvider认证器从数据库层取数据是通过UserDetailsService完成的,取到的是UserDetails。常见的UserDetailsService有jdbcDaoImpl,ClientDetailsUserDetailsService
security原理
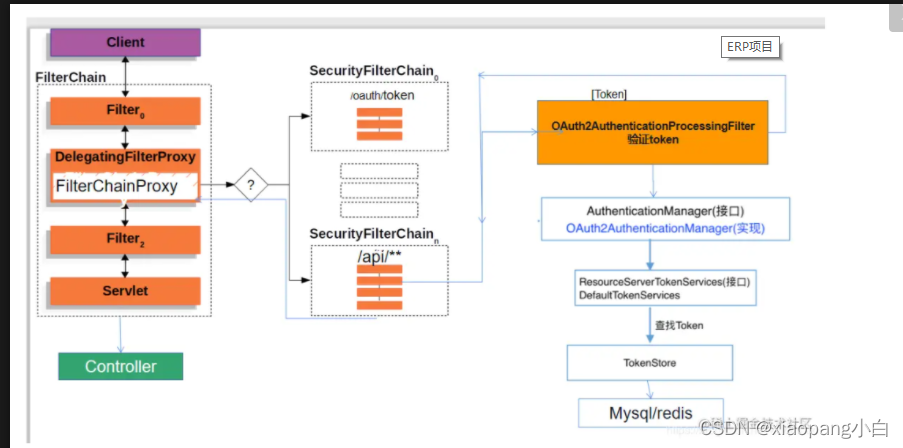
Spring Security在web应用中,是通过filter介入的。
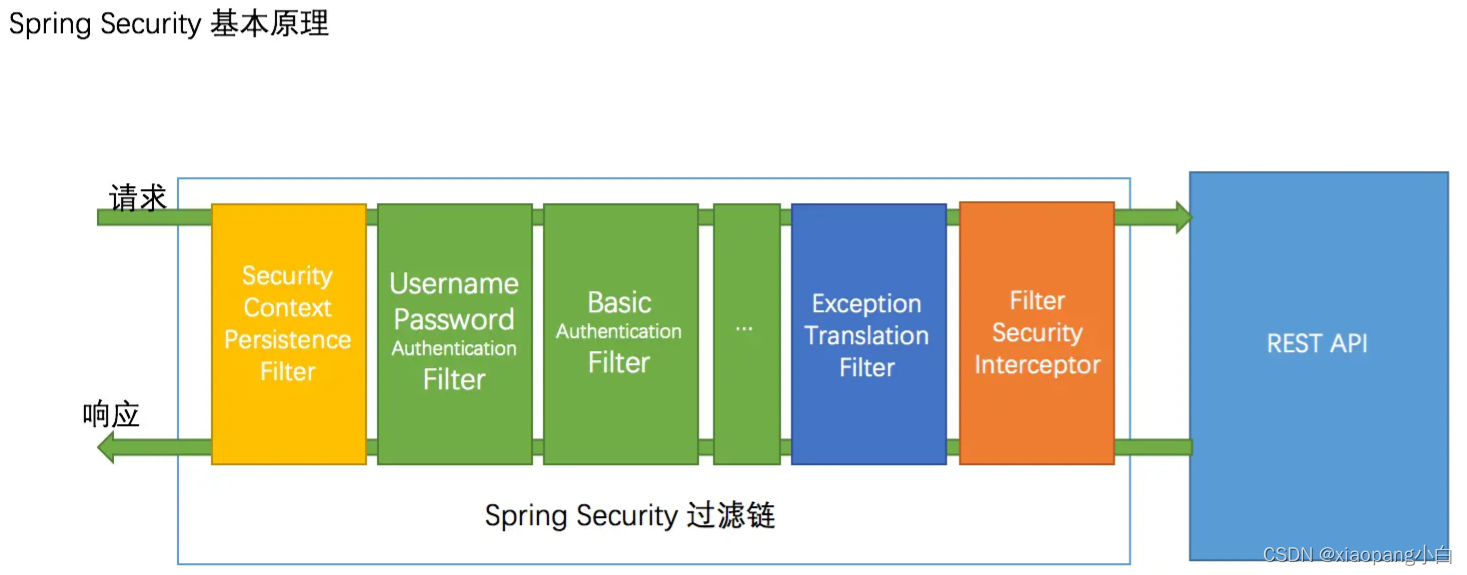
一个web请求会经过一条过滤连。在过滤链中会完成认证与授权。如果中间发现这条请求未认证或者未授权,会根据被保护API的权限去抛出异常,然后由异常处理器处理这些异常。
绿色过滤器是负责认证的,蓝色是负责异常处理的,橙色负责授权。
绿色过滤器是Spring security对保单认证和Basic认证内置的Filter。配置中通过formLogin和httpBasic配置。在配置中打开了它俩就对对用者打开了上面的过滤器。换句话说,就是我们配置了这两个,过滤器链中才会加入它们,否则它们是不会被加到过滤器链中去的。

常见组件
- DelegatingFilterProxy
这个Filter很有意思,它的内部有一个Filter delegate属性,用来代理另一个Filter。当请求执行到DelegatingFilterProxy时,会调用delegate这个Filter。
DelegatingFilterProxy可以看做是一个可以让Filter链拐弯的Filter。

- FilterChainProxy
这个也是一个Filter,Security就是通过把它设置到DelegatingFilterProxy.delegate属性上来介入了主题FilterChain。从名称上看它本上也是一个代理性质的Filter。
它内部维护了一个List filterChains来表示不同权限的url对应的不同的过滤器链,但是一次请求最多只有一个SpringSecurityFilterChains链。 - SpringSecurityFilterChain
FilterChainProxy遍历List filterChains匹配到一个适合当前请求的SecurityFilterChain然后就是链式调用了。 - Security常见的Filter
①SecurityContextPersistenceFilter:位于SecurityFilterChain的顶端。用户登录一次,用户信息存放到SecurityContextHolder中,这个放入的过程就是SecurityContextPersistenceFilter完成的。SecurityContextPersistenceFilter的主要工作创建SecurityContext安全上下文信息和请求结束时清空SecurityContextHolder。
②UsernamePasswordAuthenticationFilter:表达式认证时最常用的一种认证方式。允许表单输入用户名,密码进行登录。他会先将[username,password]封装成Authentication然后交给authenticationManager认证。authenticationManager会选择一个provider,通过UserDetailsService从redis或mysql等数据层获得存储用户信息的数据的UserDetail与Authentication进行比对。
③ExceptionTranslationFilter:异常转换过滤器位于整个springSecurityFilterChain的后方,主要处理两大异常。AccessDeniedException访问异常和AuthenticationException认证异常。根据配置和异常类型,会选择跳转到登录页面,或者404,405页面。
代码层面的集成
自定义security配置类,添加注解@EnableWebSecurity
@Retention(value = java.lang.annotation.RetentionPolicy.RUNTIME)
@Target(value = { java.lang.annotation.ElementType.TYPE })
@Documented
@Import({ WebSecurityConfiguration.class,
        SpringWebMvcImportSelector.class })
@EnableGlobalAuthentication
@Configuration
public @interface EnableWebSecurity {
    boolean debug() default false;
}
---
@Import(AuthenticationConfiguration.class)
@Configuration
public @interface EnableGlobalAuthentication {
}
@EnableWebSecurity注解的工作就是激活三个类
①SpringWebMvcImportSelector:判断当前的环境是否包含springmvc。
②WebSecurityConfiguration:用来配置web安全。
③AuthenticationConfiguration:配置认证相关的核心类,主要负责生成全局的身份认证管理者AuthenticationManager。
最主要的还是WebSecurityConfiguration。
略读源码技巧:xxConfiguration会搜集N个相关的xxConfigurer到本类中解析他们,统一成一个xxConfiguration配置文件对容器输出Bean。
public class WebSecurityConfiguration implements ImportAware, BeanClassLoaderAware {
    //搜集SecurityConfigurer到本类中,做集中解析。
    private List<SecurityConfigurer<Filter, WebSecurity>> webSecurityConfigurers
     //输出springSecurityFilterChain bean
    @Bean(name = "springSecurityFilterChain";)
    public Filter springSecurityFilterChain() throws Exception {
        boolean hasConfigurers = webSecurityConfigurers != null
                && !webSecurityConfigurers.isEmpty();
        if (!hasConfigurers) {
            WebSecurityConfigurerAdapter adapter = objectObjectPostProcessor
                    .postProcess(new WebSecurityConfigurerAdapter() {
                    });
            webSecurity.apply(adapter);
        }
        return webSecurity.build();//构建FilterChainProxy
    }
}
这里面有几个重要的点。
(1)搜集相关的SecurityConfigurer:我们集成security,通过会继承WebSecurityConfigurerAdapter做安全配置,WebSecurityConfigurerAdapter本身实现了SecurityConfigurer,这样的配置信息会被解析到WebSecurityConfiguration配置类中,作用到security中。所以这就是为啥我们要实现一个WebSecurityConfigurerAdapter来配置安全策略的原因。
(2)输出(FilterChainProxy)springSecurityFilterChain bean:这样就算在代码层面与主题FilterChain对接上了。
(3)WebSecurityConfigurerAdapter适配器模式的运用,使的我们可以选择行的实现部分配置。
security执行流程
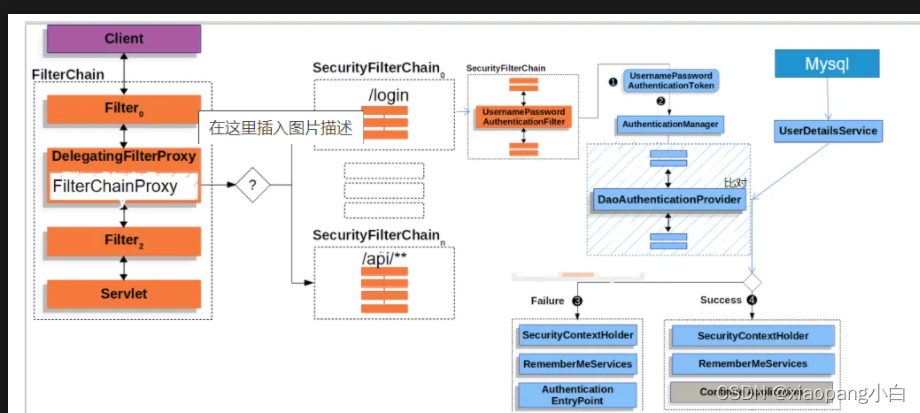
Security如何动态鉴权
通过流程图我们可以知道,鉴权是通过FilterSecurityInterceptor 来完成的。
public class FilterSecurityInterceptor extends AbstractSecurityInterceptor implements
  Filter {

            public void doFilter(ServletRequest request, ServletResponse response,
                    FilterChain chain) throws IOException, ServletException {
                FilterInvocation fi = new FilterInvocation(request, response, chain);
                invoke(fi);
            }
}
FilterSecurityInterceptor 集成抽象类AbstractSecurityInterceptor 实现接口Filter。实现方法doFilter。方法里面做了两件事。①将请求封装为FilterInvocation。②调用本身的invoke方法。
public void invoke(FilterInvocation fi) throws IOException, ServletException {
        if ((fi.getRequest() != null)
                && (fi.getRequest().getAttribute(FILTER_APPLIED) != null)
                && observeOncePerRequest) {
            // filter already applied to this request and user wants us to observe
            // once-per-request handling, so don't re-do security checking
            fi.getChain().doFilter(fi.getRequest(), fi.getResponse());
        }
        else {
            // first time this request being called, so perform security checking
            if (fi.getRequest() != null && observeOncePerRequest) {
                fi.getRequest().setAttribute(FILTER_APPLIED, Boolean.TRUE);
            }

            // 进入鉴权
            InterceptorStatusToken token = super.beforeInvocation(fi);

            try {
                fi.getChain().doFilter(fi.getRequest(), fi.getResponse());
            }
            finally {
                super.finallyInvocation(token);
            }

            super.afterInvocation(token, null);
        }
    }
invoke主要看else里面的逻辑。①调用了super.beforeInvocation(filterInvocation)。②请求放行。③super.afterInvocation(token, null);
我们主要研究下beforeInvocation。方法实现在AbstractSecurityInterceptor。
protected InterceptorStatusToken beforeInvocation(Object object) {
        Assert.notNull(object, "Object was null");
        final boolean debug = logger.isDebugEnabled();

        if (!getSecureObjectClass().isAssignableFrom(object.getClass())) {
            throw new IllegalArgumentException(
                    "Security invocation attempted for object "
                            + object.getClass().getName()
                            + " but AbstractSecurityInterceptor only configured to support secure objects of type: "
                            + getSecureObjectClass());
        }

        Collection<ConfigAttribute> attributes = this.obtainSecurityMetadataSource()
                .getAttributes(object);

        Authentication authenticated = authenticateIfRequired();

        try {
            // 鉴权需要调用的接口
            this.accessDecisionManager.decide(authenticated, object, attributes);
        }
        catch (AccessDeniedException accessDeniedException) {
            publishEvent(new AuthorizationFailureEvent(object, attributes, authenticated,
                    accessDeniedException));

            throw accessDeniedException;
        }

    }
(1)拿到了一个Collection<ConfigAttribute>对象,这个对象是一个List,其实里面就是我们在配置文件中配置的过滤规则。
(2)拿到了Authentication。这里是调用authenticateIfRequired方法拿到了。
(3)调用accessDecisionManager.decide(authentication,object,attributes)。
accessDecisionManager是一个接口,里面定义了鉴权方法和两个辅助性的方法,辅助方法的作用都是为了甄别decide方法中参数的有效性。
public interface AccessDecisionManager {

    // 主要鉴权方法
    void decide(Authentication authentication, Object object,
                Collection<ConfigAttribute> configAttributes) throws AccessDeniedException,
            InsufficientAuthenticationException;

    boolean supports(ConfigAttribute attribute);

    boolean supports(Class<?> clazz);
}
这个接口有三个实现类。分别代表了三种不同的鉴权逻辑。
(1)AffirmativeBased:一票通过,只要有一票通过就算通过,默认是它。
(2)UnanimousBased:一票反对,只要有一票反对就不能通过。
(3)ConsensusBased:少数票服从多数票。
真正进行鉴别操作的类是投票器。AccessDecisionManager接口实现类把投票器的结果综合起来来决定到底能不能通过。我们看看默认实现的逻辑。
public class AffirmativeBased extends AbstractAccessDecisionManager {

    public AffirmativeBased(List<AccessDecisionVoter<?>> decisionVoters) {
        super(decisionVoters);
    }

    // 拿到所有的投票器,循环遍历进行投票
    public void decide(Authentication authentication, Object object,
                       Collection<ConfigAttribute> configAttributes) throws AccessDeniedException {
        int deny = 0;

        for (AccessDecisionVoter voter : getDecisionVoters()) {
            int result = voter.vote(authentication, object, configAttributes);

            if (logger.isDebugEnabled()) {
                logger.debug("Voter: " + voter + ", returned: " + result);
            }

            switch (result) {
                case AccessDecisionVoter.ACCESS_GRANTED:
                    return;

                case AccessDecisionVoter.ACCESS_DENIED:
                    deny++;

                    break;

                default:
                    break;
            }
        }

        if (deny > 0) {
            throw new AccessDeniedException(messages.getMessage(
                    "AbstractAccessDecisionManager.accessDenied", "Access is denied"));
        }

        // To get this far, every AccessDecisionVoter abstained
        checkAllowIfAllAbstainDecisions();
    }
}
AffirmativeBased默认传入的构造器只有一个->WebExpressionVote。这个构造器会根据你在配置文件中的配置进行逻辑处理得到投票结果。
动态鉴权的实现
既然是动态鉴权,我们把访问的URI配置到数据库中。我们的逻辑就是实时的在数据库中去读取不同角色对应的权限然后与当前登录的用户做个比较。
我们重写一个投票器,将它放到默认的AccessDecisionManager里面,和之前一样用投票器鉴权。
我们还需要在配置文件中配置一些默认放行的规则。根据上文,我们还需要继续使用我们上文所提到的WebExpressionVote,也就是说我要自定义权限 + 配置文件双行的模式。所以我们的AccessDecisionManager里面就会有两个投票器:WebExpressionVote 和 自定义的投票器。
接着我们考虑一下使用什么样的投票策略,我们使用一票反对策略。
- 重新构造AccessDecisionManager
因为投票器是系统启动的时候自动添加进去的,所以我们想多加入一个构造器必须自己重新构建AccessDecisionManager。然后将它放到配置中去。
AccessDecisionProcessor()就是我们自定义的投票器。
@Bean
    public AccessDecisionVoter<FilterInvocation> accessDecisionProcessor() {
        return new AccessDecisionProcessor();
    }

@Bean
    public AccessDecisionManager accessDecisionManager() {
        // 构造一个新的AccessDecisionManager 放入两个投票器
        List<AccessDecisionVoter<?>> decisionVoters = Arrays.asList(new WebExpressionVoter(), accessDecisionProcessor());
        return new UnanimousBased(decisionVoters);
    }
定义完AccessDecisionManager之后,我们将它放入启动配置:
@Override
    protected void configure(HttpSecurity http) throws Exception {

        http.authorizeRequests()
                // 放行所有OPTIONS请求
                .antMatchers(HttpMethod.OPTIONS).permitAll()
                // 放行登录方法
                .antMatchers("/api/auth/login").permitAll()
                // 其他请求都需要认证后才能访问
                .anyRequest().authenticated()
                // 使用自定义的 accessDecisionManager
                .accessDecisionManager(accessDecisionManager())
                .and()
                // 添加未登录与权限不足异常处理器
                .exceptionHandling()
                .accessDeniedHandler(restfulAccessDeniedHandler())
                .authenticationEntryPoint(restAuthenticationEntryPoint())
                .and()
                // 将自定义的JWT过滤器放到过滤链中
                .addFilterBefore(jwtAuthenticationTokenFilter(), UsernamePasswordAuthenticationFilter.class)
                // 打开Spring Security的跨域
                .cors()
                .and()
                // 关闭CSRF
                .csrf().disable()
                // 关闭Session机制
                .sessionManagement().sessionCreationPolicy(SessionCreationPolicy.STATELESS);
    }
- 自定义鉴权实现
投票器也是有一个接口规范的,我们只需要实现这个AccessDecisionVoter接口就行了,然后实现它的方法。
@Slf4j
public class AccessDecisionProcessor implements AccessDecisionVoter<FilterInvocation> {
    @Autowired
    private Cache caffeineCache;

    @Override
    public int vote(Authentication authentication, FilterInvocation object, Collection<ConfigAttribute> attributes) {
        assert authentication != null;
        assert object != null;

        // 拿到当前请求uri
        String requestUrl = object.getRequestUrl();
        String method = object.getRequest().getMethod();
        log.debug("进入自定义鉴权投票器,URI : {} {}", method, requestUrl);

        String key = requestUrl + ":" + method;
        // 如果没有缓存中没有此权限也就是未保护此API,弃权
        PermissionInfoBO permission = caffeineCache.get(CacheName.PERMISSION, key, PermissionInfoBO.class);
        if (permission == null) {
            return ACCESS_ABSTAIN;
        }

        // 拿到当前用户所具有的权限
        List<String> roles = ((UserDetail) authentication.getPrincipal()).getRoles();
        if (roles.contains(permission.getRoleCode())) {
            return ACCESS_GRANTED;
        }else{
            return ACCESS_DENIED;
        }
    }

    @Override
    public boolean supports(ConfigAttribute attribute) {
        return true;
    }

    @Override
    public boolean supports(Class<?> clazz) {
        return true;
    }
}
逻辑是这样:我们以URI+METHOD为key去缓存中查找权限相关的信息,如果没有找到此URI,则证明这个URI没有被保护,投票器可以直接弃权。
如果找到了这个URI相关权限信息,则用其与用户自带的角色信息做一个对比,根据对比结果返回ACCESS_GRANTED或ACCESS_DENIED。
当然这样做有一个前提,那就是我在系统启动的时候就把URI权限数据都放到缓存中了,系统一般在启动的时候都会把热点数据放入缓存中,以提高系统的访问效率。
@Component
public class InitProcessor {
    @Autowired
    private PermissionService permissionService;
    @Autowired
    private Cache caffeineCache;

    @PostConstruct
    public void init() {
        List<PermissionInfoBO> permissionInfoList = permissionService.listPermissionInfoBO();
        permissionInfoList.forEach(permissionInfo -> {
            caffeineCache.put(CacheName.PERMISSION, permissionInfo.getPermissionUri() + ":" + permissionInfo.getPermissionMethod(), permissionInfo);
        });
    }
}
如果我们的角色权限是ant表达式的。我们可以用一个工具类进行比较:
@Test
 public void match() {
  AntPathMatcher antPathMatcher = new AntPathMatcher();
  // true
  System.out.println(antPathMatcher.match("/user/**", "/user/get/1"));
 }
@Test
 public void match() {
  AntPathMatcher antPathMatcher = new AntPathMatcher();
  // true
  System.out.println(antPathMatcher.match("/user/{id}", "/user/1"));
 }
在面对真正的系统的时候,往往是根据系统设计进行组合使用这些工具类和设计思想。
Security是如何把过滤器链创建出来,怎么加入我们的自定义配置?
@Configuration(proxyBeanMethods = false)
public class WebSecurityConfiguration implements ImportAware, BeanClassLoaderAware {
    private WebSecurity webSecurity;

    private Boolean debugEnabled;

    private List<SecurityConfigurer<Filter, WebSecurity>> webSecurityConfigurers;

    private ClassLoader beanClassLoader;

    @Autowired(required = false)
    private ObjectPostProcessor<Object> objectObjectPostProcessor;


    @Bean(name = AbstractSecurityWebApplicationInitializer.DEFAULT_FILTER_NAME)
    public Filter springSecurityFilterChain() throws Exception {
        boolean hasConfigurers = webSecurityConfigurers != null
                && !webSecurityConfigurers.isEmpty();
        if (!hasConfigurers) {
            WebSecurityConfigurerAdapter adapter = objectObjectPostProcessor
                    .postProcess(new WebSecurityConfigurerAdapter() {
                    });
            webSecurity.apply(adapter);
        }
        return webSecurity.build();
    }


    @Autowired(required = false)
    public void setFilterChainProxySecurityConfigurer(
            ObjectPostProcessor<Object> objectPostProcessor,
            @Value("#{@autowiredWebSecurityConfigurersIgnoreParents.getWebSecurityConfigurers()}") List<SecurityConfigurer<Filter, WebSecurity>> webSecurityConfigurers)
            throws Exception {
        webSecurity = objectPostProcessor
                .postProcess(new WebSecurity(objectPostProcessor));
        if (debugEnabled != null) {
            webSecurity.debug(debugEnabled);
        }

        webSecurityConfigurers.sort(AnnotationAwareOrderComparator.INSTANCE);

        Integer previousOrder = null;
        Object previousConfig = null;
        for (SecurityConfigurer<Filter, WebSecurity> config : webSecurityConfigurers) {
            Integer order = AnnotationAwareOrderComparator.lookupOrder(config);
            if (previousOrder != null && previousOrder.equals(order)) {
                throw new IllegalStateException(
                        "@Order on WebSecurityConfigurers must be unique. Order of "
                                + order + " was already used on " + previousConfig + ", so it cannot be used on "
                                + config + " too.");
            }
            previousOrder = order;
            previousConfig = config;
        }
        for (SecurityConfigurer<Filter, WebSecurity> webSecurityConfigurer : webSecurityConfigurers) {
            webSecurity.apply(webSecurityConfigurer);
        }
        this.webSecurityConfigurers = webSecurityConfigurers;
    }

}
@EnableWebSecurity注解,①@Import注解导入了三个类,这三个类中后两个是SpringSecurity为了兼容性做的一些东西,兼容SpringMVC,兼容SpringSecurityOAuth2。主要是第一个类WebSecurityConfiguration,都这个类代表了加载了这个类里面的内容。②@EnableGlobalAuthentication。这个注解,AuthenticationManager相关的配置类。
WebSecurityConfiguration这个配置类,就是帮助我们建立过滤器的配置类。
AuthenticationManager这个配置,主要是帮我们注入AuthenticatinManager相关的配置类。
WebSecurityConfiguration
这个类里面有两个比较重要的方法。springSecurityFilterChain和setFilterChainProxySecurityConfigurer。
- setFilterChainProxySecurityConfigurer
这个方法是被@Autowired注解标注。它执行的优先级比springSecurityFilterChain(被@Bean)优先执行。
@Autowired自动注入需要两个参数。
(1)objectPostProcessor是为了创建WebSecurity实例而注入进来的。
(2)webSecurityConfigurers是一个List,它实际上是所有WebSecurityConfigurerAdapter的子类,那如果我们定义了自定义的配置类,其实就是把我们的配置也读取到了。
为什么参数中SecurityConfigurer<Filter, WebSecurity>这个类型可以拿到WebSecurityConfigurerAdapter的子类?
因为WebSecurityConfigurerAdapter实现了WebSecurityConfigurer<WebSecurity>接口,而WebSecurityConfigurer<WebSecurity>又继承了SecurityConfigurer<Filter, T>,经过一层实现,一层继承关系之后,WebSecurityConfigurerAdapter终于成为了SecurityConfigurer的子类。
(1)创建了一个webSecurity实例,并且赋值给成员变量。
(2)紧接着对webSecurityConfigurers通过order进行排序,order是加载顺序。
(3)进行判断是否有相同order的配置类,如果出现将会直接报错。
(4)保存配置,将其放入webSecuriy的成员变量中。
总结:setFilterChainProxySecuityConfigurer方法就是给配置类WebSecurityConfiguration中的两个属性赋值。webSecurity 和 webSecurityConfigurers。
2. SpringSecurityFilterChain
初始化完变量,加载完配置类,我们要开始创建过滤器链了。setFilterChainProxySecurityConfigurer是有原因的,如果我们不把我们的自定义配置加载进来,创建过滤器链的时候怎么知道哪些过滤器需要哪些过滤器不需要。
@Bean(name = AbstractSecurityWebApplicationInitializer.DEFAULT_FILTER_NAME)
    public Filter springSecurityFilterChain() throws Exception {
        boolean hasConfigurers = webSecurityConfigurers != null
                && !webSecurityConfigurers.isEmpty();
        if (!hasConfigurers) {
            WebSecurityConfigurerAdapter adapter = objectObjectPostProcessor
                    .postProcess(new WebSecurityConfigurerAdapter() {
                    });
            webSecurity.apply(adapter);
        }
        return webSecurity.build();
    }
springSecurityFilterChain方法逻辑就很简单了,如果我们没有加载自定义的配置类,它就替我们加载一个默认的配置类,然后调用build方法。
public final O build() throws Exception {
        if (this.building.compareAndSet(false, true)) {
            this.object = doBuild();
            return this.object;
        }
        throw new AlreadyBuiltException("This object has already been built");
    }
build()方法是webSecurity的父类AbstractSecurityBuilder中的方法,这个方法又调用了doBuild()方法。
@Override
protected final O doBuild() throws Exception {
    synchronized (configurers) {
        buildState = AbstractConfiguredSecurityBuilder.BuildState.INITIALIZING;

        // 空方法
        beforeInit();
        // 调用init方法
        init();

        buildState = AbstractConfiguredSecurityBuilder.BuildState.CONFIGURING;

        // 空方法
        beforeConfigure();
        // 调用configure方法
        configure();

        buildState = AbstractConfiguredSecurityBuilder.BuildState.BUILDING;

        // 调用performBuild
        O result = performBuild();

        buildState = AbstractConfiguredSecurityBuilder.BuildState.BUILT;

        return result;
    }
}
构建过程,beforeInit()和beforeConfigure()都是空方法。实际有用的只有init(),configure() 和 preformBuild()方法。
(1)init(),configure()方法
private void init() throws Exception {
        Collection<SecurityConfigurer<O, B>> configurers = getConfigurers();

        for (SecurityConfigurer<O, B> configurer : configurers) {
            configurer.init((B) this);
        }

        for (SecurityConfigurer<O, B> configurer : configurersAddedInInitializing) {
            configurer.init((B) this);
        }
    }

private void configure() throws Exception {
        Collection<SecurityConfigurer<O, B>> configurers = getConfigurers();

        for (SecurityConfigurer<O, B> configurer : configurers) {
            configurer.configure((B) this);
        }
    }
源码中可以看到都是先获取我们的配置类信息,然后循环调用配置类自己的init(),configure()方法。
我们的配置类是继承了WebSecurityConfigurerAdapter的子类,而WebSecurityConfigurerAdapter又是SecurityConfigurer的子类,所有SecurityConfigurer的子类都需要实现init(),configure()方法。
所以这里的init(),configure()方法就是调用WebSecurityConfigurerAdapter自己重写的inti(),configure()方法。
public void init(final WebSecurity web) throws Exception {
        final HttpSecurity http = getHttp();
        web.addSecurityFilterChainBuilder(http).postBuildAction(() -> {
            FilterSecurityInterceptor securityInterceptor = http
                    .getSharedObject(FilterSecurityInterceptor.class);
            web.securityInterceptor(securityInterceptor);
        });
    }
①执行了getHttp()方法,这里面初始化加入了很多过滤器。
②将HttpSecurity放入WebSecurity,将FilterSecurityInterceptor放入webSecurity。FilterSecurityInterceptor就是我们鉴权的过滤器。
接下里我们看看这个getHttp方法。
protected final HttpSecurity getHttp() throws Exception {
        http = new HttpSecurity(objectPostProcessor, authenticationBuilder,
                sharedObjects);
        if (!disableDefaults) {
            // @formatter:off
            http
                    .csrf().and()
                    .addFilter(new WebAsyncManagerIntegrationFilter())
                    .exceptionHandling().and()
                    .headers().and()
                    .sessionManagement().and()
                    .securityContext().and()
                    .requestCache().and()
                    .anonymous().and()
                    .servletApi().and()
                    .apply(new DefaultLoginPageConfigurer<>()).and()
                    .logout();
            // @formatter:on
            ClassLoader classLoader = this.context.getClassLoader();
            List<AbstractHttpConfigurer> defaultHttpConfigurers =
                    SpringFactoriesLoader.loadFactories(AbstractHttpConfigurer.class, classLoader);

            for (AbstractHttpConfigurer configurer : defaultHttpConfigurers) {
                http.apply(configurer);
            }
        }

        // 我们一般重写这个方法
        configure(http);
        return http;
    }
getHttp()方法里面http调用的那一堆方法都是一个个过滤器,第一个csrf()很明显就是防止CSRF攻击的过滤器,下面还有很多,这就是SpringSecurity默认会加入过滤器链的那些过滤器了。
初始化过程中会加载自己默认的配置然后再加载我们重写的配置,configure(http)。如果我们不重写方法configure(http),那么就会用默认的配置。
(2)init(),configure(空方法)结束之后,就是调用performBuild()方法。
protected Filter performBuild() throws Exception {

    int chainSize = ignoredRequests.size() + securityFilterChainBuilders.size();

    List<SecurityFilterChain> securityFilterChains = new ArrayList<>(
            chainSize);

    for (RequestMatcher ignoredRequest : ignoredRequests) {
        securityFilterChains.add(new DefaultSecurityFilterChain(ignoredRequest));
    }

    // 调用securityFilterChainBuilder的build()方法
    for (SecurityBuilder<? extends SecurityFilterChain> securityFilterChainBuilder : securityFilterChainBuilders) {
        securityFilterChains.add(securityFilterChainBuilder.build());
    }

    FilterChainProxy filterChainProxy = new FilterChainProxy(securityFilterChains);

    if (httpFirewall != null) {
        filterChainProxy.setFirewall(httpFirewall);
    }

    filterChainProxy.afterPropertiesSet();

    Filter result = filterChainProxy;

    postBuildAction.run();
    return result;
    }
这个方法主要需要看的是调用securityFilterChainBuilder的build()方法,这个securityFilterChainBuilder是我们在init()方法中add的那个,所以这里的securityFilterChainBuilder其实就是HttpSecurity,所以这里其实是调用了HttpSecurity的bulid()方法。这个过程也是init,configure,perform。以下是HttpSecurity的performBuild方法:
@Override
    protected DefaultSecurityFilterChain performBuild() {
        filters.sort(comparator);
        return new DefaultSecurityFilterChain(requestMatcher, filters);
    }
WebSecurity的performBuilder方法将HttpSecurity的performBuilder方法返回的FilterChain转换为FilterChainProxy。最后WebSecurity的performBuild方法执行结束,返回一个Filter注入成为name="springSecurityFilterChain"的Bean。
Security Oauth2原理
阿里云开发者社区
和耳朵
问题:
(1)Security Oauth2如何架设在Security架构之上?
(2)Security Oauth2又发生了哪些变化呢?
(3)Oauth2的四种认证方式是如何实现的?见上文
组件认知
- TokenEndPoint
可以理解为一个controller,/oauth/token接口就是在这里。这个是业务逻辑处理的地方,也就是oauth逻辑处理的地方。 - TokenGranter
令牌授予者,Oauth2规范的实现就是此组件实现的。

- TokenServices
定义一些token的一些操作,创建,获取,刷新。
AuthorizationServiceTokenServices:授权服务器端用到的tokenServices。
ResourceServerTokenServices:资源服务器端的tokenservices。
请求到controller,交给TokenGranter进行授权,TokenGranter授权过程中调用TokenSrevices生成Token。
代码层面认知
有两个配置类,授权服务配置,资源服务配置。
授权服务添加注解:@EnableAuthorizationService。
//@EnableAuthorizationServer注解
@Target(ElementType.TYPE)
@Retention(RetentionPolicy.RUNTIME)
@Documented
@Import({AuthorizationServerEndpointsConfiguration.class, AuthorizationServerSecurityConfiguration.class})
public @interface EnableAuthorizationServer {
}
资源服务添加注解:@EnableResourceServer
@Target(ElementType.TYPE)
@Retention(RetentionPolicy.RUNTIME)
@Documented
@Import(ResourceServerConfiguration.class)
public @interface EnableResourceServer {
}
- 权限服务器配置
@EnableAuthorizationService注解。此注解主要是激活两个配置类。
①AuthorizationServerEndPointsConfiguration:配置TokenEndPoint等Controller类,也就是注册Controller式Bean,例如/oauth/token接口。
②AuthorizationServerSecurityConfiguration:间接实现了SecurityConfigurer接口。这个接口会在启用security时,被websecurityconfiguration配置类搜集解析。这样Oauth2的配置与Security配置体系关联起来了。
③我们自定义的授权配置类继承AuthorizationServerConfigurerAdapter。间接继承了AuthorizationServerConfigurer。看到AuthorizationServerConfigurer,可以想象应该有个xxxConfiguration
的配置文件来解析它。是的,它就是被AuthorizationServerSecurityConfiguration搜集解析的。而AuthorizationServerSecurityConfiguration会被WebSecurityConfiguration配置类搜集。这样我们自定义的配置就跟Security配置体系关联起来了。
public class AuthorizationServerSecurityConfiguration extends WebSecurityConfigurerAdapter {
    @Autowired
    private List<AuthorizationServerConfigurer> configurers = Collections.emptyList();
}
- 资源服务器
EnableResourceServer注解:主要是激活ResourceServiceConfiguration类。
ResourceServerConfiguration: 也间接实现了SecurityConfigurer接口,也就是说也会被WebSecurityConfiguration配置类搜集解析。
自定义资源服务器配置。实现了ResourceServerConfigurer接口,他会被ResourceServerConfiguration配置类搜集解析,最终也是会进入WebSecurityConfiguration配置类。
到此我们可以看出,集成Oauth2时,看似多出的两个配置类,其实还是在间接配置Security ,最终都会在Security框架体系内生效。 也说明了Oauth2框架就是架设在Security框架之上。
token获取流程图
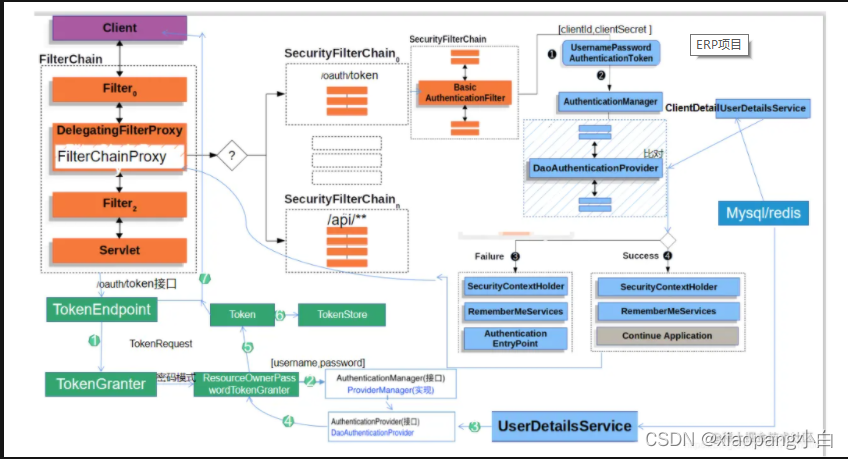
接口请求流程图
杂记
云川之下
@EnableResourceServer注解,表示开启资源中心功能,会有代理类负责登陆和授权的检查:
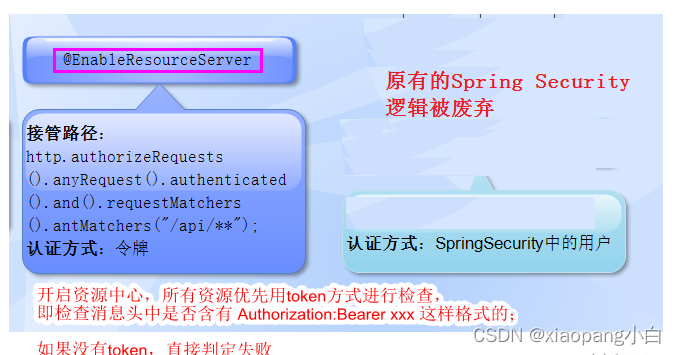
一般的Spring Security要求所有的请求url都要先判断是否登录,如果没有登录,就跳转至登陆页,然后检查用户名和密码是否正确,但是资源中心注解会内置有更高优先级的拦截器,会修改这个默认的逻辑,不是通过用户名和密码来检查是否正确,而是通过检查消息头中的Authorization:Bearer xxx参数。
开启资源中心,所有资源优先用token方式进行检查,即检查消息头中是否含有 Authorization:Bearer xxx 这样格式的;如果没有token,直接判定失败;即使有了token,那么如何验证?可以本地验证,或转发token至授权中心进行判断。
授权中心颁发token后,会把token存储在内存中,这样当ABC服务获得token后,转发至授权中心,和内存中存储的原始值进行比较就行了。
Spring Security的oauth2 是内置在Spring Security包中的,例如@EnableAuthorizationServer 开启授权中心注解是在spring-security-oauth2-2.3.4.RELEASE.jar:
梳理spring Security流程

更多推荐
 已为社区贡献1条内容


所有评论(0)