spring-cloud-starter-oauth2使用
**OAuth2主要用于校验客户端合法性、产生token、校验token****Sercurity主要用于用户名密码校验、接口权限控制**因此OAuth2与Sercurity整合之后,校验顺序:校验客户端合法性——校验用户名密码——产生token——校验token——校验接口权限............
文章目录
一 OAuth2.0介绍
OAuth(开发授权)是一个开放标准,允许用户授权第三方应用,访问他们存储在另外的服务提供者上的信息。而不需要将用户名和密码提供给第三方应用或分享他们数据的所有内容。OAuth2.0是OAuth协议的延续版,但不兼容OAuth1.0(OAuth1.0已被完全废止)。
- 第三方应用:CSDN网站
- 另外的服务提供者:微信、QQ、支付宝等
- 登陆CSDN可以选择微信扫码登陆,用户扫码就是授权了CSDN访问他们存储在微信的信息,拿到用户名、昵称等,作为用户在CSDN的用户信息。这样就不需要将用户名密码提供给CSDN
具体过程如图:
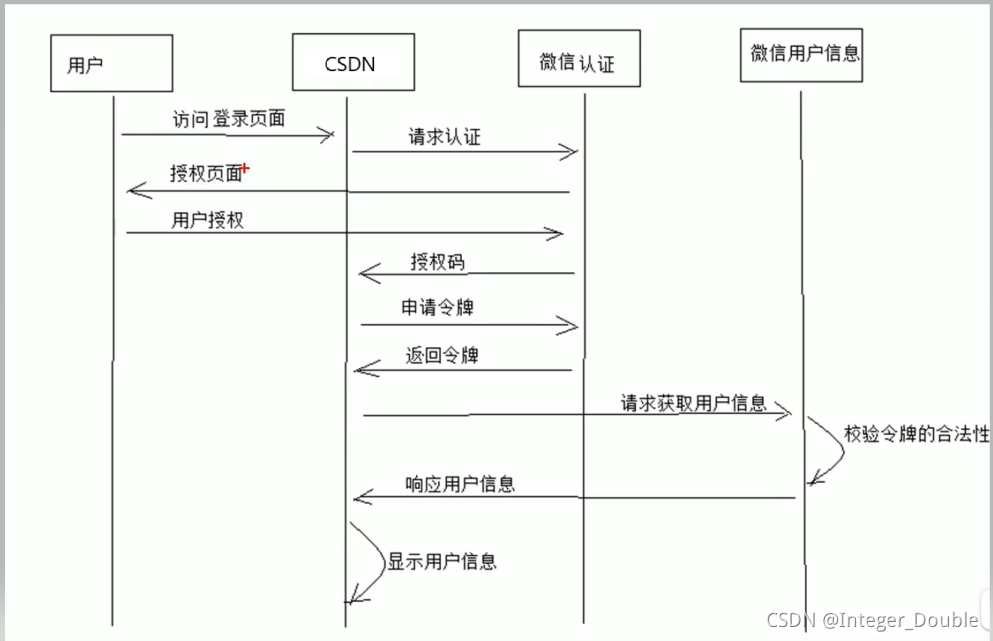
再看看OAuth2.0的协议的认证流程

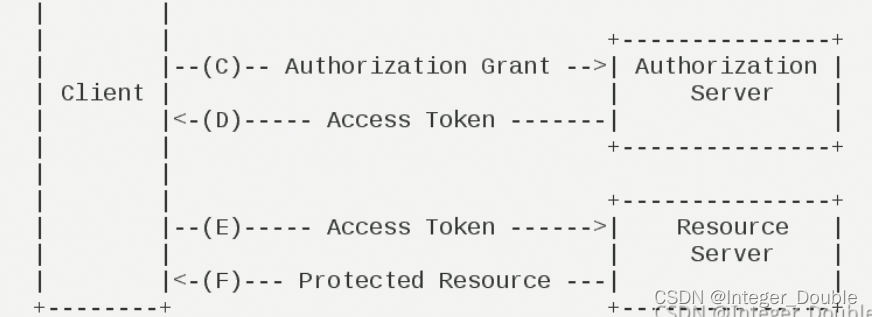
- Resource Onwer,资源所有者,即用户。
- Client,客户端,CSDN的web端、app端等。
- Authorization Server,认证服务,微信提供的认证服务。
- Resource Server,资源服务,微信存放用户信息的服务器。
认证流程:
- 用户打开客户端以后,客户端要求用户给予授权。
- 用户同意给予客户端授权。
- 客户端使用上一步获得的授权,向认证服务器申请令牌。
- 认证服务器对客户端进行认证(校验授权码、客户端合法性)以后,确认无误,同意发放令牌。
- 客户端使用令牌,向资源服务器申请获取资源。
- 资源服务器确认令牌无误,同意向客户端开放资源。
- 客户端将获取的信息保存到自己服务器端(CSDN用户信息与微信用户信息关联上)
注意:客户端合法性,需要客户端提前到微信认证服务注册,得到Client_Id和Client_Sercet,获取token时需要带上。
1.1 Web项目常用流程
一般中小型的项目中,特别是一些非互联网的项目,使用密码模式校验,不需要使用第三方提供的认证服务,流程只有如下几步
- Client,客户端,某管理系统web端、app端。
- Authorization Server,认证服务同时也是存放用户信息的微服务,方便用户名密码校验。
- Resource Server,资源服务,某管理系统的网关微服务,做统一的token校验。
认证流程:
- 用户打开客户端以后,输入用户名密码登录。
- 认证服务器对客户端进行认证(客户端合法性、验证账号密码)以后,确认无误,同意发放令牌。
- 客户端使用令牌,向资源服务器(网关)申请获取资源。
- 资源服务器校验令牌无误,同意向客户端开放资源(转发请求到对应的微服务)。
二 spring-cloud-starter-oauth2使用
2.1 Spring-Security-OAuth2介绍
Spring Security OAuth2是对OAuth2.0协议的一种实现,并且和Spring Sercurity相辅相成,属于Spring Cloud的体系,与Spring Boot的集成相当便利。在OAuth2.0的协议里包括两个服务提供方,授权服务(也叫认证服务)、资源服务。使用Spring Security OAuth2的时候可以把这两个服务放到同一个应用里面(生产环境不会这样干),也可以建立一个授权服务,对多个资源服务进行授权。
OAuth2主要用于校验客户端合法性、产生token、校验token
Sercurity主要用于用户名密码校验、接口权限控制
因此OAuth2与Sercurity整合之后,校验顺序:
校验客户端合法性——校验用户名密码——产生token——校验token——校验接口权限
2.1.1 pom.xml依赖
SpringCloud微服务全家桶中有spring-cloud-starter-security依赖组件,并且spring-cloud-starter-oauth2依赖了spring-cloud-starter-security。spring-cloud-starter-security依赖了spring-boot-starter-security;因此添加spring-cloud-starter-oauth2即可
<dependency>
    <groupId>org.springframework.cloud</groupId>
    <artifactId>spring-cloud-starter-oauth2</artifactId>
    <version>2.1.2.RELEASE</version>
</dependency>
2.1.2 数据库脚本
建表语句
CREATE TABLE `oauth_client_details` (
  `client_id` varchar(255) CHARACTER SET utf8mb4 COLLATE utf8mb4_unicode_ci DEFAULT NULL,
  `resource_ids` varchar(255) CHARACTER SET utf8mb4 COLLATE utf8mb4_unicode_ci DEFAULT NULL,
  `client_secret` varchar(255) CHARACTER SET utf8mb4 COLLATE utf8mb4_unicode_ci DEFAULT NULL,
  `scope` varchar(255) CHARACTER SET utf8mb4 COLLATE utf8mb4_unicode_ci DEFAULT NULL,
  `authorized_grant_types` varchar(255) CHARACTER SET utf8mb4 COLLATE utf8mb4_unicode_ci DEFAULT NULL,
  `web_server_redirect_uri` varchar(255) CHARACTER SET utf8mb4 COLLATE utf8mb4_unicode_ci DEFAULT NULL,
  `authorities` varchar(255) CHARACTER SET utf8mb4 COLLATE utf8mb4_unicode_ci DEFAULT NULL,
  `access_token_validity` varchar(255) CHARACTER SET utf8mb4 COLLATE utf8mb4_unicode_ci DEFAULT NULL,
  `refresh_token_validity` varchar(255) CHARACTER SET utf8mb4 COLLATE utf8mb4_unicode_ci DEFAULT NULL,
  `additional_information` varchar(255) CHARACTER SET utf8mb4 COLLATE utf8mb4_unicode_ci DEFAULT NULL,
  `autoapprove` varchar(255) CHARACTER SET utf8mb4 COLLATE utf8mb4_unicode_ci DEFAULT NULL,
  `name` varchar(255) CHARACTER SET utf8mb4 COLLATE utf8mb4_unicode_ci DEFAULT NULL
) ENGINE=InnoDB DEFAULT CHARSET=utf8mb4 COLLATE=utf8mb4_unicode_ci COMMENT='security 配置';
初始化数据
INSERT INTO `oauth_client_details` VALUES ('admin',NULL,'admin','server','password,refresh_token',NULL,NULL,'-1',NULL,NULL,'true','business-service'),('member',NULL,'member','server','password,refresh_token',NULL,NULL,'-1',NULL,NULL,'true','member-service');
2.2 Security的配置
Security的配置用于设置用户名密码校验和接口权限控制
package com.yex.source.config.oauth2;

import com.yex.source.config.MyLogoutHandler;
import org.springframework.context.annotation.Bean;
import org.springframework.context.annotation.Configuration;
import org.springframework.security.authentication.AuthenticationManager;
import org.springframework.security.config.annotation.web.builders.HttpSecurity;
import org.springframework.security.config.annotation.web.builders.WebSecurity;
import org.springframework.security.config.annotation.web.configuration.WebSecurityConfigurerAdapter;
import org.springframework.security.config.http.SessionCreationPolicy;
import org.springframework.security.crypto.bcrypt.BCryptPasswordEncoder;
import org.springframework.security.crypto.factory.PasswordEncoderFactories;
import org.springframework.security.crypto.password.PasswordEncoder;
import org.springframework.security.web.authentication.logout.HttpStatusReturningLogoutSuccessHandler;

//Security配置
@Configuration
public class SecurityConfig extends WebSecurityConfigurerAdapter {

    @Bean
    public PasswordEncoder pwd() {
        return PasswordEncoderFactories.createDelegatingPasswordEncoder();
    }

    @Bean
    @Override
    public AuthenticationManager authenticationManagerBean() throws Exception {
        //直接使用它默认的manager
        return super.authenticationManagerBean();
    }

    @Override
    public void configure(WebSecurity web) throws Exception {
        //忽略哪些资源不用security来管理
        web.ignoring().antMatchers("/userlogin", "/userlogout", "/userjwt");
    }

    @Override
    protected void configure(HttpSecurity http) throws Exception {
        //配置session
        http.sessionManagement().sessionCreationPolicy(SessionCreationPolicy.IF_REQUIRED);
        // 授权认证,最终结果就是全部不需要认证
        // 匹配到/**的不需要授权
        http.requestMatchers().antMatchers("/**")
                .and()
                //匹配/**需要验证,加上permitAll(),表示匹配上的放行
                .authorizeRequests().antMatchers("/**").permitAll()
                //剩下的其他路径请求验证之后就可以访问
                .anyRequest().authenticated();
        // 表单登录
        http.formLogin().permitAll();
        // 表单登出
        http.logout().logoutUrl("/logout").logoutSuccessHandler(new HttpStatusReturningLogoutSuccessHandler())
                //登出成功处理
                .addLogoutHandler(this.customLogoutHandler());
        //关闭跨站请求防护
        http.csrf().disable();
    }

    @Bean
    public MyLogoutHandler customLogoutHandler() {
        return new MyLogoutHandler();
    }

}
UserServiceImp用于获取用户信息做密码校验,校验是在Spring提供的DaoAuthenticationProvider进行
package com.yex.source.myservice;

import org.springframework.beans.factory.annotation.Autowired;
import org.springframework.security.core.authority.AuthorityUtils;
import org.springframework.security.core.userdetails.User;
import org.springframework.security.core.userdetails.UserDetails;
import org.springframework.security.core.userdetails.UserDetailsService;
import org.springframework.security.core.userdetails.UsernameNotFoundException;
import org.springframework.security.crypto.password.PasswordEncoder;
import org.springframework.stereotype.Service;

@Service
public class UserServiceImp implements UserDetailsService {

    @Autowired
    private PasswordEncoder passwordEncoder;
    @Override
    public UserDetails loadUserByUsername(String username) throws UsernameNotFoundException {

        //  1、模拟根据username 查询数据库
        if (!"admini".equals(username)){
            throw new UsernameNotFoundException("用户名或密码错误!");
        }
        // 2、根据查询到的对象 比对 密码
        String password = passwordEncoder.encode("123456");


        return new User("admini",password,
                AuthorityUtils.commaSeparatedStringToAuthorityList("admini"));
        //  commaSeparatedStringToAuthorityList方法: 将字符串分割,转化为权限列表,默认是用 逗号 作为分隔符
    }
}
返回默认的用户信息
下面是MyLogoutHandler,TokenStore在Oauth2的配置会讲
public class MyLogoutHandler implements LogoutHandler {
    private static final Logger LOGGER = LoggerFactory.getLogger(MyLogoutHandler.class);
    @Autowired
    private TokenStore tokenStore;

    public void logout(HttpServletRequest request, HttpServletResponse response, Authentication authentication) {
        Assert.notNull(this.tokenStore, "tokenStore must be set");
        String token = request.getHeader("Authorization");
        Assert.hasText(token, "token must be set");
        OAuth2AccessToken existingAccessToken = this.tokenStore.readAccessToken(token);
        if (existingAccessToken != null) {
            if (existingAccessToken.getRefreshToken() != null) {
                LOGGER.info("remove refreshToken!", existingAccessToken.getRefreshToken());
                OAuth2RefreshToken refreshToken = existingAccessToken.getRefreshToken();
                this.tokenStore.removeRefreshToken(refreshToken);
            }

            LOGGER.info("remove existingAccessToken!", existingAccessToken);
            this.tokenStore.removeAccessToken(existingAccessToken);
        }

    }
}
2.3 Oauth2的配置
2.2.1 开启授权服务
新建一个java类AuthorizationServer,类名不重要,添加注解@EnableAuthorizationServer并继承AuthorizationServerConfigurerAdapter,即可开启授权服务。重写AuthorizationServerConfigurerAdapter 的三个configure()方法完成配置。
@Configuration
@EnableAuthorizationServer
public class AuthorizationServer extends AuthorizationServerConfigurerAdapter {
//...略
}
每个configure的作用
/**
 * @author Dave Syer
 *
 */
public class AuthorizationServerConfigurerAdapter implements AuthorizationServerConfigurer {
	/**
	* 用来配置令牌端点的安全约束
	*/
	@Override
	public void configure(AuthorizationServerSecurityConfigurer security) throws Exception {
	}

	/**
	* 用来配置客户端信息服务,客户端详情信息在这里初始化,可以写死在代码里,也可以放到配置文件或者数据库
	*/
	@Override
	public void configure(ClientDetailsServiceConfigurer clients) throws Exception {
	}
	/**
	* 用来配置令牌的访问端点和令牌服务
	*/
	@Override
	public void configure(AuthorizationServerEndpointsConfigurer endpoints) throws Exception {
	}
}
2.2.2 配置客户端信息
 @Override
    public void configure(ClientDetailsServiceConfigurer clients) throws Exception {
        //设置客户端信息,可以将客户端信息放在内存、数据库等。前端请求时将做校验
        clients.withClientDetails(this.jdbcClientDetailsService);
    }
装配一个jdbcClientDetailsService
@Configuration
public class ClientDetailsServiceConfig {
    @Autowired
    private DataSource dataSource;

    public ClientDetailsServiceConfig() {
    }

    @Bean
    public JdbcClientDetailsService realClientDetailsService() {
        JdbcClientDetailsService clientDetailsService = new JdbcClientDetailsService (this.dataSource);
        //添加{noop}表示使用NoOpPasswordEncoder,不对密码加密
        clientDetailsService.setSelectClientDetailsSql("select client_id, CONCAT('{noop}',client_secret) as client_secret, resource_ids, scope, authorized_grant_types, web_server_redirect_uri, authorities, access_token_validity, refresh_token_validity, additional_information, autoapprove from oauth_client_details where client_id = ?");
        clientDetailsService.setFindClientDetailsSql("select client_id, CONCAT('{noop}',client_secret) as client_secret, resource_ids, scope, authorized_grant_types, web_server_redirect_uri, authorities, access_token_validity, refresh_token_validity, additional_information, autoapprove from oauth_client_details order by client_id");
        return clientDetailsService;
    }
}
注意:表oauth_client_details 要在数据库创建
2.2.3 配置令牌端点的安全约束
 @Override
    public void configure(AuthorizationServerSecurityConfigurer oauthServer) throws Exception {
        /*
         * tokenKeyAccess("permitAll()") /oauth/token_key 公开, 默认拒绝访问
         * checkTokenAccess("isAuthenticated()")  认证后可访问 /oauth/check_token , 默认拒绝访问
         */
        oauthServer.allowFormAuthenticationForClients().tokenKeyAccess("permitAll()").checkTokenAccess("isAuthenticated()");
    }
2.2.3 配置令牌访问端点的生成服务
令牌访问端点的生成服务,包括生成策略、存储策略、增强策略,Oauth2给我们提供了默认的实现,也可以设置成自定义的,方便增加我们自己的业务逻辑。
@Override
    public void configure(AuthorizationServerEndpointsConfigurer endpoints) throws Exception {
        //设置端点接受的请求类型
        endpoints.allowedTokenEndpointRequestMethods(HttpMethod.GET, HttpMethod.POST)
                //密码模式要设置认证管理器,由它持有的AuthenticationProvider进行密码校验
                .authenticationManager(this.authenticationManager)
                //以下配置可以不用,全部使用默认;令牌存储默认是内存,可以改成redis
                //令牌生成器
                .tokenGranter(this.tokenGranter)
                //令牌存储策略
                .tokenStore(this.customTokenStore)
                //令牌增强策略
                .tokenEnhancer(this.tokenEnhancer)
                //令牌服务(使用以上三个配置)
                .tokenServices(this.customAuthorizationTokenServices);
        super.configure(endpoints);
    }
authenticationManager在SecurityConfig配置了,看看customTokenStore就行了
import org.springframework.beans.factory.annotation.Autowired;
import org.springframework.context.annotation.Bean;
import org.springframework.context.annotation.Configuration;
import org.springframework.data.redis.connection.RedisConnectionFactory;
import org.springframework.security.oauth2.provider.token.TokenStore;
import org.springframework.security.oauth2.provider.token.store.redis.RedisTokenStore;

//自定义token存储
@Configuration
public class TokenStoreConfig {
    @Autowired
    private RedisConnectionFactory redisConnectionFactory;

    public TokenStoreConfig() {
    }

    @Bean
    public TokenStore cuestomTokenStore() {
        return new RedisTokenStore(this.redisConnectionFactory);
    }
}
配置文件加上redis的配置就可以了
2.4 资源服务配置
资源服务用于校验token和提供并提供用户信息,这里不做配置。在传统软件中,我们把接口当作资源,而不是第三方服务器的用户信息。前端请求时,将token放入请求头中,我们可以在网关服务中,添加一个全局过滤器用于校验token
package com.yex.source.config.oauth2.filter;

import com.fasterxml.jackson.databind.ObjectMapper;
import com.yex.source.config.oauth2.exeception.RealAuth2Exception;
import com.yex.source.service.entity.Result;
import org.springframework.core.annotation.Order;
import org.springframework.security.oauth2.common.OAuth2AccessToken;
import org.springframework.security.oauth2.provider.token.TokenStore;

import javax.servlet.*;
import javax.servlet.http.HttpServletRequest;
import java.io.IOException;
import java.util.Enumeration;

public class AuthorizationFilter implements Filter {
    private TokenStore tokenStore;

    public AuthorizationFilter(TokenStore tokenStore) {
        this.tokenStore = tokenStore;
    }

    @Override
    public void doFilter(ServletRequest servletRequest, ServletResponse response, FilterChain chain) throws IOException {
        HttpServletRequest request = (HttpServletRequest) servletRequest;
        String accessToken = getBaseHeaderToken(request);

        String tokenValue = accessToken.replace(OAuth2AccessToken.BEARER_TYPE, "").trim();

        OAuth2AccessToken auth2AccessToken = tokenStore.readAccessToken(tokenValue);

        if (null == auth2AccessToken) {
            Result<Boolean> result = new Result<>();
            result.setData(Boolean.FALSE);
            result.setMsg("验证Token失败,获取人员详情失败,token或许已经失效");
            result.setCode(401);
            ObjectMapper mapper = new ObjectMapper();
            String jsonString = mapper.writeValueAsString(result);
            response.setCharacterEncoding("UTF-8");
            response.setContentType("application/json; charset=utf-8");
            ServletOutputStream outputStream = response.getOutputStream();
            outputStream.write(jsonString.getBytes("UTF-8"));
            outputStream.flush();
            return;
        }

        if (auth2AccessToken.isExpired()) {
            throw new RealAuth2Exception("验证Token失败,获取人员详情失败,token已过期", "401");
        }
    }

    private String getBaseHeaderToken(HttpServletRequest request) {
        Enumeration<String> headers = request.getHeaders("Authorization");
        if (headers.hasMoreElements()) {
            return headers.nextElement();
        } else {
            return "";
        }
    }

}
FilterConfig
@Configuration
public class FilterConfig {
    @Bean
    public FilterRegistrationBean registFilter(TokenStore tokenStore){
        FilterRegistrationBean registrationBean = new FilterRegistrationBean();
        registrationBean.setFilter(new AuthorizationFilter(tokenStore));
        registrationBean.addUrlPatterns("/mms/*");
        registrationBean.setName("AuthorizationFilter");
        registrationBean.setOrder(-99);
        return registrationBean;
    }
}

为开发者提供学习成长、分享交流、生态实践、资源工具等服务,帮助开发者快速成长。
更多推荐


 3
3 0
0- 0


 已为社区贡献2条内容

所有评论(0)