Spring boot视频播放(解决MP4大文件无法播放),整合ffmpeg,用m3u8切片播放。
Spring boot视频播放(解决MP4大文件无法播放),整合ffmpeg,用m3u8切片播放。
一.首先说一下,不超过500M的视频如何提供给前端,这种方式比较快速,但是对前端不友好,特别大的视频文件,浏览器无法播放。
下面是Java代码实例。
这种方式不需要引入依赖。首先进行配置
import org.springframework.core.io.FileSystemResource;
import org.springframework.core.io.Resource;
import org.springframework.stereotype.Component;
import org.springframework.web.servlet.resource.ResourceHttpRequestHandler;

import javax.servlet.http.HttpServletRequest;
import java.nio.file.Path;

@Component
public class NonStaticResourceHttpRequestConfig extends ResourceHttpRequestHandler {

    public final static String ATTR_FILE = "NON-STATIC-FILE";

    @Override
    protected Resource getResource(HttpServletRequest request) {
        final Path filePath = (Path) request.getAttribute(ATTR_FILE);
        return new FileSystemResource(filePath);
    }

}
然后编写接口。
import cn.hutool.core.util.IdUtil;
import cn.hutool.core.util.StrUtil;
import com.baomidou.mybatisplus.core.conditions.query.LambdaQueryWrapper;
import com.xr.config.NonStaticResourceHttpRequestConfig;
import com.xr.config.XrConfig;
import com.xr.domain.AjaxResult;
import com.xr.utils.file.FileUtils;
import com.xr.video.domain.VideoShow;
import com.xr.video.mapper.VideoShowMapper;
import org.springframework.beans.factory.annotation.Autowired;
import org.springframework.web.bind.annotation.*;
import org.springframework.web.multipart.MultipartFile;

import javax.servlet.ServletException;
import javax.servlet.http.HttpServletRequest;
import javax.servlet.http.HttpServletResponse;
import java.io.File;
import java.io.IOException;
import java.nio.charset.StandardCharsets;
import java.nio.file.Files;
import java.nio.file.Path;
import java.nio.file.Paths;
import java.util.UUID;

//接口:前端视频上传
@RestController
//一级地址
@RequestMapping("/uploadVideoController")
public class UploadVideoController {


    @Autowired
    private VideoShowMapper videoShowMapper;

    @Autowired
    private NonStaticResourceHttpRequestConfig nonStaticResourceHttpRequestConfig;

    @Autowired
    private XrConfig xrConfig;


    //二级地址
    @PostMapping(value = "/uploadVideo")
    @ResponseBody
    //Map<String,String>: map是键值对形式组成的集合,类似前端的数组但是里面是键值对形式的,前后两个string代表键和值都是字符串格式的。
    //post请求传入的参数:MultipartFile file(理解为springmvc框架给我们提供的工具类,代表视频流数据),SavePath(前台传来的地址路径,也是用来后端保存在服务器哪个文件夹的地址)
    public AjaxResult savaVideoTest(@RequestParam("file") MultipartFile file)
    //throws IllegalStateException写在方法的前面是可以抛出异常状态的,如果有错误会把错误信息发出来对应下面的try和catch
            throws IllegalStateException {
        //new一个map集合出来
        String videoPath = xrConfig.getVideoPath();
//        Map<String, String> resultMap = new HashMap<>();
        try {
            //获取文件后缀,因此此后端代码可接收一切文件,上传格式前端限定
            String fileExt = file.getOriginalFilename().substring(file.getOriginalFilename().lastIndexOf(".") + 1).toLowerCase();
            // 重构文件名称
            //UUID(全局唯一标识符)randomUUID(随机生成标识符)toString(转成字符串)replaceAll(替换字符方法,因为随机生成的里面包括了 - ,这里意思是把 - 全部换成空)
            String pikId = UUID.randomUUID().toString().replaceAll("-", "");
            //视频名字拼接:唯一标识符加上点,再加上上面的视频后缀也就是MP4之类的。就组成了现在的视频名字,比如这样:c7bbc1f9664947a287d35dd7cdc48a95.mp4
            String newVideoName = pikId + "." + fileExt;
            System.out.println("重构文件名防止上传同名文件:" + newVideoName);
            //保存视频的原始名字
            String videoNameText = file.getOriginalFilename();
            System.out.println("视频原名:" + videoNameText);
            //保存视频url路径地址
            String videoUrl = videoPath + File.separator + newVideoName;

            //获取上一次文件的信息
            LambdaQueryWrapper<VideoShow> lambdaQueryWrapperdemo = new LambdaQueryWrapper<>();

            VideoShow selectOne = videoShowMapper.selectOne(lambdaQueryWrapperdemo);

            if (null != selectOne) {
                //清空上一次的数据
                LambdaQueryWrapper<VideoShow> lambdaQueryWrapper = new LambdaQueryWrapper<>();
                videoShowMapper.delete(lambdaQueryWrapper);
                //删除所有文件
                if (!(FileUtils.deleteFile(videoPath + File.separator + selectOne.getVideoName()))) {
                    return AjaxResult.error("删除上一次文件失败");
                }
            }


            //调用数据库接口插入数据库方法save,把视频原名,视频路径,视频的唯一标识码传进去存到数据库内
            VideoShow videoShow = new VideoShow();
            videoShow.setId(IdUtil.randomUUID());
            videoShow.setVideoName(newVideoName);
            videoShow.setVideoUrl(videoUrl);
            videoShow.setVideoUuid(IdUtil.simpleUUID());
            videoShowMapper.insert(videoShow);

            //判断SavePath这个路径也就是需要保存视频的文件夹是否存在
            File filepath = new File(videoPath, file.getOriginalFilename());
            if (!filepath.getParentFile().exists()) {
                //如果不存在,就创建一个这个路径的文件夹。
                filepath.getParentFile().mkdirs();
            }
            //保存视频:把视频按照前端传来的地址保存进去,还有视频的名字用唯一标识符显示,需要其他的名字可改这
            File fileSave = new File(videoPath, newVideoName);
            //下载视频到文件夹中
            file.transferTo(fileSave);
            //构造Map将视频信息返回给前端
            //视频名称重构后的名称:这里put代表添加进map集合内,和前端的push一样。括号内是前面字符串是键,后面是值
//            resultMap.put("newVideoName", newVideoName);
            //正确保存视频成功,则设置返回码为200
//            resultMap.put("resCode", "200");
            //返回视频保存路径
//            resultMap.put("VideoUrl", videoPath + "/" + newVideoName);
            //到这里全部保存好了,把整个map集合返给前端
            return AjaxResult.success("视频上传成功");

        } catch (Exception e) {
            //在命令行打印异常信息在程序中出错的位置及原因
            e.printStackTrace();
            //返回有关异常的详细描述性消息。
            e.getMessage();
            //保存视频错误则设置返回码为400
//            resultMap.put("resCode", "400");
            //这时候错误了,map里面就添加了错误的状态码400并返回给前端看
            return AjaxResult.error("上传失败");

        }
    }


    @GetMapping("/getVideoShipin")
    public void getVideoShipin(HttpServletRequest request, HttpServletResponse response) throws ServletException, IOException {
        //调用查询方法,把前端传来的id传过去,查询对应的视频信息。
        LambdaQueryWrapper<VideoShow> lambdaQueryWrapper = new LambdaQueryWrapper<>();
        VideoShow videoPathList = videoShowMapper.selectOne(lambdaQueryWrapper);
        //从视频信息中单独把视频路径信息拿出来保存
        String videoPathUrl = videoPathList.getVideoUrl();
        //保存视频磁盘路径
        Path filePath = Paths.get(videoPathUrl);
        //Files.exists:用来测试路径文件是否存在
        if (Files.exists(filePath)) {
            //获取视频的类型,比如是MP4这样
            File file = new File(videoPathUrl);
            String mimeType = Files.probeContentType(filePath);
            if (StrUtil.isNotEmpty(mimeType)) {
                //判断类型,根据不同的类型文件来处理对应的数据
                response.setContentType(mimeType);
                response.addHeader("Content-Length", "" + file.length());
            }
            //转换视频流部分
            request.setAttribute(NonStaticResourceHttpRequestConfig.ATTR_FILE, filePath);
            nonStaticResourceHttpRequestConfig.handleRequest(request, response);
        } else {
            response.setStatus(HttpServletResponse.SC_NOT_FOUND);
            response.setCharacterEncoding(StandardCharsets.UTF_8.toString());
        }

    }


}
调用方式,http://192.168.10.88:10001/uploadVideoController/getVideoShipin直接在浏览器打开该接口链接即可自动播放。但是播放大文件要等加载,会很慢。
所以推荐第二种方式
Spring boot整合ffmpeg,用m3u8切片播放。
1.首先需要安装ffmpeg插件。
ffmpeg插件是一个跨平台软件,可以安装在windows, linux, mac os下。
windows安装教程如下:
一、下载准备
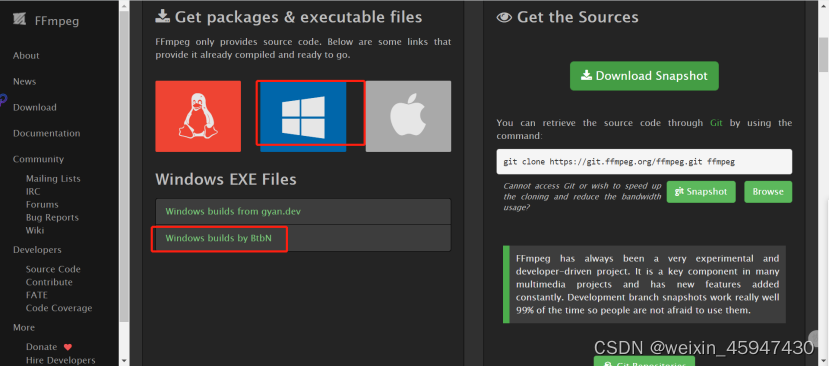
01.官网下载:https://ffmpeg.org/download.html
点击这个进入github,找到资源下载即可。

02.Github直链下载:https://github.com/BtbN/FFmpeg-Builds/releases
03.蓝奏云下载:https://pla.lanzout.com/i5SP7ysw7ta
二、安装
下载这个,然后解压到相应的文件夹。

打开bin文件夹,复制这个路径,添加到系统变量中
以我的为例,D:\ffmpeg\bin

点击此电脑空白处右键,选择属性,


选择环境变量

在用户环境中变量双击path,然后选择编辑。

选择新建,把刚刚复制的bin路径粘贴进去,点击确定。

记得点下方的确定,再关闭当前窗口再点确定,这样才能保存,千万记得不能点击取消
最后关闭窗口就行。
三、检验和测试
到这里ffmpeg的配置就差不多了,调用命令行(windows+R输入cmd)输入“ffmpeg –version”,如果出现以下结果则说明配置成功。
2.配置POM文件
    <properties>
        <maven.compiler.source>11</maven.compiler.source>
        <maven.compiler.target>11</maven.compiler.target>
        <java.version>11</java.version>
        <javacv.version>1.5.4</javacv.version>
        <ffmpeg.version>4.3.1-1.5.4</ffmpeg.version>
    </properties>


    <dependencies>

        <!--      javacv 和 ffmpeg的依赖包      -->
        <dependency>
            <groupId>org.bytedeco</groupId>
            <artifactId>javacv</artifactId>
            <version>${javacv.version}</version>
            <exclusions>
                <exclusion>
                    <groupId>org.bytedeco</groupId>
                    <artifactId>*</artifactId>
                </exclusion>
            </exclusions>
        </dependency>

        <dependency>
            <groupId>org.bytedeco</groupId>
            <artifactId>ffmpeg-platform</artifactId>
            <version>${ffmpeg.version}</version>
        </dependency>


    </dependencies>


</project>
3.配置info和key文件

以上的test.info和test.key必须配置。
两个文件如下,可以直接复用。
test.info内容如下:
- 外部访问key文件的地址
- 执行时访问key的地址
- 密钥
http://192.168.10.88:10001/m3u8controller/preview/test.key
http://192.168.10.88:10001/m3u8controller/preview/test.key
682f5033538cf71567e1bdb38f5f9a07
test.key内容如下:
n4DHLX7kMPeewvW3dGlm5i/EE8I
4.编写一个处理类和一个controller
这个类里面的http路径记得替换为你的实际路径。
这里可以通过注释掉如下代码,实现不用加密
//recorder.setOption("hls_key_info_file", infoUrl);
import org.bytedeco.ffmpeg.global.avcodec;
import org.bytedeco.ffmpeg.global.avutil;
import org.bytedeco.javacv.*;

import java.io.IOException;
import java.io.InputStream;

/**
 * @author : xuansy
 * @version : 1.0
 * @date : 2021/5/21 22:46
 * @project_name: ffmpeg-demo
 * @package_name : com.example.ffmpeg.demo.processor
 * @name: FFmpegProcessor
 * @email: 1292798418@qq.com
 * @description :
 */
public class FFmpegProcessor {

	/**
	* 这个方法的url地址都必须是一样的类型 同为post
	*/
    public static void convertMediaToM3u8ByHttp(InputStream inputStream, String m3u8Url, String infoUrl) throws IOException {

        avutil.av_log_set_level(avutil.AV_LOG_INFO);
        FFmpegLogCallback.set();

        FFmpegFrameGrabber grabber = new FFmpegFrameGrabber(inputStream);
        grabber.start();

        FFmpegFrameRecorder recorder = new FFmpegFrameRecorder(m3u8Url, grabber.getImageWidth(), grabber.getImageHeight(), grabber.getAudioChannels());

        recorder.setFormat("hls");
        recorder.setOption("hls_time", "5");
        recorder.setOption("hls_list_size", "0");
        recorder.setOption("hls_flags", "delete_segments");
        recorder.setOption("hls_delete_threshold", "1");
        recorder.setOption("hls_segment_type", "mpegts");
        recorder.setOption("hls_segment_filename", "http://localhost:8080/upload/test-%d.ts");
        recorder.setOption("hls_key_info_file", infoUrl);

        // http属性
        recorder.setOption("method", "POST");

        recorder.setFrameRate(25);
        recorder.setGopSize(2 * 25);
        recorder.setVideoQuality(1.0);
        recorder.setVideoBitrate(10 * 1024);
        recorder.setVideoCodec(avcodec.AV_CODEC_ID_H264);
        recorder.setAudioCodec(avcodec.AV_CODEC_ID_AAC);
        recorder.start();

        Frame frame;
        while ((frame = grabber.grabImage()) != null) {
            try {
                recorder.record(frame);
            } catch (FrameRecorder.Exception e) {
                e.printStackTrace();
            }
        }
        recorder.setTimestamp(grabber.getTimestamp());
        recorder.close();
        grabber.close();
    }

}
import cn.hutool.core.io.IoUtil;
import cn.hutool.core.io.file.FileReader;
import cn.hutool.core.io.file.FileWriter;
import com.example.ffmpeg.demo.processor.FFmpegProcessor;
import org.springframework.web.bind.annotation.GetMapping;
import org.springframework.web.bind.annotation.PathVariable;
import org.springframework.web.bind.annotation.PostMapping;
import org.springframework.web.bind.annotation.RestController;
import javax.servlet.ServletInputStream;
import javax.servlet.http.HttpServletRequest;
import javax.servlet.http.HttpServletResponse;
import java.io.FileInputStream;
import java.io.IOException;
/**
* @author : xuansy
* @version : 1.0
* @date : 2021/5/21 22:45
* @project_name: ffmpeg-demo
* @package_name : com.example.ffmpeg.demo.controller
* @name: TestController
* @email: 1292798418@qq.com
* @description :
*/
@RestController
public class TestController {
/**
* 目录路径,这个路径需要包含test.info文件,test.key文件和test.mp4文件
*/
private static final String PATH = "D:\\test\\";
@PostMapping("uploadToM3u8")
public void uploadToM3u8() throws Exception {
FileInputStream inputStream = new FileInputStream(PATH + "test.mp4");
String m3u8Url = "http://localhost:8080/upload/test.m3u8";
String infoUrl = "http://localhost:8080/preview/test.info";
FFmpegProcessor.convertMediaToM3u8ByHttp(inputStream, m3u8Url, infoUrl);
}
@PostMapping("upload/{fileName}")
public void upload(HttpServletRequest request, @PathVariable("fileName") String fileName) throws IOException {
ServletInputStream inputStream = request.getInputStream();
FileWriter writer = new FileWriter(PATH + fileName);
writer.writeFromStream(inputStream);
IoUtil.close(inputStream);
}
/**
* 预览加密文件
*/
@PostMapping("preview/{fileName}")
public void preview(@PathVariable("fileName") String fileName, HttpServletResponse response) throws IOException {
FileReader fileReader = new FileReader(PATH + fileName);
fileReader.writeToStream(response.getOutputStream());
}
/**
* 预览加密文件
*/
@GetMapping("download/{fileName}")
public void download(@PathVariable("fileName") String fileName, HttpServletResponse response) throws IOException {
FileReader fileReader = new FileReader(PATH + fileName);
fileReader.writeToStream(response.getOutputStream());
}
}启动springboot,执行下面图形操作,生成http测试文件


点击执行即可,等待http请求执行完,那么就可以看到目录下生成了m3u8文件和ts文件。


此时有个地方我们需要修改下,那就是m3u8中的密钥http请求地址,因为我们的例子,都是post所以我们一会浏览器测试的时候方法不支持,我们直接删除前面的,

这样请求key的时候默认会走和m3u8请求的地址前缀一样。
接下来打开chrome浏览器,安装Play HLS M3u8 插件,如果没有,那么自己找个离线可以播m3u8的软件即可。


此时就算视频切片成m3u8文件,并加密了。感谢大家观看。
更多推荐
 已为社区贡献1条内容


所有评论(0)