Spring boot整合Mybatis(超详细!)
简介在传统的SSM框架中,使用Mybatis需要大量的XML配置,而在Spring Boot中,Mybatis官方提供了一套自动化配置方案,可以做到Mybatis开箱即用。步骤1:创建项目创建Spring Boot项目,添加Mybatis依赖,数据库驱动依赖以及数据库连接池依赖:<?xml version="1.0" encoding="UTF-8"?><project xmln
·
简介
在传统的SSM框架中,使用Mybatis需要大量的XML配置,而在Spring Boot中,Mybatis官方提供了一套自动化配置方案,可以做到Mybatis开箱即用。
步骤1:创建项目
创建Spring Boot项目,添加Mybatis依赖,数据库驱动依赖以及数据库连接池依赖:
<?xml version="1.0" encoding="UTF-8"?>
<project xmlns="http://maven.apache.org/POM/4.0.0" xmlns:xsi="http://www.w3.org/2001/XMLSchema-instance"
         xsi:schemaLocation="http://maven.apache.org/POM/4.0.0 https://maven.apache.org/xsd/maven-4.0.0.xsd">
    <modelVersion>4.0.0</modelVersion>
    <parent>
        <groupId>org.springframework.boot</groupId>
        <artifactId>spring-boot-starter-parent</artifactId>
        <version>2.5.3</version>
        <relativePath/> <!-- lookup parent from repository -->
    </parent>
    <groupId>com.example</groupId>
    <artifactId>mybatis-springboot</artifactId>
    <version>0.0.1-SNAPSHOT</version>
    <name>mybatis-springboot</name>
    <description>Demo project for Spring Boot</description>
    <properties>
        <java.version>11</java.version>
    </properties>
    <dependencies>
        <dependency>
            <groupId>org.springframework.boot</groupId>
            <artifactId>spring-boot-starter-web</artifactId>
        </dependency>
        <dependency>
            <groupId>org.mybatis.spring.boot</groupId>
            <artifactId>mybatis-spring-boot-starter</artifactId>
            <version>2.2.0</version>
        </dependency>

        <dependency>
            <groupId>mysql</groupId>
            <artifactId>mysql-connector-java</artifactId>
            <scope>runtime</scope>
        </dependency>
        <dependency>
            <groupId>org.springframework.boot</groupId>
            <artifactId>spring-boot-starter-test</artifactId>
            <scope>test</scope>
        </dependency>
        <dependency>
            <groupId>com.alibaba</groupId>
            <artifactId>druid</artifactId>
            <version>1.1.9</version>
        </dependency>
    </dependencies>

    <build>
        <plugins>
            <plugin>
                <groupId>org.springframework.boot</groupId>
                <artifactId>spring-boot-maven-plugin</artifactId>
            </plugin>
        </plugins>
    </build>

</project>
步骤2:创建数据库和表
create database chapter05;

create table book(
id int(11) not null auto_increment,
name varchar(128) default null,
author varchar(64) default null,
primary key (id)
)engine=InnoDB default charset=utf8;

insert into book(id,name,author)values(1,'三国演义','罗贯中'),(2,'水浒传','施耐庵');
步骤3:数据库配置
在application.properties里面配置数据库基本连接通信
spring.datasource.type=com.alibaba.druid.pool.DruidDataSource
spring.datasource.url=jdbc:mysql://localhost:3306/chapter05?serverTimezone=GMT%2B8
spring.datasource.username=root
spring.datasource.password=123456789
步骤4:创建实体类
package com.example.model;

import lombok.Data;
import org.springframework.context.annotation.Configuration;

@Configuration
@Data
public class Book {
    private Integer id;
    private String name;
    private String author;
}
步骤5:创建数据库访问层
创建BookMapper的接口,然后在这里面只用写上对应的方法即可
package com.example.Mapper;

import com.example.model.Book;
import org.mybatis.spring.annotation.MapperScan;
import org.springframework.stereotype.Controller;

import java.util.List;
@Controller
@MapperScan("com.example.Mapper")
public interface BookMapper {


        int addBook(Book book);
        int deleteBookById(Integer id);
        int updateBookById(Book book);
        Book getBookById(Integer id);
        List<Book> getAllBooks();
}
步骤6:创建BookMapper.xml
这个xml是用来编写对应的接口,这是直接与数据进行交互的,这当中的每个接口都会出现相应的操作,#{}用来代替接口中的参数,实体类中的属性可以直接通过#{实体属性名}获取
<?xml version="1.0" encoding="UTF-8" ?>
<!DOCTYPE mapper PUBLIC "-//mybatis.org//DTD Mapper 3.0//EN"
        "http://mybatis.org/dtd/mybatis-3-mapper.dtd">
<mapper namespace="com.example.Mapper.BookMapper">
    <insert id="addBook" parameterType="com.example.model.Book">
        insert into book(name,author) values (#{name},#{author})
    </insert>
<delete id="deleteBookById" parameterType="int">
   delete  from book where id=#{id}
</delete>
    <update id="updateBookById" parameterType="com.example.model.Book">
        update book set name=#{name},author=#{author} where id=#{id}
    </update>
    <select id="getAllBooks" resultType="com.example.model.Book">
        select * from book
    </select>
    <select id="getBookById" parameterType="int" resultType="com.example.model.Book">
        select * from book where id=#{id}
    </select>
</mapper>
步骤7:重新配置一下pom.xml文件
因为需要重新指明资源文件的位置
<?xml version="1.0" encoding="UTF-8"?>
<project xmlns="http://maven.apache.org/POM/4.0.0" xmlns:xsi="http://www.w3.org/2001/XMLSchema-instance"
         xsi:schemaLocation="http://maven.apache.org/POM/4.0.0 https://maven.apache.org/xsd/maven-4.0.0.xsd">
    <modelVersion>4.0.0</modelVersion>
    <parent>
        <groupId>org.springframework.boot</groupId>
        <artifactId>spring-boot-starter-parent</artifactId>
        <version>2.5.3</version>
        <relativePath/> <!-- lookup parent from repository -->
    </parent>
    <groupId>com.example</groupId>
    <artifactId>mybatis-springboot</artifactId>
    <version>0.0.1-SNAPSHOT</version>
    <name>mybatis-springboot</name>
    <description>Demo project for Spring Boot</description>
    <properties>
        <java.version>11</java.version>
    </properties>
    <dependencies>
        <dependency>
            <groupId>org.springframework.boot</groupId>
            <artifactId>spring-boot-starter-web</artifactId>
        </dependency>
        <dependency>
            <groupId>org.mybatis.spring.boot</groupId>
            <artifactId>mybatis-spring-boot-starter</artifactId>
            <version>2.2.0</version>
        </dependency>

        <dependency>
            <groupId>mysql</groupId>
            <artifactId>mysql-connector-java</artifactId>
            <scope>runtime</scope>
        </dependency>
        <dependency>
            <groupId>org.springframework.boot</groupId>
            <artifactId>spring-boot-starter-test</artifactId>
            <scope>test</scope>
        </dependency>
        <dependency>
            <groupId>com.alibaba</groupId>
            <artifactId>druid</artifactId>
            <version>1.1.9</version>
        </dependency>
        <dependency>
            <groupId>org.projectlombok</groupId>
            <artifactId>lombok</artifactId>
        </dependency>
    </dependencies>

    <build>
        <plugins>
            <plugin>
                <groupId>org.springframework.boot</groupId>
                <artifactId>spring-boot-maven-plugin</artifactId>
            </plugin>
        </plugins>
        <resources>
            <resource>
                <directory>src/main/java</directory>
                <includes>
                    <include>**/*.xml</include>
                </includes>
            </resource>
            <resource>
                <directory>src/main/resources</directory>
            </resource>
        </resources>
    </build>

</project>
结果
启动下面这段主代码
package com.example;

import org.mybatis.spring.annotation.MapperScan;
import org.springframework.boot.SpringApplication;
import org.springframework.boot.autoconfigure.SpringBootApplication;
@MapperScan("com.example.Mapper")
@SpringBootApplication
public class MybatisSpringbootApplication {

    public static void main(String[] args) {
        SpringApplication.run(MybatisSpringbootApplication.class, args);
    }

}
然后就在端口中进行运行


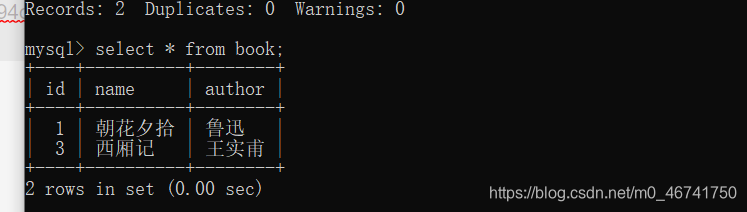
然后是在数据库当中查看:
结语
总之呢,学java并不是一蹴而就的事情,需要你每天不断地敲击和练习,才能够有所收获。看懂了等于0,你还需要自己动手能够实现,因此,我们不能急于把事情给完成,而是要专注于把东西给做出来,不要急于去写论文,而是要将自己写的东西给讲出来,这样才能够达到更高的阶层,我是明怀,一个在互联网苟且偷生的程序员,你知道的越多,你不知道的就越多,我们下期见!

为开发者提供学习成长、分享交流、生态实践、资源工具等服务,帮助开发者快速成长。
更多推荐


 9
9 0
0- 0


 已为社区贡献3条内容

所有评论(0)