springboot的starter机制
springboot自定义starter
目录
2.2 创建配置实体:@ConfigurationProperties(prefix = "ysl")
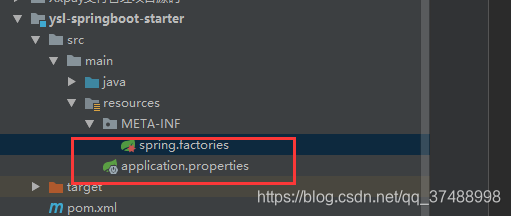
2.5 在resources文件夹下创建META-INF文件夹,并创建spring.factories文件
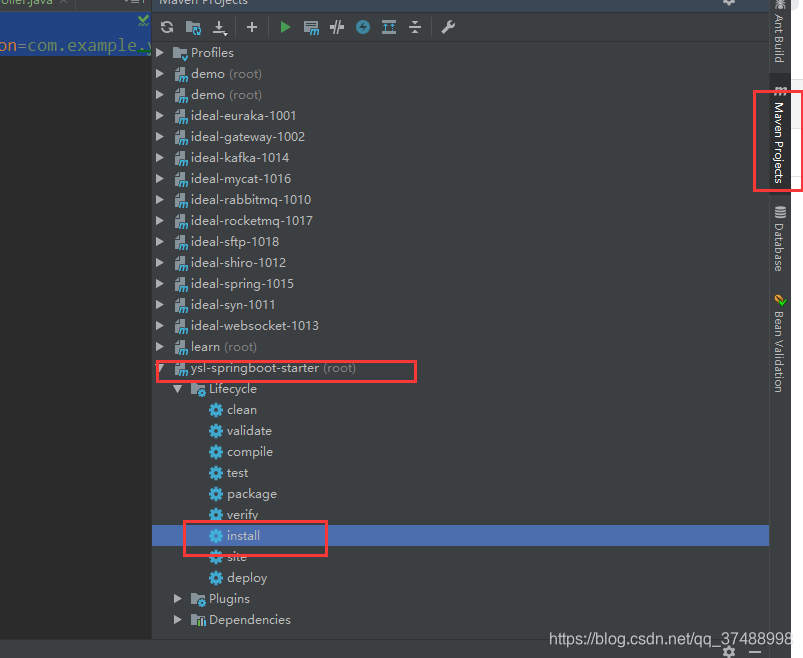
2.6 将该项目用maven打包发到maven库中,可以通过指令
一、springboot的starter机制介绍
使用过springboot的同学都知道,相比于spring在配置pom文件时候的各种复杂依赖关系,springboot整合了很多的第三方依赖使用起来相当的方便。
在使用的过程中,我们经常能在pom文件中看到很多springboot的starter依赖,starter中简单来讲就是引入了一些相关依赖和一些初始化的配置。
例如我们最常见的
<dependency>
  <groupId>org.springframework.boot</groupId>
  <artifactId>spring-boot-starter-web</artifactId>
</dependency>
当然,除此以外,还有很多的类似依赖,比如下面截图的这些官方的starter依赖。
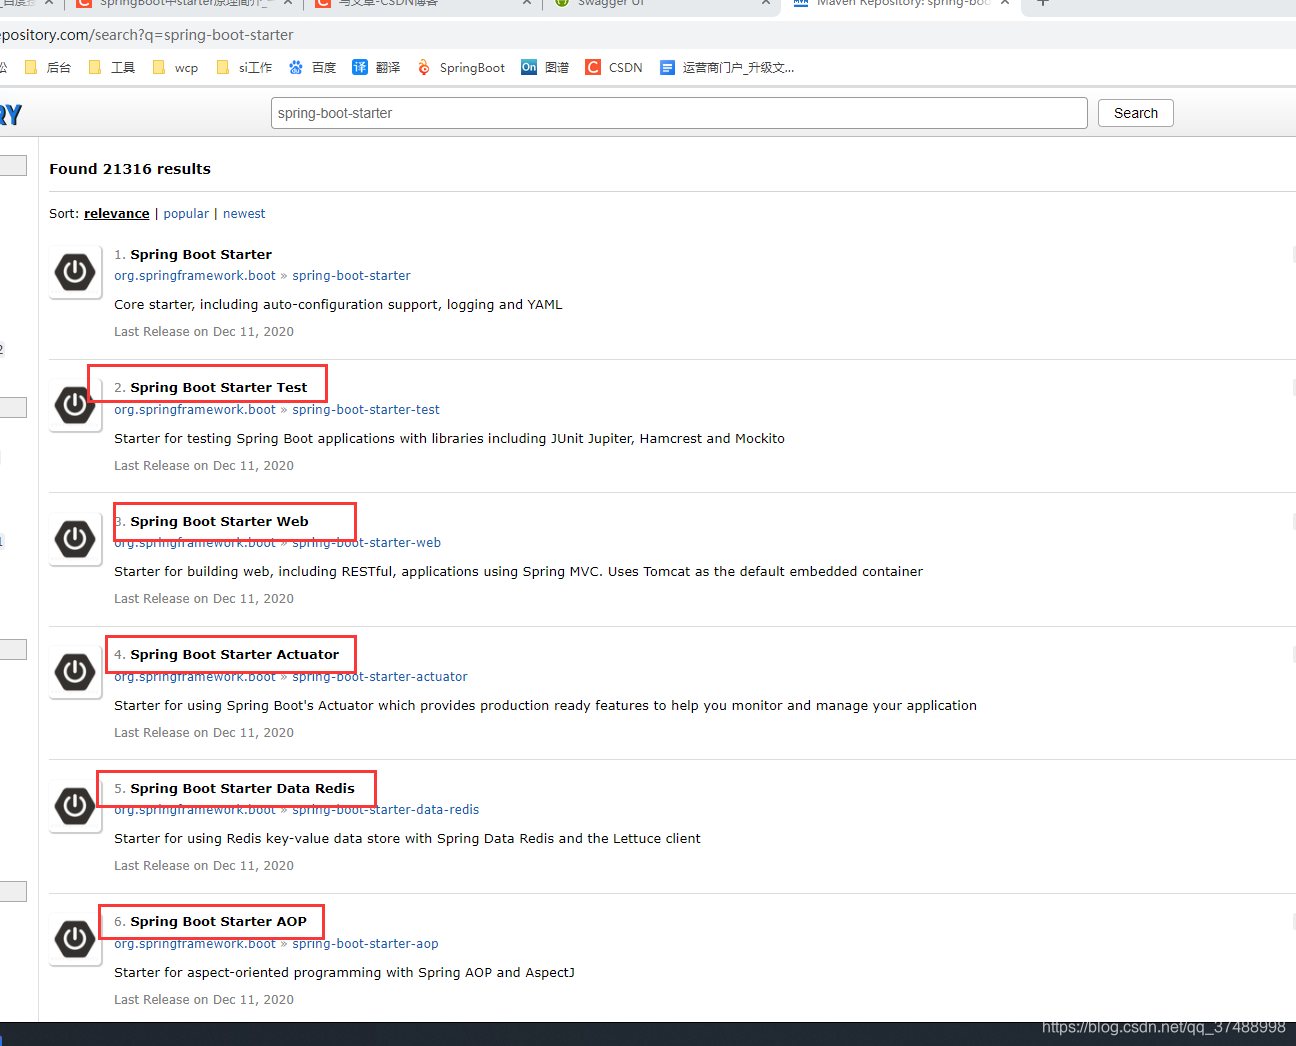
仔细观察,不难发现spring-boot-starter-***的形式,其实这是springboot的官方命名规则。
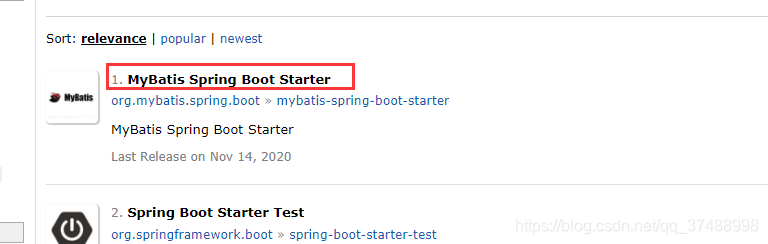
非官方的命名方式就是***-spring-boot starter的形式(如下mybatis框架的依赖),当然这些都是约定俗成的,不是强制性的,你说我就想自定义一个spring-boot-starter-***形式的,你开心就好,完全可以,做好被骂的觉悟就行了。
二、自定义starter
除了这些官方和非官方的依赖,实际开发的过程中,我们也可以定义自己的starter依赖,减少项目对某些模块的代码硬导入。
自定义starter的流程:
项目源码:https://github.com/yangshilei/ysl-springboot-starter.git
2.1 创建maven项目,添加pom依赖
<?xml version="1.0" encoding="UTF-8"?>
<project xmlns="http://maven.apache.org/POM/4.0.0" xmlns:xsi="http://www.w3.org/2001/XMLSchema-instance"
         xsi:schemaLocation="http://maven.apache.org/POM/4.0.0 https://maven.apache.org/xsd/maven-4.0.0.xsd">
    <modelVersion>4.0.0</modelVersion>

    <parent>
        <groupId>org.springframework.boot</groupId>
        <artifactId>spring-boot-starter-parent</artifactId>
        <version>2.4.1</version>
        <relativePath/> <!-- lookup parent from repository -->
    </parent>

    <groupId>com.example</groupId>
    <artifactId>ysl-springboot-starter</artifactId>
    <version>0.0.1-SNAPSHOT</version>
    <name>ysl-springboot-starter</name>
    <description>Demo project for Spring Boot</description>

    <properties>
        <java.version>1.8</java.version>
    </properties>

    <dependencies>
        <dependency>
            <groupId>org.springframework.boot</groupId>
            <artifactId>spring-boot-starter-web</artifactId>
        </dependency>
        <!-- 自定义配置包 -->
        <dependency>
            <groupId>org.springframework.boot</groupId>
            <artifactId>spring-boot-autoconfigure</artifactId>
        </dependency>
        <!--添加了该模块以来的模块,再配置yml时候会有本模块配置属性的提示信息-->
        <dependency>
            <groupId>org.springframework.boot</groupId>
            <artifactId>spring-boot-configuration-processor</artifactId>
            <optional>true</optional>
        </dependency>
        <dependency>
            <groupId>org.projectlombok</groupId>
            <artifactId>lombok</artifactId>
            <optional>true</optional>
        </dependency>
        <!--阿里json操作-->
        <dependency>
            <groupId>com.alibaba</groupId>
            <artifactId>fastjson</artifactId>
            <version>1.2.73</version>
        </dependency>
    </dependencies>

    <build>
        <plugins>
            <plugin>
                <groupId>org.springframework.boot</groupId>
                <artifactId>spring-boot-maven-plugin</artifactId>
                <configuration>
                    <excludes>
                        <exclude>
                            <groupId>org.projectlombok</groupId>
                            <artifactId>lombok</artifactId>
                        </exclude>
                    </excludes>
                </configuration>
            </plugin>
        </plugins>
    </build>

</project>
2.2 创建配置实体:@ConfigurationProperties(prefix = "ysl")
该注解可以把resources下配置文件中ysl开头的配置信息映射成实体。
package com.example.yslspringbootstarter.config;

import org.springframework.boot.context.properties.ConfigurationProperties;

/**
 * @Description: 配置信息实体
 */
@ConfigurationProperties(prefix = "ysl")
public class YslProperties {

    private String name;

    private String age;

    private String play;

    public String getName() {
        return name;
    }

    public void setName(String name) {
        this.name = name;
    }

    public String getAge() {
        return age;
    }

    public void setAge(String age) {
        this.age = age;
    }

    public String getPlay() {
        return play;
    }

    public void setPlay(String play) {
        this.play = play;
    }
}
2.3 创建业务实现对象
别的模块引用该模块可能就是为了使用模块中这个处理业务的service或者template。
package com.example.yslspringbootstarter.service;

import com.example.yslspringbootstarter.config.YslProperties;
import org.springframework.beans.factory.annotation.Autowired;

/**
 * 随便定义一个业务处理的service
 */
public class YslService {

    @Autowired
    YslProperties properties;

    public String yslSay(){
        return properties.getName() +"说" + properties.getAge() + "岁,他喜欢玩" + properties.getPlay();
    }

}
2.4 创建一个自定义的配置对象
添加上下面的两个注解:
@Configuration :声明这是一个配置对象
@EnableConfigurationProperties(YslProperties.class) :使YslProperties对象生效,将其注入IOC容器之中。
package com.example.yslspringbootstarter.config;

import com.example.yslspringbootstarter.service.YslService;
import org.springframework.beans.factory.annotation.Autowired;
import org.springframework.boot.context.properties.EnableConfigurationProperties;
import org.springframework.context.annotation.Bean;
import org.springframework.context.annotation.Configuration;

@Configuration
@EnableConfigurationProperties(YslProperties.class)
public class YslConfig {

    @Autowired
    public YslProperties yslProperties;

    @Bean
    public YslService getYslService(){
        return new YslService();
    }

}
2.5 在resources文件夹下创建META-INF文件夹,并创建spring.factories文件
spring.factories文件中配置上配置文件的配置。
#-------starter自动装配---------
org.springframework.boot.autoconfigure.EnableAutoConfiguration=com.example.yslspringbootstarter.config.YslConfig
2.6 将该项目用maven打包发到maven库中,可以通过指令
mvn clean install或者idea的打包方式
2.7 测试是否成功
创建一个项目,保证能运行成功,下面只是说下大概步骤,具体代码不再附上
2.7.1新建一个maven项目,pom中添加刚自定义的启动模块依赖信息,
        <!--ysl自定义starter-->
        <dependency>
            <groupId>com.example</groupId>
            <artifactId>ysl-springboot-starter</artifactId>
            <version>0.0.1-SNAPSHOT</version>
        </dependency>
2.7.2yml文件添加配置信息
# 自定义启动模块的配置信息
ysl:
  name: yangshilei
  age: 18
  play: football
2.7.3 创建一个controller测试一下效果
package com.docker.demo.controller;

import com.docker.demo.dto.Result;
import com.example.yslspringbootstarter.service.YslService;
import io.swagger.annotations.Api;
import io.swagger.annotations.ApiOperation;
import lombok.extern.slf4j.Slf4j;
import org.springframework.beans.factory.annotation.Autowired;
import org.springframework.web.bind.annotation.GetMapping;
import org.springframework.web.bind.annotation.RequestMapping;
import org.springframework.web.bind.annotation.RestController;

@Api
@Slf4j
@RequestMapping("/ysl")
@RestController
public class YslStarterController {

    @Autowired
    YslService yslService;

    @ApiOperation(value = "自定义starter",notes = "自定义starter")
    @GetMapping("/ysl/starter")
    Result getYslStarter(){
        log.info("开始测试");
        String s = yslService.yslSay();
        return Result.ok(s);
    }
}
2.7.4 swagger 接口访问请求

到此就全部演示结束了。

华为开发者空间,是为全球开发者打造的专属开发空间,汇聚了华为优质开发资源及工具,致力于让每一位开发者拥有一台云主机,基于华为根生态开发、创新。
更多推荐


 22
22 0
0- 0


 已为社区贡献2条内容

所有评论(0)