基于CentOS7环境的Python从3.6升级到3.8及部署Tensorflow2的过程笔记
基于CentOS7环境的Python从3.6升级到3.8及部署XGBoost、Tensorflow2的过程,并解决相关问题的笔记。
0. 前言
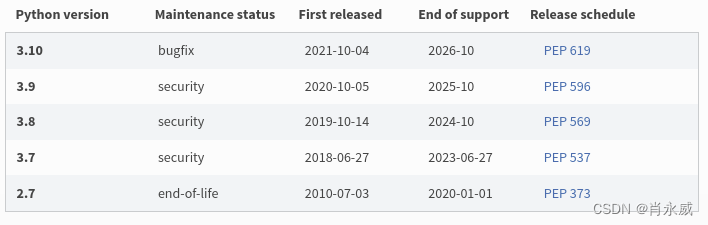
原Python计算环境是Python3.6版本,以及基于3.6的Tensoflow1.13,由于Python3.6已经没有支持,因此,现升级到3.8。
1. Python从3.6升级到3.8
1.首先安装依赖包,安装相应的编译工具
由于是升级,CentOS环境依赖已经具备,此步骤跳过。
[root@bigdatahost bin]# yum -y install zlib-devel bzip2-devel openssl-devel ncurses-devel sqlite-de
2.下载安装包
在当前用户下,把安装包下载到software文件夹下,下载有两种方式:
-
一是直接从官方网站手工下载:
https://www.python.org/ftp/python/3.8.13/Python-3.8.13.tgz -
二是命令获取:
[root@DeepLearning python]# cd software
[root@DeepLearning software]$ wget http://www.python.org/ftp/python/3.8.13/Python-3.8.13.tgz
3.解压
[root@DeepLearning software]# tar zxvf Python-3.8.13.tgz
4.备份修改原python3(3.6版本)
[root@DeepLearning software]# cd /usr/local
[root@DeepLearning local]# mv python3 python3.6
5.创建编译安装目录
[root@DeepLearning local]# mkdir /usr/local/python3
[root@DeepLearning local]# ls
bin  etc  games  include  lib  lib64  libexec  python3  python3.6  sbin  share  src
6.安装
指定安装的路径
[root@DeepLearning local]# cd /home/python/software/Python-3.8.13
[root@DeepLearning Python-3.8.13]# ./configure --prefix=/usr/local/python3
编译
[root@DeepLearning Python-3.8.13]# make
报错:
/home/python/software/Python-3.8.13/Modules/_ctypes/_ctypes.c:107:17: 致命错误:ffi.h:没有那个文件或目录
编译中断。
解决方案:
[root@DeepLearning Python-3.8.13]# yum install libffi-devel
安装
[root@DeepLearning Python-3.8.13]# make install
7.创建软链接
由于是升级,原先已经定义过,此步可以跳过。
[root@bigdatahost bin]# ln -s /usr/local/python3/bin/python3 /usr/bin/python3
[root@bigdatahost bin]# ln -s /usr/local/python3/bin/pip3 /usr/bin/pip3
需要核实验证原定义是否有效。
[root@DeepLearning bin]# ls -l /usr/bin/python3
/usr/bin/python3 -> /usr/local/python3/bin/python3
[root@DeepLearning bin]# ls -l /usr/bin/pip3
/usr/bin/pip3 -> /usr/local/python3/bin/pip3
8.验证是否成功
python3 -V
pip3 -V
9.配置环境变量【可选】
[root@DeepLearning bin]# vi ~/.bash_profile
编辑配置文件
export PYTHON_HOME=/usr/local/python3
export PATH=$PYTHON_HOME/bin:$PATH
执行配置文件,生效
[root@DeepLearning bin]# source ~/.bash_profile
[root@DeepLearning bin]# echo $PYTHON_HOME
/usr/local/python3
2. python工具包、算法框架安装
2.1. Tensorflow2环境安装
安装tensorflow2.6,依赖numpy1.19.5版本。
# 安装numpy1.19.5
[root@DeepLearning bin]# pip3 install -i https://pypi.tuna.tsinghua.edu.cn/simple numpy==1.19.5
# 安装图像依赖imageio2.9.0
[root@DeepLearning bin]# pip3 install -i https://pypi.tuna.tsinghua.edu.cn/simple imageio==2.9.0
[root@DeepLearning bin]# pip3 install -i https://pypi.tuna.tsinghua.edu.cn/simple scikit-image
[root@DeepLearning bin]# pip3 install -i https://pypi.tuna.tsinghua.edu.cn/simple opencv-python
[root@DeepLearning bin]# pip3 install -i https://pypi.tuna.tsinghua.edu.cn/simple matplotlib
[root@DeepLearning bin]# pip3 install -i https://pypi.tuna.tsinghua.edu.cn/simple tensorflow==2.6.1
2.2. 数据分析环境安装
2.2.1 数据分析
# 数值计算包
[root@DeepLearning bin]# pip3 install -i https://pypi.tuna.tsinghua.edu.cn/simple scipy
[root@DeepLearning bin]# pip3 install -i https://pypi.tuna.tsinghua.edu.cn/simple pandas
[root@DeepLearning bin]# pip3 install -i https://pypi.tuna.tsinghua.edu.cn/simple scikit-learn
[root@DeepLearning bin]# pip3 install -i https://pypi.tuna.tsinghua.edu.cn/simple seaborn
# 贝叶斯优化包
[root@DeepLearning bin]# pip3 install -i https://pypi.tuna.tsinghua.edu.cn/simple bayesian-optimization
2.2.2. 机器学习集成算法XGBoost安装
XGBoost新版本需要依赖cmake3.15以上版本,以及gcc5.0以上版本,升级cmake和gcc过程如下所示,升级过程直接跳过。
[root@bigdatahost Downloads]# wget https://cmake.org/files/v3.17/cmake-3.17.1.tar.gz
[root@bigdatahost Downloads]# tar -zxvf cmake-3.17.1.tar.gz
[root@bigdatahost Downloads]# cd cmake-3.17.1
[root@bigdatahost cmake-3.17.1]# ./bootstrap --prefix=/usr
CMake has bootstrapped.  Now run gmake.
[root@bigdatahost cmake-3.17.1]# gmake
[root@bigdatahost cmake-3.17.1]# gmake install
升级gcc到5.x
如果已经安装,可以略过:
[root@bigdatahost Downloads]# yum install bzip2
[root@bigdatahost Downloads]# wget http://mirrors.ustc.edu.cn/gnu/gcc/gcc-5.4.0/gcc-5.4.0.tar.bz2
[root@bigdatahost Downloads]# tar -jxvf gcc-5.4.0.tar.bz2
[root@bigdatahost gcc-5.4.0]# cd gcc-5.4.0
[root@bigdatahost gcc-5.4.0]# ./contrib/download_prerequisites
[root@bigdatahost bin]# /home/python/Downloads/gcc-5.4.0/configure --enable-checking=release --enable-languages=c,c++ --disable-multilib

[root@bigdatahost bin]# make
[root@bigdatahost bin]# make install
保留一下4.8.5的gcc,后续需要回退的时候,可以方便很多
[root@bigdatahost bin]# mv gcc gcc-4.85
[root@bigdatahost bin]# mv g++ g++-4.85
[root@bigdatahost bin]# mv /usr/lib64/libstdc++.so.6 /usr/lib64/libstdc++.so.6-4.85
引用处理改为新版本
[root@bigdatahost bin]# ln -s /usr/local/bin/gcc /usr/bin/gcc
[root@bigdatahost bin]# ln -s /usr/local/bin/g++ /usr/bin/g++
[root@bigdatahost bin]# ln /usr/local/lib64/libstdc++.so.6 /usr/lib64/libstdc++.so.6
安装xgboost。
[root@DeepLearning bin]# pip3 install -i https://pypi.tuna.tsinghua.edu.cn/simple xgboost
2.3. 可视化及Web服务包安装
[root@DeepLearning bin]# pip3 install -i https://pypi.tuna.tsinghua.edu.cn/simple flask
[root@DeepLearning bin]# pip3 install -i https://pypi.tuna.tsinghua.edu.cn/simple tornado
[root@DeepLearning bin]# pip3 install -i https://pypi.tuna.tsinghua.edu.cn/simple streamlit==1.9.1
streamlit 1.10及以上版本与tensorflow2冲突:
tensorflow 2.6.1 requires typing-extensions~=3.7.4, but you have typing-extensions 4.2.0 which is incompatible.
2.4. 数据库接口
[root@DeepLearning bin]# pip3 install -i https://pypi.tuna.tsinghua.edu.cn/simple pymongo
[root@DeepLearning bin]# pip3 install -i https://pypi.tuna.tsinghua.edu.cn/simple clickhouse_driver
3. 其他
3.1. 卸载python3.6
卸载的时候直接把该⽬录删了即可:
rm -rf /usr/local/python3.6
3.2. Pydev配置修改
对于Eclispe插件PyDev的配置如下:
PyDev/Interpreters/Python Interpreter中,通过“Browse for python/pypy.exe”按钮替换原来的“/usr/local/python3/bin/python3.6”为“/usr/local/python3/bin/python3.8”。

4. 总结
Python升级比较容易,很多环境依赖已经具备,只要重新安装新版本Python就可以,但是算法计算包升级要谨慎。
- 建议一:计算环境与可视化环境最好相互独立,不依存;
- 建议二:Tensorflow环境要求较为特殊,需要提前确定版本及依赖关系,例如Tensorflow2.6,依赖numpy1.19.5、imageio2.9.0、typing-extensions3.7.4等。
参考:
[1].肖永威. 基于CentOS7安装Python3计算环境与PyDev(Eclipse)开发工具日志(2021年). CSDN博客. 2021.04
[2]. 知识天罡茹薇00. linux安装和卸载python3 . 百度文库
[3]. weixin_39892615. python没有那个文件或目录_致命错误:python.h:没有那个文件或目录. CSDN博客. 2020.11

为开发者提供学习成长、分享交流、生态实践、资源工具等服务,帮助开发者快速成长。
更多推荐


 9
9 0
0- 0


 已为社区贡献11条内容

所有评论(0)