CARLA传感器详细文档介绍+python实例(持续更新ing)
作为模拟真实驾驶环境的模拟器,CARLA提供了丰富的传感器接口,不同传感器的特点不同,应该针对不同场景选择合适的传感器或将多种传感器结合使用。
CARLA中有两种类型的传感器:每帧都工作的传感器(相机,点云等)和只有特定环境下才接收数据的传感器(触发检测)。都属于carla.Sensor类,从carla.BlueprintLibrary类中实例化。
第一类:
深度相机 —— Depth camera
导航卫星传感器 —— Gnss sensor
惯性传感器 —— IMU sensor
激光雷达 —— Lidar raycast.
语义激光雷达 —— SemanticLidar raycast.
雷达 —— Radar
RGB相机 —— RGB camera (普通摄像头)
责任敏感安全传感器 —— RSS sensor (responsibility sensitive safety,我对传感器不太了解,不知道什么样的翻译比较好)
语义分割相机 —— Semantic Segmentation camera
第二类:
碰撞检测 —— Collision detector
压线检测 —— Lane invasion detector (老司机的痛)
障碍物检测 —— Obstacle detector
第一类传感器反馈的数据都是一个类的实例,其中,深度相机、普通相机和语义分割相机的数据输出都是carla.Image类,每帧都包含完整的图像信息,可以通过openCV对图像进行处理。剩余传感器输出carla.xxxMesurement类。实例中不仅包含了传感器反馈的数据(Instance Variables),还封装了一些函数(Methods)可以对数据进行基础处理。
文档中的传感器是按首字母顺序排列的,我按照传感器工作原理的类型,重新编排顺序介绍。
第一类传感器
一、RGB相机(RGB camera)
RGB相机就是普通的三通道摄像头,可以将每帧场景的画面记录下来。
如果启用 enable_postprocess_effects ,有一系列滤镜可以应用于图像:
- Vignette: 晕影,使边框变暗
- Grain jitter: 颗粒抖动,为渲染添加一些噪点
- Bloom: intense lights burn the area around them(翻译实在不通顺,有没有摄影大佬来解释一下)
- Auto exposure: 自动曝光,修改图像伽马以模拟眼睛对较暗或较亮区域的适应
- Lens flares: 镜头光晕,模拟明亮物体在镜头上的反射
- Depth of field: 调整景深
1、RGB相机实例(sensor.camera.rgb类)
Basic camera attributes
| Blueprint attribute | Type | Default | 描述 |
|---|---|---|---|
bloom_intensity | float | 0.675 | bloom特效强度,0.0表示关闭特效 |
fov | float | 90.0 | 水平视野角度 |
fstop | float | 1.4 | Opening of the camera lens. Aperture is 1/fstop with typical lens going down to f/1.2 (larger opening). Larger numbers will reduce the Depth of Field effect. |
image_size_x | int | 800 | 图像宽度像素数 |
image_size_y | int | 600 | 图像高度像素数 |
iso | float | 100.0 | 相机传感器灵敏度 |
gamma | float | 2.2 | 相机的目标gamma值 |
lens_flare_intensity | float | 0.1 | 镜头光晕特效强度,0.0表示关闭特效 |
sensor_tick | float | 0.0 | 图像捕捉周期,0.0表示尽可能短 |
shutter_speed | float | 200.0 | 快门速度,单位 (次数/秒) |
Camera lens distortion attributes
| Blueprint attribute | Type | Default | Description |
|---|---|---|---|
lens_circle_falloff | float | 5.0 | Range: [0.0, 10.0] |
lens_circle_multiplier | float | 0.0 | Range: [0.0, 10.0] |
lens_k | float | -1.0 | Range: [-inf, inf] |
lens_kcube | float | 0.0 | Range: [-inf, inf] |
lens_x_size | float | 0.08 | Range: [0.0, 1.0] |
lens_y_size | float | 0.08 | Range: [0.0, 1.0] |
Advanced camera attributes(高级相机参数,我对摄影也不是特别懂=_=)
| Blueprint attribute | Type | Default | Description |
|---|---|---|---|
min_fstop | float | 1.2 | Maximum aperture. |
blade_count | int | 5 | Number of blades that make up the diaphragm mechanism. |
exposure_mode | str | histogram | Can be manual or histogram. More in UE4 docs. |
exposure_compensation | float | Linux: -1.5 Windows: 0.0 | Logarithmic adjustment for the exposure. 0: no adjustment, -1:2x darker, -2:4 darker, 1:2x brighter, 2:4x brighter. |
exposure_min_bright | float | 7.0 | In exposure_mode: "histogram". Minimum brightness for auto exposure. The lowest the eye can adapt within. Must be greater than 0 and less than or equal to exposure_max_bright. |
exposure_max_bright | float | 9.0 | In `exposure_mode: "histogram"`. Maximum brightness for auto exposure. The highestthe eye can adapt within. Must be greater than 0 and greater than or equal to `exposure_min_bright`. |
exposure_speed_up | float | 3.0 | In exposure_mode: "histogram". Speed at which the adaptation occurs from dark to bright environment. |
exposure_speed_down | float | 1.0 | In exposure_mode: "histogram". Speed at which the adaptation occurs from bright to dark environment. |
calibration_constant | float | 16.0 | Calibration constant for 18% albedo. |
focal_distance | float | 1000.0 | Distance at which the depth of field effect should be sharp. Measured in cm (UE units). |
blur_amount | float | 1.0 | Strength/intensity of motion blur. |
blur_radius | float | 0.0 | Radius in pixels at 1080p resolution to emulate atmospheric scattering according to distance from camera. |
motion_blur_intensity | float | 0.45 | Strength of motion blur [0,1]. |
motion_blur_max_distortion | float | 0.35 | Max distortion caused by motion blur. Percentage of screen width. |
motion_blur_min_object_screen_size | float | 0.1 | Percentage of screen width objects must have for motion blur, lower value means less draw calls. |
slope | float | 0.88 | Steepness of the S-curve for the tonemapper. Larger values make the slope steeper (darker) [0.0, 1.0]. |
toe | float | 0.55 | Adjusts dark color in the tonemapper [0.0, 1.0]. |
shoulder | float | 0.26 | Adjusts bright color in the tonemapper [0.0, 1.0]. |
black_clip | float | 0.0 | This should NOT be adjusted. Sets where the crossover happens and black tones start to cut off their value [0.0, 1.0]. |
white_clip | float | 0.04 | Set where the crossover happens and white tones start to cut off their value. Subtle change in most cases [0.0, 1.0]. |
temp | float | 6500.0 | White balance in relation to the temperature of the light in the scene. White light: when this matches light temperature. Warm light: When higher than the light in the scene, it is a yellowish color. Cool light: When lower than the light. Blueish color. |
tint | float | 0.0 | White balance temperature tint. Adjusts cyan and magenta color ranges. This should be used along with the white balance Temp property to get accurate colors. Under some light temperatures, the colors may appear to be more yellow or blue. This can be used to balance the resulting color to look more natural. |
chromatic_aberration_intensity | float | 0.0 | Scaling factor to control color shifting, more noticeable on the screen borders. |
chromatic_aberration_offset | float | 0.0 | Normalized distance to the center of the image where the effect takes place. |
enable_postprocess_effects | bool | True | Post-process effects activation. |
Output attributes
| Sensor data attribute | Type | 描述 |
|---|---|---|
frame | int | 图像帧数号码 |
timestamp | double | Simulation time of the measurement in seconds since the beginning of the episode. |
transform | carla.Transform | Location and rotation in world coordinates of the sensor at the time of the measurement. |
width | int | 图像宽度像 |
height | int | 图像高度像素 |
fov | float | 水平视野角度 |
raw_data | bytes | 32位RGB图像原数据序列 |
2、输出实例(carla.Image类)
Instance Variables
Methods
convert(self, color_converter)
按照color_converter中的特定模式对图像进行变换- Parameters:
color_converter(carla.ColorConverter)
- Parameters:
save_to_disk(self, path, color_converter=Raw)
按照color_converter中的特定模式对图像进行变换后保存在指定路径。默认的变换模式是原数据,保存时原始图像不会变化。- Parameters:
path(str) – 存图路径color_converter(carla.ColorConverter) – 默认的原数据不会使图像变化
- Parameters:
例1.在cv窗口中显示rgb相机画面
首先需要生成环境和环境中的小车,这一步对于所有传感器都是一样的,写好之后不用再改。(carla环境搭建可以看我原来的文章)
import abc
import glob
import os
import sys
from types import LambdaType
from collections import deque
from collections import namedtuple

try:
#输入存放carla环境的路径
    sys.path.append(glob.glob('.../WindowsNoEditor/PythonAPI/carla/dist/carla-*%d.%d-%s.egg' % (
        sys.version_info.major,
        sys.version_info.minor,
        'win-amd64' if os.name == 'nt' else 'linux-x86_64'))[0])
except IndexError:
    pass

import carla
import random
import time
import numpy as np
import cv2
import math

IM_WIDTH = 800
IM_HEIGHT = 600
SHOW_PREVIEW = True

SHOW_CAM = SHOW_PREVIEW
im_width = IM_WIDTH
im_height = IM_HEIGHT

#与服务器建立连接
client = carla.Client('localhost',2000)
client.set_timeout(10.0)
world = client.get_world()
blueprint_library = world.get_blueprint_library()
model_3 = blueprint_library.filter('model3')[0]

actor_list = []
transform = world.get_map().get_spawn_points()[100] #spwan_points共265个点,选第一个点作为初始化小车的位置
vehicle = world.spawn_actor(model_3 , transform)
actor_list.append(vehicle)
之后定义rgb相机,将其附着在小车上。还需要单独写一个函数(process_img)来处理接收的图像并将其显示在cv图像框中。
def process_img(image):
    i = np.array(image.raw_data)
    i2 = i.reshape((im_height, im_width , 4))
    i3 = i2[: , : , : 3]
    if SHOW_CAM:
        cv2.imshow("",i3)
        cv2.waitKey(1)

cam = blueprint_library.find('sensor.camera.rgb')
cam.set_attribute('image_size_x',f'{im_width}')
cam.set_attribute('image_size_y',f'{im_height}')
cam.set_attribute('fov',f'110')

#设定传感器的相对位置(x方向偏移2.5,z方向偏移0.7,y方向偏移)
#需要调整传感器的角度可以在carla.Transform里添加carla.Rotation(roll,pitch,yew),分别代表x,y,z轴
#不设置角度当前传感器与车头前向保持一直
transform = carla.Transform(carla.Location(x=2.5 ,z=0.7 ))
#将传感器附在小车上
sensor = world.spawn_actor(cam,transform, attach_to=vehicle)
actor_list.append(sensor)
#传感器开始监听
sensor.listen(lambda data: process_img(data))
运行后,就会产生一个图像框,显示当前摄像头拍摄到的画面。

二、深度相机(Depth camera)
产生一个场景的原始图像,对每个像素点到相机之间的距离进行编码,以创建元素的深度图。图像中每个像素都用RGB三通道(以重要性B>G>R)编码,可以用以下方式进行解码,得到每个像素距相机的真实距离:
normalized = (R + G * 256 + B * 256 * 256) / (256 * 256 * 256 - 1)
in_meters = 1000 * normalized
1、深度相机实例(sensor.camera.depth类)
Basic camera attributes
| Blueprint attribute | Type | Default | Description |
|---|---|---|---|
image_size_x | int | 800 | 图像宽度像素数 |
image_size_y | int | 600 | 图像高度度像素数 |
fov | float | 90.0 | 水平视野角度 |
sensor_tick | float | 0.0 | Simulation seconds between sensor captures (ticks). |
Camera lens distortion attributes(一些相机专业参数,我也不是很懂=_=)
| Blueprint attribute | Type | Default | Description |
|---|---|---|---|
lens_circle_falloff | float | 5.0 | Range: [0.0, 10.0] |
lens_circle_multiplier | float | 0.0 | Range: [0.0, 10.0] |
lens_k | float | -1.0 | Range: [-inf, inf] |
lens_kcube | float | 0.0 | Range: [-inf, inf] |
lens_x_size | float | 0.08 | Range: [0.0, 1.0] |
lens_y_size | float | 0.08 | Range: [0.0, 1.0] |
Output attributes
| Sensor data attribute | Type | Description |
|---|---|---|
frame | int | 检测发生时帧数号 |
timestamp | double | Simulation time of the measurement in seconds since the beginning of the episode. |
transform | carla.Transform | Location and rotation in world coordinates of the sensor at the time of the measurement. |
width | int | 图像宽度像素数 |
height | int | 图像高度像素数 |
fov | float | 水平视野角度 |
raw_data | bytes | 32位图像原始数据序列 |
2、输出实例(carla.Image类)
Instance Variables
- fov (float – degrees)
图像视野的水平角度 - height (int)
图像高度像素数 - width (int)
图像宽度像素数 - raw_data (bytes)
图像原始数据
Methods
- convert(self, color_converter)
按照color_converter中的特定模式对图像进行变换- Parameters:
color_converter(carla.ColorConverter) - 深度相机中有两种转化方式(carla.ColorConverter.Depth和carla.ColorConverter.LogarithmicDepth,可以将图像转为灰度图,后一种对近处物体的处理效果更好)
- Parameters:
- save_to_disk(self, path, color_converter=Raw)
按照color_converter中的特定模式对图像进行变换后保存在指定路径。默认的变换模式是原数据,保存时原始图像不会变化。- Parameters:
path(str) – 存图路径color_converter(carla.ColorConverter) – 默认的原数据不会使图像变化
- Parameters:
例2.在cv窗口中显示深度相机画面
生成环境部分的代码不用变,只要改相机名称即可。
def process_img(image):
    #显示图像前加一步转换可以显示灰度图像
    #image.convert(carla.ColorConverter.Depth)#灰度图像
    #image.convert(carla.ColorConverter.LogarithmicDepth)#对数灰度图像
    i = np.array(image.raw_data)
    i2 = i.reshape((im_height, im_width , 4))
    i3 = i2[: , : , : 3]
    if SHOW_CAM:
        cv2.imshow("",i3)
        cv2.waitKey(1)

cam = blueprint_library.find('sensor.camera.depth')
cam.set_attribute('image_size_x',f'{im_width}')
cam.set_attribute('image_size_y',f'{im_height}')
cam.set_attribute('fov',f'110')

#设定传感器的相对位置(x方向偏移2.5,z方向偏移0.7,y方向偏移)
transform = carla.Transform(carla.Location(x=2.5 ,z=0.7 ))
#将传感器附在小车上
sensor = world.spawn_actor(cam,transform, attach_to=vehicle)
actor_list.append(sensor)
#传感器开始监听
sensor.listen(lambda data: process_img(data))
运行后可以看到深度相机传回的图像

也可以生成灰度图像或对数灰度图像

(灰度图像)

(对数灰度图像)
三、语义分割相机(Semantic Segmentation camera)
该相机对视野中的不同物体打上不同的标签,传回的数据自带标签类别(存储在图像的red通道中),可以用carla.Image类自带的函数将其转化为用不同颜色表示不同物体的图像。
当前生成好的标签如下图:
| Value | Tag | Converted color | Description |
|---|---|---|---|
0 | Unlabeled | (0, 0, 0) | Elements that have not been categorized are considered Unlabeled. This category is meant to be empty or at least contain elements with no collisions. |
1 | Building | (70, 70, 70) | Buildings like houses, skyscrapers,... and the elements attached to them. E.g. air conditioners, scaffolding, awning or ladders and much more. |
2 | Fence | (100, 40, 40) | Barriers, railing, or other upright structures. Basically wood or wire assemblies that enclose an area of ground. |
3 | Other | (55, 90, 80) | Everything that does not belong to any other category. |
4 | Pedestrian | (220, 20, 60) | Humans that walk or ride/drive any kind of vehicle or mobility system. E.g. bicycles or scooters, skateboards, horses, roller-blades, wheel-chairs, etc. |
5 | Pole | (153, 153, 153) | Small mainly vertically oriented pole. If the pole has a horizontal part (often for traffic light poles) this is also considered pole. E.g. sign pole, traffic light poles. |
6 | RoadLine | (157, 234, 50) | The markings on the road. |
7 | Road | (128, 64, 128) | Part of ground on which cars usually drive. E.g. lanes in any directions, and streets. |
8 | SideWalk | (244, 35, 232) | Part of ground designated for pedestrians or cyclists. Delimited from the road by some obstacle (such as curbs or poles), not only by markings. This label includes a possibly delimiting curb, traffic islands (the walkable part), and pedestrian zones. |
9 | Vegetation | (107, 142, 35) | Trees, hedges, all kinds of vertical vegetation. Ground-level vegetation is considered Terrain. |
10 | Vehicles | (0, 0, 142) | Cars, vans, trucks, motorcycles, bikes, buses, trains. |
11 | Wall | (102, 102, 156) | Individual standing walls. Not part of a building. |
12 | TrafficSign | (220, 220, 0) | Signs installed by the state/city authority, usually for traffic regulation. This category does not include the poles where signs are attached to. E.g. traffic- signs, parking signs, direction signs... |
13 | Sky | (70, 130, 180) | Open sky. Includes clouds and the sun. |
14 | Ground | (81, 0, 81) | Any horizontal ground-level structures that does not match any other category. For example areas shared by vehicles and pedestrians, or flat roundabouts delimited from the road by a curb. |
15 | Bridge | (150, 100, 100) | Only the structure of the bridge. Fences, people, vehicles, an other elements on top of it are labeled separately. |
16 | RailTrack | (230, 150, 140) | All kind of rail tracks that are non-drivable by cars. E.g. subway and train rail tracks. |
17 | GuardRail | (180, 165, 180) | All types of guard rails/crash barriers. |
18 | TrafficLight | (250, 170, 30) | Traffic light boxes without their poles. |
19 | Static | (110, 190, 160) | Elements in the scene and props that are immovable. E.g. fire hydrants, fixed benches, fountains, bus stops, etc. |
20 | Dynamic | (170, 120, 50) | Elements whose position is susceptible to change over time. E.g. Movable trash bins, buggies, bags, wheelchairs, animals, etc. |
21 | Water | (45, 60, 150) | Horizontal water surfaces. E.g. Lakes, sea, rivers. |
22 | Terrain | (145, 170, 100) | Grass, ground-level vegetation, soil or sand. These areas are not meant to be driven on. This label includes a possibly delimiting curb. |
1、语义分割相机实例(sensor.camera.semantic_segmentation类)
Basic camera attributes
| Blueprint attribute | Type | Default | Description |
|---|---|---|---|
fov | float | 90.0 | Horizontal field of view in degrees. |
image_size_x | int | 800 | Image width in pixels. |
image_size_y | int | 600 | Image height in pixels. |
sensor_tick | float | 0.0 | Simulation seconds between sensor captures (ticks). |
Camera lens distortion attributes
| Blueprint attribute | Type | Default | Description |
|---|---|---|---|
lens_circle_falloff | float | 5.0 | Range: [0.0, 10.0] |
lens_circle_multiplier | float | 0.0 | Range: [0.0, 10.0] |
lens_k | float | -1.0 | Range: [-inf, inf] |
lens_kcube | float | 0.0 | Range: [-inf, inf] |
lens_x_size | float | 0.08 | Range: [0.0, 1.0] |
lens_y_size | float | 0.08 | Range: [0.0, 1.0] |
Output attributes
| Sensor data attribute | Type | Description |
|---|---|---|
fov | float | Horizontal field of view in degrees. |
frame | int | Frame number when the measurement took place. |
height | int | Image height in pixels. |
raw_data | bytes | Array of BGRA 32-bit pixels. |
timestamp | double | Simulation time of the measurement in seconds since the beginning of the episode. |
transform | carla.Transform | Location and rotation in world coordinates of the sensor at the time of the measurement. |
width | int | Image width in pixels. |
2、输出实例(carla.Image类)
Instance Variables
- fov (float – degrees)
图像视野的水平角度 - height (int)
图像高度像素数 - width (int)
图像宽度像素数 - raw_data (bytes)
图像原始数据
Methods
- convert(self, color_converter)
按照color_converter中的特定模式对图像进行变换- Parameters:
color_converter(carla.ColorConverter) - 语义分割相机画面转换需要将该参数填成carla.ColorConverter.CityScapesPalette
- Parameters:
- save_to_disk(self, path, color_converter=Raw)
按照color_converter中的特定模式对图像进行变换后保存在指定路径。默认的变换模式是原数据,保存时原始图像不会变化。- Parameters:
path(str) – 存图路径color_converter(carla.ColorConverter) – 参数的设置方式同convert函数相同
- Parameters:
例3.在cv窗口中显示语义分割相机画面
除了更改实体类名称外,语义分割相机的数据图像在显示前需要对图像进行转换(代码第二行)
def process_img(image):
    image.convert(carla.ColorConverter.CityScapesPalette)
    i = np.array(image.raw_data)
    i2 = i.reshape((im_height, im_width , 4))
    i3 = i2[: , : , : 3]
    if SHOW_CAM:
        cv2.imshow("",i3)
        cv2.waitKey(1)

cam = blueprint_library.find('sensor.camera.semantic_segmentation')
cam.set_attribute('image_size_x',f'{im_width}')
cam.set_attribute('image_size_y',f'{im_height}')
cam.set_attribute('fov',f'110')

#设定传感器的相对位置(x方向偏移2.5,z方向偏移0.7,y方向偏移)
transform = carla.Transform(carla.Location(x=2.5 ,z=0.7 ))
#将传感器附在小车上
sensor = world.spawn_actor(cam,transform, attach_to=vehicle)
actor_list.append(sensor)
#传感器开始监听
sensor.listen(lambda data: process_img(data))
运行后可以看到语义分割相机传回的图像

四、导航卫星传感器(Gnss sensor)
报告物体的当前全球导航卫星系统位置,通过将度量位置添加到地图初始地理参考位置计算。
1、GNSS传感器实例(sensor.other.gnss类)
GNSS attributes
| Blueprint attribute | Type | Default | Description |
|---|---|---|---|
noise_alt_bias | float | 0.0 | Mean parameter in the noise model for altitude. |
noise_alt_stddev | float | 0.0 | Standard deviation parameter in the noise model for altitude. |
noise_lat_bias | float | 0.0 | Mean parameter in the noise model for latitude. |
noise_lat_stddev | float | 0.0 | Standard deviation parameter in the noise model for latitude. |
noise_lon_bias | float | 0.0 | Mean parameter in the noise model for longitude. |
noise_lon_stddev | float | 0.0 | Standard deviation parameter in the noise model for longitude. |
noise_seed | int | 0 | Initializer for a pseudorandom number generator. |
sensor_tick | float | 0.0 | Simulation seconds between sensor captures (ticks). |
Output attributes
| Sensor data attribute | Type | Description |
|---|---|---|
frame | int | Frame number when the measurement took place. |
timestamp | double | Simulation time of the measurement in seconds since the beginning of the episode. |
transform | carla.Transform | Location and rotation in world coordinates of the sensor at the time of the measurement. |
latitude | double | Latitude of the actor. |
longitude | double | Longitude of the actor. |
altitude | double | Altitude of the actor. |
2、输出实例(carla.GnssMeasurement类)
Instance Variables
altitude (float – meters)
海拔——水平位置相对高度
latitude (float – degrees)
纬度——地图上的北/南坐标值
longitude (float – degrees)
经度——地图上的西/东坐标值
五、惯性传感器(IMU sensor)
根据物体的当前状态,提供加速度计、陀螺仪和指南针度量。
1、惯性传感器实例(sensor.other.imu类)
IMU attributes
| Blueprint attribute | Type | Default | Description |
|---|---|---|---|
noise_accel_stddev_x | float | 0.0 | Standard deviation parameter in the noise model for acceleration (X axis). |
noise_accel_stddev_y | float | 0.0 | Standard deviation parameter in the noise model for acceleration (Y axis). |
noise_accel_stddev_z | float | 0.0 | Standard deviation parameter in the noise model for acceleration (Z axis). |
noise_gyro_bias_x | float | 0.0 | Mean parameter in the noise model for the gyroscope (X axis). |
noise_gyro_bias_y | float | 0.0 | Mean parameter in the noise model for the gyroscope (Y axis). |
noise_gyro_bias_z | float | 0.0 | Mean parameter in the noise model for the gyroscope (Z axis). |
noise_gyro_stddev_x | float | 0.0 | Standard deviation parameter in the noise model for the gyroscope (X axis). |
noise_gyro_stddev_y | float | 0.0 | Standard deviation parameter in the noise model for the gyroscope (Y axis). |
noise_gyro_stddev_z | float | 0.0 | Standard deviation parameter in the noise model for the gyroscope (Z axis). |
noise_seed | int | 0 | Initializer for a pseudorandom number generator. |
sensor_tick | float | 0.0 | Simulation seconds between sensor captures (ticks). |
Output attributes
| Sensor data attribute | Type | Description |
|---|---|---|
frame | int | Frame number when the measurement took place. |
timestamp | double | Simulation time of the measurement in seconds since the beginning of the episode. |
transform | carla.Transform | Location and rotation in world coordinates of the sensor at the time of the measurement. |
accelerometer | carla.Vector3D | Measures linear acceleration in m/s^2. |
gyroscope | carla.Vector3D | Measures angular velocity in rad/sec. |
compass | float | Orientation in radians. North is (0.0, -1.0, 0.0) in UE. |
2、输出实例(carla.IMUMeasurement类)
Instance Variables
accelerometer (carla.Vector3D – m/s2)
线性加速度,单位m/s^2
compass (float – radians)
指南针,相对于正北(在Unreal引擎中用[0.0, -1.0, 0.0]表示)的方向度量
gyroscope (carla.Vector3D – rad/s)
角速度,单位rad/s
六、责任敏感安全传感器 (RSS sensor)
RSS 传感器实现了一个用于安全保障的数学模型。它接收传感器的信息,并为车辆的控制器提供限制。总之,RSS模型利用传感器数据定义了一个描述车辆与环境中某物体之间状态的局面。在每个局面中,要进行安全检查,再做出适当的反应。
这部分功能仍然在开发中,目前只支持Linux系统。系统结构较为复杂,所以先跳过……=_=
七、雷达(Radar)
传感器制造一个圆锥形视图,可以被转换为可见元素的 2D 点图及其相对于传感器的速度。这可以用于构建物体外形和估算其运动方向。由于使用了极坐标系,点分布在视图的正中心。
测量的点在输出中以carla.RadarDetection类的数组保存,该数组指定了它们的极坐标、距离和速度。 雷达传感器提供的原始数据可以用以下方式转换为numpy格式:
# To get a numpy [[vel, altitude, azimuth, depth],...[,,,]]:
points = np.frombuffer(radar_data.raw_data, dtype=np.dtype('f4'))
points = np.reshape(points, (len(radar_data), 4))
1、雷达实例(sensor.other.radar类)
Radar attributes
| Blueprint attribute | Type | Default | Description |
|---|---|---|---|
horizontal_fov | float | 30.0 | Horizontal field of view in degrees. |
points_per_second | int | 1500 | Points generated by all lasers per second. |
range | float | 100 | Maximum distance to measure/raycast in meters. |
sensor_tick | float | 0.0 | Simulation seconds between sensor captures (ticks). |
vertical_fov | float | 30.0 | Vertical field of view in degrees. |
Output attributes
| Sensor data attribute | Type | Description |
|---|---|---|
raw_data | carla.RadarDetection | The list of points detected. |
Converted output attributes
| RadarDetection attributes | Type | Description |
|---|---|---|
altitude | float | 高度角(弧度) |
azimuth | float | 方位角(弧度) |
depth | float | 到传感器的距离(米) |
velocity | float | 朝向传感器的速度 |
2、输出实例(carla.RadarMeasurement类)
表示传感器前的一面点墙,具有与其相关的距离、角度和速度。
Instance Variables
- raw_data (bytes)
carla.RadarDetection 中包含的完整信息
Methods
Getters
例4.对雷达数据进行分析
雷达传感器的环境和前几个例子相同,只用改传感器部分代码即可
def process_radar(mesure):
    global radar_data
    radar_data = mesure

radar = blueprint_library.find('sensor.other.radar')
radar.set_attribute('points_per_second','1500')
transform = carla.Transform(carla.Location(x=2.5 ,z=0.7 ))
radar_sensor = world.spawn_actor(radar,transform,attach_to=vehicle)
actor_list.append(radar_sensor)
radar_sensor.listen(lambda mesure:process_rader(mesure))
暂时对雷达信号的数据特征不太了解,所以在监听时先将其保存到一个全局变量radar_data中,单独分析,现在radar_data就是采集到的雷达信号的raw_data,需要对其进行进一步分析。使用文档中提到的转换方式。
points = np.frombuffer(radar_data.raw_data, dtype=np.dtype('f4'))
points = np.reshape(points, (len(radar_data), 4))
points变量是一个n*4的矩阵,每一行代表一个被检测到的物体点,n会随每秒发射的点数变化,点数相同时,n也会有一些随机变动。比如我设置的雷达参数是,每秒钟发射1500个点,反馈的点数是28个,points变量的值大致如下:

按照文档中的定义,第一列是物体相对于传感器的速度(由于当前小车静止,所以相对速度是0),第二列是物体位置相对于传感器的高度角(弧度),第三列是物体位置相对于传感器的方位角(弧度),第四列是物体距离传感器的直线距离。有了这些数据,就可以将这些点阵在空间中的x,y,z坐标计算出来。

用代码将下x,y,z坐标求出,可以用matplotlib画出一张3d散点图(我原本是这样想的)。
l=np.cos(points[:,1])*points[:,3]
z=np.sin(points[:,1])*points[:,3]
y=np.cos(points[:,2])*l
x=np.sin(points[:,2])*l

import matplotlib.pyplot as plt
from mpl_toolkits.mplot3d import axes3d
import matplotlib
%matplotlib qt5
plt.figure("3D Scatter", facecolor="lightgray",figsize=(20,20),dpi=80)
ax3d = plt.gca(projection="3d")

ax3d.scatter(x, y, z, s=10, cmap="jet", marker="o")
ax3d.view_init(elev=0, azim=-70)
ax3d.set_yticks(np.arange(0, 100, 10))
plt.show()
但是在这个过程中,我发现,points[:,2](方位角)和points[:,3](距离)在方位角小于0时有很强的关联性,(下图)

而points[:,1](高度角)和points[:,3](距离)则没什么关联,无论在那个角度区间里点数都差不多(下图)。

考虑到,环境中距离车辆最近的物体其实是地面,地面也会反射雷达信号,所以当传感器俯视探测时(高度角小于0),应该会接收到反射自地面的大量点。
传感器和地面上的点之间夹角与距离的关系是(s-距离,h-传感器高度(0.7m),θ-高度角),画出图像(只考虑θ∈[-15°,0°],转换成弧度单位)。

可以看出这个函数很像points第三列和和points第四列前半部分的关系,所以我认为,文档有错误,解析出的四个维度数据的意义应该是[速度,方位角,高度角,距离],按照这个顺序重新画图:
l=np.cos(points[:,2])*points[:,3]
z=np.sin(points[:,2])*points[:,3]
y=np.cos(points[:,1])*l
x=np.sin(points[:,1])*l

plt.figure("3D Scatter", facecolor="lightgray",figsize=(20,20),dpi=80)
ax3d = plt.gca(projection="3d")

ax3d.scatter(x, y, z, s=10, cmap="jet", marker="o")
ax3d.view_init(elev=0, azim=-70)
#ax3d.set_yticks(np.arange(0, 100, 10))
plt.show()
得到一个3d散点图。

但是点数太少,场景不明显,改变参数使每秒发射点数增加到5000(radar.set_attribute ('points_per_second','5000')),重新画图观察(图像框动态拖拽看得更明显),对比真实场景。


可以看出,点的位置和真实场景大致相同,在车的正前方偏下处,有很密集的点位于同一高度(红色圆圈),是由地面反射的信号点。在车头的左侧两三米处,有一些较稀疏的点(蓝色圆圈),是信号碰到路中间的树木和路灯反射的点。在车头的右侧10米左右处,有一些更稀疏的点,表示了路边的建筑墙。而在车的正前方,由于道路是空的,没有什么障碍物。距离传感器越远的物体,越不容易反射回信号。雷达每秒发射的点数越多,能返回的点数据越多。
当我把每秒发射点数的参数设为50000(radar.set_attribute ('points_per_second','50000')),返回的点数可以达到1000左右,对于来自地面的信号,可以设置一个阈值进行过滤,例如可以认为z值小于-0.5(雷达距离地面0.7m,地面坐标相对雷达是-0.7m)的点是一个地面反射点,不显示在图中。

可以明显看出,在车头左侧,有一排等间距的树(或路灯)一直向前延伸,距离越远轮廓越模糊。而左侧更远的几个点是马路对面的围墙。在右侧前方60米处,有一个明显的直角墙。
八、激光雷达(Lidar)
该传感器模拟了一个使用了光线投射的可旋转激光雷达,点是通过垂直分布在每个通道中的激光叠加来计算的。通过模拟的旋转来计算激光雷达在一帧内扫描的水平角。每一步的各个激光投射的光线可以共同计算出一个点云。
激光雷达的探测数据包含一个在周期内生成所有的点的数据包,在同一周期内,物理环境不会更新,因此所有的点可以反映出当前场景的静态画面。
探测数据包含各个点的四维数据,前三维是点在空间内的x,y,z坐标,最后一维是点在移动后的信号强度损失,可以通过以下公式计算:
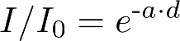
a——衰减参数,可以根据传感器的波长改变
d——信号反射位置与传感器的距离
为了获得更好的真实感,点云中的点可以被删掉部分。这是模拟由于外部扰动造成损失的一种简单方法。有两种方式可以实现。
- 普通删除 — 随机删除一部分点,这个过程在还没有对点进行追踪时就完成了,因此这些点还没有经过计算就会被删除,这样可以提高性能。如果将参数设置为
dropoff_general_rate = 0.5, 会删除一半的点。 - 基于强度删除 — 对每个探测到的点,基于计算出的强度以某种概率进行删除,概率由两个参数决定,
dropoff_zero_intensity是0强度的点被删除的概率,dropoff_intensity_limit是一个强度阈值,强度在此之上的点不会被删除。在删除范围之内的点,会以基于这两个参数的线性比例被删除。
此外,noise_stddev 属性使噪声模型能够模拟现实传感器中出现的意外偏差。对于正值,每个点都沿激光射线的矢量随机扰动。结果是具有完美的角度定位,但距离测量含有噪声的激光雷达传感器。
在每个模拟步长内,可以通过调整激光雷达的旋转以覆盖特定角度。例如,要在每个步长内旋转一次,旋转的频率应和传感器探测帧率一致。
1、激光雷达实例(sensor.lidar.ray_cast类)
Lidar attributes
| Blueprint attribute | Type | Default | Description |
|---|---|---|---|
channels | int | 32 | Number of lasers. |
range | float | 10.0 | Maximum distance to measure/raycast in meters (centimeters for CARLA 0.9.6 or previous). |
points_per_second | int | 56000 | Points generated by all lasers per second. |
rotation_frequency | float | 10.0 | LIDAR rotation frequency. |
upper_fov | float | 10.0 | Angle in degrees of the highest laser. |
lower_fov | float | -30.0 | Angle in degrees of the lowest laser. |
atmosphere_attenuation_rate | float | 0.004 | Coefficient that measures the LIDAR instensity loss per meter. Check the intensity computation above. |
dropoff_general_rate | float | 0.45 | General proportion of points that are randomy dropped. |
dropoff_intensity_limit | float | 0.8 | For the intensity based drop-off, the threshold intensity value above which no points are dropped. |
dropoff_zero_intensity | float | 0.4 | For the intensity based drop-off, the probability of each point with zero intensity being dropped. |
sensor_tick | float | 0.0 | Simulation seconds between sensor captures (ticks). |
noise_stddev | float | 0.0 | Standard deviation of the noise model to disturb each point along the vector of its raycast. |
Output attributes
| Sensor data attribute | Type | Description |
|---|---|---|
frame | int | Frame number when the measurement took place. |
timestamp | double | Simulation time of the measurement in seconds since the beginning of the episode. |
transform | carla.Transform | Location and rotation in world coordinates of the sensor at the time of the measurement. |
horizontal_angle | float | Angle (radians) in the XY plane of the LIDAR in the current frame. |
channels | int | Number of channels (lasers) of the LIDAR. |
get_point_count(channel) | int | Number of points per channel captured this frame. |
raw_data | bytes | Array of 32-bits floats (XYZI of each point). |
2、输出实例(carla.LidarMeasurement类)
Instance Variables
channels (int)
Number of lasers shot.
horizontal_angle (float – radians)
Horizontal angle the LIDAR is rotated at the time of the measurement.
raw_data (bytes)
Received list of 4D points. Each point consists of [x,y,z] coordiantes plus the intensity computed for that point.
Methods
save_to_disk(self, path)
Saves the point cloud to disk as a .ply file describing data from 3D scanners. The files generated are ready to be used within MeshLab, an open source system for processing said files. Just take into account that axis may differ from Unreal Engine and so, need to be reallocated.- Parameters:
path(str)
- Parameters:
雷达和激光雷达的工作原理类似,都是通过发射和接收无线信号来判断障碍物与传感器的相对位置,二者的区别在于发射的信号类型不同,激光的穿透能力和抗衰减能力强于普通无线电信号,会导致二者的效果不同。但激光雷达的成本高于普通雷达,因此具体使用哪种应根据使用场景决定。
九、语义激光雷达(SemanticLidar)
语义激光雷达可以看作是激光雷达和语义相机的结合,但与激光雷达有两个不同点:
- 激光语义雷达的返回值除了包含坐标点外,还包含入射角与表面法线之间的余弦值和CARLA对对象命名的语义标签。
- 激光语义雷达不包含点强度、删除点和噪声属性。
1、语义激光雷达实例(sensor.lidar.ray_cast_semantic类)
SemanticLidar attributes
| Blueprint attribute | Type | Description |
|---|---|---|
channels | int | 32 |
range | float | 10.0 |
points_per_second | int | 56000 |
rotation_frequency | float | 10.0 |
upper_fov | float | 10.0 |
lower_fov | float | -30.0 |
sensor_tick | float | 0.0 |
Output attributes
| Sensor data attribute | Type | Description |
|---|---|---|
frame | int | Frame number when the measurement took place. |
timestamp | double | Simulation time of the measurement in seconds since the beginning of the episode. |
transform | carla.Transform | Location and rotation in world coordinates of the sensor at the time of the measurement. |
horizontal_angle | float | Angle (radians) in the XY plane of the LIDAR in the current frame. |
channels | int | Number of channels (lasers) of the LIDAR. |
get_point_count(channel) | int | Number of points per channel captured in the current frame. |
raw_data | bytes | Array containing the point cloud with instance and semantic information. For each point, four 32-bits floats are stored. XYZ coordinates. cosine of the incident angle. Unsigned int containing the index of the object hit. Unsigned int containing the semantic tag of the object it. |
2、输出实例(carla.SemanticLidarMeasurement类)
Instance Variables
- channels (int)
Number of lasers shot. - horizontal_angle (float – radians)
Horizontal angle the LIDAR is rotated at the time of the measurement. - raw_data (bytes)
Received list of raw detection points. Each point consists of [x,y,z] coordinates plus the cosine of the incident angle, the index of the hit actor, and its semantic tag.
Methods
- save_to_disk(self, path)
Saves the point cloud to disk as a .ply file describing data from 3D scanners. The files generated are ready to be used within MeshLab, an open-source system for processing said files. Just take into account that axis may differ from Unreal Engine and so, need to be reallocated.- Parameters:
path(str)
- Parameters:
第二类传感器
一、碰撞检测
每次有主物体(例如小车)与环境中的其他物体发生碰撞时,传感器记录一个碰撞事件。
碰撞检测传感器没有可配置的参数
1、碰撞检测实例
Output attributes
| Sensor data attribute | Type | Description |
|---|---|---|
frame | int | Frame number when the measurement took place. |
timestamp | double | Simulation time of the measurement in seconds since the beginning of the episode. |
transform | carla.Transform | Location and rotation in world coordinates of the sensor at the time of the measurement. |
actor | carla.Actor | Actor that measured the collision (sensor's parent). |
other_actor | carla.Actor | Actor against whom the parent collided. |
normal_impulse | carla.Vector3D | Normal impulse result of the collision. |
2、输出实例
Instance Variables
actor (carla.Actor)
传感器附着的对象,用来检测碰撞,返回一个carla.Actor类,包括了该对象的详细属性
other_actor (carla.Actor)
被碰撞的对象,也是一个carla.Actor类
normal_impulse (carla.Vector3D – N*s)
由碰撞造成的推动力,用包含x,y,z的三维向量来表示
二、压线检测
当目标车辆穿过行车线时记录一个事件。
压线检测传感器没有可配置的参数
1、压线检测实例(sensor.other.lane_invasion类)
Output attributes
| Sensor data attribute | Type | Description |
|---|---|---|
frame | int | Frame number when the measurement took place. |
timestamp | double | Simulation time of the measurement in seconds since the beginning of the episode. |
transform | carla.Transform | Location and rotation in world coordinates of the sensor at the time of the measurement. |
actor | carla.Actor | Vehicle that invaded another lane (parent actor). |
crossed_lane_markings | list(carla.LaneMarking) | List of lane markings that have been crossed. |
2.、输出实例(carla.LaneInvasionEvent 类)
Instance Variables
actor (carla.Actor)
实行压线并附有压线传感器的actor
crossed_lane_markings (list(carla.LaneMarking))
被传感器检测到发生压线的行车线标号清单
三、障碍物检测
当车辆前方出现一个障碍物时,传感器会发送数据。
1、障碍物检测实例(sensor.other.obstacle类)
Obstacle detector attributes
| Blueprint attribute | Type | Default | Description |
|---|---|---|---|
distance | float | 5 | Distance to trace. |
hit_radius | float | 0.5 | Radius of the trace. |
only_dynamics | bool | False | If true, the trace will only consider dynamic objects. |
debug_linetrace | bool | False | If true, the trace will be visible. |
sensor_tick | float | 0.0 | Simulation seconds between sensor captures (ticks). |
Output attributes
| Sensor data attribute | Type | Description |
|---|---|---|
frame | int | Frame number when the measurement took place. |
timestamp | double | Simulation time of the measurement in seconds since the beginning of the episode. |
transform | carla.Transform | Location and rotation in world coordinates of the sensor at the time of the measurement. |
actor | carla.Actor | Actor that detected the obstacle (parent actor). |
other_actor | carla.Actor | Actor detected as an obstacle. |
distance | float | Distance from actor to other_actor. |
2、 输出实例(carla.ObstacleDetectionEvent类)
Instance Variables
actor (carla.Actor)
传感器附着的母对象(汽车)
other_actor (carla.Actor)
被认为时障碍物的对象
distance (float – meters)
对象距离障碍物的距离
后续有时间我会尽量把英文部分一点一点翻译过来。

为开发者提供学习成长、分享交流、生态实践、资源工具等服务,帮助开发者快速成长。
更多推荐


 36
36 1
1- 0


 已为社区贡献4条内容

所有评论(0)