
torchserve使用教程
官方文档地址:https://github.com/pytorch/serve/blob/master/docs/README.mdhttps://github.com/pytorch/serve/blob/master/docs/README.md下载项目:git cloneGitHub - pytorch/serve: Model Serving on PyTorch------Serving
官方文档地址:
下载项目:
git clone GitHub - pytorch/serve: Model Serving on PyTorch
---------------------Serving quick start------------------------------
注:还需要安装jdk11
(1)安装依赖项
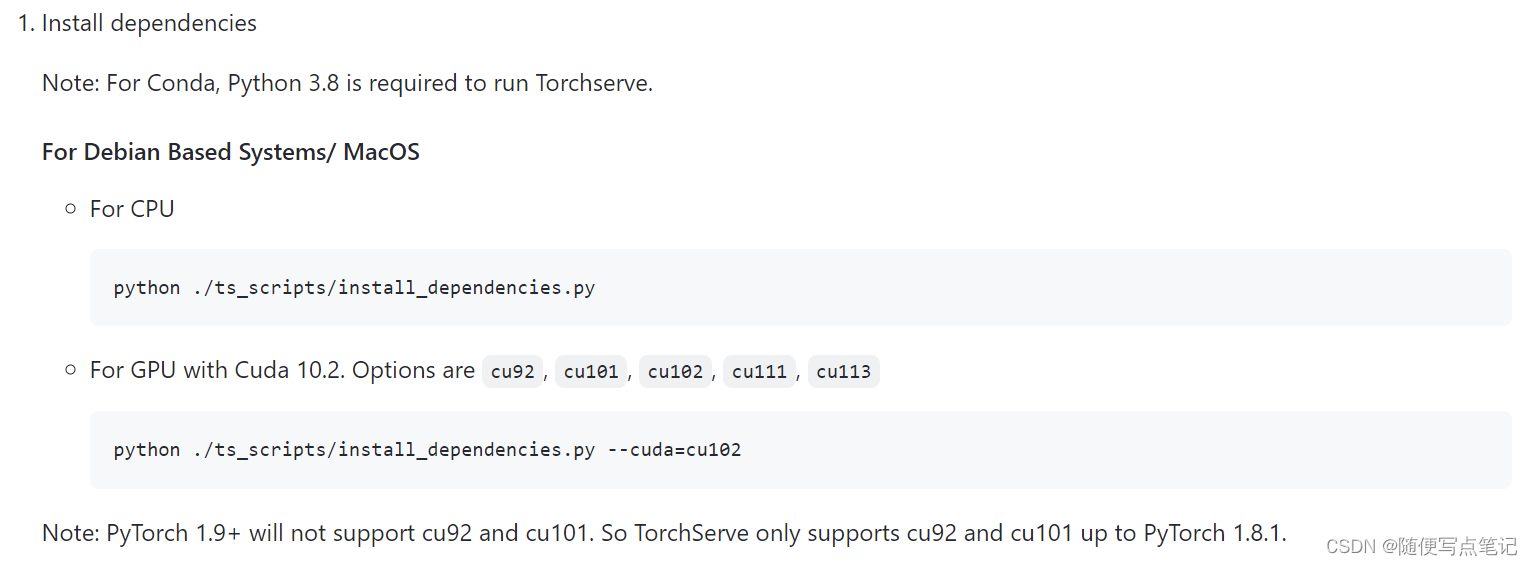
到源码根目录下运行:安装GPU的依赖
python ./ts_scripts/install_dependencies.py --cuda=cu102
(2)安装torchserve, torch-model-archiver and torch-workflow-archiver
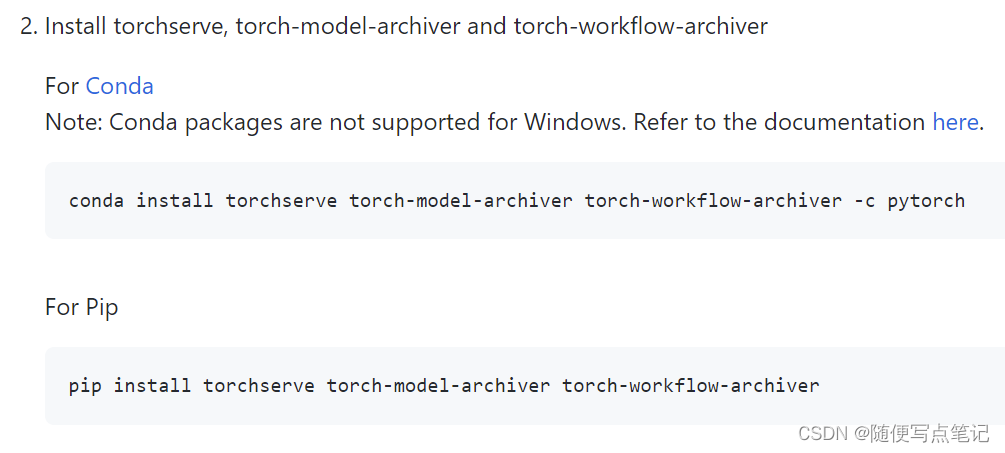
使用pip安装:
pip install torchserve torch-model-archiver torch-workflow-archiver(3)源码安装:
若要对源码进行开发,安装方式如下:
NOTE: This script uninstalls existing torchserve, torch-model-archiver and torch-workflow-archiver installations
python ./ts_scripts/install_dependencies.py --environment=dev
python ./ts_scripts/install_from_src.py
Store a Model
新建一个文件夹
mkdir model_store下载官方示例模型
wget https://download.pytorch.org/models/densenet161-8d451a50.pthArchive the model (参数解析后续详解)
--serialized-file:pth文件名
--export-path :mar文件输出路径,不指定则为当前工作路径
torch-model-archiver --model-name densenet161 --version 1.0 --model-file ./serve/examples/image_classifier/densenet_161/model.py --serialized-file densenet161-8d451a50.pth --export-path model_store --extra-files ./serve/examples/image_classifier/index_to_name.json --handler image_classifier
运行完成后在model_store下会生成一个.mar的模型
Start TorchServe to serve the model启动服务
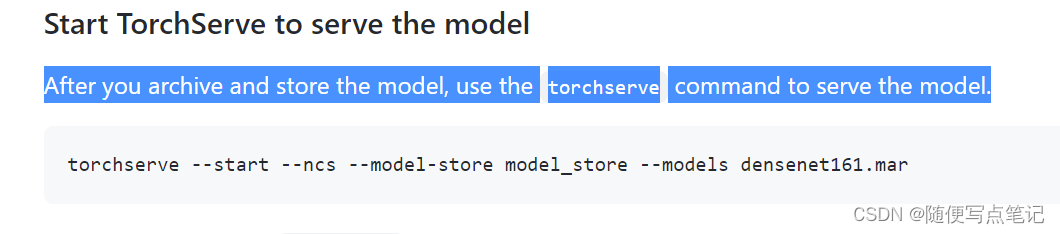
--model-store:mar文件夹路径
(其余参数后续详解)
torchserve --start --ncs --model-store model_store --models densenet161.mar
注:其中可能会有报错,确保jdk11环境;其中还会有python报错,缺少哪些环境就pip安装。
Get predictions from a model 输入图片进行预测
(1)python程序调用的方式:
pip install -U grpcio protobuf grpcio-tools
python -m grpc_tools.protoc --proto_path=frontend/server/src/main/resources/proto/ --python_out=ts_scripts --grpc_python_out=ts_scripts frontend/server/src/main/resources/proto/inference.proto frontend/server/src/main/resources/proto/management.proto
python ts_scripts/torchserve_grpc_client.py infer densenet161 examples/image_classifier/kitten.jpg
(2)REST API
最后是图片:
curl http://127.0.0.1:8080/predictions/densenet161 -T kitten_small.jpg
return返回示例
[
  {
    "tiger_cat": 0.46933549642562866
  },
  {
    "tabby": 0.4633878469467163
  },
  {
    "Egyptian_cat": 0.06456148624420166
  },
  {
    "lynx": 0.0012828214094042778
  },
  {
    "plastic_bag": 0.00023323034110944718
  }
]
------------Torch Model archiver for TorchServe----------------
torchserve需要一个.mar文件,转换自pytorch的pth文件或torchscript(jit的pt) 文件。使用独立的命令行指令,“torch-model-archiver”,可以把模型文件转换为mar文件。
创建mar存档模型需要提供:
(1)model name
(2)model file
(3)Serialized file
安装
pip install torch-model-archiver
源码安装
git clone https://github.com/pytorch/serve.git
cd serve/model-archiver
pip install .
命令行相关参数和用法
示例:
torch-model-archiver --model-name densenet161 --version 1.0 --model-file examples/image_classifier/densenet_161/model.py --serialized-file densenet161-8d451a50.pth --extra-files examples/image_classifier/index_to_name.json --handler image_classifier
$ torch-model-archiver -h
usage: torch-model-archiver [-h] --model-name MODEL_NAME  --version MODEL_VERSION_NUMBER
                      --model-file MODEL_FILE_PATH --serialized-file MODEL_SERIALIZED_PATH
                      --handler HANDLER [--runtime {python,python2,python3}]
                      [--export-path EXPORT_PATH] [-f] [--requirements-file]

Model Archiver Tool

optional arguments:
  -h, --help            show this help message and exit
  --model-name MODEL_NAME
                        Exported model name. Exported file will be named as
                        model-name.mar and saved in current working directory
                        if no --export-path is specified, else it will be
                        saved under the export path
  --serialized-file SERIALIZED_FILE
                        Path to .pt or .pth file containing state_dict in
                        case of eager mode or an executable ScriptModule
                        in case of TorchScript.
  --model-file MODEL_FILE
                        Path to python file containing model architecture.
                        This parameter is mandatory for eager mode models.
                        The model architecture file must contain only one
                        class definition extended from torch.nn.modules.
  --handler HANDLER     TorchServe's default handler name  or handler python
                        file path to handle custom TorchServe inference logic.
  --extra-files EXTRA_FILES
                        Comma separated path to extra dependency files.
  --runtime {python,python2,python3}
                        The runtime specifies which language to run your
                        inference code on. The default runtime is
                        RuntimeType.PYTHON. At the present moment we support
                        the following runtimes python, python2, python3
  --export-path EXPORT_PATH
                        Path where the exported .mar file will be saved. This
                        is an optional parameter. If --export-path is not
                        specified, the file will be saved in the current
                        working directory.
  --archive-format {tgz,default}
                        The format in which the model artifacts are archived.
                        "tgz": This creates the model-archive in <model-name>.tar.gz format.
                        If platform hosting requires model-artifacts to be in ".tar.gz"
                        use this option.
                        "no-archive": This option creates an non-archived version of model artifacts
                        at "export-path/{model-name}" location. As a result of this choice,
                        MANIFEST file will be created at "export-path/{model-name}" location
                        without archiving these model files
                        "default": This creates the model-archive in <model-name>.mar format.
                        This is the default archiving format. Models archived in this format
                        will be readily hostable on TorchServe.
  -f, --force           When the -f or --force flag is specified, an existing
                        .mar file with same name as that provided in --model-
                        name in the path specified by --export-path will
                        overwritten
  -v, --version         Model's version.
  -r, --requirements-file
                        Path to requirements.txt file containing a list of model specific python
                        packages to be installed by TorchServe for seamless model serving.
--model-name 导出的模型文件名,如果未指定--export-path则保存在当前工作目录下,否则在exportpath下
--serialized-file pt或pth文件路径
--model-file python模型结构文件路径,必须包含且仅包含一个继承自torch.nn.modules的类
--handler torchserve默认的handler名称,或者是handler python file path来自定义torchserve的推理逻辑
--extra-files 额外的依赖文件
--runtime 推理语言,默认python3
--export-path 输出mar文件保存位置,不指定则存在工作目录下
--archive-format 存储格式 默认mar
--force 存在同名mar文件则强制覆盖
--version 版本
更多细节:
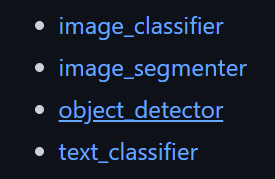
torchserve现在提供以下内置的handlers
image_classifierobject_detectortext_classifierimage_segmenter
自定义handler
(1)写一个serve/ts/torch_handler/base_handler.py中 BaseHandler的派生类,放在ts/torch_handler/下
(2)更新model-archiver/model_packaging.py ,添加新的类别名称
(3)运行测试单元serve/ts/torch_handler/unit_tests/,并在提交之前运行serve/torchserve_sanity.py
For more 自定义的details refer default handler documentation or custom handler documentation
---------------------Running TorchServe-----------------------------
简介:
在生产设置中,TorchServe可用于多种类型的推理。它提供了易于使用的命令行界面,并利用基于REST的API处理状态预测请求。
例如,你想要开发一款应用程序,让你的用户拍照,它会告诉他们在场景中检测到了什么物体,并预测这些物体可能是什么。您可以使用TorchServe为对象检测和识别模型提供预测端点,该模型接收图像,然后返回预测。您还可以使用自定义服务修改TorchServe行为,并运行多个模型。Examples文件夹中有一些自定义服务的示例。
技术细节和代码示例:
现在您已经对TorchServe有了一个高层次的了解,让我们来更深入了解一下。TorchServe采用Pytorch深度学习模型,并将其封装在一组RESTAPI中。目前,它附带一个内置的Web服务器,您可以从命令行运行该服务器。此命令行调用接受您想要服务的单个或多个型号,以及控制端口、主机和日志记录的其他可选参数。TorchServe支持运行定制服务来处理特定的推理处理逻辑。这些内容在定制服务文档中有更详细的介绍。(后续介绍自定义MNIST的过程示例【Digit recognition with MNIST】serve/examples/image_classifier/mnist at master · pytorch/serve · GitHub)
控制台指令
$ torchserve --help
usage: torchserve [-h] [-v | --version]
                          [--start]
                          [--stop]
                          [--ts-config TS_CONFIG]
                          [--model-store MODEL_STORE]
                          [--workflow-store WORKFLOW_STORE]
                          [--models MODEL_PATH1 MODEL_NAME=MODEL_PATH2... [MODEL_PATH1 MODEL_NAME=MODEL_PATH2... ...]]
                          [--log-config LOG_CONFIG]

torchserve

mandatory arguments:
  --model-store MODEL_STORE
                        Model store location where models can be loaded


optional arguments:
  -h, --help            show this help message and exit
  -v, --version         Return TorchServe Version
  --start               Start the model-server
  --stop                Stop the model-server
  --ts-config TS_CONFIG
                        Configuration file for TorchServe

  --models MODEL_PATH1 MODEL_NAME=MODEL_PATH2... [MODEL_PATH1 MODEL_NAME=MODEL_PATH2... ...]
                        Models to be loaded using [model_name=]model_location
                        format. Location can be a HTTP URL, a model archive
                        file or directory contains model archive files in
                        MODEL_STORE.
  --log-config LOG_CONFIG
                        Log4j configuration file for TorchServe
  --ncs, --no-config-snapshots
                        Disable snapshot feature
  --workflow-store WORKFLOW_STORE
                        Workflow store location where workflow can be loaded. Defaults to model-store
必选参数:
--model-store 模型存储位置
可选参数:
--help
--version return torchserve version
--start Start the model-server
--stop Stop the model-server
--models 可有多个,<model_name>=<model_path> pairs,其中model_path(mar文件位置)可以是本地或远程链接;若加载model-store下的所有模型,使用“all”
torchserve --model-store /models --start --models all
多模型加载的更多详细使用细节,见后续【Serving Multiple Models with TorchServe】serve/server.md at master · pytorch/serve · GitHub
--workflow-store Workflow store location where workflow can be loaded. Defaults to model-store,
A location where default or local workflows are stored. The workflows available in workflow store can be registered in TorchServe via register api call.
--ts-config torchserve进阶配置,见后续【Advanced configuration】serve/configuration.md at master · pytorch/serve · GitHub
--log-config Log4j configuration file for TorchServe 此参数将覆盖服务器中默认log4j2.xml。
--ncs 禁用快照功能
更多定制功能见后续【Custom Service】https://github.com/pytorch/serve/blob/master/docs/custom_service.md
日志和指标 见后续【Logging in Torchserve serve/logging.md at master · pytorch/serve · GitHub】 【Custom Service https://github.com/pytorch/serve/blob/master/docs/custom_service.md】
-------------------TorchServe REST API----------------------------------
当TorchServe启动时,会启动两个web services
默认的, TorchServe listens on port 8080 for the Inference API and 8081 for the Management API.
两个API默认只能本地访问,若需要远程访问,见后续【 TorchServe Configuration. serve/configuration.md at master · pytorch/serve · GitHub 】
------Inference API
显示 inference APIs所有信息
curl -X OPTIONS http://localhost:8080
health check
curl http://localhost:8080/ping

Predictions API
要调用模型默认版本的返回结果,make a REST call to
POST /predictions/{model_name}
例子:
curl http://localhost:8080/predictions/resnet-18 -T kitten_small.jpg

or:

curl http://localhost:8080/predictions/resnet-18 -F "data=@kitten_small.jpg"
若存在多版本,则要指定版本号调用:
POST /predictions/{model_name}/{version}
例子:
curl http://localhost:8080/predictions/resnet-18/2.0 -T kitten_small.jpg

or:

curl http://localhost:8080/predictions/resnet-18/2.0 -F "data=@kitten_small.jpg"
若成功,返回json,

Explanations API
返回Explanations
POST /explanations/{model_name}
例子:
curl http://127.0.0.1:8080/explanations/mnist -T examples/image_classifier/mnist/test_data/0.png

KFServing Inference API
略
------Management API
# To view all management APIs:
curl -X OPTIONS http://localhost:8081
TorchServe提供了以下API,允许您在运行时管理模型:端口号8081

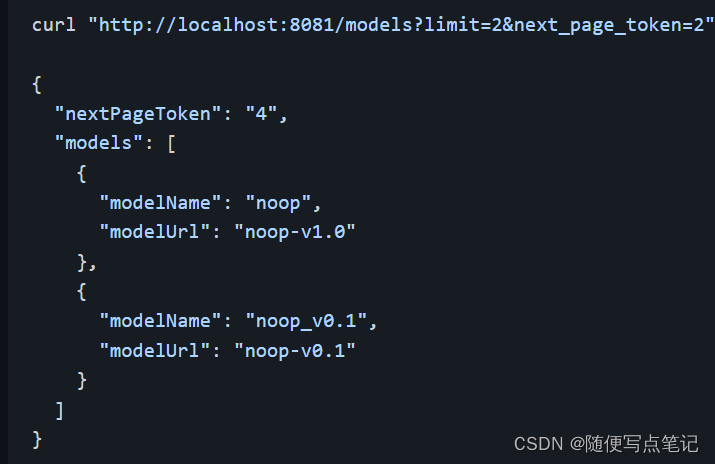
查看所有模型

curl http://127.0.0.1:8081/models

or

curl "http://localhost:8081/models?limit=2&next_page_token=2"
输出:
注册新的模型
maskrcnn.mar 在model-store下,url也可以是远程位置
curl -X POST http://localhost:8081/models?url=maskrcnn.mar若注册成功,返回如下的:
{
"status": "Model \"squeezenet_v1.1\" Version: 1.0 registered with 0 initial workers. Use scale workers API to add workers for the model."
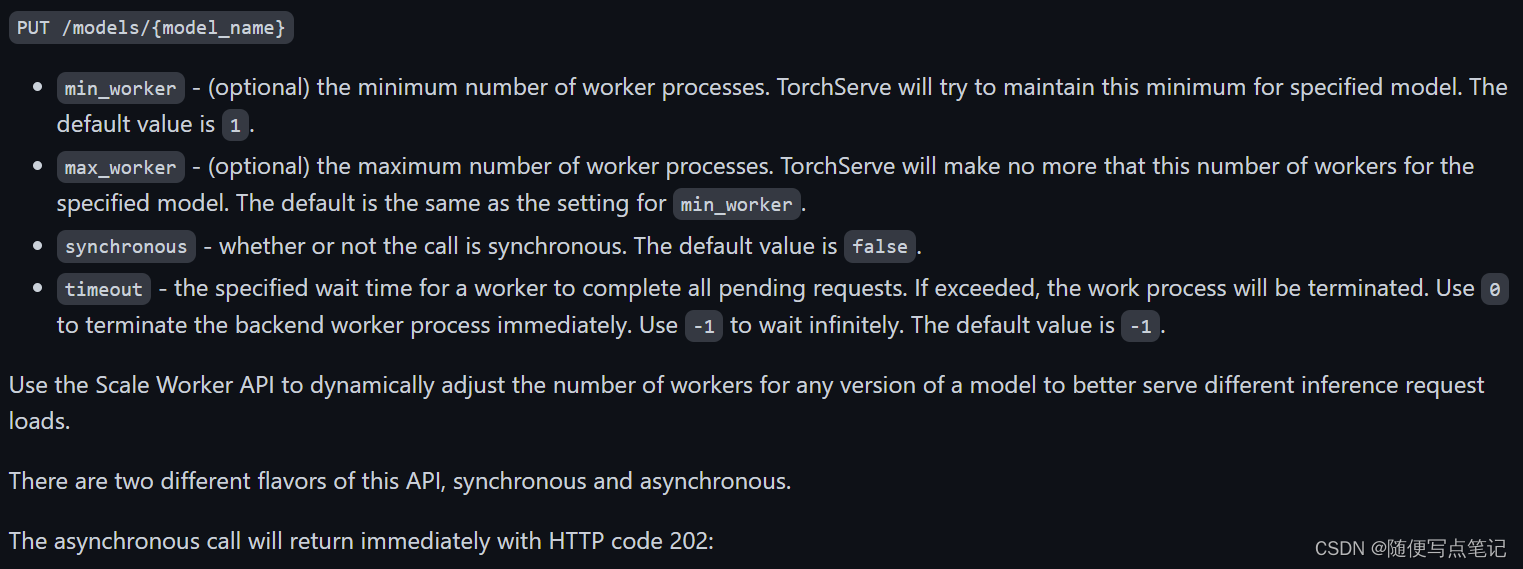
}Scale workers动态的修改worker的数量,或自定义模型的配置
使用Scale Worker API动态调整任何版本模型的工作器数量,以便更好地服务于不同的推理请求负载。
参数如下:
例子:
curl -v -X PUT "http://localhost:8081/models/noop?min_worker=3&synchronous=true"

< HTTP/1.1 200 OK
< content-type: application/json
< x-request-id: b72b1ea0-81c6-4cce-92c4-530d3cfe5d4a
< content-length: 63
< connection: keep-alive
<
{
  "status": "Workers scaled to 3 for model: noop"
}
多版本情况:
curl -v -X PUT "http://localhost:8081/models/noop/2.0?min_worker=3&synchronous=true"

< HTTP/1.1 200 OK
< content-type: application/json
< x-request-id: 3997ccd4-ae44-4570-b249-e361b08d3d47
< content-length: 77
< connection: keep-alive
<
{
  "status": "Workers scaled to 3 for model: noop, version: 2.0"
}
查看模型运行状态
GET /models/{model_name}
Use the Describe Model API to get detail runtime status of default version of a model:
curl http://localhost:8081/models/noop
[
    {
      "modelName": "noop",
      "modelVersion": "1.0",
      "modelUrl": "noop.mar",
      "engine": "Torch",
      "runtime": "python",
      "minWorkers": 1,
      "maxWorkers": 1,
      "batchSize": 1,
      "maxBatchDelay": 100,
      "workers": [
        {
          "id": "9000",
          "startTime": "2018-10-02T13:44:53.034Z",
          "status": "READY",
          "gpu": false,
          "memoryUsage": 89247744
        }
      ]
    }
]
查看所有模型状态
GET /models/{model_name}/all
注销模型
curl -X DELETE http://localhost:8081/models/noop/1.0
返回:
{
  "status": "Model \"noop\" unregistered"
}
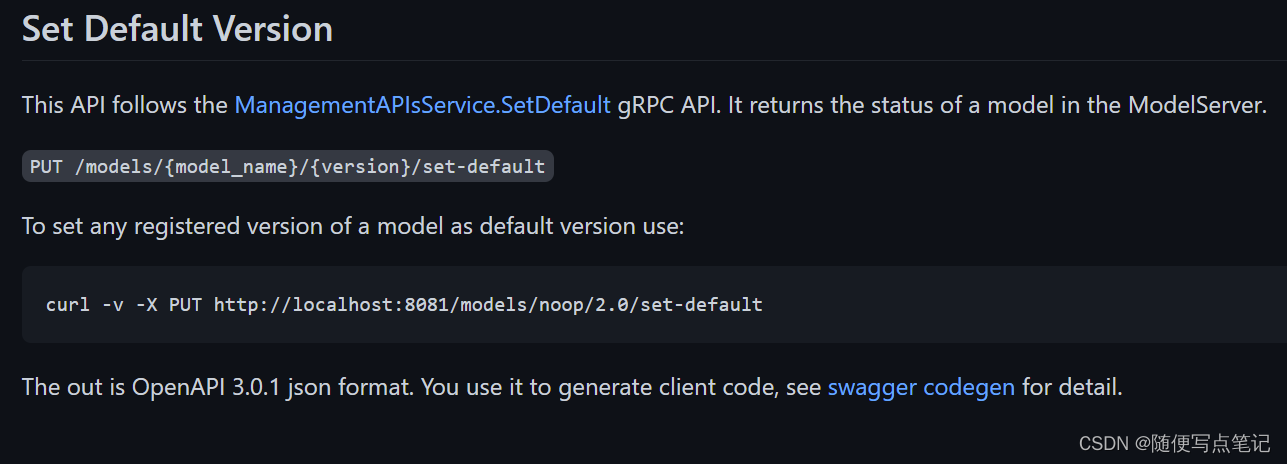
设置默认版本
--------------Logging in Torchserve---------------------------------------
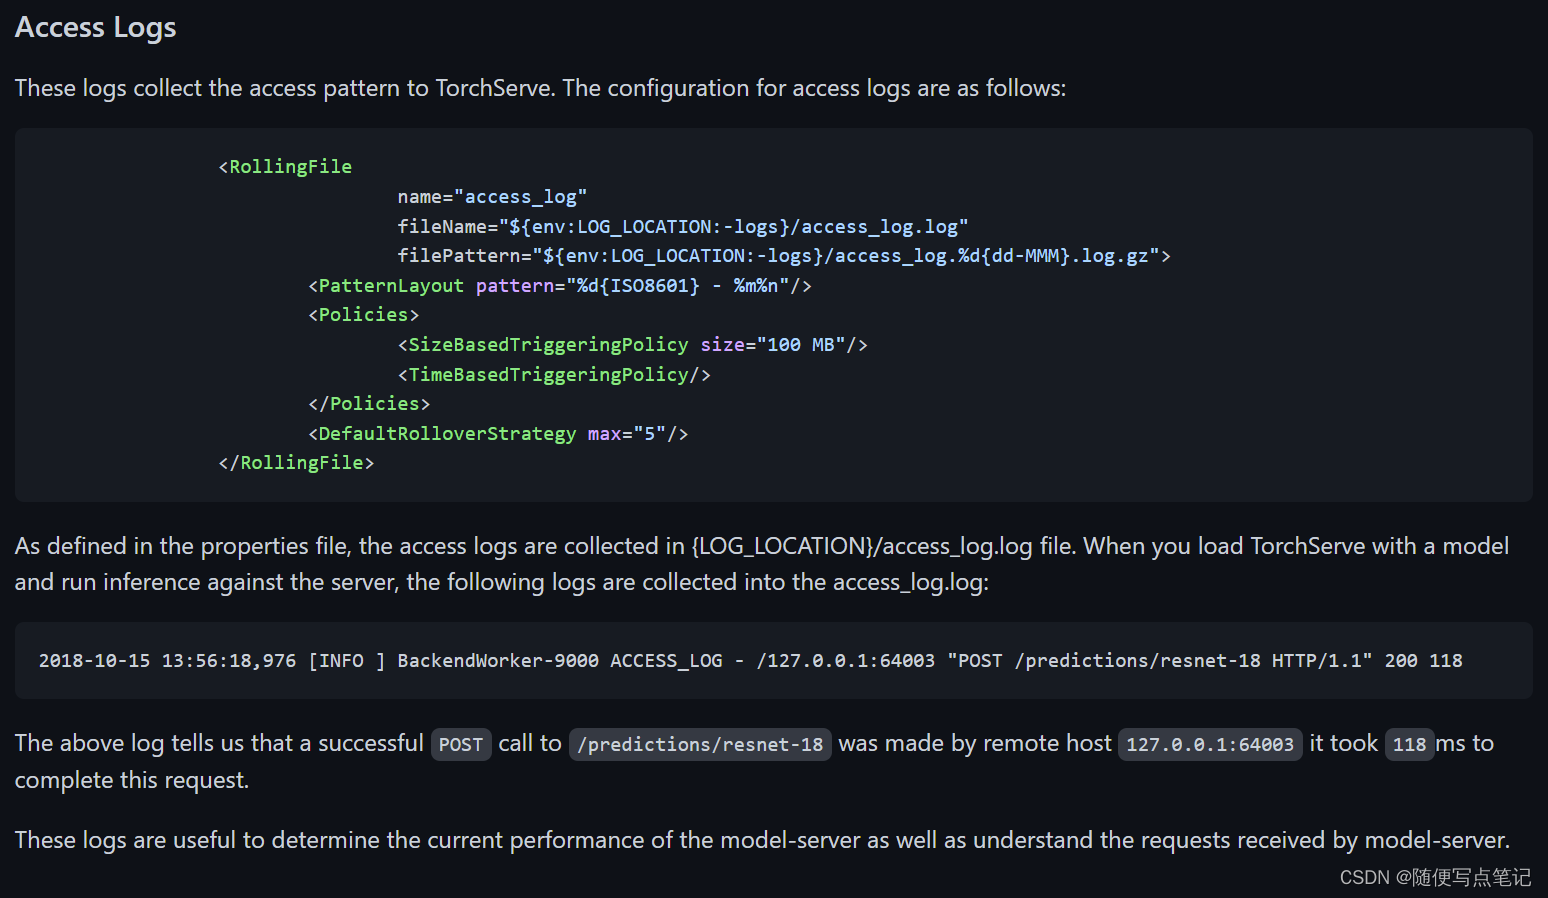
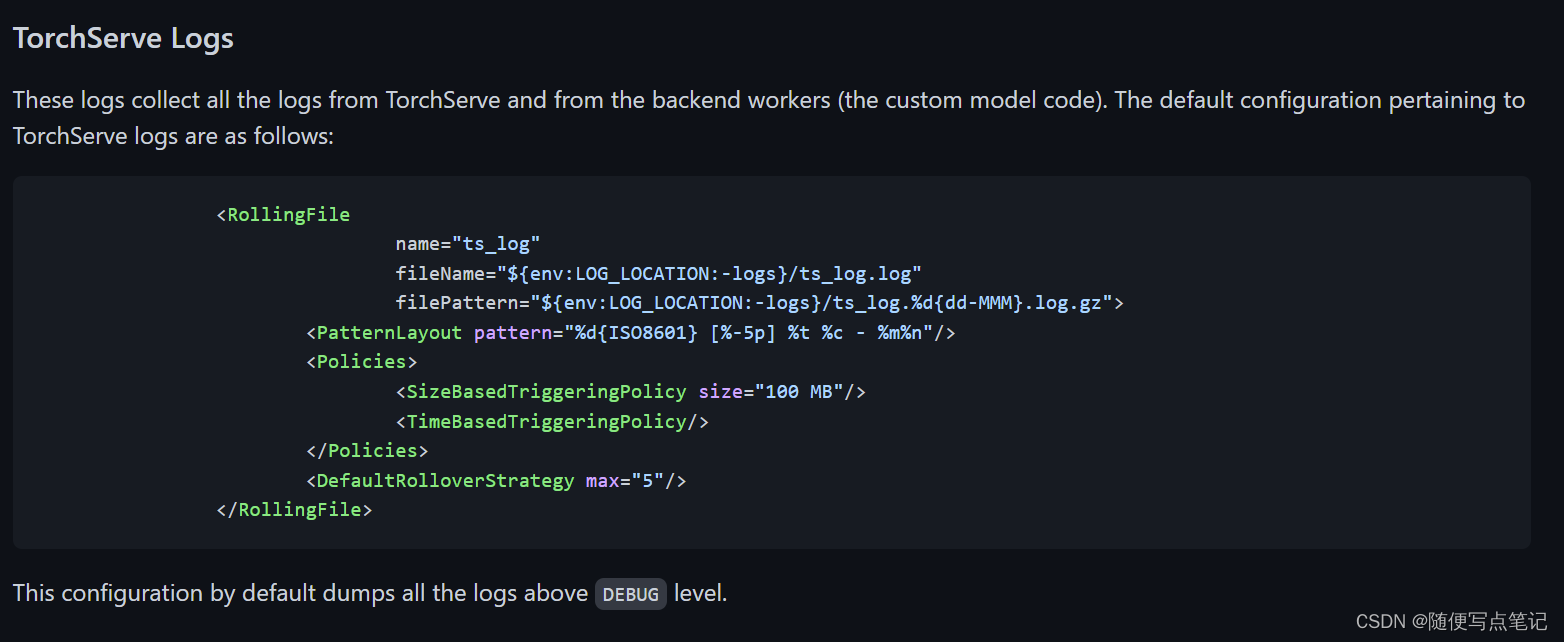
TorchServe currently provides the following types of logs
- Access logs 访问日志
- TorchServe logs torchserve运行日志
配置文件在serve/frontend/server/src/main/resources/log4j2.xml
访问日志和配置:
运行日志和配置:
自定义配置
自定义一个log4j2.xml,由以下步骤启动TorchServe:
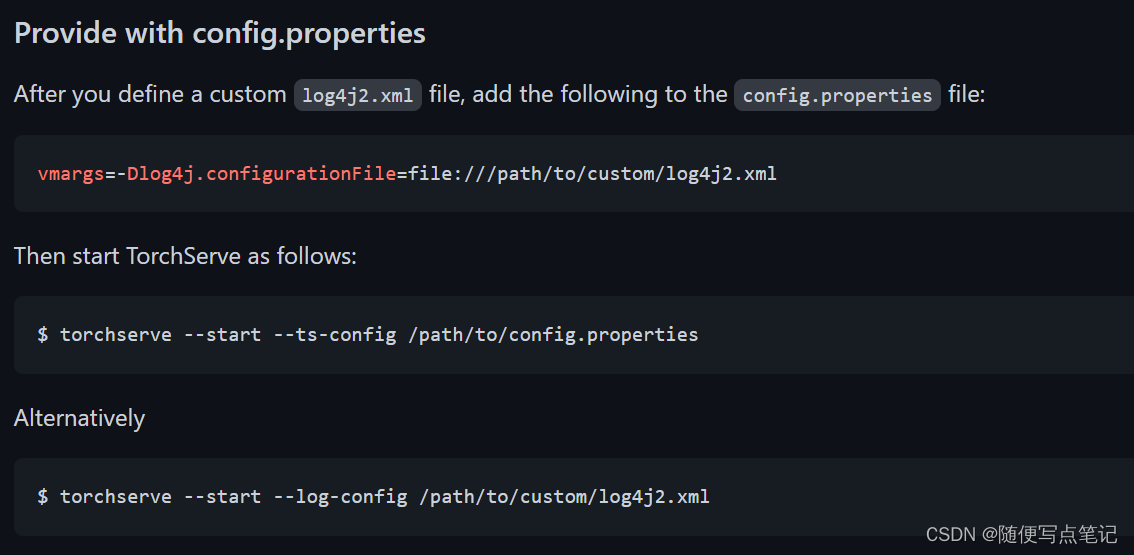
异步log
如果您的模型是超轻量级的,并且您想要高吞吐量,请考虑启用异步日志记录。如果TorchServe意外终止,日志输出可能会延迟,并且最新的日志可能会丢失。默认情况下,异步日志记录处于禁用状态。要启用异步日志记录,请在config.properties中添加以下属性:
async_logging=true--------------------------Custom Service----------------------------------
定制服务:编写一个python脚本来自定义torchServe,并在model Archiver时将其和model一起打包
------Custom handlers 自定义handlers
通过编写一个Python脚本来自定义TorchServe的行为,当您使用Torch Model archiver时,该脚本与模型一起打包。TorchServe在运行时执行此代码。
提供一个自定义的python脚本,完成以下功能:
(1)初始化模型结构
(2)输入图像预处理
(3)自定义如何调用模型进行推理或explanations。
(4)数据的后处理
以下内容适用于所有类型的自定义处理程序:
(1)data - 来自请求的输入数据
(2)context - torchserve context 。用于自定义model_name, model_dir, manifest, batch_size, gpu等
---start with BaseHandler!!
BaseHandler(serve/base_handler.py at master · pytorch/serve · GitHub)实现了您需要的大部分功能。您可以从它派生一个新类,如示例和默认处理程序中所示。大多数情况下,您只需要覆盖预处理或后处理。
Custom handler with class level entry point
您可以通过使用任何名称的类来创建自定义处理程序,但它必须具有Initialize和Handle方法。
注:如果您计划在同一个python文件中包含多个类,请确保该处理程序类是位置上的第一个。
示例:
class ModelHandler(object):
    """
    自定义handler的实现
    """

    def __init__(self):
        self._context = None
        self.initialized = False
        self.model = None
        self.device = None

    def initialize(self, context):
        """
        Invoke by torchserve for loading a model
        :param context: context contains模型的属性
        :return:
        """

        #  load the model
        self.manifest = context.manifest

        properties = context.system_properties
        model_dir = properties.get("model_dir")
        self.device = torch.device("cuda:" + str(properties.get("gpu_id")) if torch.cuda.is_available() else "cpu")

        # Read model serialize/pt file
        serialized_file = self.manifest['model']['serializedFile']
        model_pt_path = os.path.join(model_dir, serialized_file)
        if not os.path.isfile(model_pt_path):
            raise RuntimeError("Missing the model.pt file")

        self.model = torch.jit.load(model_pt_path)

        self.initialized = True


    def handle(self, data, context):
        """
        Invoke by TorchServe for prediction request.
        Do pre-processing of data, prediction using model and postprocessing of prediciton output
        :param data: Input data for prediction
        :param context: Initial context contains model server system properties.
        :return: prediction output

        由TorchServe为预测请求调用。
对数据进行预处理,利用模型进行预测,并对预测结果进行后处理。
:param data:用于预测的输入数据。
:param context:初始上下文包含模型服务器系统属性。
:RETURN:预测输出
        """
        pred_out = self.model.forward(data)
        return pred_out
------进阶
return a custom error code 错误输出
from ts.torch_handler.base_handler import BaseHandler
from ts.utils.util import PredictionException

class ModelHandler(BaseHandler):
    """
    A custom model handler implementation.
    """

    def handle(self, data, context):
        # Some unexpected error - returning error code 513
        raise PredictionException("Some Prediction Error", 513)
一个完整的自定义handler的应有的结构:
# custom handler file

# model_handler.py

"""
ModelHandler defines a custom model handler.
"""

from ts.torch_handler.base_handler import BaseHandler

class ModelHandler(BaseHandler):
    """
    A custom model handler implementation.
    """

    def __init__(self):
        self._context = None
        self.initialized = False
        self.explain = False
        self.target = 0

    def initialize(self, context):
        """
        Initialize model. This will be called during model loading time
        :param context: Initial context contains model server system properties.
        :return:
        """
        self._context = context
        self.initialized = True
        #  load the model, refer 'custom handler class' above for details

    def preprocess(self, data):
        """
        Transform raw input into model input data.
        :param batch: list of raw requests, should match batch size
        :return: list of preprocessed model input data
        """
        # Take the input data and make it inference ready
        preprocessed_data = data[0].get("data")
        if preprocessed_data is None:
            preprocessed_data = data[0].get("body")

        return preprocessed_data


    def inference(self, model_input):
        """
        Internal inference methods
        :param model_input: transformed model input data
        :return: list of inference output in NDArray
        """
        # Do some inference call to engine here and return output
        model_output = self.model.forward(model_input)
        return model_output

    def postprocess(self, inference_output):
        """
        Return inference result.
        :param inference_output: list of inference output
        :return: list of predict results
        """
        # Take output from network and post-process to desired format
        postprocess_output = inference_output
        return postprocess_output

    def handle(self, data, context):
        """
        Invoke by TorchServe for prediction request.
        Do pre-processing of data, prediction using model and postprocessing of prediciton output
        :param data: Input data for prediction
        :param context: Initial context contains model server system properties.
        :return: prediction output
        """
        model_input = self.preprocess(data)
        model_output = self.inference(model_input)
return self.postprocess(model_output)参考https://github.com/pytorch/serve/blob/master/examples/text_to_speech_synthesizer/waveglow_handler.py
获取更多细节
---------Captum explanations for 自定义 handler
Torchserve returns the captum explanations for Image Classification, Text Classification and BERT models. 调用方式:POST /explanations/{model_name}
这些解释是作为基本处理程序的EXPLAIN_HANDLE方法的一部分编写的。基础处理程序调用此EXPLAIN_HANDLE_METHOD方法。传递给解释句柄方法的参数是预处理数据和原始数据。它调用自定义处理程序的get insights函数,该函数返回captum属性。用户应该编写自己的get_insights功能来获取解释
对于为自定义处理程序提供服务的处理程序,应在处理程序的初始化函数中初始化Captum算法。
用户可以覆盖自定义处理程序中的EXPLAIN_HANDLE函数。用户应该为自定义处理程序定义他们的get_insights方法,以获取Captum属性。
上面的ModelHandler类应该有以下具有Captum功能的方法。
    def initialize(self, context):
        """
        Load the model and its artifacts
        """
        .....
        self.lig = LayerIntegratedGradients(
                captum_sequence_forward, self.model.bert.embeddings
            )

    def handle(self, data, context):
        """
        Invoke by TorchServe for prediction/explanation request.
        Do pre-processing of data, prediction using model and postprocessing of prediction/explanations output
        :param data: Input data for prediction/explanation
        :param context: Initial context contains model server system properties.
        :return: prediction/ explanations output
        """
        model_input = self.preprocess(data)
        if not self._is_explain():
                model_output = self.inference(model_input)
                model_output = self.postprocess(model_output)
            else :
                model_output = self.explain_handle(model_input, data)
            return model_output

    # Present in the base_handler, so override only when neccessary
    def explain_handle(self, data_preprocess, raw_data):
        """Captum explanations handler

        Args:
            data_preprocess (Torch Tensor): Preprocessed data to be used for captum
            raw_data (list): The unprocessed data to get target from the request

        Returns:
            dict : A dictionary response with the explanations response.
        """
        output_explain = None
        inputs = None
        target = 0

        logger.info("Calculating Explanations")
        row = raw_data[0]
        if isinstance(row, dict):
            logger.info("Getting data and target")
            inputs = row.get("data") or row.get("body")
            target = row.get("target")
            if not target:
                target = 0

        output_explain = self.get_insights(data_preprocess, inputs, target)
        return output_explain

    def get_insights(self,**kwargs):
        """
        Functionality to get the explanations.
        Called from the explain_handle method
        """
        pass
-------Extend default handlers拓展自带的handlers
自带的:
在程序中引用自带的handlers
from ts.torch_handler.<default_handler_name> import <DefaultHandlerClass>
例子:
from ts.torch_handler.image_classifier import ImageClassifier

class CustomImageClassifier(ImageClassifier):

    def preprocess(self, data):
        """
        Overriding this method for custom preprocessing.
        :param data: raw data to be transformed
        :return: preprocessed data for model input
        """
        # custom pre-procsess code goes here
        return data
更多例子请看:
serve/examples/image_classifier at master · pytorch/serve · GitHub
serve/Transformer_handler_generalized.py at master · pytorch/serve · GitHub
https://github.com/pytorch/serve/blob/master/examples/text_to_speech_synthesizer/waveglow_handler.py
----自定义handler的model archive
torch-model-archiver --model-name <model-name> --version <model_version_number> --handler model_handler[:<entry_point_function_name>] [--model-file <path_to_model_architecture_file>] --serialized-file <path_to_state_dict_file> [--extra-files <comma_seperarted_additional_files>] [--export-path <output-dir> --model-path <model_dir>] [--runtime python3]

例子:
torch-model-archiver --model-name waveglow_synthesizer --version 1.0 --model-file waveglow_model.py --serialized-file nvidia_waveglowpyt_fp32_20190306.pth --handler waveglow_handler.py --extra-files tacotron.zip,nvidia_tacotron2pyt_fp32_20190306.pth
-----多GPU的使用
在多个GPU的情况下,TorchServe以循环方式选择GPU设备,并将该设备ID传递给上下文对象中的模型处理程序。用户在创建pytorch设备对象时应指定GPU ID,以确保不会在同一GPU中创建所有的Worker。
import torch

class ModelHandler(object):
    """
    A base Model handler implementation.
    """

    def __init__(self):
        self.device = None

    def initialize(self, context):
        properties = context.system_properties
        self.device = torch.device("cuda:" + str(properties.get("gpu_id")) if torch.cuda.is_available() else "cpu")
-----------------Batch Inference with TorchServe--------------------
使用batch inference 来降低torchserve的操作成本
---Batch Inference with TorchServe's default handlers
TorchServe的默认处理程序支持开箱即用的批处理推理,text_classifier处理程序除外。
-----Batch Inference with TorchServe using ResNet-152 model
为支持批量推理,TorchServe需要以下:
(1)使用 “POST /Models“ 管理API或config.properties中的设置配置Batch_Size和max_Batch_Delay。TorchServe需要知道模型可以处理的最大批处理大小,以及TorchServe应该等待满足每个批处理请求的最长时间。
(2)handle代码:TorchServe需要模型handler程序处理批处理推理请求。
详细代码例子,参见serve/Transformer_handler_generalized.py at master · pytorch/serve · GitHub
torchserve model configuration:
从TorchServe 0.4.1开始,有两种方法可以配置TorchServe以使用批处理功能:
- 通过API修改 provide the batch configuration information through POST /models API.
- 修改配置文件provide the batch configuration information through configuration file, config.properties.
我们在这里只关心两个属性:
1.batchsize
2.max_batch_delay:等待接收batch size 大小个请求的最大延迟时间,超过此时间不管接收多少个,都发送给handler
通过API修改的示例:
curl -X POST "localhost:8081/models?url=resnet-152.mar&batch_size=8&max_batch_delay=50"
通过配置文件config.properties修改:
# The following command will register a model "resnet-152.mar" and configure TorchServe to use a batch_size of 8 and a max batch delay of 50 milli seconds, in the config.properties.

models={\
  "resnet-152": {\
    "1.0": {\
        "defaultVersion": true,\
        "marName": "resnet-152.mar",\
        "minWorkers": 1,\
        "maxWorkers": 1,\
        "batchSize": 8,\
        "maxBatchDelay": 50,\
        "responseTimeout": 120\
    }\
  }\
}
通过config.properties修改示例:
配置文件如下:请确定版本号和mar文件无误
load_models=resnet-152-batch_v2.mar
models={\
  "resnet-152-batch_v2": {\
    "2.0": {\
        "defaultVersion": true,\
        "marName": "resnet-152-batch_v2.mar",\
        "minWorkers": 1,\
        "maxWorkers": 1,\
        "batchSize": 3,\
        "maxBatchDelay": 5000,\
        "responseTimeout": 120\
    }\
  }\
}
然后启动
torchserve --start --model-store model_store --ts-config config.properties
----Demo to configure TorchServe ResNet-152 model with batch-supported model using Docker
后续补充
-------------torchserve docker------------------------------
ubuntu安装docker :参考官方文档:Install Docker Engine on Ubuntu | Docker Documentation
安装nvidia container toolkit :Installation Guide — NVIDIA Cloud Native Technologies documentation
创建docker镜像
cd serve/docker

过程中可能出现网络超时问题,请自行修改serve/docker/Dockerfile
创建docker-gpu容器
docker run -it --gpus all -p 8080:8080 -p 8081:8081 -p 8082:8082 -p 7070:7070 -p 7071:7071 -v $(pwd)/model-store:/home/model-server/model-store -v $(pwd)/examples:/home/model-server/examples pytorch/torchserve:latest-gpu--gpus 使用gpu
-p 端口映射
-v 共享文件夹
使用容器
查看运行中的容器:
docker ps
进入容器:
docker exec -it <container_id> /bin/bash
在其中运行torchserve即可,缺少环境请自行安装
服务器A的容器的导出到服务器B
- 容器打包成镜像 # docker commit -m "" -a "" [CONTAINER ID] [新的镜像名] ,其中-m和-a是可选参数,意思分别是描述和作者
- 导出镜像 # docker save -o [新的镜像名.tar] [新的镜像名]
- 拷贝镜像到目标服务器 #
- 导入镜像 # sudo docker load -i [新的镜像名.tar]
- 运行容器 # docker run
例:
服务器A:
docker commit <CONTAINER ID> torchserve_202201
docker save -o torchserve.tar torchserve_202201
服务器B:
docker load -i torchserve.tar
docker run ....(指令和服务器A构建容器时一致,共享文件拷贝过来)

为开发者提供学习成长、分享交流、生态实践、资源工具等服务,帮助开发者快速成长。
更多推荐


 3
3 0
0- 0


 已为社区贡献1条内容

所有评论(0)