XML文件解析--Python
一、对xml的解析及其函数二、xml文件三、python解析一、对xml的解析及其函数官方手册20.5. xml.etree.ElementTree — The ElementTree XML API — Python 3.6.15 documentationXML是一种固有的分层数据格式,最自然的表示方法是使用树,其内元素称作子节点通过 parse() 解析xml文本,返回根元素 tree。(一
目录
一、对xml的解析及其函数
XML 指可扩展标记语言XML 被设计用来传输和存储数据。
XML 是一种固有的分层数据格式,最自然的表示方式是使用树。 ET为此有两个类 - ElementTree将整个 XML 文档表示为一棵树,并 Element表示该树中的单个节点。与整个文档的交互(从文件读取和写入/从文件写入)通常在ElementTree级别上完成。与单个 XML 元素及其子元素的交互是在Element级别上完成的。
其内元素称作子节点通过 parse() 解析xml文本,返回根元素 tree。(一级节点Annotation) 通过对 tree 进行findall操作,可到到带有指定标签的节点(二级节点eg:filename,object)。
xml.etree.ElementTree模块实现了用于解析和创建 XML 数据的简单高效的 API。
Element对象有以下常用属性:
1、.tag: 标签
2、.findall() : 只找到带有标签的 所有节点
3、.append() : 增加新节点
4、.set():增加或者修改属性
5、.text: 去除标签,获得标签中的内容。
6、.attrib: 获取标签中的属性和属性值。
7、.remove():删除节点
保存xml文件: ElementTree.write()
另一种xml的解析方式
19.9. xml.dom.minidom — Minimal DOM implementation — Python 2.7.18 documentation
二、xml文件
<annotation>
   <folder>Chinese</folder>
   <filename>C6_M.jpeg</filename>
   <path>F:/AI/05-PaperIdentification/data/error/Chinese/C6_M.jpeg</path>
   <source>
      <database>Unknown</database>
   </source>
   <size>
      <width>1061</width>
      <height>846</height>
      <depth>1</depth>
   </size>
   <segmented>0</segmented>
   <object>
      <name>Chinese</name>
      <pose>Unspecified</pose>
      <truncated>0</truncated>
      <difficult>0</difficult>
      <bndbox>
         <xmin>46</xmin>
         <ymin>333</ymin>
         <xmax>442</xmax>
         <ymax>372</ymax>
      </bndbox>
   </object>
   <object>
      <name>Chinese</name>
      <pose>Unspecified</pose>
      <truncated>0</truncated>
      <difficult>0</difficult>
      <bndbox>
         <xmin>687</xmin>
         <ymin>292</ymin>
         <xmax>1002</xmax>
         <ymax>391</ymax>
      </bndbox>
   </object>
   <object>
      <name>Chinese</name>
      <pose>Unspecified</pose>
      <truncated>1</truncated>
      <difficult>0</difficult>
      <bndbox>
         <xmin>686</xmin>
         <ymin>75</ymin>
         <xmax>1061</xmax>
         <ymax>270</ymax>
      </bndbox>
   </object>
   <object>
      <name>Chinese</name>
      <pose>Unspecified</pose>
      <truncated>1</truncated>
      <difficult>0</difficult>
      <bndbox>
         <xmin>30</xmin>
         <ymin>805</ymin>
         <xmax>304</xmax>
         <ymax>846</ymax>
      </bndbox>
   </object>
   <object>
      <name>Chinese</name>
      <pose>Unspecified</pose>
      <truncated>0</truncated>
      <difficult>0</difficult>
      <bndbox>
         <xmin>45</xmin>
         <ymin>505</ymin>
         <xmax>246</xmax>
         <ymax>554</ymax>
      </bndbox>
   </object>
   <object>
      <name>Chinese</name>
      <pose>Unspecified</pose>
      <truncated>0</truncated>
      <difficult>0</difficult>
      <bndbox>
         <xmin>686</xmin>
         <ymin>390</ymin>
         <xmax>1042</xmax>
         <ymax>428</ymax>
      </bndbox>
   </object>
   <object>
      <name>Chinese</name>
      <pose>Unspecified</pose>
      <truncated>0</truncated>
      <difficult>0</difficult>
      <bndbox>
         <xmin>702</xmin>
         <ymin>601</ymin>
         <xmax>1037</xmax>
         <ymax>770</ymax>
      </bndbox>
   </object>
   <object>
      <name>Chinese</name>
      <pose>Unspecified</pose>
      <truncated>0</truncated>
      <difficult>0</difficult>
      <bndbox>
         <xmin>704</xmin>
         <ymin>773</ymin>
         <xmax>1050</xmax>
         <ymax>802</ymax>
      </bndbox>
   </object>
   <object>
      <name>Chinese</name>
      <pose>Unspecified</pose>
      <truncated>0</truncated>
      <difficult>0</difficult>
      <bndbox>
         <xmin>702</xmin>
         <ymin>771</ymin>
         <xmax>1048</xmax>
         <ymax>800</ymax>
      </bndbox>
   </object>
   <object>
      <name>Chinese</name>
      <pose>Unspecified</pose>
      <truncated>0</truncated>
      <difficult>0</difficult>
      <bndbox>
         <xmin>382</xmin>
         <ymin>514</ymin>
         <xmax>652</xmax>
         <ymax>556</ymax>
      </bndbox>
   </object>
   <object>
      <name>Chinese</name>
      <pose>Unspecified</pose>
      <truncated>1</truncated>
      <difficult>0</difficult>
      <bndbox>
         <xmin>747</xmin>
         <ymin>815</ymin>
         <xmax>991</xmax>
         <ymax>846</ymax>
      </bndbox>
   </object>
</annotation>
三、python解析
import xml.etree.ElementTree as ET
import os
from PIL import Image, ImageDraw, ImageFont


def parse_rec(pic_path, filename):
    """解析xml"""
    tree = ET.parse(filename)  # 解析读取xml函数
    objects = []
    img_dir = []
    coordinate = []
    for xml_name in tree.findall('filename'):
        img_path = os.path.join(pic_path, xml_name.text)
        img_dir.append(img_path)
    for obj in tree.findall('object'):
        obj_struct = {'name': obj.find('name').text, 'pose': obj.find('pose').text,
                      'truncated': int(obj.find('truncated').text), 'difficult': int(obj.find('difficult').text)}
        bbox = obj.find('bndbox')
        obj_struct['bbox'] = [int(bbox.find('xmin').text),
                              int(bbox.find('ymin').text),
                              int(bbox.find('xmax').text),
                              int(bbox.find('ymax').text)]
        objects.append(obj_struct)
    for obj_one in objects:
        xmin = int(obj_one['bbox'][0])
        ymin = int(obj_one['bbox'][1])
        xmax = int(obj_one['bbox'][2])
        ymax = int(obj_one['bbox'][3])
        label = obj_one['name']
        coordinate.append([xmin,ymin,xmax,ymax,label])
    return coordinate, img_dir


def visualise_gt(objects, img_dir, now_path, font):
    """可视化"""
    for _, img_path in enumerate(img_dir):
        img = Image.open(img_path)
        draw = ImageDraw.ImageDraw(img)
        for obj in objects:
            xmin = obj[0]
            ymin = obj[1]
            xmax = obj[2]
            ymax = obj[3]
            label = obj[4]
            draw.rectangle(((xmin, ymin), (xmax, ymax)), fill=None, outline="red")
            draw.text((xmin + 10, ymin), label, "blue", font=font)  # 利用ImageDraw的内置函数,在图片上写入文字
            img.save(os.path.join(now_path + '/' + os.path.split(img_path)[-1]))
        # img.show(img_path)


if __name__ == "__main__":
    # 图片路径
    pic_path = r"F:\AI\05-PaperIdentification\data\error\Math\JPEGImages"
    # xml文件路径
    ann_path = r"F:\AI\05-PaperIdentification\data\error\Math\Annotations"
    # 解析后存放地址
    now_path = r"F:\AI\05-PaperIdentification\data\error\Math\Now"
    # 字体路径
    fontPath = r"C:\Windows\Fonts\Consolas\consola.ttf"
    font = ImageFont.truetype(fontPath, 20)

    for filename in os.listdir(ann_path):
        xml_path = os.path.join(ann_path, filename)
        # obj_context:返回一个含有所有标注的信息,img_dir:原始图片路径
        obj_context, img_dir = parse_rec(pic_path, xml_path)
        # print("object:", obj_context)
        # print("img_dir:", img_dir)
        visualise_gt(obj_context, img_dir, now_path, font)
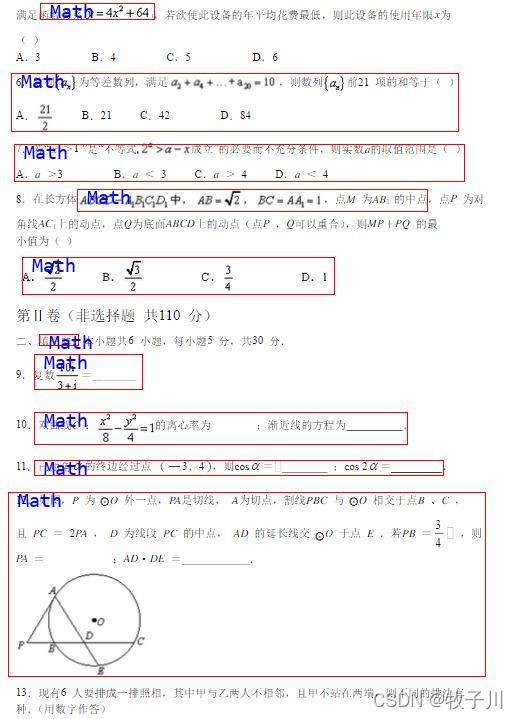
四、示例图
五、源码获取:
更多推荐
 已为社区贡献6条内容


所有评论(0)