使用grad-cam对swin transformer的特征进行可视化
使用grad-cam对swin-transformer模型的特征图进行可视化
·
使用grad-cam进行特征图的可视化
pytorch-grad-cam提供了对模型训练可视化的工具,支持CNN、Vision Transformers,图像分类、目标检测、分割、图片相似性等。
安装:pip install grad-cam
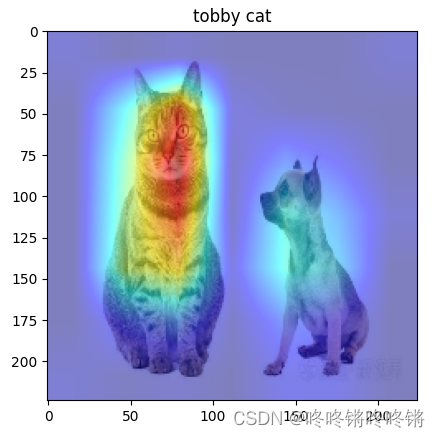
1. Swin-Transformer官方预训练模型的可视化
官网示例使用了swin_tiny_patch4_window7_224.pth(Tiny window:7 patch:4 input_size:224)预训练模型,对原代码我稍加修改方便理解:
import cv2
import timm
import torch
import argparse
import numpy as np
import matplotlib.pyplot as plt
from pytorch_grad_cam import GradCAM
from pytorch_grad_cam.utils.model_targets import ClassifierOutputTarget
from pytorch_grad_cam.utils.image import show_cam_on_image, preprocess_image

def get_args():
    parser = argparse.ArgumentParser()
    parser.add_argument('--use-cuda', action='store_true', default=False,
                        help='Use NVIDIA GPU acceleration')
    parser.add_argument(
        '--image-path',
        type=str,
        default='./images/both.png',
        help='Input image path')
    parser.add_argument('--aug_smooth', action='store_true',
                        help='Apply test time augmentation to smooth the CAM')
    parser.add_argument(
        '--eigen_smooth',
        action='store_true',
        help='Reduce noise by taking the first principle componenet'
        'of cam_weights*activations')

    args = parser.parse_args()
    args.use_cuda = args.use_cuda and torch.cuda.is_available()
    if args.use_cuda:
        print('Using GPU for acceleration')
    else:
        print('Using CPU for computation')

    return args

def reshape_transform(tensor, height=7, width=7):
    '''
    不同参数的Swin网络的height和width是不同的,具体需要查看所对应的配置文件yaml
    height = width = config.DATA.IMG_SIZE / config.MODEL.NUM_HEADS[-1]
    比如该例子中IMG_SIZE: 224  NUM_HEADS: [4, 8, 16, 32]
    height = width = 224 / 32 = 7
    '''
    result = tensor.reshape(tensor.size(0),
                            height, width, tensor.size(2))

    # Bring the channels to the first dimension,
    # like in CNNs.
    result = result.transpose(2, 3).transpose(1, 2)
    return result


if __name__ == '__main__':
    """ python swinT_example.py -image-path <path_to_image>
    Example usage of using cam-methods on a SwinTransformers network.
    """

    args = get_args()
    # 该命令会自动下载swin_tiny_patch4_window7_224.pth文件
    model = timm.create_model('swin_tiny_patch4_window7_224', pretrained=True)
    model.eval()

    if args.use_cuda:
        model = model.cuda()

    # 作者这个地方应该写错了,误导了我很久,输出model结构能发现正确的target_layers应该为最后一个stage后的LayerNorm层
    # target_layers = [model.layers[-1].blocks[-1].norm2]
    target_layers = [model.norm]

    # transformer会比CNN额外多输入参数reshape_transform
    cam = GradCAM(model=model, target_layers=target_layers,
                  use_cuda=args.use_cuda, reshape_transform=reshape_transform)

    # 保证图片输入后为RGB格式,cv2.imread读取后为BGR
    rgb_img = cv2.imread(args.image_path, 1)[:, :, ::-1]
    rgb_img = cv2.resize(rgb_img, (224, 224))
    rgb_img = np.float32(rgb_img) / 255
    input_tensor = preprocess_image(rgb_img, mean=[0.5, 0.5, 0.5],
                                    std=[0.5, 0.5, 0.5])

    # AblationCAM and ScoreCAM have batched implementations.
    # You can override the internal batch size for faster computation.
    cam.batch_size = 32

    class_map = {151: "Chihuahua", 281: "tobby cat"}
    class_id = 151
    class_name = class_map[class_id]
    grayscale_cam = cam(input_tensor=input_tensor,
                        targets=[ClassifierOutputTarget(class_id)],
                        eigen_smooth=args.eigen_smooth,
                        aug_smooth=args.aug_smooth)

    # Here grayscale_cam has only one image in the batch
    grayscale_cam = grayscale_cam[0, :]

    cam_image = show_cam_on_image(rgb_img, grayscale_cam, use_rgb=True)
    plt.imshow(cam_image)
    plt.title(class_name)
    plt.show()
python visualize.py --use-cuda --image-path ./images/00001.jpeg


2. 自己的模型可视化
训练自己的图像分类模型请看我的另一篇文章:Swin-Transformer图像分类
以swinv2_base_patch4_window12_192_22k.pth为预训练训练了自己的模型保存为output/swinv2_base_patch4_window12_192_22k/default/best_ckpt.pth,总共有3个分类(class_id: class name)—>{0: “level_1”, 1: “level_2”, 2: “level_3”}
import cv2
import torch
import argparse
import numpy as np
from config import get_config
from models import build_model
import matplotlib.pyplot as plt
from pytorch_grad_cam import GradCAM
from pytorch_grad_cam.utils.model_targets import ClassifierOutputTarget
from pytorch_grad_cam.utils.image import show_cam_on_image, preprocess_image


def parse_option():
    parser = argparse.ArgumentParser('Swin Transformer training and evaluation script', add_help=False)
    parser.add_argument('--cfg', type=str, required=True, metavar="FILE", help='path to config file', )
    parser.add_argument(
        "--opts",
        help="Modify config options by adding 'KEY VALUE' pairs. ",
        default=None,
        nargs='+',
    )

    # easy config modification
    parser.add_argument('--batch-size', type=int, help="batch size for single GPU")
    parser.add_argument('--data-path', type=str, help='path to dataset')
    parser.add_argument('--zip', action='store_true', help='use zipped dataset instead of folder dataset')
    parser.add_argument('--cache-mode', type=str, default='part', choices=['no', 'full', 'part'],
                        help='no: no cache, '
                             'full: cache all data, '
                             'part: sharding the dataset into nonoverlapping pieces and only cache one piece')
    parser.add_argument('--pretrained',
                        help='pretrained weight from checkpoint, could be imagenet22k pretrained weight')
    parser.add_argument('--resume', help='resume from checkpoint')
    parser.add_argument('--accumulation-steps', type=int, help="gradient accumulation steps")
    parser.add_argument('--use-checkpoint', action='store_true',
                        help="whether to use gradient checkpointing to save memory")
    parser.add_argument('--disable_amp', action='store_true', help='Disable pytorch amp')
    parser.add_argument('--amp-opt-level', type=str, choices=['O0', 'O1', 'O2'],
                        help='mixed precision opt level, if O0, no amp is used (deprecated!)')
    parser.add_argument('--output', default='output', type=str, metavar='PATH',
                        help='root of output folder, the full path is <output>/<model_name>/<tag> (default: output)')
    parser.add_argument('--tag', help='tag of experiment')
    parser.add_argument('--eval', action='store_true', help='Perform evaluation only')
    parser.add_argument('--throughput', action='store_true', help='Test throughput only')

    # distributed training
    parser.add_argument("--local_rank", type=int, required=True, help='local rank for DistributedDataParallel')

    # for acceleration
    parser.add_argument('--fused_window_process', action='store_true',
                        help='Fused window shift & window partition, similar for reversed part.')
    parser.add_argument('--fused_layernorm', action='store_true', help='Use fused layernorm.')
    ## overwrite optimizer in config (*.yaml) if specified, e.g., fused_adam/fused_lamb
    parser.add_argument('--optim', type=str,
                        help='overwrite optimizer if provided, can be adamw/sgd/fused_adam/fused_lamb.')

    args, unparsed = parser.parse_known_args()

    config = get_config(args)

    return args, config

def reshape_transform(tensor, height=12, width=12):
	'''
    不同参数的Swin网络的height和width是不同的,具体需要查看所对应的配置文件yaml
    height = width = config.DATA.IMG_SIZE / config.MODEL.NUM_HEADS[-1]
    比如该例子中IMG_SIZE: 384  NUM_HEADS: [ 4, 8, 16, 32 ]
    height = width = 384 / 32 = 12
    '''
    result = tensor.reshape(tensor.size(0),
        height, width, tensor.size(2))

    # Bring the channels to the first dimension,
    # like in CNNs.
    result = result.transpose(2, 3).transpose(1, 2)
    return result

if __name__ == "__main__":
    # 加载模型,参考模型推理的流程
    args, config = parse_option()
    DEVICE = torch.device("cuda:0" if torch.cuda.is_available() else "cpu")
    model = build_model(config)
    checkpoint = torch.load(config.MODEL.PRETRAINED, map_location='cpu')
    model.load_state_dict(checkpoint['model'], strict=False)
    model.eval()
    model.to(DEVICE)

    # 处理图片
    imgPath = args.data_path
    rgb_img = cv2.imread(imgPath, 1)[:, :, ::-1]
    rgb_img = cv2.resize(rgb_img, (config.DATA.IMG_SIZE, config.DATA.IMG_SIZE))
    rgb_img = np.float32(rgb_img) / 255
    input_tensor = preprocess_image(rgb_img, mean=[0.5, 0.5, 0.5],
                                    std=[0.5, 0.5, 0.5])

    # 构建CAM
    target_layer = [model.norm]
    class_map = {0: "level_1", 1: "level_2", 2: "level_3"}
    class_id = 1
    class_name = class_map[class_id]
    cam = GradCAM(model=model, target_layers=target_layer, reshape_transform=reshape_transform, use_cuda=True)
    grayscale_cam = cam(input_tensor=input_tensor, targets=[ClassifierOutputTarget(class_id)])#[ClassifierOutputTarget(class_id)]
    grayscale_cam = grayscale_cam[0, :]

    # 可视化
    visualization = show_cam_on_image(rgb_img, grayscale_cam, use_rgb=True)

    plt.figure(figsize=(20, 8))
    plt.subplot(121)
    plt.imshow(rgb_img)
    plt.title("origin image")

    plt.subplot(122)
    plt.imshow(visualization)
    plt.title(class_name)
    plt.show()
    plt.pause(2)
    plt.close()
python visualize_1.py --cfg configs/swinv2/swinv2_base_patch4_window12_192_22k.yaml --data-path ./imagenet/crop_data/val/class2/20220906_181537.jpg --pretrained output/swinv2_base_patch4_window12_192_22k/default/best_ckpt.pth --local_rank 0
- cfg: 训练时采用的配置文件
- data-path: 进行可视化的图片路径
- pretrained: 训练得到的模型路径
- local_rank: 本地单机训练,所以设置为0

华为开发者空间,是为全球开发者打造的专属开发空间,汇聚了华为优质开发资源及工具,致力于让每一位开发者拥有一台云主机,基于华为根生态开发、创新。
更多推荐


 17
17 1
1- 0


 已为社区贡献1条内容

所有评论(0)