【OpenCV 例程200篇】27. 图像的旋转(以任意点为中心)
图像以任意点 (x0, y0) 为旋转中心、顺时针旋转角度 θ 的旋转操作,可以先将原点平移到旋转中心 (x0, y0) ,然后按照原点旋转,最后再平移回坐标原点。按上式构造旋转变换矩阵 MAR,由函数 **cv2.warpAffine** 可以计算变换后的绕原点旋转图像。OpenCV 提供了 **cv2.getRotationMatrix2D** 函数, 根据旋转角度和位移计算旋转变换矩阵 MA
『youcans 的 OpenCV 例程200篇 - 总目录』
【youcans 的 OpenCV 例程200篇】27. 图像的旋转(以任意点为中心)
图像以任意点 (x0, y0) 为旋转中心、顺时针旋转角度 θ 的旋转操作,可以先将原点平移到旋转中心 (x0, y0) ,然后按照原点旋转,最后再平移回坐标原点,可以由以下公式描述:
[ x ~ y ~ 1 ] = [ 1 0 x 0 0 1 y 0 0 0 1 ] [ c o s θ − s i n θ 0 s i n θ c o s θ 0 0 0 1 ] [ 1 0 − x 0 0 1 − y 0 0 0 1 ] [ x y 1 ] \begin{bmatrix} \tilde{x}\\ \tilde{y}\\ 1 \end{bmatrix}= \begin{bmatrix} 1 &0 &x_0\\ 0 &1 &y_0\\ 0 &0 &1 \end{bmatrix} \begin{bmatrix} cos \theta &-sin \theta &0\\ sin \theta &cos \theta &0\\ 0 &0 &1 \end{bmatrix} \begin{bmatrix} 1 &0 &-x_0\\ 0 &1 &-y_0\\ 0 &0 &1 \end{bmatrix} \begin{bmatrix} x\\ y\\ 1 \end{bmatrix} ⎣⎡x~y~1⎦⎤=⎣⎡100010x0y01⎦⎤⎣⎡cosθsinθ0−sinθcosθ0001⎦⎤⎣⎡100010−x0−y01⎦⎤⎣⎡xy1⎦⎤
按上式构造旋转变换矩阵 MAR,由函数 cv2.warpAffine 可以计算变换后的绕原点旋转图像。
简便地,OpenCV 提供了 cv2.getRotationMatrix2D 函数, 根据旋转角度和位移计算旋转变换矩阵 MAR。
函数说明:
cv2.getRotationMatrix2D(center, angle, scale) → M
函数 getRotationMatrix2D 根据旋转参数计算旋转变换矩阵 MAR。
参数说明:
- center:旋转中心坐标,二元元组 (x0, y0)
- angle:旋转角度,单位为角度,逆时针为正数,顺时针为负数
- scale: 缩放因子
- 返回值:M, 旋转变换矩阵,2行3列
注意事项:
- 求出旋转变换矩阵 MAR,由函数 cv2.warpAffine 可以实现任意角度和任意中心的旋转效果。
- 以图像中心作为旋转中心时,可以用 img.shape 获得图像的宽度和高度值,除以 2 就是图像中心点坐标。
- 旋转角度为 90,180,270 度时,可以用 cv2.rotate(src, rotateCode) 函数实现,该方法实际上是通过矩阵转置实现的,因此速度很快。
基本例程:1.36 图像的旋转(任意旋转中心)
# 1.36 图像旋转 (以任意点 (x0,y0) 为中心旋转)
img = cv2.imread("../images/imgGaia.tif") # 读取彩色图像(BGR)
height, width = img.shape[:2] # 图片的高度和宽度
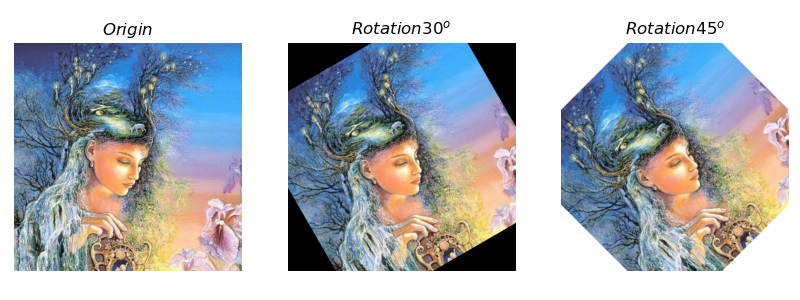
theta1, theta2 = 30, 45 # 顺时针旋转角度,单位为角度
x0, y0 = width//2, height//2 # 以图像中心作为旋转中心
MAR1 = cv2.getRotationMatrix2D((x0,y0), theta1, 1.0)
MAR2 = cv2.getRotationMatrix2D((x0,y0), theta2, 1.0)
imgR1 = cv2.warpAffine(img, MAR1, (width, height)) # 旋转变换,默认为黑色填充
imgR2 = cv2.warpAffine(img, MAR2, (width, height), borderValue=(255,255,255)) # 设置白色填充
plt.figure(figsize=(10,6))
plt.subplot(131), plt.axis('off'), plt.title(r"$Origin$")
plt.imshow(cv2.cvtColor(img, cv2.COLOR_BGR2RGB))
plt.subplot(132), plt.axis('off'), plt.title(r"$Rotation {}^o$".format(theta1))
plt.imshow(cv2.cvtColor(imgR1, cv2.COLOR_BGR2RGB))
plt.subplot(133), plt.axis('off'), plt.title(r"$Rotation {}^o$".format(theta2))
plt.imshow(cv2.cvtColor(imgR2, cv2.COLOR_BGR2RGB))
plt.show()

(本节完)
版权声明:
youcans@xupt 原创作品,转载必须标注原文链接:(https://blog.csdn.net/youcans/article/details/125112487)
Copyright 2022 youcans, XUPT
Crated:2021-11-18
【第3章:图像的几何变换】

为开发者提供学习成长、分享交流、生态实践、资源工具等服务,帮助开发者快速成长。
更多推荐


 3
3 0
0- 0


 已为社区贡献28条内容

所有评论(0)