把python文件转exe文件 和 打包报错处理
python的pyinstaller模块详解,和使用方法以及错误排除
今天,我教大家怎么把py文件转换成exe文件,
首先,我们要用到一个第三方库,他就是pyinstaller
pip install pyinstallerzip包下载(CSDN)免费
Pyinstaller代码压缩包-Python文档类资源-CSDN下载
此外,我还写了一个简易的程序,把pyinstaller的功能封装成了一个exe,可以去下载(免费,亲测有效)要源码的在文章底部
py文件转换器1.0.0-Python文档类资源-CSDN下载
除此之外,还有一个把pyinstaller封装成gui的模块,他就是auto-py-to-exe
pip install auto-py-to-exePyinstaller教程
Pyinstaller命令参数介绍
| -F | 生成的exe所运行的文件 |
| -w | 基于窗口,取消python控制台 |
| -i | exe文件图标(icon格式) |
| -n | 生成的exe的名字 |
| --add-data | 附加文件/文件夹 |
| --onedir | 生成一个文件夹,exe文件在此目录内 |
| --onefile | 单独生成exe文件 |
| --name | 同-n,生成的exe的名字 |
| --windowed | 同-w,基于窗口,取消python控制台 |
| --icon | 同-i,exe文件图标(icon格式) |
| --console | 基于控制台,再未勾选-w或--windowed的情况下,默认选择 |
以上是Pyinstaller命令参数介绍,接下来是使用方式
我们安装好之后,先打开cmd,安装Pyinstaller了之后,在命令行输入pyinstaller即可使用,
格式:
Pyinstaller 命令参数
Pyinstaller -F 文件名
Pyinstaller -n 任意字符
Pyinstaller -i 文件名
Pyinstaller --add-data 文件名
Pyinstaller -w -c --onedir --onefile 无参数
Pycharm使用Pyinstaller
1.打开Pycharm的终端

2.打开设置

3.点击螺丝刀
4.把shell.exe改成cmd.exe,
5.点击确定
完成了以上几步后,在终端输入命令即可
Auto-py-to-exe教程
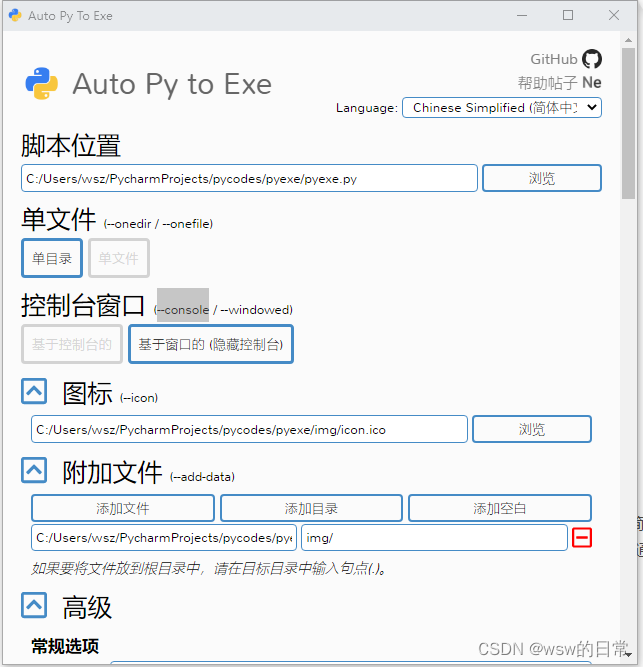
auto-py-to-exe是一个把pyinstaller封装成窗口的模块,让pyinstaller的使用方式变得十分简单,使用方式类似pyinstaller,但无命令参数,在cmd输入auto-py-to-exe即可打开进程,他不仅通俗易懂,还有多国语言
运行截图:

Pyinstaller错误排除
1.UPX is not available error
原因分析:
python环境的Scripts文件夹内缺少了一个upx.exe的文件
解决方案1:
到官网UPX: the Ultimate Packer for eXecutables - Homepage中下载一个UPX, 将下载文件解压后得到的upx.exe文件(解压后的所有文件里只要这一个文件即可,其他文件不需要), 将其复制粘贴到python环境的Scripts文件夹中即可解决该问题;
若找不到下载页面, 可使用此链接直通下载页面: Releases · upx/upx · GitHub
2.PermissionError: [Errno 13] Permission denied: 'D:\\PyCode\\venv\\Scripts\\dist\\room.exe.notanexecutable'
原因分析:
提示拒绝访问,很可能该文件现在被占用不能被写入,检查该文件目前是否被打开,比如该python文件正在编辑器中编辑,或者说还在IDE中运行,比如pycharm,若是则将其关闭后在执行打包命令。有时候代码里有要写入文件操作时显示这个错误也是这个道理,也可以按照上述方法解决。
解决方案1:
尝试关闭杀毒软件后比如360,很多人关闭杀毒软件后就打包成功了。
解决方案2:
看文件或者所属文件夹本身有没有权限问题,建议cmd以管理员身份运行,然后再进行重新打包。
3.'pyinstaller' 不是内部或外部命令,也不是可运行的程序或批处理文件
原因分析:
这种是最简单的错误,要先安装pyinstaller再打包,如果是安装了pyinstaller后出现的这种问题,原因是没有在pyinstaller环境运行命令。
解决方案1:
这种是最简单的错误,要先安装pyinstaller再打包,如果是安装了pyinstaller后出现的这种问题,原因是没有在pyinstaller环境运行命令。
4.pyinstaller打包后 Failed to load dynlib/dll 'libiconv.dll'
原因分析:
项目在没打包前运行没问题,识别正常,打包后就有以下报错,这是因为该模块的dll加载失败造成的
解决方案1:
在自己的虚拟环境中找到该模块的dll,手动复制粘贴到打包后目录即可。
解决方案2:
修改spec文件的时候设置好导入位置,打包时会自动识别。
Py文件转换器源码
文件树:
pyexe/
    img/
        icon.ico
    pyexe.py
pyexe.py
import os, sys
import tkinter as _tk
from tkinter.filedialog import *
from tkinter.messagebox import *
import tkinter.messagebox as easy

class MainWindow:
    def __init__(self):
        self.window = _tk.Tk()
        self.iel = _tk
        self.fileObj = None
        self._command = None
        self.window.resizable(False, False)
        self.window.geometry("450x500")
        self.window.title("Py文件转换 作者:wsw")
        self.start = self.iel.Button(self.window)
        self.start.place(x=330, y=430, width=100, height=50)
        self.start.config(text="开始转换", command=lambda: self.StartPyfileToExe())
        self.text_label = self.iel.Label(self.window)
        self.text_label.config(text="py文件: ")
        self.title = self.iel.Label(self.window)
        self.title.place(x=0, y=0, height=50, width=450)
        self.title.config(text="py文件转换器 \nv(1.0.0) 作者:wsw 语言:python")
        self.text_all = self.iel.Label(self.window)
        self.text_all.place(x=0, y=50, width=450, height=20)
        self.text_all.config(text="-" * 40 + "-必填-" + "-" * 40, fg="#808080")
        self.text_label.place(x=20, y=70, width=60, height=25)
        self.insert_file = self.iel.Entry(self.window)
        self.insert_file.config(background="white")
        self.insert_file.place(x=80, y=70, height=25, width=250)
        self.file_open = self.iel.Button(self.window)
        self.file_open.config(text="浏览", command=lambda: self.FileOpenFunc(self.insert_file))
        self.file_open.place(x=330, y=70, width=100, height=25)
        self.insert_name = self.iel.Entry(self.window)
        self.insert_name.config(background="white")
        self.insert_name.place(x=80, y=105, height=25, width=350)
        self.name_label = self.iel.Label(self.window)
        self.name_label.config(text="exe文件名: ")
        self.name_label.place(x=20, y=105, width=60, height=25)
        self.text = self.iel.Label(self.window)
        self.text.place(x=0, y=130, width=450, height=20)
        self.text.config(text="-" * 40 + "-选填-" + "-" * 40, fg="#808080")
        self.int_of = self.iel.IntVar()
        self.console = self.iel.Checkbutton(self.window, text='取消控制台(取消exe文件自动生成的python控制台)')
        self.console.config(variable=self.int_of, onvalue=1, offvalue=0)
        self.console.place(x=20, y=155)
        self.icon_open = self.iel.Button(self.window)
        self.icon_open.config(text="浏览", command=lambda: self.FileOpenFunc(self.icon))
        self.icon_open.place(x=330, y=185, width=100, height=25)
        self.icon_label = self.iel.Label(self.window)
        self.icon_label.config(text="exe图标(ico): ")
        self.icon_label.place(x=2, y=185, width=80, height=25)
        self.icon = self.iel.Entry(self.window)
        self.icon.place(x=80, y=185, width=250, height=25)
        self.icon.config(background="white")
        self.add_file_open = self.iel.Button(self.window)
        self.add_file_open.config(text="浏览", command=lambda: self.DirOpenFunc(self.add_file))
        self.add_file_open.place(x=330, y=220, width=100, height=25)
        self.add_file_label = self.iel.Label(self.window)
        self.add_file_label.config(text="附加文件夹: ")
        self.add_file_label.place(x=2, y=220, width=80, height=25)
        self.add_file = self.iel.Entry(self.window)
        self.add_file.place(x=80, y=220, width=250, height=25)
        self.add_file.config(background="white")

    def StartPyfileToExe(self):
        try:
            model = "c"
            icon_png = ""
            add_file = ""
            console_bool = self.int_of.get()
            if self.insert_file.get() is not None:
                if console_bool == 1:
                    model = "w"
                if self.icon.get() is not None:
                    icon_png = " -i "+f"\"{self.icon.get()}\""
                if self.add_file.get() is not None:
                    add_file = f" --add-data \"{self.add_file.get()};.\""
                self._command = f"pyinstaller --onedir -F -{model} \"{self.insert_file.get()}\" -n " \
                          f"\"{self.insert_name.get()}\" {icon_png} " + add_file
                os.system(self._command)
            else:
                easy.showinfo("Error", "请输入目标文件!")
        except Exception:
            showerror("Error", "封装出错")

    def DirOpenFunc(self,root):
        file_name = askdirectory()
        root.insert(self.iel.END, str(file_name))

    def FileOpenFunc(self, root):
        file_name = askopenfilename(defaultextension='.py')
        root.insert(self.iel.END, str(file_name))

    def ShowMainWindow(self):
        self.window.mainloop()


MainWindow().ShowMainWindow()
icon.ico
更多推荐
 已为社区贡献3条内容


所有评论(0)