基于深度学习的人脸表情识别实现
1. 前言关于人脸识别,其实我一直以来做过蛮多的项目,有些是整理出帖子了,有些是没有整理出,因为学业比较繁重,所以也是断断续续的来整理。最近刚好是五一假期,也出不去,就想着来整理一篇关于人脸表情识别的文章。这是可以既可以识别人的身份,还可以识别出人的表情出来,如开心、悲伤等基本情绪。2. 相关工作依我比较有限的知识来说的话,无论是人脸识别还是表情识别,亦或是把两者结合起来,也就是本文要实现的人脸+
1. 前言
关于人脸识别,其实我一直以来做过蛮多的项目,有些是整理出帖子了,有些是没有整理出,因为学业比较繁重,所以也是断断续续的来整理。最近刚好是五一假期,也出不去,就想着来整理一篇关于人脸表情识别的文章。这是可以既可以识别人的身份,还可以识别出人的表情出来,如开心、悲伤等基本情绪。
2. 相关工作
依我比较有限的知识来说的话,无论是人脸识别还是表情识别,亦或是把两者结合起来,也就是本文要实现的人脸+表情识别任务,其本质都是分类任务。关于人脸识别,我之前分别实现了不戴口罩和戴口罩的识别任务,具体可参考下面链接。
戴口罩的人脸识别_James Ken的博客-CSDN博客 https://blog.csdn.net/weixin_36431280/article/details/115668719简单人脸识别一之使用opencv+cnn网络实现人脸识别_James Ken的博客-CSDN博客_cnn人脸识别https://blog.csdn.net/weixin_36431280/article/details/91996066?spm=1001.2014.3001.5502无论是戴口罩还是不戴口罩,识别的步骤均是:人脸检测、人脸区域特征表示、人脸识别。两个任务最直接的区别就是人脸特征表示,检测到的人脸区域会有不同,戴口罩之后人脸区域明显会被遮挡,如何从有限区域内提取到足够多的特征用于最终的分类,这是我们考虑的问题,具体的分析在以上两篇帖子里有介绍。而最终的人脸识别都是采用了卷积神经网络来做分类任务。到了本文这里,无非就是在人脸识别的任务上再加上了表情识别的任务。其实表情识别的步骤同样还是三步:人脸检测、人脸区域特征表示、表情识别。预设的表情标签为: ['angry', 'disgust', 'fear', 'happy', 'sad', 'surprise', 'neutral'],我们需要做的那就还是有监督的分类任务。
3. 项目实现
3.1 环境设置
1. python 3.8; 建议装Anaconda环境再来创建一个python3.8的虚拟环境;
2. Windows10系统; windows对opencv库支持性最好
3. face_recognition, dlib库;注意,得先安装dlib, cmake, boost库,才能完整安装face_recognition;
其中,版本为:dlib-19.19.0; face_recognition-1.3.0; 这一块可参考 该帖子
4. onnxruntime, opencv-python, pandas, matplotlib, keras 均无版本限制;
5. tensorflow, 2.0版本以上均行;
3.2 实现流程
1)人脸检测
人脸检测步骤顾名思义,就是从一张图片中检测出人脸的区域。现有的人脸检测模型的原理其实都是从预先裁剪出的人脸金字塔中不断的筛选出符合要求的人脸框图片,如MTCNN模型,就是在P-Net、O-Net、R-Net结构中不断运用NMS非极大值抑制策略来筛选出人脸框图片出来。核心代码如下所示:
# 输入图片(numpy),输出人脸框体最大的box
def detect(self, image, conf_thresh=0.6, iou_thresh=0.4, target_shape=(360, 360)):
height, width, _ = image.shape
image_resized = cv2.resize(image, target_shape)
image_np = image_resized / 255.0 # 归一化到0~1
image_exp = np.expand_dims(image_np, axis=0)
image_transposed = image_exp.transpose((0, 3, 1, 2)).astype(np.float32)
ort_inputs = {self.ort_session.get_inputs()[0].name: image_transposed}
y_bboxes_output, y_cls_output = self.ort_session.run(None, ort_inputs)
# remove the batch dimension, for batch is always 1 for inference.
y_bboxes = decode_bbox(self.anchors_exp, y_bboxes_output)[0]
y_cls = y_cls_output[0]
# To speed up, do single class NMS, not multiple classes NMS.
bbox_max_scores = np.max(y_cls, axis=1)
bbox_max_score_classes = np.argmax(y_cls, axis=1)
# keep_idx is the alive bounding box after nms.
keep_idxs = single_class_non_max_suppression(y_bboxes, bbox_max_scores, conf_thresh, iou_thresh)
max_area, r_item = -1, None
for idx in keep_idxs:
# conf = float(bbox_max_scores[idx])
class_id = bbox_max_score_classes[idx]
bbox = y_bboxes[idx]
# clip the coordinate, avoid the value exceed the image boundary.
xmin = max(0, int(bbox[0] * width))
ymin = max(0, int(bbox[1] * height))
xmax = min(int(bbox[2] * width), width)
ymax = min(int(bbox[3] * height), height)
item = (xmin, ymin, xmax, ymax), class_id
area = (xmax - xmin) * (ymax - ymin)
if max_area < area:
max_area, r_item = area, item
return r_item
人脸检测效果大概就是如此,把人脸单独框出来。
2)人脸特征表示
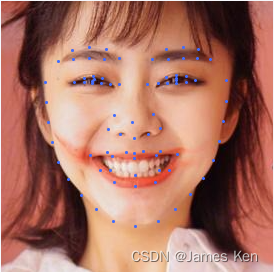
这一块就是将人脸区域的图片用其中的一些关键特征点来表示,相当于降维来减低计算成本吧,一般就是用opencv库的haar级联检测器来表示。一般就是采用其中68个特征点来表示,如眼睛、鼻子、嘴唇等,其效果如下所示:
3)人脸识别或表情识别
前面说过,这两个都是分类任务。先说说表情识别吧,其实就是根据预设的表情标签来做多分类识别,识别模型代码如下:
def make_model():
"""表情识别模型结构"""
model = Sequential()
model.add(Conv2D(32, (3, 3), padding='same', input_shape=(48, 48, 1)))
model.add(MaxPooling2D(pool_size=(2, 2)))
model.add(BatchNormalization())
model.add(Activation('relu'))
model.add(Dropout(0.4))
model.add(Conv2D(64, (3, 3), padding='same'))
model.add(MaxPooling2D(pool_size=(2, 2)))
model.add(BatchNormalization())
model.add(Activation('relu'))
model.add(Dropout(0.4))
model.add(Conv2D(96, (3, 3), padding='same'))
model.add(MaxPooling2D(pool_size=(2, 2)))
model.add(BatchNormalization())
model.add(Activation('relu'))
model.add(Dropout(0.4))
model.add(Conv2D(128, (3, 3), padding='same'))
model.add(MaxPooling2D(pool_size=(2, 2)))
model.add(BatchNormalization())
model.add(Activation('relu'))
model.add(Dropout(0.4))
model.add(Conv2D(160, (3, 3), padding='same'))
model.add(MaxPooling2D(pool_size=(2, 2)))
model.add(BatchNormalization())
model.add(Activation('relu'))
model.add(Dropout(0.4))
model.add(Flatten())
model.add(Dense(128, activation='relu'))
model.add(Dropout(0.4))
model.add(Dense(7, activation='sigmoid'))
return model
其表示识别效果如下图所示:

人脸识别同样如此,可以不同的是,人脸身份较多,不是简单的几个,所以训练起来难度会比较大。我们一般就是直接调用face_recognition库中的人脸识别模型,不然几万甚至几十万个人脸图片拿来训练,一般的电脑是训练不了的。代码如下所示:
def _get_face_feat(self, img_x, box):
"""
获取脸部的128维特征向量
:param img_x:
:param box:
:return:
"""
rec = dlib.rectangle(*box)
shape = self.sp(img_x, rec)
feat = self.facerec.compute_face_descriptor(img_x, shape)
return feat
def _face_distance(self, face_encodings, face_to_compare):
"""
基于人脸编码信息矩阵,比较不同人脸之间的距离
"""
if len(face_encodings) == 0:
return np.empty((0))
face_encodings = np.asarray(face_encodings)
return np.linalg.norm(face_encodings - face_to_compare, axis=1)
def recognize(self, image, score_threshold=0.6):
"""
识别人脸
:param image: 图片路径
:param score_threshold: 人脸识别得分阈值
:return: (know_name[ix], face_locations, cls) (人员id,box坐标(left,top,right,bottom),是否戴了口罩(0,1))
"""
if isinstance(image, str):
image = cv2.imread(image)
image = cv2.cvtColor(image, cv2.COLOR_BGR2RGB)
item = self.face_detector.detect(image)
if item:
box, cls = item
face_feat = self._get_face_feat(image, box)
scores = 1 - self._face_distance(self._known_faces, face_feat)
ix = np.argmax(scores).item()
if scores[ix] > score_threshold:
# 1 for mask
return self._know_name[ix], box, 1 - int(cls), scores[ix]
return None
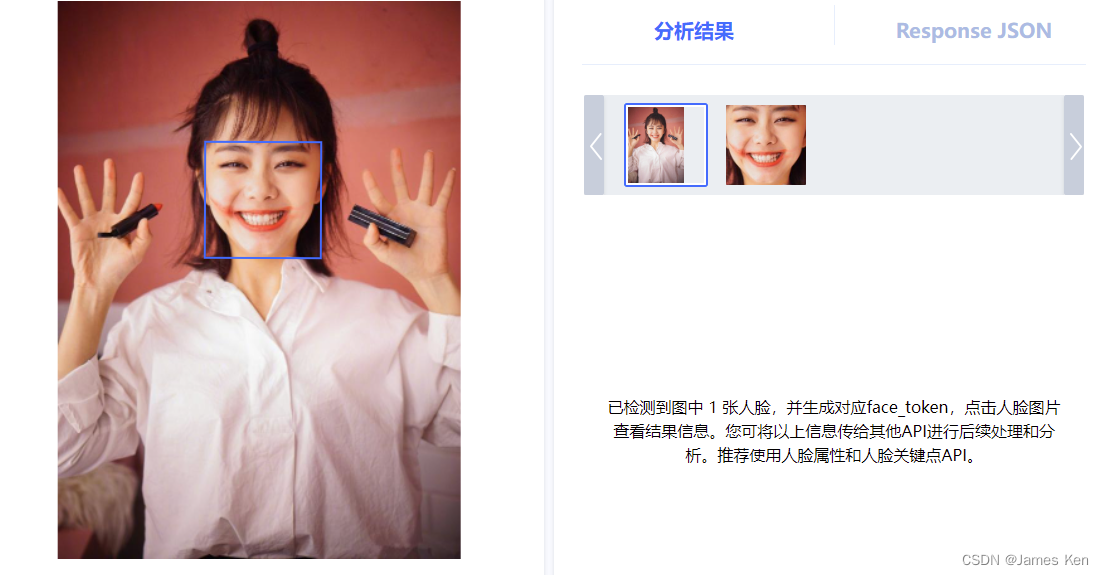
其人脸识别效果如下图所示:

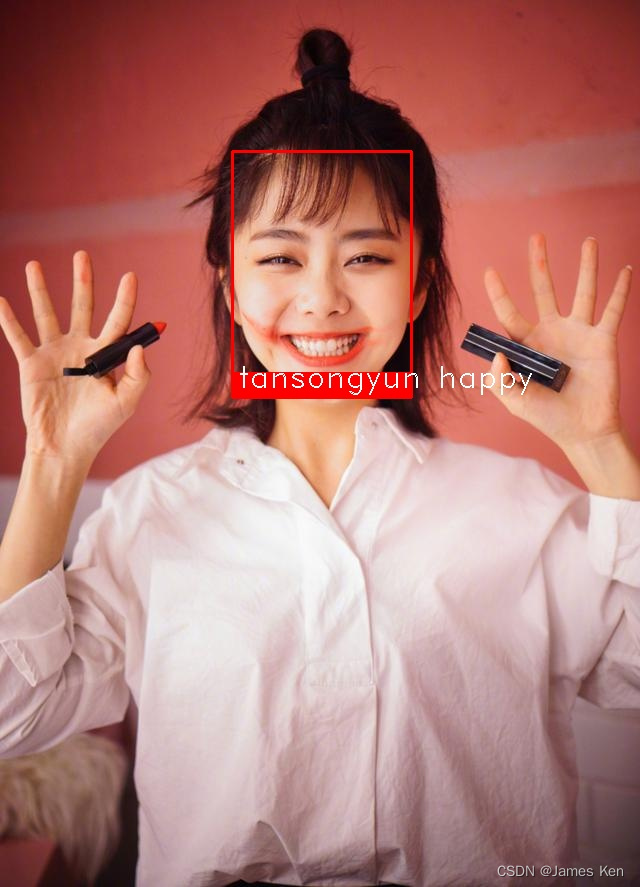
最终实现的人脸识别+表情识别的效果如下所示:

人脸识别方面蛮多的领域的,也欢迎加QQ:1018721901前来咨询。

华为开发者空间,是为全球开发者打造的专属开发空间,汇聚了华为优质开发资源及工具,致力于让每一位开发者拥有一台云主机,基于华为根生态开发、创新。
更多推荐


 17
17 0
0- 0


 已为社区贡献2条内容
 免费领云主机


 华为云 x DeepSeek:AI驱动云上应用创新

 DTT年度收官盛典:华为开发者空间大咖汇,共探云端开发创新
 华为云数字人,助力行业数字化业务创新
 企业数据治理一站式解决方案及应用实践
 轻松构建AIoT智能场景应用


所有评论(0)