SpringBoot添加压力测试
压力测试轻量级压力测试工具:添加步骤使用pom.xml中加入依赖坐标单元测试类里面使用 @Rule 注解激活 ContiPerf在具体测试方法上使用 @PerfTest、 @Required测试类前加@RunWith(SpringRunner.class)查看结果优化——加入redis轻量级压力测试工具:ContiPerf 是一个轻量级的测试工具,基于JUnit 4 开发,可用于性能测试等。可以指
压力测试
轻量级压力测试工具:
ContiPerf 是一个轻量级的测试工具,基于JUnit 4 开发,可用于性能测试等。可以指定在线程数量和执行次数,通过限制最大时间和平均执行时间来进行性能测试。
添加步骤
使用pom.xml中加入依赖坐标
注意JUnit要导入4版本的
		<!--增加压力测试支持-->
        <dependency>
            <groupId>org.databene</groupId>
            <artifactId>contiperf</artifactId>
            <version>2.3.4</version>
            <scope>test</scope>
        </dependency>

        <!-- https://mvnrepository.com/artifact/junit/junit 压力测试只支持JUnit4 (org.junit)-->
        <dependency>
            <groupId>junit</groupId>
            <artifactId>junit</artifactId>
            <version>4.12</version>
            <scope>test</scope>
        </dependency>
单元测试类里面使用 @Rule 注解激活 ContiPerf
	@Rule
    public ContiPerfRule i = new ContiPerfRule();
在具体测试方法上使用 @PerfTest、 @Required
@Test
    @PerfTest(invocations = 9000, threads = 100)
    @Required(max = 1200, average = 250, totalTime = 60000)
    public void showTest() {
        System.out.println(userservice.showUsers(1, 5, "").getList());

    }
@PerfTes:指定调用次数/线程数
@Required :指定每次执行的最长时间/平均时间/总时间等
invocations 请求次数
threads 线程数
max 每次执行的最长时间
average 平均时间
totalTime 总时间
注:
-
PerfTest参数
@PerfTest(invocations = 300):执行300次,和线程数量无关,默认值为1,表示执行1次;
@PerfTest(threads=30):并发执行30个线程,默认值为1个线程;
@PerfTest(duration = 20000):重复地执行测试至少执行20s。 -
Required参数
@Required(throughput = 20):要求每秒至少执行20个测试;
@Required(average = 50):要求平均执行时间不超过50ms;
@Required(median = 45):要求所有执行的50%不超过45ms;
@Required(max = 2000):要求没有测试超过2s;
@Required(totalTime = 5000):要求总的执行时间不超过5s;
@Required(percentile90 = 3000):要求90%的测试不超过3s;
@Required(percentile95 = 5000):要求95%的测试不超过5s;
@Required(percentile99 = 10000):要求99%的测试不超过10s;
@Required(percentiles = “66:200,96:500”):要求66%的测试不超过200ms,96%的测试不超过500ms。 -
@PerfTest @Required 可以加在类上面,表示所有方法的默认配置
测试类前加@RunWith(SpringRunner.class)
@RunWith(SpringRunner.class)
@SpringBootTest
public class UserserviceimpTest {
}
查看结果
执行

在测完之后,在本地的target下生成contiperf-report目录,里面有个index.html文件,即为测试结果
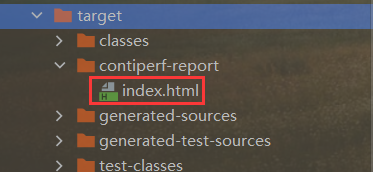
可以看到程序执行了9000次,大概耗时27s

优化——加入redis
==如何减少程序并发带来程序执行的影响呢?==可以使用redis,可以参考redis安装和测试
首先,引入redis依赖坐标
		<!--增加了redis的支持-->
        <dependency>
            <groupId>org.springframework.boot</groupId>
            <artifactId>spring-boot-starter-data-redis</artifactId>
        </dependency>
开启redis服务


修改配置文件.properties
(密码没设置所以没写)
#redis连接
spring.redis.host=localhost
spring.redis.password=
spring.redis.port=6379
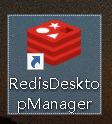
打开RedisDesktopManager
修改端口

类上加注解
要测试的类上再加上@Cacheable
@Cacheable(cacheNames = "showUsers")

耗时17s,在缓存区取数据会比一直往数据库取数据会更快
那么,又有一个问题,如果是做修改,程序取到数据库数据存入缓存,这时候数据库改动,程序取到的未必是正确的数据
我们可以在测试方法前加上
    @Override
    @Cacheable(key="#userid",cacheNames="getusersbyid")
    public User getUserById(int userid) {
        return usermapper.selectByPrimaryKey(userid);
    }
    @Override
    @CacheEvict(key="#user.userid",cacheNames="getusersbyid")
    public boolean updateUsers(User user) {
        user.setNickname("我是缓存!");
        return usermapper.updateByPrimaryKey(user) > 0;
    }
改变了缓存

数据库

再执行一次,可以看到取的仍然是新数据,所以成功


为开发者提供学习成长、分享交流、生态实践、资源工具等服务,帮助开发者快速成长。
更多推荐


 1
1 0
0- 0


 已为社区贡献1条内容

所有评论(0)