Elasticsearch集群连载-es集群安装
一、准备安装包下载地址:https://www.elastic.co/cn/downloads/elasticsearch或者是百度网盘:链接:下载elasticsearch安装包 提取码:khm2二、将压缩包放到linux机器上(集群中的任意一台)先安装jdk:[root@qf01 ~]# yum install -y java-1.8.0-openjdk-devel将安装包放到liunx的ro
一、准备安装包
下载地址:https://www.elastic.co/cn/downloads/elasticsearch
或者是百度网盘:链接:下载elasticsearch安装包 提取码:khm2
二、将压缩包放到linux机器上(集群中的任意一台)
先安装jdk:
[root@qf01 ~]# yum install -y java-1.8.0-openjdk-devel将安装包放到liunx的root目录下(可以自由放):
elasticsearch-8.1.1-linux-x86_64.tar.gz
接下来进行解压:
[root@qf01 ~]# tar ‐zvxf elasticsearch-8.1.1-linux-x86_64.tar.gz ‐C /usr/local/elasticsearch三、配置yml文件
[root@qf01 ~]# cd /usr/local/elasticsearch
[root@qf01 ~]# mkdir data
[root@qf01 ~]# mkdir log
[root@qf01 ~]# cd config
[root@qf01 ~]# vi elasticsearch.yml
8.1.1对应版本的yml是这样配置的:
添加如下内容:这里的配置要小心了,不同版本的elasticsearch中的节点可能并不是跟我相同的,方法也比较简单,就是从上到下,看下yml,都是差不多的
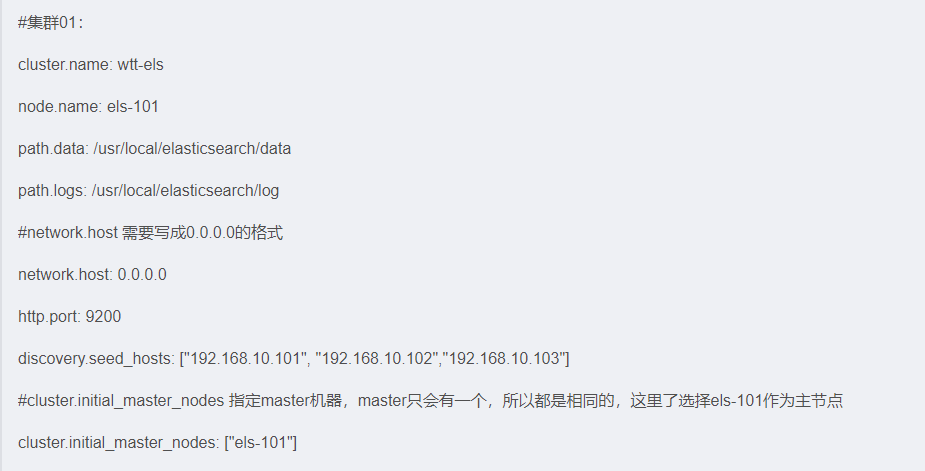
#集群01:
cluster.name: wtt-els
node.name: els-101
path.data: /usr/local/elasticsearch/data
path.logs: /usr/local/elasticsearch/log
#network.host 需要写成0.0.0.0的格式
network.host: 0.0.0.0
http.port: 9200
discovery.seed_hosts: ["192.168.10.101", "192.168.10.102","192.168.10.103"]
#cluster.initial_master_nodes 指定master机器,master只会有一个,所以都是相同的,这里了选择els-101作为主节点
cluster.initial_master_nodes: ["els-101"]
四、配置jvm.option
[root@qf01 ~]# cd /usr/local/elasticsearch/config
[root@qf01 config]# vi jvm.options
修改jvm.option,调整jvm堆内存大小,这里因为我的是虚拟机,没有太大内存,所以我给了1g,这个设置的原则上最大不超过内存的80%,一般设置为50%
-Xms1g
-Xmx1g
以上是在一台电脑上,配置的elasticsearch,目前已经配置完毕,那其它电脑怎么办呢?
1、scp 命令进行分发
2、或者都按照1-4的命令其它节点进行操作,即也可以安装elasticsearch
两种方法任选一种,你认为可行的
每个节点都需要改动elasticsearch.yml
#集群02:
cluster.name: wtt-els
node.name: els-102
path.data: /usr/local/elasticsearch/data
path.logs: /usr/local/elasticsearch/log
network.host: 0.0.0.0
http.port: 9200
discovery.seed_hosts: ["192.168.10.101", "192.168.10.102","192.168.10.103"]
cluster.initial_master_nodes: ["els-101"]
#集群03:
cluster.name: wtt-els
node.name: els-103
path.data: /usr/local/elasticsearch/data
path.logs: /usr/local/elasticsearch/log
network.host: 0.0.0.0
http.port: 9200
discovery.seed_hosts: ["192.168.10.101", "192.168.10.102","192.168.10.103"]
cluster.initial_master_nodes: ["els-101"]
五、新增用户(所有集群机器)
1、elasticsearch 不能用root账号启动,所以需要新增用户
[root@qf01 ~]# groupadd elasticsearch
[root@qf01 ~]# useradd es1
[root@qf01 ~]# passwd es1


[root@qf01 ~]# usermod ‐G elasticsearch es1
[root@qf01 ~]# chown ‐R es1 /usr/local/elasticsearch
2、设置sudo权限
#让普通用户有更大的操作权限,一般都会给普通用户设置sudo权限,方便普通用户的操作
[es1@qf01 root]# visudo
#添加
es1 ALL=(ALL) ALL
六、为了避坑,需要先修改的一些地方(所有集群机器)
避坑1:max file descriptors [4096] for elasticsearch process likely too low,increase to at least [65536]
解释:解除linux系统当中打开文件最大数目的限制
[root@qf01 ~]# su es1
[es1@qf01 root]# sudo vi /etc/security/limits.conf
#添加:注意哦,这里是用新建的用户添加的,且一定要注意内容中间的空格什么的,最好,直接复制过去就行了,我反正是已经被坑过了
* soft nofile 65536
* hard nofile 65536
* soft nproc 4096
* hard nproc 4096
避坑2:max number of threads [1024] for user [es] likely too low, increase to at least [4096]
解释:修改普通用户可以创建的最大线程数
[root@qf01 ~]# su es1
[es1@qf01 root]# sudo vi /etc/security/limits.d/20‐nproc.conf
# 修改
soft nproc 1024
#修改为
soft nproc 4096
避坑3:max virtual memory areas vm.max_map_count [65530] likely too low,increase to at least [262144]
解释:调大普通用户虚拟内存
[root@qf01 ~]# su es1
[es1@qf01 root]# vi /etc/sysctl.conf
#添加:
vm.max_map_count=655360
添加完后,执行:
[es1@qf01 root]# sysctl ‐p坑1,坑2,坑3,注意都是在新建的账户下操作,都需要重新登录账号才能生效
避坑4:ERROR: [1] bootstrap checks failed. You must address the points described in the following [1] lines before starting Elasticsearch.bootstrap check failure [1] of [1]: Transport SSL must be enabled if security is enabled. Please set [xpack.security.transport.ssl.enabled] to [true] or disable security by setting [xpack.security.enabled] to [false]
解释:按照这个错误来说,就是要设置个属性
[root@qf01 ~]# su es1
[es1@qf01 root]# cd /usr/local/elasticsearch/config
[es1@qf01 root]# vi elasticsearch.yml
添加:
xpack.security.enabled: false
七、启动elasticsearch(节点依次启动)
首先要关闭防火墙
[root@qf01 ~]# systemctl stop firewalld
[root@qf01 ~]# systemctl disable firewalld
[root@qf01 ~]# su es1
[es1@qf01 root]# cd /usr/local/elasticsearch/bin
[es1@qf01 root]# ./elasticsearch
启动起来,发现,报错:received plaintext traffic on an encrypted channel, closing connection Netty4TcpChannel{localAddress。。。。
是因为开启了ssl认证,可以把这个去掉
[root@qf01 ~]# su es1
[es1@qf01 root]# cd /usr/local/elasticsearch/config
[es1@qf01 root]# vi elasticsearch.yml
找到xpack.security.http.ssl,
xpack.security.http.ssl:
enabled: false
keystore.path: certs/http.p12
重新启动:
[es1@qf01 root]# cd /usr/local/elasticsearch/bin
[es1@qf01 root]# ./elasticsearch启动以后,用http://IP:9200/ 进行验证,如果出现如下画面,说明启动成功
{
  "name" : "els-101",
  "cluster_name" : "wtt-els",
  "cluster_uuid" : "2SAx4aG_R8yljSUEAHbLsQ",
  "version" : {
    "number" : "8.1.1",
    "build_flavor" : "default",
    "build_type" : "tar",
    "build_hash" : "d0925dd6f22e07b935750420a3155db6e5c58381",
    "build_date" : "2022-03-17T22:01:32.658689558Z",
    "build_snapshot" : false,
    "lucene_version" : "9.0.0",
    "minimum_wire_compatibility_version" : "7.17.0",
    "minimum_index_compatibility_version" : "7.0.0"
  },
  "tagline" : "You Know, for Search"
}
启动成功以后,可以断开,改用后台启动:
[es1@qf01 root]# cd /usr/local/elasticsearch/bin
[es1@qf01 root]# ./elasticsearch -d
为开发者提供学习成长、分享交流、生态实践、资源工具等服务,帮助开发者快速成长。
更多推荐


 0
0 0
0- 0


 已为社区贡献4条内容

所有评论(0)