探店点评--项目笔记 基于redis底层原理+redis分布式锁+SpringBoot+Mybatisplus的实战项目
redis学习项目
目录
项目介绍
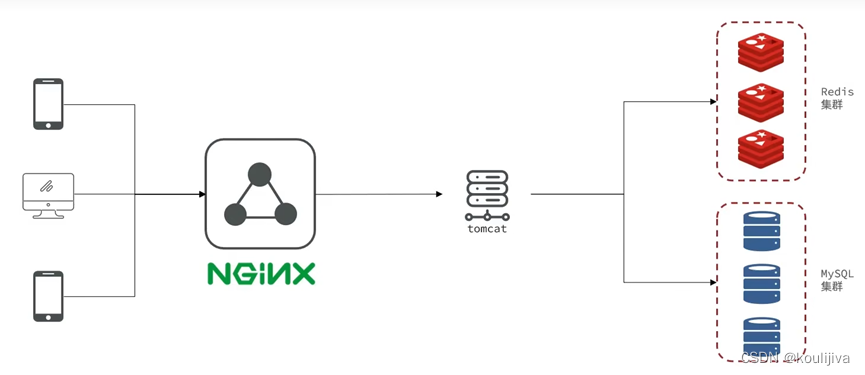
项目整体架构

项目前端基于Vue做视图控制+nginx对前端请求做负载均衡
后端基于redis底层原理+redis分布式锁+SpringBoot+Mybatisplus
后面会对用到的一些技术进行更新
如:消息队列变为RabbitMQ,拦截器换成spring security,对MySQL数据库进行简单调优
展示效果


数据库表设计

功能一:短信登入
流程图

ThreadLocal线程域对象,将线程的数据保存到每个线程的内部避免多线程并发修改的安全问题。
发送短信验证码

获取验证码发送请求:Request URL: http://127.0. 0.1:8080/api/user/code?phone=13566775566 api 象征的服务的请求自动过滤

代码如下:
@PostMapping("code")
public Result sendCode(@RequestParam("phone") String phone, HttpSession session) {
// 发送短信验证码并保存验证码
return userService.sendCode(phone, session);
}
@Override
public Result sendCode(String phone, HttpSession session) {
// 1.校验手机号
if (RegexUtils.isPhoneInvalid(phone)) {
// 2.如果不符合,返回错误信息
return Result.fail("手机号格式错误!");
}
// 3.符合,生成验证码
String code = RandomUtil.randomNumbers(6);
// 4.保存验证码到 session
stringRedisTemplate.opsForValue().set(LOGIN_CODE_KEY + phone, code, LOGIN_CODE_TTL, TimeUnit.MINUTES);
// 5.发送验证码
log.debug("发送短信验证码成功,验证码:{}", code);
// 返回ok
return Result.ok();
}

登录请求:Request URL: http://127.0.0. 1:8080/api/user/login

这里注意前端提交的是一个Json数据所以后端接收时需要用到@RequestBody注解来接收
@Override
public Result login(LoginFormDTO loginForm, HttpSession session) {
// 1.校验手机号
String phone = loginForm.getPhone();
if (RegexUtils.isPhoneInvalid(phone)) {
// 2.如果不符合,返回错误信息
return Result.fail("手机号格式错误!");
}
// 3.从redis获取验证码并校验
String cacheCode = stringRedisTemplate.opsForValue().get(LOGIN_CODE_KEY + phone);
String code = loginForm.getCode();
if (cacheCode == null || !cacheCode.equals(code)) {
// 不一致,报错
return Result.fail("验证码错误");
}
// 4.一致,根据手机号查询用户 select * from tb_user where phone = ?
//query()由于该方法继承了ServiceImpl<UserMapper, User>,可以使用Mybatisplus
User user = query().eq("phone", phone).one();
// 5.判断用户是否存在
if (user == null) {
// 6.不存在,创建新用户并保存
user = createUserWithPhone(phone);
}
// 7.保存用户信息到 redis中
// 7.1.随机生成token,作为登录令牌
String token = UUID.randomUUID().toString(true);
// 7.2.将User对象转为HashMap存储
UserDTO userDTO = BeanUtil.copyProperties(user, UserDTO.class);
Map<String, Object> userMap = BeanUtil.beanToMap(userDTO, new HashMap<>(),
CopyOptions.create()
.setIgnoreNullValue(true)
.setFieldValueEditor((fieldName, fieldValue) -> fieldValue.toString()));
// 7.3.存储
String tokenKey = LOGIN_USER_KEY + token;
stringRedisTemplate.opsForHash().putAll(tokenKey, userMap);
// 7.4.设置token有效期
stringRedisTemplate.expire(tokenKey, LOGIN_USER_TTL, TimeUnit.MINUTES);
// 8.返回token
return Result.ok(token);
}
由于发现每次访问页面时都需要进行登录校验,由此引出拦截器

@Configuration
public class MvcConfig implements WebMvcConfigurer {
@Resource
private StringRedisTemplate stringRedisTemplate;
@Override
public void addInterceptors(InterceptorRegistry registry) {
// 登录拦截器
registry.addInterceptor(new LoginInterceptor())
.excludePathPatterns(
"/shop/**",
"/voucher/**",
"/shop-type/**",
"/upload/**",
"/blog/hot",
"/user/code",
"/user/login"
).order(1);
// token刷新的拦截器
registry.addInterceptor(new RefreshTokenInterceptor(stringRedisTemplate)).addPathPatterns("/**").order(0);
}
}
session共享问题:多台Tomcat并不共享session存储空间,当请求切换到不同tomcat服务时导致数据丢失的问题。 通过把存在session中的数据转存到一个外部存储空间中即引出存在redis


拦截优化让每次请求都刷新token而不是只有需要用户信息的请求才刷新token过期时间
功能二:商户查询缓存
什么是缓存

添加redis缓存

根据id查询商铺信息的流程图
缓存更新策略


主动更新策略

缓存穿透
缓存穿透是指客户端请求的数据在缓存中和数据库中都不存在,这样缓存永远不会生效,这些请求都会打到数据库。
常见两种解决方案为
缓存null对象
布隆过滤

缓存穿透解决方案流程

代码:
// TODO 解决缓存穿透向redis存入空值的方案
public <R,ID> R queryWithPassThrough(
String keyPrefix, ID id, Class<R> type, Function<ID, R> dbFallback, Long time, TimeUnit unit){
String key = keyPrefix + id;
// 1.从redis查询商铺缓存
String json = stringRedisTemplate.opsForValue().get(key);
// 2.判断是否存在
if (StrUtil.isNotBlank(json)) {
// 3.存在,直接返回
return JSONUtil.toBean(json, type);
}
// 判断命中的是否是空值
if (json != null) {
// 返回一个错误信息
return null;
}
// 4.不存在,根据id查询数据库
R r = dbFallback.apply(id);
// 5.不存在,返回错误
if (r == null) {
// 将空值写入redis
stringRedisTemplate.opsForValue().set(key, "", CACHE_NULL_TTL, TimeUnit.MINUTES);
// 返回错误信息
return null;
}
// 6.存在,写入redis
this.set(key, r, time, unit);
return r;
}

缓存雪崩

缓存击穿

两种解决方案对比

互斥锁解决方案代码:
// TODO 缓存击穿 互斥锁的解决方案实现
public <R, ID> R queryWithMutex(
String keyPrefix, ID id, Class<R> type, Function<ID, R> dbFallback, Long time, TimeUnit unit) {
String key = keyPrefix + id;
// 1.从redis查询商铺缓存
String shopJson = stringRedisTemplate.opsForValue().get(key);
// 2.判断是否存在
if (StrUtil.isNotBlank(shopJson)) {
// 3.存在,直接返回
return JSONUtil.toBean(shopJson, type);
}
// 判断命中的是否是空值
if (shopJson != null) {
// 返回一个错误信息
return null;
}
// 4.实现缓存重建
// 4.1.获取互斥锁
String lockKey = LOCK_SHOP_KEY + id;
R r = null;
try {
boolean isLock = tryLock(lockKey);
// 4.2.判断是否获取成功
if (!isLock) {
// 4.3.获取锁失败,休眠并重试
Thread.sleep(50);
return queryWithMutex(keyPrefix, id, type, dbFallback, time, unit);
}
// 4.4.获取锁成功,根据id查询数据库
r = dbFallback.apply(id);
// 5.不存在,返回错误
if (r == null) {
// 将空值写入redis
stringRedisTemplate.opsForValue().set(key, "", CACHE_NULL_TTL, TimeUnit.MINUTES);
// 返回错误信息
return null;
}
// 6.存在,写入redis
this.set(key, r, time, unit);
} catch (InterruptedException e) {
throw new RuntimeException(e);
}finally {
// 7.释放锁
unlock(lockKey);
}
// 8.返回
return r;
}
逻辑过期解决方案代码:
// TODO 缓存击穿 互斥锁的解决方案实现
public <R, ID> R queryWithMutex(
String keyPrefix, ID id, Class<R> type, Function<ID, R> dbFallback, Long time, TimeUnit unit) {
String key = keyPrefix + id;
// 1.从redis查询商铺缓存
String shopJson = stringRedisTemplate.opsForValue().get(key);
// 2.判断是否存在
if (StrUtil.isNotBlank(shopJson)) {
// 3.存在,直接返回
return JSONUtil.toBean(shopJson, type);
}
// 判断命中的是否是空值
if (shopJson != null) {
// 返回一个错误信息
return null;
}
// 4.实现缓存重建
// 4.1.获取互斥锁
String lockKey = LOCK_SHOP_KEY + id;
R r = null;
try {
boolean isLock = tryLock(lockKey);
// 4.2.判断是否获取成功
if (!isLock) {
// 4.3.获取锁失败,休眠并重试
Thread.sleep(50);
return queryWithMutex(keyPrefix, id, type, dbFallback, time, unit);
}
// 4.4.获取锁成功,根据id查询数据库
r = dbFallback.apply(id);
// 5.不存在,返回错误
if (r == null) {
// 将空值写入redis
stringRedisTemplate.opsForValue().set(key, "", CACHE_NULL_TTL, TimeUnit.MINUTES);
// 返回错误信息
return null;
}
// 6.存在,写入redis
this.set(key, r, time, unit);
} catch (InterruptedException e) {
throw new RuntimeException(e);
}finally {
// 7.释放锁
unlock(lockKey);
}
// 8.返回
return r;
}
功能三:优惠券秒杀功能
全局ID生成器

实现方案:
实现优惠券秒杀下单:

保存优惠券
@Override
@Transactional
public void addSeckillVoucher(Voucher voucher) {
// 保存优惠券
save(voucher);
// 保存秒杀信息
SeckillVoucher seckillVoucher = new SeckillVoucher();
seckillVoucher.setVoucherId(voucher.getId());
seckillVoucher.setStock(voucher.getStock());
seckillVoucher.setBeginTime(voucher.getBeginTime());
seckillVoucher.setEndTime(voucher.getEndTime());
seckillVoucherService.save(seckillVoucher);
// 保存秒杀库存到Redis中
stringRedisTemplate.opsForValue().set(SECKILL_STOCK_KEY + voucher.getId(), voucher.getStock().toString());
}
实现优惠券秒杀下单

实现过程流程图
超卖问题原因

超卖问题解决方案加锁

乐观锁:

一人一单并发安全问题

分布式锁的方案解决集群模式下一人一单的安全问题

分布式锁实现的三种方式

redis方案获取锁释放锁
public class SimpleRedisLock implements ILock {
private String name;
private StringRedisTemplate stringRedisTemplate;
public SimpleRedisLock(String name, StringRedisTemplate stringRedisTemplate) {
this.name = name;
this.stringRedisTemplate = stringRedisTemplate;
}
private static final String KEY_PREFIX = "lock:";
private static final String ID_PREFIX = UUID.randomUUID().toString(true) + "-";
private static final DefaultRedisScript<Long> UNLOCK_SCRIPT;
static {
UNLOCK_SCRIPT = new DefaultRedisScript<>();
UNLOCK_SCRIPT.setLocation(new ClassPathResource("unlock.lua"));
UNLOCK_SCRIPT.setResultType(Long.class);
}
@Override
public boolean tryLock(long timeoutSec) {
// 获取线程标示
String threadId = ID_PREFIX + Thread.currentThread().getId();
// 获取锁
Boolean success = stringRedisTemplate.opsForValue()
.setIfAbsent(KEY_PREFIX + name, threadId, timeoutSec, TimeUnit.SECONDS);
return Boolean.TRUE.equals(success);
}
@Override
public void unlock() {
// 调用lua脚本
stringRedisTemplate.execute(
UNLOCK_SCRIPT,
Collections.singletonList(KEY_PREFIX + name),
ID_PREFIX + Thread.currentThread().getId());
}
防止业务超时锁自动释放误删的问题

实现可重入锁引出redission
@Configuration
public class RedissonConfig {
@Bean
public RedissonClient redissonClient(){
// 配置
Config config = new Config();
config.useSingleServer().setAddress("redis://192.168.230.128:6378");
// 创建RedissonClient对象
return Redisson.create(config);
}
}
redission可重入锁原理
锁结构

原理流程图

redission分布式锁原理


redission解决主从一致性问题使用联锁

总结

redis优化秒杀
优化前

优化后
利用set集合记录用户下单的id实现下单流程图
lua脚本
-- 1.参数列表
-- 1.1.优惠券id
local voucherId = ARGV[1]
-- 1.2.用户id
local userId = ARGV[2]
-- 1.3.订单id
local orderId = ARGV[3]
-- 2.数据key
-- 2.1.库存key
local stockKey = 'seckill:stock:' .. voucherId
-- 2.2.订单key
local orderKey = 'seckill:order:' .. voucherId
-- 3.脚本业务
-- 3.1.判断库存是否充足 get stockKey
if(tonumber(redis.call('get', stockKey)) <= 0) then
-- 3.2.库存不足,返回1
return 1
end
-- 3.2.判断用户是否下单 SISMEMBER orderKey userId
if(redis.call('sismember', orderKey, userId) == 1) then
-- 3.3.存在,说明是重复下单,返回2
return 2
end
-- 3.4.扣库存 incrby stockKey -1
redis.call('incrby', stockKey, -1)
-- 3.5.下单(保存用户)sadd orderKey userId
redis.call('sadd', orderKey, userId)
-- 3.6.发送消息到队列中, XADD stream.orders * k1 v1 k2 v2 ...
redis.call('xadd', 'stream.orders', '*', 'userId', userId, 'voucherId', voucherId, 'id', orderId)
return 0
基于阻塞队列完成订单的处理

由于阻塞队列的异步秒杀存在的问题引出消息队列

redis提供了三种不同的方式实现消息队列


基于PubSub的消息队列


消费者组(Consumer Group) :将多个消费者划分到一个组中,监听同-一个队列。具备下列特点:

private class VoucherOrderHandler implements Runnable{
private final String queueName = "stream.orders";
@Override
public void run() {
while (true) {
try {
// 0.初始化stream
initStream();
// 1.获取消息队列中的订单信息 XREADGROUP GROUP g1 c1 COUNT 1 BLOCK 2000 STREAMS s1 >
List<MapRecord<String, Object, Object>> list = stringRedisTemplate.opsForStream().read(
Consumer.from("g1", "c1"),
StreamReadOptions.empty().count(1).block(Duration.ofSeconds(2)),
StreamOffset.create(queueName, ReadOffset.lastConsumed())
);
// 2.判断订单信息是否为空
if (list == null || list.isEmpty()) {
// 如果为null,说明没有消息,继续下一次循环
continue;
}
// 解析数据
MapRecord<String, Object, Object> record = list.get(0);
Map<Object, Object> value = record.getValue();
VoucherOrder voucherOrder = BeanUtil.fillBeanWithMap(value, new VoucherOrder(), true);
// 3.创建订单
handleVoucherOrder(voucherOrder);
// 4.确认消息 XACK stream.orders g1 id
stringRedisTemplate.opsForStream().acknowledge(queueName, "g1", record.getId());
} catch (Exception e) {
log.error("处理订单异常", e);
handlePendingList();
}
}
}
public void initStream(){
Boolean exists = stringRedisTemplate.hasKey(queueName);
if (BooleanUtil.isFalse(exists)) {
log.info("stream不存在,开始创建stream");
// 不存在,需要创建
stringRedisTemplate.opsForStream().createGroup(queueName, ReadOffset.latest(), "g1");
log.info("stream和group创建完毕");
return;
}
// stream存在,判断group是否存在
StreamInfo.XInfoGroups groups = stringRedisTemplate.opsForStream().groups(queueName);
if(groups.isEmpty()){
log.info("group不存在,开始创建group");
// group不存在,创建group
stringRedisTemplate.opsForStream().createGroup(queueName, ReadOffset.latest(), "g1");
log.info("group创建完毕");
}
}
private void handleVoucherOrder(VoucherOrder voucherOrder) {
Long userId = voucherOrder.getId();
// 创建锁对象
// SimpleRedisLock lock = new SimpleRedisLock("order:" + userId, stringRedisTemplate);
RLock lock = redissonClient.getLock("lock:order:" + userId);
// 获取锁
boolean isLock = lock.tryLock();
// 判断是否获取锁成功
if(!isLock){
// 获取锁失败,返回错误或重试
log.error("不允许重复下单");
return;
}
try {
// 获取代理对象(事务)
createVoucherOrder(voucherOrder);
} finally {
// 释放锁
lock.unlock();
}
}
IVoucherOrderService proxy;
@Override
// 用户下单过程
public Result seckillVoucher(Long voucherId) {
Long userId = UserHolder.getUser().getId();
long orderId = redisIdWorker.nextId("order");
// 1.执行lua脚本
Long result = stringRedisTemplate.execute(
SECKILL_SCRIPT,
Collections.emptyList(),
voucherId.toString(), userId.toString(), String.valueOf(orderId)
);
int r = result.intValue();
// 2.判断结果是否为0
if (r != 0) {
// 2.1.不为0 ,代表没有购买资格
return Result.fail(r == 1 ? "库存不足" : "不能重复下单");
}
// 3.获取代理对象
proxy = (IVoucherOrderService) AopContext.currentProxy();
// 4.返回订单id
return Result.ok(orderId);
}


功能四、达人探店
上传图片和删除图片
@Slf4j
@RestController
@RequestMapping("upload")
public class UploadController {
@PostMapping("blog")
public Result uploadImage(@RequestParam("file") MultipartFile image) {
try {
// 获取原始文件名称
String originalFilename = image.getOriginalFilename();
// 生成新文件名
String fileName = createNewFileName(originalFilename);
// 保存文件
image.transferTo(new File(SystemConstants.IMAGE_UPLOAD_DIR, fileName));
// 返回结果
log.debug("文件上传成功,{}", fileName);
return Result.ok(fileName);
} catch (IOException e) {
throw new RuntimeException("文件上传失败", e);
}
}
@GetMapping("/blog/delete")
public Result deleteBlogImg(@RequestParam("name") String filename) {
File file = new File(SystemConstants.IMAGE_UPLOAD_DIR, filename);
if (file.isDirectory()) {
return Result.fail("错误的文件名称");
}
FileUtil.del(file);
return Result.ok();
}
private String createNewFileName(String originalFilename) {
// 获取后缀
String suffix = StrUtil.subAfter(originalFilename, ".", true);
// 生成目录
String name = UUID.randomUUID().toString();
int hash = name.hashCode();
int d1 = hash & 0xF;
int d2 = (hash >> 4) & 0xF;
// 判断目录是否存在
File dir = new File(SystemConstants.IMAGE_UPLOAD_DIR, StrUtil.format("/blogs/{}/{}", d1, d2));
if (!dir.exists()) {
dir.mkdirs();
}
// 生成文件名
return StrUtil.format("/blogs/{}/{}/{}.{}", d1, d2, name, suffix);
}
}
查询探店笔记
public Result queryHotBlog(Integer current) {
// 根据用户查询
Page<Blog> page = query()
.orderByDesc("liked")
.page(new Page<>(current, SystemConstants.MAX_PAGE_SIZE));
// 获取当前页数据
List<Blog> records = page.getRecords();
// 查询用户
records.forEach(blog -> {
this.queryBlogUser(blog);
this.isBlogLiked(blog);
});
return Result.ok(records);
}
@Override
public Result queryBlogById(Long id) {
// 1.查询blog
Blog blog = getById(id);
if (blog == null) {
return Result.fail("笔记不存在!");
}
// 2.查询blog有关的用户
queryBlogUser(blog);
// 3.查询blog是否被点赞
isBlogLiked(blog);
return Result.ok(blog);
}
点赞功能

private void isBlogLiked(Blog blog) {
// 1.获取登录用户
UserDTO user = UserHolder.getUser();
if (user == null) {
// 用户未登录,无需查询是否点赞
return;
}
Long userId = user.getId();
// 2.判断当前登录用户是否已经点赞
String key = "blog:liked:" + blog.getId();
Double score = stringRedisTemplate.opsForZSet().score(key, userId.toString());
blog.setIsLike(score != null);
}
@Override
public Result likeBlog(Long id) {
// 1.获取登录用户
Long userId = UserHolder.getUser().getId();
// 2.判断当前登录用户是否已经点赞
String key = BLOG_LIKED_KEY + id;
Double score = stringRedisTemplate.opsForZSet().score(key, userId.toString());
if (score == null) {
// 3.如果未点赞,可以点赞
// 3.1.数据库点赞数 + 1
boolean isSuccess = update().setSql("liked = liked + 1").eq("id", id).update();
// 3.2.保存用户到Redis的set集合 zadd key value score
if (isSuccess) {
stringRedisTemplate.opsForZSet().add(key, userId.toString(), System.currentTimeMillis());
}
} else {
// 4.如果已点赞,取消点赞
// 4.1.数据库点赞数 -1
boolean isSuccess = update().setSql("liked = liked - 1").eq("id", id).update();
// 4.2.把用户从Redis的set集合移除
if (isSuccess) {
stringRedisTemplate.opsForZSet().remove(key, userId.toString());
}
}
return Result.ok();
}
@Override
public Result queryBlogLikes(Long id) {
String key = BLOG_LIKED_KEY + id;
// 1.查询top5的点赞用户 zrange key 0 4
Set<String> top5 = stringRedisTemplate.opsForZSet().range(key, 0, 4);
if (top5 == null || top5.isEmpty()) {
return Result.ok(Collections.emptyList());
}
// 2.解析出其中的用户id
List<Long> ids = top5.stream().map(Long::valueOf).collect(Collectors.toList());
String idStr = StrUtil.join(",", ids);
// 3.根据用户id查询用户 WHERE id IN ( 5 , 1 ) ORDER BY FIELD(id, 5, 1)
List<UserDTO> userDTOS = userService.query()
.in("id", ids).last("ORDER BY FIELD(id," + idStr + ")").list()
.stream()
.map(user -> BeanUtil.copyProperties(user, UserDTO.class))
.collect(Collectors.toList());
// 4.返回
return Result.ok(userDTOS);
}
点赞排行榜

@Override
public Result queryBlogLikes(Long id) {
String key = BLOG_LIKED_KEY + id;
// 1.查询top5的点赞用户 zrange key 0 4
Set<String> top5 = stringRedisTemplate.opsForZSet().range(key, 0, 4);
if (top5 == null || top5.isEmpty()) {
return Result.ok(Collections.emptyList());
}
// 2.解析出其中的用户id
List<Long> ids = top5.stream().map(Long::valueOf).collect(Collectors.toList());
String idStr = StrUtil.join(",", ids);
// 3.根据用户id查询用户 WHERE id IN ( 5 , 1 ) ORDER BY FIELD(id, 5, 1)
List<UserDTO> userDTOS = userService.query()
.in("id", ids).last("ORDER BY FIELD(id," + idStr + ")").list()
.stream()
.map(user -> BeanUtil.copyProperties(user, UserDTO.class))
.collect(Collectors.toList());
// 4.返回
return Result.ok(userDTOS);
}
功能五、好友关注功能
关注和取关

@Override
public Result queryBlogOfFollow(Long max, Integer offset) {
// 1.获取当前用户
Long userId = UserHolder.getUser().getId();
// 2.查询收件箱 ZREVRANGEBYSCORE key Max Min LIMIT offset count
String key = FEED_KEY + userId;
Set<ZSetOperations.TypedTuple<String>> typedTuples = stringRedisTemplate.opsForZSet()
.reverseRangeByScoreWithScores(key, 0, max, offset, 2);
// 3.非空判断
if (typedTuples == null || typedTuples.isEmpty()) {
return Result.ok();
}
// 4.解析数据:blogId、minTime(时间戳)、offset
List<Long> ids = new ArrayList<>(typedTuples.size());
long minTime = 0; // 2
int os = 1; // 2
for (ZSetOperations.TypedTuple<String> tuple : typedTuples) { // 5 4 4 2 2
// 4.1.获取id
ids.add(Long.valueOf(tuple.getValue()));
// 4.2.获取分数(时间戳)
long time = tuple.getScore().longValue();
if(time == minTime){
os++;
}else{
minTime = time;
os = 1;
}
}
// 5.根据id查询blog
String idStr = StrUtil.join(",", ids);
List<Blog> blogs = query().in("id", ids).last("ORDER BY FIELD(id," + idStr + ")").list();
for (Blog blog : blogs) {
// 5.1.查询blog有关的用户
queryBlogUser(blog);
// 5.2.查询blog是否被点赞
isBlogLiked(blog);
}
// 6.封装并返回
ScrollResult r = new ScrollResult();
r.setList(blogs);
r.setOffset(os);
r.setMinTime(minTime);
return Result.ok(r);
}
共同关注
@Override
public Result followCommons(Long id) {
// 1.获取当前用户
Long userId = UserHolder.getUser().getId();
String key = "follows:" + userId;
// 2.求交集
String key2 = "follows:" + id;
Set<String> intersect = stringRedisTemplate.opsForSet().intersect(key, key2);
if (intersect == null || intersect.isEmpty()) {
// 无交集
return Result.ok(Collections.emptyList());
}
// 3.解析id集合
List<Long> ids = intersect.stream().map(Long::valueOf).collect(Collectors.toList());
// 4.查询用户
List<UserDTO> users = userService.listByIds(ids)
.stream()
.map(user -> BeanUtil.copyProperties(user, UserDTO.class))
.collect(Collectors.toList());
return Result.ok(users);
}
关注推送Feed流模式


实现滚动分页查询
@Override
public Result queryBlogOfFollow(Long max, Integer offset) {
// 1.获取当前用户
Long userId = UserHolder.getUser().getId();
// 2.查询收件箱 ZREVRANGEBYSCORE key Max Min LIMIT offset count
String key = FEED_KEY + userId;
Set<ZSetOperations.TypedTuple<String>> typedTuples = stringRedisTemplate.opsForZSet()
.reverseRangeByScoreWithScores(key, 0, max, offset, 2);
// 3.非空判断
if (typedTuples == null || typedTuples.isEmpty()) {
return Result.ok();
}
// 4.解析数据:blogId、minTime(时间戳)、offset
List<Long> ids = new ArrayList<>(typedTuples.size());
long minTime = 0; // 2
int os = 1; // 2
for (ZSetOperations.TypedTuple<String> tuple : typedTuples) { // 5 4 4 2 2
// 4.1.获取id
ids.add(Long.valueOf(tuple.getValue()));
// 4.2.获取分数(时间戳)
long time = tuple.getScore().longValue();
if(time == minTime){
os++;
}else{
minTime = time;
os = 1;
}
}
// 5.根据id查询blog
String idStr = StrUtil.join(",", ids);
List<Blog> blogs = query().in("id", ids).last("ORDER BY FIELD(id," + idStr + ")").list();
for (Blog blog : blogs) {
// 5.1.查询blog有关的用户
queryBlogUser(blog);
// 5.2.查询blog是否被点赞
isBlogLiked(blog);
}
// 6.封装并返回
ScrollResult r = new ScrollResult();
r.setList(blogs);
r.setOffset(os);
r.setMinTime(minTime);
return Result.ok(r);
}
功能六、附近商铺
GEO数据结构的基本用法

附近商铺搜索

@Test
void loadShopData() {
// 1.查询店铺信息
List<Shop> list = shopService.list();
// 2.把店铺分组,按照typeId分组,typeId一致的放到一个集合
Map<Long, List<Shop>> map = list.stream().collect(Collectors.groupingBy(Shop::getTypeId));
// 3.分批完成写入Redis
for (Map.Entry<Long, List<Shop>> entry : map.entrySet()) {
// 3.1.获取类型id
Long typeId = entry.getKey();
String key = SHOP_GEO_KEY + typeId;
// 3.2.获取同类型的店铺的集合
List<Shop> value = entry.getValue();
List<RedisGeoCommands.GeoLocation<String>> locations = new ArrayList<>(value.size());
// 3.3.写入redis GEOADD key 经度 纬度 member
for (Shop shop : value) {
// stringRedisTemplate.opsForGeo().add(key, new Point(shop.getX(), shop.getY()), shop.getId().toString());
locations.add(new RedisGeoCommands.GeoLocation<>(
shop.getId().toString(),
new Point(shop.getX(), shop.getY())
));
}
stringRedisTemplate.opsForGeo().add(key, locations);
}
}
@Override
public Result queryShopByType(Integer typeId, Integer current, Double x, Double y) {
// 1.判断是否需要根据坐标查询
if (x == null || y == null) {
// 不需要坐标查询,按数据库查询
Page<Shop> page = query()
.eq("type_id", typeId)
.page(new Page<>(current, SystemConstants.DEFAULT_PAGE_SIZE));
// 返回数据
return Result.ok(page.getRecords());
}
// 2.计算分页参数
int from = (current - 1) * SystemConstants.DEFAULT_PAGE_SIZE;
int end = current * SystemConstants.DEFAULT_PAGE_SIZE;
// 3.查询redis、按照距离排序、分页。结果:shopId、distance
String key = SHOP_GEO_KEY + typeId;
GeoResults<RedisGeoCommands.GeoLocation<String>> results = stringRedisTemplate.opsForGeo() // GEOSEARCH key BYLONLAT x y BYRADIUS 10 WITHDISTANCE
.search(
key,
GeoReference.fromCoordinate(x, y),
new Distance(5000),
RedisGeoCommands.GeoSearchCommandArgs.newGeoSearchArgs().includeDistance().limit(end)
);
// 4.解析出id
if (results == null) {
return Result.ok(Collections.emptyList());
}
List<GeoResult<RedisGeoCommands.GeoLocation<String>>> list = results.getContent();
if (list.size() <= from) {
// 没有下一页了,结束
return Result.ok(Collections.emptyList());
}
// 4.1.截取 from ~ end的部分
List<Long> ids = new ArrayList<>(list.size());
Map<String, Distance> distanceMap = new HashMap<>(list.size());
list.stream().skip(from).forEach(result -> {
// 4.2.获取店铺id
String shopIdStr = result.getContent().getName();
ids.add(Long.valueOf(shopIdStr));
// 4.3.获取距离
Distance distance = result.getDistance();
distanceMap.put(shopIdStr, distance);
});
// 5.根据id查询Shop
String idStr = StrUtil.join(",", ids);
List<Shop> shops = query().in("id", ids).last("ORDER BY FIELD(id," + idStr + ")").list();
for (Shop shop : shops) {
shop.setDistance(distanceMap.get(shop.getId().toString()).getValue());
}
// 6.返回
return Result.ok(shops);
}
功能七、用户签到
bitMap用法

@Override
public Result sign() {
// 1.获取当前登录用户
Long userId = UserHolder.getUser().getId();
// 2.获取日期
LocalDateTime now = LocalDateTime.now();
// 3.拼接key
String keySuffix = now.format(DateTimeFormatter.ofPattern(":yyyyMM"));
String key = USER_SIGN_KEY + userId + keySuffix;
// 4.获取今天是本月的第几天
int dayOfMonth = now.getDayOfMonth();
// 5.写入Redis SETBIT key offset 1
stringRedisTemplate.opsForValue().setBit(key, dayOfMonth - 1, true);
return Result.ok();
}
签到统计

@Override
public Result signCount() {
// 1.获取当前登录用户
Long userId = UserHolder.getUser().getId();
// 2.获取日期
LocalDateTime now = LocalDateTime.now();
// 3.拼接key
String keySuffix = now.format(DateTimeFormatter.ofPattern(":yyyyMM"));
String key = USER_SIGN_KEY + userId + keySuffix;
// 4.获取今天是本月的第几天
int dayOfMonth = now.getDayOfMonth();
// 5.获取本月截止今天为止的所有的签到记录,返回的是一个十进制的数字 BITFIELD sign:5:202203 GET u14 0
List<Long> result = stringRedisTemplate.opsForValue().bitField(
key,
BitFieldSubCommands.create()
.get(BitFieldSubCommands.BitFieldType.unsigned(dayOfMonth)).valueAt(0)
);
if (result == null || result.isEmpty()) {
// 没有任何签到结果
return Result.ok(0);
}
Long num = result.get(0);
if (num == null || num == 0) {
return Result.ok(0);
}
// 6.循环遍历
int count = 0;
while (true) {
// 6.1.让这个数字与1做与运算,得到数字的最后一个bit位 // 判断这个bit位是否为0
if ((num & 1) == 0) {
// 如果为0,说明未签到,结束
break;
}else {
// 如果不为0,说明已签到,计数器+1
count++;
}
// 把数字右移一位,抛弃最后一个bit位,继续下一个bit位
num >>>= 1;
}
return Result.ok(count);
}
功能八、UV统计
HyperLogLog用法

@Test
void testHyperLogLog() {
String[] values = new String[1000];
int j = 0;
for (int i = 0; i < 1000000; i++) {
j = i % 1000;
values[j] = "user_" + i;
if(j == 999){
// 发送到Redis
stringRedisTemplate.opsForHyperLogLog().add("hl2", values);
}
}
// 统计数量
Long count = stringRedisTemplate.opsForHyperLogLog().size("hl2");
System.out.println("count = " + count);
}

华为开发者空间,是为全球开发者打造的专属开发空间,汇聚了华为优质开发资源及工具,致力于让每一位开发者拥有一台云主机,基于华为根生态开发、创新。
更多推荐


 33
33 1
1- 0


 已为社区贡献1条内容
 免费领云主机


 华为云 x DeepSeek:AI驱动云上应用创新

 DTT年度收官盛典:华为开发者空间大咖汇,共探云端开发创新
 华为云数字人,助力行业数字化业务创新
 企业数据治理一站式解决方案及应用实践
 轻松构建AIoT智能场景应用


所有评论(0)