ELK日志系统之ES索引删除
ELK日志系统之ES索引删除公司ELK日志收集系统,运行三年之久,积累了很多的日志索引,条件有限elasticsearch单机部署不堪重负,终于罢工,清理磁盘也挽回不了的那种。重启巨慢,且经常启动不起来,看日志一直在刷索引。于是,想要清理老旧日志,顺道优化,以绝后患。
ELK日志系统之ES索引删除
背景
公司ELK日志收集系统,运行三年之久,积累了很多的日志索引,条件有限elasticsearch单机部署不堪重负,终于罢工,清理磁盘也挽回不了的那种。重启巨慢,且经常启动不起来,看日志一直在刷索引。于是,想要清理老旧日志,顺道优化,以绝后患。
Curator
查找资料,决定使用Curator,这是ES官方支持的工具(Curator)。
版本
服务器:Ubuntu 16.04.4 LTS
Curator版本跟ES版本有关,可参考Version Compatibility。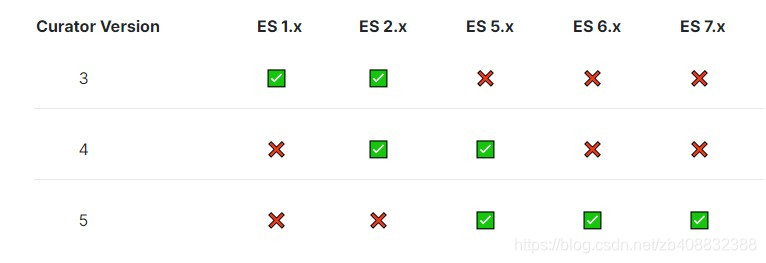
在ES服务器上执行curl http://127.0.0.1:9200,显示
{
  "name" : "6gHUj7K",
  "cluster_name" : "docker-cluster",
  "cluster_uuid" : "0kSHDWWKQBCZdPddUQwVCQ",
  "version" : {
    "number" : "6.1.0",
    "build_hash" : "c0c1ba0",
    "build_date" : "2017-12-12T12:32:54.550Z",
    "build_snapshot" : false,
    "lucene_version" : "7.1.0",
    "minimum_wire_compatibility_version" : "5.6.0",
    "minimum_index_compatibility_version" : "5.0.0"
  },
  "tagline" : "You Know, for Search"
}
可知ES版本6.1.0,使用Curator5.X。
安装
官方指引
我服务器是Ubuntu ,且使用root账号,安装流程如下:
1.执行:
wget -qO - https://packages.elastic.co/GPG-KEY-elasticsearch | apt-key add -
显示OK。
2.跳转到/etc/apt/sources.list.d/目录,增加curator.list文件,文件内容:
deb [arch=amd64] https://packages.elastic.co/curator/5/debian stable main
3.执行apt-get update && apt-get install elasticsearch-curator,等待安装完成。
4.执行curator --help,看到帮助文档,表示安装成功。
配置
需要增加两个配置文件,config.yml和active.yml,位置自选,我放在/data/curator下。
config.yml:
#leave a key empty if there is no value.  None will be a string,
# not a Python "NoneType"
client:
  hosts:
    - 127.0.0.1
  port: 9200
  url_prefix:
  use_ssl: False
  certificate:
  client_cert:
  client_key:
  ssl_no_validate: False
  http_auth:
  timeout: 300
  master_only: True

logging:
  loglevel: INFO
  logfile: "/data/curator/action.log"
  logformat: default
  blacklist: ['elasticsearch', 'urllib3']
参考官方,修改了hosts/port/master_only/logfile,具体参数请参考官方,注意此处我将日志位置设置在/data/curator/action.log,便于后面查看。
active.yml:
# Leave a key impty if there is no value.  None will be a string,
# not a Python "NoneType"
#
# Also remember that all examples have 'disable_action' set to True.  If you
# want to use this action as a template, be sure to set this to False after
# copying it.
actions:
  1:
    action: delete_indices
    description: >-
      Delete indices older than 180 days (based on index name), for logstash-
      prefixed indices. Ignore the error if the filter does not result in an
      actionable list of indices (ignore_empty_list) and exit cleanly.
    options:
      ignore_empty_list: True
      disable_action: False
    filters:
    - filtertype: pattern
      kind: prefix
      value: logstash-
    - filtertype: age
      source: name
      direction: older
      timestring: '%Y.%m.%d'
      unit: days
      unit_count: 180
参考官网,官方示例。注意要把disable_action设置为False。
这里我希望通过pattern去匹配index名,需要先去查一下ES里面有哪些index,执行:
curl http://127.0.0.1:9200/_cat/indices?v
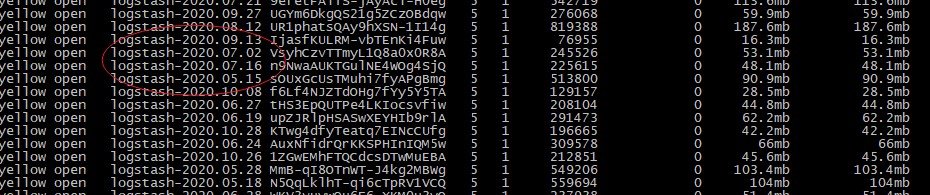
还好我的index格式比较固定。
执行清理
可以先用命令
curator --config /data/curator/config.yml --dry-run /data/curator/action.yml
执行一下,看看会不会报错,该命令并不会真正删除索引。
正式执行清理命令如下:
curator --config /data/curator/config.yml /data/curator/action.yml
这里可能是因为我需要清理的索引量太大,执行了多次,每次都是报链接超时,所幸执行多次之后,成功清理了所有180天之前的日志。链接超时,可以通过设置config.yml中的timeout来修改超时时间,单位秒。
定时任务
每次手动清理比较麻烦,希望自动清理,保证ES里面超过180天的索引尽量不积压,使用linux的crontab。
1.增加执行脚本文件del_indices_task.sh,如下
curator --config /data/curator/config.yml /data/curator/action.yml
添加文件执行权限
chmod u+x del_indices_task.sh
2.执行crontab -e,进入编辑器,编辑如下:
12 2 10 * * /data/curator/del_indices_task.sh
设置为每月10号自动执行。
9 1 * * 0 /home/myoracle/Documents/clearfiles.sh
crontab 定时命令有6个值,6个值之间用空格隔开,第一个值表示分钟,取值范围 0~59,如本例中的9,表示第9分钟;第二个值表示小时,取值范围 0~23,本例中的1,表示1点;第三个值表示每个月的某些天,取值范围 01-31,本例中的表示所有的天;第四个值表示年中的某些月,取值范围 01-12,本例中的表示所有月;第五个值表示周中的某些天,取值范围 0-6 ,本例中的0表示星期天;第六个值表示要执行的脚本。
3.执行crontab -l,查看任务是否设置成功了。
4.可以用/etc/init.d/cron reload ,重新加载任务。
参考资料

华为开发者空间,是为全球开发者打造的专属开发空间,汇聚了华为优质开发资源及工具,致力于让每一位开发者拥有一台云主机,基于华为根生态开发、创新。
更多推荐


 0
0 0
0- 0


 已为社区贡献1条内容

所有评论(0)