zk的watch机制使用及原理分析
Zookeeper引入了wacther机制来实现分布式数据的发布/订阅功能。可以让多个订阅者同时监听某一个主题对象,当主题对象自身状态发生改变时就会通知所有订阅者。以上就是watch注册与实现监听的整个过程了。其实 主体逻辑不复杂,只是夹杂着网络通信以及大量的异步化流程 加大了阅读代码的难度。...
文章目录
Watch机制概述
Zookeeper引入了wacther机制来实现分布式数据的发布/订阅功能。可以让多个订阅者同时监听某一个主题对象,当主题对象自身状态发生改变时就会通知所有订阅者。
Watcher常见的事件类型
| 事件类型 | 事件含义 |
|---|---|
| NodeCreated | 节点被创建 |
| NodeDeleted | 节点被删除 |
| NodeDataChanged | 节点数据发生变化 |
| NodeChildrenChanged | 子节点发生变化(增、删、改) |
Watch机制示例
笔者使用Zookeeper Server 3.6.3版本
        <dependency>
            <groupId>org.apache.curator</groupId>
            <artifactId>curator-framework</artifactId>
            <version>5.1.0</version>
        </dependency>
        <dependency>
            <groupId>org.apache.curator</groupId>
            <artifactId>curator-recipes</artifactId>
            <version>5.1.0</version>
        </dependency>
public class WatchDemo {
    public static void main(String[] args) throws Exception {
        CountDownLatch countDownLatch = new CountDownLatch(1);
        ZooKeeper zooKeeper = new ZooKeeper("127.0.0.1:2181", 30000, watchedEvent -> {
            if (watchedEvent.getState().equals(Watcher.Event.KeeperState.SyncConnected)) {
                System.out.println("连接zk成功");
                countDownLatch.countDown();
            }
        });
        countDownLatch.await();


        zooKeeper.exists("/exist", new MyWatcher2(zooKeeper));

        Stat stat = new Stat();
        zooKeeper.getData("/data", new MyWatcher(), stat);

        zooKeeper.getChildren("/child", new MyWatcher());

        zooKeeper.addWatch("/wojiushiwo", watchedEvent -> {
            System.out.println("--------" + watchedEvent.getPath() + "持久化监听--------");
        }, AddWatchMode.PERSISTENT);

        zooKeeper.addWatch("/test", watchedEvent -> {
            System.out.println("--------" + watchedEvent.getPath() + "持久化递归监听--------");
        }, AddWatchMode.PERSISTENT_RECURSIVE);
        System.in.read();

    }

    static class MyWatcher implements Watcher {

        @Override
        public void process(WatchedEvent watchedEvent) {
            System.out.println("--------" + watchedEvent.getPath() + "接收监听--------");
        }
    }

    static class MyWatcher2 implements Watcher {
        ZooKeeper zooKeeper;

        public MyWatcher2(ZooKeeper zooKeeper) {
            this.zooKeeper = zooKeeper;
        }

        @Override
        public void process(WatchedEvent watchedEvent) {
            System.out.println("--------" + watchedEvent.getPath() + "接收监听--------");
            try {
                //回调中 再次注册监听
                zooKeeper.exists(watchedEvent.getPath(),this);
            } catch (KeeperException e) {
                e.printStackTrace();
            } catch (InterruptedException e) {
                e.printStackTrace();
            }
        }
    }
}
示例中给出了数种wacth监听方式的使用。其中,getData、exists、getChildren是较旧的监听API,默认均是一次性监听,监听被出发后即被删除。因此想要多次监听 则必须在watch回调中手动再次注册监听,如上面的MyWatcher2#process
zk另外新增了一个添加监听的API:addWatch,它可以实现持久化监听,其AddWatchMode值类型如下:
- PERSISTENT 持久化监听
- PERSISTENT_RECURSIVE 持久化递归监听 可以监听子节点的变化
Watch机制流程浅析
Watch注册流程
以addWatch持久化监听为例简述下Watch的注册过程
-
客户端将watch请求 封装为Packet,将Packet放到阻塞队列outgoingQueue中;随后在异步流程中,将Packet序列化后由网络通信发送至服务器端
-
服务器端读取客户端的注册watch请求,将path与watcher的关联关系写入到服务端维护的两个HashMap中。随后 向客户端进行响应
//一个path路径下可能有多个Watcher,这里的Watcher实际上是NIOServerCnxn
private final Map<String, Set<Watcher>> watchTable = new HashMap<>();
//一个Watcher可能被多个path路径复用,这里的Watcher实际上是NIOServerCnxn
private final Map<Watcher, Set<String>> watch2Paths = new HashMap<>();
-
客户端收到服务器端的响应后,也将path与watcher监听器的关联关系写入到客户端维护的HashMap中
private final Map<String, Set<Watcher>> persistentWatches = new HashMap<String, Set<Watcher>>();
Watch通知流程
- 服务器端响应客户端对某path的操作,如果该path恰好被监听,那么会根据path-watcher的关系 找到监听该path的所有watcher进行通知,随后服务器端将watcher通知 响应给客户端
- 客户端收到服务器端的watch通知后,会根据path找到相应的客户端wacther 进行回调通知
说白了 就是 客户端和服务端分别维护自己的监听路径与wacther的关联。客户端对znode的某些特定操作下 会触发服务器端的监听机制,服务端将对应的path推给客户端由客户端发起监听回调。只是当中穿插着网络通信以及大量的异步流程 使得整个流程显得不那么清晰明朗了。
源码浅析
Watch注册过程分析
下面我们从源码出发 先来分析下Watch注册的主要流程
客户端发送请求
客户端发送请求的时序图
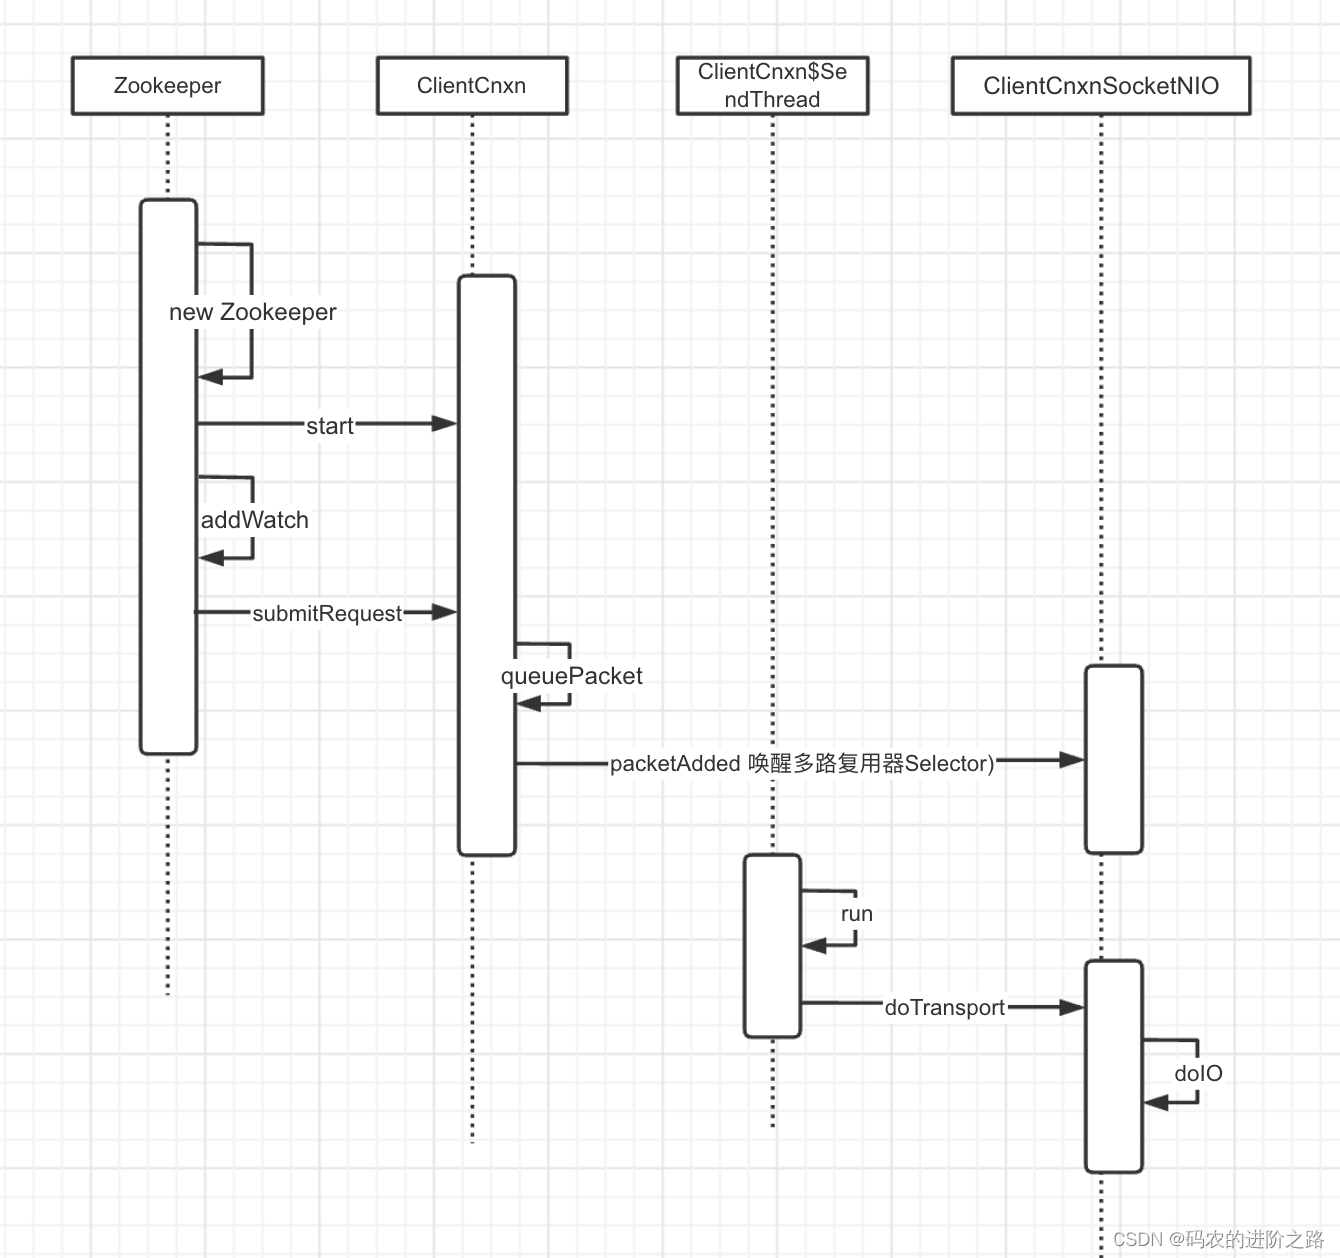
先来看下Zookeeper对象的构造,其构造方法内部包含了对几个重要对象的创建以及线程的启动,它们在watch的注册很重要
Zookeeper
public ZooKeeper(
        String connectString,
        int sessionTimeout,
        Watcher watcher,
        boolean canBeReadOnly,
        HostProvider aHostProvider,
        ZKClientConfig clientConfig) throws IOException {
        //省略日志

        if (clientConfig == null) {
            clientConfig = new ZKClientConfig();
        }
        this.clientConfig = clientConfig;
  			//ZKWatchManager
        watchManager = defaultWatchManager();
        watchManager.defaultWatcher = watcher;
        ConnectStringParser connectStringParser = new ConnectStringParser(connectString);
        hostProvider = aHostProvider;
				//创建客户端连接 得到的是ClientCnxn
        cnxn = createConnection(
            connectStringParser.getChrootPath(),
            hostProvider,
            sessionTimeout,
            this,
            watchManager,
          	//创建得到的是ClientCnxnSocketNIO
            getClientCnxnSocket(),
            canBeReadOnly);
  			//启动ClientCnxn
        cnxn.start();
    }
ClientCnxn
它是客户端负责网络通信的类,它内部有两个线程很重要
- SendThread 负责客户端发起请求 以及 接收服务端的响应
- EventThread 负责处理watch事件
	 public void start() {
     		//启动发送线程 该线程主要处理涉及服务端通信的读写操作
        sendThread.start();
     		//启动事件线程
        eventThread.start();
    }
介绍完前置内容后,下面正式从addWatch方法开始展开
Zookeeper
//basePath 监听的节点路径
//watcher 监听器对象
//监听模式:有持久化监听、有持久化递归监听
public void addWatch(String basePath, Watcher watcher, AddWatchMode mode)
            throws KeeperException, InterruptedException {
        //省略无关代码
		//请求头对象
        RequestHeader h = new RequestHeader();
  		//请求头类型 服务端接收到请求后 会根据type执行不同逻辑
        h.setType(ZooDefs.OpCode.addWatch);
  		//请求对象
        AddWatchRequest request = new AddWatchRequest(serverPath, mode.getMode());
  		//提交请求(结合上下文 cnxn这里是ClientCnxnSocketNIO)
        ReplyHeader r = cnxn.submitRequest(h, request, new ErrorResponse(),
                new AddWatchRegistration(watcher, basePath, mode));
  		//如果响应出错 抛出异常
        if (r.getErr() != 0) {
            throw KeeperException.create(KeeperException.Code.get(r.getErr()),
                    basePath);
        }
    }
ClientCnxn
public ReplyHeader submitRequest(
        RequestHeader h,
        Record request,
        Record response,
        WatchRegistration watchRegistration,
        WatchDeregistration watchDeregistration) throws InterruptedException {

        ReplyHeader r = new ReplyHeader();
  		//构造packet对象 并将其加入到outgoingQueue队列
        Packet packet = queuePacket(
            h,
            r,
            request,
            response,
            null,
            null,
            null,
            null,
            watchRegistration,
            watchDeregistration);
  			//阻塞方式获得pakcet
        synchronized (packet) {
            if (requestTimeout > 0) {
                // Wait for request completion with timeout
                waitForPacketFinish(r, packet);
            } else {
                // Wait for request completion infinitely
                while (!packet.finished) {
                    packet.wait();
                }
            }
        }
        if (r.getErr() == Code.REQUESTTIMEOUT.intValue()) {
            sendThread.cleanAndNotifyState();
        }
        return r;
    }
眼见的读者会发现,提交完请求之后就返回了,什么逻辑都没有了,那程序接下来是怎么执行的呢?
别着急,既然同步流程执行结束了,那会不会有异步流程呢?毕竟packet是被加入到阻塞队列的,肯定有一处代码 会将packet从队列取出来的。
还记得我们前面提过的SendThread线程吗?没错 接下来就从这个线程出发 继续探索watch执行踪迹
SendThread
//SendThread 构造函数
SendThread(ClientCnxnSocket clientCnxnSocket) {
            super(makeThreadName("-SendThread()"));
            state = States.CONNECTING;
  			//ClientCnxnSocketNIO
            this.clientCnxnSocket = clientCnxnSocket;
  					//守护线程
            setDaemon(true);
        }

//SendThread线程执行逻辑
public void run() {
            clientCnxnSocket.introduce(this, sessionId, outgoingQueue);
            clientCnxnSocket.updateNow();
            clientCnxnSocket.updateLastSendAndHeard();
            int to;
            long lastPingRwServer = Time.currentElapsedTime();
            final int MAX_SEND_PING_INTERVAL = 10000; //10 seconds
            InetSocketAddress serverAddress = null;
            while (state.isAlive()) {
                //省略无关代码
				//主要逻辑是基于NIO来实现请求的发送与接收
                    clientCnxnSocket.doTransport(to, pendingQueue, ClientCnxn.this);
               //省略无关代码
        }
ClientCnxnSocketNIO
//下面的代码比较多,但大多是NIO的模版代码 我们注重看下对读写请求的操作
void doTransport(
        int waitTimeOut,
        Queue<Packet> pendingQueue,
        ClientCnxn cnxn) throws IOException, InterruptedException {
  			//等待接收链接
        selector.select(waitTimeOut);
        Set<SelectionKey> selected;
        synchronized (this) {
            selected = selector.selectedKeys();
        }
        updateNow();
        for (SelectionKey k : selected) {
            SocketChannel sc = ((SocketChannel) k.channel());
          	//省略无关代码
            } else if ((k.readyOps() & (SelectionKey.OP_READ | SelectionKey.OP_WRITE)) != 0) {
          	//如果是读或写操作 则执行这里
            doIO(pendingQueue, cnxn);
            }
        }
        //省略无关代码
        selected.clear();
    }
void doIO(Queue<Packet> pendingQueue, ClientCnxn cnxn) throws InterruptedException, IOException {
        SocketChannel sock = (SocketChannel) sockKey.channel();
        if (sock == null) {
            throw new IOException("Socket is null!");
        }
  		//读操作 此时客户端是写请求 因此略过这里
        if (sockKey.isReadable()) {
            //...
        }
  	   //如果是写操作
        if (sockKey.isWritable()) {
            //看到这里终于找到了outgoingQueue了,没错这里就是从outgoingQueue中取出packet
            Packet p = findSendablePacket(outgoingQueue, sendThread.tunnelAuthInProgress());

            if (p != null) {
                updateLastSend();
                // If we already started writing p, p.bb will already exist
                if (p.bb == null) {
                    if ((p.requestHeader != null)
                        && (p.requestHeader.getType() != OpCode.ping)
                        && (p.requestHeader.getType() != OpCode.auth)) {
                      	//设置Xid
                        p.requestHeader.setXid(cnxn.getXid());
                    }
                    //数据序列化 便于网络传输
                    p.createBB();
                }
                //将序列化后的数据 发送给服务端
                sock.write(p.bb);

            //省略无关代码
    }
至此 客户端就将watch监听的请求发送出去了,接下来我们看下服务端是怎么做的?
服务端接收请求
老规矩,为了好理解下面的代码 因此将服务端这块逻辑涉及的几个重要类的初始化先拎出来说下
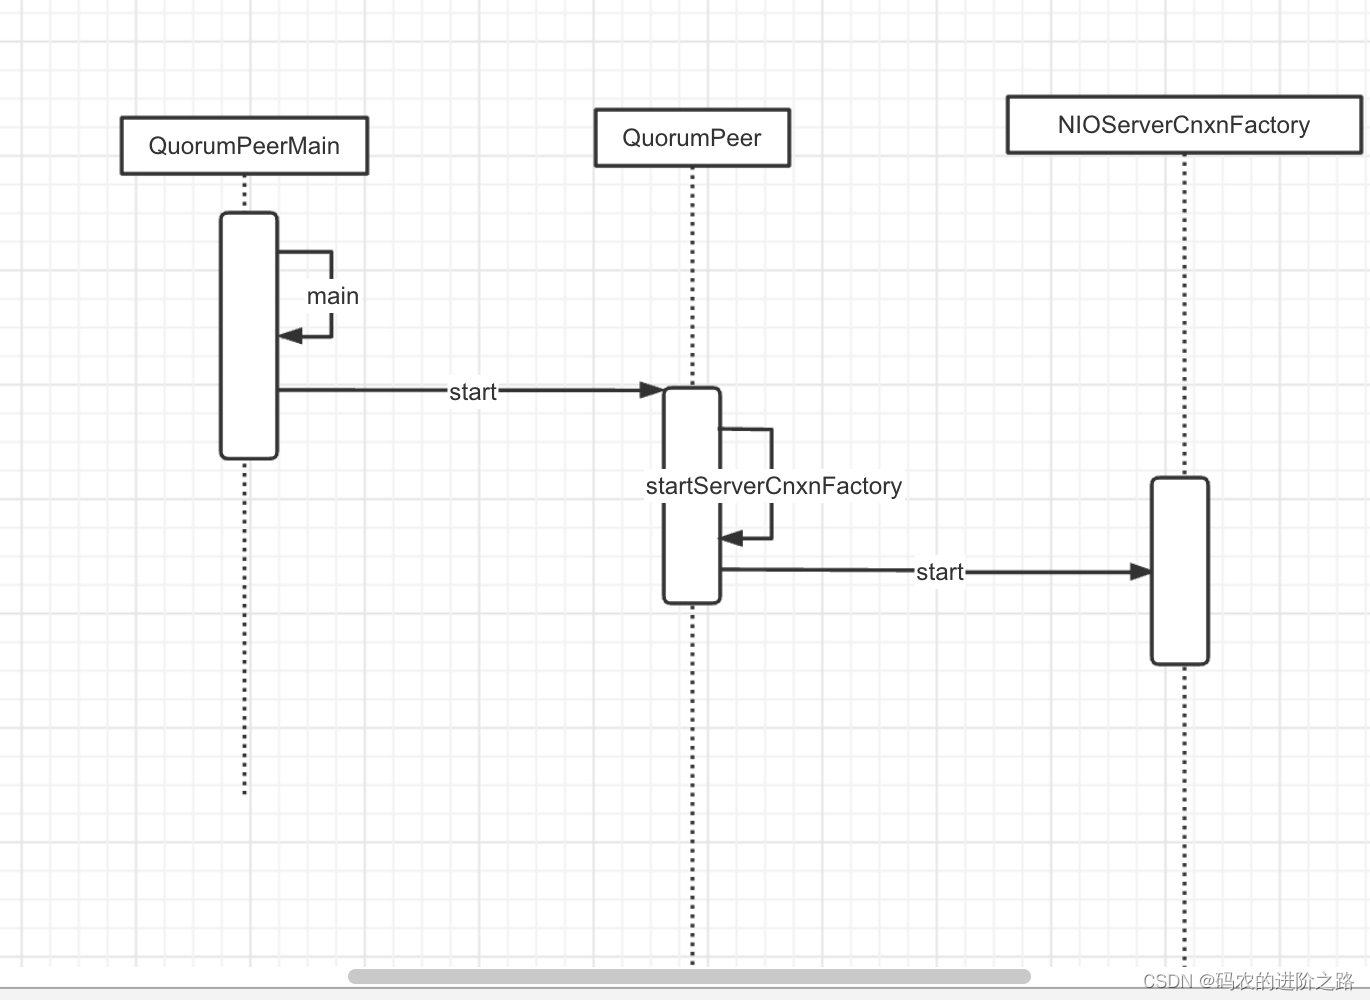
由上面时序图可以看出,在zk启动时便会初始化及启动NIOServerCnxnFactory,其主要代码如下
//QuorumPeerMain#main
if (config.getClientPortAddress() != null) {
  				//默认实现类NIOServerCnxnFactory
                cnxnFactory = ServerCnxnFactory.createFactory();
                cnxnFactory.configure(config.getClientPortAddress(), config.getMaxClientCnxns(), config.getClientPortListenBacklog(), false);
            }
NIOServerCnxnFactory
public void start() {
        stopped = false;
        if (workerPool == null) {
          	//创建线程池 后面会用来执行任务
            workerPool = new WorkerService("NIOWorker", numWorkerThreads, false);
        }
  			//启动SelectorThread
        for (SelectorThread thread : selectorThreads) {
            if (thread.getState() == Thread.State.NEW) {
                thread.start();
            }
        }
        //启动acceptThread
        if (acceptThread.getState() == Thread.State.NEW) {
            acceptThread.start();
        }
  			//启动expirerThread
        if (expirerThread.getState() == Thread.State.NEW) {
            expirerThread.start();
        }
    }
这里来说下,NIOServerCnxnFactory将接收网络连接与处理IO的操作分开了,也即是AcceptThread用来接收连接,SelectorThread用来处理IO请求。

上面的流程中SelectorThread接收到客户端请求,然后交由线程池处理调度。循着这个调用链路 我们直接从NIOServerCnxn#doIO开始看下后续的调用时序图
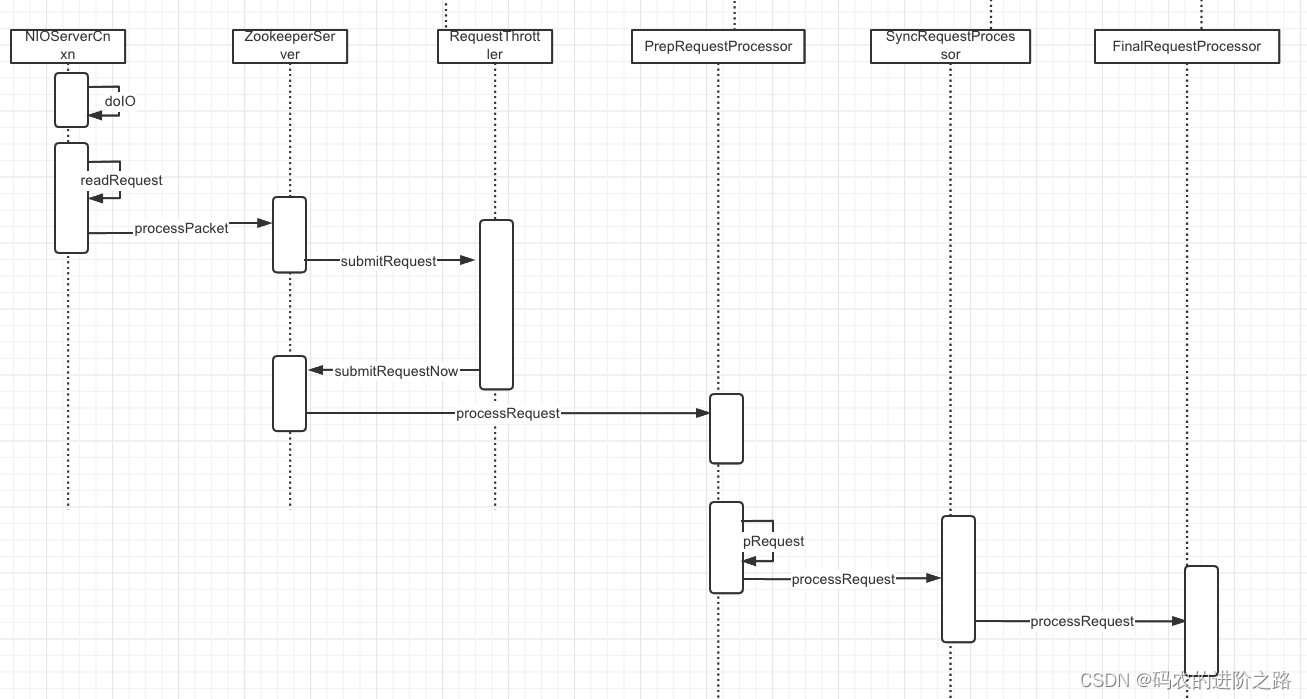
NIOServerCnxn
void doIO(SelectionKey k) throws InterruptedException {
        try {
            //省略无关代码
          	//处理客户端写请求
            if (k.isReadable()) {
                int rc = sock.read(incomingBuffer);
                if (rc < 0) {
                    handleFailedRead();
                }
                if (incomingBuffer.remaining() == 0) {
                    boolean isPayload;
                   省略无关代码
                    if (isPayload) {
                      	//读取数据
                        readPayload();
                    } else {
                        return;
                    }
                }
            }
            //省略无关代码
    }
小插曲
zk大量使用了阻塞队列与异步线程,因此当主流程走不通时 看看有没有异步线程存在,会不会逻辑在异步线程中被执行
言归正传,
时序图中PrepRequestProcessor、SyncRequestProcessor、FinalRequestProcessor是责任链机制,责任链构造代码如下
protected void setupRequestProcessors() {
        RequestProcessor finalProcessor = new FinalRequestProcessor(this);
        RequestProcessor syncProcessor = new SyncRequestProcessor(this, finalProcessor);
        ((SyncRequestProcessor) syncProcessor).start();
        firstProcessor = new PrepRequestProcessor(this, syncProcessor);
        ((PrepRequestProcessor) firstProcessor).start();
    }
并且PrepRequestProcessor、SyncRequestProcessor、FinalRequestProcessor均是线程类,结合着阻塞队列 完成异步任务。在当前流程下PrepRequestProcessor、SyncRequestProcessor没做什么事,我们直接看FinalRequestProcessor了
FinalRequestProcessor
public void processRequest(Request request) {
        		 //省略无关代码
            switch (request.type) {
             //省略无关代码 因为客户端发送请求类型是addWatch 因此直接定位到这里
            case OpCode.addWatch: {
                lastOp = "ADDW";
                AddWatchRequest addWatcherRequest = new AddWatchRequest();
                ByteBufferInputStream.byteBuffer2Record(request.request,
                        addWatcherRequest);
                      //存储watch关联关系
                zks.getZKDatabase().addWatch(addWatcherRequest.getPath(), cnxn, addWatcherRequest.getMode());
                rsp = new ErrorResponse(0);
                break;
            }

 				//省略无关代码
        ReplyHeader hdr = new ReplyHeader(request.cxid, lastZxid, err.intValue());
       //省略无关代码
       //发送服务端添加watch的响应给客户端
       cnxn.sendResponse(hdr, rsp, "response");
                }
            }
            //省略无关代码
    }
终于来到了服务端存储watch关系的地方了,下面画出addWatch的时序图 并进行分析

WatchManager
    private final Map<String, Set<Watcher>> watchTable = new HashMap<>();

    private final Map<Watcher, Set<String>> watch2Paths = new HashMap<>();


	public synchronized boolean addWatch(String path, Watcher watcher, WatcherMode watcherMode) {
        //省略无关代码
		//查找当前路径下的watcher
        Set<Watcher> list = watchTable.get(path);
        if (list == null) {
            //若不存在 则构建watchTable
            list = new HashSet<>(4);
            watchTable.put(path, list);
        }
    	//将watcher添加到进去 这里的watcher不是客户端自定义的 是NIOServerCnxn
        list.add(watcher);

    	//同理 维护Watcher与path的关系
        Set<String> paths = watch2Paths.get(watcher);
        if (paths == null) {
            // cnxns typically have many watches, so use default cap here
            paths = new HashSet<>();
            watch2Paths.put(watcher, paths);
        }
		//设置 监听模式
        watcherModeManager.setWatcherMode(watcher, path, watcherMode);

        return paths.add(path);
    }
服务端添加过watcher之后 会向客户端发起响应,这里的网络通信就不分析了。
客户端接收服务端的addWatch响应

上图 给出了 接收到服务端请求后客户端的注册过程
        private final Map<String, Set<Watcher>> persistentWatches = new HashMap<String, Set<Watcher>>();

public void register(int rc) {
            if (shouldAddWatch(rc)) {
              	//我们基于addWatch添加的监听 因此其实现类是AddWatchRegistration
              	//这里会根据监听模式的不同 而选择不同的Map来存储
                Map<String, Set<Watcher>> watches = getWatches(rc);
                synchronized (watches) {
                    Set<Watcher> watchers = watches.get(clientPath);
                    if (watchers == null) {
                        watchers = new HashSet<Watcher>();
                        watches.put(clientPath, watchers);
                    }
                }
                //这里的watcher 是客户端定义的
                watchers.add(watcher);
            }
        }
至此 客户端、服务端添加watch的流程就分析完了,下面我们分析下watch机制是如何被触发的?
Watch通知过程分析
我们知道,客户端只是发送请求 而真正处理逻辑的地方在服务端,那么可以推测watch通知是由服务端通知到客户端的。
结合前面的示例,假如我们对/wojiushiwo 这个path进行了监听,那当我们操作set /wojiushwo 1234时 会发生什么呢?
当客户端对znode的某些操作 会触发watche机制,假如客户端执行的是 set path value指令,我们看下服务端是怎么处理的?
有了前面的基础 我们直接来到FinalRequestProcessor

根据时序图 直接来到DataTree,看看服务端对set指令做了什么操作?
DataTree
public ProcessTxnResult processTxn(TxnHeader header, Record txn, boolean isSubTxn) {
        ProcessTxnResult rc = new ProcessTxnResult();

        try {
          	//从客户端请求中 取出数据
            rc.clientId = header.getClientId();
            rc.cxid = header.getCxid();
            rc.zxid = header.getZxid();
            rc.type = header.getType();
            rc.err = 0;
            rc.multiResult = null;
            switch (header.getType()) {
			//省略无关代码
            case OpCode.setData:
                SetDataTxn setDataTxn = (SetDataTxn) txn;
                rc.path = setDataTxn.getPath();
                rc.stat = setData(
                    setDataTxn.getPath(),
                    setDataTxn.getData(),
                    setDataTxn.getVersion(),
                    header.getZxid(),
                    header.getTime());
                break;

        //省略无关代码
        return rc;
    }
接着看setData的执行时序
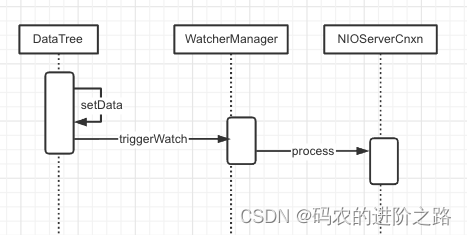
通过时序图发现,setData中有对watcher进行触发的动作
WatcherManager
//path 节点路径
//type 节点事件类型,结合我们的举例 这里type=NodeDataChanged
public WatcherOrBitSet triggerWatch(String path, EventType type, WatcherOrBitSet supress) {
        // 构造WatchedEvent
        WatchedEvent e = new WatchedEvent(type, KeeperState.SyncConnected, path);
        Set<Watcher> watchers = new HashSet<>();
        PathParentIterator pathParentIterator = getPathParentIterator(path);
        synchronized (this) {
            for (String localPath : pathParentIterator.asIterable()) {
                //取出localPath关联的watcher
                Set<Watcher> thisWatchers = watchTable.get(localPath);
                //没有设置监听 则跳过
                if (thisWatchers == null || thisWatchers.isEmpty()) {
                    continue;
                }
                Iterator<Watcher> iterator = thisWatchers.iterator();
                // 迭代wacther
                while (iterator.hasNext()) {
                    Watcher watcher = iterator.next();
                    //获取监听类型
                    WatcherMode watcherMode = watcherModeManager.getWatcherMode(watcher, localPath);
                    //如果是递归监听
                    if (watcherMode.isRecursive()) {
                        if (type != EventType.NodeChildrenChanged) {
                            watchers.add(watcher);
                        }
                    } else if (!pathParentIterator.atParentPath()) {
                        watchers.add(watcher);
                        //看这里 如果不是持久化监听 则删除监听器
                        if (!watcherMode.isPersistent()) {
                            iterator.remove();
                            Set<String> paths = watch2Paths.get(watcher);
                            if (paths != null) {
                                paths.remove(localPath);
                            }
                        }
                    }
                }
                if (thisWatchers.isEmpty()) {
                    watchTable.remove(localPath);
                }
            }
        }
        if (watchers.isEmpty()) {
            //省略日志
            return null;
        }
		//逐个执行wacther,这里的Watcher类型是NioServerCnxn
        for (Watcher w : watchers) {
            if (supress != null && supress.contains(w)) {
                continue;
            }
            //这里才是响应客户端的关键
            w.process(e);
        }
        //省略无关代码
        return new WatcherOrBitSet(watchers);
    }
这里 留意下,当监听模式不是持久化监听时,会删除掉path-watcher的关联
NioServerCnxn
public void process(WatchedEvent event) {
        // 构建header,注意这里的xid = NOTIFICATION_XID 客户端那里会用到
        ReplyHeader h = new ReplyHeader(ClientCnxn.NOTIFICATION_XID, -1L, 0);
        //省略日志
        // 构建WatcherEvent对象
        // Convert WatchedEvent to a type that can be sent over the wire
        WatcherEvent e = event.getWrapper();
        //省略无关代码
        // 将请求序列化传送到客户端
        sendResponse(h, e, "notification", null, null, ZooDefs.OpCode.error);
    }
客户端响应服务端watch通知
好了 又来到了客户端,我们来看下客户端是怎么响应watch操作的?

EventThread
private void queueEvent(WatchedEvent event, Set<Watcher> materializedWatchers) {
            if (event.getType() == EventType.None && sessionState == event.getState()) {
                return;
            }
            sessionState = event.getState();
            final Set<Watcher> watchers;
            if (materializedWatchers == null) {
                // 调用Zookeeper#materialize 取出path对应的watcher
                watchers = watcher.materialize(event.getState(), event.getType(), event.getPath());
            } else {
               //省略无关代码
            }
            // 基于wacthers、WatchedEvent构建WatcherSetEventPair对象
            WatcherSetEventPair pair = new WatcherSetEventPair(watchers, event);
            //添加到阻塞队列
            waitingEvents.add(pair);
        }
Zookeeper
//结合前文 state=SyncConnected,type=NodeDataChanged
public Set<Watcher> materialize(
            Watcher.Event.KeeperState state,
            Watcher.Event.EventType type,
            String clientPath) {
            Set<Watcher> result = new HashSet<Watcher>();

            switch (type) {
           	//省略无关代码
            case NodeDataChanged:
            case NodeCreated:
                //被getData监听的path 关联关系放到 dataWatches
                synchronized (dataWatches) {
                  	//将clientPath监听器添加到result并从dataWatches中移除该clientPath监听
                    addTo(dataWatches.remove(clientPath), result);
                }
                 //被exists 关联关系放到 existWatches
                synchronized (existWatches) {
                    //将clientPath监听器添加到result并从existWatches中移除该clientPath监听
                    addTo(existWatches.remove(clientPath), result);
                }
                //持久化监听相关
                addPersistentWatches(clientPath, result);
                break;

		  //省略无关代码
          //返回wactehr集合
            return result;
        }
 private void addPersistentWatches(String clientPath, Set<Watcher> result) {
            //持久化监听
            synchronized (persistentWatches) {
                //这里只是取出watcher 放到result 并未删除
                addTo(persistentWatches.get(clientPath), result);
            }
    			//持久化递归监听
            synchronized (persistentRecursiveWatches) {
                for (String path : PathParentIterator.forAll(clientPath).asIterable()) {
                    addTo(persistentRecursiveWatches.get(path), result);
                }
            }
        }
    }
这里留意下,非持久化监听 会将path-watcher的关联给删除
EventThread
  public void run() {
            try {
                isRunning = true;
                while (true) {
                //省略无关代码
                //处理watch事件
                processEvent(event);
               //省略无关代码
            }
           //省略无关代码
        }
 private void processEvent(Object event) {
            try {
                if (event instanceof WatcherSetEventPair) {

                    WatcherSetEventPair pair = (WatcherSetEventPair) event;
                    //取出WatchEvent对应的Watcher
                    for (Watcher watcher : pair.watchers) {
                        try {
                            //这里就是调用客户端的watcher#process方法了
                            watcher.process(pair.event);
                        } catch (Throwable t) {
                            LOG.error("Error while calling watcher ", t);
                        }
                    }
                } //省略无关代码
        }

    }
至此 客户端响应watch事件的触发流程就分析完成了
总结
以上就是watch注册与实现监听的整个过程了。其实 主体逻辑不复杂,只是夹杂着网络通信以及大量的异步化流程 加大了阅读代码的难度。由于笔者水平有限,文中错漏之处在所难免,如您在阅读过程中发现有误,还望指出,谢谢!

为开发者提供学习成长、分享交流、生态实践、资源工具等服务,帮助开发者快速成长。
更多推荐


 3
3 1
1- 0


 已为社区贡献1条内容

所有评论(0)