Centos7安装Redis6.2.7(集群)
Centos7安装Redis6.2.7集群
1、安装环境
- 服务器:
| IP | 端口 |
|---|---|
| 192.168.0.151 | 主:7001,从:7002 |
| 192.168.0.152 | 主:7001,从:7002 |
| 192.168.0.153 | 主:7001,从:7002 |
- 系统:CentOS Linux release 7.9.2009 (Core)
- 版本:6.2.7
- 模式:三主三从(3台主机,每台主机通过不同端口区分起两个redis-server)
2、Redis简介
Redis是一种高级key-value数据库。它跟memcached类似,不过数据可以持久化,而且支持的数据类型很丰富。有字符串,链表,集 合和有序集合。支持在服务器端计算集合的并,交和补集(difference)等,还支持多种排序功能。所以Redis也可以被看成是一个数据结构服务器。
Redis的所有数据都是保存在内存中(效率高),然后不定期的通过异步方式保存到磁盘上(这称为“半持久化模式”);也可以把每一次数据变化都写入到一个append only file(aof)里面(这称为“全持久化模式”)。
3、安装依赖
3.1、安装gcc
yum -y install gcc gcc-c++
3.2、升级gcc
查看gcc版本
gcc -v
使用内建 specs。
COLLECT_GCC=gcc
COLLECT_LTO_WRAPPER=/usr/libexec/gcc/x86_64-redhat-linux/4.8.5/lto-wrapper
目标:x86_64-redhat-linux
配置为:../configure --prefix=/usr --mandir=/usr/share/man --infodir=/usr/share/info --with-bugurl=http://bugzilla.redhat.com/bugzilla --enable-bootstrap --enable-shared --enable-threads=posix --enable-checking=release --with-system-zlib --enable-__cxa_atexit --disable-libunwind-exceptions --enable-gnu-unique-object --enable-linker-build-id --with-linker-hash-style=gnu --enable-languages=c,c++,objc,obj-c++,java,fortran,ada,go,lto --enable-plugin --enable-initfini-array --disable-libgcj --with-isl=/builddir/build/BUILD/gcc-4.8.5-20150702/obj-x86_64-redhat-linux/isl-install --with-cloog=/builddir/build/BUILD/gcc-4.8.5-20150702/obj-x86_64-redhat-linux/cloog-install --enable-gnu-indirect-function --with-tune=generic --with-arch_32=x86-64 --build=x86_64-redhat-linux
线程模型:posix
gcc 版本 4.8.5 20150623 (Red Hat 4.8.5-44) (GCC)
CentOS7默认安装的是4.8.5,而redis6.0只支持5.3以上版本,这里将gcc升级到9
yum -y install centos-release-scl
yum -y install devtoolset-9-gcc devtoolset-9-gcc-c++ devtoolset-9-binutils
# 临时切换版本
scl enable devtoolset-9 bash
# 永久切换版本
echo source /opt/rh/devtoolset-9/enable >> /etc/profile
验证gcc是否升级到9
gcc -v
Using built-in specs.
COLLECT_GCC=gcc
COLLECT_LTO_WRAPPER=/opt/rh/devtoolset-9/root/usr/libexec/gcc/x86_64-redhat-linux/9/lto-wrapper
Target: x86_64-redhat-linux
Configured with: ../configure --enable-bootstrap --enable-languages=c,c++,fortran,lto --prefix=/opt/rh/devtoolset-9/root/usr --mandir=/opt/rh/devtoolset-9/root/usr/share/man --infodir=/opt/rh/devtoolset-9/root/usr/share/info --with-bugurl=http://bugzilla.redhat.com/bugzilla --enable-shared --enable-threads=posix --enable-checking=release --enable-multilib --with-system-zlib --enable-__cxa_atexit --disable-libunwind-exceptions --enable-gnu-unique-object --enable-linker-build-id --with-gcc-major-version-only --with-linker-hash-style=gnu --with-default-libstdcxx-abi=gcc4-compatible --enable-plugin --enable-initfini-array --with-isl=/builddir/build/BUILD/gcc-9.3.1-20200408/obj-x86_64-redhat-linux/isl-install --disable-libmpx --enable-gnu-indirect-function --with-tune=generic --with-arch_32=x86-64 --build=x86_64-redhat-linux
Thread model: posix
gcc version 9.3.1 20200408 (Red Hat 9.3.1-2) (GCC)
3.3、修改系统配置信息
编辑/etc/security/limits.conf文件
ulimit -n 65535 # 临时生效
# 永久生效
vim /etc/security/limits.conf
在文件最后添加以下内容
*    soft    nofile    65535
*    hard    nofile    65535
修改内核参数,提高TCP端口监听队列的长度,查看默认值
cat /proc/sys/net/core/somaxconn
128
编辑/etc/sysctl.conf文件
vim /etc/sysctl.conf
在最后增加下面内容
net.core.somaxconn = 20480
注意:该值不要超过ulimit -n 值的一半
执行以下命令,使修改生效
sysctl -p
3.4、关闭防火墙
查看防火墙状态,如果是运行状态,则继续关闭
firewall-cmd --state
停止防火墙
systemctl stop firewalld.service
禁止防火墙开机启动
systemctl disable firewalld.service
4、编译安装Redis
4.1、下载Redis
wget https://download.redis.io/releases/redis-6.2.7.tar.gz
4.2、解压Redis
tar zxf redis-6.2.7.tar.gz
解压后的目录结构
cd redis-6.2.7
ls -l

4.3、编译安装Redis
创建安装目录
mkdir -p /var/local/redis-6.2.7/{data,conf,logs,pid}
data:数据目录
conf:配置文件目录
logs:日志目录
pid:redis进程文件目录
编译Redis,如果没有打印出错误信息则表示编译成功
make
安装Redis并指定安装目录
make install PREFIX=/var/local/redis-6.2.7
完成后自动在安装目录下生成bin文件夹及命令
ls -l /var/local/redis-6.2.7/bin

4.4、配置并启动Redis
拷贝配置文件
cp redis.conf /var/local/redis-6.2.7/conf/redis_7001.conf
cd /var/local/redis-6.2.7
修改配置文件redis_7001.conf中以下内容
vim conf/redis_7001.conf
bind 0.0.0.0
port 7001 # 修改默认端口,只要不占用就可以
daemonize yes # 后台运行程序
pidfile /var/local/redis-6.2.7/pid/redis_7001.pid # 以端口命名pid文件名
loglevel notice
logfile "/var/local/redis-6.2.7/logs/redis_7001.log" # 以端口命名log文件名
dbfilename dump_7001.rdb
dir /var/local/redis-6.2.7/data
repl-disable-tcp-nodelay yes
masterauth 246890
requirepass 123456
maxclients 10000
maxmemory 524288000 # 500M
maxmemory-policy allkeys-lru
appendonly yes
appendfilename "appendonly_7001.aof"
no-appendfsync-on-rewrite yes
auto-aof-rewrite-percentage 100
cluster-enabled yes
cluster-config-file nodes_7001.conf
cluster-node-timeout 15000
cluster-migration-barrier 1
参数说明:
| bind | 绑定的主机IP 默认:127.0.0.1 只有本机能访问;0.0.0.0:所有IP都能访问(不安全)多IP访问:192.168.1.100 10.0.0.1 |
|---|---|
| port | reids端口。默认:6379;为了安全建议修改 |
| daemonize | Redis 默认不是以守护进程的方式运行,可以通过该配置项修改,使用 yes 启用守护进程(Windows 不支持守护线程的配置为 no ) |
| pidfile | 当 Redis 以守护进程方式运行时,Redis 默认会把 pid 写入 /var/run/redis.pid 文件,可以通过 pidfile 指定 |
| loglevel | 指定日志记录级别,Redis 总共支持四个级别:debug、verbose、notice、warning,默认为 notice |
| logfile | 日志记录方式,默认为标准输出(logfile stdout),如果配置 Redis 为守护进程方式运行,而这里又配置为日志记录方式为标准输出,则日志将会发送给 /dev/null |
| dir | 指定本地数据库存放目录 |
| requirepass | 设置 Redis 连接密码,如果配置了连接密码,客户端在连接 Redis 时需要通过 AUTH 命令提供密码,默认关闭 |
| maxclients | 设置同一时间最大客户端连接数,默认无限制,Redis 可以同时打开的客户端连接数为 Redis 进程可以打开的最大文件描述符数,如果设置 maxclients 0,表示不作限制。当客户端连接数到达限制时,Redis 会关闭新的连接并向客户端返回 max number of clients reached 错误信息 |
| maxmemory | 指定 Redis 最大内存限制,Redis 在启动时会把数据加载到内存中,达到最大内存后,Redis 会先尝试清除已到期或即将到期的 Key,当此方法处理 后,仍然到达最大内存设置,将无法再进行写入操作,但仍然可以进行读取操作。Redis 新的 vm 机制,会把 Key 存放内存,Value 会存放在 swap 区 |
拷贝配置文件redis_7001.conf
cp conf/redis_7001.conf conf/redis_7002.conf
替换配置文件redis_7002.conf中端口号
sed -i 's/7001/7002/g' conf/redis_7002.conf
为了方便起见,我们创建一个简单的redis启动shell,在redis安装目录下
vim start_redis.sh
写入以下内容
#/bin/bash
REDIS_HOME=/var/local/redis-6.2.7
$REDIS_HOME/bin/redis-server $REDIS_HOME/conf/redis_7001.conf &
sleep 1s
$REDIS_HOME/bin/redis-server $REDIS_HOME/conf/redis_7002.conf &
添加文件可执行权限
chmod +x start_redis.sh
拷贝Redis到其他服务器
scp -r /var/local/redis-6.2.7 root@192.168.0.152:/var/local/
scp -r /var/local/redis-6.2.7 root@192.168.0.153:/var/local/
5、启动Redis服务
5.1、启动服务,每个服务器执行
./start_redis.sh
查看日志,判断是否启动成功
more logs/redis_7001.log
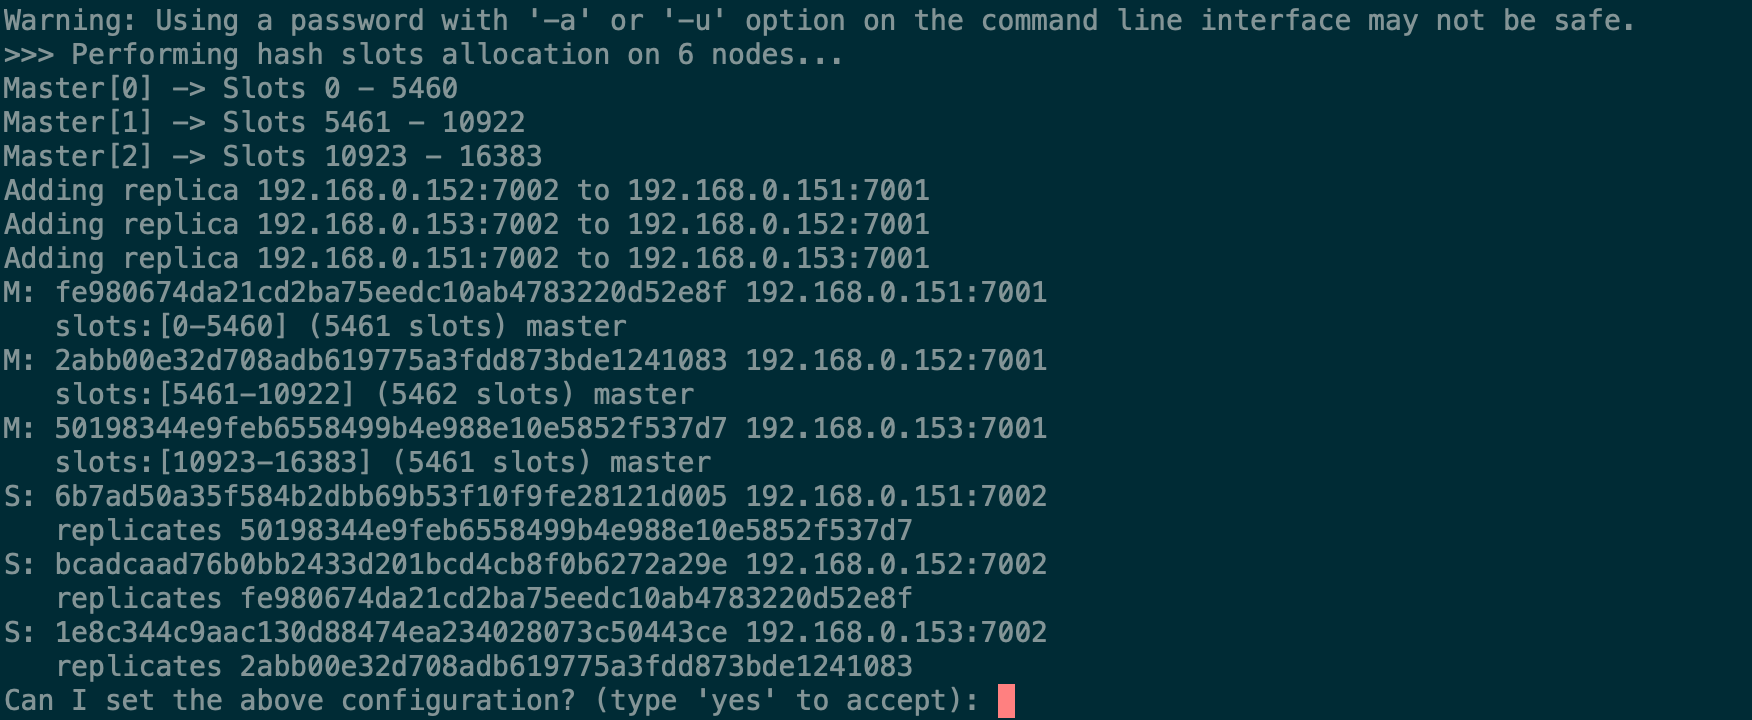
5.2、创建集群
每个服务器上redis实例成功启动后,在第一台上执行命令创建集群(注意如果在redis.conf中设置了密码,这里就要加上-a ‘密码’,如果没有密码,就不加-a参数)
bin/redis-cli -a 123456 --cluster create --cluster-replicas 1 192.168.0.151:7001 192.168.0.152:7001 192.168.0.153:7001 192.168.0.151:7002 192.168.0.152:7002 192.168.0.153:7002
确认对应主从节点配置信息,前三台为主,后三天为从,如果在提示中确认主从没有问题,输入yes即可
6、验证Redis集群
使用redis-cli工具链接redis集群,连接集群需要添加 “-c ” 参数
./bin/redis-cli -c -h 192.168.0.151 -p 7001 -a 123456
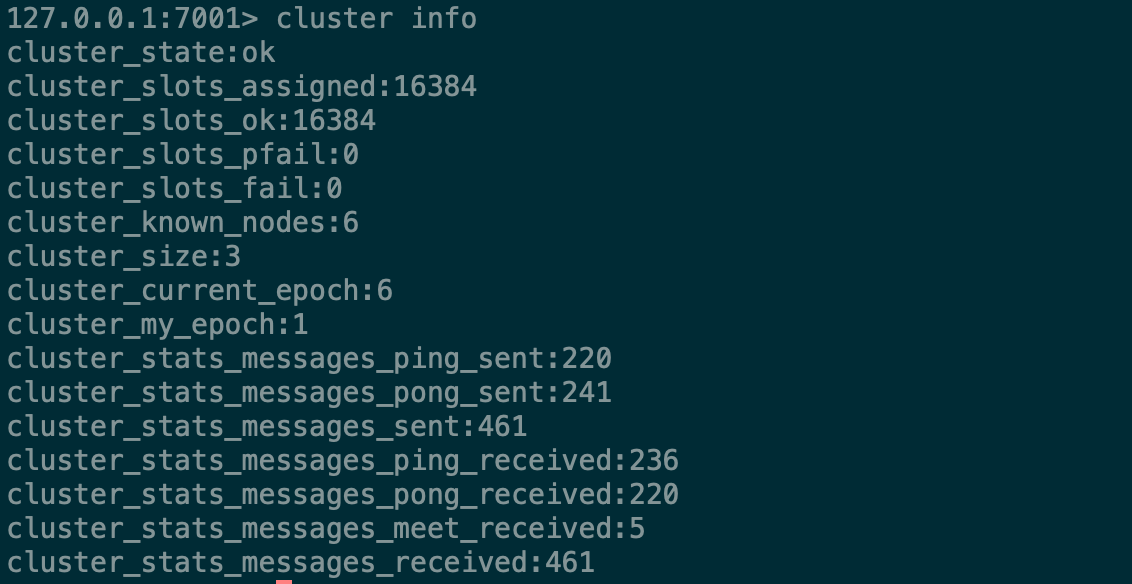
查看集群信息
cluster info
查看集群节点信息
cluster nodes

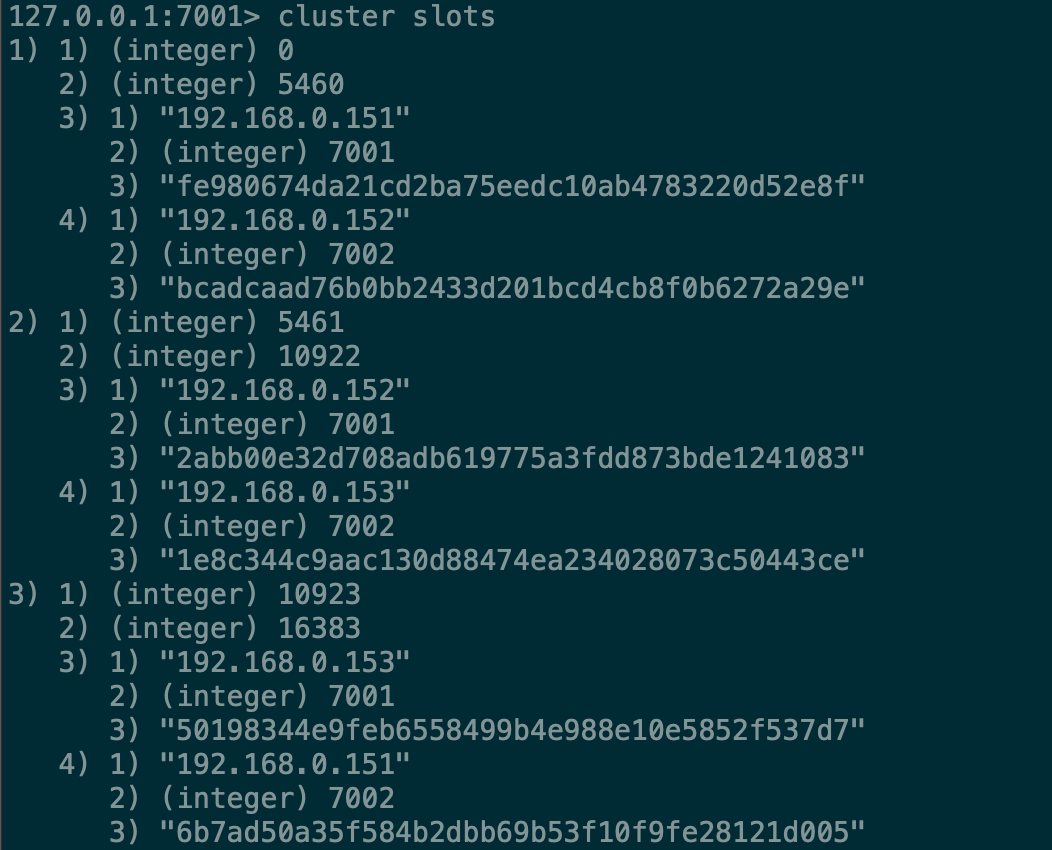
查看槽位信息
cluster slots
存储数据
set name tt
读取数据
get name
"tt"
删除key
del name

华为开发者空间,是为全球开发者打造的专属开发空间,汇聚了华为优质开发资源及工具,致力于让每一位开发者拥有一台云主机,基于华为根生态开发、创新。
更多推荐


 0
0 0
0- 0


 已为社区贡献1条内容

所有评论(0)