Docker安装Redis——下载Redis镜像——创建配置文件——创建容器实例并启动——创建并启动MySQL数据库——修改时区
当服务器和容器都不存在 redis.conf 文件时, 执行启动命令的时候 docker 会将 redis.conf 作为。可以去官方下载配置文件,但是好像没有必要,因为我已经下载过了,可以直接去下边CV。redis的data文件位置 : /home/redis/data。4.将下边内容放进配置文件redis.conf中。1.创建配置文件的目录(-p创建多级目录)下载后解压拿到配置文件redis.
Docker安装Redis——下载Redis镜像——创建配置文件——创建容器实例并启动
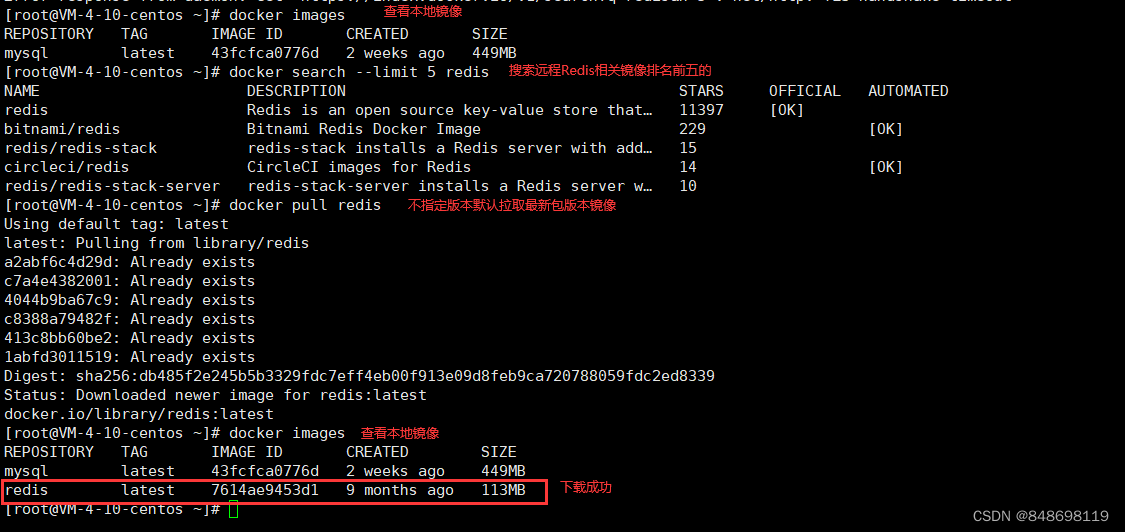
1. 下载Redis镜像
2. 创建Redis配置文件
当服务器和容器都不存在 redis.conf 文件时, 执行启动命令的时候 docker 会将 redis.conf 作为
目录创建,而我们需要的是一个文件。
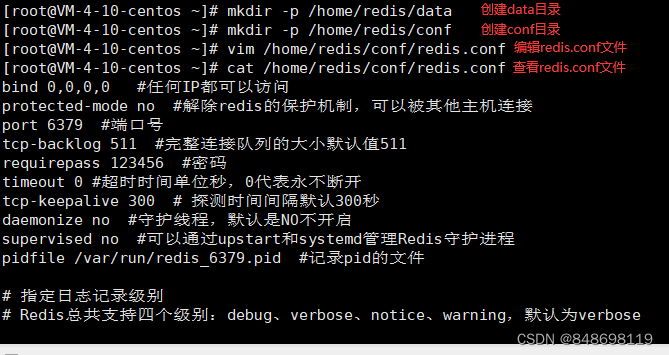
2.1 创建配置,日志,数据文件夹
1.创建配置,日志,数据3个文件夹(-p创建多级目录)
mkdir -p /home/redis/{conf,log,data}
2.创建配置文件redis.conf
touch /home/redis/conf/redis.conf
3.编辑文件
vim /home/redis/conf/redis.conf
4.将下边内容放进配置文件redis.conf中。
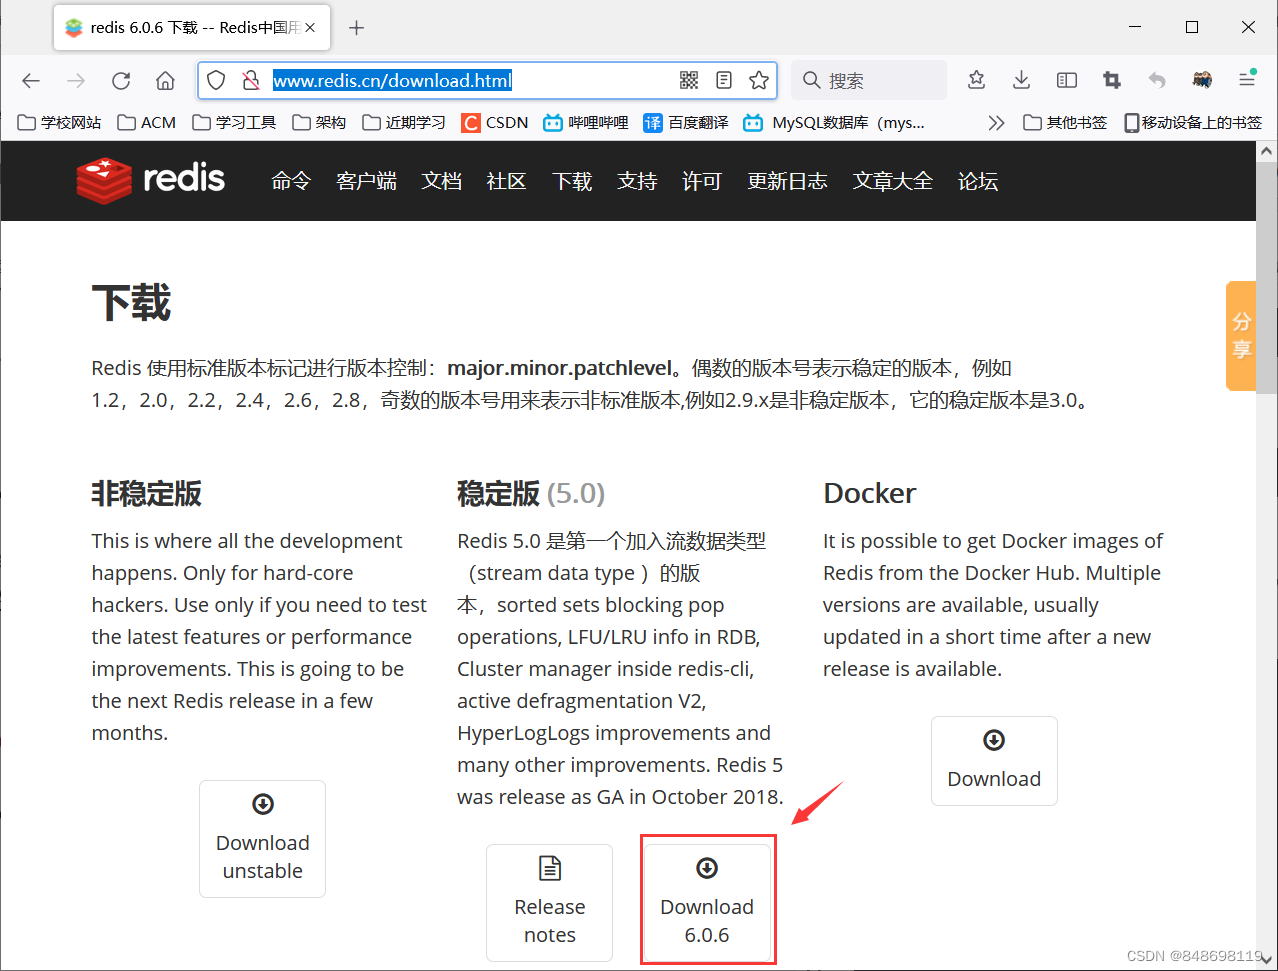
可以去官方下载配置文件,但是好像没有必要,因为我已经下载过了,可以直接去下边CV
官方配置文件地址:http://www.redis.cn/download.html
下载后解压拿到配置文件redis.conf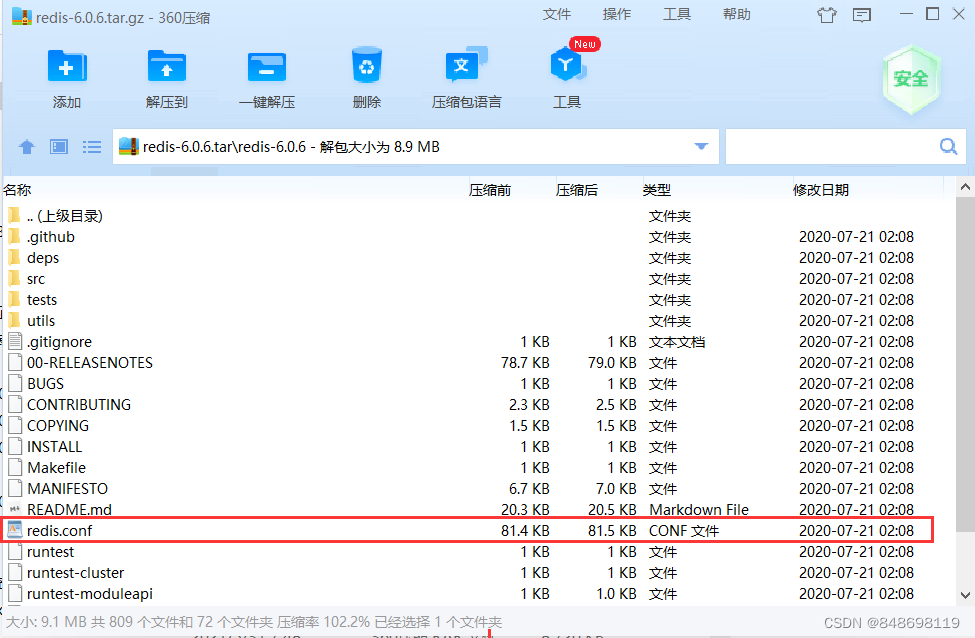
protected-mode no
requirepass 123456
port 6379

tcp-backlog 511
timeout 0
tcp-keepalive 300
daemonize no
supervised no
pidfile /var/run/redis_6379.pid

loglevel notice
logfile /log/redis.log
databases 30
always-show-logo yes
save 900 1
save 300 10
save 60 10000

stop-writes-on-bgsave-error yes

rdbcompression yes
rdbchecksum yes
dbfilename dump.rdb
dir ./
replica-serve-stale-data yes
replica-read-only yes
repl-diskless-sync no
repl-disable-tcp-nodelay no
replica-priority 100

lazyfree-lazy-eviction no
lazyfree-lazy-expire no
lazyfree-lazy-server-del no
replica-lazy-flush no

appendonly yes
appendfilename "appendonly.aof"
no-appendfsync-on-rewrite no
auto-aof-rewrite-percentage 100
auto-aof-rewrite-min-size 64mb
aof-load-truncated yes
aof-use-rdb-preamble yes

lua-time-limit 5000
slowlog-max-len 128

notify-keyspace-events ""
hash-max-ziplist-entries 512
hash-max-ziplist-value 64
list-max-ziplist-size -2
list-compress-depth 0

set-max-intset-entries 512
zset-max-ziplist-entries 128
zset-max-ziplist-value 64
hll-sparse-max-bytes 3000

stream-node-max-bytes 4096
stream-node-max-entries 100

activerehashing yes

hz 10
dynamic-hz yes

aof-rewrite-incremental-fsync yes
rdb-save-incremental-fsync yes
这个带中文注释的好像不行
bind 0.0.0.0   #任何IP都可以访问
protected-mode no  #解除redis的保护机制,可以被其他主机连接
port 6379  #端口号

tcp-backlog 511  #完整连接队列的大小默认值511
requirepass 123456  #密码
timeout 0 #超时时间单位秒,0代表永不断开
tcp-keepalive 300  # 探测时间间隔默认300秒
daemonize no  #守护线程,默认是NO不开启
supervised no  #可以通过upstart和systemd管理Redis守护进程
pidfile /var/run/redis_6379.pid  #记录pid的文件

# 指定日志记录级别
# Redis总共支持四个级别:debug、verbose、notice、warning,默认为verbose
# debug 记录很多信息,用于开发和测试
# varbose 有用的信息,不像debug会记录那么多
# notice 普通的verbose,常用于生产环境
# warning 只有非常重要或者严重的信息会记录到日志
loglevel notice

logfile "/var/log/redis/redis.log" #配置log文件地址
# 可用数据库数
# 默认值为16,默认数据库为0,数据库范围在0-(database-1)之间
databases 16
always-show-logo yes  #是否显示logo,默认是开启的

# 快照:保存数据到磁盘,格式如下:
#save 900 1  900秒内至少有1个key被改变(那就会在900秒的时候执行rdb同步)
#save 300 10  300秒内至少有300个key被改变(那就会在900秒的时候执行rdb同步)
#save 60 10000  60秒内至少有10000个key被改变 (那就会在60秒的时候执行rdb同步)
save 900 1
save 300 10
save 60 10000

stop-writes-on-bgsave-error yes #持久化出现错误后,是否还继续工作,默认为yes
rdbcompression yes #是否压缩rdb文件,默认为yes,需要消耗CPU的资源
rdbchecksum yes  #存rdb文件时,进行错误的校验检查
dbfilename dump.rdb
dir ./    #rdb文件保存的目录
replica-serve-stale-data yes   #主从复制
#控制从节点允许读写操作,还是读操作。默认yes只读操作,no 支持读写操作
replica-read-only yes
repl-diskless-sync no  #主从数据复制是否使用无硬盘复制功能
repl-disable-tcp-nodelay no  #启用NO_DELAY
replica-priority 100  #值越小优先级越高
#设置惰性删除
#缓存淘汰时的数据删除场景
lazyfree-lazy-eviction no
#过期Key的删除场景
lazyfree-lazy-expire no
#会隐式进行删除操作的server命令执行场景
lazyfree-lazy-server-del no
#从节点完成全量同步后,删除原有旧数据的场景
replica-lazy-flush no

appendonly yes  #是否启用aof持久化方式
appendfilename "appendonly.aof"  #更新日志文件名
no-appendfsync-on-rewrite no  #表示要调用fsync
auto-aof-rewrite-percentage 100  #当AOF文件大小的增长率大于该配置项时自动开启重写。
auto-aof-rewrite-min-size 64mb  #当AOF文件大小大于该配置项时自动开启重写。
aof-load-truncated yes  #redis在启动时可以加载被截断的AOF文件
aof-use-rdb-preamble yes  #yes 表示已经开启混合持久化,no 表示关闭
lua-time-limit 5000  #lua脚本的最大运行时间是需要被严格限制的,要注意单位是毫秒
slowlog-max-len 128  #最多能保存多少条日志
notify-keyspace-events ""  #服务器该发送哪些类型的通知
# 当哈希值只有少量条目且最大条目不超过给定阈值时,使用内存有效的数据结构对其进行编码。
# 可以使用以下指令配置这些阈值。
hash-max-ziplist-entries 512
hash-max-ziplist-value 64

list-max-ziplist-size -2 #每个quicklsit节点上的ziplist大小不能超过8kb
list-compress-depth 0  #0: 表示都不压缩
#set数据类型内部数据如果全部是数值型,且包含多少节点以下会采用紧凑格式存储
set-max-intset-entries 512
zset-max-ziplist-entries 128  #zsort 数据类型多少节点以下会采用去指针的紧凑存储格式。
zset-max-ziplist-value 64  #zsort 数据类型节点值大小小于多少字节会采用紧凑存储格式
hll-sparse-max-bytes 3000
stream-node-max-bytes 4096
stream-node-max-entries 100
activerehashing yes
# 设置Redis后台任务执行频率,比如清除过期键任务。
# 设置范围为1到500,默认为10.越大CPU消耗越大,延迟越小。
# 建议不要超过100
hz 10
dynamic-hz yes  #开启动态HZ
aof-rewrite-incremental-fsync yes  # 当子进程重写AOF文件,以下选项开启时,AOF文件会每产生32M数据同步一次。
rdb-save-incremental-fsync yes ## 当redis保存RDB文件时,如果启用以下选项,该文件将每32mb的数据生成一次fsync。
# 这对于以增量的方式将文件提交到磁盘并避免较大的延迟峰值非常有用。
3. 创建Redis容器并启动
docker run \
-p 6379:6379 --name redis \
-v /home/redis/conf/redis.conf:/etc/redis/redis.conf \
-v /home/redis/data:/data \
-v /home/redis/log:/log \
-d redis redis-server /etc/redis/redis.conf --appendonly yes
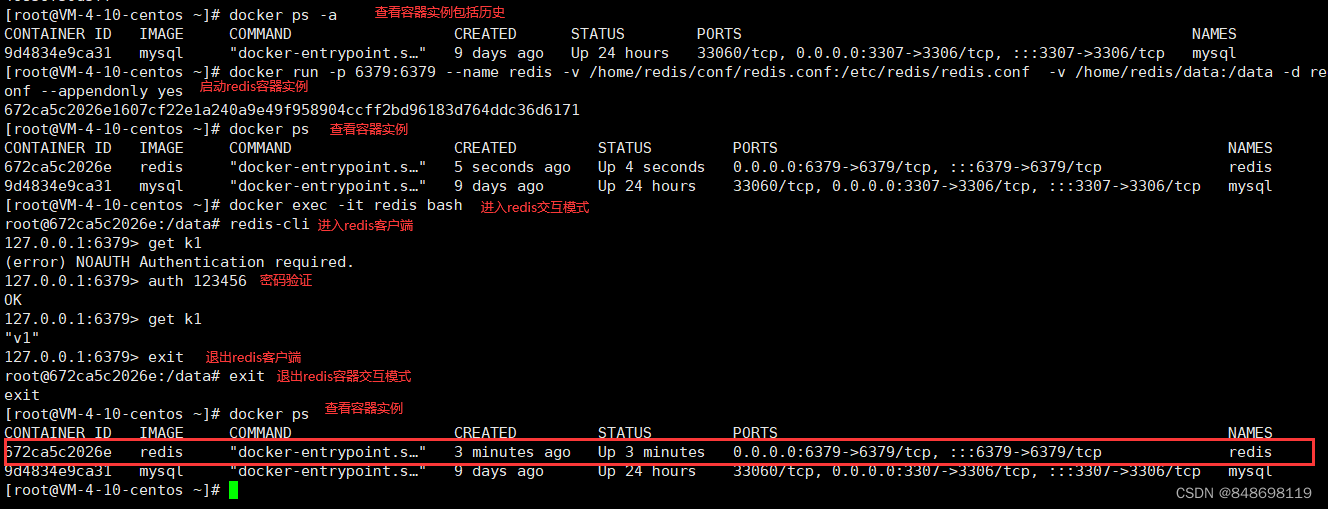
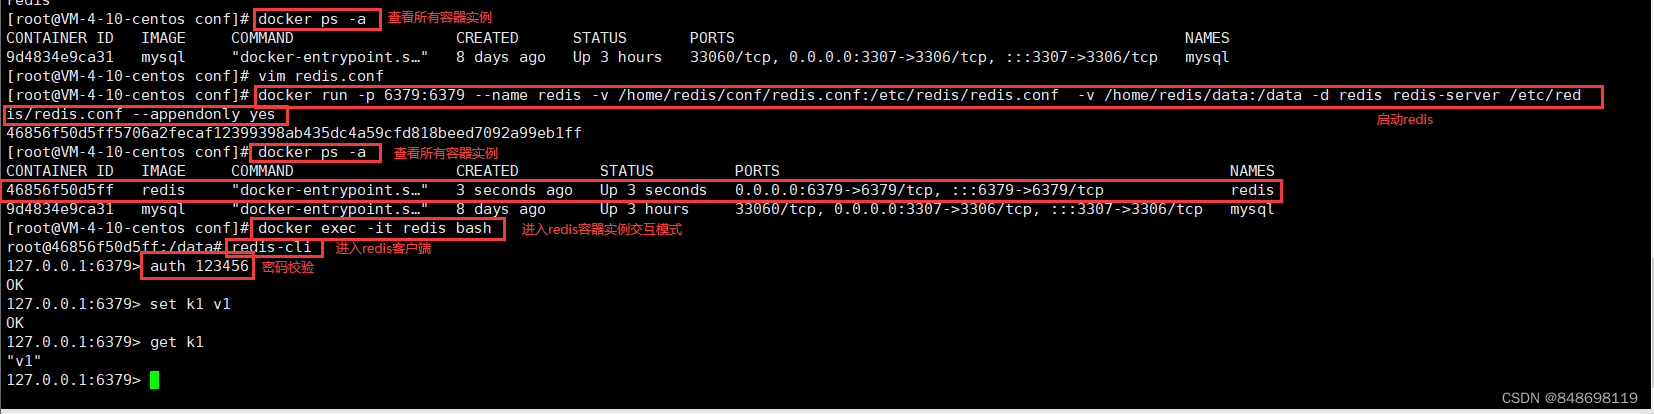 进入容器实例交互式模式:
docker exec -it redis bash
进入redis客户端:redis-cli
redis 密码验证:auth 密码
退出redis客户端 exit
退出容器是交互模式exit
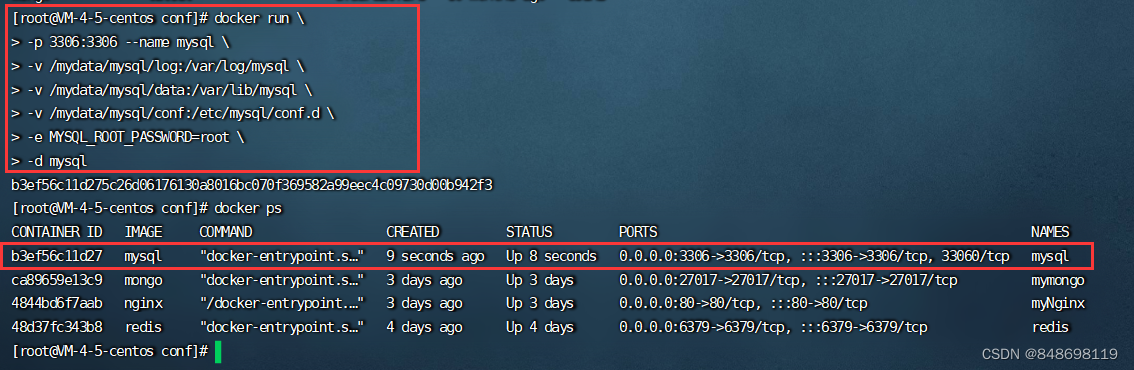
4. docker创建并启动MySQL数据库
这里使用的最新版的镜像
docker run \
-p 3306:3306 \
--name mysql \
-v /mydata/mysql/log:/var/log/mysql \
-v /mydata/mysql/data:/var/lib/mysql \
-v /mydata/mysql/conf:/etc/mysql/conf.d \
-e MYSQL_ROOT_PASSWORD=root \
-d mysql
Navicat连接Docker上的MySQL容器服务
#登录
mysql -uroot -p

#选择数据库
use mysql;

授权:
mysql> GRANT ALL ON *.* TO 'root'@'%';

刷新权限:
mysql> flush privileges;

更新加密规则:(加密验证方式改为老的:mysql_native_password)
mysql> ALTER USER 'root'@'localhost' IDENTIFIED BY 'root' PASSWORD EXPIRE NEVER;


更新root用户密码:
mysql> ALTER USER 'root'@'%' IDENTIFIED WITH mysql_native_password BY '123456';

刷新权限:
mysql> flush privileges;
5. docker和MySQL8.0时区修改
MySQL服务是部署在docker容器上的,docker容器是部署在Linux系统上的,所以还需要三步确认
1.首先确定
Linux系统的时区对不对
2.然后确定Linux上的docker容器的时区对不对
3.最后确定Linux上的docker上的MySQL的时区对不对
5.1 修改Linux系统的时区
今天在Linux服务器上跑程序,遇到了时区不一致问题,刚开始怀疑市Linux系统时区问题,通过下面一系列操作发现不是的
查看当前Linux系统的时间date -R
Wed, 19 Oct 2022 09:46:17 +0800 这样是北京时区无需修改,如果不是+0800可以采用下列命令修改
修改Linux系统的时区:tzselect
[root@VM-4-5-centos ~]# date -R
Wed, 19 Oct 2022 09:46:17 +0800
[root@VM-4-5-centos ~]# tzselect
Please identify a location so that time zone rules can be set correctly.
Please select a continent or ocean.
 1) Africa
 2) Americas
 3) Antarctica
 4) Arctic Ocean
 5) Asia
 6) Atlantic Ocean
 7) Australia
 8) Europe
 9) Indian Ocean
10) Pacific Ocean
11) none - I want to specify the time zone using the Posix TZ format.
#? 5
Please select a country.
 1) Afghanistan           18) Israel                35) Palestine
 2) Armenia               19) Japan                 36) Philippines
 3) Azerbaijan            20) Jordan                37) Qatar
 4) Bahrain               21) Kazakhstan            38) Russia
 5) Bangladesh            22) Korea (North)         39) Saudi Arabia
 6) Bhutan                23) Korea (South)         40) Singapore
 7) Brunei                24) Kuwait                41) Sri Lanka
 8) Cambodia              25) Kyrgyzstan            42) Syria
 9) China                 26) Laos                  43) Taiwan
10) Cyprus                27) Lebanon               44) Tajikistan
11) East Timor            28) Macau                 45) Thailand
12) Georgia               29) Malaysia              46) Turkmenistan
13) Hong Kong             30) Mongolia              47) United Arab Emirates
14) India                 31) Myanmar (Burma)       48) Uzbekistan
15) Indonesia             32) Nepal                 49) Vietnam
16) Iran                  33) Oman                  50) Yemen
17) Iraq                  34) Pakistan
#? 9
Please select one of the following time zone regions.
1) Beijing Time
2) Xinjiang Time
#? 1

The following information has been given:

        China
        Beijing Time

Therefore TZ='Asia/Shanghai' will be used.
Local time is now:      Wed Oct 19 09:46:51 CST 2022.
Universal Time is now:  Wed Oct 19 01:46:51 UTC 2022.
Is the above information OK?
1) Yes
2) No
#? 1

You can make this change permanent for yourself by appending the line
        TZ='Asia/Shanghai'; export TZ
to the file '.profile' in your home directory; then log out and log in again.

Here is that TZ value again, this time on standard output so that you
can use the /usr/bin/tzselect command in shell scripts:
Asia/Shanghai
[root@VM-4-5-centos ~]# date -R
Wed, 19 Oct 2022 09:47:11 +0800
5.2 修改Linux上docker的时区
进入容器进行设置
[root@VM-4-5-centos ~]# docker exec -it mycsdn bash
root@3ff3052ed382:/# date
Wed Oct 19 04:49:20 UTC 2022
root@3ff3052ed382:/# rm /etc/localtime
root@3ff3052ed382:/# ln -s /usr/share/zoneinfo/Asia/Shanghai /etc/localtime
root@3ff3052ed382:/# date
Wed Oct 19 12:51:10 CST 2022
root@3ff3052ed382:/#
[root@VM-4-5-centos ~]# docker exec -it mysql bash
root@b3ef56c11d27:/# date
Wed Oct 19 04:54:13 UTC 2022
root@b3ef56c11d27:/# rm /etc/localtime
root@b3ef56c11d27:/# ln -s /usr/share/zoneinfo/Asia/Shanghai /etc/localtime
root@b3ef56c11d27:/# date
Wed Oct 19 12:54:39 CST 2022
root@b3ef56c11d27:/#
5.3 修改Docker上MySQL8.0的时区
接下来又是一波操作终于解决了问题
获取当前日期:select CURTIME();
修改当前会话时区:SET time_zone = '+8:00';
修改mysql全局时区为北京时间SET global time_zone = '+8:00';
立即生效:flush privileges;
[root@VM-4-5-centos ~]# docker exec -it mysql bash
root@b3ef56c11d27:/# bash
root@b3ef56c11d27:/# mysql -uroot -p
Enter password:
Welcome to the MySQL monitor.  Commands end with ; or \g.
Your MySQL connection id is 777
Server version: 8.0.27 MySQL Community Server - GPL

Copyright (c) 2000, 2021, Oracle and/or its affiliates.

Oracle is a registered trademark of Oracle Corporation and/or its
affiliates. Other names may be trademarks of their respective
owners.

Type 'help;' or '\h' for help. Type '\c' to clear the current input statement.

mysql> select CURTIME();
+-----------+
| CURTIME() |
+-----------+
| 01:48:26  |
+-----------+
1 row in set (0.00 sec)

mysql> SET time_zone = '+8:00';
Query OK, 0 rows affected (0.00 sec)

mysql> SET global time_zone = '+8:00';
Query OK, 0 rows affected (0.00 sec)

mysql> flush privileges;
Query OK, 0 rows affected (0.01 sec)

mysql>  select CURTIME();
+-----------+
| CURTIME() |
+-----------+
| 09:49:26  |
+-----------+
1 row in set (0.00 sec)

mysql>
方法二:直接修改MySQL的配置文件,需要重启服务生效
[root@VM-4-5-centos ~]# vim /etc/my.cnf
[root@VM-4-5-centos ~]# cat /etc/my.cnf
[mysqld]
default-time_zone = '+8:00'
datadir=/var/lib/mysql
socket=/var/lib/mysql/mysql.sock
# Disabling symbolic-links is recommended to prevent assorted security risks
symbolic-links=0
# Settings user and group are ignored when systemd is used.
# If you need to run mysqld under a different user or group,
# customize your systemd unit file for mariadb according to the
# instructions in http://fedoraproject.org/wiki/Systemd

[mysqld_safe]
log-error=/var/log/mariadb/mariadb.log
pid-file=/var/run/mariadb/mariadb.pid

#
# include all files from the config directory
#
!includedir /etc/my.cnf.d
skip-grant

为开发者提供学习成长、分享交流、生态实践、资源工具等服务,帮助开发者快速成长。
更多推荐


 2
2 0
0- 0


 已为社区贡献4条内容

所有评论(0)