TP5.1/Thinkcmf5.1使用think-queue实现异步延迟队列
一定要注意think-queue版本的选择
这边尤其要注意插件的版本和thinkphp的版本相对应,否则会碰到不少问题,我会把我走的弯路也一并分享一下。
前置工作:安装TP5.1/Thinkcmf5.1、安装Redis及PHP的redis扩展
一、首先安装think-queue插件
网上很多文章直接写 composer require topthink/think-queue 的,会发现安装完出现各种问题,因为这样是直接现在插件最新版本,而目前think-queue已经v3+的版本了,3.*的版本是适用于tp6的
# Thinkphp5.1
composer require topthink/think-queue:2.*
# Thinkphp6
composer require topthink/think-queue:3.*
我装的是2.0.4版本
composer require topthink/think-queue 2.0.4安装完成之后会生成一个config/queue.php文件,但我这里因为是用的thinkcmf5.1的框架,所以我这边做了两处修改,如果是tp5.1的可跳过下面步骤直接看第二步
1、删除config文件夹
2、在data/config/app.php中添加queue配置
'queue'=>[
        'connector' => 'Redis',
        'expire'     => 60,              // 任务的过期时间,默认为60秒; 若要禁用,则设置为 null
        'default'    => 'sync_queue',       // 默认的队列名称
        'host'       => '127.0.0.1',     // redis 主机ip
        'port'       => 6379,            // redis 端口
        'password'   => '',              // redis 密码
        'select'     => 4,               // 使用哪一个 db,默认为 db0
        'timeout'    => 0,               // redis连接的超时时间
        'persistent' => false,           // 是否是长连接
    ]
如下图

3、修改vendor/topthink/think-queue/src/Queue.php文件的第33行
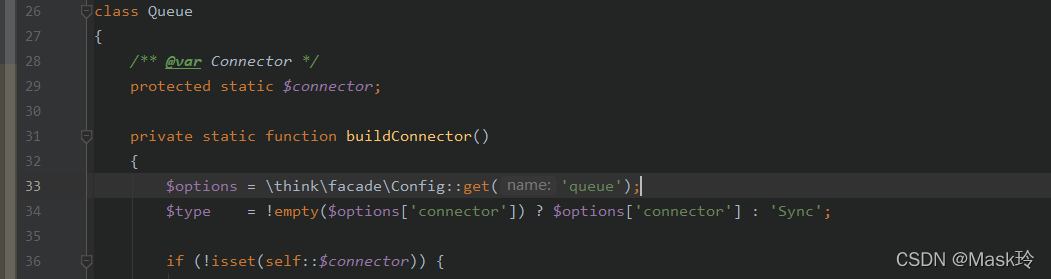
二、消息的创建与推送
我们在控制器中执行测试代码,将数据推送到helloJobQueue队列
<?php
/**
 * 测试代码
 */
namespace api\wxapp\controller;

use think\Controller;
use think\Queue;

class IndexController extends Controller
{
    public function test(){
        //任务执行类(消费者消费的处理逻辑)
        $jobHandlerClassName = "app\job\Test@fire";
        //队列名,如不存在会自动创建
        $jobQueueName = "helloJobQueue";
        //推送的业务数据
        $jobData = [ 'name' => 'test'.rand(), 'password'=>rand()];
        //延迟推送,推送后等待消费者消费
//        $isPushed = Queue::later(300, $jobHandlerClassName , $jobData , $jobQueueName );
        //立即推送,等待消费者消费
        $isPushed = Queue::push($jobHandlerClassName , $jobData , $jobQueueName );
        // database 驱动时,返回值为 1|false  ;   redis 驱动时,返回值为 随机字符串|false
        if( $isPushed !== false ){
            echo date('Y-m-d H:i:s') . " a new Hello Job is Pushed to the MQ"."<br>";
        }else{
            echo 'Oops, something went wrong.';
        }
    }
}
当写完这一步时,访问接口路径就可以发布任务了;在浏览器中访问 http://your.project.domain/api/wxapp/index/test ,可以看到消息推送成功:2022-02-23 16:51:56 a new Hello Job is Pushed to the MQ
消息推送成功后可以用redis可视化工具查看redis数据进行验证
 三、消息的消费与删除
新建可执行类,创建的路径要与上面创建任务代码中任务执行类的$jobHandlerClassName路径一致。
<?php
/**
 * 文件路径: \application\index\job\Hello.php
 * 这是一个消费者类,用于处理 helloJobQueue 队列中的任务
 */
namespace app\job;
use think\queue\Job;

class Test {
    /**
     * fire方法是消息队列默认调用的方法
     * @param Job            $job      当前的任务对象
     * @param array|mixed    $data     发布任务时自定义的数据
     */
    public function fire(Job $job,$data){
        // 如有必要,可以根据业务需求和数据库中的最新数据,判断该任务是否仍有必要执行.
        $isJobStillNeedToBeDone = $this->checkDatabaseToSeeIfJobNeedToBeDone($data);
        if(!$isJobStillNeedToBeDone){
            $job->delete();
            return;
        }

        $isJobDone = $this->doHelloJob($data);

        if ($isJobDone) {
            //如果任务执行成功, 记得删除任务
            $job->delete();
        }else{
            if ($job->attempts() > 3) {
                //通过这个方法可以检查这个任务已经重试了几次了
                $job->delete();
                // 也可以重新发布这个任务
                //$job->release(2); //$delay为延迟时间,表示该任务延迟2秒后再执行
            }
        }
    }

    /**
     * 有些消息在到达消费者时,可能已经不再需要执行了
     * @param array|mixed    $data     发布任务时自定义的数据
     * @return boolean                 任务执行的结果
     */
    private function checkDatabaseToSeeIfJobNeedToBeDone($data){
        return true;
    }

    /**
     * 根据消息中的数据进行实际的业务处理
     * @param array|mixed    $data     发布任务时自定义的数据
     * @return boolean                 任务执行的结果
     */
    private function doHelloJob($data) {
        // 根据消息中的数据进行实际的业务处理...
        // test
        if (!empty($data)) {
            \api\common\lib\dingtalk\Robot::getInstance()->setContent("消息推送:" . json_encode($data))->send("xxxx");
        }
        return true;
    }
}
我这边在doHelloJob方法中处理了一下数据的钉钉消息推送来测试
执行任务需要使用php命令行方式去执行
#命令:php think queue:work --queue 队列名
例:php think queue:work --queue helloJobQueue
坑1:我之前装的think-queue版本是1.1.4的时候,在这一步运行时报错
[think\exception\ThrowableError]
  Fatal error: Using $this when not in object context


Exception trace:
 () at /www/wwwroot/test/vendor/thinkphp/library/think/Hook.php:146
 think\Hook::listen() at /www/wwwroot/test/vendor/topthink/think-queue/src/queue/Worker.php:35
 think\queue\Worker->pop() at /www/wwwroot/test/vendor/topthink/think-queue/src/queue/command/Work.php:75
 think\queue\command\Work->execute() at /www/wwwroot/test/vendor/thinkphp/library/think/console/Command.php:175
 think\console\Command->run() at /www/wwwroot/test/vendor/thinkphp/library/think/Console.php:675
 think\Console->doRunCommand() at /www/wwwroot/test/vendor/thinkphp/library/think/Console.php:261
 think\Console->doRun() at /www/wwwroot/test/vendor/thinkphp/library/think/Console.php:198
 think\Console->run() at /www/wwwroot/test/vendor/thinkphp/library/think/Console.php:115
 think\Console::init() at /www/wwwroot/test/think:33
正确的执行应该是:

至此,我们成功地经历了一个消息的 创建 -> 推送 -> 消费 -> 删除 的基本流程
参考文章: thinkphp-queue自带的队列包使用分析_will5451的博客-CSDN博客_php queue
四、守护进程,保证进程常驻
很多自己使用PHP+Redis的list类型实现的简单队列是将数据存在redis中,然后通过定时脚本轮询的去执行命令去触发消费,但对于脚本的运行没有做到一个守护
supervisor是用Python开发的一个client/server服务,是Linux/Unix系统下的一个进程管理工具。可以很方便的监听、启动、停止、重启一个或多个进程。用supervisor管理的进程,当一个进程意外被杀死,supervisor监听到进程死后,会自动将它重启,很方便的做到进程自动恢复的功能,不再需要自己写shell脚本来控制
下面来说一下supervisor的安装和配置
# 安装supervisor
yum install supervisor
# 设置开机自启
systemctl enable supervisord.service
# 进入配置文件目录
cd /etc/supervisord.d
# 创建配置文件 一个进程一个配置文件 名字自己随意
vim process.ini

# 配置文件内容
[program:自定义名称]
process_name=进程名称
command=php /www/wwwroot/项目目录/think queue:work --queue 需监听的队列名称
directory= /www/wwwroot/项目目录
autostart=true
autorestart=true
user=www #如有权限问题可修改为root
numprocs=1
redirect_stderr=true
stdout_logfile=/root/日志文件名称.log

# 保存后执行已下命令
supervisorctl reread
supervisorctl update
坑2:当我安装完并且修改完配置后,执行supervisorctl reread的时候报错
error: <class 'socket.error'>, [Errno 2] No such file or directory: file: /usr/lib64/python2.7/socket.py line: 224
网上找到一个处理方法,使用以下命令来重启服务:
/usr/bin/python2 /usr/bin/supervisord -c /etc/supervisor/supervisord.confsupervisor常用命令
# 启动
systemctl start supervisord.service
# 停止
systemctl stop supervisord.service
# 重启
systemctl restart supervisord.service

# 查看进程状态
supervisorctl status

# 关闭进程    stop后边可增加进程名称参数 all为关闭所有
supervisorctl stop all
# 启动进程    同上
supervisorctl start all
# 重启进程    同上
supervisorctl restart all
# 重新读取配置文件
supervisorctl reread
# 更新配置到进程
supervisorctl update

# 重新启动配置中的所有程序
supervisorctl reload
# 启动某个进程(program_name=你配置中写的程序名称)
supervisorctl start program_name
# 停止某一进程 (program_name=你配置中写的程序名称)
pervisorctl stop program_name
# 重启某一进程 (program_name=你配置中写的程序名称)
supervisorctl restart program_name
为开发者提供学习成长、分享交流、生态实践、资源工具等服务,帮助开发者快速成长。
更多推荐


 0
0 0
0- 0


 已为社区贡献2条内容

所有评论(0)