J2Cache的学习
J2Cache的学习此教程基于黑马程序员Java品达通用权限项目,哔哩哔哩链接:https://www.bilibili.com/video/BV1tw411f79E?p=97一、j2cache介绍j2cache是OSChina(开源中国)目前正在使用的两级缓存框架。j2cache的两级缓存结构:L1: 进程内缓存 caffeine/ehcacheL2: 集中式缓存 Redis/Memcached
J2Cache的学习
此教程基于黑马程序员Java品达通用权限项目,哔哩哔哩链接:https://www.bilibili.com/video/BV1tw411f79E?p=97
一、j2cache介绍
j2cache是OSChina(开源中国)目前正在使用的两级缓存框架。
j2cache的两级缓存结构:
- L1: 进程内缓存 caffeine/ehcache
- L2: 集中式缓存 Redis/Memcached
j2cache其实并不是在重复造轮子,而是作资源整合,即将Ehcache、Caffeine、redis、Spring Cache等进行整合。
由于大量的缓存读取会导致L2的网络成为整个系统的瓶颈,因此L1的目标是降低对L2的读取次数,因为L1是进程内的,读取数据没有网络开销,性能更高
该缓存框架主要用于集群环境中,单机也可使用,用于避免应用重启导致的ehcache缓存数据丢失。
j2cache从1.3.0版本开始支持JGroups和Redis Pub/Sub两种方式进行缓存事件的通知。
数据读取顺序 -> L1 -> L2 -> DB(数据库)
使用j2cache需要导入的maven坐标:
<dependency>
    <groupId>net.oschina.j2cache</groupId>
    <artifactId>j2cache-spring-boot2-starter</artifactId>
    <version>2.8.0-release</version>
</dependency>
<dependency>
    <groupId>net.oschina.j2cache</groupId>
    <artifactId>j2cache-core</artifactId>
    <version>2.8.0-release</version>
    <!-- 排除 -->
    <exclusions>
        <exclusion>
            <groupId>org.slf4j</groupId>
            <artifactId>slf4j-simple</artifactId>
        </exclusion>
        <exclusion>
            <groupId>org.slf4j</groupId>
            <artifactId>slf4j-api</artifactId>
        </exclusion>
    </exclusions>
</dependency>
二、j2cache入门案例
第一步:创建maven工程j2cache_demo并配置pom.xml文件
<?xml version="1.0" encoding="UTF-8"?>
<project xmlns="http://maven.apache.org/POM/4.0.0"
         xmlns:xsi="http://www.w3.org/2001/XMLSchema-instance"
         xsi:schemaLocation="http://maven.apache.org/POM/4.0.0
                             http://maven.apache.org/xsd/maven-4.0.0.xsd">
    <modelVersion>4.0.0</modelVersion>
    <parent>
        <groupId>org.springframework.boot</groupId>
        <artifactId>spring-boot-starter-parent</artifactId>
        <version>2.2.2.RELEASE</version>
        <relativePath/>
    </parent>
    <groupId>cn.itcast</groupId>
    <artifactId>j2cache_demo</artifactId>
    <version>1.0-SNAPSHOT</version>

    <dependencies>
        <!-- web依赖 -->
        <dependency>
            <groupId>org.springframework.boot</groupId>
            <artifactId>spring-boot-starter-web</artifactId>
        </dependency>
        <!-- j2cache依赖 -->
        <dependency>
            <groupId>net.oschina.j2cache</groupId>
            <artifactId>j2cache-spring-boot2-starter</artifactId>
            <version>2.8.0-release</version>
        </dependency>
        <!-- j2cache依赖 -->
        <dependency>
            <groupId>net.oschina.j2cache</groupId>
            <artifactId>j2cache-core</artifactId>
            <version>2.8.0-release</version>
            <!-- 排除 -->
            <exclusions>
                <exclusion>
                    <groupId>org.slf4j</groupId>
                    <artifactId>slf4j-simple</artifactId>
                </exclusion>
                <exclusion>
                    <groupId>org.slf4j</groupId>
                    <artifactId>slf4j-api</artifactId>
                </exclusion>
            </exclusions>
        </dependency>
    </dependencies>

</project>
第二步:创建application.yml
server:
  port: 9000
# redis 通用配置, 不同的环境,需要配置不同的链接信息,
# 只需要将这段信息复制到具体环境的配置文件中进行修改即可
# 如:复制到pd-auth-server-dev.yml中将数据库名和ip改掉
pinda:
  redis:
    ip: 127.0.0.1
    port: 6379
    password:
    database: 0 # 使用0号数据库

spring:
  cache:
    type: GENERIC
  redis:
    host: ${pinda.redis.ip}
    password: ${pinda.redis.password}
    port: ${pinda.redis.port}
    database: ${pinda.redis.database}

j2cache:
  #  config-location: /j2cache.properties
  open-spring-cache: true
  cache-clean-mode: passive
  allow-null-values: true
  redis-client: lettuce #指定redis客户端使用lettuce,也可以使用Jedis
  l2-cache-open: true #开启二级缓存,false则表示只使用一级缓存
  # 事件通知的机制,j2cache从1.3.0版本开始支持JGroups和Redis Pub/Sub两种方式进行缓存事件的通知。
  # 此处我们使用基于redis的发布订阅模式来通知缓存的各个节点来进行缓存数据的同步(由j2cache进行实现,我们写上配置即可)
  broadcast: net.oschina.j2cache.cache.support.redis.SpringRedisPubSubPolicy
  #  broadcast: jgroups
  L1: #指定一级缓存提供者为caffeine
    provider_class: caffeine
  L2: #指定二级缓存提供者为redis
    provider_class: net.oschina.j2cache.cache.support.redis.SpringRedisProvider
    config_section: lettuce
  sync_ttl_to_redis: true
  default_cache_null_object: false
  serialization: fst
caffeine:
  properties: /caffeine.properties   # 这个配置文件需要放在项目中
# lettuce是redis的一个客户端,也可以使用jedis,都是用来操作redis的java客户端
lettuce:
  mode: single
  namespace:
  storage: generic
  channel: j2cache
  scheme: redis
  hosts: ${pinda.redis.ip}:${pinda.redis.port}
  password: ${pinda.redis.password}
  database: ${pinda.redis.database}
  sentinelMasterId:
  maxTotal: 100
  maxIdle: 10
  minIdle: 10
  timeout: 10000
第三步:创建/resources/caffeine.properties文件
#########################################
# Caffeine configuration
# [name] = size, xxxx[s|m|h|d]
#########################################
# 默认区域,最多可以放入2000个缓存对象,缓存2个小时的时间,s表示秒,m分钟,h小时,d天
default=2000, 2h
# 定义的第二个缓存的区域,名字任意,此处为rx,最多存放50个缓存对象,缓存2个小时,时间到就会自动清除缓存
rx=50, 2h
第四步:创建MyController
package cn.itcast.controller;

import net.oschina.j2cache.CacheChannel;
import net.oschina.j2cache.CacheObject;
import org.springframework.beans.factory.annotation.Autowired;
import org.springframework.web.bind.annotation.GetMapping;
import org.springframework.web.bind.annotation.RequestMapping;
import org.springframework.web.bind.annotation.RestController;
import java.util.ArrayList;
import java.util.List;

@RestController
@RequestMapping("/cache")
public class MyController {

    private String key = "myKey"; // 定义缓存的key
    private String region="rx"; // 缓存的区域

    // 我们使用j2chache提供的CacheChannel来操作我们的缓存数据
    /*
    * 为什么我们没有配置就可以直接注入CacheChannel,因为我们导入了j2cache的坐标,他会帮我们自动完成配置
    * 自动加载我们在application.yml中的配置,把CacheChannel实例化出来,并且载入spring容器
    * */
    @Autowired
    private CacheChannel cacheChannel;

    // 放入缓存(一级缓存和二级缓存都会放入)
    @GetMapping("/getInfos")
    public List<String> getInfos(){
        CacheObject cacheObject = cacheChannel.get(region, key);
        if(cacheObject.getValue() == null){
            //缓存中没有找到,查询数据库获得
            List<String> data = new ArrayList<String>();
            data.add("info1");
            data.add("info2");
            //放入缓存,指定区域,key,数据
            cacheChannel.set(region,key,data);
            return data;
        }
        return (List<String>) cacheObject.getValue();
    }

    //清理指定缓存(一级缓存和二级缓存都会清理)
    @GetMapping("/evict")
    public String evict(){
        cacheChannel.evict(region,key);
        return "evict success";
    }

    //清理指定区域的缓存(会把整个区域的缓存进行清理掉,(一级缓存和二级缓存都会清理))
    @GetMapping("/clear")
    public String clear(){
        cacheChannel.clear(region);
        return "clear success";
    }

    //检测缓存数据是否存在
    @GetMapping("/exists")
    public String exists(){
        boolean exists = cacheChannel.exists(region, key);
        return "exists:" + exists;
    }

    // 检测指定的缓存数据是从哪一级缓存获取到的,如果两级缓存都没有数据,则返回为0
    @GetMapping("/check")
    public String check(){
        int check = cacheChannel.check(region, key);
        return "level:" + check;
    }
}
第五步:创建启动类
package cn.itcast;

import org.springframework.boot.SpringApplication;
import org.springframework.boot.autoconfigure.SpringBootApplication;

@SpringBootApplication
public class J2CacheApp {
    public static void main(String[] args) {
        SpringApplication.run(J2CacheApp.class,args);
    }
}
注意:由于我们当前第二级缓存使用的是redis,所以需要启动redis服务才能正常运行入门案例。
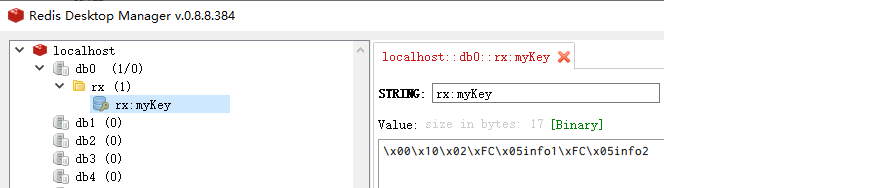
启动项目,访问地址:http://localhost:9000/cache/getInfos ,使用redis可视化工具RDM可以发现redis中已经缓存了数据:
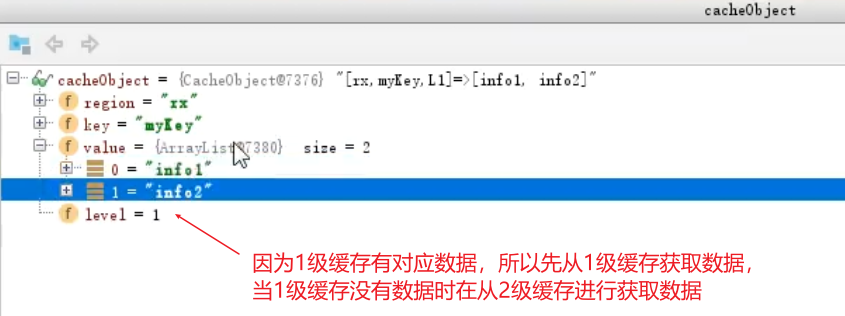
且获取数据首先是从一级缓存中进行缓存,
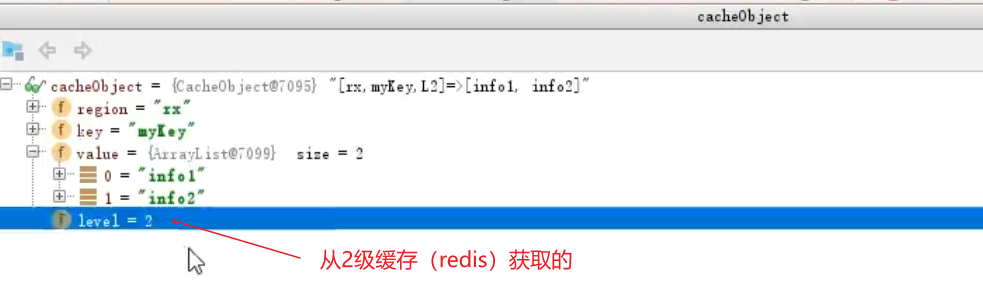
重启项目,由于j2cache的一级缓存(caffeine)是进程级缓存,重启后一级缓存消失。但是二级缓存(redis)的数据还存在,再次访问 http://localhost:9000/cache/getInfos,通过debug断点调试可以看到程序从redis中获取了缓存数据。
三、starter定制及使用
我们可以开发一个starter,名字为pd-tools-j2cache,我们的应用直接引入其maven坐标并配置j2cache的配置文件就可以将CacheChannel对象直接注入到我们的程序中进行缓存数据操作了。具体使用过程和入门案例一致,只需要更换j2cache的maven坐标为pd-tools-j2cache的maven坐标即可。
starter模块的定制可以参考b站链接:https://www.bilibili.com/video/BV1tw411f79E?p=103&spm_id_from=pageDriver,此处我们不做过多叙述
喜欢请关注我
至此,我们的J2Cache的学习就讲解完毕了。喜欢我的话可以关注我的微信公众号 我爱学习呀嘻嘻 ,不定期分享各类资源哦。


为开发者提供学习成长、分享交流、生态实践、资源工具等服务,帮助开发者快速成长。
更多推荐


 2
2 0
0- 0


 已为社区贡献2条内容

所有评论(0)