Elasticsearch:使用最新的 Python client 8.0 来创建索引并搜索
随着 Elastic Stack 8.0 的推出,Elastic 也推出了最新的 python client 8.0 安装包。这是 Elasticsearch 的官方低级 Python 客户端。 它的目标是为 Python 中所有与 Elasticsearch 相关的代码提供共同基础。 出于这个原因,客户端被设计为可扩展的。 在文档中提供了 API 参考。在我之前的文章 “Elasticsearc
随着 Elastic Stack 8.0 的推出,Elastic 也推出了最新的 python client 8.0 安装包。这是 Elasticsearch 的官方低级 Python 客户端。 它的目标是为 Python 中所有与 Elasticsearch 相关的代码提供共同基础。 出于这个原因,客户端被设计为可扩展的。 在文档中提供了 API 参考。在我之前的文章 “Elasticsearch:Elasticsearch 开发入门 - Python”,我详细描述了如何在 Elastic Stack 7.x 中进行操作。
Elasticsearch:使用最新的 python client 8.0 来创建索引并搜索
Elasticsearch:使用最新的 python client 8.0 来创建索引并搜索_哔哩哔哩_bilibili
兼容性
Python 语言客户端向前兼容; 这意味着客户端支持与 Elasticsearch 更大或相同的次要版本进行通信。 Elasticsearch 语言客户端仅向后兼容默认发行版,并且不做任何保证。
前提条件
你需要在你的电脑上安装 python3,并安装如下的 elasticsearch 包:
python -m pip install elasticsearch
python -m pip install elasticsearch[async]
或者使用如下的命令来进行安装:
pip3 install elasticsearch
pip3 install elasticsearch[async]
我们可以使用如下的命令来检查 elasticsearch 包的版本:
pip list | grep elasticsearch$ pip list | grep elasticsearch
elasticsearch 8.0.0上面的命令表明,我们的 elasticsearch 安装包版本是 8.0 的。
安装
如果你还没有安装自己的 Elasticsearch,那么请阅读文章 “如何在 Linux,MacOS 及 Windows 上进行安装 Elasticsearch” 来安装 Elasticsearch 8.x。特别地,在今天的练习中,我将使用 Elasticsearch 8.1.2 来进行展示。由于 Elasticsearch 8.x 在默认的情况下是带有安全的,并且 HTTPS 是自动配置的。为了方便,我们首先来尝试不带有安全的 Elasticsearch 安装来进行展示。然后接下来再来安装带有安全的 Elasticsearch 集群。
可能很多开发者并不知道如何安装不带有安全的 Elasticsearch 集群。请参照我之前的文章 “Elastic Stack 8.0 安装 - 保护你的 Elastic Stack 现在比以往任何时候都简单”。仔细阅读文章中 “如何配置 Elasticsearch 不带安全性” 章节进行配置。
Python 示例
接下来,我们来展示如何使用 python client 8.0 来创建索引等操作。我们的很多步骤和之前的文章 “Elasticsearch:Elasticsearch 开发入门 - Python” 也有所不同。区别是在连接部分以及有些 API 的变化。
首先,我们在自己的电脑上创建一个目录,并创建一个叫做 main.py 的文档:
main.py
$ pwd
/Users/liuxg/python/elasticsearch-py8
$ ls
main.py
$ cat main.py

# Import Elasticsearch package
from elasticsearch import Elasticsearch

# Connect to the elastic cluster
# The following does not work for elasticsearch 8.0
es = Elasticsearch([{'host':'localhost','port':9200}])
print(es)
在上面,我们使用之前的方法来连接 Elasticsearch 8.x,那么我们可以看到如下的信息:
$ python main.py
Traceback (most recent call last):
  File "/Users/liuxg/python/elasticsearch-py8/main.py", line 7, in <module>
    es = Elasticsearch([{'host':'localhost','port':9200}])
  File "/Library/Frameworks/Python.framework/Versions/3.10/lib/python3.10/site-packages/elasticsearch/_sync/client/__init__.py", line 312, in __init__
    node_configs = client_node_configs(
  File "/Library/Frameworks/Python.framework/Versions/3.10/lib/python3.10/site-packages/elasticsearch/_sync/client/utils.py", line 101, in client_node_configs
    node_configs = hosts_to_node_configs(hosts)
  File "/Library/Frameworks/Python.framework/Versions/3.10/lib/python3.10/site-packages/elasticsearch/_sync/client/utils.py", line 144, in hosts_to_node_configs
    node_configs.append(host_mapping_to_node_config(host))
  File "/Library/Frameworks/Python.framework/Versions/3.10/lib/python3.10/site-packages/elasticsearch/_sync/client/utils.py", line 211, in host_mapping_to_node_config
    return NodeConfig(**options)  # type: ignore
TypeError: NodeConfig.__init__() missing 1 required positional argument: 'scheme'
显然,我们的方法是有问题的。正确的方法是:
main.py
# Import Elasticsearch package
from elasticsearch import Elasticsearch

# Connect to the elastic cluster
# The following does not work for elasticsearch 8.0
es = Elasticsearch("http://localhost:9200")
print(es)
运行上面的代码,我们可以看到:
$ python main.py
<Elasticsearch(['http://localhost:9200'])>
从上面的输出中,我们可以看到它成功地连接到 Elasticsearch 8.x。
创建索引并写入文档
Elasticsearch 是面向文档的,这意味着它存储了整个对象或文档。 它不仅存储它们,而且索引每个文档的内容以使其可搜索。 在 Elasticsearch 中,你可以对文档进行索引,搜索,排序和过滤。
Elasticsearch 使用 JSON 作为文档的序列化格式。现在让我们开始索引员工文档。在 Elasticsearch 中存储数据的行为称为索引编制。 Elasticsearch 集群可以包含多个索引,而索引又包含一个类型。 这些类型包含多个文档,并且每个文档都有多个字段。如果你想了解更多这些概念,请阅读我之前的文章 “Elasticsearch 中的一些重要概念: cluster, node, index, document, shards 及 replica”。
main.py
# Import Elasticsearch package
from elasticsearch import Elasticsearch

# Connect to the elastic cluster
es = Elasticsearch("http://localhost:9200")
print(es)

INDEX_NAME = "megacorp"

e1 = {
    "first_name":"nitin",
    "last_name":"panwar",
    "age": 27,
    "about": "Love to play cricket",
    "interests": ['sports','music'],
}

res = es.index(index = INDEX_NAME, id = 1, document = e1)
print(res)
运行上面的代码,我们可以看到如下的结果:
$ python main.py
<Elasticsearch(['http://localhost:9200'])>
{'_index': 'megacorp', '_id': '1', '_version': 1, 'result': 'created', '_shards': {'total': 2, 'successful': 1, 'failed': 0}, '_seq_no': 0, '_primary_term': 1}
从上面的输出中,我们可以看出来操作是成功的。我们可以在 Kibana 中进行查看:

当然,我们也可以使用如下的命令来让 Elasticsearch 给我们分配一个文档 id。这在大多数的情况下是被推荐的方法,因为这样的摄入速度会更快:
main.py
# Import Elasticsearch package
from elasticsearch import Elasticsearch

# Connect to the elastic cluster
es = Elasticsearch("http://localhost:9200")
print(es)

INDEX_NAME = "megacorp"

e1 = {
    "first_name":"nitin",
    "last_name":"panwar",
    "age": 27,
    "about": "Love to play cricket",
    "interests": ['sports','music'],
}

res = es.index(index = INDEX_NAME, id = 1, document = e1)
print(res)

e2 = {
    "first_name" :  "Jane",
    "last_name" :   "Smith",
    "age" :         32,
    "about" :       "I like to collect rock albums",
    "interests":  [ "music" ]
}

res = es.index(index = 'megacorp', document = e2)
print(res['result'])
运行上面的代码:
$ python main.py
<Elasticsearch(['http://localhost:9200'])>
{'_index': 'megacorp', '_id': '1', '_version': 2, 'result': 'updated', '_shards': {'total': 2, 'successful': 1, 'failed': 0}, '_seq_no': 1, '_primary_term': 2}
created
我们可以看到第一个文档的状态是 updated,而第二个文档的状态是 created,也就是说第一个文档被更新,而第二个文档是被创建。我们可以通过 Kibana 来查看:
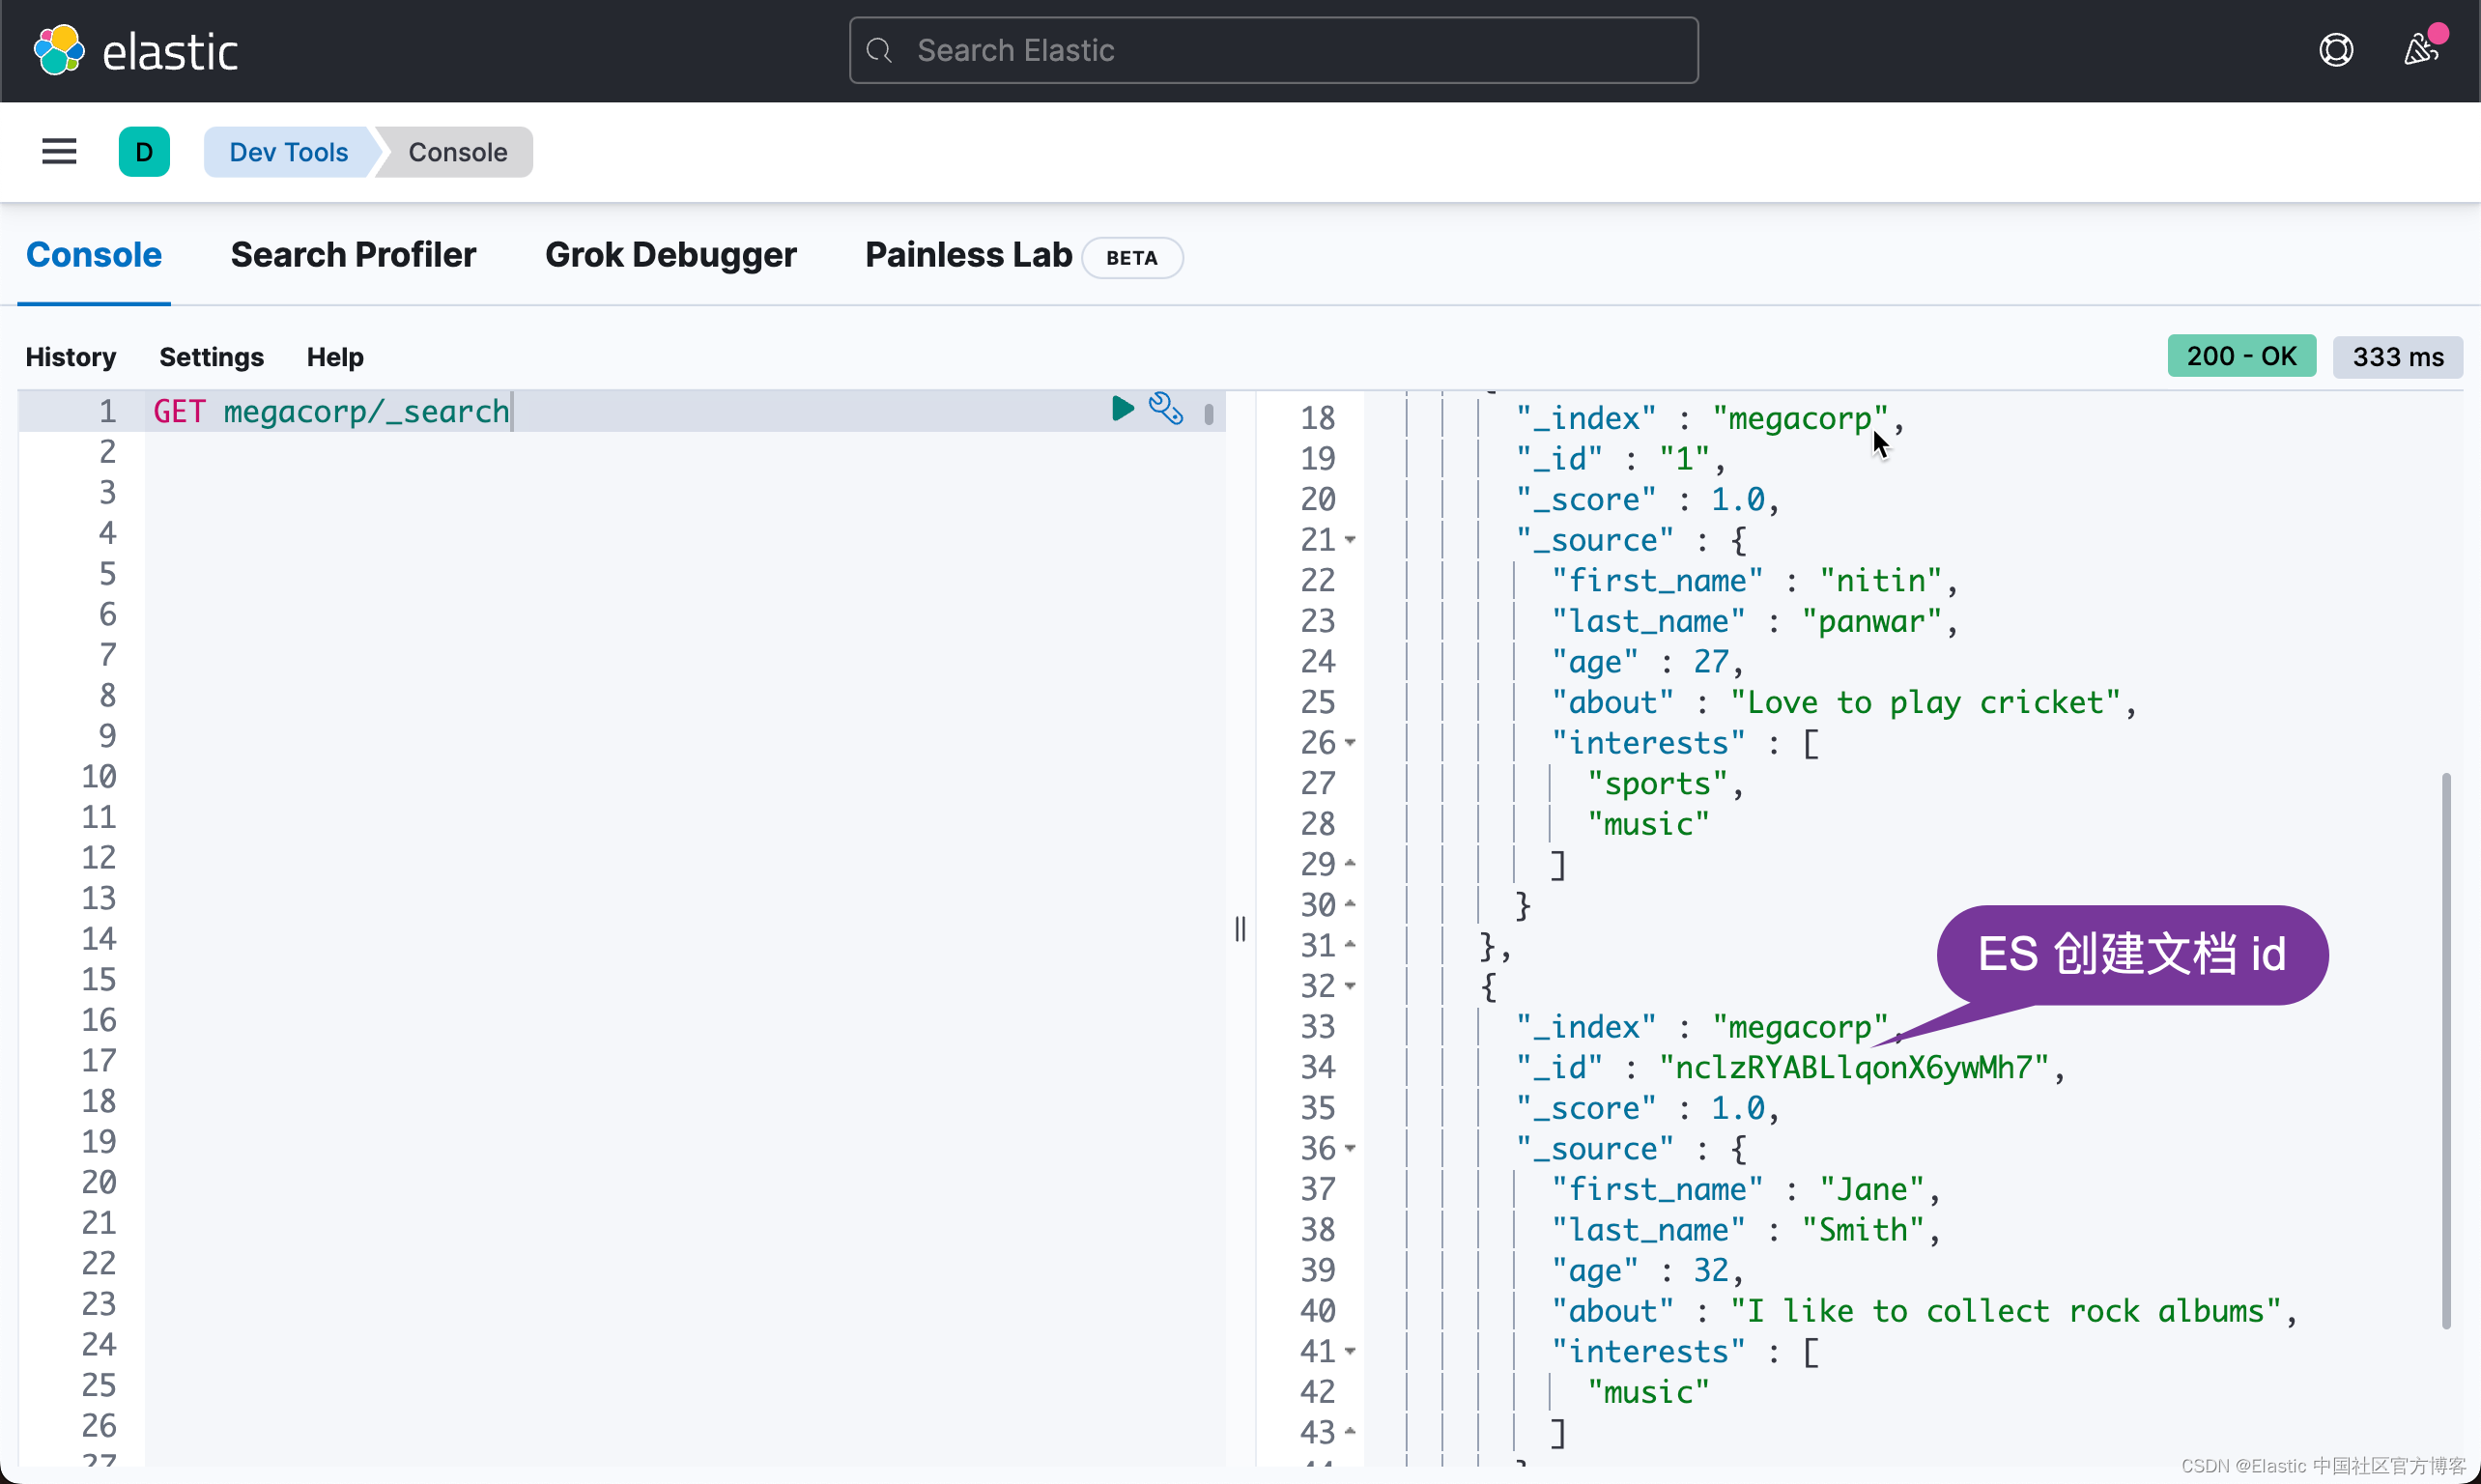
从上面,我们可以看出来,第二个文档的 id 是一个像是随机生成的但是唯一的 id。
上面的命令相当于如下的命令:
PUT megacorp/_doc/1
{
  "first_name": "Jane",
  "last_name": "Smith",
  "age": 32,
  "about": "I like to collect rock albums",
  "interests": [
    "music"
  ]
}
获取一个文档
在 Elasticsearch 中这很容易。 我们只需执行一个 HTTP GET 请求并指定文档的地址-索引,类型和 ID。 使用这三段信息,我们可以返回原始 JSON 文档。
main.py
# Import Elasticsearch package
from elasticsearch import Elasticsearch

# Connect to the elastic cluster
es = Elasticsearch("http://localhost:9200")
print(es)

INDEX_NAME = "megacorp"

e1 = {
    "first_name":"nitin",
    "last_name":"panwar",
    "age": 27,
    "about": "Love to play cricket",
    "interests": ['sports','music'],
}

res = es.index(index = INDEX_NAME, id = 1, document = e1)
print(res)

res = es.get(index = INDEX_NAME, id = 1)
print(res)
在上面,我们获取 id 为 1 的文档:
res = es.get(index = INDEX_NAME, id = 1)
print(res)
运行上面的代码:
$ python main.py
<Elasticsearch(['http://localhost:9200'])>
{'_index': 'megacorp', '_id': '1', '_version': 3, 'result': 'updated', '_shards': {'total': 2, 'successful': 1, 'failed': 0}, '_seq_no': 3, '_primary_term': 2}
{'_index': 'megacorp', '_id': '1', '_version': 3, '_seq_no': 3, '_primary_term': 2, 'found': True, '_source': {'first_name': 'nitin', 'last_name': 'panwar', 'age': 27, 'about': 'Love to play cricket', 'interests': ['sports', 'music']}}
从上面的输出中,我们可以看到它成功地获取了该文档。上述命令相当于如下的命令:
GET megacorp/_doc/1删除一个文档
我们可以使用如下的命令来删除 id 为 1 的文档:
res = es.delete(index = 'megacorp', id = 1)
print(res['result'])
main.py
# Import Elasticsearch package
from elasticsearch import Elasticsearch

# Connect to the elastic cluster
es = Elasticsearch("http://localhost:9200")
print(es)

INDEX_NAME = "megacorp"

e1 = {
    "first_name":"nitin",
    "last_name":"panwar",
    "age": 27,
    "about": "Love to play cricket",
    "interests": ['sports','music'],
}

res = es.index(index = INDEX_NAME, id = 1, document = e1)
print(res)

res = es.get(index = INDEX_NAME, id = 1)
print(res)

res = es.delete(index = 'megacorp', id = 1)
print(res['result'])
运行上面的程序:
$ python main.py
<Elasticsearch(['http://localhost:9200'])>
{'_index': 'megacorp', '_id': '1', '_version': 4, 'result': 'updated', '_shards': {'total': 2, 'successful': 1, 'failed': 0}, '_seq_no': 4, '_primary_term': 2}
{'_index': 'megacorp', '_id': '1', '_version': 4, '_seq_no': 4, '_primary_term': 2, 'found': True, '_source': {'first_name': 'nitin', 'last_name': 'panwar', 'age': 27, 'about': 'Love to play cricket', 'interests': ['sports', 'music']}}
deleted
上面显示,id 为 1 的文档已经被删除了。上面的代码相当于如下的命令:
DELETE megacorp/_doc/1我们可以使用如下的命令来检查该文档是否已经被成功删除了:
GET megacorp/_doc/1{
"_index" : "megacorp",
"_id" : "1",
"found" : false
}
上面显示 id 为 1 的文档已经不存在了。
搜索文档
我们可以使用如下的命令来搜索所有的文档:
main.py
# Import Elasticsearch package
from elasticsearch import Elasticsearch

# Connect to the elastic cluster
es = Elasticsearch("http://localhost:9200")
print(es)

INDEX_NAME = "megacorp"

e1 = {
    "first_name":"nitin",
    "last_name":"panwar",
    "age": 27,
    "about": "Love to play cricket",
    "interests": ['sports','music'],
}

res = es.index(index = INDEX_NAME, id = 1, document = e1)
print(res)

# Get a doc with id = 1
res = es.get(index = INDEX_NAME, id = 1)
print(res)

# Search all of the available documents
res = es.search(index = 'megacorp', query = {"match_all": {}} )
print(res['hits'])
上面的命令相当于如下的命令:
GET megacorp/_search
{
  "query": {
    "match_all": {}
  }
}
运行上面的代码,我们可以看到如下的结果:
$ python main.py
<Elasticsearch(['http://localhost:9200'])>
{'_index': 'megacorp', '_id': '1', '_version': 4, 'result': 'updated', '_shards': {'total': 2, 'successful': 1, 'failed': 0}, '_seq_no': 10, '_primary_term': 2}
{'_index': 'megacorp', '_id': '1', '_version': 4, '_seq_no': 10, '_primary_term': 2, 'found': True, '_source': {'first_name': 'nitin', 'last_name': 'panwar', 'age': 27, 'about': 'Love to play cricket', 'interests': ['sports', 'music']}}
{'total': {'value': 2, 'relation': 'eq'}, 'max_score': 1.0, 'hits': [{'_index': 'megacorp', '_id': 'nclzRYABLlqonX6ywMh7', '_score': 1.0, '_source': {'first_name': 'Jane', 'last_name': 'Smith', 'age': 32, 'about': 'I like to collect rock albums', 'interests': ['music']}}, {'_index': 'megacorp', '_id': '1', '_score': 1.0, '_source': {'first_name': 'nitin', 'last_name': 'panwar', 'age': 27, 'about': 'Love to play cricket', 'interests': ['sports', 'music']}}]}
从上面的输出结果中,我们可以看出来搜索出来两个文档。
接下来,让我们来搜索 first_name 为 nitin 的文档:
main.py
# Import Elasticsearch package
from elasticsearch import Elasticsearch

# Connect to the elastic cluster
es = Elasticsearch("http://localhost:9200")
print(es)

INDEX_NAME = "megacorp"

e1 = {
    "first_name":"nitin",
    "last_name":"panwar",
    "age": 27,
    "about": "Love to play cricket",
    "interests": ['sports','music'],
}

res = es.index(index = INDEX_NAME, id = 1, document = e1)
print(res)

# Get a doc with id = 1
res = es.get(index = INDEX_NAME, id = 1)
print(res)

# Search all of the available documents
# res = es.search(index = 'megacorp', query = {"match_all": {}} )
# print(res['hits'])

# Search for a document with first_name = nitin
res= es.search(index = 'megacorp', query = {'match':{'first_name':'nitin'}})
print(res['hits']['hits'])
上面的命令相当于:
GET megacorp/_search?filter_path=**.hits
{
  "query": {
    "match": {
      "first_name": "nitin"
    }
  }
}
运行上面的代码,我们可以看到如下的输出:
$ python main.py
<Elasticsearch(['http://localhost:9200'])>
{'_index': 'megacorp', '_id': '1', '_version': 5, 'result': 'updated', '_shards': {'total': 2, 'successful': 1, 'failed': 0}, '_seq_no': 11, '_primary_term': 2}
{'_index': 'megacorp', '_id': '1', '_version': 5, '_seq_no': 11, '_primary_term': 2, 'found': True, '_source': {'first_name': 'nitin', 'last_name': 'panwar', 'age': 27, 'about': 'Love to play cricket', 'interests': ['sports', 'music']}}
[{'_index': 'megacorp', '_id': '1', '_score': 0.20763937, '_source': {'first_name': 'nitin', 'last_name': 'panwar', 'age': 27, 'about': 'Love to play cricket', 'interests': ['sports', 'music']}}]
我们可以看到有一个文档被搜索到了。
我们接下来再来一个 bool 搜索:
main.py
# Import Elasticsearch package
from elasticsearch import Elasticsearch

# Connect to the elastic cluster
es = Elasticsearch("http://localhost:9200")
print(es)

INDEX_NAME = "megacorp"

e1 = {
    "first_name":"nitin",
    "last_name":"panwar",
    "age": 27,
    "about": "Love to play cricket",
    "interests": ['sports','music'],
}

res = es.index(index = INDEX_NAME, id = 1, document = e1)
print(res)

# Get a doc with id = 1
res = es.get(index = INDEX_NAME, id = 1)
print(res)

# Search all of the available documents
# res = es.search(index = 'megacorp', query = {"match_all": {}} )
# print(res['hits'])

# Search for a document with first_name = nitin
res= es.search(index = 'megacorp', query = {'match':{'first_name':'nitin'}})
print(res['hits']['hits'])

res= es.search(index = 'megacorp', query = {
        "bool": {
        "must": [
            {
            "match": {
                "first_name": "nitin"
            }
            }
        ],
        "should": [
            {
            "range": {
                "age": {
                "gte": 10
                }
            }
            }
        ]
        }
    })

print(res['hits']['hits'])
上面的命令相当于如下的命令:
GET megacorp/_search?filter_path=**.hits
{
  "query": {
    "bool": {
      "must": [
        {
          "match": {
            "first_name": "nitin"
          }
        }
      ],
      "should": [
        {
          "range": {
            "age": {
              "gte": 10
            }
          }
        }
      ]
    }
  }
}
运行上面的代码,我们可以看到如下的结果:
$ python main.py
<Elasticsearch(['http://localhost:9200'])>
{'_index': 'megacorp', '_id': '1', '_version': 7, 'result': 'updated', '_shards': {'total': 2, 'successful': 1, 'failed': 0}, '_seq_no': 13, '_primary_term': 2}
{'_index': 'megacorp', '_id': '1', '_version': 7, '_seq_no': 13, '_primary_term': 2, 'found': True, '_source': {'first_name': 'nitin', 'last_name': 'panwar', 'age': 27, 'about': 'Love to play cricket', 'interests': ['sports', 'music']}}
[{'_index': 'megacorp', '_id': '1', '_score': 0.6931471, '_source': {'first_name': 'nitin', 'last_name': 'panwar', 'age': 27, 'about': 'Love to play cricket', 'interests': ['sports', 'music']}}]
[{'_index': 'megacorp', '_id': '1', '_score': 1.6931472, '_source': {'first_name': 'nitin', 'last_name': 'panwar', 'age': 27, 'about': 'Love to play cricket', 'interests': ['sports', 'music']}}]
从上面的输出中,我们可以看到有一个结果在 bool 查询中被搜索到了。
如果你想了解更关于 Elasticsearch 的 DSL 查询,请详细阅读我之前的文章 “开始使用 Elasticsearch (2)”。
如何连接含有 Basic 安全的 Elasticsearch 集群
在上面,我们已经展示了该如何创建索引,文档及对文档进行操作。在我们演示的环境中,Elasticsearch 集群是不带有安全的。那么带有安全的集群该如何进行连接呢?
首先,我们来创建一个含有密码保护的 Elasticsearch 集群。在该集群中,我们不配置 HTTPS。针对 Elasticsearch 8.0 的安装,请参阅我之前的文章 “Elastic Stack 8.0 安装 - 保护你的 Elastic Stack 现在比以往任何时候都简单”。请详细阅读章节 “如何配置 Elasticsearch 只带有基本安全”。为了讲述的方便,我们设置 elastic 超级用户的密码为 password。
等我们搭建好我们的集群后,我们再次使用如下的代码来运行:
main.py
# Import Elasticsearch package
from elasticsearch import Elasticsearch

# Connect to the elastic cluster
es = Elasticsearch("http://localhost:9200")
print(es)

INDEX_NAME = "megacorp"

e1 = {
    "first_name":"nitin",
    "last_name":"panwar",
    "age": 27,
    "about": "Love to play cricket",
    "interests": ['sports','music'],
}

res = es.index(index = INDEX_NAME, id = 1, document = e1)
print(res)
在上面,我们没有使用任何的账号信息来访问 Elasticsearch,那么我们可以看到如下的输出:
$ python main.py
<Elasticsearch(['http://localhost:9200'])>
Traceback (most recent call last):
File "/Users/liuxg/python/elasticsearch-py8/main.py", line 19, in <module>
res = es.index(index = INDEX_NAME, id = 1, document = e1)
File "/Library/Frameworks/Python.framework/Versions/3.10/lib/python3.10/site-packages/elasticsearch/_sync/client/utils.py", line 404, in wrapped
return api(*args, **kwargs)
File "/Library/Frameworks/Python.framework/Versions/3.10/lib/python3.10/site-packages/elasticsearch/_sync/client/__init__.py", line 2207, in index
return self.perform_request( # type: ignore[return-value]
File "/Library/Frameworks/Python.framework/Versions/3.10/lib/python3.10/site-packages/elasticsearch/_sync/client/_base.py", line 321, in perform_request
raise HTTP_EXCEPTIONS.get(meta.status, ApiError)(
elasticsearch.AuthenticationException: AuthenticationException(401, 'security_exception', 'missing authentication credentials for REST request [/megacorp/_doc/1]')
上面的错误信息显示我们没有用到任何的账号信息。我们该如何把账号信息传入呢?在连接 Elasticsearch 时,我们可以使用如下的方式:
main.py
# Import Elasticsearch package
from elasticsearch import Elasticsearch

# Connect to the elastic cluster
es = Elasticsearch("http://localhost:9200", basic_auth=("elastic", "password"))
print(es)

INDEX_NAME = "megacorp"
c
e1 = {
    "first_name":"nitin",
    "last_name":"panwar",
    "age": 27,
    "about": "Love to play cricket",
    "interests": ['sports','music'],
}

res = es.index(index = INDEX_NAME, id = 1, document = e1)
print(res)
如上所示,我们在连接时添加了 basic_auth 参数,并把用户名及密码传入。运行上面的代码:
$ python main.py
<Elasticsearch(['http://localhost:9200'])>
{'_index': 'megacorp', '_id': '1', '_version': 1, 'result': 'created', '_shards': {'total': 2, 'successful': 1, 'failed': 0}, '_seq_no': 0, '_primary_term': 1}
我们可以看到文档已经被成功地写入到 Elasticsearch 中去了。
连接含有 HTTPS 配置的集群
在默认的情况下,Elasticsearch 8.x 的安装是带有 HTTPS 配置的。我们可以按照我之前的教程 “如何在 Linux,MacOS 及 Windows 上进行安装 Elasticsearch” 在自己喜欢的平台上进行安装。请参考 “Elastic Stack 8.x 安装” 章节。在安装的过程中,我们需要记下如下的启动信息:

我们可以有如下的两种方法来进行连接:
使用 fingerprint
我们必须保证 python 的版本是 3.10 及以后。
我们可以在 Elasticsearch 的安装目录下运行如下的命令:
openssl x509 -fingerprint -sha256 -in config/certs/http_ca.crt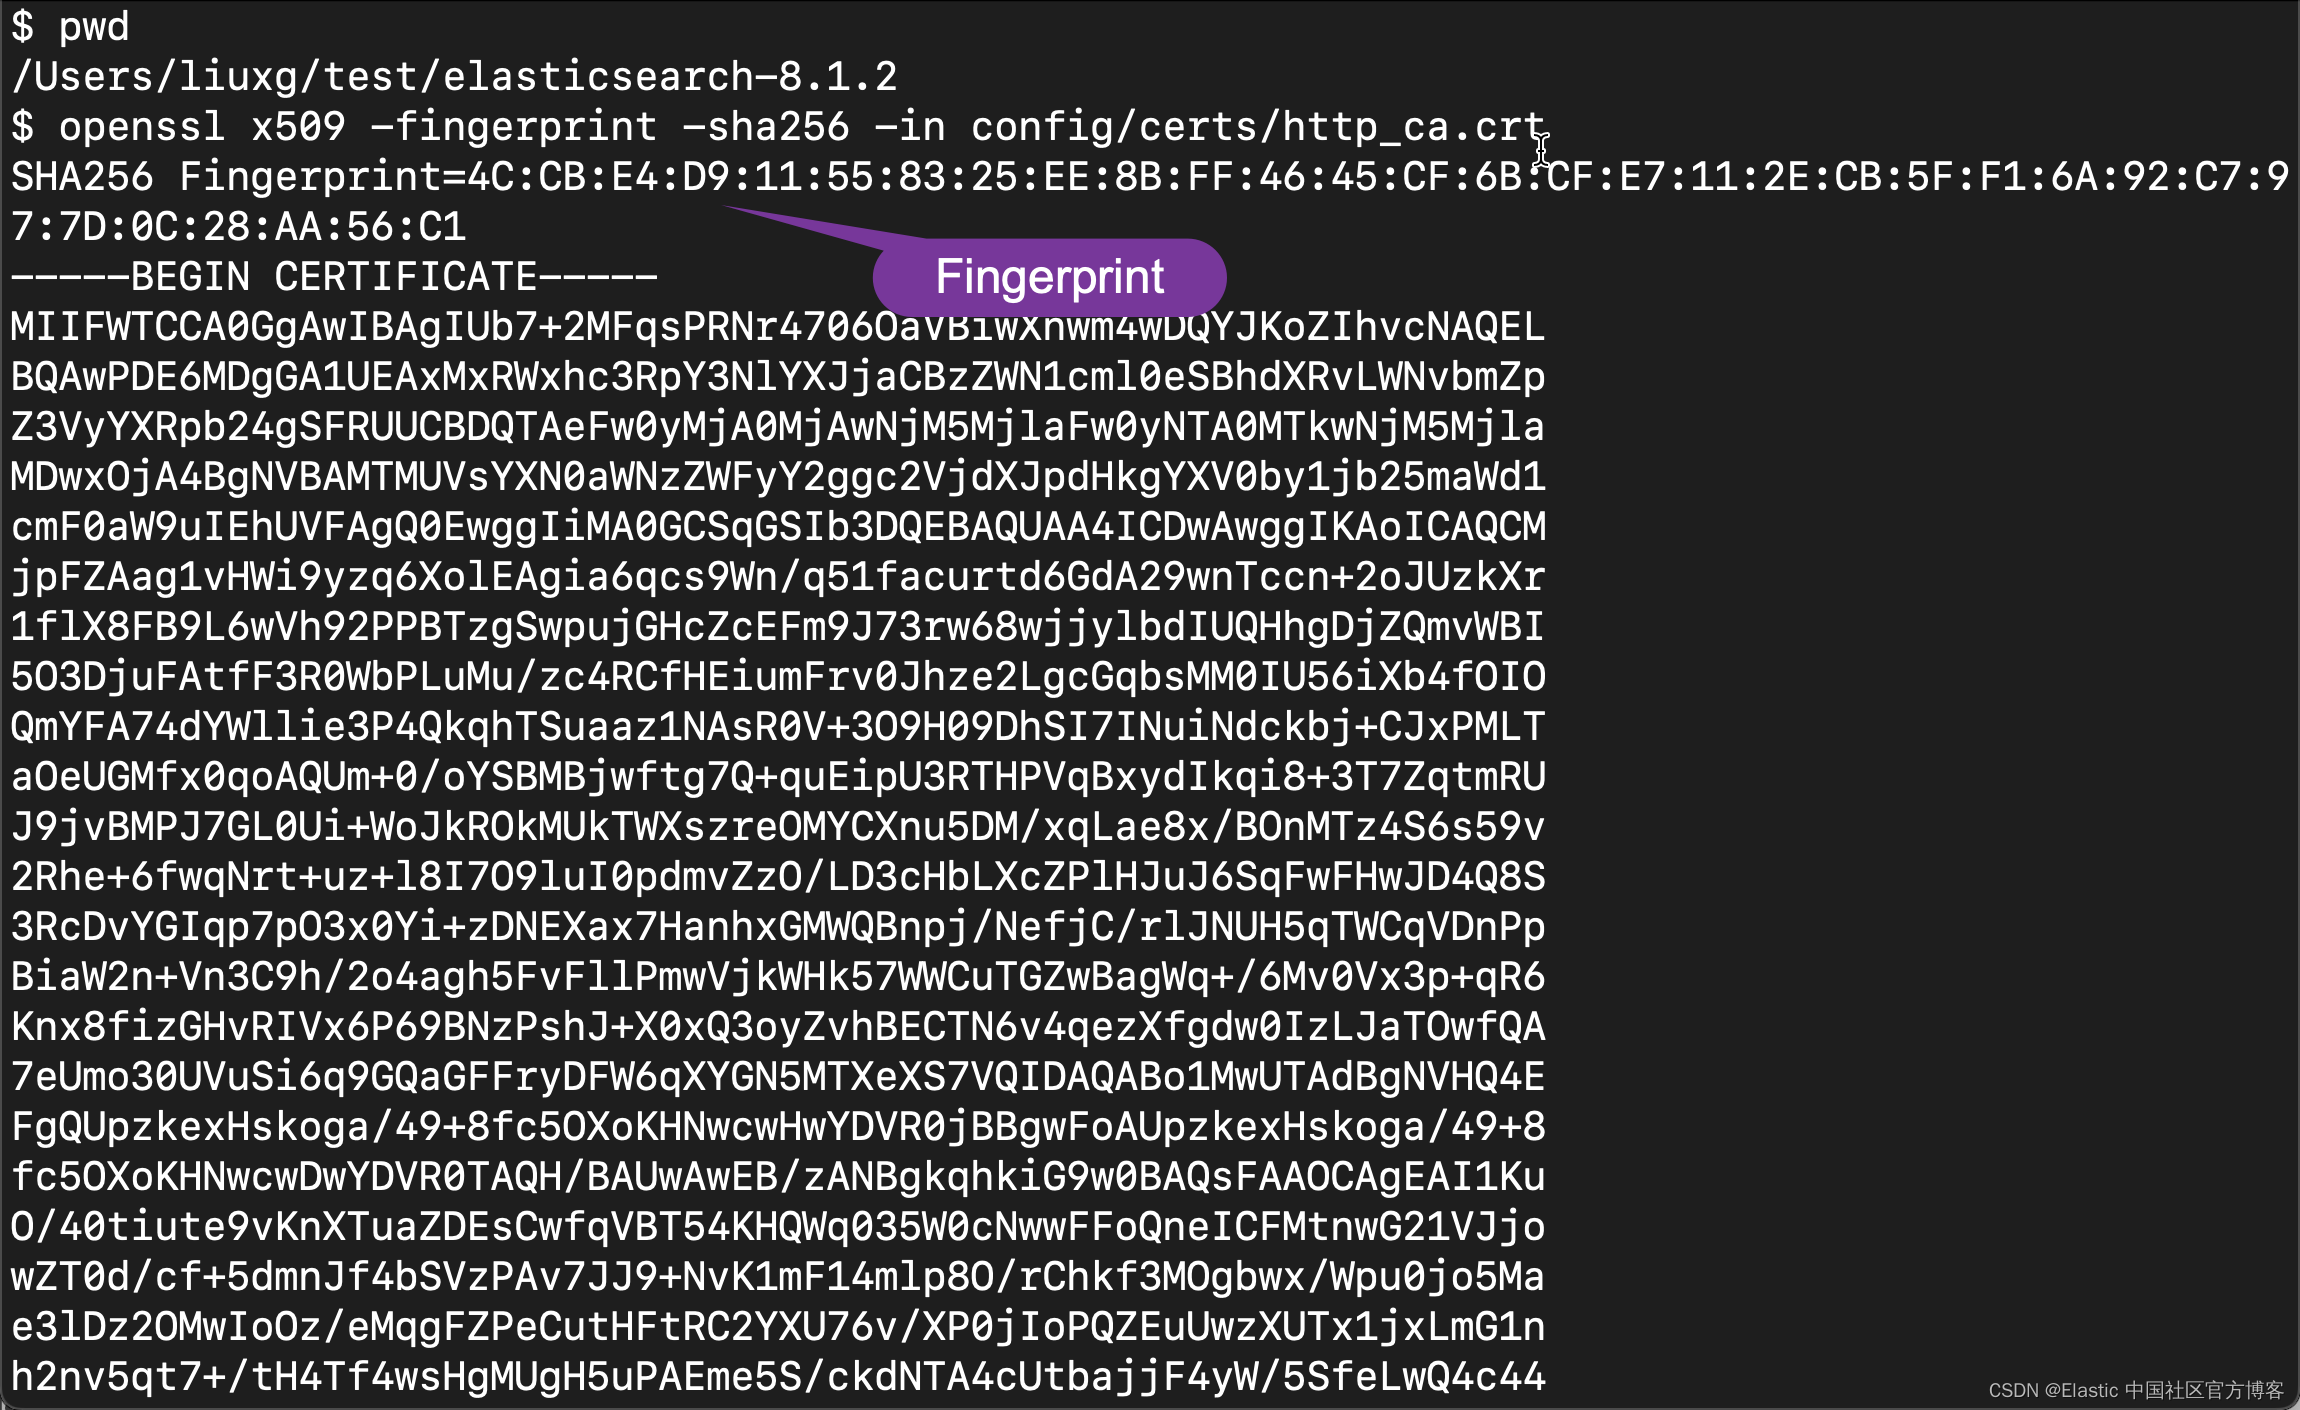
main.py
# Import Elasticsearch package
from elasticsearch import Elasticsearch

# Connect to the elastic cluster
# Password for the 'elastic' user generated by Elasticsearch
ELASTIC_PASSWORD = "6oBcV7Qa40zfXsqQic5v"
CERT_FINGERPRINT = "4CCBE4D911558325EE8BFF4645CF6BCFE7112ECB5FF16A92C7977D0C28AA56C1"
es = Elasticsearch("https://localhost:9200",
                    ssl_assert_fingerprint = CERT_FINGERPRINT,
                    basic_auth=("elastic", ELASTIC_PASSWORD),
                    verify_certs=False)
print(es)
es.info()

INDEX_NAME = "megacorp"

e1 = {
    "first_name":"nitin",
    "last_name":"panwar",
    "age": 27,
    "about": "Love to play cricket",
    "interests": ['sports','music'],
}

res = es.index(index = INDEX_NAME, id = 1, document = e1)
print(res)
由于是自签名证书,我们在连接 Elasticsearch 时,传入参数 verify_certs=False。如果你的证书是签名证书,你可以设置 verify_certs=True。
事实上,我们也可以使用如下的格式来连接:
main.py
# Import Elasticsearch package
from elasticsearch import Elasticsearch

# Connect to the elastic cluster
# Password for the 'elastic' user generated by Elasticsearch
ELASTIC_PASSWORD = "6oBcV7Qa40zfXsqQic5v"
CERT_FINGERPRINT = "4CCBE4D911558325EE8BFF4645CF6BCFE7112ECB5FF16A92C7977D0C28AA56C1"
es = Elasticsearch("https://elastic:6oBcV7Qa40zfXsqQic5v@localhost:9200",
                    ssl_assert_fingerprint = CERT_FINGERPRINT,
                    verify_certs=False)
print(es)
es.info()

INDEX_NAME = "megacorp"

e1 = {
    "first_name":"nitin",
    "last_name":"panwar",
    "age": 27,
    "about": "Love to play cricket",
    "interests": ['sports','music'],
}

res = es.index(index = INDEX_NAME, id = 1, document = e1)
print(res)
在上面,我们把用户名及密码直接写到 elasticsearch 的连接 URL 里。
针对自签名证书,如果我们不希望验证证书,我们直接使用如下的方法:
main.py
# Import Elasticsearch package
from elasticsearch import Elasticsearch

# Connect to the elastic cluster
# Password for the 'elastic' user generated by Elasticsearch
ELASTIC_PASSWORD = "6oBcV7Qa40zfXsqQic5v"
CERT_FINGERPRINT = "4CCBE4D911558325EE8BFF4645CF6BCFE7112ECB5FF16A92C7977D0C28AA56C1"
es = Elasticsearch("https://localhost:9200",
                    basic_auth=("elastic", ELASTIC_PASSWORD),
                    verify_certs=False)
print(es)
es.info()

INDEX_NAME = "megacorp"

e1 = {
    "first_name":"nitin",
    "last_name":"panwar",
    "age": 27,
    "about": "Love to play cricket",
    "interests": ['sports','music'],
}

res = es.index(index = INDEX_NAME, id = 1, document = e1)
print(res)
在上面,我们直接配置 verify_certs=False 即可。
使用证书
我们可以使用如下的方法把证书也写进连接的参数里:
main.py
# Import Elasticsearch package
from elasticsearch import Elasticsearch

# Connect to the elastic cluster
# Password for the 'elastic' user generated by Elasticsearch
ELASTIC_PASSWORD = "6oBcV7Qa40zfXsqQic5v"
CERT_FINGERPRINT = "4CCBE4D911558325EE8BFF4645CF6BCFE7112ECB5FF16A92C7977D0C28AA56C1"
es = Elasticsearch("https://elastic:6oBcV7Qa40zfXsqQic5v@localhost:9200",
                    ca_certs="/Users/liuxg/test/elasticsearch-8.1.2/config/certs/http_ca.crt",
                    verify_certs=True)
print(es)
es.info()

INDEX_NAME = "megacorp"

e1 = {
    "first_name":"nitin",
    "last_name":"panwar",
    "age": 27,
    "about": "Love to play cricket",
    "interests": ['sports','music'],
}

res = es.index(index = INDEX_NAME, id = 1, document = e1)
print(res)
如上所示,我们在连接时,通过设置 ca_certs 把证书所在的位置传入,那么在这种情况下,我们可以把 verify_certs 设置为 True。运行上面的代码:
$ python main.py
<Elasticsearch(['https://localhost:9200'])>
{'_index': 'megacorp', '_id': '1', '_version': 5, 'result': 'updated', '_shards': {'total': 2, 'successful': 1, 'failed': 0}, '_seq_no': 4, '_primary_term': 1}
显然,我们的连接是成功的。
参考:
【1】 Connecting | Elasticsearch Python Client [master] | Elastic
【2】Python Elasticsearch Client — Python Elasticsearch client 8.1.2 documentation
【3】Overview | Elasticsearch Python Client [master] | Elastic

华为开发者空间,是为全球开发者打造的专属开发空间,汇聚了华为优质开发资源及工具,致力于让每一位开发者拥有一台云主机,基于华为根生态开发、创新。
更多推荐


 7
7 0
0- 0


 已为社区贡献104条内容

所有评论(0)