Redisson分布式锁
redission 分布式锁原理讲解(包含源码分析)
一、什么是分布式锁
我们的一些互斥资源,不能并行执行,需要一个东西来保证串行执行
synchronized、lock 都是单机锁
但是这些锁都是在单台机器下生效,如果部署多台机器,或者互斥资源在不同的服务之间进行操作,那么就锁不住。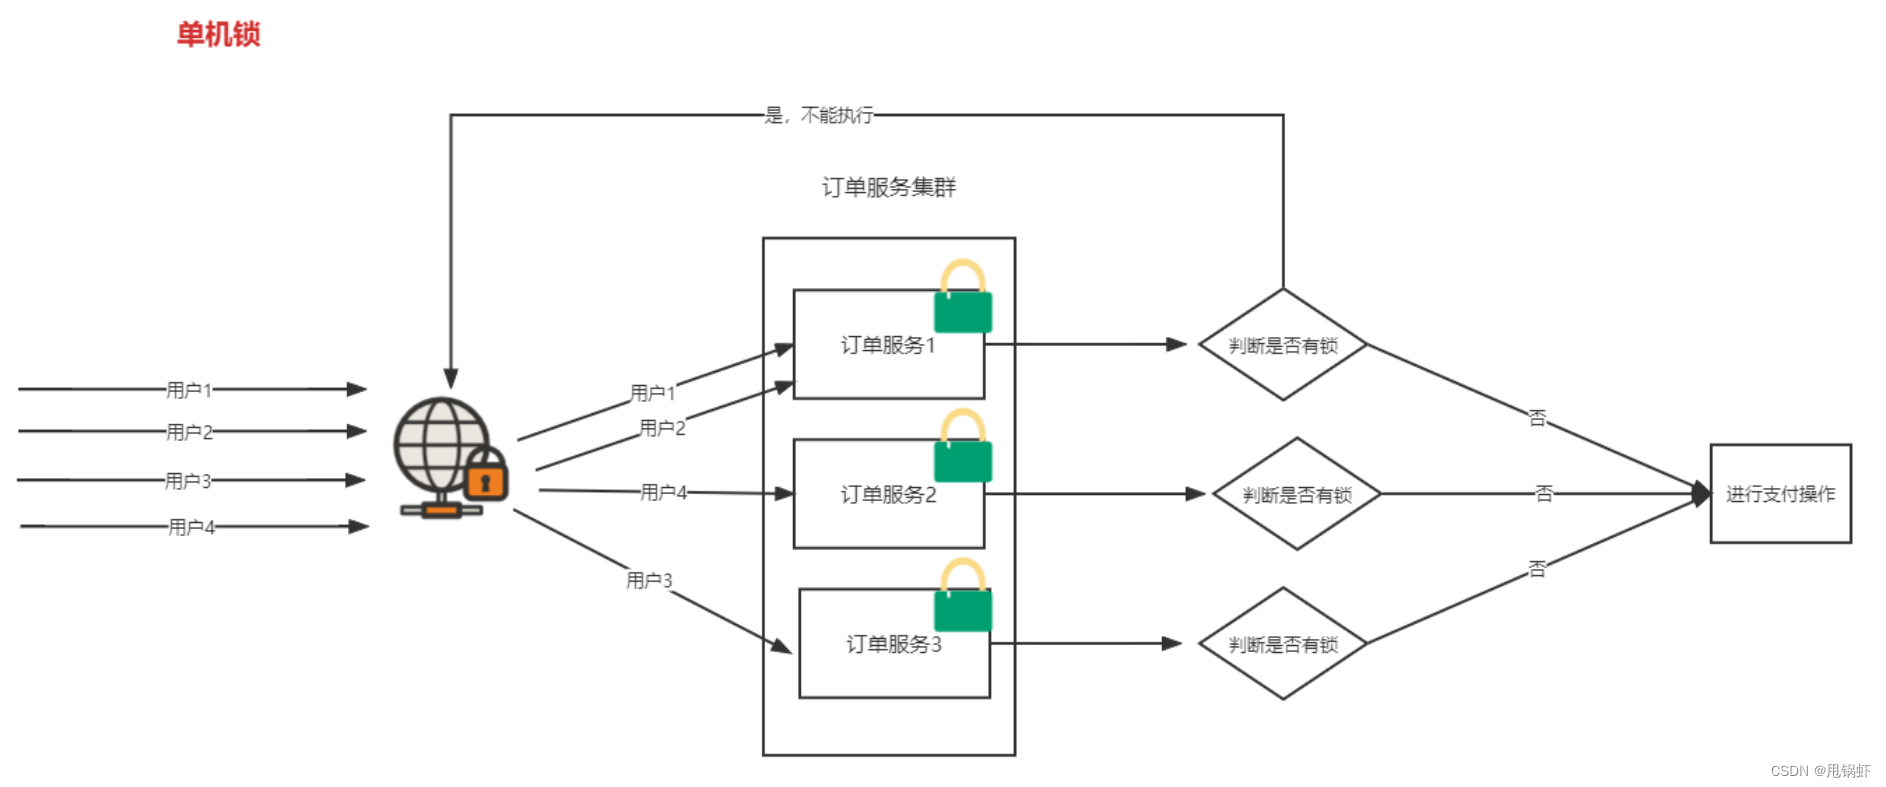

分布式锁一定是独立于业务服务的。
Redis本来就是一个单独的服务,所以,肯定是独立于我们业务服务 的,本身就属于分布式的
二、自己设计一个锁,如何实现
实现分布式锁需要满足的需求:
1、只能有一个线程能执行互斥的资源
2、其他的线程想要执行互斥资源的时候,有线程正在执行的话,要么等待,要么报错
那么为了实现这个需求我们需要做什么?
1、通过一个标记来标记是不是有线程在执行,其他线程想要执行的时候,先看下是否有这个标记;
2、这个标记必须是可见的,保证相互之间这个标记是能拿到最新结果的;
3、抢占这个标记的过程不能多个线程同时抢占成功,必须是线程安全的;
三、Redis中是怎么做分布式锁
1、标记,因为redis是k-v结构,key作为一个标记,这个key存在的话说明有人在做,如果不存在,说明没人在做;
2、可见性,必须set完,你才能get,redis的单线程命令执行就解决了这个问题;
3、保证原子性,redis命令是单线程的,可以保证指令的原子性。
虽然指令是原子性的,但是我们需要先判断是否有标记,没标记再记录标记,这是两个命令在执行,可能会产生并发问题,导致同时得到没有锁的场景,然后执行业务代码,如下图所示
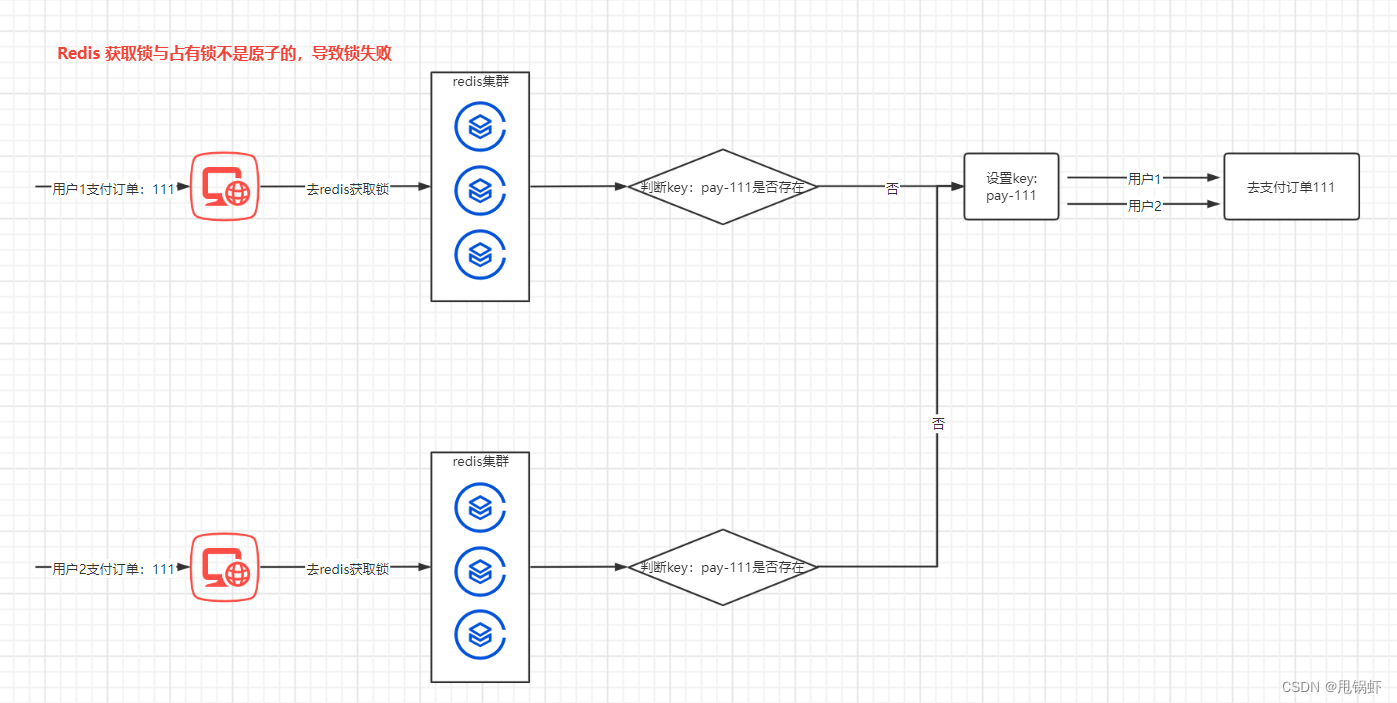
那么发现根本原因,是在判断跟设置的时候不是原子性的,判断为空,其他线程也会判断为空!
所以,得保证这2个指令执行的时候不能有其他线程操作(保证多指令的原子性),必须等执行完毕,并且去设置完了以后其他指令才能执行。
四、如何保证多个执行指令原子性
什么是原子性?
简单的理解就是:整个程序中的所有操作,要么全部完成,要不全部不完成,不会停留在中间某个环节。那么非原子性就是不满足原子性的条件就是非原子性了
1、redis事务
redis 事务通过 multi和 exec两个指令实现
开启事务:multi
提交事务:exec
回滚不提交:discard
事务中的多条指令是不会直接去执行的,是先排队,等到执行 exec指令时再执行队列中指令。
事务中的错误处理
1.可能指令在排队的时候就错误,比如语法错误(编译器错误), 会报错给用户 ,并且丢失这次事务,不执行;
2.执行指令的失败,比如你对string类型执行incr (运行时错误),这种事务里面的其他指令会正常执行,并且不提供回滚!
事务开启后,如果相关的数据被其他事务更改了怎么办?
Mysql提供了不同 的隔离级别,然后通过MVCC来LBCC来解决。
Redis中的用到了 Cas思想 ,watch指令
并发的时候有这么一个思想:比较并替换,是以一种无锁的形式来实现线程安全,一个资源只能在一个地方被更改。
那么Redis中也有cas的思想 check-and-set 检查,设置事务开启后,执行相关的指令的时候,如果其他人更改了指令的值,事务不执行,通过watch指令实现;
总结
1、redis命令是原子的,在执行事务中的指令时,服务器阻塞,不能执行其他指令。
当发出multi命令时,redis会进入事务,redis会进入阻塞状态,不再响应任何别的客户端的请求,直到发出multi命令的客户端再发出exec命令为止。那么被multi和exec包围的命令会进入独享redis的过程,直到执行完毕;
2、但是不能拿到事务中间的指令的结果,来决定后面指令的逻辑,这个很重要,这个原因导致redis事务不能用于实现分布式锁
2、lua脚本
lua语言是一个轻量级的脚本语言,致力于很容易嵌入其他语言中使用的语 言。所以依赖于其他宿主语言,自己不会有大而全的功能,但是可以调用宿主语言的功能。
redis中完美契合了lua脚本功能 redis可以调用lua脚本中的api,lua脚本也 可以调用redis中的指令
具体lua脚本的知识这里先不详细展开,后面讲源码的时候,可以稍微讲解一下
五、Redission分布式锁原理
重入锁
同一个线程能加锁多次。
为什么要有重入锁?
防止死锁的可能。
在有些场景下,我需要同一个线程能对同一把锁进行反复加锁!如下:
1、假如我有个定时调度的批处理,批量处理未支付的订单去进行支付,这个逻辑需要加锁,查询未支付的订单不能有并发。
2、这个支付的方法,除了批量处理这块,其他地方也会调用,所以也需要加锁
3、加的是同一把锁,因为synchronized加锁范围是当前实例,如果同一个线程加锁后不能再进行加锁的话,会导致死锁。
所以,在单机锁时代,为了降低死锁几率,提出了一个重入锁的思想:同一个线程能对同一把锁加锁多次。
自己设计一把重入锁需要保存3个东西:
-
互斥条件,标记是否有线程;
-
知道线程信息,记录线程信息,来判断加锁的是不是同一个线程;
-
保存重入次数,记录重入次数,再释放锁的时候,减少相应的次数。
redis里面有个数据类型是hash,是一种key 、 filed 、value的格式,完美的契合了重入锁的实现。
大key可以做为 互斥条件、filed保存线程信息、value保存重入次数。
Redission使用
导入redission客户端包
<dependency>
    <groupId>org.redisson</groupId>
    <artifactId>redisson-spring-boot-starter</artifactId>
    <version>3.15.6</version>
</dependency>
在业务代码中获取redssionClient连接
@Resource
private RedissonClient redissonClient;
分布式锁流程图
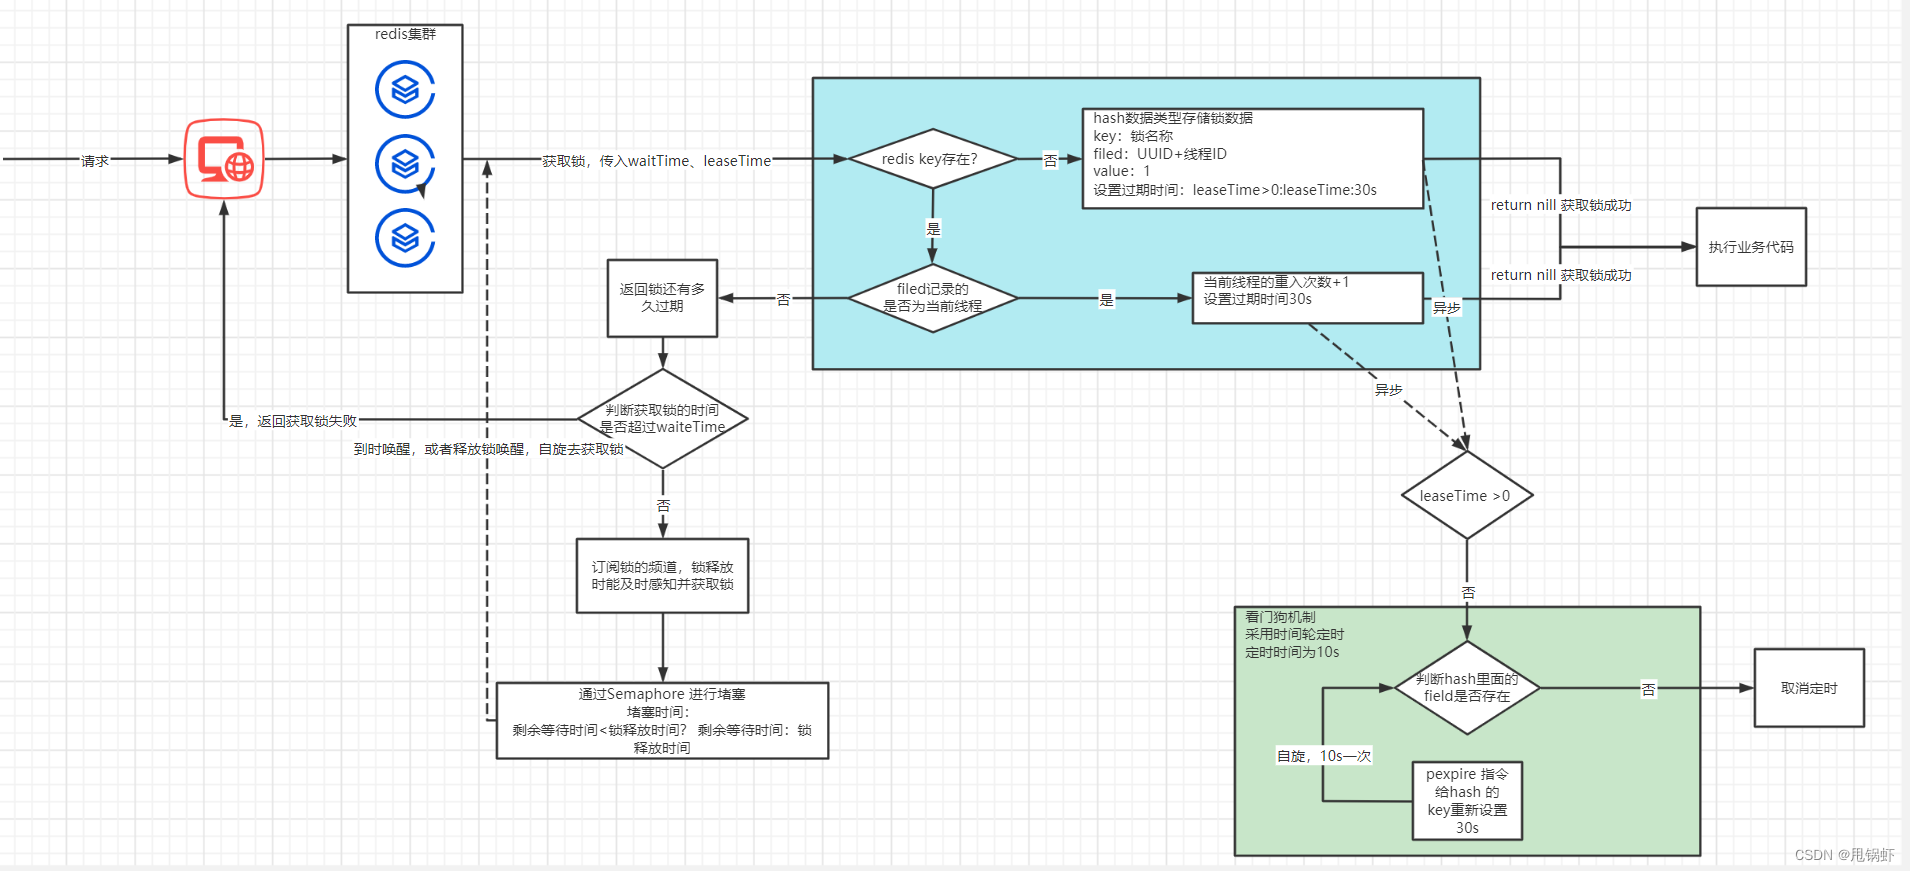
源码分析
	/**
    * 分布式锁在项目中使用案例,对支付流程进行限制,防止订单重复支付
    */
	@Override
    public String rlock(String orderId) {
        //初始化锁的对象
        RLock rLock = redissonClient.getLock("lock_" + orderId);
        try {
            //尝试加锁, 最多等待5秒
            boolean lock = rLock.tryLock(5, -1, TimeUnit.SECONDS);
            if (lock) {
                log.debug("获取到锁,执行支付流程");
                //延时15s
                Thread.sleep(15000);
                log.debug("支付完成");
                return "支付完成";
            } else {
                return "请稍等,有人正在支付";
            }
        } catch (InterruptedException e) {
            log.error("获取锁异常 e:{}", e.getMessage());
            return "获取锁异常";
        } finally {
            //是锁定状态,并且是当前执行线程的锁,释放锁
            if (rLock.isLocked() && rLock.isHeldByCurrentThread()) {
                rLock.unlock();
            }
        }
    }
以下开始对源码的讲解:
1、初始化锁的对象
    public RedissonLock(CommandAsyncExecutor commandExecutor, String name) {
        //初始化RedissionBaseLock
        super(commandExecutor, name);
        this.commandExecutor = commandExecutor;
        this.internalLockLeaseTime = commandExecutor.getConnectionManager().getCfg().getLockWatchdogTimeout();
        this.pubSub = commandExecutor.getConnectionManager().getSubscribeService().getLockPubSub();
    }
    public RedissonBaseLock(CommandAsyncExecutor commandExecutor, String name) {
        //进入初始化 RedissonObject
        super(commandExecutor, name);
        this.commandExecutor = commandExecutor;
        // id 是初始化redission 时就定义好的值,为随机生成的UUID
        this.id = commandExecutor.getConnectionManager().getId();
        //这个参数是定义默认的锁释放时间,默认为 30s,这个数值是可以通过配置文件进行配置的
        this.internalLockLeaseTime = commandExecutor.getConnectionManager().getCfg().getLockWatchdogTimeout();
        //赋值entryId UUid:锁name
        this.entryName = id + ":" + name;
    }
    public RedissonObject(Codec codec, CommandAsyncExecutor commandExecutor, String name) {
        this.codec = codec;
        this.commandExecutor = commandExecutor;
        if (name == null) {
            throw new NullPointerException("name can't be null");
        }
		//将传入的锁name赋值给RedissonObject.name
        setName(name);
    }
2、加锁
tryLock 主方法
    @Override
    public boolean tryLock(long waitTime, long leaseTime, TimeUnit unit) throws InterruptedException {
        //要等待的时间
        long time = unit.toMillis(waitTime);
        long current = System.currentTimeMillis();
        long threadId = Thread.currentThread().getId();
        //尝试加锁
        Long ttl = tryAcquire(waitTime, leaseTime, unit, threadId);
        // lock acquired
        //如果返回null代表拿到了锁
        if (ttl == null) {
            return true;
        }
        //否则说明抢锁失败

        time -= System.currentTimeMillis() - current;
        //超过了要等待的时间,拿锁失败 返回false
        if (time <= 0) {
            acquireFailed(waitTime, unit, threadId);
            return false;
        }

        current = System.currentTimeMillis();
        //添加锁的订阅,如果锁释放,会进入监听类,将Semaphore释放,及时拿到锁
        //这里涉及到一个redis发布订阅的知识点,就先不在这里讲了
        RFuture<RedissonLockEntry> subscribeFuture = subscribe(threadId);
        if (!subscribeFuture.await(time, TimeUnit.MILLISECONDS)) {
            if (!subscribeFuture.cancel(false)) {
                subscribeFuture.onComplete((res, e) -> {
                    if (e == null) {
                        unsubscribe(subscribeFuture, threadId);
                    }
                });
            }
            acquireFailed(waitTime, unit, threadId);
            return false;
        }

        try {
            time -= System.currentTimeMillis() - current;
            if (time <= 0) {
                acquireFailed(waitTime, unit, threadId);
                return false;
            }

            //只要没有到等待时间,自旋获取锁
            while (true) {
                long currentTime = System.currentTimeMillis();
                //再次加锁
                ttl = tryAcquire(waitTime, leaseTime, unit, threadId);
                // lock acquired
                if (ttl == null) {
                    return true;
                }

                time -= System.currentTimeMillis() - currentTime;
                if (time <= 0) {
                    acquireFailed(waitTime, unit, threadId);
                    return false;
                }

                // waiting for message
                currentTime = System.currentTimeMillis();
                //通过Semaphore.tryAcquire 阻塞,会在释放锁的时候,通过订阅发布及时解除堵塞,使用Semaphore堵塞就不用一直自旋,浪费CPU性能
                //个人觉得 Semaphore 这个很好,后面有时间我再研究研究
                if (ttl >= 0 && ttl < time) {
                    //如果锁的超时时间小于等待时间,Semaphore.tryAcquire阻塞锁的释放时间
                    subscribeFuture.getNow().getLatch().tryAcquire(ttl, TimeUnit.MILLISECONDS);
                } else {
                    //否则,Semaphore.tryAcquire阻塞传入的最大等待时间
                    subscribeFuture.getNow().getLatch().tryAcquire(time, TimeUnit.MILLISECONDS);
                }

                time -= System.currentTimeMillis() - currentTime;
                if (time <= 0) {
                    acquireFailed(waitTime, unit, threadId);
                    return false;
                }
            }
        } finally {
            unsubscribe(subscribeFuture, threadId);
        }
//        return get(tryLockAsync(waitTime, leaseTime, unit));
    }
这里加一个小demo 讲解一下 Semaphore 用法
    @Test
    public void  test() throws InterruptedException {
        log.debug("开始");
        Semaphore semaphore=new Semaphore(0);
//        semaphore.release(); //释放semaphore,才能解除阻塞,否则要10s后才能继续执行
        if (semaphore.tryAcquire(10, TimeUnit.SECONDS))
        {
            log.debug("10s过后");
        }
        log.debug("1");
    }
继续讲解,刚才说到在获取锁失败后,如果没有超过等待时间,会添加锁的订阅,如果锁释放,会进入监听类,将Semaphore释放,其他线程可以及时拿到锁
    public RFuture<E> subscribe(String entryName, String channelName) {
        AsyncSemaphore semaphore = service.getSemaphore(new ChannelName(channelName));
        RPromise<E> newPromise = new RedissonPromise<>();
        semaphore.acquire(() -> {
            if (!newPromise.setUncancellable()) {
                semaphore.release();
                return;
            }

            E entry = entries.get(entryName);
            if (entry != null) {
                entry.acquire();
                semaphore.release();
                entry.getPromise().onComplete(new TransferListener<E>(newPromise));
                return;
            }

            E value = createEntry(newPromise);
            value.acquire();

            E oldValue = entries.putIfAbsent(entryName, value);
            if (oldValue != null) {
                oldValue.acquire();
                semaphore.release();
                oldValue.getPromise().onComplete(new TransferListener<E>(newPromise));
                return;
            }
			// 源码中会通过 createListener 方法添加订阅,或者说是监听,如果监听的值发生变动,会进入 LockPubSub的onMessage 方法
            RedisPubSubListener<Object> listener = createListener(channelName, value);
            service.subscribe(LongCodec.INSTANCE, channelName, semaphore, listener);
        });

        return newPromise;
    }
    @Override
    protected void onMessage(RedissonLockEntry value, Long message) {
        if (message.equals(UNLOCK_MESSAGE)) {
            Runnable runnableToExecute = value.getListeners().poll();
            if (runnableToExecute != null) {
                runnableToExecute.run();
            }
			//释放Semaphore
            value.getLatch().release();
        } else if (message.equals(READ_UNLOCK_MESSAGE)) {
            while (true) {
                Runnable runnableToExecute = value.getListeners().poll();
                if (runnableToExecute == null) {
                    break;
                }
                runnableToExecute.run();
            }

            value.getLatch().release(value.getLatch().getQueueLength());
        }
    }
tryLock主方法中 调用 tryAcquire(waitTime, leaseTime, unit, threadId); 方法尝试获取锁
   private <T> RFuture<Long> tryAcquireAsync(long waitTime, long leaseTime, TimeUnit unit, long threadId) {
        RFuture<Long> ttlRemainingFuture;
        if (leaseTime != -1) {
            //如果传入了释放时间,将释放时间传入
            ttlRemainingFuture = tryLockInnerAsync(waitTime, leaseTime, unit, threadId, RedisCommands.EVAL_LONG);
        } else {
            //如果没有传入锁的释放时间,默认internalLockLeaseTime = 30000,这个是可配置的
            ttlRemainingFuture = tryLockInnerAsync(waitTime, internalLockLeaseTime,
                    TimeUnit.MILLISECONDS, threadId, RedisCommands.EVAL_LONG);
        }
        ttlRemainingFuture.onComplete((ttlRemaining, e) -> {
            if (e != null) {
                return;
            }

            // lock acquired
            //如果返回null说明抢到了锁或者是可重入 否则直接返回还有多久过期
            if (ttlRemaining == null) {
                if (leaseTime != -1) {
                    //如果传入了释放时间 赋值给internalLockLeaseTime
                    internalLockLeaseTime = unit.toMillis(leaseTime);
                } else {
                    //如果没有传入锁的释放时间进入scheduleExpirationRenewal(这个后面会细讲,这是看门狗机制,通过时间轮方式来定时)
                    scheduleExpirationRenewal(threadId);
                }
            }
        });
        return ttlRemainingFuture;
    }
    // 终于看到了 lua脚本,这里就是通过命令来获取锁,并加锁,来来来我来讲解一下
	<T> RFuture<T> tryLockInnerAsync(long waitTime, long leaseTime, TimeUnit unit, long threadId, RedisStrictCommand<T> command) {
        return evalWriteAsync(getRawName(), LongCodec.INSTANCE, command,
                "if (redis.call('exists', KEYS[1]) == 0) then " +   //判断锁是否存在 =0为不存在 没人抢占锁
                        "redis.call('hincrby', KEYS[1], ARGV[2], 1); " +  //设置hash值,key为锁的name, filed为线程ID,value:1  代表重入一次
                        "redis.call('pexpire', KEYS[1], ARGV[1]); " + //设置过期时间
                        "return nil; " +  //返回nil 加锁成功
                        "end; " + //结束
                        "if (redis.call('hexists', KEYS[1], ARGV[2]) == 1) then " + //进入这里说明有线程抢占了锁,判断是否同一个线程 ==1说明是同一个线程
                        "redis.call('hincrby', KEYS[1], ARGV[2], 1); " +  //将原来的hash值的value +1,代表重入一次
                        "redis.call('pexpire', KEYS[1], ARGV[1]); " + //设置新的过期时间
                        "return nil; " + //返回nil 加锁成功
                        "end; " + //结束
                        "return redis.call('pttl', KEYS[1]);", //如果前面两个if 都没走,说明有线程抢占了锁并且不是同一个线程,直接返回这个锁还有多久过期
                Collections.singletonList(getRawName()), unit.toMillis(leaseTime), getLockName(threadId));
    }
3、释放锁
讲到了这里我顺便说一下释放锁,在执行unlock 释放锁的时候也是通过执行lua脚本来实现的
    @Override
    public RFuture<Void> unlockAsync(long threadId) {
        RPromise<Void> result = new RedissonPromise<>();
        //执行lua脚本释放锁
        RFuture<Boolean> future = unlockInnerAsync(threadId);

        future.onComplete((opStatus, e) -> {
            //移除ExpirationEntry中的threadId 并且移除EXPIRATION_RENEWAL_MAP中的ExpirationEntry watchDog就不会继续续期
            cancelExpirationRenewal(threadId);

            //抛出错误
            if (e != null) {
                result.tryFailure(e);
                return;
            }

            //如果返回空 要解锁的线程已经不存在,抛出异常
            if (opStatus == null) {
                IllegalMonitorStateException cause = new IllegalMonitorStateException("attempt to unlock lock, not locked by current thread by node id: "
                        + id + " thread-id: " + threadId);
                result.tryFailure(cause);
                return;
            }

            result.trySuccess(null);
        });

        return result;
    }
    protected RFuture<Boolean> unlockInnerAsync(long threadId) {
        return evalWriteAsync(getRawName(), LongCodec.INSTANCE, RedisCommands.EVAL_BOOLEAN,
                "if (redis.call('hexists', KEYS[1], ARGV[3]) == 0) then " +  // 判断如果存在锁,判断是否同一个线程 ==0说明持有锁的线程不是当前线程
                        "return nil;" + //返回 nil,抛出释放锁异常
                        "end; " +
                        "local counter = redis.call('hincrby', KEYS[1], ARGV[3], -1); " + // 否则,获取当前线程锁的重入次数 -1
                        "if (counter > 0) then " +   // 如果计数器大于0,说明还在持有锁
                        "redis.call('pexpire', KEYS[1], ARGV[2]); " + //设置过期时间
                        "return 0; " +
                        "else " +
                        "redis.call('del', KEYS[1]); " +  // 如果计数器<=0,使用del指令删除key
                        "redis.call('publish', KEYS[2], ARGV[1]); " +  //往订阅的频道发送message,发送UNLOCK_MESSAGE
                        "return 1; " +
                        "end; " +
                        "return nil;", //最后,如果以上的都没走,说明没有锁存在,返回 nil,抛出释放锁异常
                Arrays.asList(getRawName(), getChannelName()), LockPubSub.UNLOCK_MESSAGE, internalLockLeaseTime, getLockName(threadId));
    }
4、看门狗机制(时间轮)
这里问大家一个问题,怎么解决锁时间到了,但是业务没有执行完?
如果是我,我会希望能给锁再加点时间,让业务继续执行完,等到执行完了,业务再释放锁。
具体怎么做?我们是否可以用定时来实现?
定时判断锁是不是还存在,如果存在就在加点时间,我们平时用到的定时有 xxl-job、Scheduled或者是 rabbitMq的死信队列等等。
在redis中,大佬们是使用了 netty 下的时间轮算法来搞定这个问题。
先看一下我在业务中怎么使用时间轮,写的很简单哈
	@Override
    public void newTimeOut() {
        //创建一个HashedWheelTimer hash轮定时器
        Timer timer = new HashedWheelTimer();
        log.debug("开启定时任务执行");
        // 提交第一个任务,让它在 10s 后执行
        timer.newTimeout(task -> log.debug("第一个任务执行"), 10, TimeUnit.SECONDS);
        // 提交第二个任务,让它在 20s 后执行
        timer.newTimeout(task -> log.debug("第二个任务执行"), 20, TimeUnit.SECONDS);
    }
这个是执行结果…

时间轮
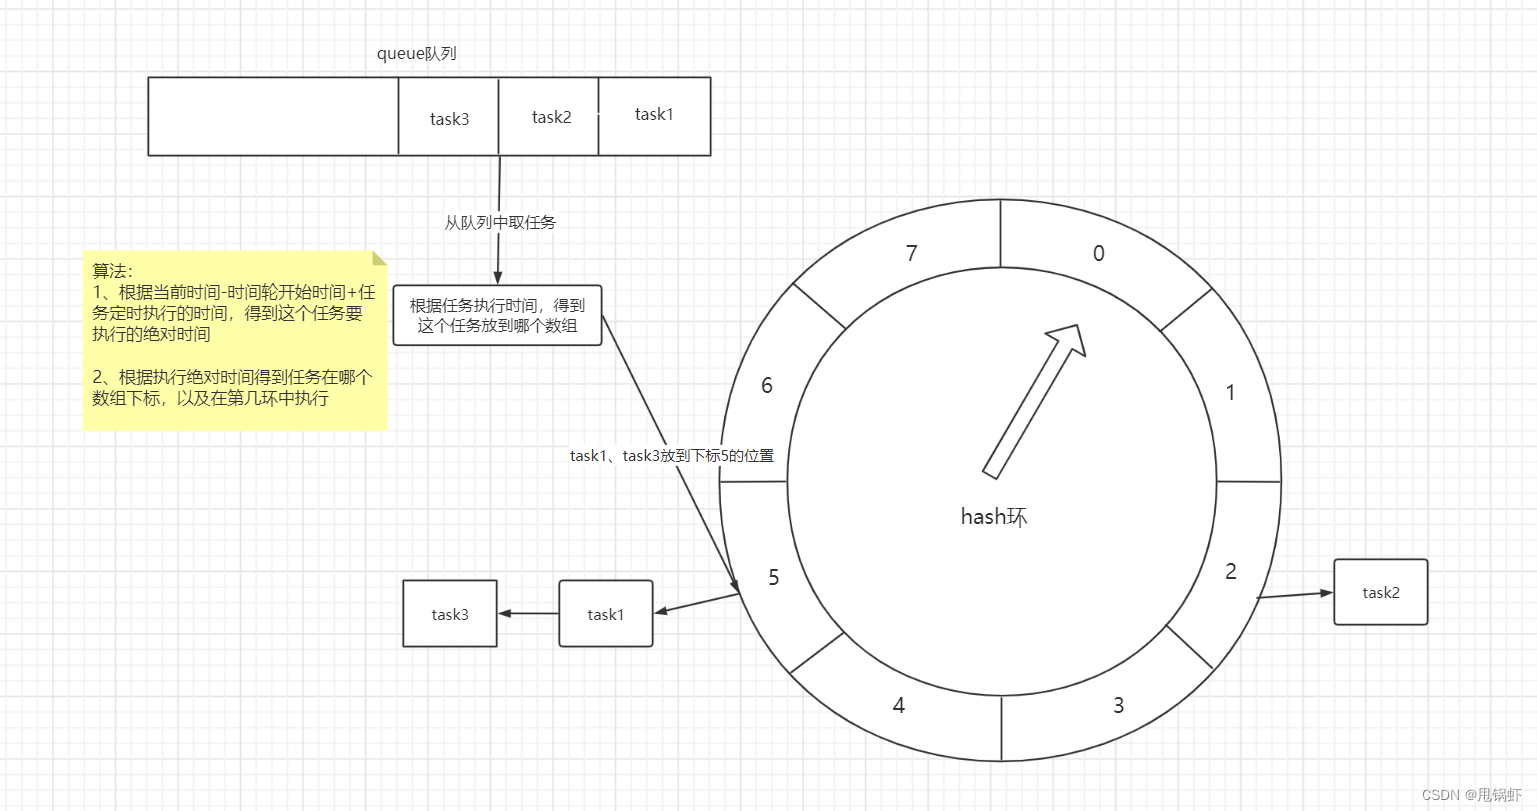
根据这个示意图,我先举个场景来让大家理解下,如上图,有一个数组大小为8的hash环,每次循环下标的时间是1s,那么整个hash环跑完的时间是8s
现在有3个任务,task1是5s后执行,task2是13s后执行,task3是5s后执行,但是task2是在执行完task1和task3后才加入进来的,那么在时间轮中他们是怎么执行的哪?
1、new HashedWheelTimer() 的时候,会定义好数组大小为8的hash环,数组循环间隔设置为1s
2、在 第一次 newTimeout 放入 task1 时,会将任务添加到queue 中,并且开启hash环的循环,设置hash环的启动时间
3、 hash环开始循环,从队列中拿到task1,是5s后执行
a. task1 是5s后执行,先计算出task1 执行的绝对时间(从时间轮开始,多久后执行),执行绝对时间 = 当前时间 - 时间轮开始时间 + 5,因为是第一次启动,绝对时间无限接近5
b. 根据task1 的5s绝对执行时间,取模hash环的大小 -1,即 5 & (8-1)= 5,放入下标为5的位置。
c. 同理,task3 也会放入下标为5的位置,因为下标已经有task1,task3会链表在task1 后面
从0开始,当hash环循环到 下标为5的位置的时间刚好是5s,把5 位置链表中的任务都执行,所以5s后 task1和task3都执行
4、当task1和task3都执行完后,这是task2加入进来
a. task2是 13s后执行,执行绝对时间 = 当前时间 - 时间轮开始时间 + 13,即5 + 13 =18s
b. 根据 绝对时间取模,18 & 7 = 2,所以task2 放入下标2的位置,但是从5走到2的位置,只需要5s,所以第一次循环到2的时候不能执行task2,
我们需要计算出在第几环的时候才能执行,Round = (18 - 5 ) / 8 = 1,所以task2放到下标2的同时,还要保存 Round =1
c. 下次走到2的时候,判断 task2的Round是否为0,第一次走到的时候 Round=1,不执行,但是会将 task2 的Round -1
d. 第二次走到2 的时候, task2的Round = 0,可以执行。从 5走到第二轮的2,经过的时间正好时13s
案例我讲解完了,大家应该都理解的差不多了,下面我来讲下源码中是如何实现这个逻辑的
1、初始化时间轮
	public HashedWheelTimer(
            ThreadFactory threadFactory,
            long tickDuration, TimeUnit unit, int ticksPerWheel, boolean leakDetection,
            long maxPendingTimeouts, Executor taskExecutor) {

        checkNotNull(threadFactory, "threadFactory");
        checkNotNull(unit, "unit");
        checkPositive(tickDuration, "tickDuration");
        checkPositive(ticksPerWheel, "ticksPerWheel");
        this.taskExecutor = checkNotNull(taskExecutor, "taskExecutor");

        // Normalize ticksPerWheel to power of two and initialize the wheel.

        //默认创建512个环格 就是创建一个长度为512的HashedWheelBucket数组,刚才我举例的是8个环格
        wheel = createWheel(ticksPerWheel);
        //数组长度-1,用于后续task取模
        mask = wheel.length - 1;

        // Convert tickDuration to nanos.

        //默认循环的步长 tickDuration=100ms 即duration=100000000纳秒,100ms循环一次,也就是指针100ms跳动一次,每次跳动一个环格,刚才的案例我举例的是1s
        long duration = unit.toNanos(tickDuration);

        // Prevent overflow.
        if (duration >= Long.MAX_VALUE / wheel.length) {
            throw new IllegalArgumentException(String.format(
                    "tickDuration: %d (expected: 0 < tickDuration in nanos < %d",
                    tickDuration, Long.MAX_VALUE / wheel.length));
        }

        if (duration < MILLISECOND_NANOS) {
            logger.warn("Configured tickDuration {} smaller then {}, using 1ms.",
                        tickDuration, MILLISECOND_NANOS);
            this.tickDuration = MILLISECOND_NANOS;
        } else {
            this.tickDuration = duration;
        }

        //初始化一个新线程,但是没有启动
        workerThread = threadFactory.newThread(worker);

        leak = leakDetection || !workerThread.isDaemon() ? leakDetector.track(this) : null;

        this.maxPendingTimeouts = maxPendingTimeouts;

        if (INSTANCE_COUNTER.incrementAndGet() > INSTANCE_COUNT_LIMIT &&
            WARNED_TOO_MANY_INSTANCES.compareAndSet(false, true)) {
            reportTooManyInstances();
        }
    }
2、添加任务
    @Override
    public Timeout newTimeout(TimerTask task, long delay, TimeUnit unit) {
        checkNotNull(task, "task");
        checkNotNull(unit, "unit");

        long pendingTimeoutsCount = pendingTimeouts.incrementAndGet();
		//检验等待任务是否达到阈值,最大允许等待的任务数,默认没有限制
        if (maxPendingTimeouts > 0 && pendingTimeoutsCount > maxPendingTimeouts) {
            pendingTimeouts.decrementAndGet();
            throw new RejectedExecutionException("Number of pending timeouts ("
                + pendingTimeoutsCount + ") is greater than or equal to maximum allowed pending "
                + "timeouts (" + maxPendingTimeouts + ")");
        }

        //调用start方法,这块重点讲解
        start();

        // Add the timeout to the timeout queue which will be processed on the next tick.
        // During processing all the queued HashedWheelTimeouts will be added to the correct HashedWheelBucket.

        //得到任务多久后执行(执行的绝对时间),这个时候 startTime 肯定被子线程赋值了,因为start里面会判断如果=0 会阻塞,这块具体怎么堵塞的我下面会讲
        long deadline = System.nanoTime() + unit.toNanos(delay) - startTime;

        // Guard against overflow.
        if (delay > 0 && deadline < 0) {
            deadline = Long.MAX_VALUE;
        }
        //初始化HashedWheelTimeout,里面持有task与任务执行的绝对时间
        HashedWheelTimeout timeout = new HashedWheelTimeout(this, task, deadline);
        //timeout放入timeouts队列
        timeouts.add(timeout);
        return timeout;
    }
   public void start() {
       //默认是0
        switch (WORKER_STATE_UPDATER.get(this)) {
            case WORKER_STATE_INIT:
                //cas将0改成1
                if (WORKER_STATE_UPDATER.compareAndSet(this, WORKER_STATE_INIT, WORKER_STATE_STARTED)) {

                    //开启额外的工作线程,workerThread执行的是worker的run方法,这块需要清楚,不是开始执行主线程的run方法,worker线程在初始化时间轮的时候创建的
                    workerThread.start();
                }
                break;
             //多个任务只会开启1个线程
            case WORKER_STATE_STARTED:
                break;
            case WORKER_STATE_SHUTDOWN:
                throw new IllegalStateException("cannot be started once stopped");
            default:
                throw new Error("Invalid WorkerState");
        }

        // Wait until the startTime is initialized by the worker.
       //这块就是刚才我要讲的,线程继续执行,但是必须等到新起的线程赋值startTime否则阻塞,计算任务的绝对执行时间时用到的 startTime 一定是有值的
       //这里用到了 CountDownLatch 的 await 主线程等待
        while (startTime == 0) {
            try {
                startTimeInitialized.await();
            } catch (InterruptedException ignore) {
                // Ignore - it will be ready very soon.
            }
        }
    }
3、开始时间轮循环
//进入 Worker的run方法
private final class Worker implements Runnable {
        private final Set<Timeout> unprocessedTimeouts = new HashSet<Timeout>();

        private long tick;

        @Override
        public void run() {
            // Initialize the startTime.
            //得到当前的系统时间
            startTime = System.nanoTime();
            if (startTime == 0) {
                // We use 0 as an indicator for the uninitialized value here, so make sure it's not 0 when initialized.
                startTime = 1;
            }

            // Notify the other threads waiting for the initialization at start().
            //得到了当前的系统时间后,主线程可以正常执行,CountDownLatch的countDown方法,释放主线程阻塞
            startTimeInitialized.countDown();

            //自旋,重点执行逻辑
            do {
                //获取指针下一次走到的时间,如果没到下一次的时间,就等待
                final long deadline = waitForNextTick();
                if (deadline > 0) {
                    //根据tick与轮的大小取模 得到当前tick所在的环的下标
                    int idx = (int) (tick & mask);
                    //移除已经取消了的任务
                    processCancelledTasks();
                    //根据idx下标 得到轮的hash桶
                    HashedWheelBucket bucket =
                            wheel[idx];
                    //将队列的任务放到相关的hash桶,如果一个数组有多个任务,采用链表的形式
                    transferTimeoutsToBuckets();
                    //去执行hash桶下的task任务
                    bucket.expireTimeouts(deadline);
                    tick++;
                }
            } while (WORKER_STATE_UPDATER.get(HashedWheelTimer.this) == WORKER_STATE_STARTED);

            // Fill the unprocessedTimeouts so we can return them from stop() method.
            for (HashedWheelBucket bucket: wheel) {
                bucket.clearTimeouts(unprocessedTimeouts);
            }
            for (;;) {
                HashedWheelTimeout timeout = timeouts.poll();
                if (timeout == null) {
                    break;
                }
                if (!timeout.isCancelled()) {
                    unprocessedTimeouts.add(timeout);
                }
            }
            processCancelledTasks();
        }


       private long waitForNextTick() {
           	//100ms走一次 得到下一次的deadLine 指针
            long deadline = tickDuration * (tick + 1);

            for (;;) {
                //得到当前时间跟开始时间的差值(时间轮走了多少时间)
                final long currentTime = System.nanoTime() - startTime;
                //sleepTimeMs如果大于0,说明还没走到指针该走的时间,睡眠
                long sleepTimeMs = (deadline - currentTime + 999999) / 1000000;

                //如果到了时间,直接返回
                if (sleepTimeMs <= 0) {
                    if (currentTime == Long.MIN_VALUE) {
                        return -Long.MAX_VALUE;
                    } else {
                        return currentTime;
                    }
                }

                // Check if we run on windows, as if thats the case we will need
                // to round the sleepTime as workaround for a bug that only affect
                // the JVM if it runs on windows.
                //
                // See https://github.com/netty/netty/issues/356
                if (PlatformDependent.isWindows()) {
                    sleepTimeMs = sleepTimeMs / 10 * 10;
                    if (sleepTimeMs == 0) {
                        sleepTimeMs = 1;
                    }
                }

                try {
                    //如果没到指针时间,睡眠
                    Thread.sleep(sleepTimeMs);
                } catch (InterruptedException ignored) {
                    if (WORKER_STATE_UPDATER.get(HashedWheelTimer.this) == WORKER_STATE_SHUTDOWN) {
                        return Long.MIN_VALUE;
                    }
                }
            }
        }


        private void transferTimeoutsToBuckets() {
            // transfer only max. 100000 timeouts per tick to prevent a thread to stale the workerThread when it just
            // adds new timeouts in a loop.
            //从队列中获取任务,每次最多只能获取100000次
            for (int i = 0; i < 100000; i++) {
                //从队列中获取task,任务会在主线程中添加到队列
                HashedWheelTimeout timeout = timeouts.poll();
                if (timeout == null) {
                    // all processed
                    break;
                }
                if (timeout.state() == HashedWheelTimeout.ST_CANCELLED) {
                    // Was cancelled in the meantime.
                    continue;
                }

				// 任务的deadline(执行的绝对时间)/每次指针时间(100ms),从第一个starttime开始 得到需要多少指针
                long calculated = timeout.deadline / tickDuration;
                //计算环数,默认512的环的大小,如果大于,则需要在第二次环的时候才会执行
                timeout.remainingRounds = (calculated - tick) / wheel.length;

                //取2个的最大值,确保不会把时间安排在过去
                final long ticks = Math.max(calculated, tick); // Ensure we don't schedule for past.
                //取模 得到指针跳到哪个hash环执行
                int stopIndex = (int) (ticks & mask);

                HashedWheelBucket bucket = wheel[stopIndex];
                //放到对应的hashWheeld的下标中,如果这个hash下标中有值,则添加至链表后面
                bucket.addTimeout(timeout);
            }
        }
 }
4、执行任务
	//去执行hash桶下的task任务
	public void expireTimeouts(long deadline) {
        HashedWheelTimeout timeout = head;

        // process all timeouts
        //循环hash环中链表
        while (timeout != null) {
           HashedWheelTimeout next = timeout.next;
            //是不是当前轮应该执行的任务
           if (timeout.remainingRounds <= 0) {
               //从链表清除
                next = remove(timeout);
               //判断是否到了执行时间
                if (timeout.deadline <= deadline) {
                    //调用timeout.expire方法,执行task
                    timeout.expire();
                } else {
                    // The timeout was placed into a wrong slot. This should never happen.
                    throw new IllegalStateException(String.format(
                          "timeout.deadline (%d) > deadline (%d)", timeout.deadline, deadline));
                }
            } else if (timeout.isCancelled()) {
                next = remove(timeout);
            } else {
               //任务的环数 -1
                timeout.remainingRounds --;
            }
            timeout = next;
        }
    }
        public void expire() {
            if (!compareAndSetState(ST_INIT, ST_EXPIRED)) {
                return;
            }

            try {
                //开启线程去执行HashedWheelTimeout的run方法
                timer.taskExecutor.execute(this);
            } catch (Throwable t) {
                if (logger.isWarnEnabled()) {
                    logger.warn("An exception was thrown while submit " + TimerTask.class.getSimpleName()
                            + " for execution.", t);
                }
            }
        }

		@Override
        public void run() {
            try {
                //执行task的run方法
                task.run(this);
            } catch (Throwable t) {
                if (logger.isWarnEnabled()) {
                    logger.warn("An exception was thrown by " + TimerTask.class.getSimpleName() + '.', t);
                }
            }
        }
Redission 中时间轮的使用
在tryAcquireAsync 获取锁时,获取到锁了,如果锁的释放时间leaseTime = -1会设置一个时间轮(watchDog看门狗)来定时更新锁的过期时间
    protected void scheduleExpirationRenewal(long threadId) {
        ExpirationEntry entry = new ExpirationEntry();
        //放入EXPIRATION_RENEWAL_MAP 这个chm中
        ExpirationEntry oldEntry = EXPIRATION_RENEWAL_MAP.putIfAbsent(getEntryName(), entry);

        //第一次进来,里面没有
        if (oldEntry != null) {
            //如果其他线程来抢占这个锁,进入将线程ID保存至 ExpirationEntry的threadIds这个Map中
            oldEntry.addThreadId(threadId);
        } else {
            //将线程ID保存至ExpirationEntry的threadIds这个Map中
            entry.addThreadId(threadId);
            renewExpiration();
        }
    }
   private void renewExpiration() {
       	//从Map中拿到ExpirationEntry
        ExpirationEntry ee = EXPIRATION_RENEWAL_MAP.get(getEntryName());
        if (ee == null) {
            return;
        }

       //newTimeout 开启时间轮,时间是10s之后执行我们的TimerTask任务
        Timeout task = commandExecutor.getConnectionManager().newTimeout(new TimerTask() {
            @Override
            public void run(Timeout timeout) throws Exception {
                //从EXPIRATION_RENEWAL_MAP中拿到锁的对象,有可能在定时的时候被移除取消
                ExpirationEntry ent = EXPIRATION_RENEWAL_MAP.get(getEntryName());
                if (ent == null) {
                    return;
                }
                //得到加锁的线程ID
                Long threadId = ent.getFirstThreadId();
                if (threadId == null) {
                    return;
                }

                //给锁续期
                RFuture<Boolean> future = renewExpirationAsync(threadId);
                future.onComplete((res, e) -> {
                    if (e != null) {
                        //异常报错,从Map移除
                        log.error("Can't update lock " + getRawName() + " expiration", e);
                        EXPIRATION_RENEWAL_MAP.remove(getEntryName());
                        return;
                    }

                    //如果返回的是1 代表线程还占有锁,递归调用自己
                    if (res) {
                        // reschedule itself
                        renewExpiration();
                    }
                });
            }
        }, internalLockLeaseTime / 3, TimeUnit.MILLISECONDS); //定时续期,internalLockLeaseTime / 3,也就是10s;

        //设置ExpirationEntry的TimeOut
        ee.setTimeout(task);
    }
    @Override
    public Timeout newTimeout(TimerTask task, long delay, TimeUnit unit) {
        try {
            //timer 为HashedWheelTimer 也就是时间轮
            return timer.newTimeout(task, delay, unit);
        } catch (IllegalStateException e) {
            if (isShuttingDown()) {
                return DUMMY_TIMEOUT;
            }

            throw e;
        }
    }
    //给锁续期
	protected RFuture<Boolean> renewExpirationAsync(long threadId) {
        return evalWriteAsync(getRawName(), LongCodec.INSTANCE, RedisCommands.EVAL_BOOLEAN,
                "if (redis.call('hexists', KEYS[1], ARGV[2]) == 1) then " +  //判断如果存在锁,判断是否同一个线程 ==1说明持有锁的线程当前线程
                        "redis.call('pexpire', KEYS[1], ARGV[1]); " + ////给锁重新设置30s
                        "return 1; " +
                        "end; " +
                        "return 0;",
                Collections.singletonList(getRawName()),
                internalLockLeaseTime, getLockName(threadId));
    }
联锁
原名红锁,红锁已经过期了
因为Redis属于CAP中的AP,为了优先保证高可用性,所以会牺牲一定的数据一致性。
比如主从方案中,如果主库挂的话,从库是不管数据有没有同步完主库的数据,都会自动升级为主。
那么这样就会出现一种情况:加锁返回是成功的,但是由于发生了主库挂 的,从库切换的时候,没有同步到这个锁,从而导致锁失效。
能做的是尽可能的去减少这种情况!
同时往多个主节点加同一个锁,只要超过一半的节点能够加锁成功,就成功。
RLock RedissonClient.getMultiLock(RLock... locks)
   public boolean tryLock(long waitTime, long leaseTime, TimeUnit unit) throws InterruptedException {
//        try {
//            return tryLockAsync(waitTime, leaseTime, unit).get();
//        } catch (ExecutionException e) {
//            throw new IllegalStateException(e);
//        }
        long newLeaseTime = -1;
        if (leaseTime != -1) {
            if (waitTime == -1) {
                newLeaseTime = unit.toMillis(leaseTime);
            } else {
                //如果等待时间跟释放时间都填了,那么释放时间 是等待时间的2倍 防止等待时间大于释放时间,就会出现我还在等待但是锁已经失效
                newLeaseTime = unit.toMillis(waitTime)*2;
            }
        }

        long time = System.currentTimeMillis();
        long remainTime = -1;
        if (waitTime != -1) {
            remainTime = unit.toMillis(waitTime);
        }
        long lockWaitTime = calcLockWaitTime(remainTime);

       //还能允许失败的数量,如果等于0,代表失败
        int failedLocksLimit = failedLocksLimit();
        List<RLock> acquiredLocks = new ArrayList<>(locks.size());
        //循环要加锁的实例列表
        for (ListIterator<RLock> iterator = locks.listIterator(); iterator.hasNext();) {
            //遍历RLock实例
            RLock lock = iterator.next();
            boolean lockAcquired;
            try {
                if (waitTime == -1 && leaseTime == -1) {
                    lockAcquired = lock.tryLock();
                } else {
                    long awaitTime = Math.min(lockWaitTime, remainTime);
                    lockAcquired = lock.tryLock(awaitTime, newLeaseTime, TimeUnit.MILLISECONDS);
                }
            } catch (RedisResponseTimeoutException e) {
                unlockInner(Arrays.asList(lock));
                lockAcquired = false;
            } catch (Exception e) {
                lockAcquired = false;
            }

            if (lockAcquired) {
                acquiredLocks.add(lock);
            } else {
                //如果某个节点加锁失败 判断是否过半 假如5台机器,必须要有3台的时候 break 代表加锁成功
                if (locks.size() - acquiredLocks.size() == failedLocksLimit()) {
                    break;
                }

                //失败的节点数达到了界限
                if (failedLocksLimit == 0) {
                    //将已有加锁的实例删除锁
                    unlockInner(acquiredLocks);
                    //达到了等待时间 返回加锁失败
                    if (waitTime == -1) {
                        return false;
                    }
                    failedLocksLimit = failedLocksLimit();
                    //清空已有的加锁的集合
                    acquiredLocks.clear();
                    // reset iterator
                    while (iterator.hasPrevious()) {
                        iterator.previous();
                    }
                } else {
                    //加锁失败一次
                    failedLocksLimit--;
                }
            }

            if (remainTime != -1) {
                remainTime -= System.currentTimeMillis() - time;
                time = System.currentTimeMillis();
                if (remainTime <= 0) {
                    unlockInner(acquiredLocks);
                    return false;
                }
            }
        }

        if (leaseTime != -1) {
            acquiredLocks.stream()
                    .map(l -> (RedissonLock) l)
                    .map(l -> l.expireAsync(unit.toMillis(leaseTime), TimeUnit.MILLISECONDS))
                    .forEach(f -> f.syncUninterruptibly());
        }

        return true;
    }

华为开发者空间,是为全球开发者打造的专属开发空间,汇聚了华为优质开发资源及工具,致力于让每一位开发者拥有一台云主机,基于华为根生态开发、创新。
更多推荐


 6
6 0
0- 0


 已为社区贡献1条内容

所有评论(0)