Elasticsearch:使用不同的 CA 更新安全证书 (二)
在之前的文章 “Elasticsearch:使用不同的 CA 更新安全证书 (一)” 中,我详细地描述了如何更新 transport 层的证书。transport 层的证书复制集群中各个节点之前的连接,甚至关乎集群之前的连接。在这边文章中,我将继续之前的内容来详述如何替换 HTTP 层的证书。HTTP:用于 HTTP 通信绑定的地址和端口,这是 Elasticsearch REST API 公开
在之前的文章 “Elasticsearch:使用不同的 CA 更新安全证书 (一)” 中,我详细地描述了如何更新 transport 层的证书。transport 层的证书复制集群中各个节点之前的连接,甚至关乎集群之前的连接。在这边文章中,我将继续之前的内容来详述如何替换 HTTP 层的证书。
- HTTP:用于 HTTP 通信绑定的地址和端口,这是 Elasticsearch REST API 公开的方式
- transport:用于集群内节点之间的内部通信
Elasticsearch:使用不同的 CA 更新安全证书 (二)
为 HTTP 层生成新证书
你可以使用新的 CA 证书和私钥为 HTTP 层生成证书。 其他组件(例如 Kibana 或任何 Elastic 语言客户端)在连接到 Elasticsearch 时会验证此证书。
注意:如果你的组织有自己的 CA,则需要生成证书签名请求 (CSR)。 CSR 包含你的 CA 用于生成和签署安全证书的信息,而不是使用 elasticsearch-certutil 工具生成的自签名证书。
更新客户端以信任新 CA
在为 HTTP 层生成(但在使用之前)新证书之后,你需要转到连接到 Elasticsearch 的所有客户端(例如 Beats、Logstash 和任何语言客户端)并将它们配置为也信任新 CA(ca. crt) 生成的。
每个客户端的此过程都不同,因此请参阅客户端的文档以获取信任证书。 在此过程中生成必要的证书后,你将更新 Kibana 和 Elasticsearch 之间的 HTTP 加密。
我们将使用如下的步骤来更新 HTTP 层的证书:
1)在集群中安装了 Elasticsearch 的任何节点上,运行 Elasticsearch HTTP 证书工具。
./bin/elasticsearch-certutil http此命令会生成一个 .zip 文件,其中包含用于 Elasticsearch 和 Kibana 的证书和密钥。 每个文件夹都包含一个 README.txt,解释如何使用这些文件。
- 当询问你是否要生成 CSR 时,输入 n。
- 当询问你是否要使用现有 CA 时,输入 y。
- 输入新 CA 证书的绝对路径,例如 ca.crt 文件的路径。
- 输入新 CA 证书私钥的绝对路径,例如 ca.key 文件的路径。
- 输入证书的到期值。你可以输入年、月或日的有效期。例如,输入 1y 表示一年。
- 当询问你是否要为每个节点生成一个证书时,输入 y。
- 每个证书都有自己的私钥,并针对特定的主机名或 IP 地址颁发。
- 出现提示时,输入集群中第一个节点的名称。使用与 elasticsearch.yml 文件中 node.name 参数的值相同的节点名称。
- 输入用于连接到你的第一个节点的所有主机名。这些主机名将作为 DNS 名称添加到证书的主题备用名称 (SAN) 字段中。
- 列出用于通过 HTTPS 连接到集群的每个主机名和变体。
- 输入客户端可用于连接到你的节点的 IP 地址。
- 对集群中的每个其他节点重复这些步骤。
$ pwd
/Users/liuxg/elastic0/elasticsearch-8.3.2
$ ./bin/elasticsearch-certutil http

## Elasticsearch HTTP Certificate Utility

The 'http' command guides you through the process of generating certificates
for use on the HTTP (Rest) interface for Elasticsearch.

This tool will ask you a number of questions in order to generate the right
set of files for your needs.

## Do you wish to generate a Certificate Signing Request (CSR)?

A CSR is used when you want your certificate to be created by an existing
Certificate Authority (CA) that you do not control (that is, you don't have
access to the keys for that CA).

If you are in a corporate environment with a central security team, then you
may have an existing Corporate CA that can generate your certificate for you.
Infrastructure within your organisation may already be configured to trust this
CA, so it may be easier for clients to connect to Elasticsearch if you use a
CSR and send that request to the team that controls your CA.

If you choose not to generate a CSR, this tool will generate a new certificate
for you. That certificate will be signed by a CA under your control. This is a
quick and easy way to secure your cluster with TLS, but you will need to
configure all your clients to trust that custom CA.

Generate a CSR? [y/N]n

## Do you have an existing Certificate Authority (CA) key-pair that you wish to use to sign your certificate?

If you have an existing CA certificate and key, then you can use that CA to
sign your new http certificate. This allows you to use the same CA across
multiple Elasticsearch clusters which can make it easier to configure clients,
and may be easier for you to manage.

If you do not have an existing CA, one will be generated for you.

Use an existing CA? [y/N]y

## What is the path to your CA?

Please enter the full pathname to the Certificate Authority that you wish to
use for signing your new http certificate. This can be in PKCS#12 (.p12), JKS
(.jks) or PEM (.crt, .key, .pem) format.
CA Path: /Users/liuxg/elastic0/elasticsearch-8.3.2/ca/ca.crt

## What is the path to your CA key?

/Users/liuxg/elastic0/elasticsearch-8.3.2/ca/ca.crt appears to be a PEM formatted certificate file.
In order to use it for signing we also need access to the private key
that corresponds to that certificate.

CA Key: /Users/liuxg/elastic0/elasticsearch-8.3.2/ca/ca.key

## How long should your certificates be valid?

Every certificate has an expiry date. When the expiry date is reached clients
will stop trusting your certificate and TLS connections will fail.

Best practice suggests that you should either:
(a) set this to a short duration (90 - 120 days) and have automatic processes
to generate a new certificate before the old one expires, or
(b) set it to a longer duration (3 - 5 years) and then perform a manual update
a few months before it expires.

You may enter the validity period in years (e.g. 3Y), months (e.g. 18M), or days (e.g. 90D)

For how long should your certificate be valid? [5y]

## Do you wish to generate one certificate per node?

If you have multiple nodes in your cluster, then you may choose to generate a
separate certificate for each of these nodes. Each certificate will have its
own private key, and will be issued for a specific hostname or IP address.

Alternatively, you may wish to generate a single certificate that is valid
across all the hostnames or addresses in your cluster.

If all of your nodes will be accessed through a single domain
(e.g. node01.es.example.com, node02.es.example.com, etc) then you may find it
simpler to generate one certificate with a wildcard hostname (*.es.example.com)
and use that across all of your nodes.

However, if you do not have a common domain name, and you expect to add
additional nodes to your cluster in the future, then you should generate a
certificate per node so that you can more easily generate new certificates when
you provision new nodes.

Generate a certificate per node? [y/N]y

## What is the name of node #1?

This name will be used as part of the certificate file name, and as a
descriptive name within the certificate.

You can use any descriptive name that you like, but we recommend using the name
of the Elasticsearch node.

node #1 name: mac

## Which hostnames will be used to connect to mac?

These hostnames will be added as "DNS" names in the "Subject Alternative Name"
(SAN) field in your certificate.

You should list every hostname and variant that people will use to connect to
your cluster over http.
Do not list IP addresses here, you will be asked to enter them later.

If you wish to use a wildcard certificate (for example *.es.example.com) you
can enter that here.

Enter all the hostnames that you need, one per line.
When you are done, press <ENTER> once more to move on to the next step.

localhost
liuxgm.local
liuxg.com
mac

You entered the following hostnames.

 - localhost
 - liuxgm.local
 - liuxg.com
 - mac

Is this correct [Y/n]y

## Which IP addresses will be used to connect to mac?

If your clients will ever connect to your nodes by numeric IP address, then you
can list these as valid IP "Subject Alternative Name" (SAN) fields in your
certificate.

If you do not have fixed IP addresses, or not wish to support direct IP access
to your cluster then you can just press <ENTER> to skip this step.

Enter all the IP addresses that you need, one per line.
When you are done, press <ENTER> once more to move on to the next step.

192.168.0.3

You entered the following IP addresses.

 - 192.168.0.3

Is this correct [Y/n]y

## Other certificate options

The generated certificate will have the following additional configuration
values. These values have been selected based on a combination of the
information you have provided above and secure defaults. You should not need to
change these values unless you have specific requirements.

Key Name: mac
Subject DN: CN=mac
Key Size: 2048

Do you wish to change any of these options? [y/N]n
Generate additional certificates? [Y/n]y

## What is the name of node #2?

This name will be used as part of the certificate file name, and as a
descriptive name within the certificate.

You can use any descriptive name that you like, but we recommend using the name
of the Elasticsearch node.

node #2 name: ubuntu

## Which hostnames will be used to connect to ubuntu?

These hostnames will be added as "DNS" names in the "Subject Alternative Name"
(SAN) field in your certificate.

You should list every hostname and variant that people will use to connect to
your cluster over http.
Do not list IP addresses here, you will be asked to enter them later.

If you wish to use a wildcard certificate (for example *.es.example.com) you
can enter that here.

Enter all the hostnames that you need, one per line.
When you are done, press <ENTER> once more to move on to the next step.

parallels
localhost

You entered the following hostnames.

 - parallels
 - localhost

Is this correct [Y/n]y

## Which IP addresses will be used to connect to ubuntu?

If your clients will ever connect to your nodes by numeric IP address, then you
can list these as valid IP "Subject Alternative Name" (SAN) fields in your
certificate.

If you do not have fixed IP addresses, or not wish to support direct IP access
to your cluster then you can just press <ENTER> to skip this step.

Enter all the IP addresses that you need, one per line.
When you are done, press <ENTER> once more to move on to the next step.

192.168.0.8

You entered the following IP addresses.

 - 192.168.0.8

Is this correct [Y/n]y

## Other certificate options

The generated certificate will have the following additional configuration
values. These values have been selected based on a combination of the
information you have provided above and secure defaults. You should not need to
change these values unless you have specific requirements.

Key Name: ubuntu
Subject DN: CN=ubuntu
Key Size: 2048

Do you wish to change any of these options? [y/N]n
Generate additional certificates? [Y/n]n

## What password do you want for your private key(s)?

Your private key(s) will be stored in a PKCS#12 keystore file named "http.p12".
This type of keystore is always password protected, but it is possible to use a
blank password.

If you wish to use a blank password, simply press <enter> at the prompt below.
Provide a password for the "http.p12" file:  [<ENTER> for none]

## Where should we save the generated files?

A number of files will be generated including your private key(s),
public certificate(s), and sample configuration options for Elastic Stack products.

These files will be included in a single zip archive.

What filename should be used for the output zip file? [/Users/liuxg/elastic0/elasticsearch-8.3.2/elasticsearch-ssl-http.zip]

Zip file written to /Users/liuxg/elastic0/elasticsearch-8.3.2/elasticsearch-ssl-http.zip
2)为每个节点生成证书后,在出现提示时输入密钥库的密码。
3)解压生成的 elasticsearch-ssl-http.zip 文件。 此压缩文件包含一个用于 Elasticsearch 和 Kibana 的目录。 /elasticsearch 目录中是您使用其自己的 http.p12 文件指定的每个节点的目录。 例如:
$ pwd
/Users/liuxg/elastic0/elasticsearch-8.3.2
$ ls
LICENSE.txt                data                       lib
NOTICE.txt                 elastic-certificates.p12   logs
README.asciidoc            elastic-stack-ca.p12       modules
bin                        elastic-stack-ca.zip       plugins
ca                         elasticsearch-ssl-http.zip
config                     jdk.app
$ unzip elasticsearch-ssl-http.zip
Archive:  elasticsearch-ssl-http.zip
   creating: elasticsearch/
   creating: elasticsearch/mac/
  inflating: elasticsearch/mac/README.txt
  inflating: elasticsearch/mac/http.p12
  inflating: elasticsearch/mac/sample-elasticsearch.yml
   creating: elasticsearch/ubuntu/
  inflating: elasticsearch/ubuntu/README.txt
  inflating: elasticsearch/ubuntu/http.p12
  inflating: elasticsearch/ubuntu/sample-elasticsearch.yml
   creating: kibana/
  inflating: kibana/README.txt
  inflating: kibana/elasticsearch-ca.pem
  inflating: kibana/sample-kibana.yml
4)如有必要,重命名每个 http.p12 文件以匹配您现有的 HTTP 客户端通信证书的名称。 例如,node1-http.p12。针对我的情况,我直接把上面生成的 http.p12 拷入到之前的目录中:
$ cp ./elasticsearch/mac/http.p12 ./config/certs/
overwrite ./config/certs/http.p12? (y/n [n]) y
这样我们就覆盖了之前的证书。我们同时使用如下的命令来更新 config/certs/http_ca.crt 文件:
cp ca/ca.crt config/certs/http_ca.crt$ cp http_ca.crt ./config/certs/
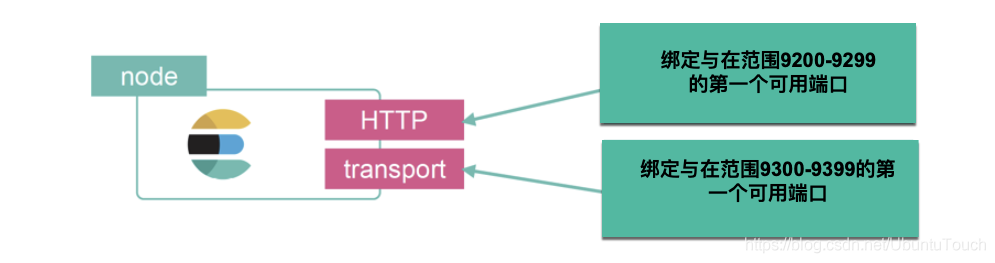
overwrite ./config/certs/http_ca.crt? (y/n [n]) y我们可以很容易验证这个证书的正确性:
$ curl --cacert /Users/liuxg/elastic0/elasticsearch-8.3.2/config/certs/http_ca.crt -u elastic:WRuB1Xdd4bu3jzpo_ugw -XGET "https://192.168.0.3:9200/"
{
  "name" : "liuxgm.local",
  "cluster_name" : "elasticsearch",
  "cluster_uuid" : "w2WUiix7RcaWODjmFdMiYA",
  "version" : {
    "number" : "8.3.2",
    "build_type" : "tar",
    "build_hash" : "8b0b1f23fbebecc3c88e4464319dea8989f374fd",
    "build_date" : "2022-07-06T15:15:15.901688194Z",
    "build_snapshot" : false,
    "lucene_version" : "9.2.0",
    "minimum_wire_compatibility_version" : "7.17.0",
    "minimum_index_compatibility_version" : "7.0.0"
  },
  "tagline" : "You Know, for Search"
}
上面显示我们的证书是正确的。
5)在集群中要更新密钥库的当前节点上,启动滚动重启。
在指示 Perform any needed changes 的步骤处停止,然后继续执行此过程中的下一步。
6)用新的密钥库替换现有的密钥库,确保文件名匹配。 例如,node1-http.p12。
重要:如果你的密钥库密码正在更改,请使用新文件名保存密钥库,以便 Elasticsearch 在你更新密码之前不会尝试重新加载文件。
7)如果你需要使用新文件名保存新密钥库,请更新 ES_PATH_CONF/elasticsearch.yml 文件以使用新密钥库的文件名。 例如:
xpack.security.http.ssl.enabled: true
xpack.security.http.ssl.keystore.path: node1-http.p12
8)如果你的密钥库密码正在更改,请将你的私钥密码添加到 Elasticsearch 中的安全设置中。
$ pwd
/Users/liuxg/elastic0/elasticsearch-8.3.2
$ ./bin/elasticsearch-keystore list
keystore.seed
xpack.security.http.ssl.keystore.secure_password
xpack.security.transport.ssl.keystore.secure_password
xpack.security.transport.ssl.truststore.secure_password
$ ./bin/elasticsearch-keystore show xpack.security.http.ssl.keystore.secure_password
sdNqGKAyRqiqtvhELjqg7Q
$ ./bin/elasticsearch-keystore add xpack.security.http.ssl.keystore.secure_password
Setting xpack.security.http.ssl.keystore.secure_password already exists. Overwrite? [y/N]y
Enter value for xpack.security.http.ssl.keystore.secure_password:
请注意这个密码是在上面的第一步中生成证书时提示输入的一个密码:
Your private key(s) will be stored in a PKCS#12 keystore file named "http.p12".
This type of keystore is always password protected, but it is possible to use a
blank password.

If you wish to use a blank password, simply press <enter> at the prompt below.
Provide a password for the "http.p12" file:  [<ENTER> for none]
我们可以通过上面的方法来更新这个密码。
9)启动更新密钥库的节点。
启动如下的命令来查看 HTTP 是否正常。在我上面的演示中,我特别添加了 liuxg.com 这个域名。在默认安装的情况下,这个是不可以访问的,但是由于我们添加了这个,我们尝试使用 liuxg.com 来进行访问。有关 liuxg.com 的配置,你可以在 /etc/hosts 中今天添加:


显然我们的访问是成功的。
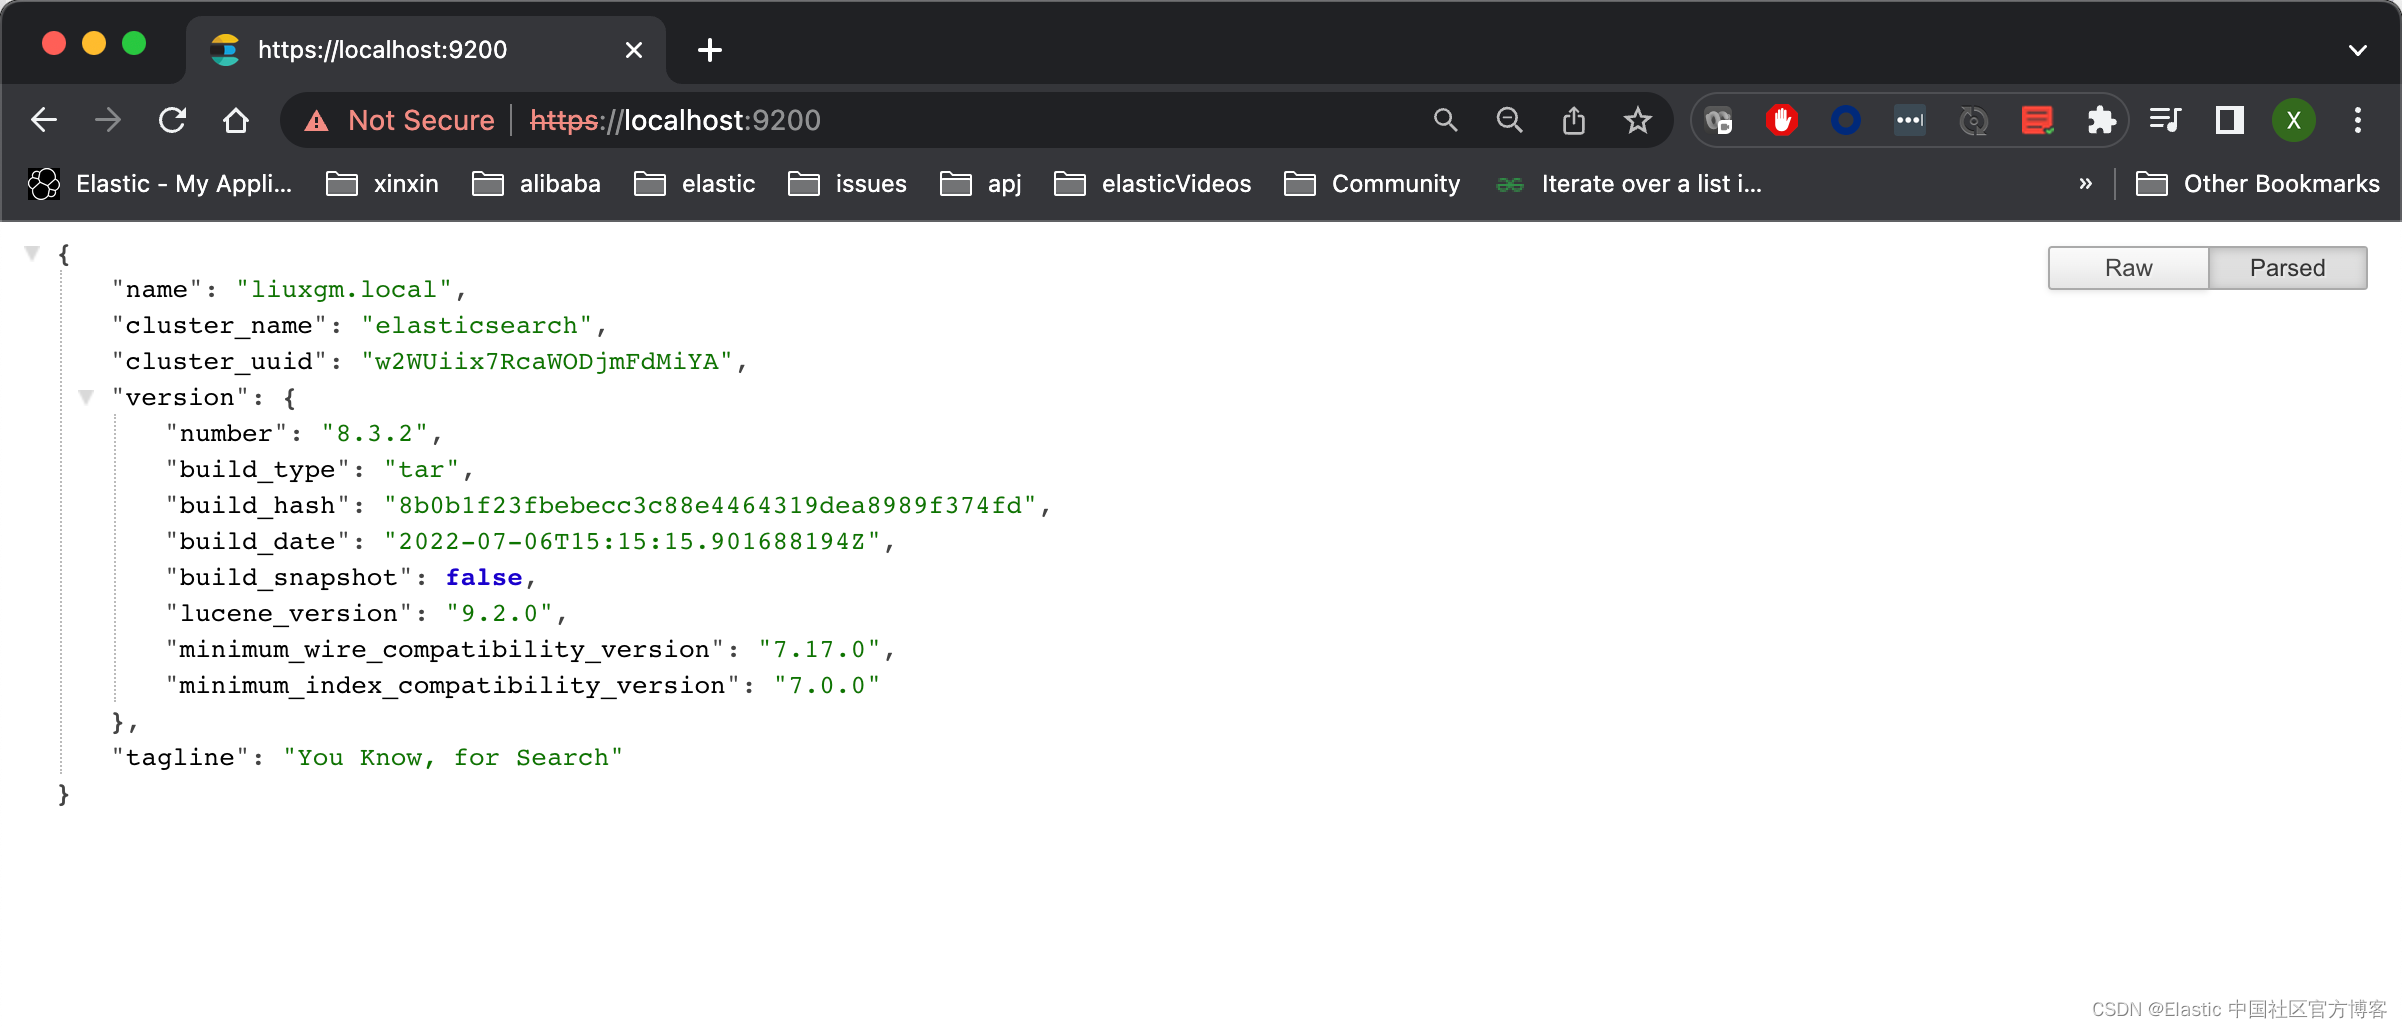
10)我们还可以通过如下的命令来查看 Elasticsearch 所装载的 keystore:
GET /_ssl/certificates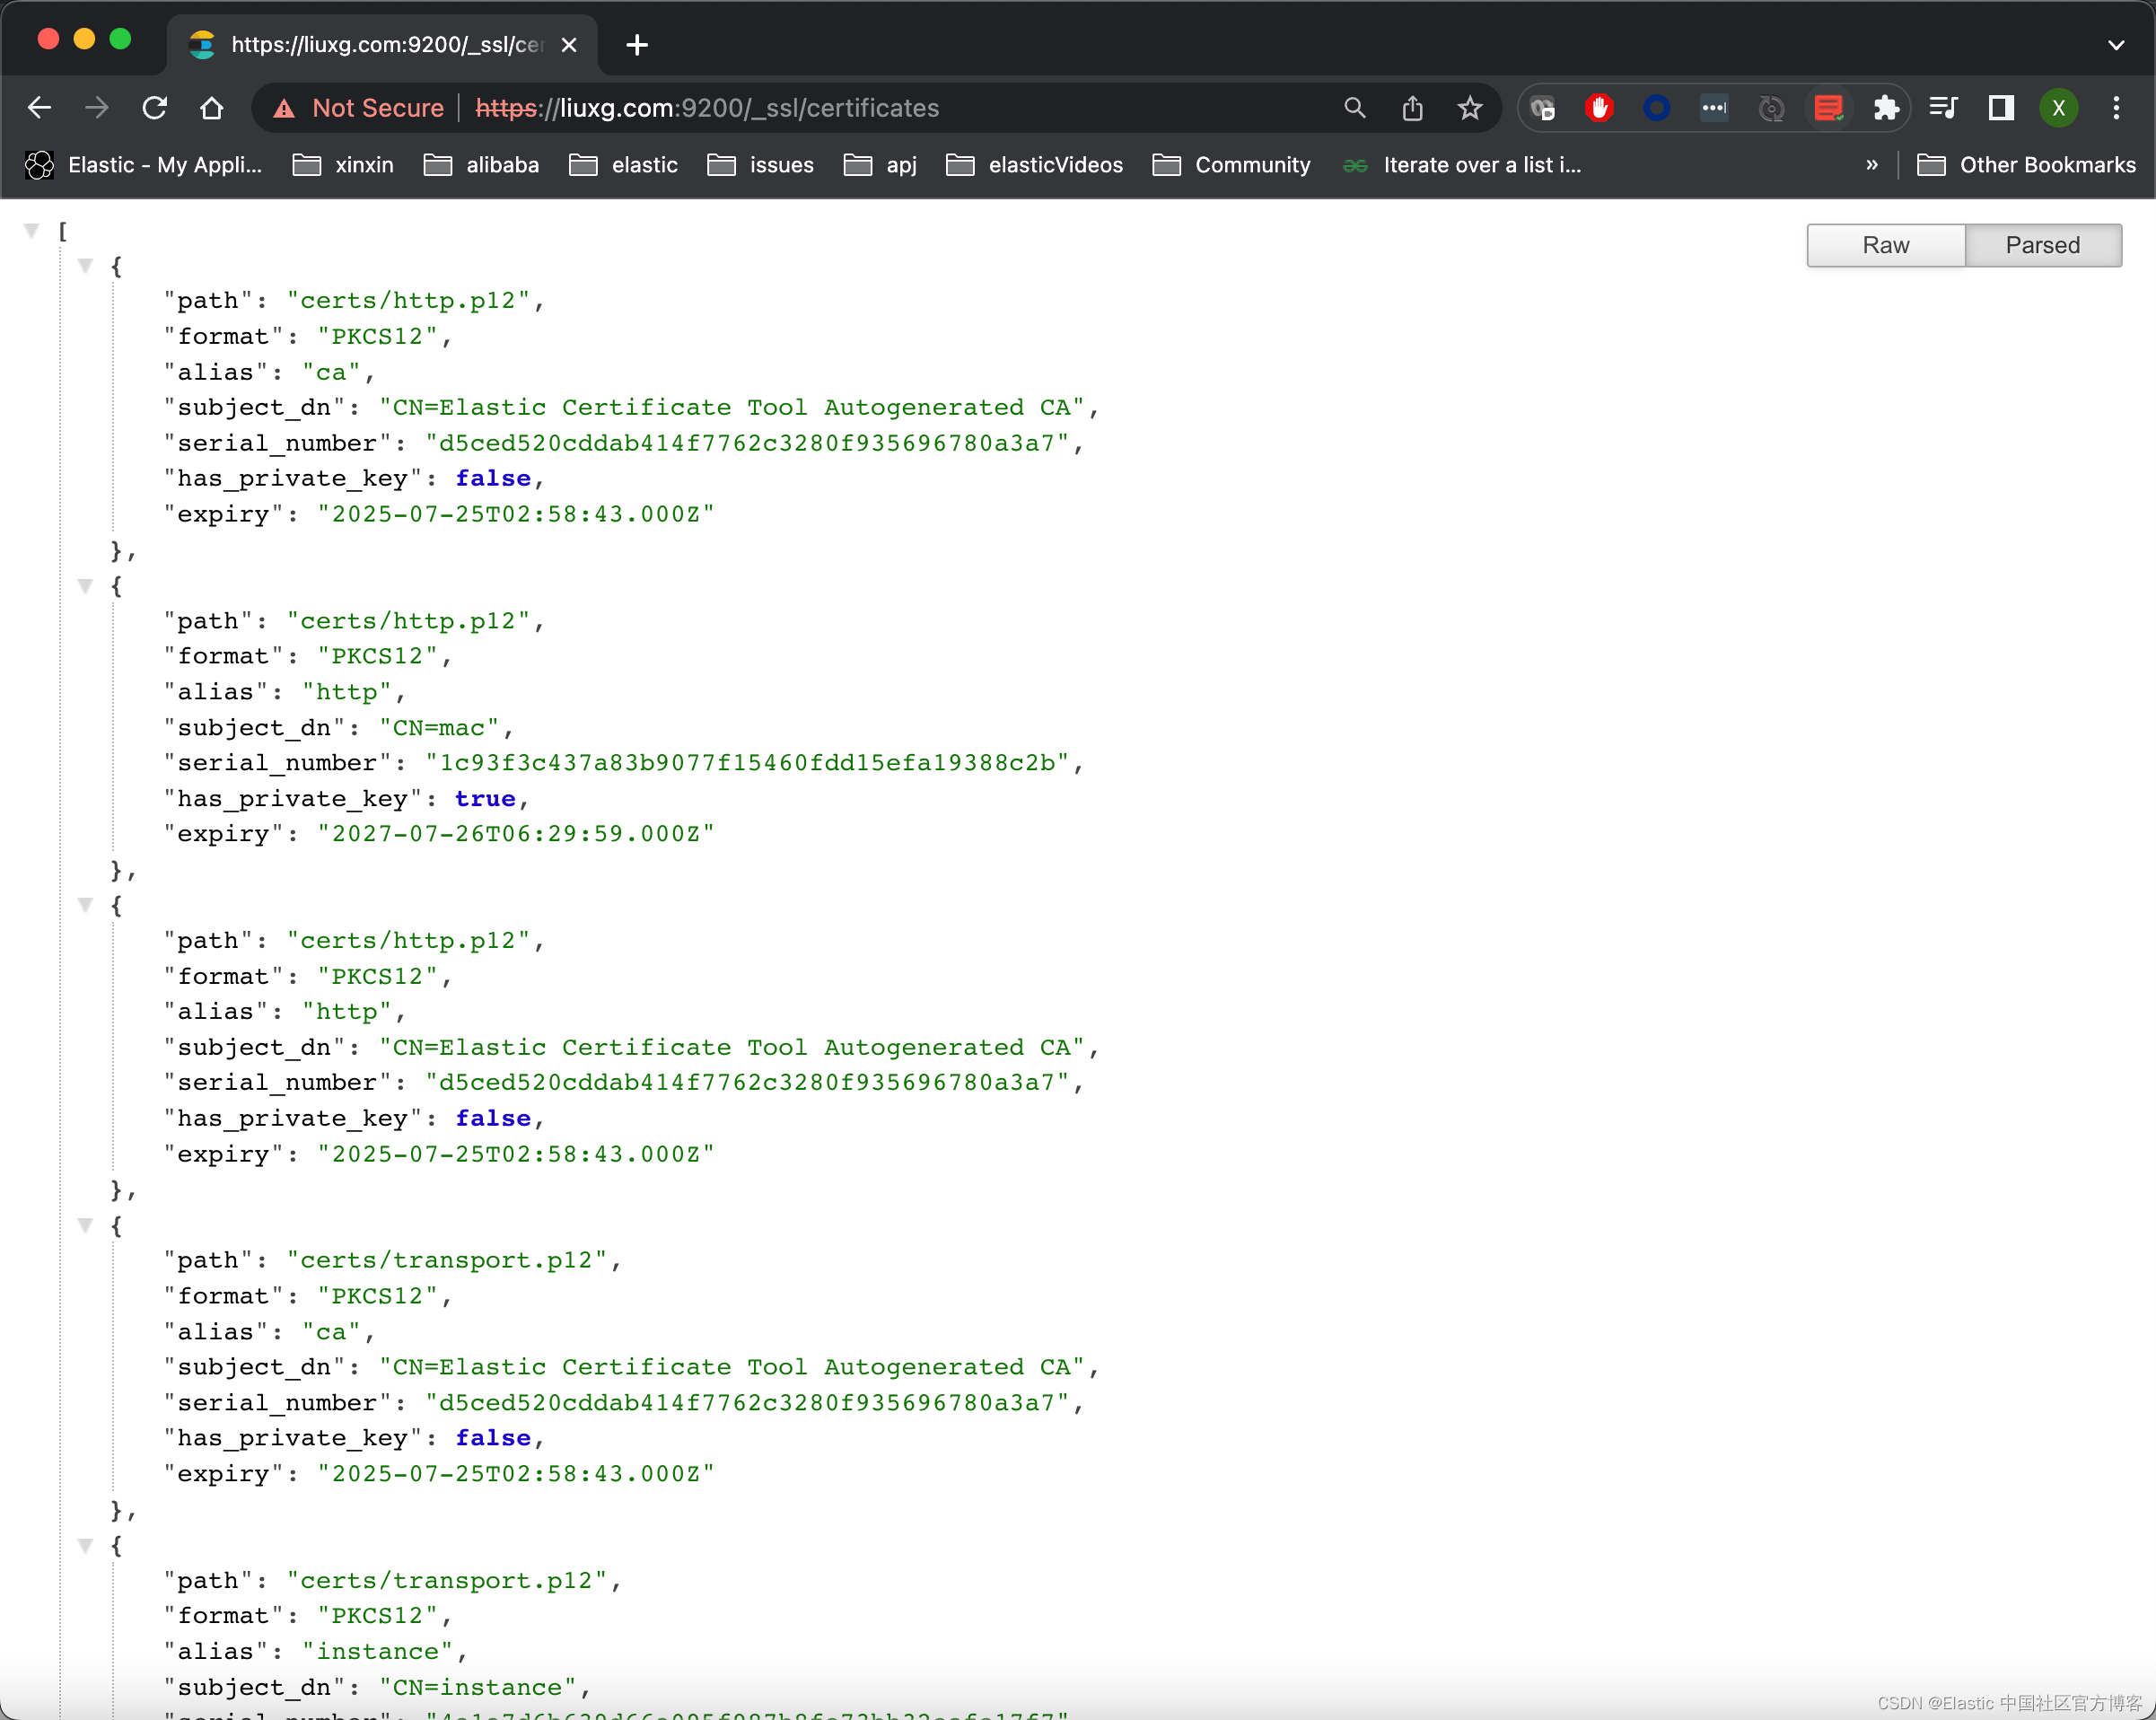
11)一次一个节点,完成第 5 步到第 10 步,直到你更新了集群中的所有密钥库。
12)完成滚动重启的剩余步骤,从 Reenable shard allocation 的步骤开始。
如果这个时候,我们尝试访问 Kibana,我们将看到如下的信息:
显然,我们的访问是不成功的。我将在下面来配置 Kibana。
更新 Kibana 和 Elasticsearch 之间的加密
当你使用 http 选项运行 elasticsearch-certutil 工具时,它会创建一个 /kibana 目录,其中包含一个 elasticsearch-ca.pem 文件。 你可以使用此文件将 Kibana 配置为信任 HTTP 层的 Elasticsearch CA。
1)将 elasticsearch-ca.pem 文件复制到由 KBN_PATH_CONF 路径定义的 Kibana 配置目录。
注意:KBN_PATH_CONF 包含 Kibana 配置文件的路径。 如果你使用归档发行版(zip 或 tar.gz)安装 Kibana,则路径默认为 KBN_HOME/config。 如果你使用软件包发行版(Debian 或 RPM),则路径默认为 /etc/kibana。
$ pwd
/Users/liuxg/elastic0/elasticsearch-8.3.2
$ cp kibana/elasticsearch-ca.pem ../kibana-8.3.2/config
$ cd ../kibana-8.3.2/config/
$ ls
elasticsearch-ca.pem kibana.yml           node.options
2)如果你修改了 elasticsearch-ca.pem 文件的文件名,请编辑 kibana.yml 并更新配置以指定 HTTP 层的安全证书的位置。
kibana.yml
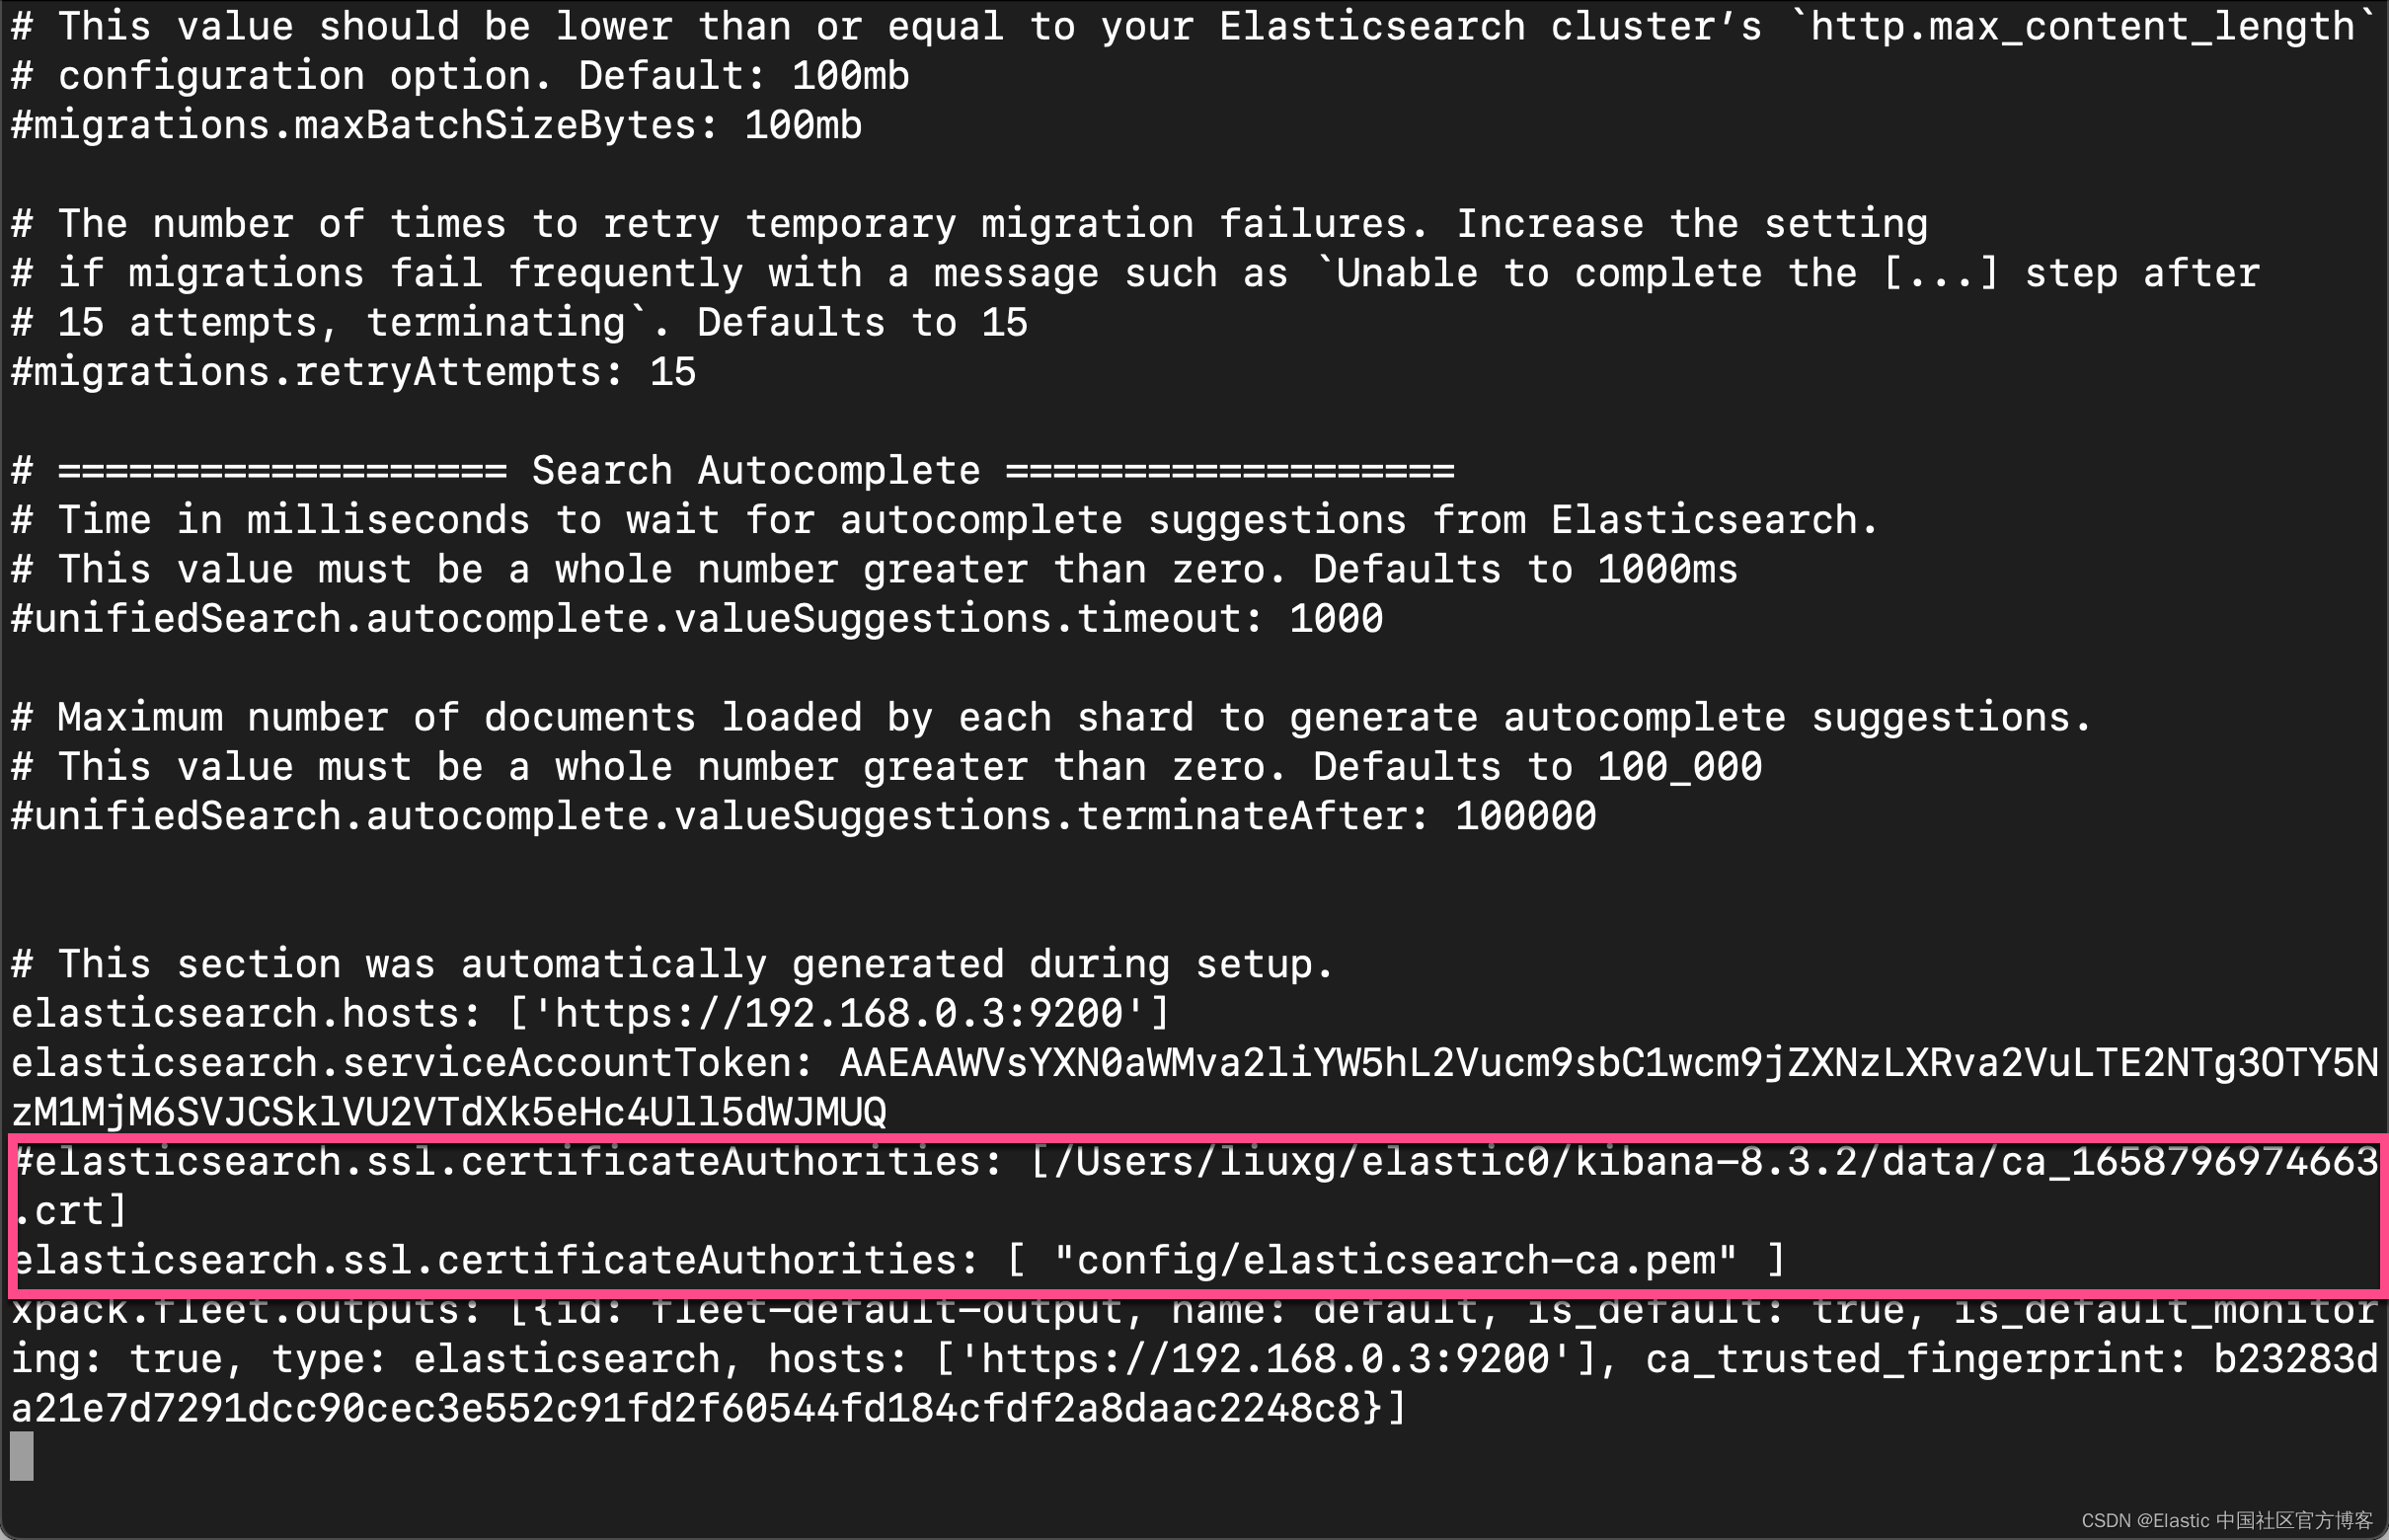
保存上面的文件
3)重新启动 Kibana。我们再次访问 Kibana:

上面显示我们的访问是成功的。

为开发者提供学习成长、分享交流、生态实践、资源工具等服务,帮助开发者快速成长。
更多推荐


 3
3 0
0- 0


 已为社区贡献117条内容

所有评论(0)