SpringBoot+OAuth2+Spring Security+Redis+mybatis-plus+mysql+swagger搭建实现
SpringBoot+OAuth2+Spring Security+Redis+mybatis-plus+mysql+swagger搭建实现
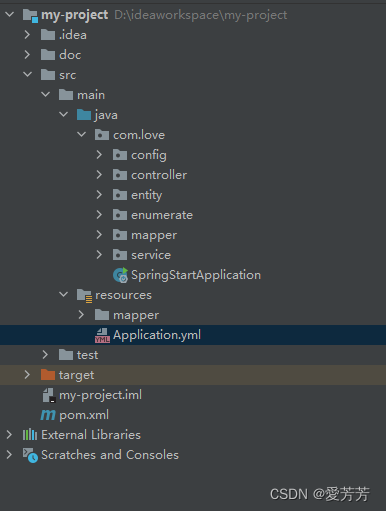
一.项目结构介绍
直接看图就行:
关键点都在config包里面,那我们看看config:
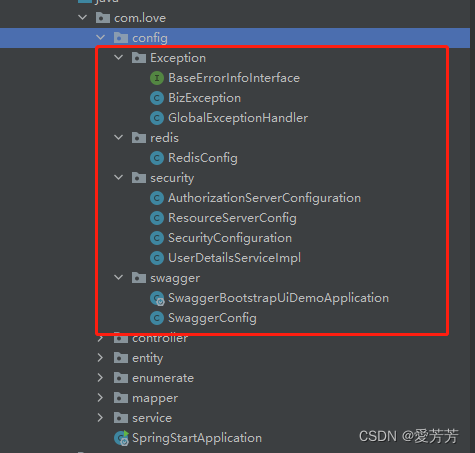
很明了,
- Excepition 是自定义异常封装类
- redis redis缓存配置
- security spring-security-oauth2相关配置,最最最重要部分
- swagger knife4j接口开发文档
- Application.yml spring配置文件(redis、数据源、oauth2等)
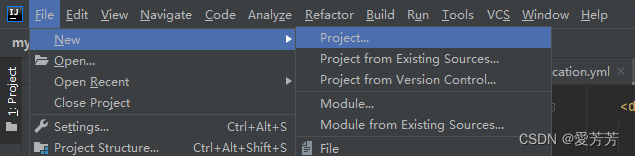
二.创建项目,这里是idea开发工具
左上角: File>New>Project
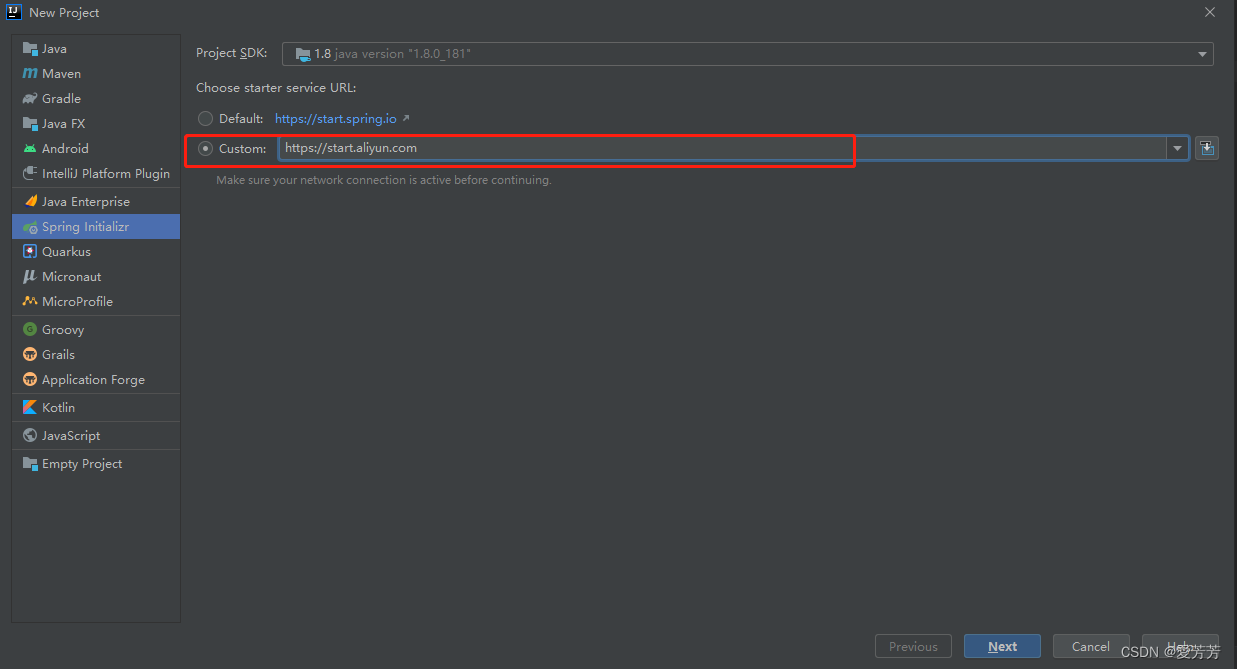
然后直接Next(这里你可能会遇到https://start.spring.io连接很慢或者直接连接失败,导致创建项目走不了下一步,那你可以选择Custom,输入https://start.aliyun.com):
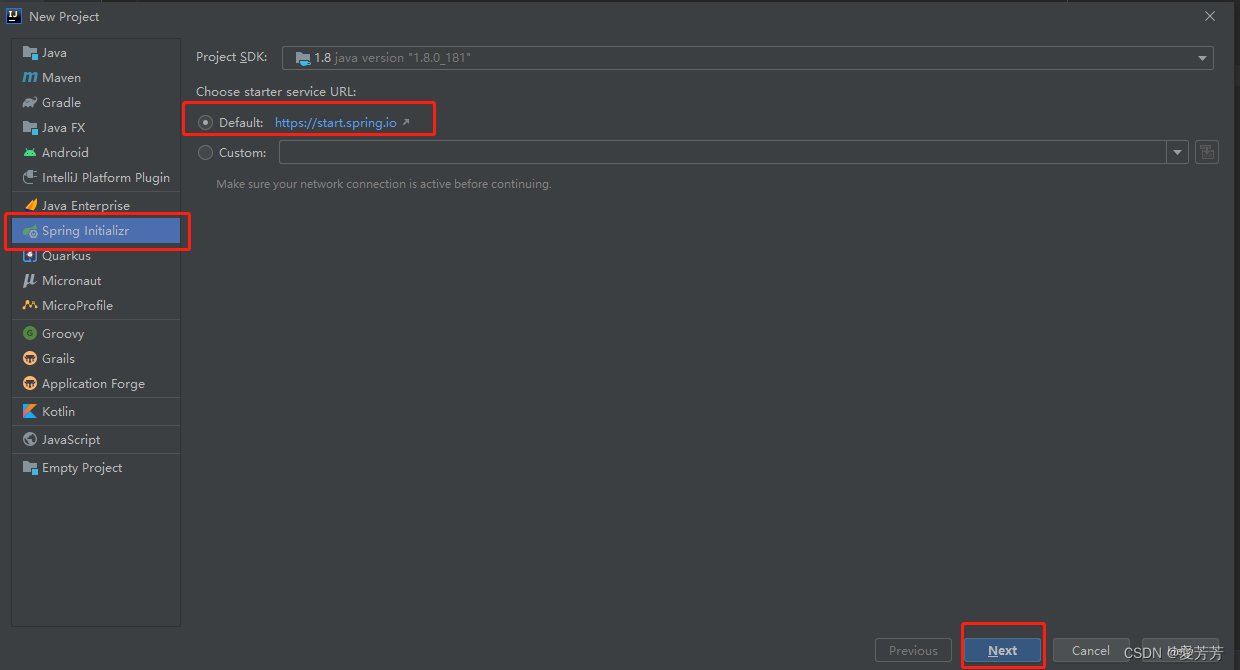
这是使用阿里云的:https://start.aliyun.com,当然创建后的项目可能不太一样,Application.yml阿里云应该是application.properties文件代替,其实都是大同小异的,语法稍微有些差别
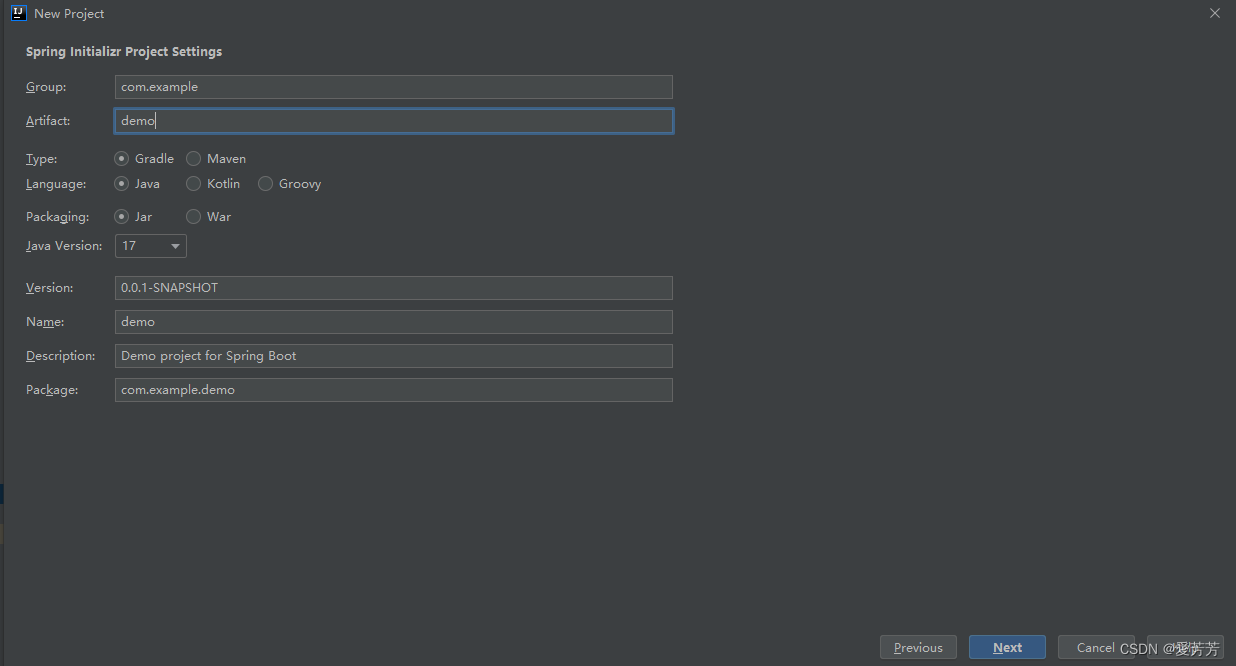
继续填好项目名称,包名等,记得Type选择Maven Next:
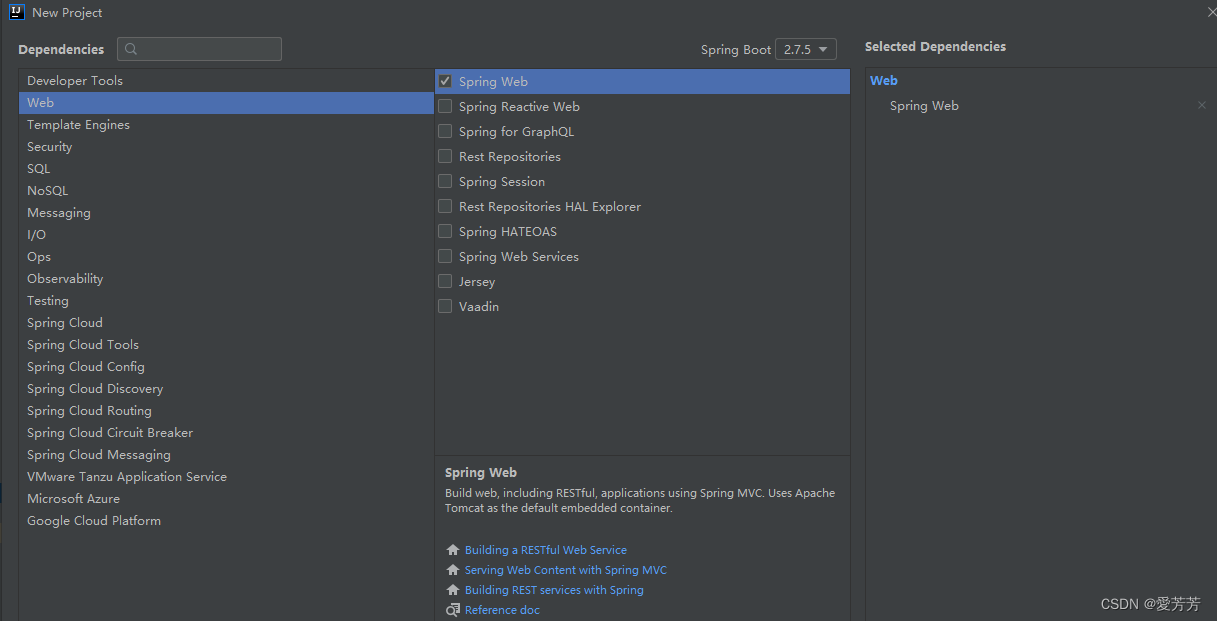
勾选依赖(按实际情况,也可后续在pom.xml里面手动灵活添加,也建议这么做),然后一直Next按照提示就创建完成了:
三.写代码前先搞好配置和下载好依赖,也就是pom文件啦~
pom文件不要缺,好好贴出来~
<?xml version="1.0" encoding="UTF-8"?>
<project xmlns="http://maven.apache.org/POM/4.0.0"
         xmlns:xsi="http://www.w3.org/2001/XMLSchema-instance"
         xsi:schemaLocation="http://maven.apache.org/POM/4.0.0 http://maven.apache.org/xsd/maven-4.0.0.xsd">
    <modelVersion>4.0.0</modelVersion>

    <groupId>com.love</groupId>
    <artifactId>my-project</artifactId>
    <version>1.0-SNAPSHOT</version>
    <properties>
        <mybatis.plus.version>3.5.2</mybatis.plus.version>
    </properties>

    <parent>
        <groupId>org.springframework.boot</groupId>
        <artifactId>spring-boot-starter-parent</artifactId>
        <version>2.0.5.RELEASE</version>
    </parent>

    <dependencies>
        <dependency>
            <groupId>org.springframework.plugin</groupId>
            <artifactId>spring-plugin-core</artifactId>
            <version>2.0.0.RELEASE</version>
        </dependency>
        <dependency>
            <groupId>org.springframework.plugin</groupId>
            <artifactId>spring-plugin-metadata</artifactId>
            <version>2.0.0.RELEASE</version>
        </dependency>

        <dependency>
            <groupId>org.springframework.boot</groupId>
            <artifactId>spring-boot-starter-web</artifactId>
        </dependency>

        <dependency>
            <groupId>mysql</groupId>
            <artifactId>mysql-connector-java</artifactId>
            <version>8.0.25</version>
        </dependency>

        <dependency>
            <groupId>com.baomidou</groupId>
            <artifactId>mybatis-plus-boot-starter</artifactId>
            <version>${mybatis.plus.version}</version>
        </dependency>

        <dependency>
            <groupId>org.projectlombok</groupId>
            <artifactId>lombok</artifactId>
        </dependency>

        <dependency>
            <groupId>com.github.xiaoymin</groupId>
            <artifactId>knife4j-spring-boot-starter</artifactId>
            <version>2.0.8</version>
        </dependency>

        <dependency>
            <groupId>com.github.xiaoymin</groupId>
            <artifactId>knife4j-micro-spring-boot-starter</artifactId>
            <version>2.0.8</version>
        </dependency>

        <dependency>
            <groupId>junit</groupId>
            <artifactId>junit</artifactId>
            <scope>test</scope>
        </dependency>

        <dependency>
            <groupId>org.springframework.boot</groupId>
            <artifactId>spring-boot-starter-test</artifactId>
            <scope>test</scope>
        </dependency>

        <dependency>
            <groupId>org.springframework.boot</groupId>
            <artifactId>spring-boot-starter-security</artifactId>
        </dependency>

        <!-- https://mvnrepository.com/artifact/org.springframework.security.oauth/spring-security-oauth2 -->
        <dependency>
            <groupId>org.springframework.security.oauth</groupId>
            <artifactId>spring-security-oauth2</artifactId>
            <version>2.3.3.RELEASE</version>
        </dependency>


        <dependency>
            <groupId>org.springframework.boot</groupId>
            <artifactId>spring-boot-starter-data-redis</artifactId>
            <version>2.0.5.RELEASE</version>
        </dependency>

    </dependencies>
</project>
稍微讲解一下啊?那好:
1.mybatis-plus相关依赖
mybatis-plus版本号属性独立配置,mysql版本8.0.25,driver配置后面要注意
<properties>
    <mybatis.plus.version>3.5.2</mybatis.plus.version>
</properties>

 <dependency>
    <groupId>mysql</groupId>
     <artifactId>mysql-connector-java</artifactId>
     <version>8.0.25</version>
 </dependency>

 <dependency>
     <groupId>com.baomidou</groupId>
     <artifactId>mybatis-plus-boot-starter</artifactId>
     <version>${mybatis.plus.version}</version>
 </dependency>
2.lombok
Lombok项目是一个java库,它可以自动插入到编辑器和构建工具中,增强java的性能。不需要再写getter、setter或equals方法,只要有一个注解,你的类就有一个功能齐全的构建器、自动记录变量等等。
 <dependency>
     <groupId>org.projectlombok</groupId>
     <artifactId>lombok</artifactId>
 </dependency>
3.swagger 开发文档
前后端分离开发少不了~
配置也很简单~,稍等,后面说道
<dependency>
    <groupId>com.github.xiaoymin</groupId>
    <artifactId>knife4j-spring-boot-starter</artifactId>
    <version>2.0.8</version>
</dependency>

<dependency>
    <groupId>com.github.xiaoymin</groupId>
    <artifactId>knife4j-micro-spring-boot-starter</artifactId>
    <version>2.0.8</version>
</dependency>
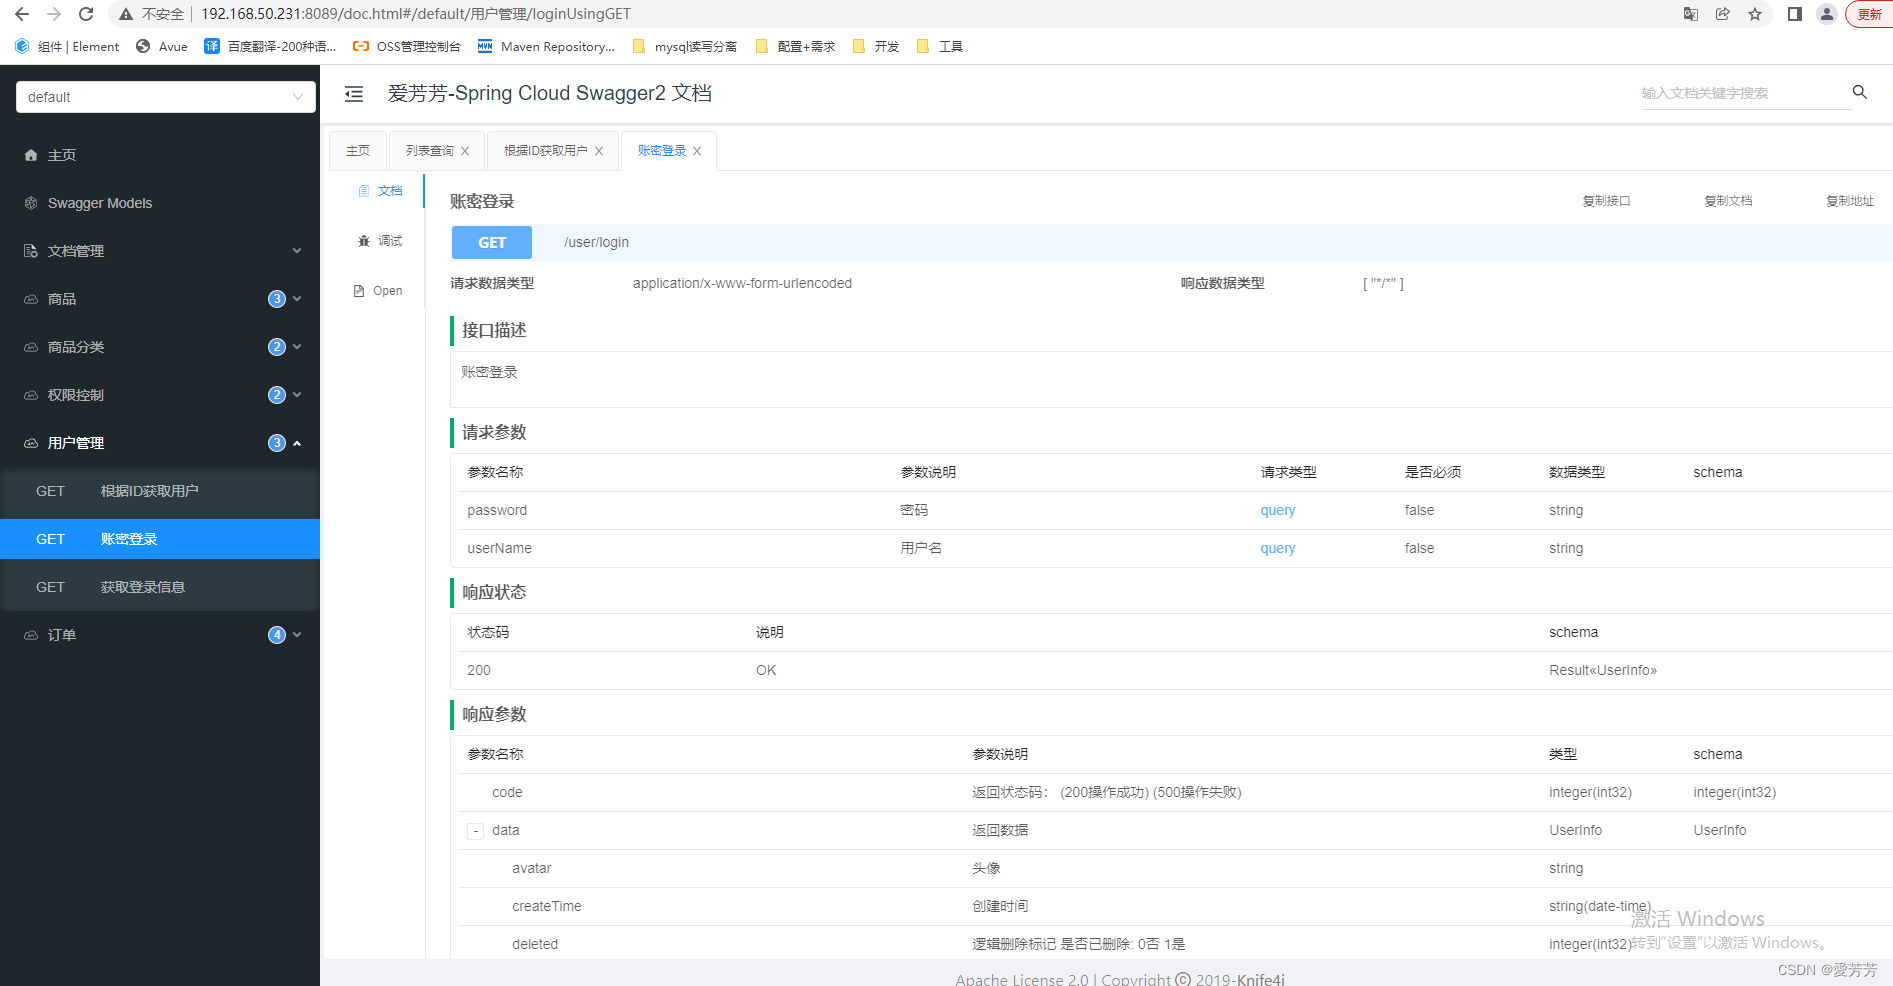
swagger长这样:
4.spring-security,oauth2集成依赖
这里可能你会遇到版本号或者各种冲突,那可以灵活更换依赖就行,冷静思考,多百度一下就行~
 <dependency>
     <groupId>org.springframework.boot</groupId>
     <artifactId>spring-boot-starter-security</artifactId>
 </dependency>

 <!-- https://mvnrepository.com/artifact/org.springframework.security.oauth/spring-security-oauth2 -->
 <dependency>
     <groupId>org.springframework.security.oauth</groupId>
     <artifactId>spring-security-oauth2</artifactId>
     <version>2.3.3.RELEASE</version>
 </dependency>
5.redis集成依赖
 <dependency>
     <groupId>org.springframework.boot</groupId>
     <artifactId>spring-boot-starter-data-redis</artifactId>
     <version>2.0.5.RELEASE</version>
 </dependency>
三.pom完美解决了,接着就是Application.yml配置了
还是乖乖贴完整的好~
server:
  port: 8089
#  path: /love
  error:
    include-stacktrace: never

spring:
  datasource:
    url: jdbc:mysql://localhost:3306/sys?autoReconnect=true&useUnicode=true&characterEncoding=UTF-8&useSSL=false&allowMultiQueries=true&useAffectedRows=true&allowPublicKeyRetrieval=true
    username: root
    password: root
    driver-class-name: com.mysql.cj.jdbc.Driver

  redis:
    # Redis数据库索引(默认为0)
    database: 0
    # Redis服务器地址
    host: 127.0.0.1
    # Redis服务器连接端口
    port: 6379
    # Redis服务器连接密码(默认为空)
    password: root
    # 连接池最大连接数(使用负值表示没有限制)
    max-active: 20
    # 连接池最大阻塞等待时间(使用负值表示没有限制)
    max-wait: 1
    # 连接池中的最大空闲连接
    max-idle: 0
    # 连接池中的最小空闲连接
    min-idle: 0
    # 连接超时时间(毫秒)
    timeout: 1000

mybatis-plus:
  mapper-locations: classpath*:mapper/*.xml
  type-aliases-package: com.love.*.mapper


# oauth2.0配置
client:
  oauth2:
    # 客户端标识Id
    client-id: appId
    # 客户端安全码
    secret: 123456
    # 授权类型
    grant_types:
      - password
      - refresh_token
    # token 有效期
    token-validity-time: 3600
    refresh-token-validity-time: 3600
    # 客户端访问范围
    scopes:
      - api
      - all
好像可以说点什么,好像也没什么好说的,那还是说点吧~

1.项目访问端口配置8089
2.项目访问前缀路径path,如:/love,即是:http://127.0.0.1:8089/love
3.数据源配置,注意driver:com.mysql.cj.jdbc.Driver
4.redis配置看注释~
5.mybatis-plus包扫描配置,通配符扫描,mapper里的java和resources下面的mapper里的xml最好名称一致,会自动映射,没必要搞特殊找麻烦~
6.oauth2.0配置,接口请求要声明:客户端标识Id和客户端安全码,与配置一致,否则无权访问,看下图明了(postman截图):
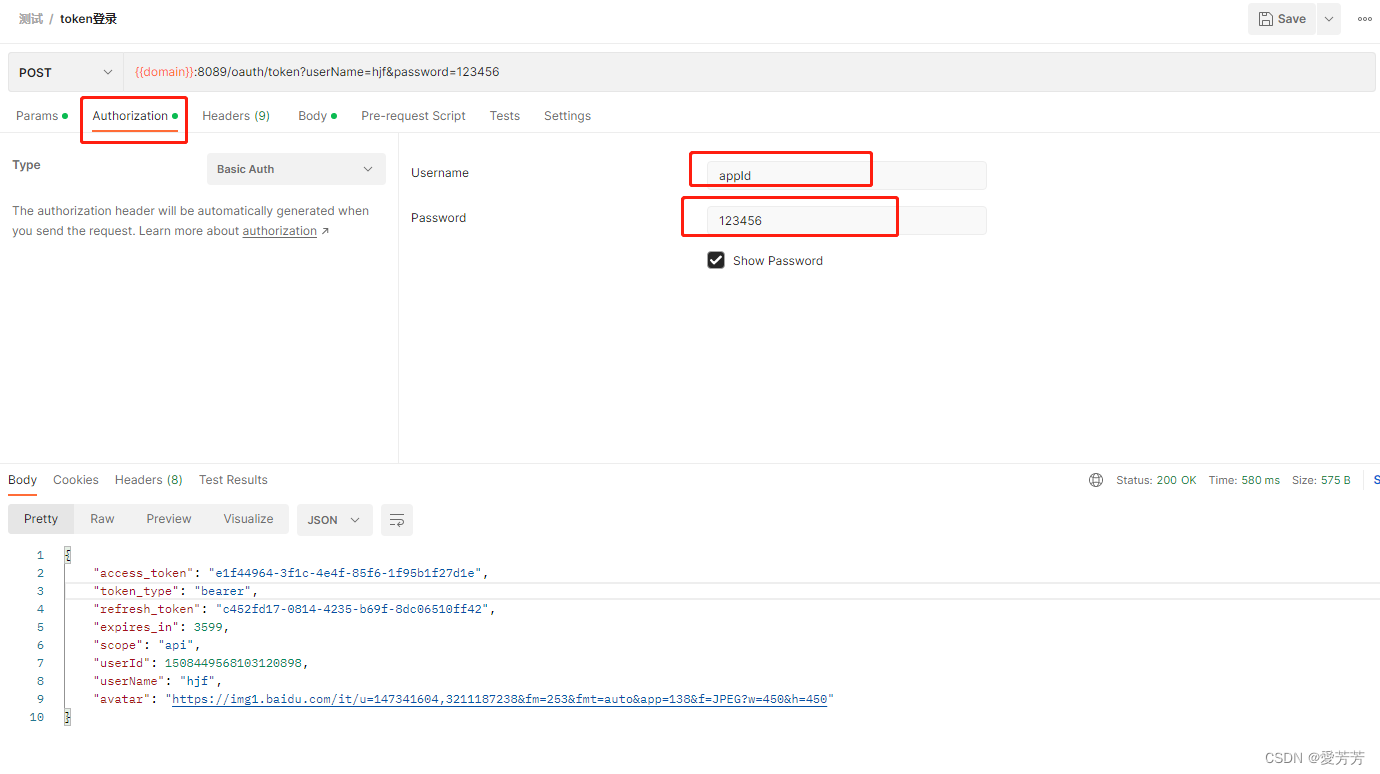
grant_types分为password,也就账密登录的意思,refresh_token比较特殊,大概可以理解为:token过期后通过refresh_token授权刷新token来续费,也就是告诉你没钱了,赶紧交钱,不然停止服务~

token有效期,3600秒,一个钟
四.redis配置类,序列化存储的关键,其实网上很多,类似
package com.love.config.redis;

import com.fasterxml.jackson.annotation.JsonAutoDetect;
import com.fasterxml.jackson.annotation.PropertyAccessor;
import com.fasterxml.jackson.databind.ObjectMapper;
import org.springframework.context.annotation.Bean;
import org.springframework.context.annotation.Configuration;
import org.springframework.data.redis.connection.RedisConnectionFactory;
import org.springframework.data.redis.core.RedisTemplate;
import org.springframework.data.redis.serializer.Jackson2JsonRedisSerializer;
import org.springframework.data.redis.serializer.StringRedisSerializer;

/**
 * @author hjf
 * @date 2022-10-24 10:33
 * @describe redis配置
 */

@Configuration //使用注解注入配置,必须要添加,这样application.properties中的配置才能在redis中生效,添加@Configuration之后,spring 会自动扫描注入
public class RedisConfig {
    @Bean
    @SuppressWarnings("all")
    public RedisTemplate<String, Object> redisTemplate(RedisConnectionFactory factory) {
        // 我们为了自己开发方便,一般直接使用 <String,Object>
        RedisTemplate<String, Object> template = new RedisTemplate<String,Object>();
        template.setConnectionFactory(factory);
        // Json序列化配置
        Jackson2JsonRedisSerializer jackson2JsonRedisSerializer = new Jackson2JsonRedisSerializer(Object.class);
        ObjectMapper om = new ObjectMapper();
        om.setVisibility(PropertyAccessor.ALL, JsonAutoDetect.Visibility.ANY);
        om.enableDefaultTyping(ObjectMapper.DefaultTyping.NON_FINAL);
        jackson2JsonRedisSerializer.setObjectMapper(om);
        // String 的序列化
        StringRedisSerializer stringRedisSerializer = new StringRedisSerializer();
        // key采用String的序列化方式
        template.setKeySerializer(stringRedisSerializer);
        // hash的key也采用String的序列化方式
        template.setHashKeySerializer(stringRedisSerializer);
        // value序列化方式采用jackson
        template.setValueSerializer(jackson2JsonRedisSerializer);
        // hash的value序列化方式采用jackson
        template.setHashValueSerializer(jackson2JsonRedisSerializer);
        template.afterPropertiesSet();
        return template;
    }
}
五.AuthorizationServerConfiguration实现类
token存储userId,userName和头像avatar
package com.love.config.security;

import com.love.entity.vo.LoginUser;
import com.love.entity.base.ClientOauth2DataConfiguration;
import org.springframework.context.annotation.Configuration;
import org.springframework.security.authentication.AuthenticationManager;
import org.springframework.security.crypto.password.PasswordEncoder;
import org.springframework.security.oauth2.common.DefaultOAuth2AccessToken;
import org.springframework.security.oauth2.config.annotation.configurers.ClientDetailsServiceConfigurer;
import org.springframework.security.oauth2.config.annotation.web.configuration.AuthorizationServerConfigurerAdapter;
import org.springframework.security.oauth2.config.annotation.web.configuration.EnableAuthorizationServer;
import org.springframework.security.oauth2.config.annotation.web.configurers.AuthorizationServerEndpointsConfigurer;
import org.springframework.security.oauth2.config.annotation.web.configurers.AuthorizationServerSecurityConfigurer;
import org.springframework.security.oauth2.provider.token.store.redis.RedisTokenStore;

import javax.annotation.Resource;
import java.util.LinkedHashMap;

/**
 * @author hjf
 * @date 2022-10-24 14:10
 * @describe 授权配置类
 */

@Configuration
@EnableAuthorizationServer
public class AuthorizationServerConfiguration extends AuthorizationServerConfigurerAdapter {

    @Resource
    private UserDetailsServiceImpl userService;

    @Resource
    private RedisTokenStore redisTokenStore;

    /**
     * 管理器
     */
    @Resource
    private AuthenticationManager authenticationManager;

    /**
     * 密码编码器
     */
    @Resource
    private PasswordEncoder passwordEncoder;

    /**
     * 客户端配置类
     */
    @Resource
    private ClientOauth2DataConfiguration oauth2DataConfiguration;


    /**
     * 客户端配置授权模型
     * @param clients
     * @throws Exception
     */
    @Override
    public void configure(ClientDetailsServiceConfigurer clients) throws Exception {
        clients.inMemory().withClient(oauth2DataConfiguration.getClientId())
                .secret(passwordEncoder.encode(oauth2DataConfiguration.getSecret()))
                .authorizedGrantTypes(oauth2DataConfiguration.getGrantTypes()) // token 授权类型
                .accessTokenValiditySeconds(oauth2DataConfiguration.getTokenValidityTime()) // token 过期时间
                .refreshTokenValiditySeconds(oauth2DataConfiguration.getRefreshTokenValidityTime()) // token 刷新过期时间
                .scopes(oauth2DataConfiguration.getScopes());
    }

    /**
     * 配置令牌端点的安全约束
     * @param security
     * @throws Exception
     */
    @Override
    public void configure(AuthorizationServerSecurityConfigurer security) throws Exception {
        // 允许访问 token 的公钥,默认 /oauth/token_key 受保护的
        security.tokenKeyAccess("permitAll()")
                // 允许访问 token 的状态,默认 /oauth/check_token 受保护的
                .checkTokenAccess("permitAll()");
    }

    @Override
    public void configure(AuthorizationServerEndpointsConfigurer endpoints) throws Exception {
        // 认证器
        endpoints.authenticationManager(authenticationManager)
                // 具体登陆方法
                .userDetailsService(userService)
                // token 存储方式 redis
                .tokenStore(redisTokenStore)
                // 令牌增强对象 , 增强返回的结果
                .tokenEnhancer((accessToken, authentication) ->{
                    // 获取用户信息,然后设置
                    LoginUser loginUser = (LoginUser) authentication.getPrincipal();
                    LinkedHashMap<String, Object> map = new LinkedHashMap<>();
                    map.put("userId",loginUser.getId());
                    map.put("userName",loginUser.getUsername());
                    map.put("avatar", loginUser.getAvatar());
                    DefaultOAuth2AccessToken token = (DefaultOAuth2AccessToken) accessToken;
                    token.setAdditionalInformation(map);
                    return token;
                });

    }

}
重要点
private UserDetailsServiceImpl userService;
自定义类UserDetailsServiceImpl实现security的UserDetailsService,并且重写方法loadUserByUsername:
package com.love.config.security;

import com.baomidou.mybatisplus.core.conditions.query.QueryWrapper;
import com.love.entity.vo.LoginUser;
import com.love.entity.UserInfo;
import com.love.service.UserInfoService;
import lombok.RequiredArgsConstructor;
import lombok.extern.slf4j.Slf4j;
import org.springframework.beans.BeanUtils;
import org.springframework.security.core.userdetails.UserDetails;
import org.springframework.security.core.userdetails.UserDetailsService;
import org.springframework.security.core.userdetails.UsernameNotFoundException;
import org.springframework.stereotype.Service;

/**
 * @author hjf
 * @date 2022-10-24 14:24
 * @describe
 */

@Slf4j
@Service
@RequiredArgsConstructor
public class UserDetailsServiceImpl implements UserDetailsService {

    private final UserInfoService userInfoService;

    /**
     * 用户密码登录
     * @param username 用户名
     * @return UserDetails
     * @throws UsernameNotFoundException
     */
    @Override
    public UserDetails loadUserByUsername(String username) throws UsernameNotFoundException {
        // 根据用户名查询用户的接口
        QueryWrapper<UserInfo> wrapper = new QueryWrapper<>();
        wrapper.eq("user_name", username);
        UserInfo userInfo = userInfoService.getOne(wrapper);
        if (userInfo == null) {
            throw new UsernameNotFoundException("用户名不存在!");
        }
        return getUserDetails(userInfo);
    }

    /**
     * 构建用户信息
     * @param userInfo
     * @return 用户详情
     */
    private LoginUser getUserDetails(UserInfo userInfo) {
        // UserVO是用户实体类,AuthUserDetails是SpringSecurity认证用户详情对象
        LoginUser userDetail = new LoginUser();
        // 1. 用户详情封装(此处由于是继承关系,可以使用属性复制的方式)
        BeanUtils.copyProperties(userInfo, userDetail);
        return userDetail;

    }
}
逻辑很简单,根据用户名username数据库查询是否存在用户,不存在直接抛对应异常,你会看到这里为什么没有密码判断,按理说登录应该是账号密码一起判断才对,然后会提示:账号或密码错误 之类的~稍等,主要是security帮你处理掉了,后面说道
六.ResourceServerConfig资源配置类,对外开放访问资源
package com.love.config.security;

import org.springframework.context.annotation.Configuration;
import org.springframework.security.config.annotation.web.builders.HttpSecurity;
import org.springframework.security.oauth2.config.annotation.web.configuration.EnableResourceServer;
import org.springframework.security.oauth2.config.annotation.web.configuration.ResourceServerConfigurerAdapter;
import org.springframework.security.oauth2.config.annotation.web.configurers.ResourceServerSecurityConfigurer;
import org.springframework.security.oauth2.provider.token.store.redis.RedisTokenStore;

import javax.annotation.Resource;

/**
 * @author hjf
 * @date 2022-10-24 18:09
 * @describe 资源配置类
 */

@Configuration
@EnableResourceServer
public class ResourceServerConfig extends ResourceServerConfigurerAdapter {

    @Resource
    private RedisTokenStore redisTokenStore;

    @Override
    public void configure(HttpSecurity http) throws Exception {
        http.authorizeRequests().anyRequest()
                .authenticated()
                .and()
                .requestMatchers().antMatchers("/user/**");
    }

    @Override
    public void configure(ResourceServerSecurityConfigurer resources) throws Exception {
        // 设置token存储
        resources.tokenStore(redisTokenStore);
    }
}
若没有配置路径,结果:
当然配置了,除了白名单,其他也还要带上token访问才行~
{
    "timestamp": "2022-11-07T08:04:02.264+0000",
    "status": 403,
    "error": "Forbidden",
    "message": "Access Denied",
    "path": "/user/getUserInfoById"
}
七.SecurityConfiguration,白名单配置放行,自定义加密配置
package com.love.config.security;

import org.springframework.context.annotation.Bean;
import org.springframework.context.annotation.Configuration;
import org.springframework.data.redis.connection.RedisConnectionFactory;
import org.springframework.security.authentication.AuthenticationManager;
import org.springframework.security.config.annotation.web.builders.HttpSecurity;
import org.springframework.security.config.annotation.web.configuration.EnableWebSecurity;
import org.springframework.security.config.annotation.web.configuration.WebSecurityConfigurerAdapter;
import org.springframework.security.crypto.bcrypt.BCryptPasswordEncoder;
import org.springframework.security.crypto.password.PasswordEncoder;
import org.springframework.security.oauth2.provider.token.store.redis.RedisTokenStore;

import javax.annotation.Resource;

/**
 * @author hjf
 * @date 2022-10-24 14:23
 * @describe
 */

@Configuration
@EnableWebSecurity
public class SecurityConfiguration extends WebSecurityConfigurerAdapter {
    /**
     * 注入redis 连接工厂
     */
    @Resource
    private RedisConnectionFactory redisConnectionFactory;

    /**
     * 初始化 redisTokenStore 用户将token 放入redis
     * @return
     */
    @Bean
    public RedisTokenStore redisTokenStore(){
        RedisTokenStore redisTokenStore = new RedisTokenStore(redisConnectionFactory);
        redisTokenStore.setPrefix("TOKEN:");
        return redisTokenStore;
    }

    /**
     * http请求设置
     */
    @Override
    protected void configure(HttpSecurity http) throws Exception {
        http.csrf().disable()
                .authorizeRequests()
                // 放行
                .antMatchers(
                        "/oauth/**",
                        "/actuator/**",
                        "/doc.html/**",
                        "/favicon.ico",
                        "/webjars/**",
                        "/swagger-resources/**",
                        "/v2/api-docs/**")
                .permitAll()
                .and()
                .authorizeRequests()
                .anyRequest()
                // 其他需要拦截
                .authenticated();
    }

    /**
     * 初始化管理对象
     */
    @Override
    @Bean
    public AuthenticationManager authenticationManager() throws Exception {
        return super.authenticationManager();
    }

    /**
     * 密码加密算法
     * @return 加密算法,BCrypt实现加密器可以有效防止撞库
     */
    @Bean
    public PasswordEncoder passwordEncoder(){
        PasswordEncoder encoder = new BCryptPasswordEncoder();
        return encoder;
    }

}
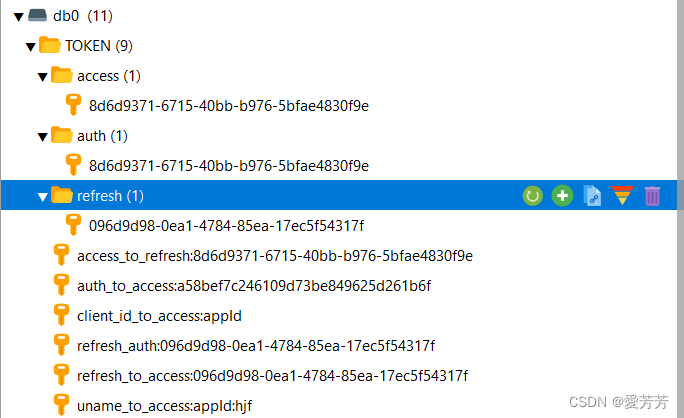
token存放key:
redisTokenStore.setPrefix(“TOKEN:”);
看看都存了什么?下图,真实产品肯定没必要存这么多,这里就可以再深入自定义处理了,暂时到这里先吧~
密码怎么加密,这里提高一个test测试类:
package com.love;

import org.junit.Test;
import org.junit.runner.RunWith;
import org.springframework.security.crypto.bcrypt.BCryptPasswordEncoder;
import org.springframework.test.context.junit4.SpringRunner;

@RunWith(SpringRunner.class)
public class UserInfoTest {

    @Test
    public void getUserInfoVo() {
        String myPassword = "";//你的密码
        //密码加密
        myPassword = new BCryptPasswordEncoder().encode(myPassword );
        System.out.println("myPassword ="+myPassword );
    }
}
八.swagger配置,两个类,几乎复制拷贝就行~
SwaggerBootstrapUiDemoApplication:
package com.love.config.swagger;

import org.springframework.boot.autoconfigure.SpringBootApplication;
import org.springframework.web.servlet.config.annotation.ResourceHandlerRegistry;
import org.springframework.web.servlet.config.annotation.WebMvcConfigurer;

@SpringBootApplication
public class SwaggerBootstrapUiDemoApplication  implements WebMvcConfigurer {

    @Override
    public void addResourceHandlers(ResourceHandlerRegistry registry) {
        registry.addResourceHandler("doc.html").addResourceLocations("classpath:/META-INF/resources/");
        registry.addResourceHandler("/webjars/**").addResourceLocations("classpath:/META-INF/resources/webjars/");
    }
}
SwaggerConfig:
package com.love.config.swagger;

import com.github.xiaoymin.knife4j.spring.annotations.EnableKnife4j;
import org.springframework.context.annotation.Bean;
import org.springframework.context.annotation.Configuration;
import org.springframework.context.annotation.Import;
import springfox.bean.validators.configuration.BeanValidatorPluginsConfiguration;
import springfox.documentation.builders.ApiInfoBuilder;
import springfox.documentation.builders.PathSelectors;
import springfox.documentation.builders.RequestHandlerSelectors;
import springfox.documentation.service.ApiInfo;
import springfox.documentation.spi.DocumentationType;
import springfox.documentation.spring.web.plugins.Docket;
import springfox.documentation.swagger2.annotations.EnableSwagger2WebMvc;

/**
 * @author hjf
 * @date 2022-10-11 12:11
 * @describe Swagger开发文档
 */
@Configuration
@EnableSwagger2WebMvc
@EnableKnife4j
@Import(BeanValidatorPluginsConfiguration.class)
public class SwaggerConfig {

    @Bean
    public Docket createRestApi() {
        return new Docket(DocumentationType.SWAGGER_2)
                .useDefaultResponseMessages(false)
                .apiInfo(apiInfo())
                .select()
                .apis(RequestHandlerSelectors.basePackage("com.love"))
                .paths(PathSelectors.any())
                .build();

    }

    private ApiInfo apiInfo() {
        return new ApiInfoBuilder().version("1.0.0")
                .title("爱芳芳-Spring Cloud Swagger2 文档")
                .description("爱芳芳-Spring Cloud Swagger2 文档")
                .termsOfServiceUrl("https://blog.csdn.net/lucky_fang?type=blog")
                .build();
    }
}
记得改成自己的包名~
十.OauthController,登录获取凭证token
package com.love.controller;

import io.swagger.annotations.Api;
import lombok.RequiredArgsConstructor;
import lombok.extern.slf4j.Slf4j;
import org.springframework.security.oauth2.common.DefaultOAuth2AccessToken;
import org.springframework.security.oauth2.common.OAuth2AccessToken;
import org.springframework.security.oauth2.provider.endpoint.TokenEndpoint;
import org.springframework.security.oauth2.provider.token.TokenStore;
import org.springframework.web.HttpRequestMethodNotSupportedException;
import org.springframework.web.bind.annotation.*;

import java.security.Principal;
import java.util.LinkedHashMap;
import java.util.Map;

/**
 * @author hjf
 * @date 2022-10-24 15:19
 * @describe 登录认证
 */

@Api(tags = "权限控制")
@Slf4j
@RestController
@RequiredArgsConstructor
@RequestMapping("/oauth")
public class OauthController {

    /**
     * 返回增强
     */
    private final TokenEndpoint tokenEndpoint;

    private final TokenStore tokenStore;


    @PostMapping("/login")
    public Map<String, Object> postAccessToken(Principal principal, @RequestParam Map<String,String> param) throws HttpRequestMethodNotSupportedException {
        return custom(tokenEndpoint.postAccessToken(principal, param).getBody());
    }

    private Map<String,Object> custom(OAuth2AccessToken oAuth2AccessToken){
        DefaultOAuth2AccessToken token = (DefaultOAuth2AccessToken) oAuth2AccessToken;

        Map<String,Object> data =  new LinkedHashMap(token.getAdditionalInformation());
        data.put("accessToken",token.getValue());
        data.put("expireIn", token.getExpiresIn());
        data.put("scopes", token.getScope());
        if (token.getRefreshToken() != null){
            data.put("refreshToken",token.getRefreshToken().getValue());
        }
        return data;
    }


    /**
     * 移除access_token和refresh_token,退出登录
     *
     * @param access_token 登录token
     */
    @DeleteMapping(value = "/removeToken", params = "access_token")
    public void removeToken(Principal principal, String access_token) {
        OAuth2AccessToken accessToken = tokenStore.readAccessToken(access_token);
        if (accessToken != null) {
            // 移除access_token
            tokenStore.removeAccessToken(accessToken);

            // 移除refresh_token
            if (accessToken.getRefreshToken() != null) {
                tokenStore.removeRefreshToken(accessToken.getRefreshToken());
            }
        }
    }
}
postman请求截图
记得配置这个,上面已经说过:
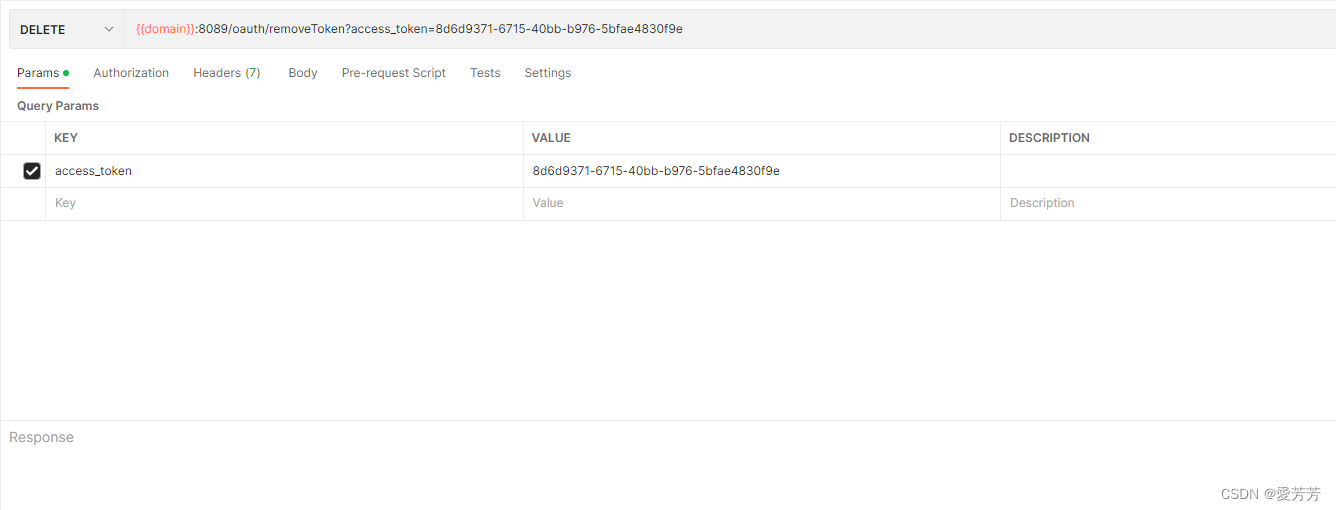
退出登录,清除token,redis同时也会清除:
十一.其他杂七杂八的一并乖乖贴上
LoginUser:
package com.love.entity.vo;

import com.baomidou.mybatisplus.core.toolkit.StringUtils;
import com.love.entity.UserInfo;
import io.swagger.annotations.ApiModelProperty;
import lombok.AllArgsConstructor;
import lombok.Data;
import lombok.NoArgsConstructor;
import org.springframework.security.core.GrantedAuthority;
import org.springframework.security.core.authority.AuthorityUtils;
import org.springframework.security.core.authority.SimpleGrantedAuthority;
import org.springframework.security.core.userdetails.UserDetails;

import java.util.Collection;
import java.util.List;
import java.util.stream.Collectors;
import java.util.stream.Stream;

/**
 * @author hjf
 * @date 2022-10-24 14:27
 * @describe
 */
@Data
@NoArgsConstructor
@AllArgsConstructor
public class LoginUser extends UserInfo implements UserDetails {

    @ApiModelProperty(value = "凭证")
    private List<GrantedAuthority> authorities;

    @Override
    public String getPassword() {
        return this.password;
    }

    @Override
    public String getUsername() {
        return this.userName;
    }

    @Override
    public boolean isAccountNonExpired() {
        return true;
    }

    @Override
    public boolean isAccountNonLocked() {
        return true;
    }

    @Override
    public boolean isCredentialsNonExpired() {
        return true;
    }

    @Override
    public boolean isEnabled() {
        return this.status != 1;
    }


    private String roles;
    //** 获取角色信息
    @Override
    public Collection<? extends GrantedAuthority> getAuthorities() {
        if (StringUtils.isNotBlank(this.roles)){
            //获取数据库中角色
            this.authorities = Stream.of(this.roles.split(",")).map(role ->{
                return new SimpleGrantedAuthority(role);
            }).collect(Collectors.toList());
        }else{
            // 如果角色为空
            this.authorities = AuthorityUtils
                    .commaSeparatedStringToAuthorityList("ROLE_USER");
        }
        return this.authorities;
    }
}
UserInfo:
package com.love.entity;

import com.baomidou.mybatisplus.annotation.TableName;
import com.love.entity.base.BaseEntity;
import io.swagger.annotations.ApiModelProperty;
import lombok.AllArgsConstructor;
import lombok.Data;
import lombok.NoArgsConstructor;

/**
 * @author hjf
 * @date 2022-10-19 10:24
 * @describe 用户
 */
@Data
@NoArgsConstructor
@AllArgsConstructor
@TableName(value ="user_info")
public class UserInfo extends BaseEntity {

    @ApiModelProperty(value = "用户名称")
    public String userName;

    @ApiModelProperty(value = "登录密码 加密")
    public String password;

    @ApiModelProperty(value = "登录密码 原始密码")
    public String originalPassword;

    @ApiModelProperty(value = "头像")
    public String avatar;

    /**
     * {@link com.love.enumerate.Gender}
     */
    @ApiModelProperty(value = "性别")
    public Integer gender;

    /**
     * {@link com.love.enumerate.YesOrNo}
     */
    @ApiModelProperty(value = "状态")
    public Integer status;

    @ApiModelProperty(value = "备注")
    public String remark;

}
BaseEntity:
package com.love.entity.base;

import com.baomidou.mybatisplus.annotation.*;
import com.fasterxml.jackson.annotation.JsonFormat;
import com.fasterxml.jackson.databind.annotation.JsonDeserialize;
import com.fasterxml.jackson.databind.annotation.JsonSerialize;
import com.fasterxml.jackson.datatype.jsr310.deser.LocalDateTimeDeserializer;
import com.fasterxml.jackson.datatype.jsr310.ser.LocalDateTimeSerializer;
import io.swagger.annotations.ApiModelProperty;
import lombok.AllArgsConstructor;
import lombok.Data;
import lombok.NoArgsConstructor;

import java.io.Serializable;
import java.time.LocalDateTime;

/**
 * @author hjf
 * @date 2022-10-19 10:26
 * @describe 基础类
 */
@Data
@NoArgsConstructor
@AllArgsConstructor
public class BaseEntity implements Serializable {

    private static final long serialVersionUID = 1L;

    @TableId(type = IdType.ASSIGN_ID)
    @ApiModelProperty(name = "id", value = "表主键")
    public Long id;

    @ApiModelProperty(name = "deleted", value = "逻辑删除标记 是否已删除: 0否  1是")
    @TableLogic
    public Integer deleted;

    @JsonFormat(pattern = "yyyy-MM-dd HH:mm:ss", timezone = "GMT+8")
    @JsonDeserialize(using = LocalDateTimeDeserializer.class)
    @JsonSerialize(using = LocalDateTimeSerializer.class)
    @TableField(fill = FieldFill.INSERT)
    @ApiModelProperty(name = "createTime", value = "创建时间")
    public LocalDateTime createTime;

    @JsonFormat(pattern = "yyyy-MM-dd HH:mm:ss", timezone = "GMT+8")
    @JsonDeserialize(using = LocalDateTimeDeserializer.class)
    @JsonSerialize(using = LocalDateTimeSerializer.class)
    @TableField(fill = FieldFill.INSERT_UPDATE)
    @ApiModelProperty(name = "updateTime", value = "修改时间")
    public LocalDateTime updateTime;
}
UserInfoMapper.xml:
<?xml version="1.0" encoding="UTF-8"?>
<!DOCTYPE mapper
        PUBLIC "-//mybatis.org//DTD Mapper 3.0//EN"
        "http://mybatis.org/dtd/mybatis-3-mapper.dtd">
<mapper namespace="com.love.mapper.UserInfoMapper">

    <!--详情-->
    <select id="getByUserName" resultType="com.love.entity.UserInfo">
        select
        id,
        user_name,
        password,
        avatar,
        gender,
        remark,
        status,
        deleted,
        create_time,
        update_time
        from
        user_info
        where
        user_name = #{userName}
        limit 1
    </select>

    <!--详情-->
    <select id="getById" resultType="com.love.entity.UserInfo">
        select
        id,
        user_name,
        password,
        avatar,
        gender,
        remark,
        status,
        deleted,
        create_time,
        update_time
        from
        user_info
        where
        id = #{id}
        limit 1
    </select>

</mapper>
UserInfoMapper.java:
package com.love.mapper;

import com.baomidou.mybatisplus.core.mapper.BaseMapper;
import com.love.entity.UserInfo;
import org.apache.ibatis.annotations.Param;

/**
 * @author hjf
 * @date 2022-10-19 10:26
 * @describe 用户mapper
 */
public interface UserInfoMapper extends BaseMapper<UserInfo> {

    /**
     * 用户详情
     *
     * @param userName 用户名
     * @return UserInfo
     */
    UserInfo getByUserName(@Param("userName") String userName);

    /**
     * 用户详情
     *
     * @param id 用户ID
     * @return UserInfo
     */
    UserInfo getById(@Param("id") Long id);
}
UserInfoService:
package com.love.service;

import com.baomidou.mybatisplus.extension.service.IService;
import com.love.entity.base.Result;
import com.love.entity.UserInfo;

/**
 * @author hjf
 * @date 2022-10-19 10:26
 * @describe 用户service
 */
public interface UserInfoService extends IService<UserInfo> {

    /**
     * 用户登录
     *
     * @return Result<UserInfo>
     */
    Result<UserInfo> login(String userName,String password);

    /**
     * 用户详情
     *
     * @param id
     * @return Result<UserInfo>
     */
    Result<UserInfo> getUserInfoById(Long id);
}
UserInfoServiceImpl:
package com.love.service.impl;

import com.baomidou.mybatisplus.extension.service.impl.ServiceImpl;
import com.love.entity.UserInfo;
import com.love.entity.base.Result;
import com.love.enumerate.YesOrNo;
import com.love.mapper.UserInfoMapper;
import com.love.service.UserInfoService;
import lombok.RequiredArgsConstructor;
import lombok.extern.slf4j.Slf4j;
import org.springframework.security.crypto.bcrypt.BCryptPasswordEncoder;
import org.springframework.security.crypto.password.PasswordEncoder;
import org.springframework.stereotype.Service;

/**
 * @author hjf
 * @date 2022-10-19 10:26
 * @describe 用户service
 */
@Slf4j
@Service
@RequiredArgsConstructor
public class UserInfoServiceImpl extends ServiceImpl<UserInfoMapper, UserInfo> implements UserInfoService {

    private final UserInfoMapper userInfoMapper;


    /**
     * 用户登录
     *
     * @return Result<UserInfo>
     */
    @Override
    public Result<UserInfo> login(String userName,String password) {
        UserInfo userInfo = userInfoMapper.getByUserName(userName);
        if(userInfo != null){
            if(userInfo.getDeleted().equals(YesOrNo.YES.getValue())){
                return Result.failMsg("登录失败,账号已注销");
            }
            if(userInfo.getStatus().equals(YesOrNo.YES.getValue())){
                return Result.failMsg("登录失败,账号已禁用,请联系客服人员");
            }
            PasswordEncoder encoder = new BCryptPasswordEncoder();
            boolean matches = encoder.matches(password, userInfo.getPassword());
            if (!matches) {
                return Result.failMsg("账号或密码错误");
            }
            return Result.OK(userInfo);
        }else{
            return Result.failMsg("账号或密码错误");
        }


    }

    /**
     * 获取用户详情
     *
     * @return Result<UserInfo>
     */
    @Override
    public Result<UserInfo> getUserInfoById(Long id) {
        //方式1
        //UserInfo userInfo = getById(id);

        //方式2
        //QueryWrapper<UserInfo> wrapper = new QueryWrapper<>();
        //wrapper.eq("id", id);
        //UserInfo userInfo = getOne(wrapper);

        //方式3
        UserInfo userInfo = userInfoMapper.getById(id);
        if(userInfo != null){
            return Result.OK(userInfo);
        }
        return Result.fail();
    }
}
UserInfoController:
package com.love.controller;

import com.love.entity.base.Result;
import com.love.entity.UserInfo;
import com.love.entity.vo.LoginUser;
import com.love.service.UserInfoService;
import io.swagger.annotations.Api;
import io.swagger.annotations.ApiOperation;
import io.swagger.annotations.ApiParam;
import lombok.RequiredArgsConstructor;
import lombok.extern.slf4j.Slf4j;
import org.springframework.security.core.Authentication;
import org.springframework.web.bind.annotation.*;

/**
 * @author hjf
 * @date 2022-10-19 10:26
 * @describe 用户controller
 */
@Api(tags = "用户管理")
@Slf4j
@RestController
@RequiredArgsConstructor
@RequestMapping("/user")
public class UserInfoController {

    private final UserInfoService userInfoService;

    @ApiOperation(value = "账密登录", notes = "账密登录")
    @GetMapping("/login")
    public Result<UserInfo> login(
            @ApiParam("用户名") @RequestParam("userName") String userName,
            @ApiParam("密码") @RequestParam("password") String password
    ) {
        return userInfoService.login(userName,password);
    }

    @ApiOperation(value = "根据ID获取用户", notes = "根据ID获取用户")
    @GetMapping("/getUserInfoById")
    public Result<UserInfo> getUserInfoById(@ApiParam("用户ID") @RequestParam("id") Long id) {
        return userInfoService.getUserInfoById(id);
    }

    @ApiOperation(value = "获取登录信息", notes = "获取登录信息")
    @GetMapping("/me")
    public Result<LoginUser> postAccessToken(Authentication authentication){
        LoginUser loginUser = (LoginUser) authentication.getPrincipal();
        return Result.OK(loginUser);
    }
}
十二.OAuth2.0简述
OAuth2.0认证授权过程
OAuth2.0简单历史回顾
OAuth2.06种全新流程

为开发者提供学习成长、分享交流、生态实践、资源工具等服务,帮助开发者快速成长。
更多推荐


 2
2 0
0- 0


 已为社区贡献9条内容

所有评论(0)