RedisTemplate Pipeline 管道使用
当需要执行大批量的写入或者查询时,使用redis一条条命令的执行性能肯定没有一次性执行完要好;假设执行完一条redis命令的网络耗时为20ms,有1万条命令需要执行,算一下光发送这些命令的网络耗时就达到200,000ms(200s),这是不能接受的,我们可以使用提供的管道进行批量执行。Redis提供了对pipelining的支持,在向服务器发送多个命令时,无需等待每一条命令响应,然后在一个步骤中读
官网文档:https://docs.spring.io/spring-data/redis/docs/current/reference/html/
一、前言
当需要执行大批量的写入或者查询时,使用 redis 一条条命令的执行性能肯定没有一次性执行完要好;假设执行完一条 redis 命令的网络耗时为 20ms,有 1 万条命令需要执行,算一下光发送这些命令的网络耗时就达到 200,000ms(200s),这是不能接受的,我们可以使用 RedisTemplate 提供的管道进行批量执行。
根据官网的描述:Redis 提供了对 pipelining 的支持,在向服务器发送多个命令时,无需等待每一条命令响应,然后在一个步骤中读取所有的响应。经过打包命令发送与返回,在一定程度上节省了网络io耗时。
二、Pipelining 介绍与使用
我们使用 Spring 的RedisTemplate 来执行管道操作,RedisTemplate 提供了管道的方法,如下图:
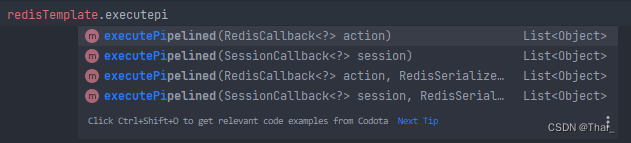
可以看到主要为 SessionCallback 与 RedisCallback,它们的区别主要为 API 的封装,RedisCallback 为原生的 api,SessionCallback 为 Spring 封装的 api。
下图为 SessionCallback 的方法:
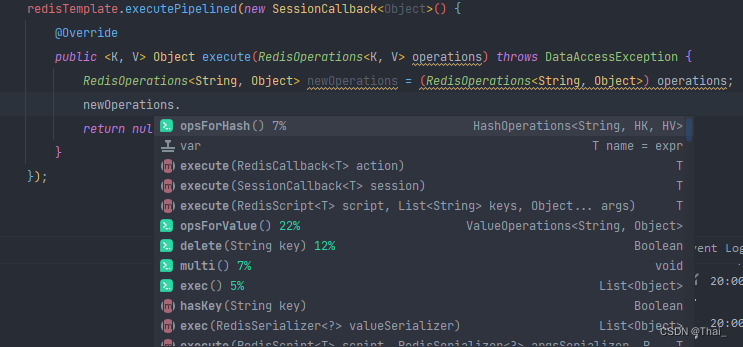
追踪源码可以知道入参 RedisOperations<K, V> operations 其实就是 RedisTemplate 本身,因此所有操作都是经过封装的 api
	private Object executeSession(SessionCallback<?> session) {
		return session.execute(this);
	}
下图为 RedisConnection 的方法:
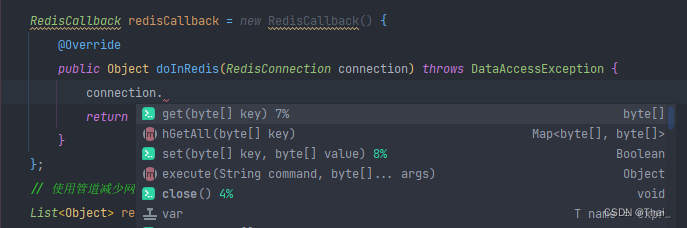
同样的,我们追踪源码可以知道入参为 RedisConnection
public <T> T execute(RedisCallback<T> action, boolean exposeConnection, boolean pipeline) {

		// 略...

		RedisConnectionFactory factory = getRequiredConnectionFactory();
		RedisConnection conn = RedisConnectionUtils.getConnection(factory, enableTransactionSupport);

		try {

			boolean existingConnection = TransactionSynchronizationManager.hasResource(factory);
			RedisConnection connToUse = preProcessConnection(conn, existingConnection);

			boolean pipelineStatus = connToUse.isPipelined();
			if (pipeline && !pipelineStatus) {
				connToUse.openPipeline();
			}

			RedisConnection connToExpose = (exposeConnection ? connToUse : createRedisConnectionProxy(connToUse));
			// 入参为 connection
			T result = action.doInRedis(connToExpose);

			// close pipeline
			if (pipeline && !pipelineStatus) {
				connToUse.closePipeline();
			}

			return postProcessResult(result, connToUse, existingConnection);
		} finally {
			RedisConnectionUtils.releaseConnection(conn, factory, enableTransactionSupport);
		}
	}
因此它们两个的主要区别就是提供的方法不同,如果想使用原生的 api 则使用 RedisCallback,想使用 Spring 给我们封装后的 api 则使用 SessionCallback。
介绍了管道的基本实现,下面以 SessionCallback 实现来讲讲如何使用:
写入:
SessionCallback<?> sessionCallback = new SessionCallback<>() {
    @Override
    public <K, V> Object execute(RedisOperations<K, V> operations) throws DataAccessException {
        // 转为你 RedisTemplate 即可
        RedisTemplate<String, Object> ops = (RedisTemplate<String, Object>) operations;
        ops.opsForValue().set("key", "value");
        // 必须返回 null,
        return null;
    }
};
redisTemplate.executePipelined(sessionCallback);
需要注意的是返回值必须为 null,否则会报错;源码判断结果是否为 null 逻辑如下:
Object result = executeSession(session);
if (result != null) {
    throw new InvalidDataAccessApiUsageException("Callback cannot return a non-null value as it gets overwritten by the pipeline");
}
读取:
SessionCallback<?> sessionCallback = new SessionCallback<>() {
    @Override
    public <K, V> Object execute(RedisOperations<K, V> operations) throws DataAccessException {
        // 转为你 RedisTemplate 即可
        RedisTemplate<String, Object> ops = (RedisTemplate<String, Object>) operations;
        ops.opsForValue().get("key");
        // 必须返回 null,
        return null;
    }
};
redisTemplate.executePipelined(sessionCallback);
需要注意的是我们不能直接将结果存储起来,类似这样 ×
List<Object> results = new ArrayList<>(10);
SessionCallback<?> sessionCallback = new SessionCallback<>() {
    @Override
    public <K, V> Object execute(RedisOperations<K, V> operations) throws DataAccessException {
        // 转为你 RedisTemplate 即可
        RedisTemplate<String, Object> ops = (RedisTemplate<String, Object>) operations;
        results.add(ops.opsForValue().get("key"));
        // 必须返回 null,
        return null;
    }
};
这样子是拿不到需要的查询结果,正确的做法是从管道执行的返回结果获取 √
List<Object> resultObjs = redisTemplate.executePipelined(sessionCallback);
而从源码可以知道,结果确实也是从管道中拿到的
Object result = executeSession(session);
if (result != null) {
	throw new InvalidDataAccessApiUsageException("Callback cannot return a non-null value as it gets overwritten by the pipeline");
}
// 里面的实现大致是从 future 中 get 拿到结果;具体步骤这里不做分析,有兴趣的可以自己看源码
List<Object> closePipeline = connection.closePipeline();
三、测试
下面测试一下使用管道与不使用管道写入 key 耗时。注:Redis 为单节点
- 先测试不使用管道,写入 1 万个 key 耗时
    @Test
    public void write() {
        TimeInterval timer = DateUtil.timer();
        String keyPrefix = "writeTest:";
        ValueOperations<String, Object> operations = redisTemplate.opsForValue();
        for (int i = 0; i < 10000; i++) {
            operations.set(keyPrefix + i, i);
        }
        System.out.println("写入 1 万个 key 耗时:" + timer.intervalMs() + " ms");
    }
输出结果为:写入 1 万个 key 耗时:5796 ms
- 再测试使用管道的耗时情况
@Test
   public void write() {
       TimeInterval timer = DateUtil.timer();
       String keyPrefix = "writeTest:";
       SessionCallback<?> sessionCallback = new SessionCallback<>() {
           @Override
           public <K, V> Object execute(RedisOperations<K, V> opt) throws DataAccessException {
               RedisTemplate<String, Object> template = (RedisTemplate<String, Object>) opt;
               ValueOperations<String, Object> operations = template.opsForValue();
               for (int i = 0; i < 10000; i++) {
                   operations.set(keyPrefix + i, i);
               }
               return null;
           }
       };
       redisTemplate.executePipelined(sessionCallback);
       System.out.println("写入 1 万个 key 耗时:" + timer.intervalMs() + " ms");
   }
输出结果为:写入 1 万个 key 耗时:626 ms
从输出的结果就能明显看出管道的使用对批量插入与读取的性能有很大的提升!!
四、总结
本文主要介绍了在 Spring 中使用管道的两种方式,分别为 SessionCallback 与 RedisCallback 的方法重载;介绍了它们之间的区别,并介绍了 SessionCallback 方法如何进行写入与读取;最后简单的对使用管道与不使用管道在批量写入的情况下性能的差异。

为开发者提供学习成长、分享交流、生态实践、资源工具等服务,帮助开发者快速成长。
更多推荐


 4
4 0
0- 0


 已为社区贡献5条内容

所有评论(0)