4、docker-compose安装elasticsearch:7.12.0带用户名密码验证并配置es-head连接
搭建es带用户名密码验证,并能es-head登录,及简单命令
·
目录
- 一、搭建es,带用户名密码验证
- 1、(基础文件准备开始)创建`instances.yml` 标识您需要为其创建证书的实例。
- 2、创建`create-certs.yml` 用来生成Elasticsearch和Kibana的证书。
- 3、创建单节点es配置elastic-docker-tls.yml
- 4、(开始)通过启动create-certs容器为Elasticsearch生成证书:
- 5、建立单节点的Elasticsearch集群:
- 6、运行该elasticsearch-setup-passwords工具为所有内置用户(包括该kibana_system用户)生成密码,自动生成密码用auto, 自己设置用 interactive。
- 7、访问es
- 二、es-head连接方式
- 三、连接es常用命令
一、搭建es,带用户名密码验证
Elastic 安全是非常重要的。没有这个我们的数据可以被任何的人进行访问,串改,删除。Elastic Stack 的安全是由 x-pack 所提供的。在 Elastic Stack 7.0 版本之前,这个是商用的版本,需要进行安装,并购买。从Elastic Stack 7.0之后,x-pack 都已经在发布版中,所以不需要进行安装。我们只需要进行配置就可以了。
参考:docker-compose安装ELK7.12.0并启用x-pack及kibana设置日志报警 中的 es01部署
具体如下
1、(基础文件准备开始)创建instances.yml 标识您需要为其创建证书的实例。
instances:
  - name: es01
    dns:
      - es01
      - localhost
    ip:
      - 192.168.181.52

  - name: 'kib01'
    dns:
      - kib01
      - localhost
2、创建create-certs.yml 用来生成Elasticsearch和Kibana的证书。
version: '2'

services:
  create_certs:
    image: docker.elastic.co/elasticsearch/elasticsearch:7.12.0
    #image: elk_es:v1
    container_name: create_certs
    command: >
      bash -c '
        yum install -y -q -e 0 unzip;
        if [[ ! -f /certs/bundle.zip ]]; then
          bin/elasticsearch-certutil cert --silent --pem --in config/certificates/instances.yml -out /certs/bundle.zip;
          unzip /certs/bundle.zip -d /certs;
        fi;
        chown -R 1000:0 /certs
      '
    working_dir: /usr/share/elasticsearch
    volumes:
      #- certs:/certs
      - ./certs:/certs
      - .:/usr/share/elasticsearch/config/certificates
    networks:
      - elastic

#volumes:
#  certs:
#    driver: local

networks:
  elastic:
    driver: bridge
3、创建单节点es配置elastic-docker-tls.yml
version: '2.1'
services:
  es01:
    image: docker.elastic.co/elasticsearch/elasticsearch:7.12.0
    container_name: es01
    restart: always
    environment:
      - "discovery.type=single-node"
      - "ES_JAVA_OPTS=-Xms2048m -Xmx2048m"
      # 生成并应用支持传输层安全性的试用许可证。
      - xpack.license.self_generated.type=trial
      - xpack.security.enabled=true
      # 启用传输层安全性以加密客户端通信。
      - xpack.security.http.ssl.enabled=true
      - xpack.security.http.ssl.key=/usr/share/elasticsearch/config/certificates/es01/es01.key
      - xpack.security.http.ssl.certificate_authorities=/usr/share/elasticsearch/config/certificates/ca/ca.crt
      - xpack.security.http.ssl.certificate=/usr/share/elasticsearch/config/certificates/es01/es01.crt
      # 启用传输层安全性以加密节点间通信。
      - xpack.security.transport.ssl.enabled=true
      # 通过不需要主机名验证来允许使用自签名证书。
      - xpack.security.transport.ssl.verification_mode=certificate
      - xpack.security.transport.ssl.certificate_authorities=/usr/share/elasticsearch/config/certificates/ca/ca.crt
      - xpack.security.transport.ssl.certificate=/usr/share/elasticsearch/config/certificates/es01/es01.crt
      - xpack.security.transport.ssl.key=/usr/share/elasticsearch/config/certificates/es01/es01.key
      - "http.cors.enabled=true"
      - "http.cors.allow-origin=*"
      - "http.cors.allow-headers=Authorization,X-Requested-With,Content-Length,Content-Type"
    ulimits:
      memlock:
        soft: -1
        hard: -1
    volumes:
      - ./data01:/usr/share/elasticsearch/data
      - ./certs:/usr/share/elasticsearch/config/certificates
    ports:
      - 9200:9200
    networks:
      - elastic
    healthcheck:
      test: curl --cacert /usr/share/elasticsearch/config/certificates/ca/ca.crt -s https://localhost:9200 >/dev/null; if [[ $$? == 52 ]]; then echo 0; else echo 1; fi
      # 每次检查之间的间隔时间
      interval: 30s
      # 运行命令的超时时间
      timeout: 10s
      # 重试次数
      retries: 5

  es-head:
    image: mobz/elasticsearch-head:5
    container_name: elasticsearch-head
    restart: always
    ports:
      - 9100:9100

networks:
  elastic:
    driver: bridge
4、(开始)通过启动create-certs容器为Elasticsearch生成证书:
[root@dev23 stack_elk]# docker-compose -f create-certs.yml run --rm create_certs
5、建立单节点的Elasticsearch集群:
[root@dev23 stack_elk]# mkdir data01
[root@dev23 stack_elk]# chmod 777 data01
[root@dev23 stack_elk]# docker-compose -f elastic-docker-tls.yml up -d es01
6、运行该elasticsearch-setup-passwords工具为所有内置用户(包括该kibana_system用户)生成密码,自动生成密码用auto, 自己设置用 interactive。
[root@dev23 stack_elk]# docker exec es01 /bin/bash -c "bin/elasticsearch-setup-passwords auto --batch --url https://es01:9200"

#为elastic用户设置密码后,引导密码将不再有效。并且再次执行elasticsearch-setup-passwords命令会抛出异常
Failed to authenticate user 'elastic' against https://es01:9200/_security/_authenticate?pretty
Possible causes include:
 * The password for the 'elastic' user has already been changed on this cluster
 * Your elasticsearch node is running against a different keystore
   This tool used the keystore at /usr/share/elasticsearch/config/elasticsearch.keystore

ERROR: Failed to verify bootstrap password
要重新设置密码,第一步,需要设置es无密码起动,更改es的启动文件elastic-docker-tls.yml,更改如下:
xpack.security.enabled=false
xpack.security.http.ssl.enabled=false
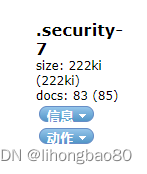
第二步,用es-head 连接es删除索引 .security-7
第三步,改回es的启动文件elastic-docker-tls.yml的两个值,后再执行 第6步 重新生成密码
xpack.security.enabled=true
xpack.security.http.ssl.enabled=true
7、访问es
浏览器访问:https://192.168.181.52:9200/ ,输入用户名密码
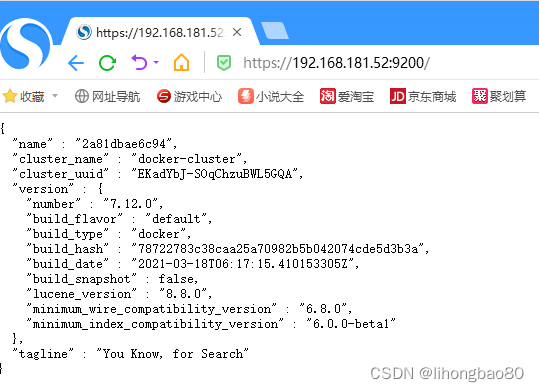
命令访问:
curl -u elastic:n8uZfbZqpnlXxdxY5IES 'https://192.168.181.52:9200' -k
或者
 curl 'https://elastic:n8uZfbZqpnlXxdxY5IES@192.168.181.52:9200' -k
在这里, elastic 是超级用户的用户名,password 是我们设置的密码
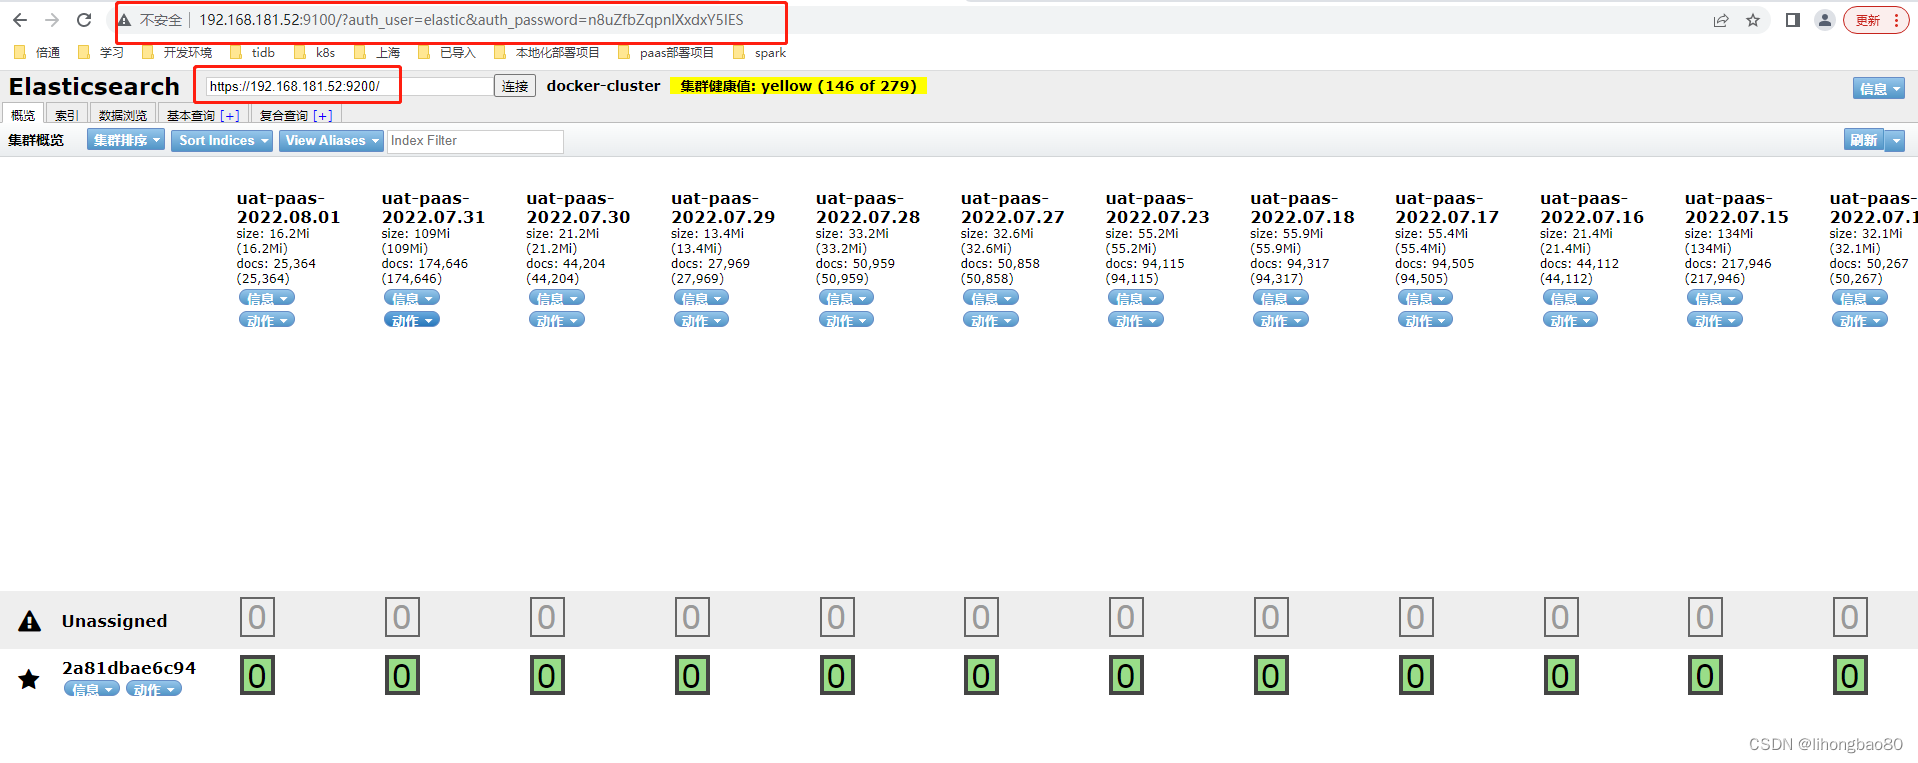
二、es-head连接方式
es-head连接地址:http://192.168.181.52:9100/?auth_user=elastic&auth_password=n8uZfbZqpnlXxdxY5IES,
es地址:https://192.168.181.52:9200/
如下图所示
cors解释:Cross Origin Resource Sharing 跨域资源共享

http.cors.enabled 是否支持跨域,默认为false
http.cors.allow-origin 当设置允许跨域,默认为*,表示支持所有域名,如果我们只是允许某些网站能访问,那么可以使用正则表达式。比如只允许本地地址。 /https?:\ /\ /localhost(:[0-9]+)?/
http.cors.max-age 浏览器发送一个“预检”OPTIONS请求,以确定CORS设置。最大年龄定义多久的结果应该缓存。默认为1728000(20天)
http.cors.allow-methods 允许跨域的请求方式,默认OPTIONS,HEAD,GET,POST,PUT,DELETE
http.cors.allow-headers 跨域允许设置的头信息,默认为X-Requested-With,Content-Type,Content-Length
http.cors.allow-credentials 是否返回设置的跨域Access-Control-Allow-Credentials头,如果设置为true,那么会返回给客户端。
三、连接es常用命令
#查看所有索引
#方法一:
curl --cacert certs/ca/ca.crt -u elastic:n8uZfbZqpnlXxdxY5IES 'https://192.168.181.52:9200/_cat/indices?v'
#方法二:
curl --user elastic:n8uZfbZqpnlXxdxY5IES 'https://192.168.181.52:9200/_cat/indices?v' -k
#删除索引
#方法一:
curl --cacert certs/ca/ca.crt -u elastic:n8uZfbZqpnlXxdxY5IES -XDELETE https://192.168.181.52:9200/*-2022.06.02
#方法二:
curl -u elastic:n8uZfbZqpnlXxdxY5IES -XDELETE https://192.168.181.52:9200/*-2022.06.02 -k

为开发者提供学习成长、分享交流、生态实践、资源工具等服务,帮助开发者快速成长。
更多推荐


 4
4 0
0- 0


 已为社区贡献13条内容

所有评论(0)