Linux dts设备树和platform驱动详解
概念小麦大叔 2019-05-06 22:56:31 12603 收藏 135什么是设备树 dts(device tree)?设备树(Device Tree)是描述计算机的特定硬件设备信息的数据结构,以便于操作系统的内核可以管理和使用这些硬件,包括CPU或CPU,内存,总线和其他一些外设。dtb文件会被保存到ROM中,最终通过bootbolader被加载到内核,这样内核就可以通过解析设备树来让驱动
概念
小麦大叔 2019-05-06 22:56:31 12603 收藏 135
什么是设备树 dts(device tree)?
设备树(Device Tree)是描述计算机的特定硬件设备信息的数据结构,以便于操作系统的内核可以管理和使用这些硬件,包括CPU或CPU,内存,总线和其他一些外设。dtb文件会被保存到ROM中,最终通过bootbolader被加载到内核,这样内核就可以通过解析设备树来让驱动去控制实际的硬件了。
设备树是通过Open Firmware项目从基于SPARC的工作站和服务器派生而来的。当前的Devicetree一般针对嵌入式系统,但仍然与某些服务器级系统一起使用(例如,Power Architecture Platform Reference所描述的系统)。
然而x86架构的个人计算机通常不使用设备树,而是依靠各种自动配置协议来识别硬件。使用设备树的系统通常将静态设备树(可能存储在ROM中)传递给操作系统,但也可以在引导的早期阶段生成设备树。例如,U-Boot和kexec可以在启动新操作系统时传递设备树。一些系统使用的引导加载程序可能不支持设备树,但是可以与操作系统一起安装静态设备树,Linux内核支持这种方法。
Device Tree规范目前由名为devicetree.org的社区管理,该社区与Linaro和Arm等相关联。
Linux内核源码下的文档Documentation/devicetree/bindings。

使用设备树的优势有哪些?
Linux内核从3.x版本之后开始支持使用设备树,这样做的意义重大,可以实现驱动代码与设备的硬件信息相互的隔离,减少了代码中的耦合性,在此之前,一些与硬件设备相关的具体信息都要写在驱动代码中,如果外设发生相应的变化,那么驱动代码就需要改动。但是在引入了设备树之后,这种尴尬的情况找到了解决的办法,通过设备树对硬件信息的抽象,驱动代码只要负责处理逻辑,而关于设备的具体信息存放到设备树文件中,这样,如果只是硬件接口信息的变化而没有驱动逻辑的变化,开发者只需要修改设备树文件信息,不需要改写驱动代码。
简介
(1) dts
硬件的相应信息都会写在.dts为后缀的文件中,每一款硬件可以单独写一份xxxx.dts,一般在Linux源码中存在大量的dts文件,对于arm架构可以在arch/arm/boot/dts找到相应的dts,另外mips则在arch/mips/boot/dts,powerpc在arch/powerpc/boot/dts。
(2) dtsi
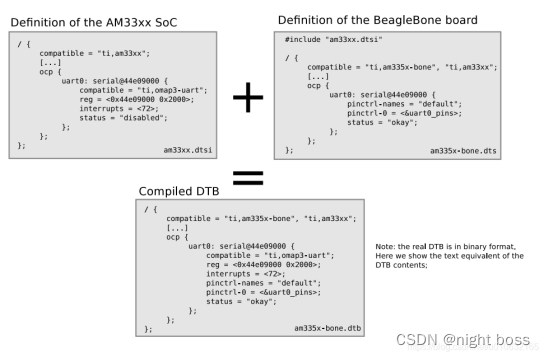
值得一提的是,对于一些相同的dts配置可以抽象到dtsi文件中,然后类似于C语言的方式可以include到dts文件中,对于同一个节点的设置情况,dts中的配置会覆盖dtsi中的配置。具体如下图所示;
(3) dtc
dtc是编译dts的工具,可以在Ubuntu系统上通过指令apt-get install device-tree-compiler安装dtc工具,不过在内核源码scripts/dtc路径下已经包含了dtc工具。
(4) dtb
dtb(Device Tree Blob),dts经过dtc编译之后会得到dtb文件,dtb通过Bootloader引导程序加载到内核。所以Bootloader需要支持设备树才行;Kernel也需要加入设备树的支持。

基本框架
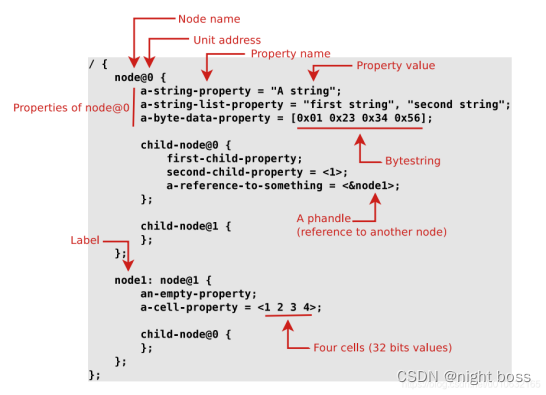
下图是一个设备树文件的基本架构;大概看了一下有点类似于XML文件,简单概括一下有这几个部分;
根节点:
设备节点:nodex
节点名称:图中node;
节点地址:node@0就是节点的地址;
子节点:childnode
属性:属性名称(Property name)和属性值(Property value)
标签
具体如下图所示;
实例
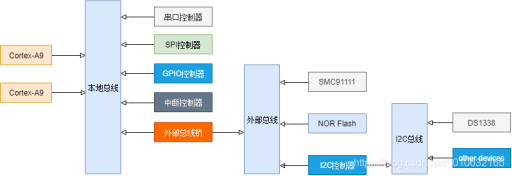
硬件结构
1个双核ARM Cortex-A932位处理器;
ARM本地总线上的内存映射区域分布有两个串口(分别位于0x101F1000和0x101F2000)
GPIO控制器(位于0x101F3000)
SPI控制器(位于0x10170000)
中断控制器(位于0x10140000)
外部总线桥上连接的设备如下:
SMC SMC91111以太网(位于0x10100000)
I2C控制器(位于0x10160000)
64MB NOR Flash(位于0x30000000)
外部总线桥上连接的I2C控制器所对应的I2C总线上又连接了Maxim DS1338实时钟(I2C地址为0x58)
具体如下图所示:
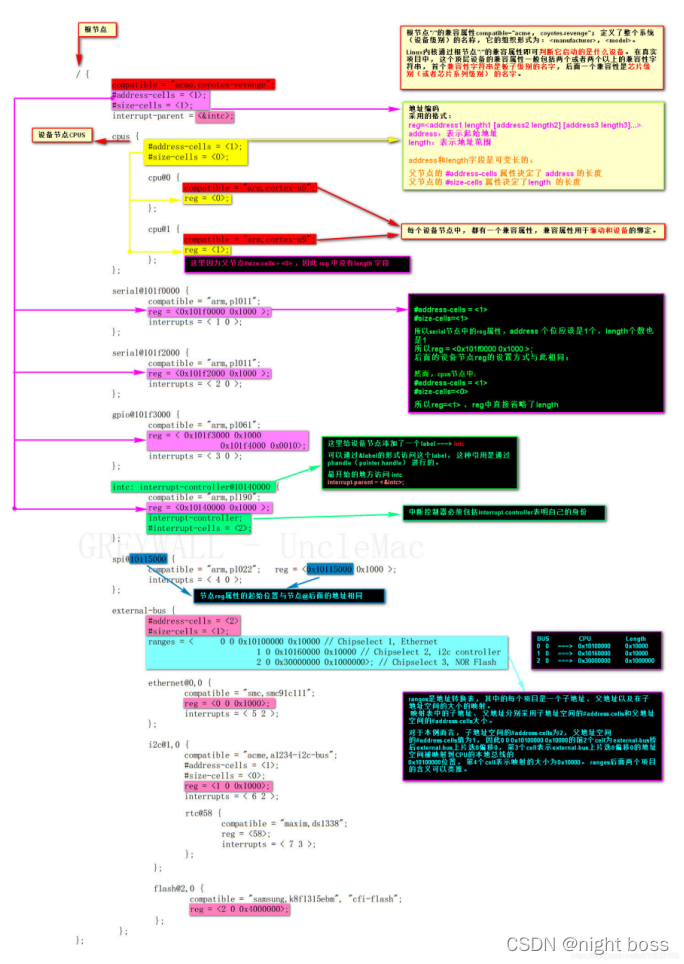
设备树dts文件
那么,如何将上面的硬件结构,通过设备树语言描述成dts文件呢?具体我实现在下图,并且做出了详细的解释。其中需要注意的有以下几个属性:
compatitable:兼容性属性;
#address-cells,#size-cells:地址编码所采用的格式;
节点名称@节点地址:例如gpio@101f3000,这里名称和地址要和实际的对应起来;
标签:例如interrupt-parent = <&intc;,这这里的intc就是一个标签(label),通过&可以获取它的值,这里可以简单的理解成一个变量,然后在下面需要对这个标签进行另外的解析,例如intc:interrupt-controller@10140000;所以,这两个地方的intc都是对应起来的。
最后,具体的实现可以参考下图;
设备树常用的属性
① #address-cells、#size-cells 。cell 指一个 32 位的数值, address-cells:address 要用多少个 32 位数来表示;size-cells:size 要用多少个 32 位数来表示。
② compatible 表示可以"兼容"什么
③ model 准确地定义这个硬件是什么
④ status 明确此设备的状态
⑤ reg 用来表示寄存器地址 也可以用来描述一段空间
⑥ name 表示节点的名字 在跟 platform_driver 匹配时,优先级最低。
⑦ device_type 表示节点的类型跟 platform_driver 匹配时,优先级为中。
示例1:(涉及①address-cells和⑤ reg)
下例中,address-cells 为 1,所以 reg 中用 1 个数来表示地址,即用 0x80000000 来表
示地址;size-cells 为 1,所以 reg 中用 1 个数来表示大小,即用 0x20000000 表示大小:
/ {
#address-cells = <1;
#size-cells = <1;
memory {
reg = <0x80000000 0x20000000;
};
};
示例2 :涉及② compatible ③ model
/ {
compatible = “samsung,smdk2440”, “samsung,mini2440”;
model = “jz2440_v3”;
};
它表示这个单板,可以兼容内核中的"smdk2440",也兼容"mini2440"。从 compatible 属性中可以知道它兼容哪些板,但是它到底是什么板?用 model 属性来明确。
示例3:涉及④ status
&uart1 {
status = “disabled”;
};
dtsi 文件中定义了很多设备,但是在你的板子上某些设备是没有的。这时你可以给这个设备节点添加一个 status 属性,设置为"disabled".
Value Description
“okay” 设备正常运行
“disabled” 设备不可操作,但是后面可能恢复工作
“fail” 发生了严重错误,需修复
“fail-sss” 发生了严重错误,需要修复;sss表示错误信息
dtb转换成device_node
博客园 牧野星辰
本设备树解析基于arm平台
struct device_node结构:
struct device_node {
    const char *name;
    const char *type;
    phandle phandle;
    const char *full_name;
    struct fwnode_handle fwnode;

    struct property *properties;
    struct property *deadprops; /* removed properties */
    struct device_node *parent;
    struct device_node *child;
    struct device_node *sibling;
    struct kobject kobj;
    unsigned long _flags;
    void *data;
    #if defined(CONFIG_SPARC)
        const char *path_component_name;
        unsigned int unique_id;
        struct of_irq_controller *irq_trans;
    #endif
}

struct property {
    char *name;
    int length;
    void *value;
    struct property *next;
    unsigned long _flags;
    unsigned int unique_id;
    struct bin_attribute attr;
};
.name属性:设备节点中的name属性转换而来。
.type属性:由设备节点中的device_type转换而来。
.phandle属性:有设备节点中的"phandle"和"linux,phandle"属性转换而来,特殊的还可能由"ibm,phandle"属性转换而来。
full_name:这个指针指向整个结构体的结尾位置,在结尾位置存储着这个结构体对应设备树节点的unit_name,意味着一个struct device_node结构体占内存空间为sizeof(struct device_node)+strlen(unit_name)+字节对齐。
.properties:这是一个设备树节点的属性链表,属性可能有很多种,比如:“interrupts”,“timer”,"hwmods"等等。
.parent,.child,.sibling:与当前属性链表节点相关节点,所以相关链表节点构成整个device_node的属性节点。
.kobj:用于在/sys目录下生成相应用户文件。
"phandle"属性和"linux,phandle"属性,直接填充struct device_node 的phandle字段,不放在属性链表中。在设备树中,对于属性的描述是key = value,这个结构体中的name和value分别对应key和value,而length表示value的长度,next指针指向下一个struct property结构体。
(1) 从start_kernel开始
linux最底层的初始化部分在HEAD.s中,这是汇编代码,我们暂且不作过多讨论,在head.s完成部分初始化之后,就开始调用C语言函数,而被调用的第一个C语言函数就是start_kernel,start kernel原型是这样的:
asmlinkage __visible void __init start_kernel(void)
{
	...
	setup_arch(&command_line);
	...
}
而对于设备树的处理,基本上就在setup_arch()这个函数中。
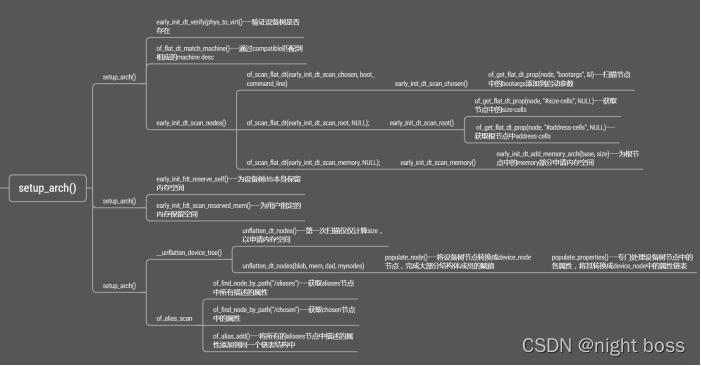
(2) setup_arch
可以看到,在start_kernel()中调用了setup_arch(&command_line);
void __init setup_arch(char **cmdline_p)
{
	const struct machine_desc *mdesc;

	mdesc = setup_machine_fdt(__atags_pointer);
	...
	arm_memblock_init(mdesc);
	...
	unflatten_device_tree();
	...
}
这三个被调用的函数就是主要的设备树处理函数,setup_machine_fdt()函数根据传入的设备树dtb的首地址完成一些初始化操作。
arm_memblock_init()函数主要是内存相关,为设备树保留相应的内存空间,保证设备树dtb本身存在于内存中而不被覆盖。用户可以在设备树中设置保留内存,这一部分同时作了保留指定内存的工作。
unflatten_device_tree()从命名可以看出,这个函数就是对设备树具体的解析,事实上在这个函数中所做的工作就是将设备树各节点转换成相应的struct device_node结构体。
下面我们再来通过代码跟踪仔细分析,先从setup_machine_fdt()开始。
(3) setup_machine_fdt(__atags_pointer)
__atags_pointer这个全局变量存储的就是r2的寄存器值,是设备树在内存中的起始地址,将设备树起始地址传递给setup_machine_fdt,对设备树进行解析。接着跟踪setup_machine_fdt()函数:
const struct machine_desc * __init setup_machine_fdt(unsigned int dt_phys)
{
	const struct machine_desc *mdesc, *mdesc_best = NULL;

	if (!dt_phys || !early_init_dt_verify(phys_to_virt(dt_phys))) --------part 1
		return NULL;
	mdesc = of_flat_dt_match_machine(mdesc_best, arch_get_next_mach); --------part 2
	early_init_dt_scan_nodes(); ------------------part 3
	...
}
第一部分先将设备树在内存中的物理地址转换为虚拟地址,然后再检查该地址上是否有设备树的魔数(magic),魔数就是一串用于识别的字节码,如果没有或者魔数不匹配,表明该地址没有设备树文件,函数返回,否则验证成功,将设备树地址赋值给全局变量initial_boot_params。
第二部分of_flat_dt_match_machine(mdesc_best, arch_get_next_mach),逐一读取设备树根目录下的compatible属性。
将compatible中的属性一一与内核中支持的硬件单板相对比,匹配成功后返回相应的machine_desc结构体指针。
machine_desc结构体中描述了单板相关的一些硬件信息,这里不过多描述。
主要的的行为就是根据这个compatible属性选取相应的硬件单板描述信息,一般compatible属性名就是"厂商,芯片型号"。
第三部分就是扫描设备树中的各节点,主要分析这部分代码。
void __init early_init_dt_scan_nodes(void)
{
	of_scan_flat_dt(early_init_dt_scan_chosen, boot_command_line);
	of_scan_flat_dt(early_init_dt_scan_root, NULL);
	of_scan_flat_dt(early_init_dt_scan_memory, NULL);
}
出人意料的是,这个函数中只有一个函数的三个调用,直觉告诉我这三个函数调用并不简单。
首先of_scan_flat_dt()这个函数接收两个参数,一个是函数指针,一个为boot_command_line,boot_command_line是一个静态数组,存放着启动参数,而of_scan_flat_dt()函数的作用就是扫描设备树中的节点,然后对各节点分别调用传入的回调函数。
在上述代码中,传入的参数分别为early_init_dt_scan_chosen,early_init_dt_scan_root,early_init_dt_scan_memory这三个函数,从名称可以猜测,这三个函数分别是处理chosen节点、root节点中除子节点外的属性信息、memory节点。
int __init early_init_dt_scan_chosen(unsigned long node, const char *uname, int depth, void *data){
	...
	p = of_get_flat_dt_prop(node, "bootargs", &l);
	if (p != NULL && l > 0)
		strlcpy(data, p, min((int)l, COMMAND_LINE_SIZE));
	...
}
经过代码分析,第一个被传入的函数参数作用是获取bootargs,然后将bootargs放入boot_command_line中,作为启动参数,而并非处理整个chosen节点。
接下来再看第二个函数调用:
int __init early_init_dt_scan_root(unsigned long node, const char *uname, int depth, void *data)
{
	dt_root_size_cells = OF_ROOT_NODE_SIZE_CELLS_DEFAULT;
	dt_root_addr_cells = OF_ROOT_NODE_ADDR_CELLS_DEFAULT;

	prop = of_get_flat_dt_prop(node, "#size-cells", NULL);
	if (prop)
		dt_root_size_cells = be32_to_cpup(prop);

	prop = of_get_flat_dt_prop(node, "#address-cells", NULL);
	if (prop)
		dt_root_addr_cells = be32_to_cpup(prop);
	...
}
通过进一步代码分析,第二个函数执行是为了将root节点中的#size-cells和#address-cells属性提取出来,并非获取root节点中所有的属性,放到全局变量dt_root_size_cells和dt_root_addr_cells中。
size-cells和address-cells表示对一个属性(通常是reg属性)的地址需要多少个四字节描述,而地址的长度需要多少个四字节描述,数据长度基本单位为4。
#size-cells = 1
#address-cells = 1
reg = <0x12345678 0x100 0x22 0x4>
在上述示例中,size-cells为1表示数据大小为一个4字节描述,address-cells为1表示地址由一个四字节描述。
而reg属性由四个四字节组成,所以存在两组地址描述,第一组是起始地址为0x12345678,长度为0x100,第二组起始地址为0x22,长度为0x4,因为在<中,所有数据都是默认为32位。
接下来看第三个函数调用:
int __init early_init_dt_scan_memory(unsigned long node, const char *uname,int depth, void *data){
...
if (!IS_ENABLED(CONFIG_PPC32) || depth != 1 || strcmp(uname, "memory@0") != 0)
return 0;
reg = of_get_flat_dt_prop(node, "reg", &l);
endp = reg + (l / sizeof(__be32));
while ((endp - reg) = (dt_root_addr_cells + dt_root_size_cells)) {
base = dt_mem_next_cell(dt_root_addr_cells, ®);
size = dt_mem_next_cell(dt_root_size_cells, ®);
early_init_dt_add_memory_arch(base, size);
}
}
函数先判断节点的unit name是memory@0,如果不是,则返回。然后将所有memory相关的reg属性取出来,根据address-cell和size-cell的值进行解析,然后调用early_init_dt_add_memory_arch()来申请相应的内存空间。
到这里,setup_machine_fdt()函数对于设备树的第一次扫描解析就完成了,主要是获取了一些设备树提供的总览信息。
接下来继续回到setup_arch()函数中,继续向下跟踪代码。
(4) arm_memblock_init
void __init arm_memblock_init(const struct machine_desc *mdesc)
{
	...
	early_init_fdt_reserve_self();
	early_init_fdt_scan_reserved_mem();
	...
}
arm_memblock_init()对于设备树的初始化而言,主要做了两件事:
调用early_init_fdt_reserve_self,根据设备树的大小为设备树分配空间,设备树的totalsize在dtb头部中有指明,因此当系统启动之后,设备树就一直存在在系统中。
扫描设备树节点中的"reserved-memory"节点,为其分配保留空间。
memblock_init对于设备树的部分解析就完成了,主要是为设备树指定保留内存空间。
接下来继续回到setup_arch()函数中,继续向下跟踪代码。
unflatten_device_tree
这一部分就进入了设备树的解析部分:
void __init unflatten_device_tree(void)
{
	__unflatten_device_tree(initial_boot_params, NULL, &of_root,early_init_dt_alloc_memory_arch, false); ------------------ part1
	of_alias_scan(early_init_dt_alloc_memory_arch); ------------------ part2
	...
}
of_alias_scan
为了讲解的方便,我们先来看part2,从名字来看,这个函数的作用是解析根目录下的alias,跟踪代码:
void of_alias_scan(void * (*dt_alloc)(u64 size, u64 align)){
	of_aliases = of_find_node_by_path("/aliases");
	of_chosen = of_find_node_by_path("/chosen");
	if (of_chosen) {
		if (of_property_read_string(of_chosen, "stdout-path", &name))
			of_property_read_string(of_chosen, "linux,stdout-path", &name);
		if (IS_ENABLED(CONFIG_PPC) && !name)
			of_property_read_string(of_aliases, "stdout", &name);
		if (name)
			of_stdout = of_find_node_opts_by_path(name, &of_stdout_options);
	}

	for_each_property_of_node(of_aliases, pp) {
		...
		ap = dt_alloc(sizeof(*ap) + len + 1, __alignof__(*ap));
		if (!ap)
			continue;
		memset(ap, 0, sizeof(*ap) + len + 1);
		ap->alias = start;
		of_alias_add(ap, np, id, start, len);
		...
	}
}
从上文贴出的程序来看,of_alias_scan()函数先是处理设备树chosen节点中的"stdout-path"或者"stdout"属性(两者最多存在其一),然后将stdout指定的path赋值给全局变量of_stdout_options,并将返回的全局struct
device_node类型数据赋值给of_stdout,指定系统启动时的log输出。
接下来为aliases节点申请内存空间,如果一个节点中同时没有name/phandle/linux,phandle,则被定义为特殊节点,对于这些特殊节点将不会申请内存空间。
然后,使用of_alias_add()函数将所有的aliases内容放置在同一个链表中。
of_chosen和of_aliases都是struct device_node型的全局数据。
__unflatten_device_tree
我们再来看最主要的设备树解析函数:
void *__unflatten_device_tree(const void *blob,struct device_node *dad,struct device_node **mynodes,void *(*dt_alloc)(u64 size, u64 align),bool detached){
	int size;

	...
	size = unflatten_dt_nodes(blob, NULL, dad, NULL);
	...
	mem = dt_alloc(size + 4, __alignof__(struct device_node));
	...
	unflatten_dt_nodes(blob, mem, dad, mynodes);
}
主要的解析函数为unflatten_dt_nodes(),在__unflatten_device_tree()函数中,unflatten_dt_nodes()被调用两次,第一次是扫描得出设备树转换成device node需要的空间,然后系统申请内存空间,第二次就进行真正的解析工作,我们继续看unflatten_dt_nodes()函数:
值得注意的是,在第二次调用unflatten_dt_nodes()时传入的参数为unflatten_dt_nodes(blob, mem, dad, mynodes);
第一个参数是设备树存放首地址,第二个参数是申请的内存空间,第三个参数为父节点,初始值为NULL,第四个参数为mynodes,初始值为of_node.
static int unflatten_dt_nodes(const void *blob,void *mem,struct device_node *dad,struct device_node **nodepp)
{
	...
	for (offset = 0;offset = 0 && depth = initial_depth;offset = fdt_next_node(blob, offset, &depth)) {
		populate_node(blob, offset, &mem,nps[depth], fpsizes[depth], &nps[depth+1], dryrun);
		...
	}
}
这个函数中主要的作用就是从根节点开始,对子节点依次调用populate_node(),从函数命名上来看,这个函数就是填充节点,为节点分配内存。
我们继续往下追踪:
static unsigned int populate_node(const void *blob,int offset,void **mem,
struct device_node *dad,unsigned int fpsize,struct device_node **pnp,bool dryrun){
	struct device_node *np;

	...
	np = unflatten_dt_alloc(mem, sizeof(struct device_node) + allocl,__alignof__(struct device_node));
	of_node_init(np);
	np->full_name = fn = ((char *)np) + sizeof(*np);
	if (dad != NULL) {
		np->parent = dad;
		np->sibling = dad->child;
		dad->child = np;
	}

	...
	populate_properties(blob, offset, mem, np, pathp, dryrun);
	np->name = of_get_property(np, "name", NULL);
	np->type = of_get_property(np, "device_type", NULL);
	if (!np->name)
		np->name = "<NULL";
	if (!np->type)
		np->type = "<NULL";
	...
}
通过跟踪populate_node()函数,可以看出,首先为当前节点申请内存空间,使用of_node_init()函数对node进行初始化,of_node_init()函数也较为简单:
static inline void of_node_init(struct device_node *node)
{
	kobject_init(&node-kobj, &of_node_ktype);
	node->fwnode.ops = &of_fwnode_ops;
}
设置kobj,接着设置node的fwnode.ops。
然后再设置一些参数,需要特别注意的是:对于一个struct device_node结构体,申请的内存空间是sizeof(struct device_node)+allocl,这个allocl是节点的unit_name长度(类似于chosen、memory这类子节点描述开头时的名字,并非.name成员)。
然后通过np->full_name = fn = ((char )np) + sizeof(np);将device_node的full_name指向结构体结尾处,即将一个节点的unit name放置在一个struct device_node的结尾处。
同时,设置其parent和sibling节点。
接着,调用populate_properties()函数,从命名上来看,这个函数的作用是为节点的各个属性分配空间。
紧接着,设置device_node节点的name和type属性,name由设备树中.name属性而来,type则由设备树中.device_type而来。
一个设备树中节点转换成一个struct device_node结构的过程渐渐就清晰起来,现在我们接着看看populate_properties()这个函数,看看属性是怎么解析的:
static void populate_properties(const void *blob,int offset,void **mem,struct device_node *np,const char *nodename,bool dryrun){
	...
	for (cur = fdt_first_property_offset(blob, offset);
	cur = 0;
	cur = fdt_next_property_offset(blob, cur))
	{
		fdt_getprop_by_offset(blob, cur, &pname, &sz);
		unflatten_dt_alloc(mem, sizeof(struct property),__alignof__(struct property));
		if (!strcmp(pname, "phandle") || !strcmp(pname, "linux,phandle")) {
			if (!np->phandle)
				np->phandle = be32_to_cpup(val);
			pp->name = (char *)pname;
			pp->length = sz;
			pp->value = (__be32 *)val;
			*pprev = pp;
			pprev = &pp->next;
			...
		}
	}
}
从属性转换部分的程序可以看出,对于大部分的属性,都是直接填充一个struct property属性,而对于,"phandle"属性和"linux,phandle"属性,直接填充struct device_node 的phandle字段,不放在属性链表中。
在设备树中,对于属性的描述是key = value,这个结构体中的name和value分别对应key和value,而length表示value的长度,next指针指向下一个struct property结构体。
这就是设备树子节点到struct device_node的转换,为了能更直观地看出设备树节点到struct device_node的转换过程,博主特意制作了一张脑图:
device_node转换成platform_device
以下讨论基于linux4.14,arm平台
struct platform_device {
	const char * name;
	int id;

	struct device dev;
	u32 num_resources;

	struct resource *resource;
	struct platform_device_id *id_entry;// 用来进行与设备驱动匹配用的id_table表,一个驱动支持多个设备*

	struct pdev_archdata archdata;/* arch specific additions */
};

struct resource {
	resource_size_t start;
	resource_size_t end;
	const char *name;
	unsigned long flags;
	struct resource *parent, *sibling, *child;
};

struct platform_device_id {
	char name[PLATFORM_NAME_SIZE];
	kernel_ulong_t driver_data;
};

struct device {
	struct device *parent;
	struct device_private *p;
	struct kobject kobj;
	const char *init_name; /* initial name of the device */
	struct device_type *type;
	struct mutex mutex; /* mutex to synchronize calls to its driver.*/
	struct bus_type *bus; /* type of bus device is on */
	struct device_driver *driver; /* which driver has allocated this device */
	void *platform_data; /* Platform specific data, device core doesn't touch it */
	struct dev_pm_info power;
	struct dev_power_domain *pwr_domain;

#ifdef CONFIG_NUMA
	int numa_node; /* NUMA node this device is close to */
#endif
	u64 *dma_mask; /* dma mask (if dma'able device) */
	u64 coherent_dma_mask;/* Like dma_mask, but for alloc_coherent mappings as not all hardware supports 64 bit addresses for consistent allocations such descriptors. */

	struct device_dma_parameters *dma_parms;
	struct list_head dma_pools; /* dma pools (if dma'ble) */
	struct dma_coherent_mem *dma_mem; /* internal for coherent mem override */
	struct dev_archdata archdata;/* arch specific additions */

	struct device_node *of_node; /* associated device tree node */

	dev_t devt; /* dev_t, creates the sysfs "dev" */
	spinlock_t devres_lock;
	struct list_head devres_head;
	struct klist_node knode_class;
	struct class *class;
	const struct attribute_group **groups; /* optional groups */
	void (*release)(struct device *dev);
};
设备树的产生就是为了替代driver中过多的platform_device部分的静态定义,将硬件资源抽象出来,由系统统一解析,这样就可以避免各驱动中对硬件资源大量的重复定义,这样一来,几乎可以肯定的是,设备树中的节点最终目标是转换成platform device结构,在驱动开发时就只需要添加相应的platform driver部分进行匹配即可。
在上一节中讲到设备树dtb文件中的各个节点转换成device_node的过程,每个设备树子节点都将转换成一个对应的device_node节点,那么:是不是每个由设备树节点转换而来的device_node结构体都将转换成对应的?
首先,对于所有的device_node,如果要转换成platform_device,必须满足以下条件:
(1) 该节点必须含有compatible属性
(2) 根节点的子节点(节点必须含有compatible属性)
(3) 含有特殊compatible属性的节点的子节点(子节点必须含有compatible属性):这些特殊的compatilbe属性为: “simple-bus”,“simple-mfd”,“isa”,“arm,amba-bus”
如果是device_node转换成platform device,这个转换过程又是怎么样的呢?
在老版本的内核中,platform_device部分是静态定义的,其实最主要的部分就是resources部分,这一部分描述了当前驱动需要的硬件资源,一般是IO,中断等资源。
在设备树中,这一类资源通常通过reg属性来描述,中断则通过interrupts来描述,所以,设备树中的reg和interrupts资源将会被转换成platform_device内的struct resources资源。
那么,设备树中其他属性是怎么转换的呢?答案是:不需要转换,在platform_device中有一个成员struct device dev,这个dev中又有一个指针成员struct device_node *of_node,linux的做法就是将这个of_node指针直接指向由设备树转换而来的device_node结构。
例如,有这么一个struct platform_device* of_test.我们可以直接通过of_test->dev.of_node来访问设备树中的信息.
设备树节点到device_node的转换参考一篇博客:设备树dtb到device_node的转换.
大体流程讲完了,接下来从源代码中进行求证。
platform_device转换的开始
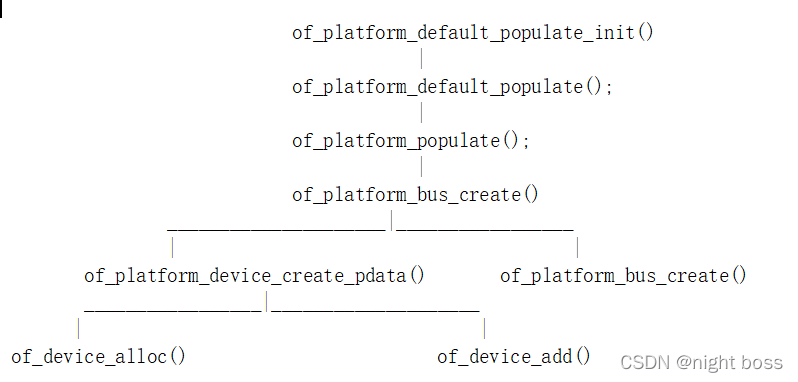
事实上,如果从C语言的开始函数start_kernel进行追溯,是找不到platform device这一部分转换的源头的,事实上,这个转换过程的函数是of_platform_default_populate_init(),它被调用的方式是这样一个声明:
arch_initcall_sync(of_platform_default_populate_init);
在linux中,同系列的调用声明还有:
#define pure_initcall(fn) __define_initcall(fn, 0)
#define core_initcall(fn) __define_initcall(fn, 1)
#define core_initcall_sync(fn) __define_initcall(fn, 1s)
#define postcore_initcall(fn) __define_initcall(fn, 2)
#define postcore_initcall_sync(fn) __define_initcall(fn, 2s)
#define arch_initcall(fn) __define_initcall(fn, 3)
#define arch_initcall_sync(fn) __define_initcall(fn, 3s)
#define subsys_initcall(fn) __define_initcall(fn, 4)
#define subsys_initcall_sync(fn) __define_initcall(fn, 4s)
#define fs_initcall(fn) __define_initcall(fn, 5)
#define fs_initcall_sync(fn) __define_initcall(fn, 5s)
#define rootfs_initcall(fn) __define_initcall(fn, rootfs)
#define device_initcall(fn) __define_initcall(fn, 6)
#define device_initcall_sync(fn) __define_initcall(fn, 6s)
#define late_initcall(fn) __define_initcall(fn, 7)
#define late_initcall_sync(fn) __define_initcall(fn, 7s)
这些宏最终都是调用__define_initcall(fn, n),这个数字代表系统启动时被调用的优先级,数字越小,优先级越低,用这一系列宏声明一个新的函数就是将这个函数指针放入内存中一个指定的段内。
#define _define_initcall(fn, id) \
static initcall_t __initcall##fn##id __used \
__attribute__((__section__(".initcall" #id “.init”))) = fn;
即放入到".initcalln.init"中,n代表优先级,当系统启动时,会依次调用这些段中的函数。
(详细了解linux的initcall机制可以参考我的另一篇博客:linux的initcall机制)
下面我们就进入到of_platform_default_populate_init()中,查看它的执行过程:
static int __init of_platform_default_populate_init(void)
{
	...
	of_platform_default_populate(NULL, NULL, NULL);
	...
}
在函数of_platform_default_populate_init()中,调用了of_platform_default_populate(NULL, NULL, NULL);,传入三个空指针:
const struct of_device_id of_default_bus_match_table[] = {
{ .compatible = “simple-bus”, },
{ .compatible = “simple-mfd”, },
{ .compatible = “isa”, },
#ifdef CONFIG_ARM_AMBA
{ .compatible = “arm,amba-bus”, },
#endif /* CONFIG_ARM_AMBA /
{} / Empty terminated list */
};
int of_platform_default_populate(struct device_node *root,const struct of_dev_auxdata *lookup,struct device *parent)
{
	return of_platform_populate(root, of_default_bus_match_table, lookup, parent);
}
of_platform_default_populate()调用了of_platform_populate()。
需要注意的是,在调用of_platform_populate()时传入了参数of_default_bus_match_table[],这个table是一个静态数组,这个静态数组中定义了一系列的compatible属性:“simple-bus”、“simple-mfd”、“isa”、“arm,amba-bus”。
按照我们上文中的描述,当某个根节点下的一级子节点的compatible属性为这些属性其中之一时,它的一级子节点也将由device_node转换成platform_device.
到底是不是这样呢?接着往下看:
int of_platform_populate(struct device_node *root,const struct of_device_id *matches,const struct of_dev_auxdata *lookup,struct device *parent){
	root = root ? of_node_get(root) : of_find_node_by_path("/");

	for_each_child_of_node(root, child) {
		rc = of_platform_bus_create(child, matches, lookup, parent, true);
		if (rc) {
			of_node_put(child);
			break;
		}
	}
	...
}
首先,从设备树中获取根节点的device_node结构体,然后对每个根目录下的一级子节点调用of_platform_bus_create(),从命名上来看,这部分解析的目的是建立各个bus的platform_device结构,需要注意的是对于of_platform_bus_create(child, matches, lookup, parent, true),matchs参数是上文中提到的compatible静态数组,而lookup和parent依旧为NULL。
接着跟踪代码:
static int of_platform_bus_create(struct device_node *bus,const struct of_device_id *matches,const struct of_dev_auxdata *lookup,struct device *parent, bool strict)
{
	dev = of_platform_device_create_pdata(bus, bus_id, platform_data, parent);
	if (!dev || !of_match_node(matches, bus))
		return 0;

	for_each_child_of_node(bus, child) {
		pr_debug(" create child: %pOFn", child);
		rc = of_platform_bus_create(child, matches, lookup, &dev-dev, strict);
		if (rc) {
			of_node_put(child);
			break;
		}
	}
	...
}
对于节点的转换,是由of_platform_device_create_pdata(bus, bus_id, platform_data, parent)函数来实现的。
紧接着,在第二行的函数调用中,判断of_match_node(matches,bus)函数的返回值,这个matchs就是compatible的静态数组,这个函数的作用就是判断当前节点的compatible属性是否包含上文中compatible静态数组中的元素,如果不包含,函数返回。
如果当前compatible属性中包含静态数组中的元素,即当前节点的compatible属性有"simple-bus"、“simple-mfd”、“isa”、"arm,amba-bus"其中一项,递归地对当前节点调用of_platform_bus_create(),即将符合条件的子节点转换为platform_device结构。
关于节点转换的细节部分我们接着跟踪of_platform_device_create_pdata(bus, bus_id, platform_data, parent)函数,此时的参数platform_data为NULL。
static struct platform_device *of_platform_device_create_pdata(struct device_node *np,const char *bus_id,void *platform_data,struct device *parent)
{
	struct platform_device *dev;

	dev = of_device_alloc(np, bus_id, parent);
	dev->dev.bus = &platform_bus_type;
	dev->dev.platform_data = platform_data;

	if (of_device_add(dev) != 0) {
		platform_device_put(dev);
		goto err_clear_flag;
	}
}
struct platform_device终于现出了真身,在这个函数调用中,显示申请并初始化一个platform_device结构体,将传入的device_node链接到成员:dev.fo_node中
赋值bus成员和platform_data成员,platform_data成员为NULL。
再使用of_device_add()将当前生成的platform_device添加到系统中。
对于of_platform_device_create_pdata()函数中的实现,我们需要逐一讲解其中的函数实现:
of_device_alloc()
struct platform_device *of_device_alloc(struct device_node *np,const char *bus_id,struct device *parent)
{
	//统计reg属性的数量
	while (of_address_to_resource(np, num_reg, &temp_res) == 0)
		num_reg++;

	//统计中断irq属性的数量
	num_irq = of_irq_count(np);

	//根据num_irq和num_reg的数量申请相应的struct resource内存空间。
	if (num_irq || num_reg) {
		res = kzalloc(sizeof(*res) * (num_irq + num_reg), GFP_KERNEL);
		if (!res) {
		platform_device_put(dev);
		return NULL;
	}

	//设置platform_device中的num_resources成员
	dev->num_resources = num_reg + num_irq;

	//设置platform_device中的resource成员
	dev->resource = res;

	//将device_node中的reg属性转换成platform_device中的struct resource成员。
	for (i = 0; i < num_reg; i++, res++) {
		rc = of_address_to_resource(np, i, res);
		WARN_ON(rc);
	}

	//将device_node中的irq属性转换成platform_device中的struct resource成员。
	if (of_irq_to_resource_table(np, res, num_irq) != num_irq)
		pr_debug("not all legacy IRQ resources mapped for %sn", np-name);
	}

	//将platform_device的dev.of_node成员指针指向device_node。
	dev->dev.of_node = of_node_get(np);
	//将platform_device的dev.fwnode成员指针指向device_node的fwnode成员。
	dev->dev.fwnode = &np-fwnode;
	//设备parent为platform_bus
	dev->dev.parent = parent ? : &platform_bus;
}
首先,函数先统计设备树中reg属性和中断irq属性的个数,然后分别为它们申请内存空间,链入到platform_device中的struct resources成员中。除了设备树中"reg"和"interrupt"属性之外,还有可选的"reg-names"和"interrupt-names"这些io中断资源相关的设备树节点属性也在这里被转换。
将相应的设备树节点生成的device_node节点链入到platform_device的dev.of_node中。
of_device_add
int of_device_add(struct platform_device *ofdev){
	...
	return device_add(&ofdev-dev);
}
将当前platform_device中的struct device成员注册到系统device中,并为其在用户空间创建相应的访问节点。
总结
总的来说,将device_node转换为platform_device的过程还是比较简单的。
整个转换过程的函数调用关系是这样的:
设备树常用的OF操作函数
晩风与她 2020-08-27 14:39:24 415 收藏 3
查找节点的OF函数
设备都是以节点的形式挂到设备树上的,因此想要获取这个设备的其他属性信息,必须先获取到这个设备的节点。
linux内核使用device_node结构体来描述一个节点,该结构体定义在include/linux/of.h中。
定义如下:
struct device_node {
	const char *name; /* 节点名字 */
	const char *type; /* 设备类型 */
	phandle phandle;
	const char *full_name; /* 节点全名 */
	struct fwnode_handle fwnode;

	struct property *properties; /* 属性 */
	struct property *deadprops; /* removed 属性 */
	struct device_node *parent; /* 父节点 */
	struct device_node *child; /* 子节点 */
	struct device_node *sibling;
	struct kobject kobj;
	unsigned long _flags;
	void *data;
#if defined(CONFIG_SPARC)
	const char *path_component_name;
	unsigned int unique_id;
	struct of_irq_controller *irq_trans;
#endif
};
1.1 of_find_node_by_name函数
of_find_node_by_name函数通过节点名字查找指定的节点。
struct device_node *of_find_node_by_name(struct device_node *from,const char *name);
/***************************************************
*函数参数及返回值的含义:
*from:开始查找的节点,如果为NULL表示从根节点开始查找整个设备树。
*name:要查找的节点的名字。
*返回值:找到的节点;如果为NULL,查找失败。
***************************************************/
1.2 of_find_node_by_type函数
of_find_node_by_type函数通过device_type查找指定的节点。
struct device_node *of_find_node_by_type(struct device_node *from,const char *type);
/***************************************************
*函数参数及返回值的含义:
*from:开始查找的节点,如果为NULL表示从根节点开始查找整个设备树。
*type:要查找的节点对应的type字符串,即device_type属性值。
*返回值:找到的节点;如果为NULL,查找失败。
***************************************************/
1.3 of_find_compatible_node函数
of_find_compatible_node函数通过device_type和compatible两个属性查找指定的节点。
struct device_node *of_find_compatible_node(struct device_node *from,const char *type,const char *compatible);
/***************************************************
*函数参数及返回值的含义:
*from:开始查找的节点,如果为NULL表示从根节点开始查找整个设备树。
*type:要查找的节点对应的type字符串,即device_type属性值;也可以为NULL,表示可以忽略该属性。
*compatible:要查找的节点对应的compatible属性列表。
*返回值:找到的节点;如果为NULL,查找失败。
***************************************************/
1.4 of_find_matching_node_and_match函数
of_find_matching_node_and_match函数通过of_device_id匹配表来查找指定的节点。
struct device_node *of_find_matching_node_and_match(struct device_node *from,const struct of_device_id *matches,const struct of_device_id **match);
/***************************************************
*函数参数及返回值的含义:
*from:开始查找的节点,如果为NULL表示从根节点开始查找整个设备树。
*matches:of_device_id匹配表,也就是在此匹配表里查找节点。
*match:找到匹配的of_device_id。
*返回值:找到的节点;如果为NULL,查找失败。
***************************************************/
1.5 of_find_node_by_path函数
of_find_node_by_path函数通过路径查找指定的节点。
inline struct device_node *of_find_node_by_path(const char *path);
/***************************************************
*函数参数及返回值的含义:
*path:带有全路径的节点名,可以使用节点的别名,比如"/backlight"就是 backlight 这个节点的全路径
*返回值:找到的节点;如果为NULL,查找失败。
***************************************************/
2、查找父/子节点的OF函数
2.1 of_get_parent函数
of_get_parent函数用于获取指定节点的父节点(如果存在父节点)。
struct device_node *of_get_parent(const struct device_node *node);
/***************************************************
*函数参数及返回值的含义:
*node:需要查找父节点的节点。
*返回值:找到的父节点。
***************************************************/
2.2 of_get_next_child函数
of_get_next_child函数用迭代的方法查找子节点。
struct device_node *of_get_next_child(const struct device_node *node,struct device_node *prev);
/***************************************************
*函数参数及返回值的含义:
*node:父节点。
*prev:前一个子节点,表示从哪一个子节点开始查找下一个子节点;可以设置为NULL,表示从第一个子节点开始查找。
*返回值:找到的下一个子节点。
***************************************************/
3、提取属性值的OF函数
节点的属性信息里面保存了驱动所需要的内容,因此对于属性值的提取非常重要。
linux内核使用结构体property表示属性,此结构体定义在文件include/linux/of.h中。
内容如下:
struct property {
	char *name; /* 属性名字 */
	int length; /* 属性长度 */
	void *value; /* 属性值 */
	struct property *next; /* 下一个属性 */
	unsigned long _flags;
	unsigned int unique_id;
	struct bin_attribute attr;
};
3.1 of_find_property函数
of_find_property函数用于查找指定的属性。
property *of_find_property(const struct device_node *np,const char *name,int *lenp);
/***************************************************
*函数参数及返回值的含义:
*np:设备节点。
*name:属性名字。
*lenp:属性值的字节数。
*返回值:找到的属性。
***************************************************/
3.2 of_property_count_elems_of_size函数
of_property_count_elems_of_size函数用于获取属性中元素的数量,比如reg属性值是一个数组,可以用此函数获取到数组的大小。
int of_property_count_elems_of_size(const struct device_node *np,const char *propname,int elem_size);
/***************************************************
*函数参数及返回值的含义:
*np:设备节点。
*propname:需要统计元素数量的属性名字。
*elem_size:元素的长度。
*返回值:得到的属性元素的数量。
***************************************************/
3.3 of_property_read_string函数
of_property_read_string函数用于读取属性中字符串值。
int of_property_read_string(struct device_node *np,const char *propname,const char **out_string);
/***************************************************
*函数参数及返回值的含义:
*np:设备节点。
*propname:需要读取的属性名字。
*out_string:读取到的字符串值。
*返回值:0,读取成功;负数,读取失败。
***************************************************/
4、其他常用的OF函数
4.1 of_device_is_compatible函数
of_device_is_compatible函数用于查看节点的compatible属性是否包含compat指定的字符串,即检查设备节点的兼容性。
int of_device_is_compatible(const struct device_node *device,const char *compat);
/***************************************************
*函数参数及返回值的含义:
*device:设备节点。
*compat:要查看的字符串。
*返回值:0,节点兼容属性中不包含要查看的字符串;正数,节点兼容属性中包含要查看的字符串。
***************************************************/
4.2 of_translate_address函数
of_translate_address函数用于将从设备树读取到的地址转换为物理地址。
u64 of_translate_address(struct device_node *dev,const __be32 *in_addr);
/***************************************************
*函数参数及返回值的含义:
*dev:设备节点。
*in_addr:要转换的地址。
*返回值:得到的物理地址;如果为OF_BAD_ADDR表示转换失败。
***************************************************/
platform bus总线设备驱动框架原理
huofengfeihu 2019-06-12 09:00:02 1298 收藏 12
涛少& 博客园
相对于USB、PCI、I2C、SPI等物理总线来说,platform总线是一种虚拟、抽象出来的总线,实际中并不存在这样的总线。
那为什么需要platform总线呢?其实是Linux设备驱动模型为了保持设备驱动的统一性而虚拟出来的总线。因为对于usb设备、i2c设备、pci设备、spi设备等等,他们与cpu的通信都是直接挂在相应的总线下面与我们的cpu进行数据交互的,但是在我们的嵌入式系统当中,并不是所有的设备都能够归属于这些常见的总线,在嵌入式系统里面,SoC系统中集成的独立的外设控制器、挂接在SoC内存空间的外设却不依附与此类总线。所以Linux驱动模型为了保持完整性,将这些设备挂在一条虚拟的总线上(platform总线),而不至于使得有些设备挂在总线上,另一些设备没有挂在总线上。
platform总线相关代码:driverbaseplatform.c 文件
相关结构体定义:includelinuxplatform_device.h 文件中
platform总线、platform设备、platform驱动之间的关系及框架
(1)总线用于将设备和驱动绑定;在系统注册设备时,寻找与之匹配的驱动;在系统注册驱动时,寻找与之匹配的设备,匹配由总线完成。
(2)对于任何一种Linux设备驱动模型下的总线都由两个部分组成:描述设备相关的结构体和描述驱动相关的结构体
(3)platform bus是一条虚拟总线,platform_device为相应的设备,platform_driver为相应的驱动。
(4)与传统的bus/device/driver机制相比,platform由内核统一进行管理,提高了代码的可移植性和安全性。所谓的platform_device并不是与字符设备、块设备和网络设备并列的概念,而是Linux系统提供的一种附加手段。
(5)Linux总线、设备、驱动的模型框架如下图所示
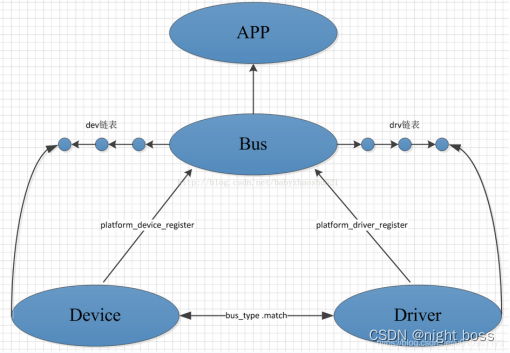
在总线设备驱动模型中,需关心总线、设备和驱动这3个实体,总线将设备和驱动绑定。
(1)当系统向内核注册每一个驱动程序时,都要通过调用platform_driver_register函数将驱动程序注册到总线(bus),并将其放入所属总线的drv链表中,注册驱动的时候会调用所属总线的match函数寻找该总线上与之匹配的每一个设备,如果找到与之匹配的设备则会调用相应的probe函数将相应的设备和驱动进行绑定;
(2)当系统向内核注册每一个设备时,可以通过调用platform_device_register函数,也可以通过解析DTB由内核完成platform device的创建,并将设备platform device注册到总线platform bus,并将其放入所属总线的dev链表中,注册设备的时候同样也会调用所属总线的match函数寻找该总线上与之匹配的每一个驱动程序,如果找到与之匹配的驱动程序时会调用相应的probe函数将相应的设备和驱动进行绑定;而这一匹配的过程是由总线自动完成的。
Platform bus
关键结构体:
struct bus_type {
	const char *name; // 总线名字
	struct bus_attribute *bus_attrs; // 该总线的属性
	struct device_attribute *dev_attrs; // 该总线下设备的属性
	struct driver_attribute *drv_attrs; // 该总线下设备驱动的属性

	int (*match)(struct device *dev, struct device_driver *drv); //该总线下设备与设备驱动的匹配函数
	int (*uevent)(struct device *dev, struct kobj_uevent_env *env); // 事件函数 热拨插
	int (*probe)(struct device *dev); //总线下的 探针函数
	int (*remove)(struct device *dev); // 总线下的 卸载函数 void (*shutdown)(struct device *dev);
	int (*suspend)(struct device *dev, pm_message_t state);
	int (*resume)(struct device *dev);

	const struct dev_pm_ops *pm; // 电源管理相关的
	struct bus_type_private *p; // 总线的私有数据 p-subsys.kobj 表示该总线在驱动模型中对应的对象
};

struct bus_type_private {
	struct kset subsys; // 这个是bus主要的kset
	struct kset *drivers_kset; // 这个kset指针用来指向该总线的 drivers目录的
	struct kset *devices_kset; // 这个kse指针用来指向该总线的devices目录的
	struct klist klist_devices; // 用来挂接该总线下的设备的一个链表头
	struct klist klist_drivers; // 用来挂接该总线下的设备驱动的一个链表头
	struct blocking_notifier_head bus_notifier;
	unsigned int drivers_autoprobe:1; // 是否需要在设备驱动注册时候子自动匹配设备
	struct bus_type *bus; // 指向本bus结构体
};
bus_register 虚拟总线注册
int bus_register(struct bus_type *bus)
{
	int retval;
	struct bus_type_private *priv; // 定义一个bus_type_private 结构体指针

	priv = kzalloc(sizeof(struct bus_type_private), GFP_KERNEL); // 申请分配内存
	if (!priv)
		return -ENOMEM;

	priv->bus = bus; // 使用 priv->bus 指向我们传进来的bus
	bus->p = priv; // 通过 bus->p 指向priv

	BLOCKING_INIT_NOTIFIER_HEAD(&priv->bus_notifier);

	// 给我们的bus在设备驱动模型中的对象设置名字 bus->p->subsys.kobj
	retval = kobject_set_name(&priv->subsys.kobj, "%s", bus->name);
	if (retval)
		goto out;

	// 这里就是对bus的私有数据进行一些填充
	priv->subsys.kobj.kset = bus_kset; // 设置bus对象的父对象 /sys/bus
	priv->subsys.kobj.ktype = &bus_ktype; // 设置bus对象的 对象类型为 bus_ktype
	priv->drivers_autoprobe = 1; // 配置为在注册设备或者是注册设备驱动时自动进行配置

	// 注册kset结构体(内部会调用kobject_add_internal函数,也就是将bus对象添加到 /sys/bus/目录下, /sys/bus/xxx_busType 对应具体的总线)
	retval = kset_register(&priv->subsys);
	if (retval)
		goto out;

	retval = bus_create_file(bus, &bus_attr_uevent); // 在该bus下建立属性文件
	if (retval)
		goto bus_uevent_fail;

	// 在具体总线的目录下创建 kset 容器对象 /sys/bus/xxx_busType/devices
	priv->devices_kset=kset_create_and_add("devices", NULL, &priv->subsys.kobj);
	if (!priv->devices_kset) {
		retval = -ENOMEM;
		goto bus_devices_fail;
	}

	priv->drivers_kset = kset_create_and_add("drivers", NULL, &priv->subsys.kobj);
	if (!priv->drivers_kset) {
		retval = -ENOMEM;
		goto bus_drivers_fail;
	}

	klist_init(&priv->klist_devices, klist_devices_get, klist_devices_put);
	klist_init(&priv->klist_drivers, NULL, NULL); // 初始化链表 klist

	// 添加探针文件;添加属性文件/sys/bus/xxx_busType/drivers_probe
	retval = add_probe_files(bus);
	if (retval)
		goto bus_probe_files_fail;

	retval = bus_add_attrs(bus); // 根据 bus-bus_attrs 中的属性设置来添加属性文件
	if (retval)
		goto bus_attrs_fail;

	pr_debug("bus: '%s': registeredn", bus->name);
	return 0;

bus_attrs_fail:
	remove_probe_files(bus);

bus_probe_files_fail:
	kset_unregister(bus->p->drivers_kset);

bus_drivers_fail:
	kset_unregister(bus->p->devices_kset);

bus_devices_fail:
	bus_remove_file(bus, &bus_attr_uevent);

bus_uevent_fail:
	kset_unregister(&bus->p->subsys);
	kfree(bus->p);

out:
	bus->p = NULL;
	return retval;
}
platform_match
static int platform_match(struct device *dev, struct device_driver *drv)

{
	struct platform_device *pdev = to_platform_device(dev);
	struct platform_driver *pdrv = to_platform_driver(drv);

	/* match against the id table first */
	if (pdrv->id_table) // 如果pdrv中的id_table 表存在
		return platform_match_id(pdrv->id_table, pdev) != NULL; // 匹配id_table

	/* fall-back to driver name match */
	return (strcmp(pdev->name, drv->name) == 0);

}

static const struct platform_device_id *platform_match_id(
const struct platform_device_id *id,
struct platform_device *pdev)
{
	while (id->name[0]) { //循环去比较id_table数组中的各个id名字是否与pdev-name 相同
		if (strcmp(pdev->name, id->name) == 0) {
			pdev->id_entry = id;
			return id; // 返回这个指针
		}
		id++;
	}

	return NULL;
}
platform_device 设备
platform_device_register 添加设备
int platform_device_register(struct platform_device *pdev)
{
	device_initialize(&pdev->dev);
	return platform_device_add(pdev);
}

int platform_device_add(struct platform_device *pdev)
{
	int i, ret = 0;

	if (!pdev)
		return -EINVAL;

	if (!pdev->dev.parent)
		pdev->dev.parent = &platform_bus; // 将平台设备的父设备设置为 platform_bus (对应的就是 /sys/devices/platform 这个目录)

	pdev->dev.bus = &platform_bus_type; //设置平台设备挂接在platform总线下

	if (pdev->id != -1)
	// 给平台设备对应的对象设置名字 name.id (如果我们的 pdev->id 设置不等于-1时)
		dev_set_name(&pdev->dev, "%s.%d", pdev->name, pdev->id);
	else
		dev_set_name(&pdev->dev, "%s", pdev->name);

	 // 下面的for 循环是对平台设备资源的一些处理
	for (i = 0; i < pdev->num_resources; i++) {
		struct resource *p, *r = &pdev->resource[i];
		if (r->name == NULL)
			r->name = dev_name(&pdev->dev);
		p = r->parent;

		if (!p) {
			if (resource_type(r) == IORESOURCE_MEM)
				p = &iomem_resource;
			else if (resource_type(r) == IORESOURCE_IO)
				p = &ioport_resource;
		}

		if (p && insert_resource(p, r)) {
			printk(KERN_ERR"%s: failed to claim resource %dn", dev_name(&pdev->dev), i);
			ret = -EBUSY;
			goto failed;
		}
	}

	pr_debug("Registering platform device '%s'. Parent at %sn", dev_name(&pdev->dev), dev_name(pdev->dev.parent));

	ret = device_add(&pdev->dev);//将平台设备添加到系统中去 /sys/devices/platform/xxx
	if (ret == 0)
		return ret;

failed:
	while (--i = 0) {
		struct resource *r = &pdev->resource[i];
		unsigned long type = resource_type(r);
		if (type == IORESOURCE_MEM || type == IORESOURCE_IO)
		release_resource(r);
	}

	return ret;
}

int device_add(struct device *dev)
{
	dev = get_device(dev);//增加该设备的引用计数

	if (!dev->p) {
		error = device_private_init(dev);//初始化设备的私有成员p
		if (error)
			goto done;
	}

	if (dev->init_name) {
		dev_set_name(dev, "%s", dev->init_name);//初始化设备内部的kobject的名字
		dev->init_name = NULL;
	}

	if (!dev_name(dev) && dev->bus && dev->bus->dev_name)
		dev_set_name(dev, "%s%u", dev->bus->dev_name, dev->id);//使用bus以及设备id来初始化设备内部kobject名字

	if (!dev_name(dev)) {//获得设备的名字
		error = -EINVAL;
		goto name_error;
	}

	parent = get_device(dev->parent);增加设备父设备并增加父设备引用计数
	kobj = get_device_parent(dev, parent);

	if (kobj)
		dev->kobj.parent = kobj;//在kobject层实现设备父子关系

	if (parent)
		set_dev_node(dev, dev_to_node(parent));

	error = kobject_add(&dev->kobj, dev->kobj.parent, NULL);//将设备加入到kobject模型中,创建sys相关目录

	/* notify platform of device entry */
	if (platform_notify)
		platform_notify(dev);

	error = device_create_file(dev, &uevent_attr);//创建sys目录下设备的uevent属性文件,通过它可以查看设备的uevent事件

	if (MAJOR(dev->devt)) {
		error = device_create_file(dev, &devt_attr);//创建sys目录下设备的设备号属性,即major和minor
		error = device_create_sys_dev_entry(dev);
		devtmpfs_create_node(dev);
	}

	error = device_add_class_symlinks(dev);
	error = device_add_attrs(dev);//创建sys目录下设备其他属性文件
	error = bus_add_device(dev);//将设备加入到管理它的bus总线的设备连表上
	error = dpm_sysfs_add(dev);//电源管理相关

	device_pm_add(dev);

	if (dev->bus)
		blocking_notifier_call_chain(&dev->bus->p->bus_notifier,BUS_NOTIFY_ADD_DEVICE, dev);//通知注册监听该总线的设备,有新设备加入

	kobject_uevent(&dev->kobj, KOBJ_ADD);//产生一个内核uevent事件,该事件可以被内核以及应用层捕获,属于linux设备模型中热插拔机制

	bus_probe_device(dev);//------------开始寻找设备所对应的驱动------------

	if (parent)
		klist_add_tail(&dev->p->knode_parent, &parent->p->klist_children);//建立设备与总线间的父子关系

	if (dev->class) {//如果设备的属于某个设备类,比如Mass storage,HID等等
		mutex_lock(&dev->class->p->mutex);
		/* tie the class to the device */
		klist_add_tail(&dev->knode_class,&dev->class->p->klist_devices);//将设备挂接在其设备类上面
		/* notify any interfaces that the device is here */
		list_for_each_entry(class_intf,&dev->class->p->interfaces, node)
		if (class_intf->add_dev)
		class_intf->add_dev(dev, class_intf);//通知有新设备加入
		mutex_unlock(&dev->class->p->mutex);
	}

done:
	put_device(dev);
	return error;
}

void bus_probe_device(struct device *dev)//为设备找到一个驱动
{
	struct bus_type *bus = dev->bus;//获得设备的隶属的总线,该值在设备初始化时设置
	struct subsys_interface *sif;
	int ret;

	if (!bus)
		return;

	if (bus->p->drivers_autoprobe) {
		ret = device_attach(dev);//-------尝试为该设备找一个driver-------
		WARN_ON(ret < 0);
	}

	mutex_lock(&bus->p->mutex);
	list_for_each_entry(sif, &bus->p->interfaces, node)
	if (sif->add_dev)
		sif->add_dev(dev, sif);
	mutex_unlock(&bus->p->mutex);
}

/**
* device_attach - 尝试为设备寻找到一个驱动
*遍历设备隶属的总线上所有的driver,然后调用driver_probe_device匹配设备和驱动,成功就结束循环退出
*成功返回值为1,失败为0,-ENODEV表示设备没有被注册
*/
int device_attach(struct device *dev)
{
	int ret = 0;

	device_lock(dev);
	if (dev->driver) {//如果设备已经有驱动
		if (klist_node_attached(&dev->p->knode_driver)) {
			ret = 1;
			goto out_unlock;
		}

		ret = device_bind_driver(dev);
		if (ret == 0)
			ret = 1;
		else {
			dev->driver = NULL;
			ret = 0;
		}
	} else {//设备没有驱动
		pm_runtime_get_noresume(dev);
		ret = bus_for_each_drv(dev->bus, NULL, dev, __device_attach);//遍历总线dv链表
		pm_runtime_put_sync(dev);
	}

out_unlock:
	device_unlock(dev);
	return ret;
}
// 到这里之后就和下面的11.1.platform_driver_register 驱动注册 一样了
platform_device_unregister 设备取消
void platform_device_unregister(struct platform_device *); // 用来卸载我们的设备
platform_driver 驱动
几个重要的结构体:
struct platform_driver {
	int (*probe)(struct platform_device *);
	int (*remove)(struct platform_device *);
	void (*shutdown)(struct platform_device *);
	int (*suspend)(struct platform_device *, pm_message_t state);
	int (*resume)(struct platform_device *);

	struct device_driver driver;
	const struct platform_device_id *id_table;

	bool prevent_deferred_probe;
};

struct platform_device_id {
	char name[PLATFORM_NAME_SIZE];
	kernel_ulong_t driver_data;
};

struct device_driver {
	const char *name;
	struct bus_type *bus; //struct bus_type platform_bus_type

	struct module *owner;
	const char *mod_name; /* used for built-in modules */

	bool suppress_bind_attrs; /* disables bind/unbind via sysfs */
	enum probe_type probe_type;

	const struct of_device_id *of_match_table;
	const struct acpi_device_id *acpi_match_table;

	int (*probe) (struct device *dev); //最终调用platform_driver->probe
	int (*remove) (struct device *dev); //最终调用platform_driver->remove
	void (*shutdown) (struct device *dev); //最终调用platform_driver->shutdown
	int (*suspend) (struct device *dev, pm_message_t state);
	int (*resume) (struct device *dev);
	const struct attribute_group **groups;

	const struct dev_pm_ops *pm;
	struct driver_private *p; //p->driver指向自己
};

struct of_device_id {
	char name[32];
	char type[32];
	char compatible[128];
	const void *data;
};
platform_driver_register 驱动注册
int platform_driver_register(struct platform_driver *drv)
{
	drv->driver.bus = &platform_bus_type; // 设置设备驱动 挂接在 platform平台总线下

	// 下面做的就是对 drv 中的函数指针进行填充
	if (drv->probe)
		drv->driver.probe = platform_drv_probe;
	if (drv->remove)
		drv->driver.remove = platform_drv_remove;
	if (drv->shutdown)
		drv->driver.shutdown = platform_drv_shutdown;

	return driver_register(&drv->driver); // 注册设备驱动
}

int driver_register(struct device_driver *drv)
{
	int ret;
	struct device_driver *other; // 定义一个设备驱动指针 other

	BUG_ON(!drv->bus->p);

	if ((drv->bus->probe && drv->probe) || (drv->bus->remove && drv->remove) || (drv->bus->shutdown && drv->shutdown))
		printk(KERN_WARNING "Driver '%s' needs updating - please use " "bus_type methodsn", drv->name);

	other = driver_find(drv->name, drv->bus); // 校验,是否存在同名驱动
	if (other) {
		put_driver(other); // 如果名字相同 直接打印错误 并退出
		printk(KERN_ERR "Error: Driver '%s' is already registered, ""aborting...n", drv-name);
		return -EBUSY;
	}

	ret = bus_add_driver(drv); //在总线挂接设备驱动
	if (ret)
		return ret;

	ret = driver_add_groups(drv, drv->groups); //
	if (ret)
		bus_remove_driver(drv);

	return ret;
}

int bus_add_driver(struct device_driver *drv)
{
	struct bus_type *bus; // 定义一个bus_type 结构体指针
	struct driver_private *priv; // 定义一个 driver_private 指针
	int error = 0;

	bus = bus_get(drv->bus); // 获取 drv的bus

	if (!bus)
		return -EINVAL;
	pr_debug("bus: '%s': add driver %sn", bus->name, drv->name);

	priv = kzalloc(sizeof(*priv), GFP_KERNEL); // 给priv 申请分配内存空间
	if (!priv) {
		error = -ENOMEM;
		goto out_put_bus;
	}

	klist_init(&priv->klist_devices, NULL, NULL); // 初始化 priv-klist_devices 链表

	priv->driver = drv; // 使用 priv-driver 指向 drv
	drv->p = priv; // 使用drv->p 指向 priv ,跟之前分析的是一样的意思 就是建立关系
	priv->kobj.kset = bus->p->drivers_kset; // 设置设备驱动对象的父对象
	//添加kobject 对象到目录层次中,/sys/bus/bus_type/drivers/ 目录中可见

	error = kobject_init_and_add(&priv->kobj, &driver_ktype, NULL, "%s", drv->name);
	if (error)
		goto out_unregister;

	if (drv->bus->p->drivers_autoprobe) { //如果定义了自动匹配设备标志位,则行自动匹配
		error = driver_attach(drv); // 尝试将驱动绑定到设备
		if (error)
			goto out_unregister;
	}

	//链表挂接: priv->knode_bus 挂接到 bus->p->klist_drivers 链表头上去
	klist_add_tail(&priv->knode_bus, &bus->p->klist_drivers);
	module_add_driver(drv->owner, drv);

	error = driver_create_file(drv, &driver_attr_uevent); // 建立属性文件:uevent
	if (error) {
		printk(KERN_ERR "%s: uevent attr (%s) failedn", __func__, drv->name);
	}

	error = driver_add_attrs(bus, drv);// 根据总线的 bus->drv_attrs 来建立属性文件
	if (error) {
		/* How the hell do we get out of this pickle? Give up */
		printk(KERN_ERR "%s: driver_add_attrs(%s) failedn", __func__, drv->name);
	}

	if (!drv->suppress_bind_attrs) {
		error = add_bind_files(drv);
		if (error) {
			/* Ditto */
			printk(KERN_ERR "%s: add_bind_files(%s) failedn", __func__, drv->name);
		}
	}

	kobject_uevent(&priv->kobj, KOBJ_ADD);
	return 0;

out_unregister:
	kobject_put(&priv->kobj);
	kfree(drv->p);
	drv->p = NULL;

out_put_bus:
	bus_put(bus);
	return error;
}

int driver_attach(struct device_driver *drv)
{
	// 依次去匹配bus总线下的各个设备
	return bus_for_each_dev(drv->bus, NULL, drv, __driver_attach);
}

int bus_for_each_dev(struct bus_type *bus, struct device *start,
void *data, int (*fn)(struct device *, void *))
{
	struct klist_iter i; // 定义klist_iter : struct klist 和struct klist_node
	struct device *dev;
	int error = 0;

	if (!bus)
		return -EINVAL;

	//这个函数的功能就是将 klist_devices 和 knode_bus填充到 i 变量中
	klist_iter_init_node(&bus->p->klist_devices, &i, (start ? &start->p->knode_bus : NULL));

	while ((dev = next_device(&i)) && !error) // 依次返回出总线上的各个设备结构体device
		error = fn(dev, data); //对于每一个设备和设备驱动都调用fn这个函数

	klist_iter_exit(&i);
	return error;
}

static int __driver_attach(struct device *dev, void *data)
{
	struct device_driver *drv = data; // 定义一个device_driver 指针

	if (!driver_match_device(drv, dev)) //进行匹配 调用总线下的match 函数
		return 0;

	if (dev->parent) /* Needed for USB */
		device_lock(dev->parent);

	device_lock(dev);
	if (!dev->driver)
		driver_probe_device(drv, dev); // 调用probe函数
	device_unlock(dev);

	if (dev->parent)
		device_unlock(dev->parent);

	return 0;
}

int driver_probe_device(struct device_driver *drv, struct device *dev)
{
	int ret = 0;

	if (!device_is_registered(dev)) // 判断这个设备是否已经注册了
		return -ENODEV;

	pr_debug("bus: '%s': %s: matched device %s with driver %sn", drv->bus->name, __func__, dev_name(dev), drv->name);

	pm_runtime_get_noresume(dev);
	pm_runtime_barrier(dev);
	ret = really_probe(dev, drv); //调用设备驱动或者是总线下的 probe 函数
	pm_runtime_put_sync(dev);

	return ret;
}

static int really_probe(struct device *dev, struct device_driver *drv)
{
	int ret = 0;

	atomic_inc(&probe_count);

	pr_debug("bus: '%s': %s: probing driver %s with device %sn", drv->bus->name, __func__, drv->name, dev_name(dev));
	WARN_ON(!list_empty(&dev->devres_head));

	dev->driver = drv; // 使用 dev-driver 指针去指向 drv 这就使得这两者建立了一种关系

	if (driver_sysfs_add(dev)) {
		printk(KERN_ERR "%s: driver_sysfs_add(%s) failedn", __func__, dev_name(dev));
		goto probe_failed;
	}

	if (dev->bus->probe) { // 如果总线下的probe函数存在 则调用优先调用这个函数
		ret = dev->bus->probe(dev);
		if (ret)
			goto probe_failed;
	} else if (drv->probe) { // 否则调用设备驱动中的probe函数
		ret = drv->probe(dev); // 所以由此可知: 总线中的probe函数具有更高的优先级
		if (ret)
			goto probe_failed;
	}

	driver_bound(dev);

	ret = 1;
	pr_debug("bus: '%s': %s: bound device %s to driver %sn", drv->bus->name, __func__, dev_name(dev), drv->name);

	goto done;

probe_failed:
	devres_release_all(dev);
	driver_sysfs_remove(dev);
	dev->driver = NULL;
	if (ret != -ENODEV && ret != -ENXIO) {
		/* driver matched but the probe failed */
		printk(KERN_WARNING"%s: probe of %s failed with error %dn", drv->name, dev_name(dev), ret);
	}
	ret = 0;

done:
	atomic_dec(&probe_count);
	wake_up(&probe_waitqueue);
	return ret;
}
platform_driver_unregister 驱动取消
void platform_driver_unregister(struct platform_driver *); // 用来卸载我们的设备驱动

为开发者提供学习成长、分享交流、生态实践、资源工具等服务,帮助开发者快速成长。
更多推荐


 28
28 0
0- 0


 已为社区贡献1条内容

所有评论(0)