Linux系统破解root密码
各个版本linux root用户密码破解
文章目录
CentOS 6.X
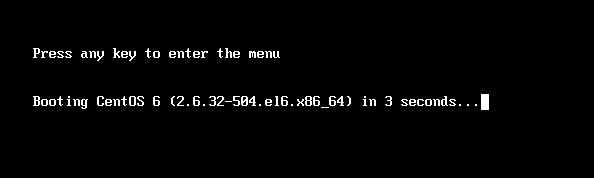
如上按【Esc】键进入内核界面:
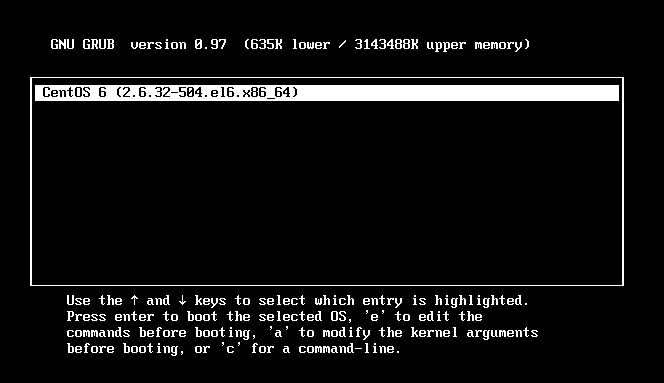
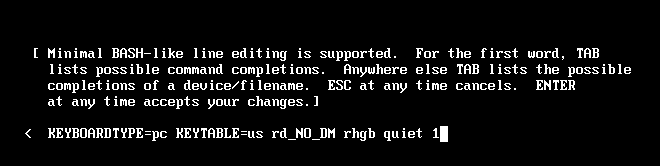
按a进入如下界面:
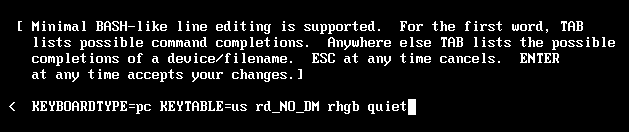
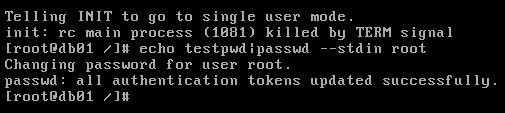
按【空格】键,输入“1” 或者输入single、S、s,再【回车】都可以进入单用户模式
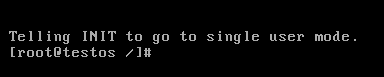
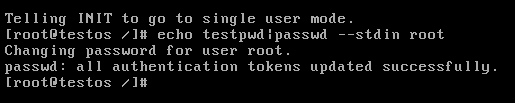
在单用户模式下修改密码
echo testpwd | passwd --stdin root
重启os验证密码
reboot
CentOS 7.X
方法1
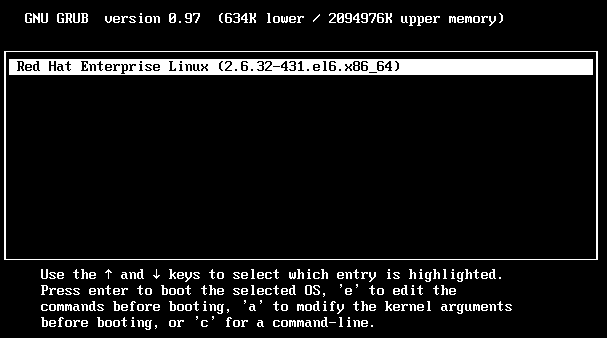
在启动grub菜单,选择编辑选项启动
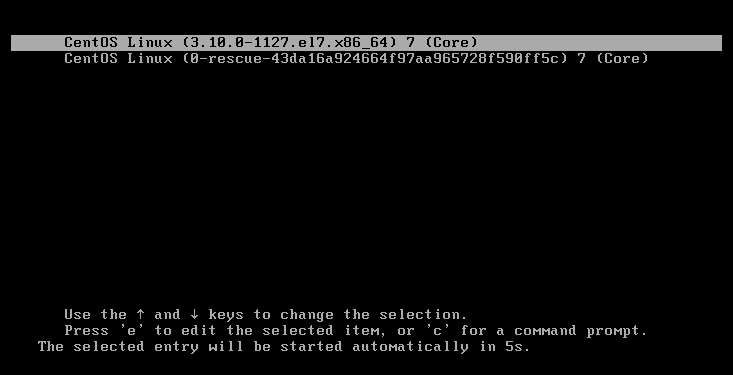
按e进入编辑模式
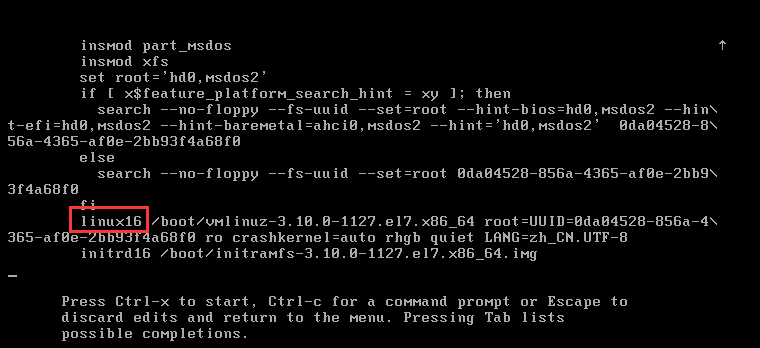
找到linux16这一行,将ro改为 rw init=/sysroot/bin/sh
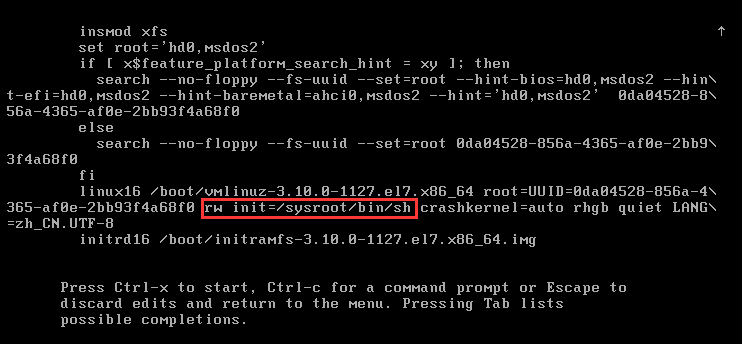
现在按下 Ctrl+X ,进入单用户模式

#修改root根
chroot /sysroot
#中文语言安装系统需要执行LANG=en,否则passwd的提示显示为乱码的方块。
LANG=en
#重置密码
echo testpwd | passwd --stdin root
#更新selinux上下文
touch /.autorelabel
#退出chroot
exit
#重启验证
reboot
方法2
在启动grub菜单,选择编辑选项启动
按e进入编辑模式
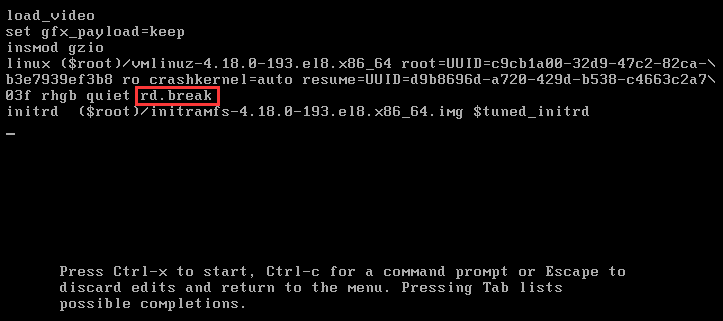
找到linux16这一行,尾部添加内核参数rd.break
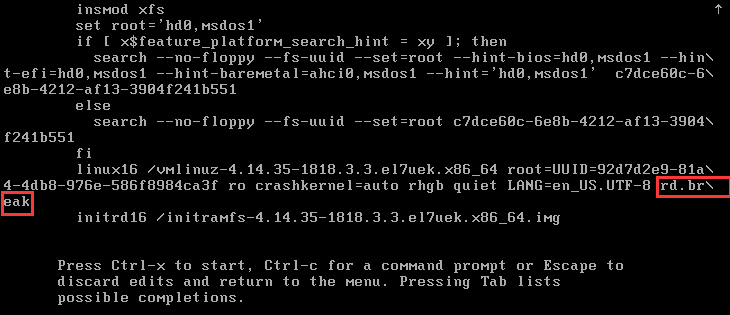
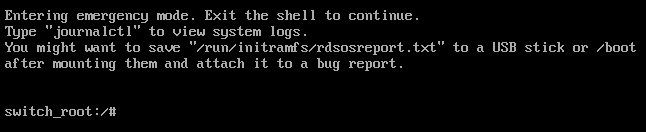
现在按下 Ctrl+X ,进入单用户模式
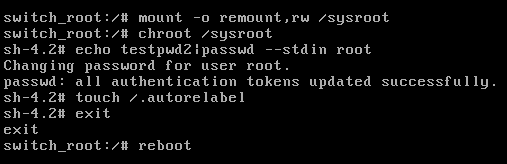
#以读写权限重新挂载/sysroot
mount -o remount,rw /sysroot
#修改根为/sysroot
chroot /sysroot
#中文语言安装系统需要执行LANG=en,否则passwd的提示显示为乱码的方块。
LANG=en
#修改密码
echo testpwd2 | passwd --stdin root
#更新SELinux安全上下文
touch /.autorelabel
#退出/sysroot
exit
#重启验证密码
reboot
备注:如果操作系统没有开SELinux,则不需要做touch /.autorelabel这一步骤
CentOS 8.X
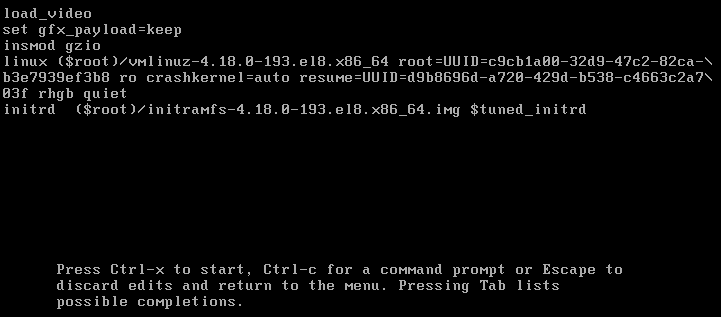
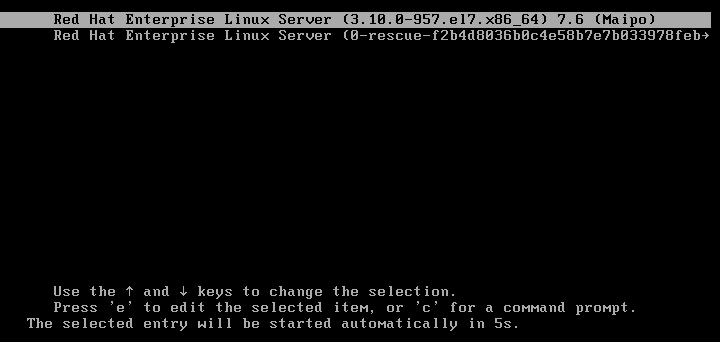
在以linux起首quiet结尾的这行的行尾处输入【空格】+ rd.break,
然后键盘按【ctrl+X】进入紧急救援模式
执行mount -o remount,rw /sysroot,以读写权限重新挂载/sysroot

执行chroot /sysroot/切换其目录下

中文语言安装系统需要执行LANG=en,否则passwd的提示显示为乱码的方块。
LANG=en
重置密码
echo testpwd | passwd --stdin root

系统selinux开启的情况下,需要执行touch /.autorelabel,更新SELinux上下文

exit退出sysroot
重启reboot验证密码
Oracle Linux 6.X
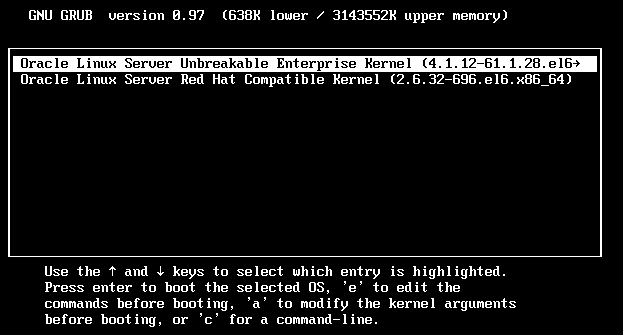
按a进入如下界面:
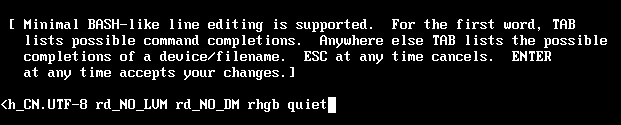
按【空格】键,输入“1” 或者输入single、S、s,再【回车】都可以进入单用户模式

在单用户模式下修改密码
echo testpwd | passwd --stdin root
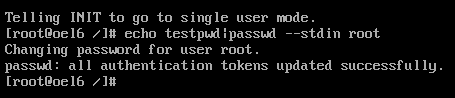
重启os验证密码:reboot
Oracle Linux 7.X
方法1
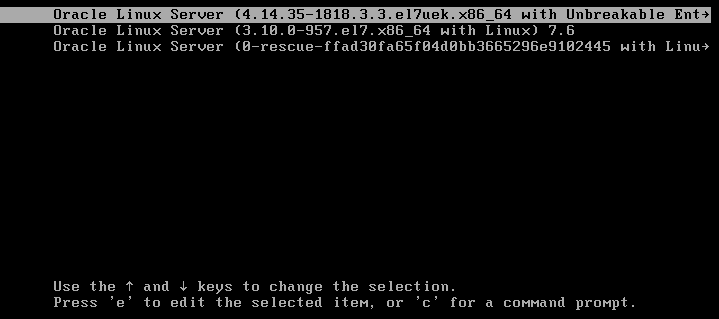
按e进入编辑模式
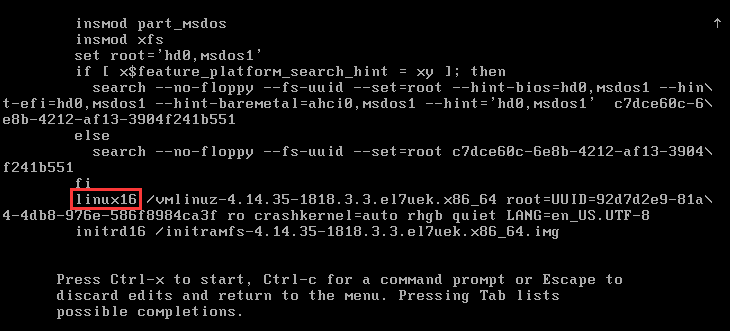
找到linux16这一行,将ro改为 rw init=/sysroot/bin/sh
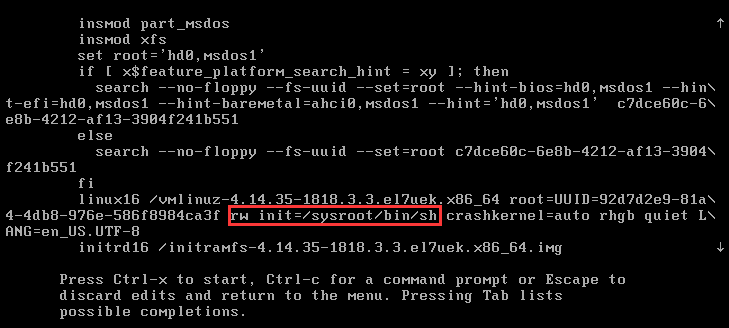
现在按下 Ctrl+X ,进入单用户模式

#修改root根
chroot /sysroot
#中文语言安装系统需要执行LANG=en,否则passwd的提示显示为乱码的方块。
LANG=en
#重置密码
echo testpwd | passwd --stdin root
#更新selinux上下文
touch /.autorelabel
#退出chroot
exit
#重启验证
reboot
方法2
按e进入编辑模式
找到linux16这一行,尾部添加内核参数rd.break
按Ctrl+X启动进入单用户模式

#以读写权限重新挂载/sysroot
mount -o remount,rw /sysroot
#修改根为/sysroot
chroot /sysroot
#中文语言安装系统需要执行LANG=en,否则passwd的提示显示为乱码的方块。
LANG=en
#修改密码
echo testpwd2 | passwd --stdin root
#更新SELinux安全上下文
touch /.autorelabel
#退出/sysroot
exit
#重启验证密码
reboot
RHEL 6.X
按a进入如下界面:


按【空格】键,输入“1” 或者输入single、S、s,再【回车】都可以进入单用户模式

在单用户模式下修改密码
echo testpwd | passwd --stdin root
重启os验证密码
reboot
RHEL 7.X
方法1
按e进入编辑模式
找到linux16这一行,将ro改为 rw init=/sysroot/bin/sh
现在按下 Ctrl+X ,进入单用户模式
#修改root根
chroot /sysroot
#中文语言安装系统需要执行LANG=en,否则passwd的提示显示为乱码的方块。
LANG=en
#重置密码
echo testpwd | passwd --stdin root
#更新selinux上下文
touch /.autorelabel
#退出chroot
exit
#重启验证
reboot
方法2
按e进入编辑模式
找到linux16这一行,尾部添加内核参数rd.break
按Ctrl+X启动进入单用户模式
#以读写权限重新挂载/sysroot
mount -o remount,rw /sysroot
#修改根为/sysroot
chroot /sysroot
#中文语言安装系统需要执行LANG=en,否则passwd的提示显示为乱码的方块。
LANG=en
#修改密码
echo testpwd2 | passwd --stdin root
#更新SELinux安全上下文
touch /.autorelabel
#退出/sysroot
exit
#重启验证密码
reboot
RHEL 8.X
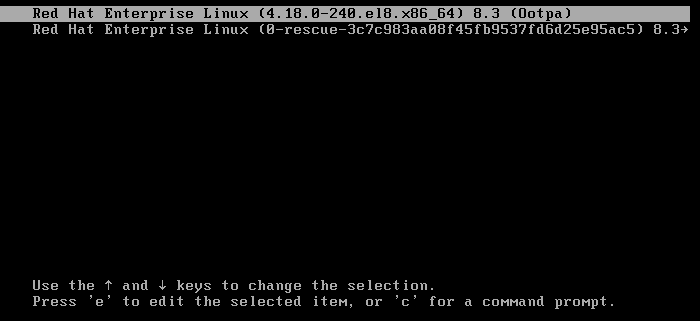
在以linux起首quiet结尾的这行的行尾处输入【空格】+ rd.break,
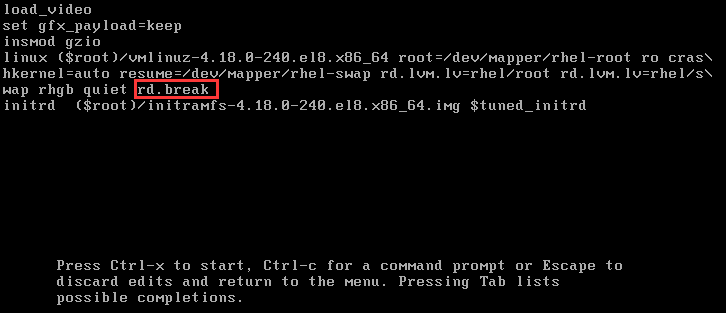
然后键盘按【ctrl+X】进入紧急救援模式
执行mount -o remount,rw /sysroot,以读写权限重新挂载/sysroot
mount -o remount,rw /sysroot
执行chroot /sysroot/切换其目录下
中文语言安装系统需要执行LANG=en,否则passwd的提示显示为乱码的方块。
LANG=en
重置密码
echo testpwd | passwd --stdin root
系统selinux开启的情况下,需要执行touch /.autorelabel,更新SELinux上下文
exit退出sysroot
重启reboot验证密码
总结
针对Linux6:
#1、按【ESC】进入GRUB界面
#2、按 a 进入修改内核参数界面
#3、在尾部按【空格】键,再输入“1” 或者输入single、S、s,
#4、再按【回车】进入单用户模式
#5、单用户模式下修改root密码
echo testpwd | passwd --stdin root
#6、重启OS验证密码
针对Linux7:
方法1:
#1、grub菜单,按 e 进入编辑模式
#2、找到linux16这一行,将ro改为 rw init=/sysroot/bin/sh
ro  -->   rw init=/sysroot/bin/sh
#3、按下 Ctrl+X ,进入单用户模式
#4、修改root根
chroot /sysroot
#5、中文语言安装系统需要执行LANG=en,否则passwd的提示显示为乱码的方块。
LANG=en
#6、重置root密码
echo testpwd | passwd --stdin root
#7、更新selinux上下文
touch /.autorelabel
#8、退出chroot
exit
#9、重启验证
reboot
方法2:
#1、grub菜单,按 e 进入编辑模式
#2、找到linux16这一行,尾部添加内核参数rd.break
rd.break
#3、按下 Ctrl+X ,进入单用户模式
#4、以读写权限重新挂载/sysroot
mount -o remount,rw /sysroot
#5、修改根为/sysroot
chroot /sysroot
#6、中文语言安装系统需要执行LANG=en,否则passwd的提示显示为乱码的方块。
LANG=en
#7、修改root密码
echo testpwd2 | passwd --stdin root
#8、更新SELinux安全上下文
touch /.autorelabel
#9、退出/sysroot
exit
#10重启验证密码
reboot
针对Linux8:
#1、grub菜单,按 e 进入编辑模式
#2、找到linux16这一行,尾部添加内核参数rd.break
rd.break
#3、按下 Ctrl+X ,进入单用户模式
#4、以读写权限重新挂载/sysroot
mount -o remount,rw /sysroot
#5、修改根为/sysroot
chroot /sysroot
#6、中文语言安装系统需要执行LANG=en,否则passwd的提示显示为乱码的方块。
LANG=en
#7、修改root密码
echo testpwd2 | passwd --stdin root
#8、更新SELinux安全上下文
touch /.autorelabel
#9、退出/sysroot
exit
#10重启验证密码
reboot

为开发者提供学习成长、分享交流、生态实践、资源工具等服务,帮助开发者快速成长。
更多推荐


 1
1 0
0- 0


 已为社区贡献4条内容

所有评论(0)