【Nexus】安装配置与使用
Nexus Repository OSS
1、 为什么使用Nexus
如果没有私服,我们所需的所有构件都需要通过maven的中央仓库和第三方的Maven仓库下载到本地,而一个团队中的所有人都重复的从maven仓库下 载构件无疑加大了仓库的负载和浪费了外网带宽,如果网速慢的话,还会影响项目的进程。很多情况下项目的开发都是在内网进行的,连接不到maven仓库怎么 办呢?开发的公共构件怎么让其它项目使用?这个时候我们不得不为自己的团队搭建属于自己的maven私服,这样既节省了网络带宽也会加速项目搭建的进程, 当然前提条件就是你的私服中拥有项目所需的所有构件。
2、Nexus下载
下载地址:Download Archives - Repository Manager 3
3、Nexus启动
我下载的是zip包,解压后进入\nexus-2.1.2-bundle\nexus-2.1.2\bin\jsw\,根据操作系统类型选择文件夹,我选的是windows-x86-32文件夹,进入后可看到如下所示bat文件。

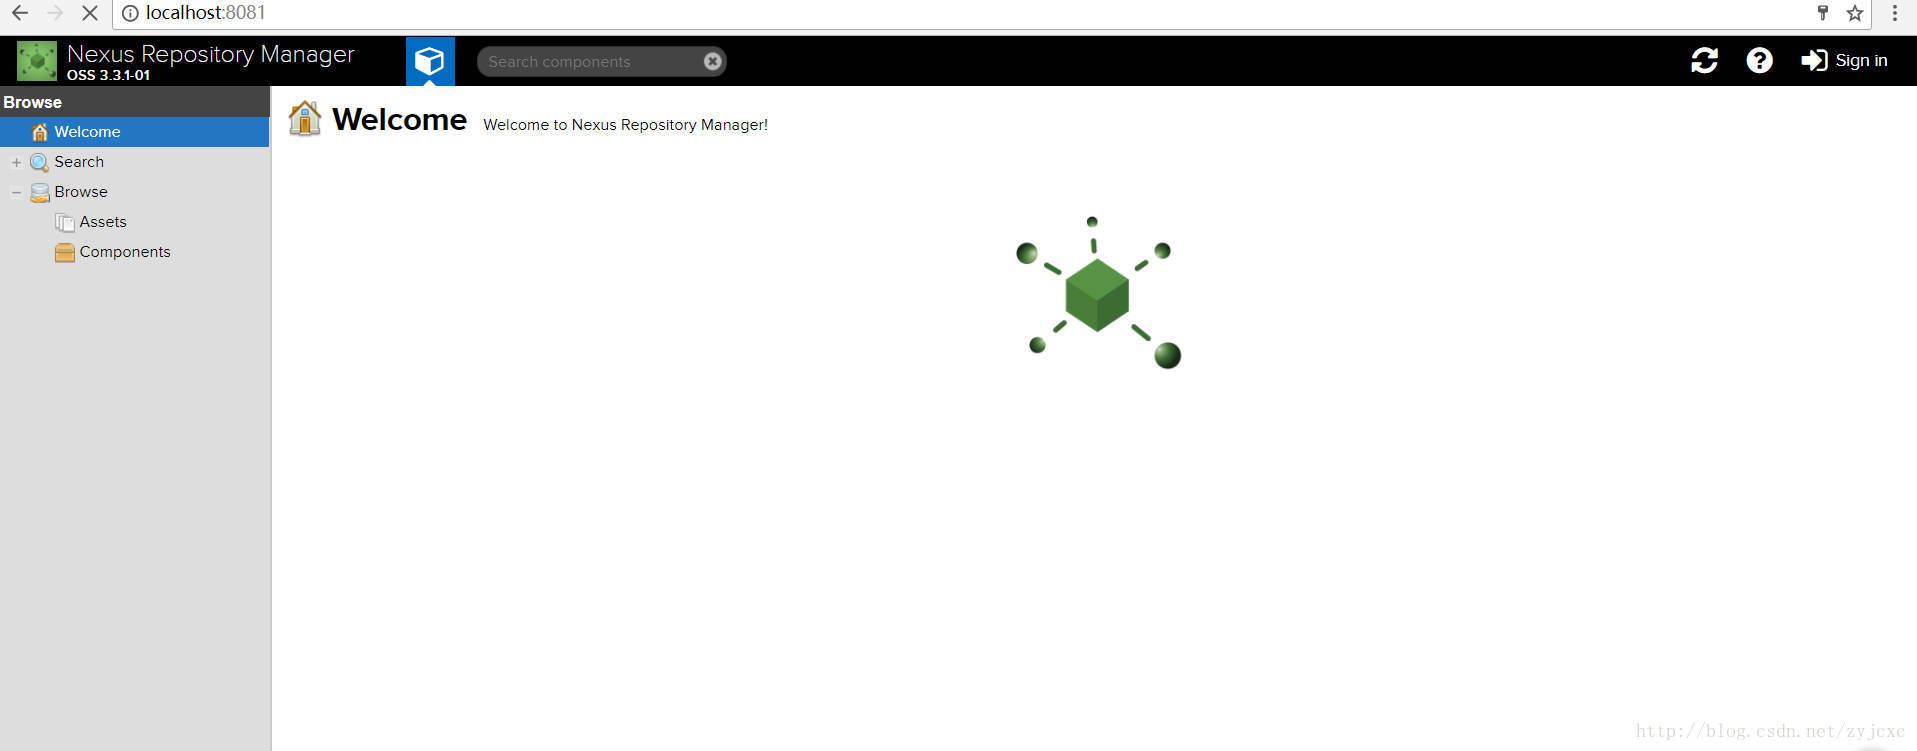
双击console-nexus.bat运行。游览器中输入http://127.0.0.1:8081/nexus/,出现图下所示就代表nexus已经启动成功。

8081为默认的端口号,要修改端口号可进入nexus-2.1.2-bundle\nexus-2.1.2\conf\打开nexus.properties文件,修改application-port属性值就可以了。
默认的用户名和密码:admin/admin123,登录后看到图下所示:

4、Nexus仓库
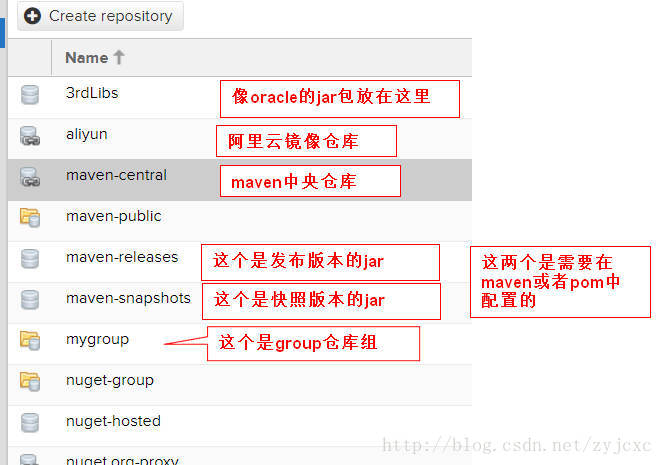
nexus的仓库类型分为以下四种:
group: 仓库组
hosted:宿主
proxy:代理
virtual:虚拟
首次登陆nexus后可以看到以下一个仓库组和多个仓库。

Public Repositories:  仓库组

3rd party: 无法从公共仓库获得的第三方发布版本的构件仓库

Apache Snapshots: 用了代理ApacheMaven仓库快照版本的构件仓库

Central: 用来代理maven中央仓库中发布版本构件的仓库

Central M1 shadow: 用于提供中央仓库中M1格式的发布版本的构件镜像仓库

Codehaus Snapshots: 用来代理CodehausMaven 仓库的快照版本构件的仓库

Releases: 用来部署管理内部的发布版本构件的宿主类型仓库

Snapshots:用来部署管理内部的快照版本构件的宿主类型仓库
4.1、创建Nexus宿主仓库
在Repositories选项页的菜单栏上点击Add按钮会出现如下所示,选择要添加的仓库类型。

这里我点击添加宿主类型的仓库,在仓库列表的下方会出现新增仓库的配置,如下所示:

点击save按钮后就会在仓库列表中看到刚才新增的仓库。
4.2、创建Nexus代理仓库
点击菜单栏上的Add按钮后选择Proxy Repository,看到如下所示配置界面:

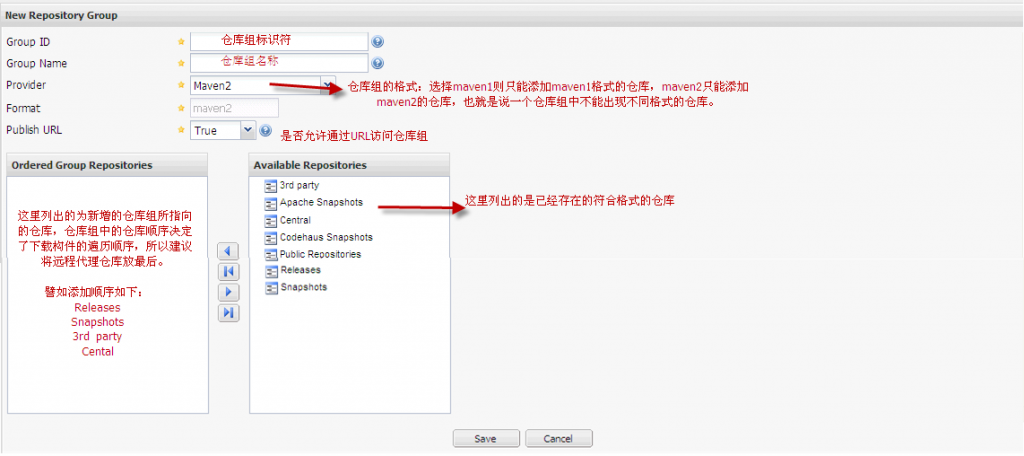
4.3、创建Nexus仓库组
仓库组和仓库关系是一对多的关系,一个仓库组可以指向多个仓库。
点击菜单栏上的Add按钮选择Repository Group就可以看到仓库组的配置界面,如下所示:
点击save后就可在仓库列表中看到新增的仓库组了,项目中如果要下载构件的话,配置文件中一般都用仓库组的URL。
5、修改Maven配置文件从Nexus下载构件
1)如果想对操作系统的所有用户统一配置maven,则只需修改maven\conf\setting.xml文件就可以了,如果只想对用户单独配置maven,只需将conf\setting.xml文件复制到C:\Documents and Settings\Administrator\.m2文件夹下(我这里假设系统装在c盘,用户为Administrator)。
2) 打开setting.xml文件,可以看到如下代码:
<!-- localRepository
   | The path to the local repository maven will use to store artifacts.
   |
   | Default: ~/.m2/repository
  <localRepository></localRepository>
 -->
表示如果不设置localRepository,maven会默认将本地仓库建到/.m2/repository文件夹下。
设置localRepository如下代码所示:
<localRepository>F:\myCenterRepository</localRepository>表示在myCenterRepository文件夹下建立本地仓库。个人建议不要采用默认的仓库地址,因为项目如果很多的话,那么本地仓库所占的磁盘空间就比较多了,所以指定仓库地址到其他盘符,更方便管理。
5.2、在POM文件中配置Nexus仓库
在项目的pom文件中添加如下代码:
<repositories>
    <repository>
      <id>nexus</id>
      <name>my-nexus-repository</name>
      <url>http://127.0.0.1:7788/nexus/content/groups/public/</url>
      <releases>
        <enabled>true</enabled>
      </releases>
      <snapshots>
        <enabled>false</enabled>
      </snapshots>
    </repository>
  </repositories>
  <pluginRepositories>
    <pluginRepository>
      <id>nexus</id>
      <name>my-nexus-repository</name>
      <url>http://127.0.0.1:7788/nexus/content/groups/public/</url>
      <releases>
        <enabled>true</enabled>
      </releases>
      <snapshots>
        <enabled>false</enabled>
      </snapshots>
    </pluginRepository>
  </pluginRepositories>
在pom文件中配置只对当前项目有效,而实际开发中不可能在每个项目中重复配置信息,所以不建议在pom文件中配置。
5.3、在setting.xml文件中配置Nexus仓库
1)maven提供了profile来配置仓库信息,如下所示:
<profiles>
    <profile>
      <id>myprofile</id>
      <repositories>
		    <repository>
		        <id>central</id>
		        <url>http://central</url>
		        <releases>
		            <enabled>true</enabled>
		        </releases>
		        <snapshots>
		            <enabled>true</enabled>
		        </snapshots>
		    </repository>
		</repositories>
		 <pluginRepositories>
			<pluginRepository>
			  <id>central</id>
			  <url>http://central</url>
			  <releases>
				<enabled>true</enabled>
			  </releases>
			  <snapshots>
				<enabled>false</enabled>
			  </snapshots>
			</pluginRepository>
	    </pluginRepositories>
    </profile>
</profiles>
2) 激活profile
<activeProfiles>
    <activeProfile>myprofile</activeProfile>
  </activeProfiles>
3)配置镜像
 <mirrors>
     <mirror>
      <id>nexus</id>
      <url>http://127.0.0.1:7788/nexus/content/groups/public/</url>
      <mirrorOf>*</mirrorOf>
    </mirror>
  </mirrors>
6、部署构件到Nexus仓库
6.1、maven部署
1) 修改pom文件
在pom文件中添加如下配置:
<distributionManagement>
       <repository>
           <id>my-nexus-releases</id>
           <url>http://127.0.0.1:7788/nexus/content/repositories/releases/</url>
       </repository>

       <snapshotRepository>
           <id>my-nexus-snapshot</id>
           <url>http://127.0.0.1:7788/nexus/content/repositories/snapshots/</url>
       </snapshotRepository>
  </distributionManagement>
2)在setting.xml文件中添加认证信息:
<servers>
     <server>
      <id>my-nexus-releases</id>
      <username>admin</username>
      <password>admin123</password>
    </server>
	<server>
      <id>my-nexus-snapshot</id>
      <username>admin</username>
      <password>admin123</password>
    </server>
</servers>
上面的配置中我用的是超级管理员的账户,开发项目中可以改为具有部署构件权限的用户就可以了。
3)执行部署
测试的构件项目信息如下:
<groupId>com.ez</groupId>
  <artifactId>TestJar</artifactId>
  <version>1.0</version>
  <packaging>jar</packaging>
  <name>TestJar</name>
从上面的信息中可以看出构件为发布版本,所以部署构件的话会自动部署至releases仓库中。
在命令行中执行:mvn clean deploy
如果之前没用执行过该命令,maven会自动到中央仓库中下载部署所需的插件。最后在命令行中看到如下所示就代表构件已经部署成功。

到nexus的releases仓库中查看刚刚部署好的构件信息如下所示:

如果部署失败的要检查一下用户是否有部署的权限,目标仓库是否允许部署,是否缺少部署所需的构件。
6.2、手动部署
手动部署构件则更为简单了,在nexus的仓库列表中点击要部署的目标仓库,然后点击Artifact Upload选项卡看到下图所示:

linux安装部署:
1.下载解压
wget http://download.sonatype.com/nexus/3/nexus-3.21.1-01-unix.tar.gz
tar -zxf nexus-3.21.1-01-unix.tar.gz
2.配置
2.1端口及上下文路径
vim nexus/nexus-3.21.1-01/etc/ nexus-default.properties

application-port=8081
application-host=192.168.1.129
nexus-args=${jetty.etc}/jetty.xml,${jetty.etc}/jetty-http.xml,${jetty.etc}/jetty-requestlog.xml
nexus-context-path=/nexus

# Nexus section
nexus-edition=nexus-pro-edition
nexus-features=\
nexus-pro-feature
2.2使用root运行
vim nexus/nexus-3.21.1-01/bin/nexus.rc

run_as_user=root #使用root运行
2.3JVM参数
vim nexus/nexus-3.21.1-01/bin/nexus.vmoptions

-Xms256m
-Xmx1024m
-XX:MaxDirectMemorySize=2703m
-XX:+UnlockDiagnosticVMOptions
-XX:+LogVMOutput
-XX:LogFile=../sonatype-work/nexus3/log/jvm.log
-XX:-OmitStackTraceInFastThrow
-Djava.net.preferIPv4Stack=true
-Dkaraf.home=.
-Dkaraf.base=.
-Dkaraf.etc=etc/karaf
-Djava.util.logging.config.file=etc/karaf/java.util.logging.properties
-Dkaraf.data=../sonatype-work/nexus3
-Dkaraf.log=../sonatype-work/nexus3/log
-Djava.io.tmpdir=../sonatype-work/nexus3/tmp
-Dkaraf.startLocalConsole=false
#
# additional vmoptions needed for Java9+
#
# --add-reads=java.xml=java.logging
# --add-exports=java.base/org.apache.karaf.specs.locator=java.xml,ALL-UNNAMED
# --patch-module=java.base=lib/endorsed/org.apache.karaf.specs.locator-4.2.6.jar
# --patch-module=java.xml=lib/endorsed/org.apache.karaf.specs.java.xml-4.2.6.jar
# --add-opens=java.base/java.security=ALL-UNNAMED
# --add-opens=java.base/java.net=ALL-UNNAMED
# --add-opens=java.base/java.lang=ALL-UNNAMED
# --add-opens=java.base/java.util=ALL-UNNAMED
# --add-opens=java.naming/javax.naming.spi=ALL-UNNAMED
# --add-opens=java.rmi/sun.rmi.transport.tcp=ALL-UNNAMED
# --add-exports=java.base/sun.net.www.protocol.http=ALL-UNNAMED
# --add-exports=java.base/sun.net.www.protocol.https=ALL-UNNAMED
# --add-exports=java.base/sun.net.www.protocol.jar=ALL-UNNAMED
# --add-exports=jdk.xml.dom/org.w3c.dom.html=ALL-UNNAMED
# --add-exports=jdk.naming.rmi/com.sun.jndi.url.rmi=ALL-UNNAMED
#
# comment out this vmoption when using Java9+
#
2.4修改环境变量
vim /etc/profile

export NEXUS_HOME=/alidata/server/nexus/nexus-3.21.1-01

export PATH=$PATH:$NEXUS_HOME/bin
source /etc/profile
2.5设置开机自启动
ln -s /alidata/server/nexus/nexus-3.21.1-01/bin/nexus /etc/init.d/nexus3
chkconfig --add nexus3
chkconfig nexus3 on
2.6修改 nexus3 启动时要使用的 jdk 版本
vim /alidata/server/nexus/nexus-3.21.1-01/bin

第 14 行:
INSTALL4J_JAVA_HOME_OVERRIDE=/alidata/server/jdk1.8.0_152
2.7修改 nexus3 数据以及相关日志的存储位置 (可选):
vim nexus/nexus-3.21.1-01/bin/nexus.vmoptions

-XX:LogFile=./sonatype-work/nexus3/log/jvm.log
-Dkaraf.data=./sonatype-work/nexus3
-Djava.io.tmpdir=./sonatype-work/nexus3/tmp
2.8启动
bin/nexus start2.9服务器开放Nexus私服端口
(1)firewall-cmd --zone=public --add-port=8081/tcp --permanent
(2)阿里云服务器安全组配置
3.nginx代理nexus
server {
    listen 80;
    server_name 域名;

    location /nexus {
        proxy_pass http://127.0.0.1:8081;
        proxy_redirect off;
        proxy_set_header Host $host;
        proxy_set_header X-Real-IP $remote_addr;
        proxy_set_header X-Forwarded-For $proxy_add_x_forwarded_for;
        client_max_body_size 300M;
    }
}
# 重启nginx
./nginx -s reload
4.配置仓库
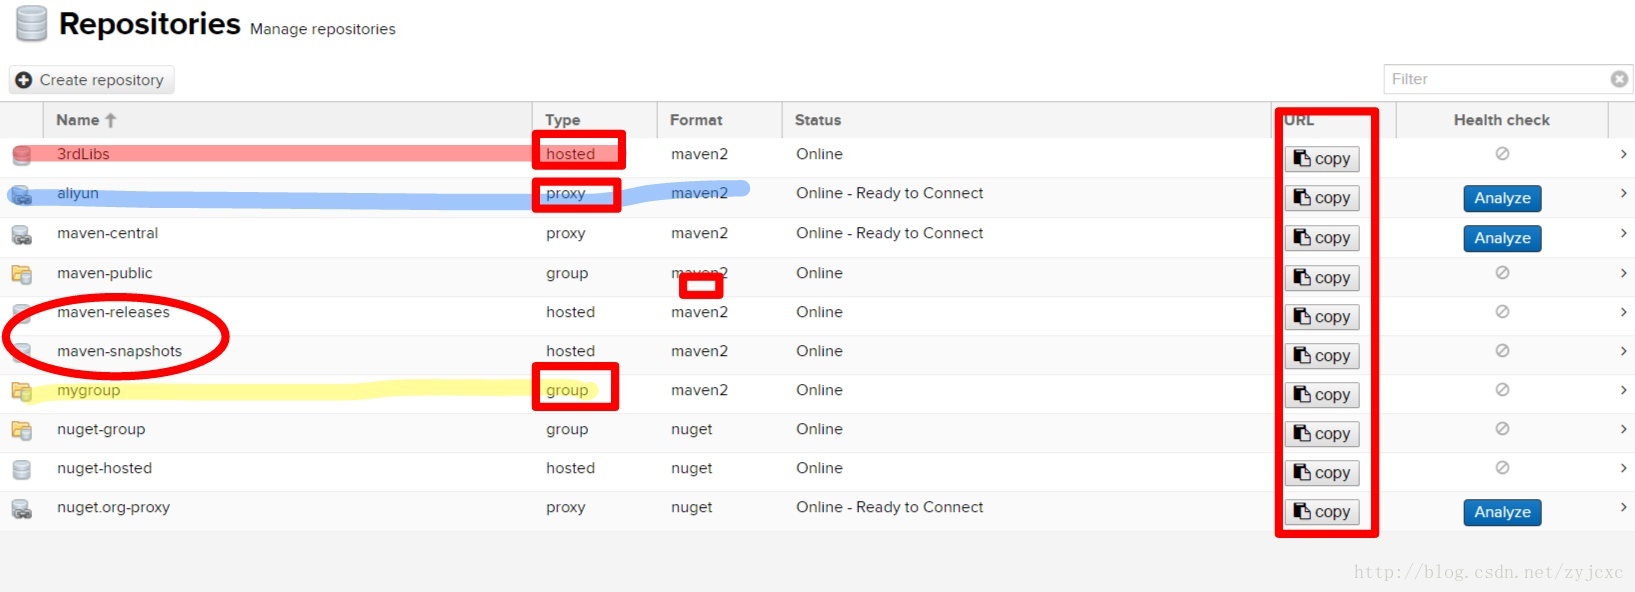
安装成功后有两个默认账号admin、anonymous,其中admin具有全部权限;anonymous作为匿名用户,只具有查看权限。
pepositories name属性说明
maven-central:maven中央库,默认从https://repo1.maven.org/maven2/拉取jar
maven-releases:私库发行版jar
maven-snapshots:私库快照(调试版本)jar
maven-public:仓库分组,把上面三个仓库组合在一起对外提供服务,在本地maven基础配置settings.xml中使用。
pepositories type属性说明
group(仓库组类型):又叫组仓库,用于方便开发人员自己设定的仓库
hosted(宿主类型):内部项目的发布仓库(内部开发人员,发布上去存放的仓库)
proxy(代理类型):从远程中央仓库中寻找数据的仓库(可以点击对应的仓库的Configuration页签下Remote Storage Location属性的值即被代理的远程仓库的路径)
virtual(虚拟类型):虚拟仓库(这个基本用不到,重点关注上面三个仓库的使用)
一般,访问我们使用maven-public
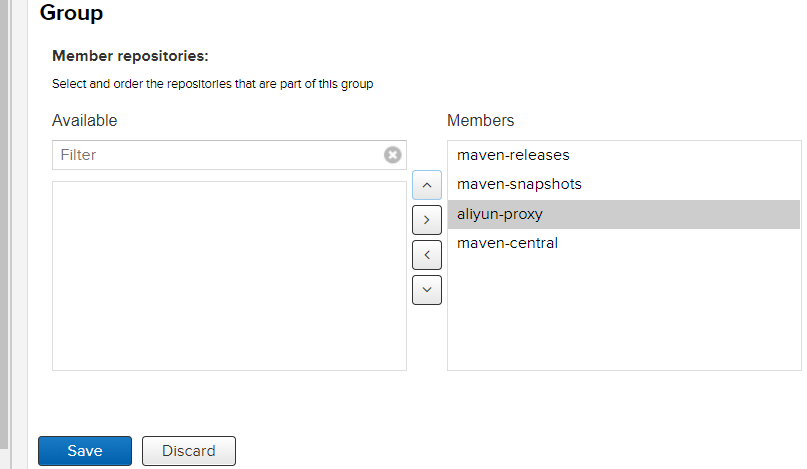
http://域名/nexus/repository/maven-public/由于访问中央仓库有时候会比较慢,这里我添加一个阿里云的代理仓库,然后优先级放到默认中央库之前, 阿里云的maven仓库url为http://maven.aliyun.com/nexus/content/groups/public
 然后再public组里面讲这个aliyun-proxy仓库加入,排在maven-central之前即可。
创建Blob Stores
文件存储的地方,创建一个目录的话,对应文件系统的一个目录,可供仓库上传文件使用,如图所示:

5. 本地Maven使用私服
在maven的默认配置settings.xml中修改如下:
<servers>
	<server>
        <id>nexus</id>
        <username>admin</username>
        <password>123456</password>
    </server>
</servers>

<mirrors>
    <mirror>
        <id>nexus</id>
        <mirrorOf>*</mirrorOf>
        <url>http://域名/nexus/repository/maven-public/</url>
    </mirror>
</mirrors>

<profiles>
    <profile>
      <id>nexus</id>
      <repositories>
        <repository>
          <id>Nexus</id>
          <url>http://域名/nexus/repository/maven-public/</url>
          <releases>
            <enabled>true</enabled>
			<updatePolicy>always</updatePolicy>
          </releases>
          <snapshots>
            <enabled>true</enabled>
            <updatePolicy>always</updatePolicy>
          </snapshots>
        </repository>
      </repositories>
      <activation>
        <activeByDefault>true</activeByDefault>
        <jdk>1.8</jdk>
      </activation>
      <properties>
        <maven.compiler.source>1.8</maven.compiler.source>
        <maven.compiler.target>1.8</maven.compiler.target>
        <maven.compiler.compilerVersion>1.8</maven.compiler.compilerVersion>
      </properties>
    </profile>
</profiles>

<activeProfiles>
    <activeProfile>nexus</activeProfile>
</activeProfiles>
6.修改工程的pom.xml
如果要发布自己的jar到私服,就需要修改工程的pom.xml,添加如下内容,否则什么都不用做:
<distributionManagement>
    <repository>
        <id>nexus</id>
        <name>Releases</name>
        <url>http://域名/nexus/repository/maven-releases</url>
    </repository>
    <snapshotRepository>
        <id>nexus</id>
        <name>Snapshot</name>
        <url>http://域名/nexus/repository/maven-snapshots</url>
    </snapshotRepository>
</distributionManagement>
注意:上面的repository的id值一定要跟settings.xml文件中配置的server一致。上传到Nexus上,使用 mvn deploy 即可,开发的时候请使用snapshot版本,也就是version的后缀必须是-SNAPSHOT。
仓库类型, nexus最重要的概念
这时候已经搭建好了Nexus,要做操作前先登录,默认用户名admin,默认密码admin123。来看看各个Repository。点击左侧Repositories。
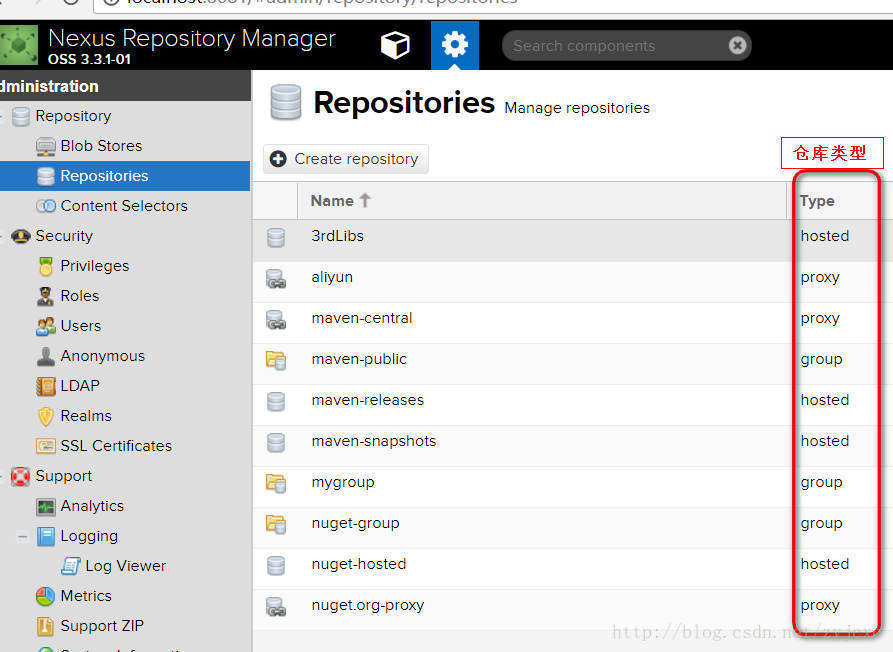
hosted:本地仓库,通常我们会部署自己的构件到这一类型的仓库。比如公司的第二方库。
所有我们自己jar包都在这种类型的仓库中.
proxy:代理仓库,它们被用来代理远程的公共仓库,如maven中央仓库。
如果本地nexus仓库中没有的jar包, 会从代理仓库中取, 就是这个意思, 当然maven中央仓库在nexus中只是代理仓库中的一个, 可以设定多个代理仓库, 比如阿里云, 比较快.
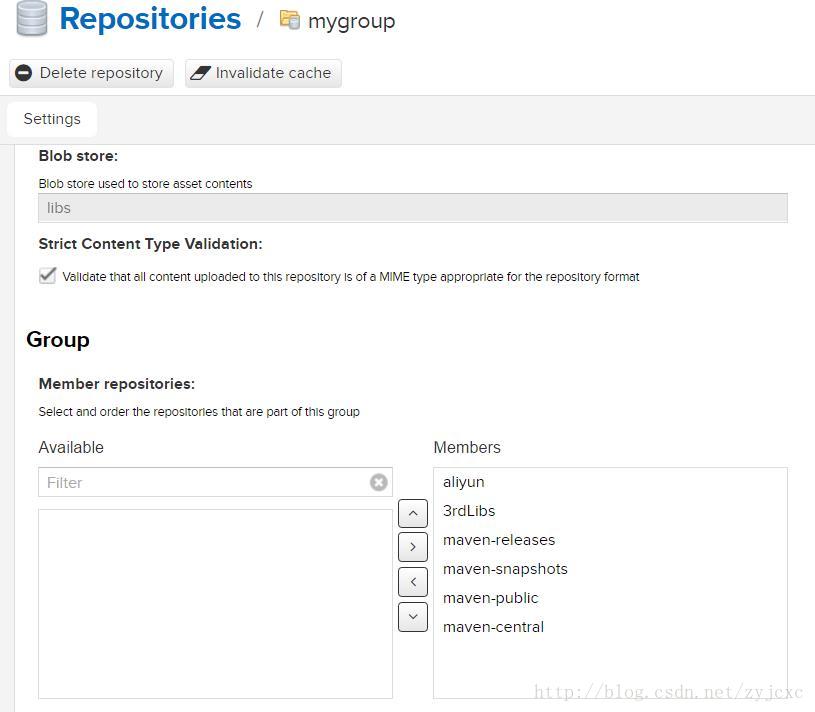
group:仓库组,用来合并多个hosted/proxy仓库。
这个就是检索一组仓库, 取jar包, 这个貌似有缓存的, 我在后面的上传jar包时被坑了n个小时. 就是明明组里有设定其他hosted类型仓库, 就是不去检索那个仓库, 导致我自己上传的jar包在hosted仓库中, 明明有缺不检索, pom一直报错.
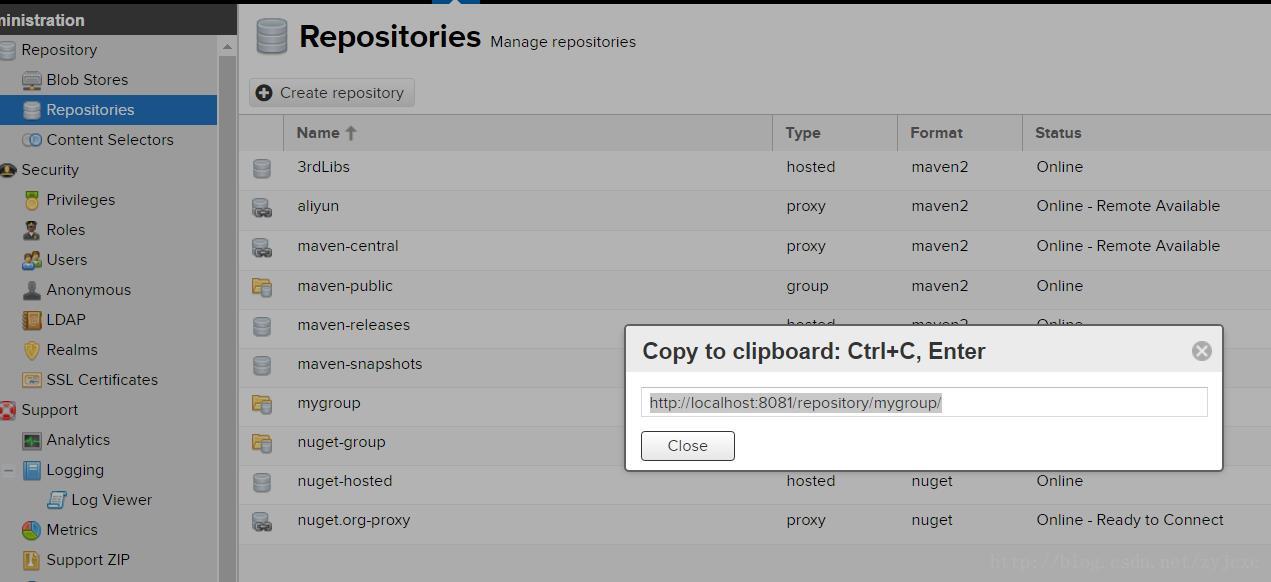
下面这张图, copy的作用, 是用来配置文件里粘贴仓库地址的(例如第三方jar上传的路径) 花圈的部分, maven项目发布时. 有一些第三方的jar或者公司的jar, 如果pom.xml里的version是带snapshots的, 会自动发布到maven-snapshots目录(jar名字后会带有时间戳,代表不同快照版本)
下面是配置
pom中配置:
<repositories>
        <repository>
            <id>maven-central</id>
            <name>maven-central</name>
            <url>http://192.168.1.28:8081/repository/maven-central/</url>
            <snapshots>
                <enabled>true</enabled>
            </snapshots>
            <releases>
                <enabled>true</enabled>
            </releases>
        </repository>
    </repositories>
Snapshot包的管理
1.先修改Maven的settings.xml文件,加入认证机制
<servers>
<server>
      <id>nexus</id>
      <username>admin</username>
      <password>admin123</password>
</server>
2.修改工程的Pom文件
<distributionManagement>
        <snapshotRepository>
            <id>nexus</id>
            <name>Nexus Snapshot</name>
            <url>http://192.168.1.28:8081/repository/maven-snapshots/</url>
        </snapshotRepository>
        <site>
            <id>nexus</id>
            <name>Nexus Sites</name>
            <url>dav:http://192.168.1.28:8081/repository/maven-snapshots/</url>
        </site>
    </distributionManagement>
注意事项:
上面修改的Pom文件如截图中的名字要跟/usr/local/maven/conf/settings.xml文件中的名字一定要对应上。
3.上传到Nexus上
先配置POM文件的头部, 根据需要自己配置版本是shapshot
<groupid>com.woasis</groupid>
<artifactid>test-nexus</artifactid>
<version>1.0.0SHAPSHOT</version>
<packaging>jar</packaging>
使用mvn deploy命令运行即可(运行结果在此略过)
最后因为Snapshot是快照版本,默认他每次会把Jar加一个时间戳,做为历史备份版本。
Releases包的管理
- 与Snapshot大同小异,只是上传到私服上的Jar包不会自动带时间戳
- 与Snapshot配置不同的地方,就是工程的POM文件,加入repository配置
<repository> <id>nexus</id> <name>Nexus Snapshot</name> <url>http://192.168.1.28:8081/repository/maven-releases/</url> </repository> - 发布版记得打包的时候需要把Snapshot去掉
    <groupId>com.woasis</groupId>
    <artifactId>test-nexus</artifactId>
    <version>1.0.0</version>
    <packaging>jar</packaging>
现在就看我目前的配置文件就行, 亲测好使
- 本地maven库配置settings.xml
<settings>
<!-- 暂不知作用 -->
<pluginGroups>
     <pluginGroup>org.sonatype.plugins</pluginGroup>
</pluginGroups>

<!-- 必填 -->
<servers>
     <server>
          <id>nexus</id>
          <username>admin</username>
          <password>admin123</password>
     </server>
</servers>

<mirrors>
     <mirror>
          <id>nexus</id>
          <mirrorOf>*</mirrorOf>
          <url>http://localhost:8081/repository/mygroup</url>
     </mirror>
</mirrors>
注意: 这个地址是参照我nexus建的分组地址, 我认为分组检索比较省事, 这样写就是能够让maven直接检索我的分组里的仓库, 把需要检索的仓库都扔里就好了
下图, 把需要的仓库扔仓库组里面
<!-- 这个就是说可以免去每个项目配置发布目录的意思, 但是需要最后activeProfiles激活-->
<profiles>
     <profile>
     <id>nexus</id>
     <repositories>
          <repository>
               <id>central</id>
               <url>http://central</url>
               <releases>
                    <enabled>true</enabled>
               </releases>
               <snapshots>
                    <enabled>true</enabled>
               </snapshots>
          </repository>
     </repositories>

     <pluginRepositories>
          <pluginRepository>
               <id>central</id>
               <url>http://central</url>
               <releases>
                    <enabled>true</enabled>
               </releases>
               <snapshots>
                    <enabled>true</enabled>
               </snapshots>
          </pluginRepository>
     </pluginRepositories>
     </profile>
</profiles>

<activeProfiles>
     <activeProfile>nexus</activeProfile>
</activeProfiles>


</settings>
上传第三方jar到私服
mvn:deploy在整合或者发布环境下执行,将最终版本的包拷贝到远程的repository,使得其他的开发者或者工程可以共享。
以将ojdbc14传到nexus中的thirdparty为例
我的例子: nexus3 中 将ojdbc14 传到自己 建设的 3rdLibs库中
一 、配置settings.xml
因为nexus是需要登陆操作,当然可以通过配置免登陆,这是后话。
在maven的 settings.xml的<servers> </servers>中配置
<server>
<id>thirdparty</id>
<username>admin</username>
<password>admin123</password>
</server>
如果进行deploy时返回Return code is: 401错误,则需要进行用户验证或者你已经验证的信息有误。
二、 cmd输入命令
mvn deploy:deploy-file -DgroupId=com.xy.Oracle -DartifactId=ojdbc14 -Dversion=10.2.0.4.0 -Dpackaging=jar -Dfile=E:\ojdbc14.jar -Durl=http://localhost:9090/nexus-2.2-01/content/repositories/thirdparty/ -DrepositoryId=thirdparty
亲测: 笔记本好使的cmd命令, 我自己传的一个拼音转换jar包
mvn deploy:deploy-file -DgroupId=com.xy.pinyin -DartifactId=pinyin4j -Dversion=2.5.0 -Dpackaging=jar -Dfile=E:\pinyin4j-2.5.0.jar -Durl=http://localhost:8081/repository/3rdLibs/ -DrepositoryId=nexusDgroupId和DartifactId构成了该jar包在pom.xml的坐标,项目就是依靠这两个属性定位。自己起名字也行。
Dfile表示需要上传的jar包的绝对路径。
Durl私服上仓库的位置,打开nexus——>repositories菜单,可以看到该路径。
DrepositoryId服务器的表示id,在nexus的configuration可以看到。
Dversion表示版本信息,怎样得到一个jar包准确的版本呢?
解压该包,会发现一个叫MANIFEST.MF的文件,这个文件就有描述该包的版本信息。
比如Manifest-Version: 1.0可以知道该包的版本了。上传成功后,在nexus界面点击3rd party仓库可以看到这包。
三、 一些问题
发现问题
在敲击该命令的时候,有时候看到提示需要POM文件,但上传包是不需要pom文件的。
可能原因
最大可能是你语句打错了如多了一个空格和换行,这样语句直接截断到换行前面,cmd就找它可以认识的语句执行,比如直接执行mvn,而mvn是对项目打包,是要pom文件的。
解决办法
耐心把命令重新敲一遍。还有如果是miror中配置了nexus是检索分组的地址, 例如我的配置就是检索一组仓库,那么一定注意,一定要把三方库加入到分组中去

为开发者提供学习成长、分享交流、生态实践、资源工具等服务,帮助开发者快速成长。
更多推荐


 1
1 0
0- 0


 已为社区贡献2条内容

所有评论(0)