proxmox 下载-安装-基本配置
0. 准备电脑:建议2013年以后的,能装UltraISO的。U盘:格式化后的容量大于镜像文件 2G以上【目前2G够用】。网络:下载和后面更新要用到。1. 下载官网下载:https://proxmox.com/en/downloads下载最新版本的:Proxmox VE 7.2 ISO Installer 【目前7.2】2. 安装下载并打开:UltraISO文件-打开-proxmox-ve_7.2
·
0. 准备
- 电脑:建议2013年以后的,能装UltraISO的。
- U盘:格式化后的容量大于镜像文件 2G以上【目前2G够用】。
- 网络:下载和后面更新要用到。
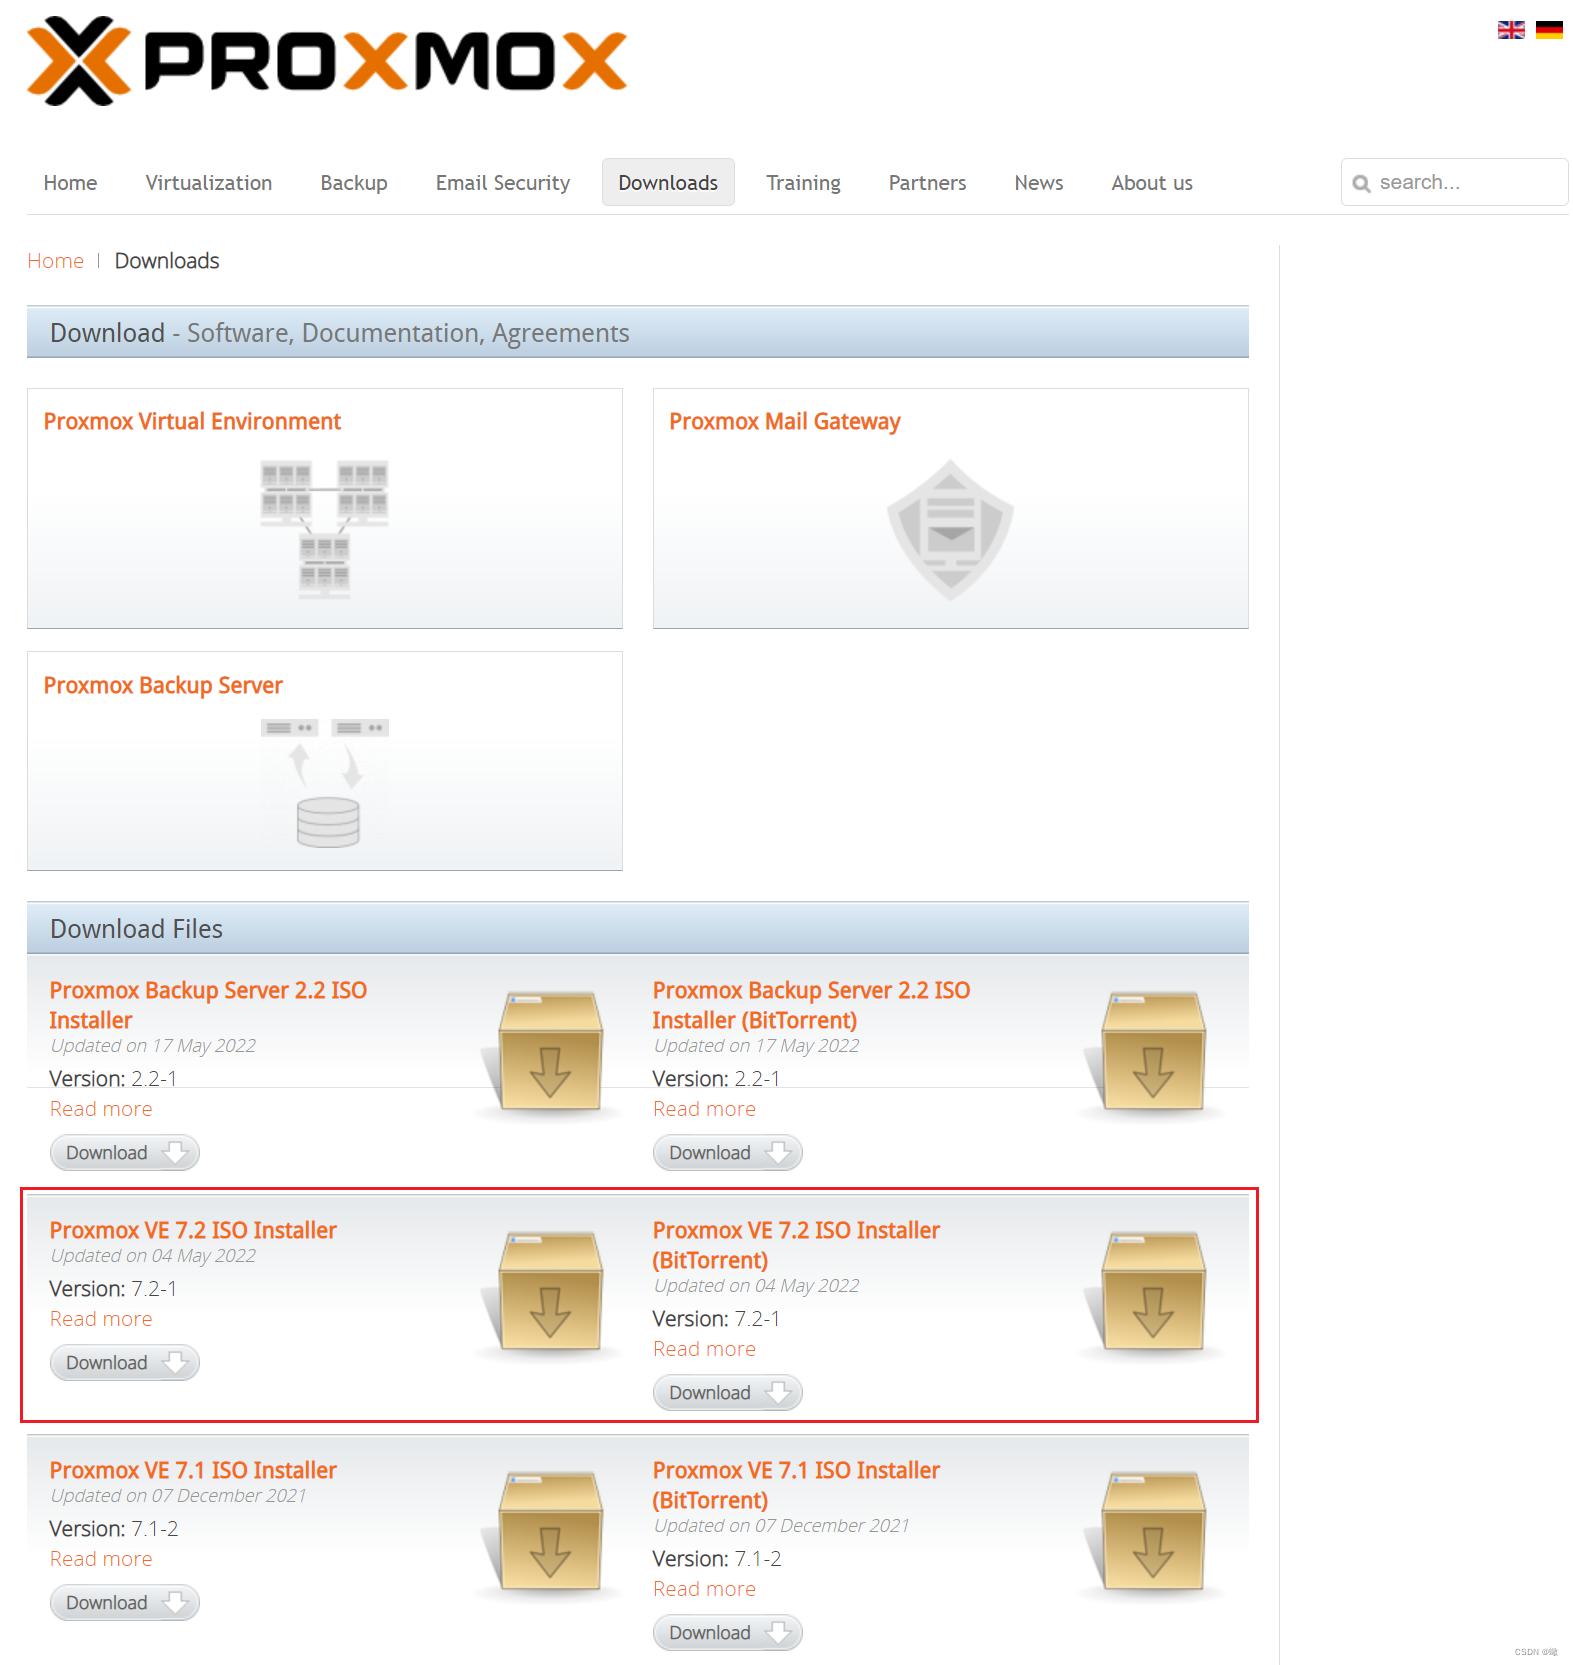
1. 下载
- 官网下载:https://proxmox.com/en/downloads
- 下载最新版本的:Proxmox VE 7.2 ISO Installer 【目前7.2】
2. 安装
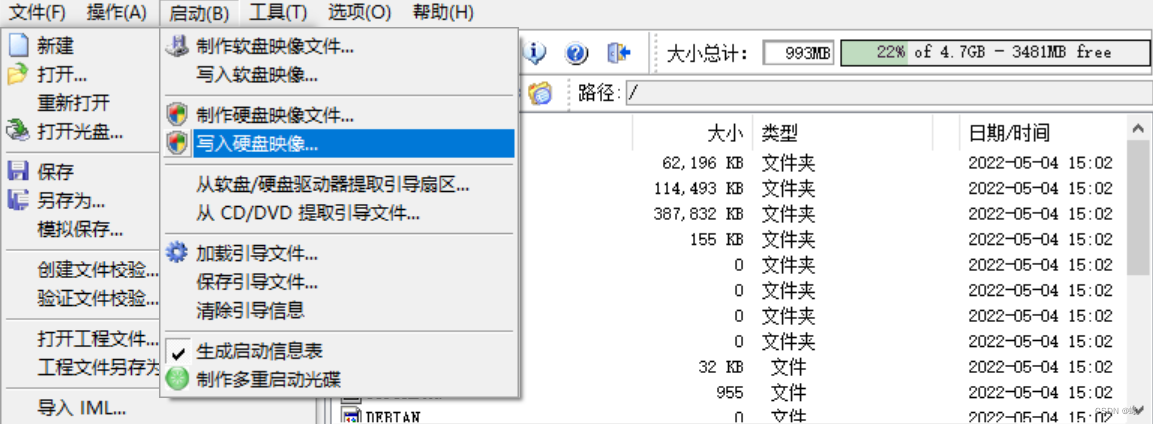
- 下载并打开:UltraISO
- 文件-打开-proxmox-ve_7.2-1.iso
- 启动-写入硬盘映像…
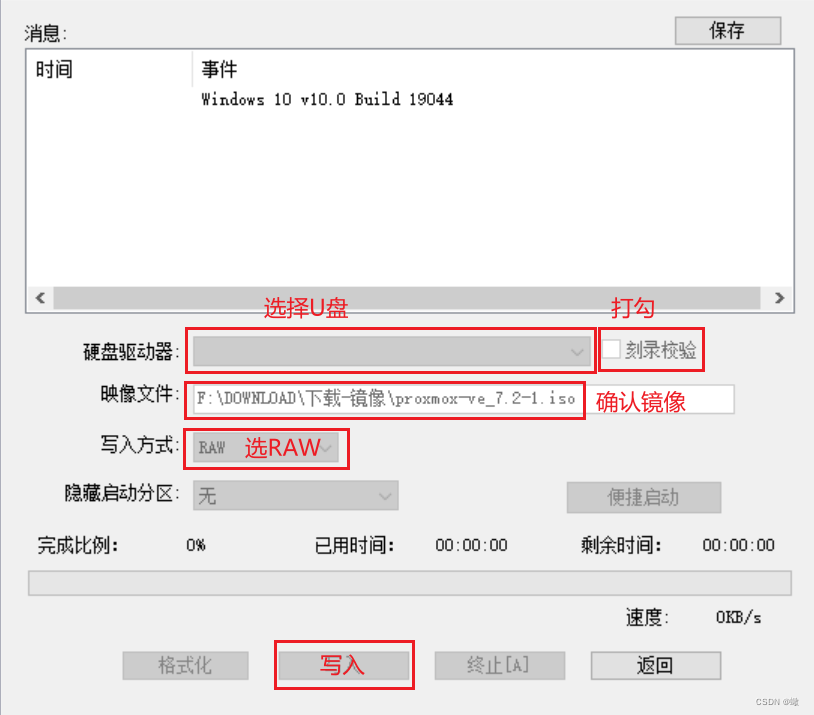
- 选U盘-刻录校验-确认镜像-选RAW-写入-等完成
- 确认写入完成后把U盘插到要装的电脑上 开机,选择U盘启动
- 进入proxmox安装程序,选择:install Proxmox VE
- 进入安装协议,I agree
- 进入安装硬盘选择,选择要目标硬盘,Next
- 进入国家时区语言选择,China,Shanghai,Englis,Next
- 进入设置密码,输入密码:***,再次输入密码:***,输入E-Mail:***,Next
- 进入网络设置,选择网卡,输入主机名:***,输入IP:192.168.*.*,输入网关:192.168.*.1,输入DNS:192.168.*.1,(自己输),Next
- 进入确认 确认输入无误,Install
- 等安装完成,确认完成后,Reboot
- 重启开机后自动默认选择第一项启动
- 启动完成,显示:
pve login:_ - 局域网浏览器地址输入设置的IP和端口(https://192.168.*.*:8006)进入【控制台】
3. 基本配置
3.1 磁盘映射
- 添加新硬盘
- 查看硬盘及硬盘分区(可以在 控制台-节点(pve)-磁盘 查看)
ls /dev/sd*
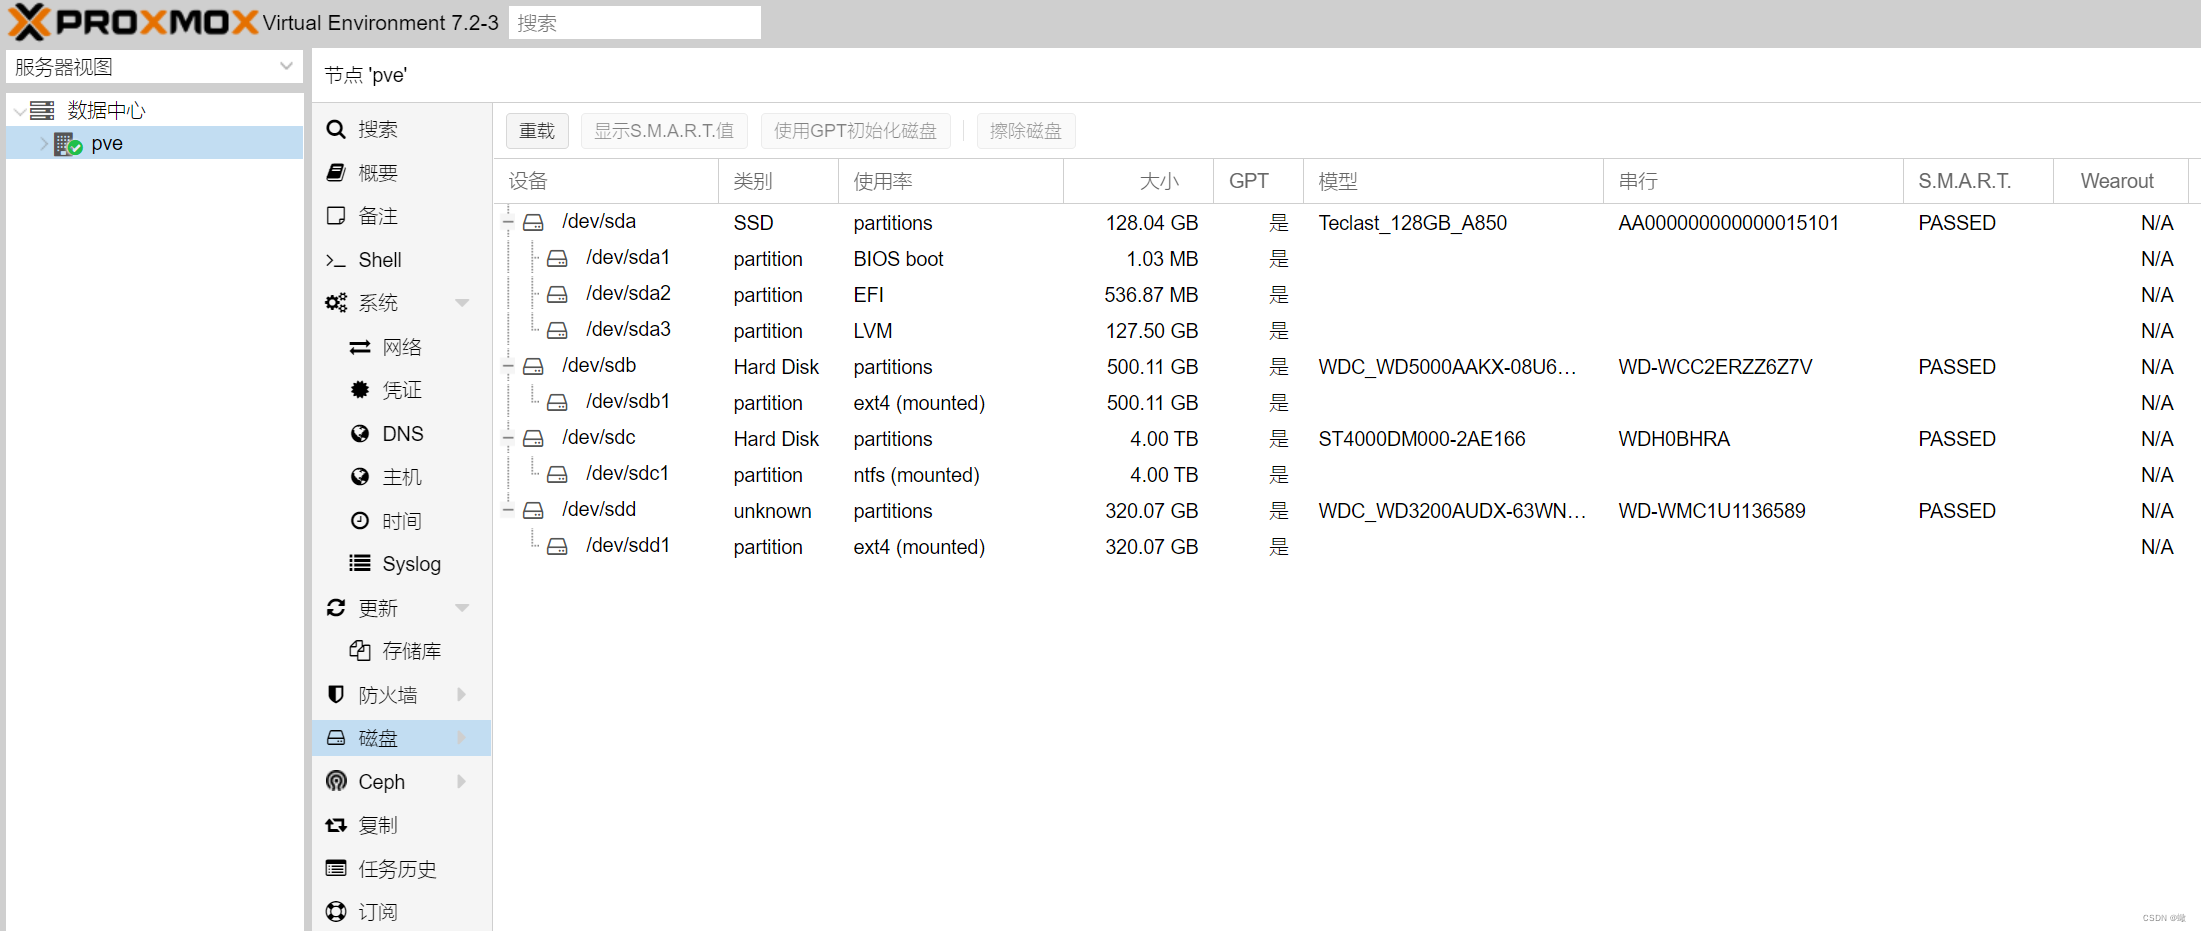
- 如果显示只有例如:/dev/sdb 没有 /dev/sdb1(控制台显示硬盘没有子级)表示未分区(最好在安装前在将硬盘分区删除)
root@pve:/♯ ls /dev/sd*
/dev/sda  /dev/sda1  /dev/sda2	/dev/sda3  /dev/sdb  /dev/sdc  /dev/sdc1  /dev/sdd
# sdb,sdd 未分区
- 给sdb分区;n:新建分区,1:默认Enter,2048:默认Enter,976773134:默认Enter,w:写入&退出
root@pve:/♯ fdisk /dev/sdb

Welcome to fdisk (util-linux 2.36.1).
Changes will remain in memory only, until you decide to write them.
Be careful before using the write command.


Command (m for help): n
Partition number (1-128, default 1):
First sector (34-976773134, default 2048): 4096
Last sector, +/-sectors or +/-size{K,M,G,T,P} (4096-976773134, default 976773134):

Created a new partition 1 of type 'Linux filesystem' and of size 465.8 GiB.

Command (m for help): w
The partition table has been altered.
Calling ioctl() to re-read partition table.
Syncing disks.
- 格式化分区
root@pve:/♯ mkfs -t ext4 /dev/sdb1
mke2fs 1.46.2 (28-Feb-2021)
Creating filesystem with 122096129 4k blocks and 30531584 inodes
Filesystem UUID: 20db2862-0907-4491-bb61-f81bb600aea8
Superblock backups stored on blocks:
	32768, 98304, 163840, 229376, 294912, 819200, 884736, 1605632, 2654208,
	4096000, 7962624, 11239424, 20480000, 23887872, 71663616, 78675968,
	102400000

Allocating group tables: done
Writing inode tables: done
Creating journal (262144 blocks): done
Writing superblocks and filesystem accounting information: done
- 新建挂载目录,将分区挂载到 pve
root@pve:/♯ mkdir -p /mnt/sdb1
root@pve:/♯ echo /dev/sdb1 /mnt/sdb1 ext4 defaults 1 2 >> /etc/fstab
root@pve:/♯ mount /dev/sdb1 /mnt/sdb1
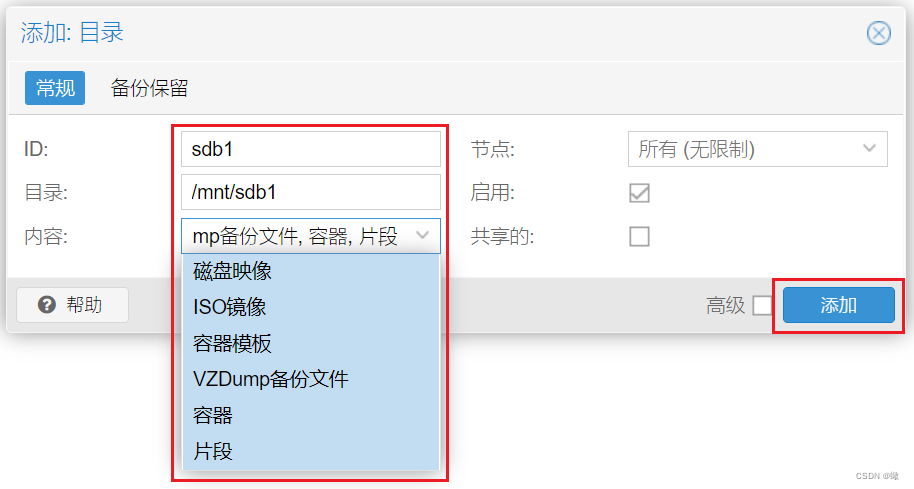
- 在控制台添加目录:控制台-数据中心-存储-添加-目录
- 设置内核启动参数,修改如下参数值(intel:quiet intel_iommu=on;amd:quiet amd_iommu=on),F2保存退出
root@pve:/♯ nano /etc/default/grub
GRUB_CMDLINE_LINUX_DEFAULT="quiet intel_iommu=on"
- 更新配置
root@pve:/♯ update-grub
Generating grub configuration file ...
Found linux image: /boot/vmlinuz-5.15.30-2-pve
Found initrd image: /boot/initrd.img-5.15.30-2-pve
Found memtest86+ image: /boot/memtest86+.bin
Found memtest86+ multiboot image: /boot/memtest86+_multiboot.bin
Adding boot menu entry for EFI firmware configuration
done
- 移除 LVM-Thin
root@pve:/♯ lvremove pve/data
Do you really want to remove active logical volume pve/data? [y/n]: y
  Logical volume "data" successfully removed
- 将移除 LVM-Thin 的空间并入 local
root@pve:/♯ lvextend -l +100%FREE -r pve/root
  Size of logical volume pve/root changed from 29.50 GiB (7552 extents) to <110.74 GiB (28349 extents).
  Logical volume pve/root successfully resized.
resize2fs 1.46.2 (28-Feb-2021)
Filesystem at /dev/mapper/pve-root is mounted on /; on-line resizing required
old_desc_blocks = 4, new_desc_blocks = 14
The filesystem on /dev/mapper/pve-root is now 29029376 (4k) blocks long.
- 关闭企业版订阅
root@pve:/♯ mv /etc/apt/sources.list.d/pve-enterprise.list /etc/apt/sources.list.d/pve-enterprise.list.bak
- 更新 debian 国内更新源和 pve 非订阅版更新源,F2保存退出
root@pve:/♯ nano /etc/apt/sources.list
# debian updates
# deb http://ftp.debian.org/debian bullseye main contrib
# deb http://ftp.debian.org/debian bullseye-updates main contrib
# deb http://security.debian.org bullseye-security main contrib

# debian aliyun source
deb https://mirrors.aliyun.com/debian buster main contrib non-free
deb https://mirrors.aliyun.com/debian buster-updates main contrib non-free
deb https://mirrors.aliyun.com/debian-security buster/updates main contrib non-free

# proxmox source
# deb http://download.proxmox.com/debian/pve buster pve-no-subscription
# deb https://mirrors.ustc.edu.cn/proxmox/debian/pve buster pve-no-subscription
deb http://download.proxmox.cc/debian/pve buster pve-no-subscription
- 关闭订阅提醒
root@pve:/♯ sed -i.bak "s/data.status !== 'Active'/false/g" /usr/share/javascript/proxmox-widget-toolkit/proxmoxlib.js && systemctl restart pveproxy.service
- 升级apt-get update为最新版本
root@pve:/♯ apt-get update
Hit:1 https://mirrors.aliyun.com/debian buster InRelease
......
W: Some index files failed to download. They have been ignored, or old ones used instead.
- 安装磁盘直通的工具
root@pve:/♯ apt-get install lshw
Reading package lists... Done
......
The following NEW packages will be installed:
  lshw
0 upgraded, 1 newly installed, 0 to remove and 0 not upgraded.
......
Processing triggers for man-db (2.9.4-2) ...
- 查看硬盘ID
root@pve:/♯ ls -l /dev/disk/by-id/
total 0
......
lrwxrwxrwx 1 root root  9 May 22 01:50 ata-WDC_WD5000AAKX-08U6AA0_WD-WCC2ERZZ6Z7V -> ../../sdc
lrwxrwxrwx 1 root root 10 May 22 01:54 ata-WDC_WD5000AAKX-08U6AA0_WD-WCC2ERZZ6Z7V-part1 -> ../../sdc1
......
- 全盘映射方式直通硬盘(危险操作不细说)可以参考这里星哥的博客
root@pve:/♯ qm set 100 -sata1 /dev/disk/by-id/ata-WDC_WD5000AAKX-08U6AA0_WD-WCC2ERZZ6Z7V
- PCIe直通
还没搞…

为开发者提供学习成长、分享交流、生态实践、资源工具等服务,帮助开发者快速成长。
更多推荐


 0
0 0
0- 0


 已为社区贡献1条内容

所有评论(0)