安装nginx之后,处理 conf.d下无default.conf文件
在学习nginx的过程中,安装nginx后找不到conf.d目录下的default.conf文件,其原因是该操作系统下的epel源是默认下载就是Fedora操作系统的方案一解决方法重新进行安装nginx,并修改nginx的epel镜像源地址重新安装sudo yum install yum-utils创建新的nginx.repo文件sudo vim /etc/yum.repos.d/nginx.re
在学习nginx的过程中,安装nginx后找不到conf.d目录下的default.conf文件,其原因是该操作系统下的epel源是默认下载就是Fedora操作系统的
方案一
解决方法
重新进行安装nginx,并修改nginx的epel镜像源地址
重新安装
sudo yum install yum-utils
创建新的nginx.repo文件
sudo vim /etc/yum.repos.d/nginx.repo
添加
[nginx-stable]
name=nginx stable repo
baseurl=http://nginx.org/packages/centos/$releasever/$basearch/
gpgcheck=1
enabled=1
gpgkey=https://nginx.org/keys/nginx_signing.key
module_hotfixes=true

[nginx-mainline]
name=nginx mainline repo
baseurl=http://nginx.org/packages/mainline/centos/$releasever/$basearch/
gpgcheck=1
enabled=0
gpgkey=https://nginx.org/keys/nginx_signing.key
module_hotfixes=true
默认情况下,使用稳定的nginx软件包的存储库。如果要使用主线nginx软件包,请运行以下命令:
sudo yum-config-manager --enable nginx-mainline
安装nginx
sudo yum install nginx
这个是我在网上找的资料,看到很多人都是按照这个方案处理了这个问题,但是如何你和我一样,按照方案一conf.d下方仍然没有default.conf文件,那么可以试试第二个方法。
方案二
因为这个default.conf 本身就是一个配置文件,所以我的思路是既然没有就直接创建一个,看看行不行。于是,就用 vi default.conf 创建了一个空文件,然后在网上找到 default.conf 文件的内容,放进去。
server {
    listen       80;
    server_name  localhost;


    #charset koi8-r;
    #access_log  /var/log/nginx/host.access.log  main;

    location /mystatus {
        stub_status;
    }

    location / {
        root   /usr/share/nginx/html;
        index  index.html index.htm;
    }


    #error_page  404              /404.html;


    # redirect server error pages to the static page /50x.html
    #
    error_page   500 502 503 504  404 /50x.html;//修改404 状态码的对应的指向的访问目录,修改后需重启服务器。
    location = /50x.html {
        root   /usr/share/nginx/html;
    }


    # proxy the PHP scripts to Apache listening on 127.0.0.1:80
    #
    #location ~ \.php$ {
    #    proxy_pass   http://127.0.0.1;
    #}


    # pass the PHP scripts to FastCGI server listening on 127.0.0.1:9000
    #
    #location ~ \.php$ {
    #    root           html;
    #    fastcgi_pass   127.0.0.1:9000;
    #    fastcgi_index  index.php;
    #    fastcgi_param  SCRIPT_FILENAME  /scripts$fastcgi_script_name;
    #    include        fastcgi_params;
    #}


    # deny access to .htaccess files, if Apache's document root
    # concurs with nginx's one
    #
    #location ~ /\.ht {
    #    deny  all;
    #}
}
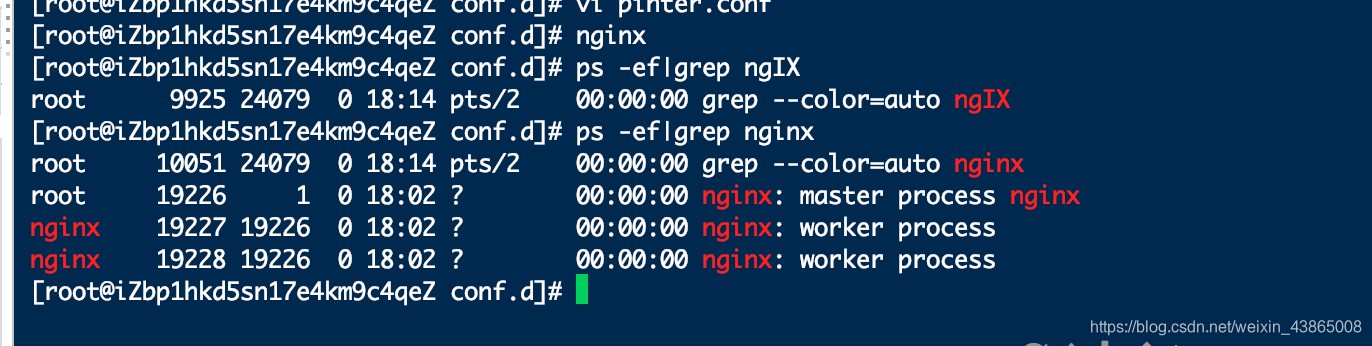
最后根据自己部署的项目需求,更改了配置,我们也启动一下nginx来看看。可以看到启动nginx之后,没有报错,并且我们也看到nginx的进程,说明这个方法可行,也比方案一操作简单。

华为开发者空间,是为全球开发者打造的专属开发空间,汇聚了华为优质开发资源及工具,致力于让每一位开发者拥有一台云主机,基于华为根生态开发、创新。
更多推荐


 3
3 0
0- 0


 已为社区贡献2条内容

所有评论(0)