Puppeteer之模拟鼠标、键盘输入、操作shadow dom内的页面元素
Puppeteer系列七之模拟鼠标、键盘输入、操作shadow dom内的页面元素
前面博客中我们梳理过常用的页面操作场景,之前的博客只介绍了部分操作场景的实现脚本,此篇博客将介绍其他操作场景。在开始正式学习前,我们在看看之前梳理过的常见操作场景。

因为之前已经演示过点击、输入框中输入内容、下拉列表选择、单选或多选按钮选择操作,此次课程接着学习如何模拟键盘和鼠标操作以及浏览器的前进、后退等操作。为了完成此次课程目标,拆分了4个task
- 模拟键盘操作
- 模拟鼠标操作
- 操作shadow dom下的元素
- page对象提供的其他常用操作
接下来就开始第一个task吧。
模拟键盘操作
以下例子是模拟键盘在输入框中输入值,同样执行“npm run keyboard-action”
const waitUntil = require('../common/waitUntil');
      describe("keyboard action demo", () => {
      it("keyboard action practice", async () => {
        await page.goto('https://devexpress.github.io/testcafe/example/');
        await page.focus('#developer-name');
        //将第一个输入框设置为焦点元素,如果对通过操作键盘对输入框输入内容,首先需要将输入框设置为焦点元素

        await page.keyboard.down('Shift');
        await page.keyboard.press('KeyA');
        await page.keyboard.up('Shift');
        //按住shift的同时,输入字母A,可以看到输入的字母A是大写状态

        await page.keyboard.press('Tab');
        //输入Tab键,用press和用down+up的效果一致

        await page.focus('#comments');
        //将最下面的comment输入框设置为焦点元素

        await page.keyboard.sendCharacter('DDD');
        //在comment输入框中输入字符串DDD

        await page.keyboard.press('Enter');
        //输入enter键

        await page.waitFor(3000);
       //添加waitFor(x)固定时间等待,方便调试的时候确认脚本是否按期望的运行

    });
});
以上是模拟键盘输入内容场景,总结而言模拟键盘输入比较简单,调用page.keyborad.方法名("键值")即可。keboard对象总共对外提供了5个api。
- keyboard.down("键值")和keyborad.up("键值"),模拟键盘的点击和释放操作。当按下某个键时需要同时输入其他键,可以用此方式。如上面案例所示。
- keyboard.press("键值"),等同于keyboard.down()+keyboard.up()。模拟某个键值输入操作。
- keyboard.sendCharacter(char),模拟在某个输入框中输入内容。
- keyboard.type(text),模拟在某个输入框中输入内容。
上面讲解了如何模拟键盘输入场景,接着我们看看如何模拟鼠标点击操作。要模拟鼠标操作需要调用page.mouse.click(xpostion,ypostion,{options})或者调用page.mouse.up、page.mouse.move、page.mouse.down。在前面的页面元素拖动场景中,已经演示过如何调用mouse.move等完成页面元素拖动,故此次课程主要演示如何调用mouse.click()模拟 “点击鼠标右键” 操作。同样,执行“npm run mouse-action”即可运行下面的案例。
模拟鼠标操作
describe("mouse action demo", () => {
    it("mouse action ", async () => {
        await page.goto('https://devexpress.github.io/testcafe/example/');
        const elementHandle = await page.$('#developer-name');
        //获取要点击鼠标右键的页面元素对象

        const rect = await page.evaluate((elementHandle) => {
            const {top, left, bottom, right} = elementHandle.getBoundingClientRect();
            return {top, left, bottom, right};
        }, elementHandle);
        //通过调用getBoundingClientRect()获取元素的坐标值

        console.log('the position is' + rect.top,rect.left,rect.bottom,rect.right);

        await page.mouse.click(rect.left, rect.top, {'button': 'right'});
        //模拟点击鼠标右键操作

        await page.mouse.click(rect.left, rect.top, {'button': 'left'});
        //模拟点击鼠标左键操作,{}不传入参数,默认就是点击鼠标左键。

        const elementHandle2 = await page.$('#windows');
        await elementHandle2.click({button: 'left',});
        //调用page|elementHandle.click(selector)方法,实际执行的就是点击鼠标左键操作
    });
});
以上是模拟鼠标点击操作场景,总结而言,如果需要实现页面元素拖动场景,那么可以调用mouse.move()方法实现。另外,如果需要实现点击鼠标右键操作,可以在调用click()方法时传入options参数实现,如上面案例所示。接下来,我们看看如何操作shadow dom下的页面元素。
操作shadow dom下的页面元素
如果页面元素在shadow dom下,直接使用前面讲解的各种selector无法直接定位到页面元素。例如下面元素包含在shadow dom中。
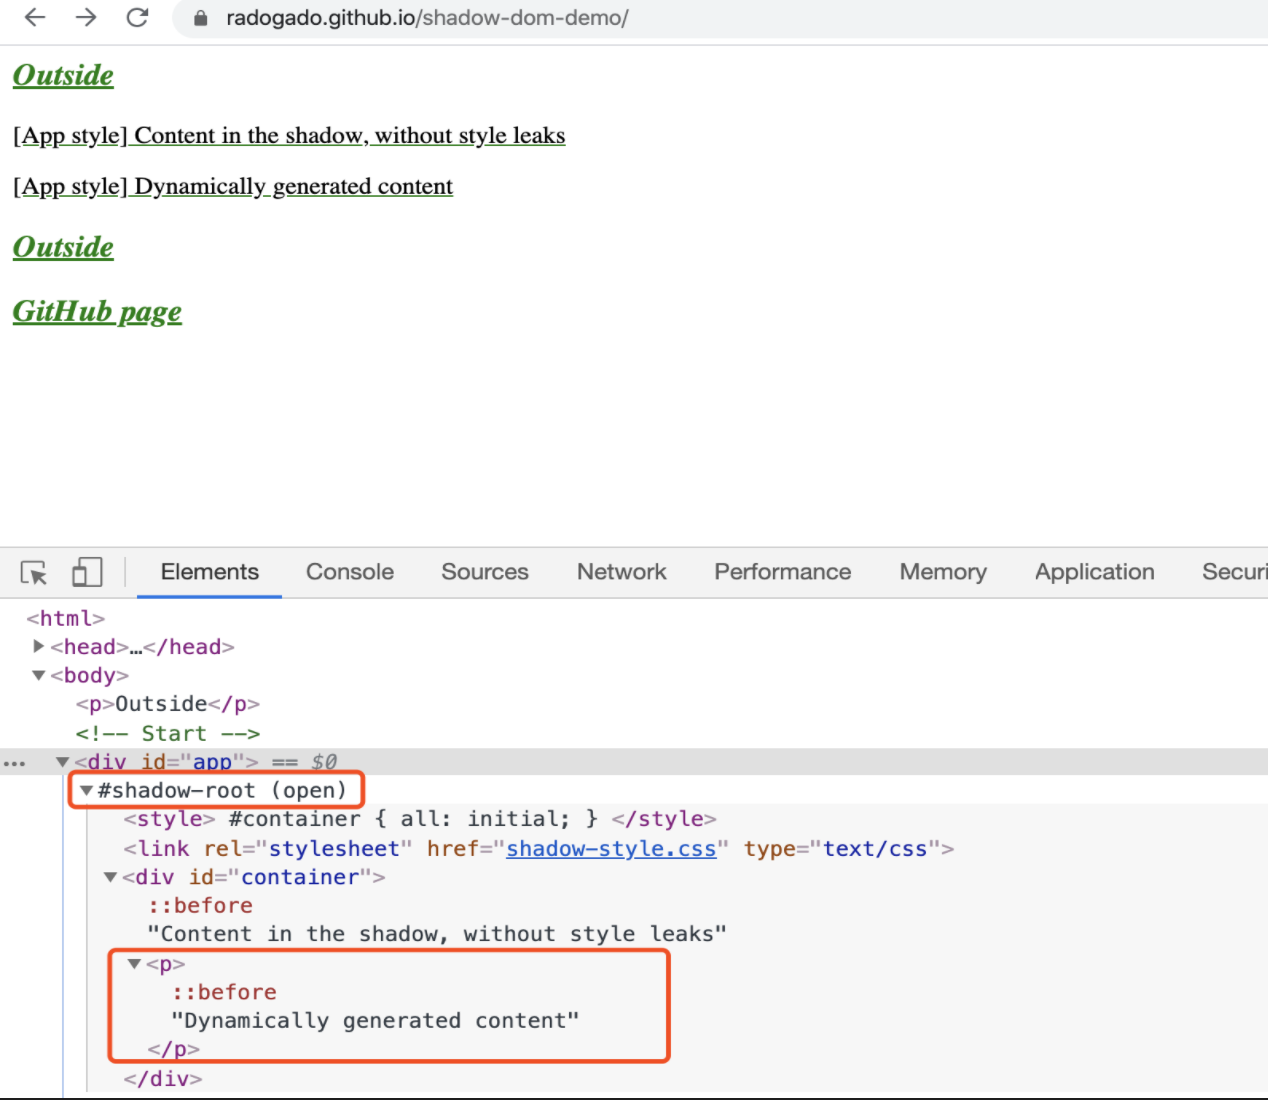
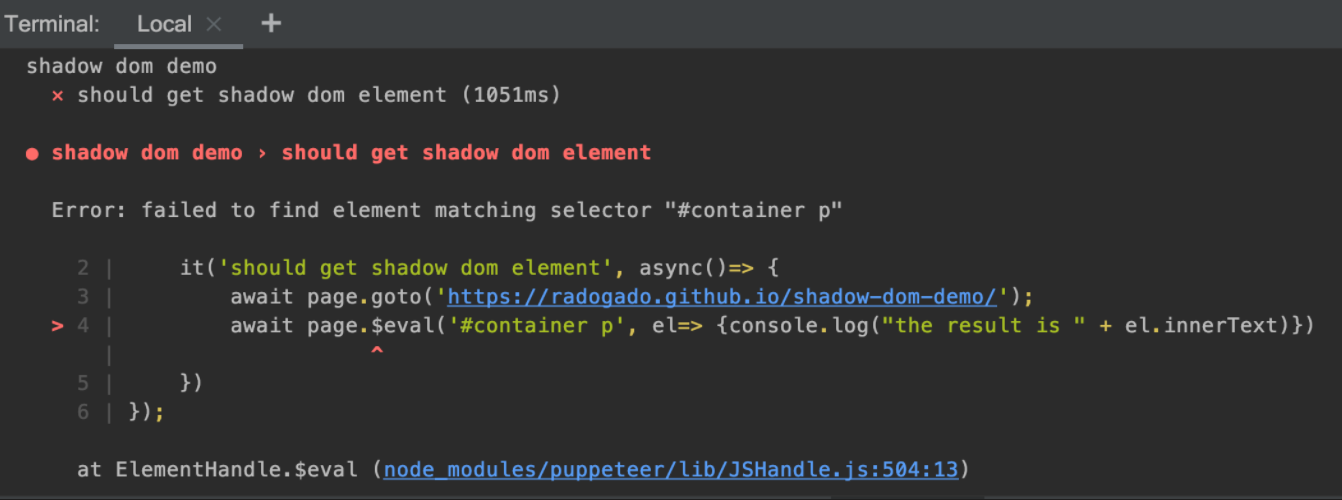
如果用“#container p”这个selector定位页面元素,会提示找不到页面元素,如下图所示。
那么如何定位shadow dom下的页面元素呢?实际可以通过document对象定位shadow dom下的页面元素,具体代码如下所示。同样,执行“npm run shadow-element”即可运行下面的脚本。
describe("shadow dom demo", () => {
    it('should get shadow dom element', async () => {
        await page.goto('https://radogado.github.io/shadow-dom-demo/');
        //打开被测页面

        // await page.$eval('#container p', el=> {console.log("the result is " + el.innerText)})
        //如果用上面的方式定位页面元素,会提示找不到页面元素

        const value = await page.evaluate(() => {
            return document.querySelector('#app').shadowRoot.querySelector('#container p').innerText
            //获取页面元素值,这里可以在浏览器的console上先调试好后,再迁移到自动化脚本中
        });
        //通过document对象获取该页面元素的innerText

        await console.log("the value is" + value)
       //打印获取到的内容,验证获取的内容是否正确
    })
});
通过document对象定位页面元素前面介绍过,在调试时可以先在浏览器的console进行调试,保证定位、获取页面元素值正确后,再迁移到自动化脚本中。同样,获取shadow dom下的页面元素脚本也可以在浏览器的console中进行调试。接下来我们再看看page对象对外提供的其他一些常用方法,例如浏览器的前进、后退等操作,具体内容如下所示,同样,执行“npm run page-other-function”即可运行下面的案例。
Page对象提供的其他常用操作
下面案例中演示了如何实现浏览器的前进、后退、设置窗口大小、截图以及hover操作。
describe("page other api demo", () => {
    it("browser go back or forward demo", async () => {
        await page.goto("https://angular.realworld.io/");
        await expect(page).toClick('app-layout-header li a[href="/login"]');
        await page.goBack();
        await page.goForward();
        //浏览器的前进和后退

        await page.hover('app-layout-header li a[href="/login"]');
        //hover操作,可以看到hover到“sign in”按钮上时,页面左下角显示sign的连接地址

        await page.waitFor(3000);
       //添加等待查看hover效果

        await page.goBack();
       //返回到“https://angular.realworld.io/” 页面

        await page.reload({ waitUntil: ["networkidle0", "domcontentloaded"] });
       //刷新操作,也就是重新加载页面

        await page.waitFor(3000);
        //添加等待查看刷新页面效果

    });
    it.skip("support pdf generation when headless is true ", async()=> {
        await page.goto("https://angular.realworld.io/");
        await page.emulateMediaType('screen');
        await page.pdf({path: 'report/screen/page.pdf'});
        //截图,运行此用例必须把浏览器设置为headless=true,因为pdf方法只支持浏览器无头模式
    });

       it("support screenshot", async() => {
        await page.goto("https://angular.realworld.io/");
        await page.screenshot({path:'./report/screen/screen.pdf',type:'jpeg'})
        //截图,运行是浏览器可以是headful或者headless
    });

    it("set page viewport", async()=> {
        await page.setViewport({
            width: 640,
            height: 480,
            deviceScaleFactor: 1,
        });
        //在运行某个用例时重新设置页面大小,此设置优先级高于全局设置

        await page.goto('https://angular.realworld.io/');
    })

    it('should expose function successfully', async () => {
        await page.exposeFunction('printLog', async test => {
            console.log(test)
        });
        //page提供exposeFunction(functionName,function)方法,包装在exposeFunction()中的内容,要调用时,用window.functionName

        await page.evaluate(async () => {
            await window.printLog('this is expose function demo');
        });
         //只有在page.evaluate()里面才能获取window对象,故这里通过page.evaluate(async()=> await window.functionName())调用前面包好的方法
    })
});
上面案例只演示了page对象提供的常用api,实际项目中,如果遇到了案例中未覆盖的场景,可查看官方文档了解所有puppeteer提供的api。官方文档链接“ puppeteer/api.md at main · puppeteer/puppeteer · GitHub ”。
除此之外,使用puppeteer框架时还支持同一个测试案例下可以访问不同域页面,下面两个案例演示了同一个浏览器、同一个测试案例中访问不同的域页面。同样,执行“npm run diff-domain”即可执行下面的脚本。
describe('cross domain page' ,()=> {
    it("can't visit diff domain url page", async () => {
        await page.goto("http://www.lorenzostanco.com/lab/demos/CrossDomainFragment/Demo.html");
        await expect(page).toClick('p a:nth-child(1)');
        //点击后会打开一个新页面,该页面与page.goto的页面属于不同的域

        await page.waitFor(3000)
        //添加等待处理,主要时方便查看执行效果
    });

    it('should visit cross domain page successfully', async () => {
        await page.goto('https://chercher.tech/practice/popups');
        await page.waitForSelector('#sub-menu');
        //expect-puppeteer没有提供hover接口,故调用hover操作时需要添加等待语句

        await page.hover('#sub-menu');

        await page.waitFor(1000);
        //通过实验发现,点击hover后,直接点击hover后显示的信息如果中间不添加等待处理,会出现偶发性的失败,故这里添加了固定时间的等待语句

        await expect(page).toClick('div a[href="https://google.com"]');
        //点击后会打开一个新页面,该页面与page.goto的页面属于不同的域

        await page.waitFor(3000)
    })
});
为开发者提供学习成长、分享交流、生态实践、资源工具等服务,帮助开发者快速成长。
更多推荐


 1
1 0
0- 0


 已为社区贡献4条内容

所有评论(0)