
HADOOP集群大数据词频统计及设计比较(完整教程)
wordcount加了combiner的代码后,运行效率提高了。
###如若发现错误,或代码敲错,望能评论指正!!!
通过百度网盘分享的文件:Hadoop相关需要的软件
链接:https://pan.baidu.com/s/1XzDvyhP4_LQzAM1auQCSrg?pwd=tph5
提取码:tph5
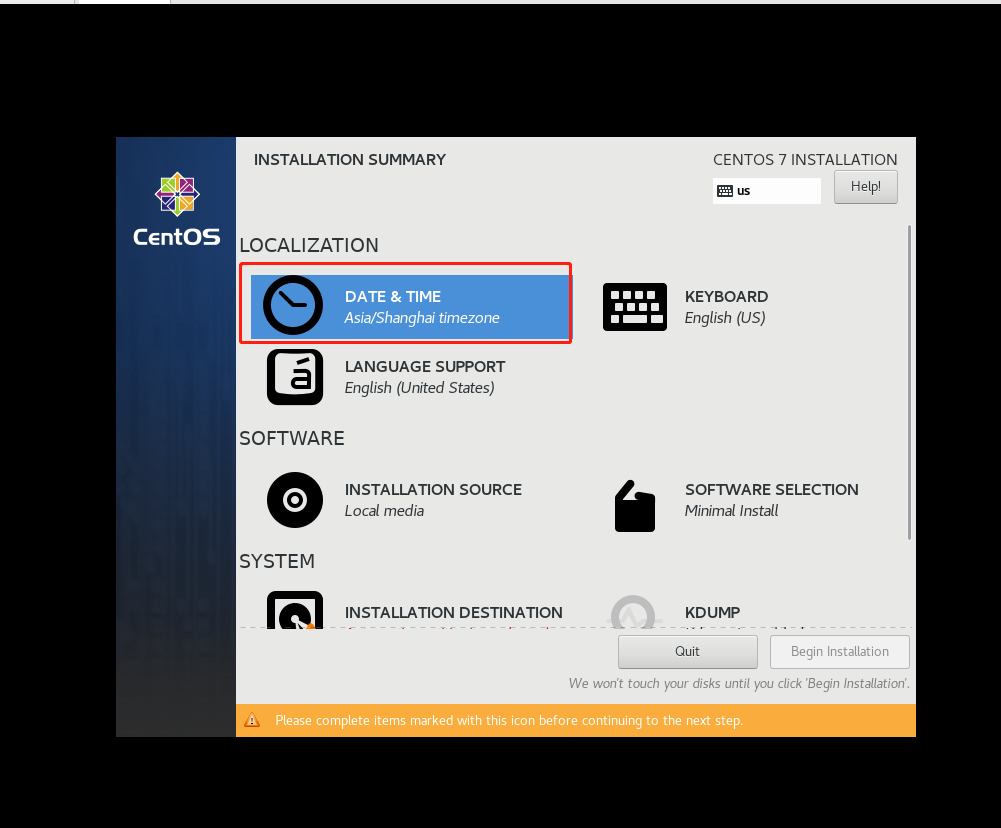
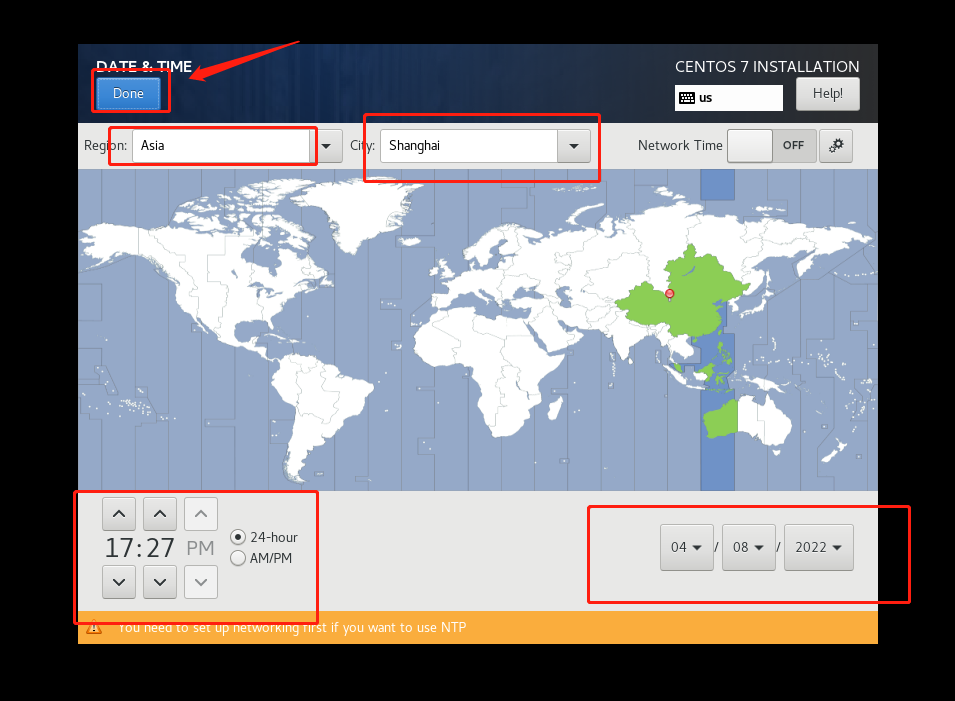
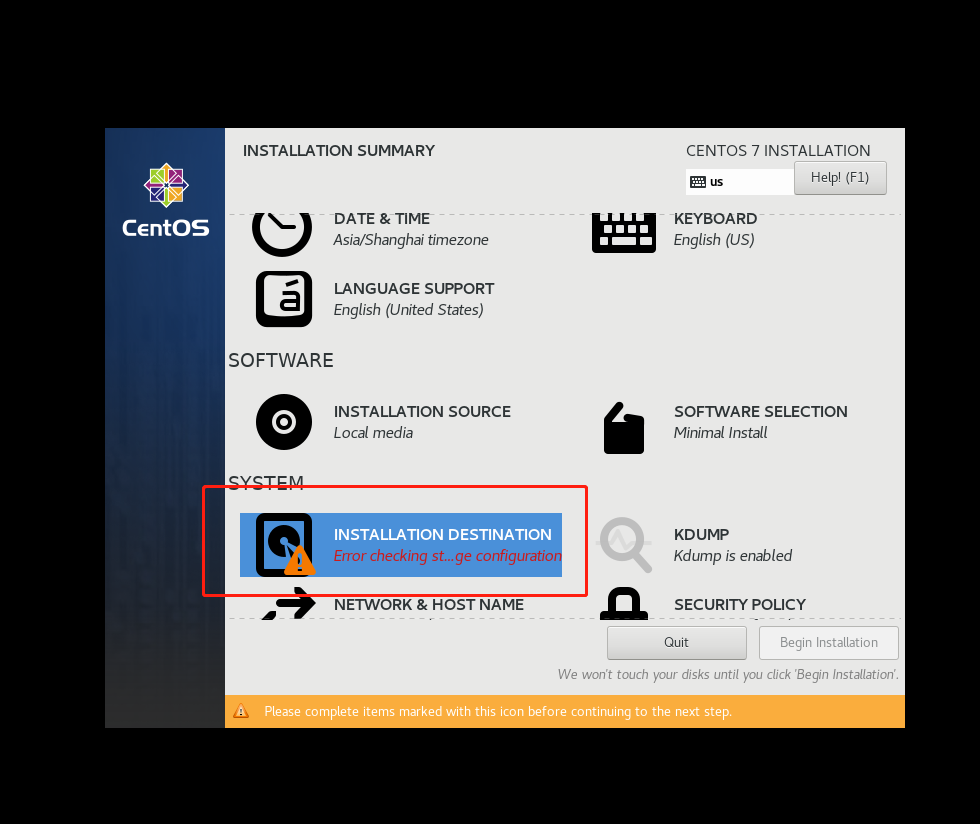
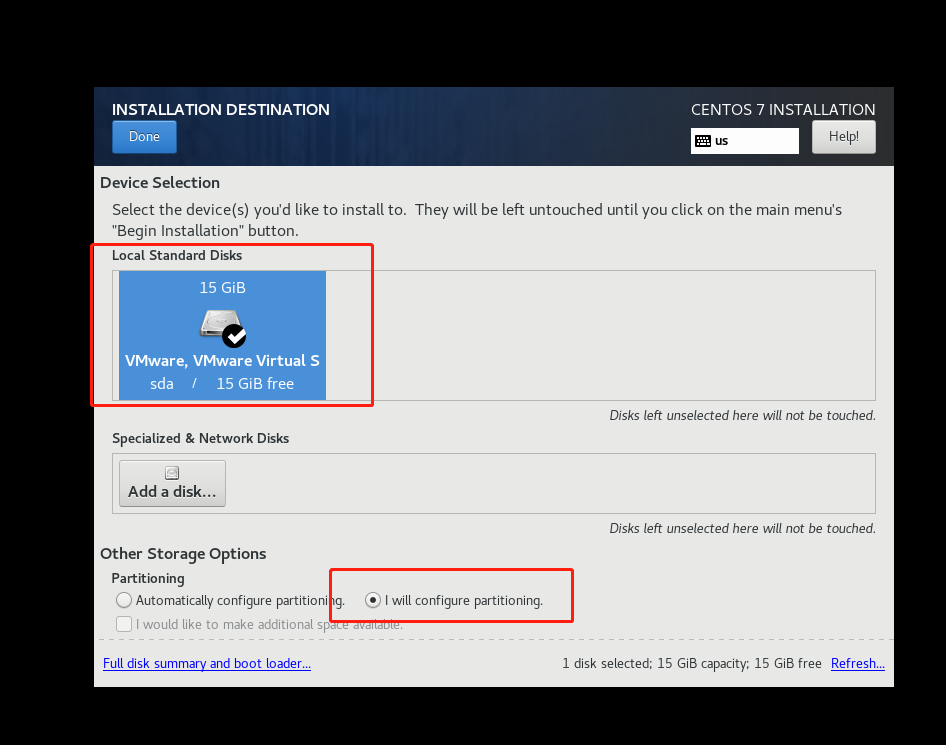
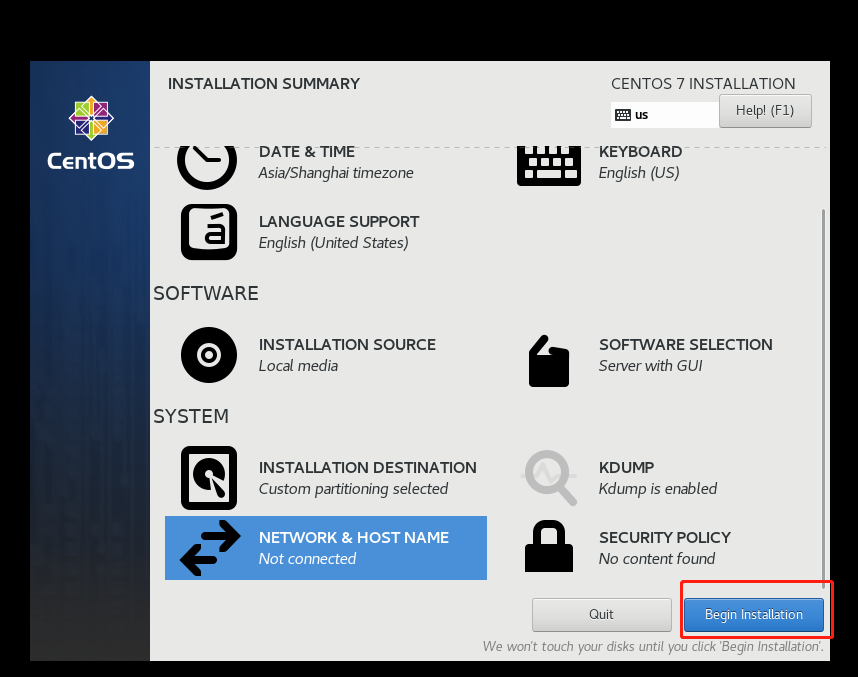
VMware下安装CentOS
一、先安装一个虚拟机
安装好后要右键,找到用管理员的方式打开
也可以设置成每次打开都是以管理员身份运行

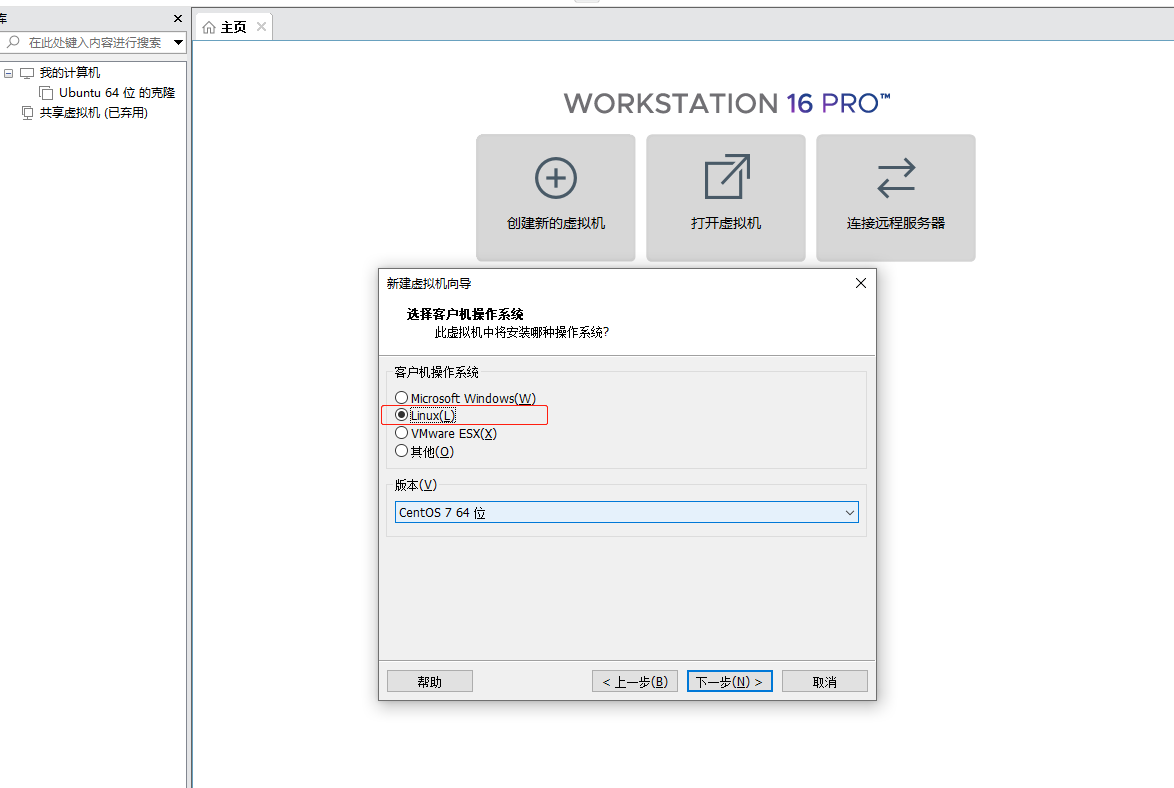
二、安装一个CentOS,这里使用的是7版本的

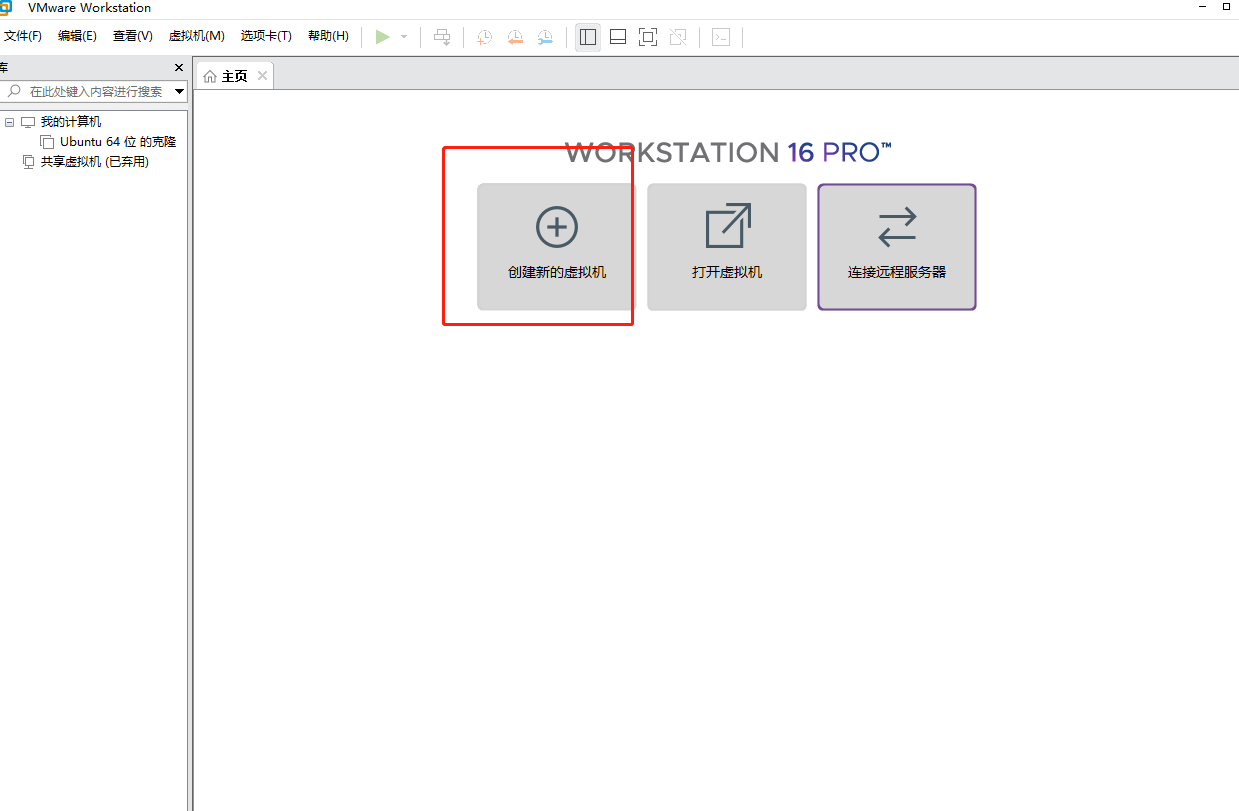
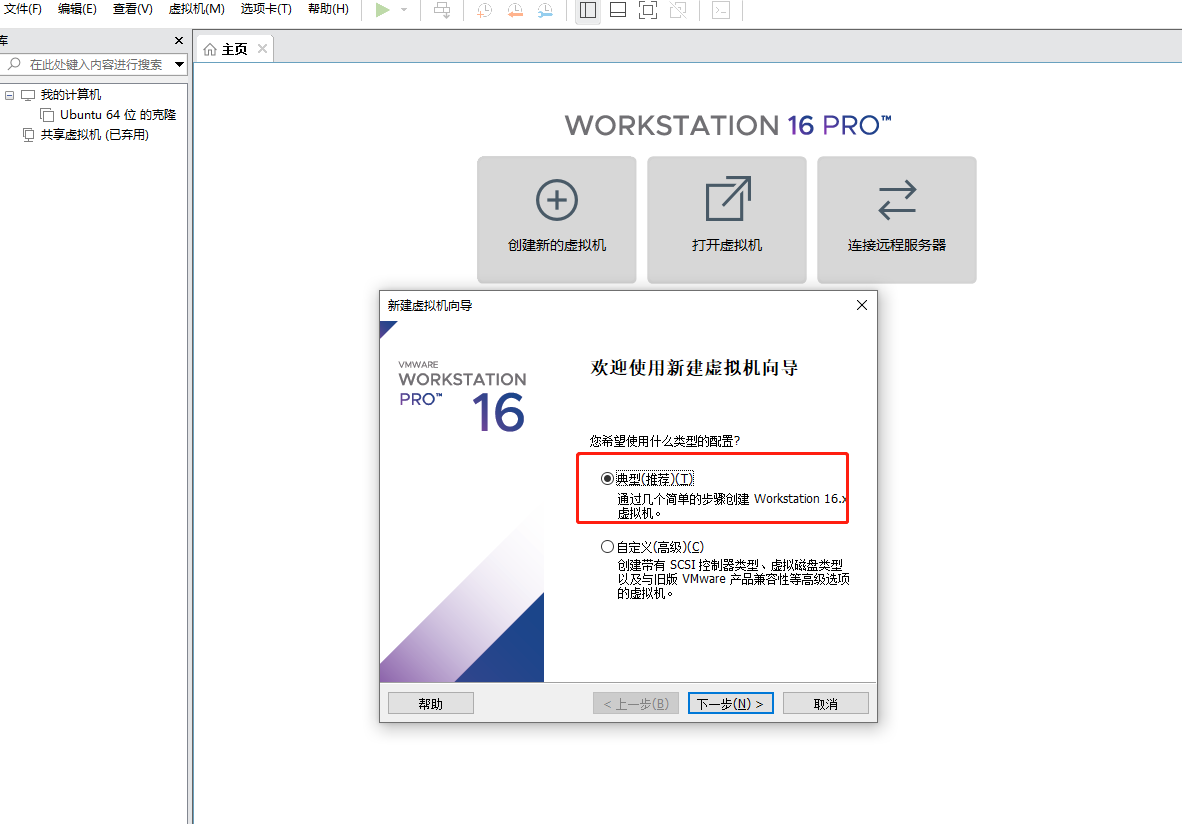
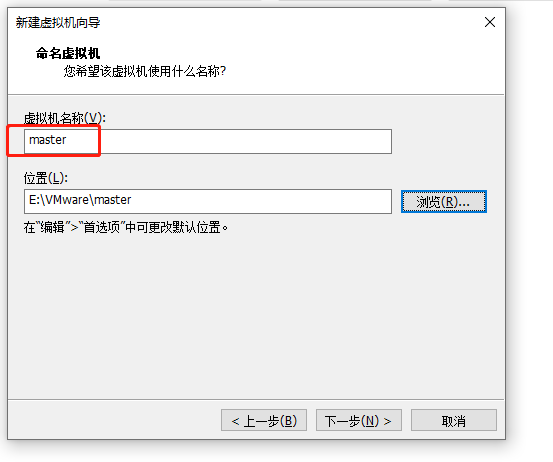
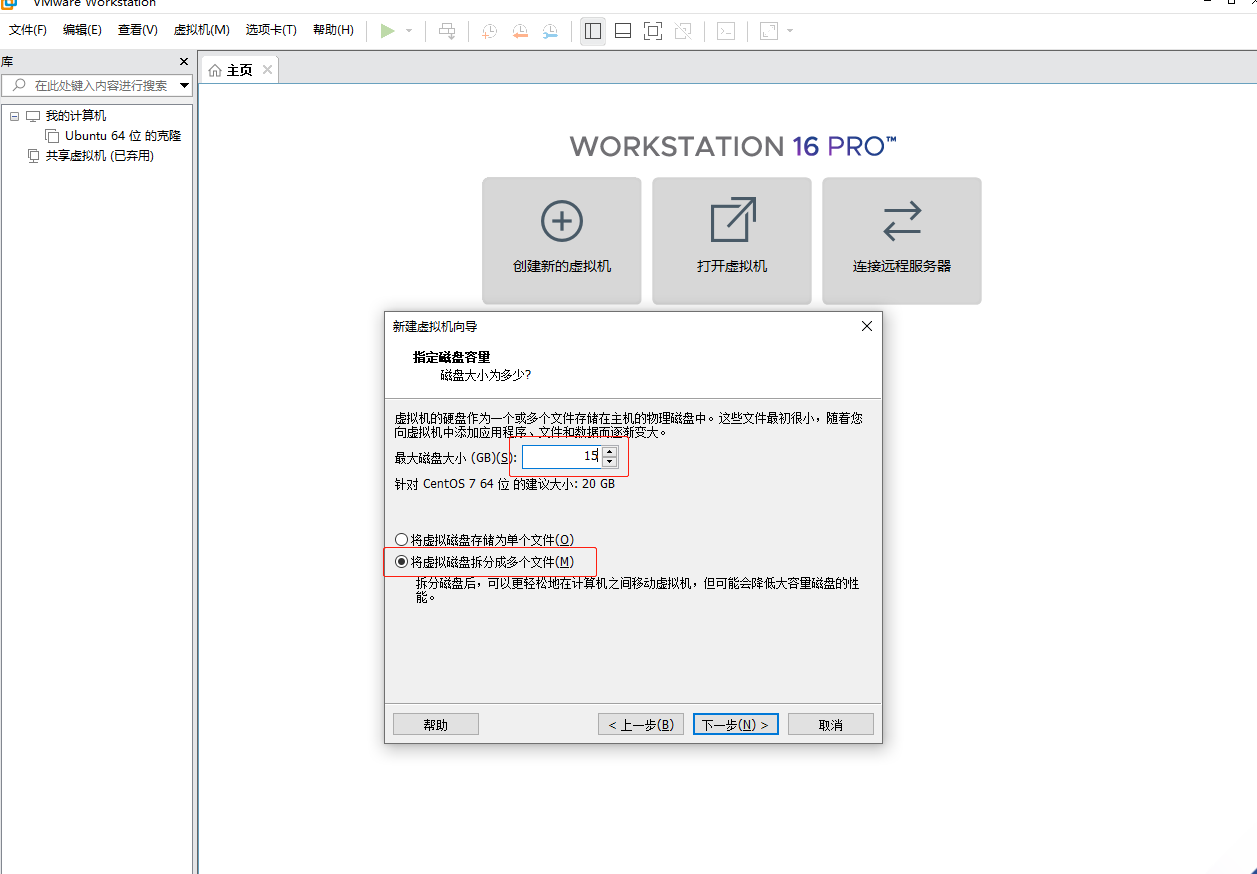
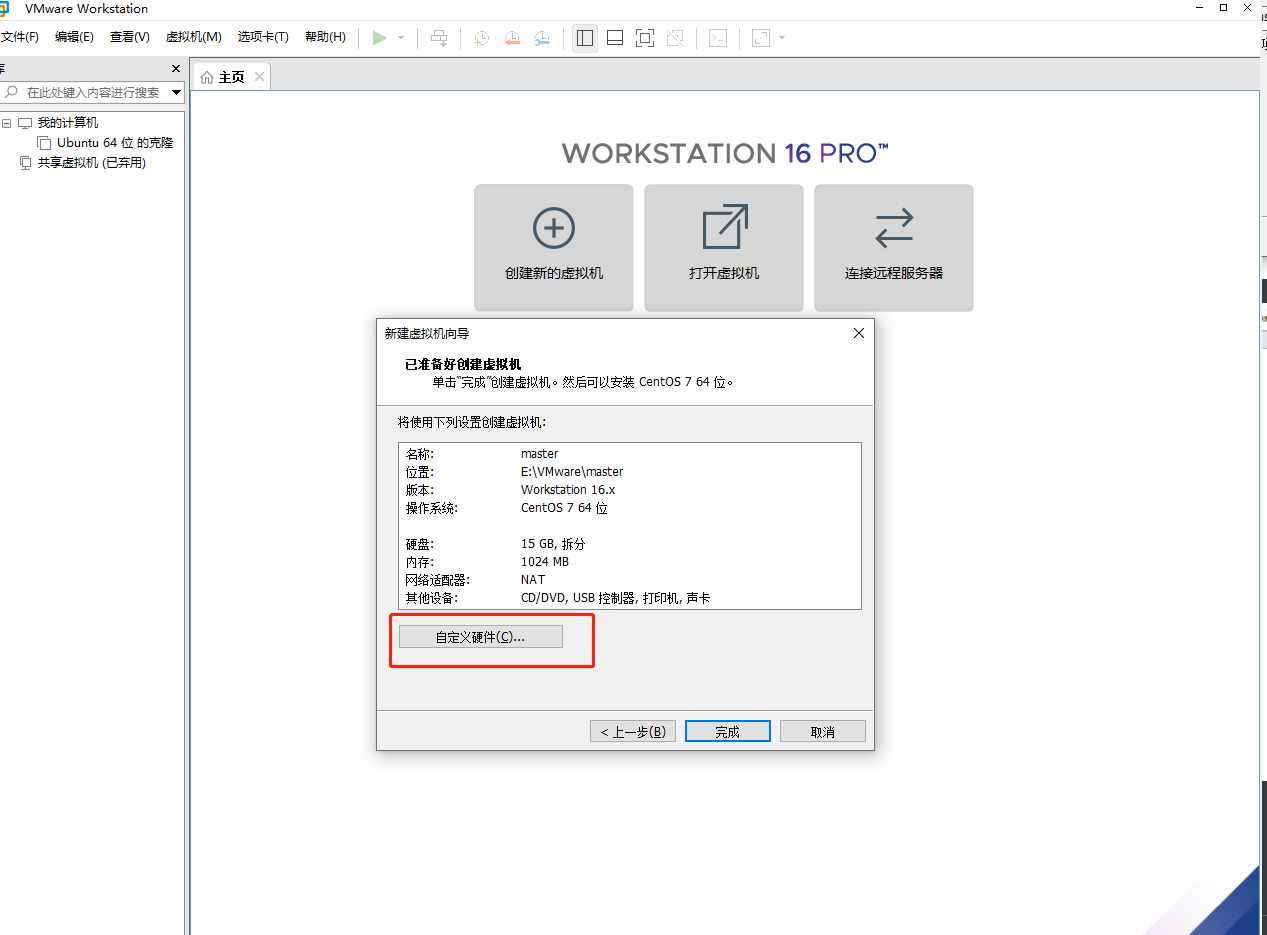
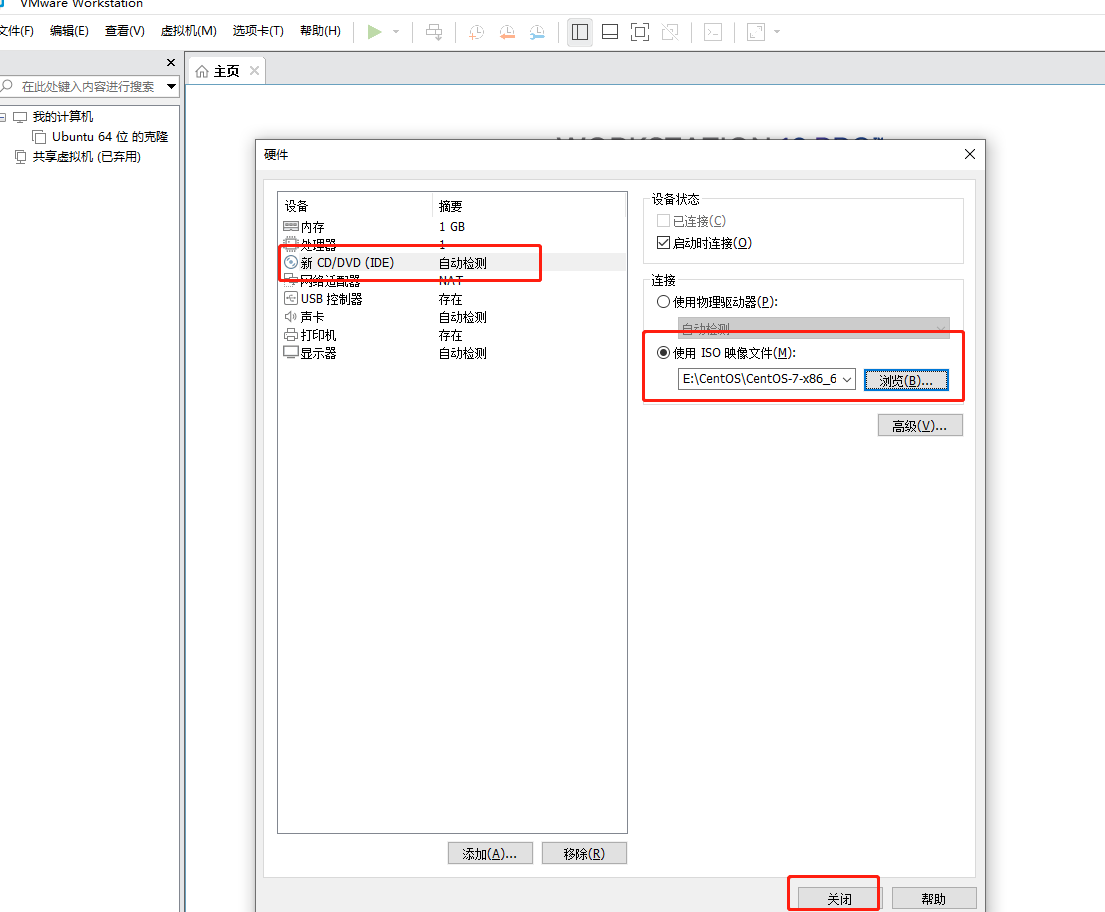
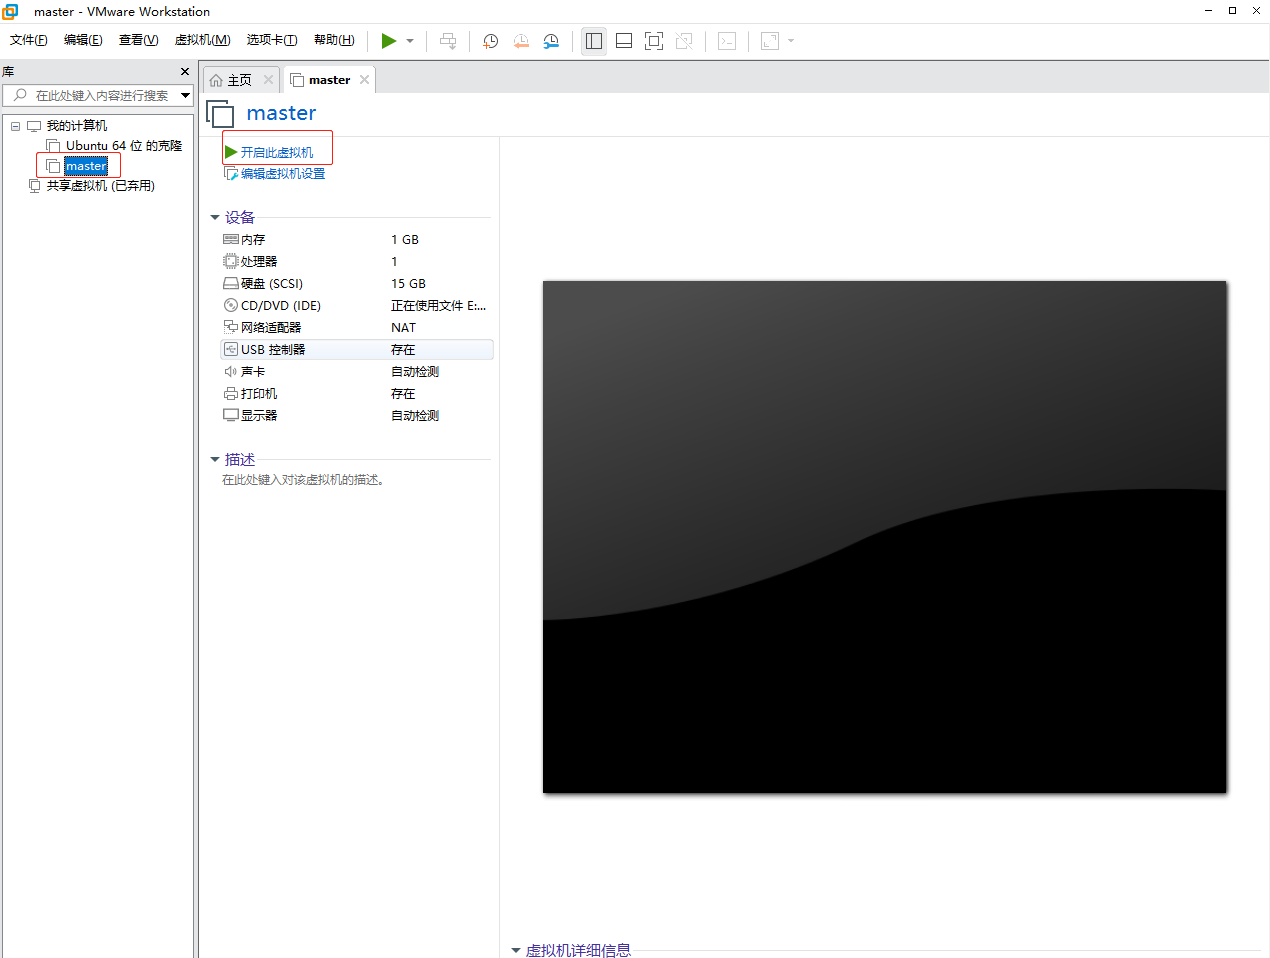
三、打开VMware,创建新的虚拟机

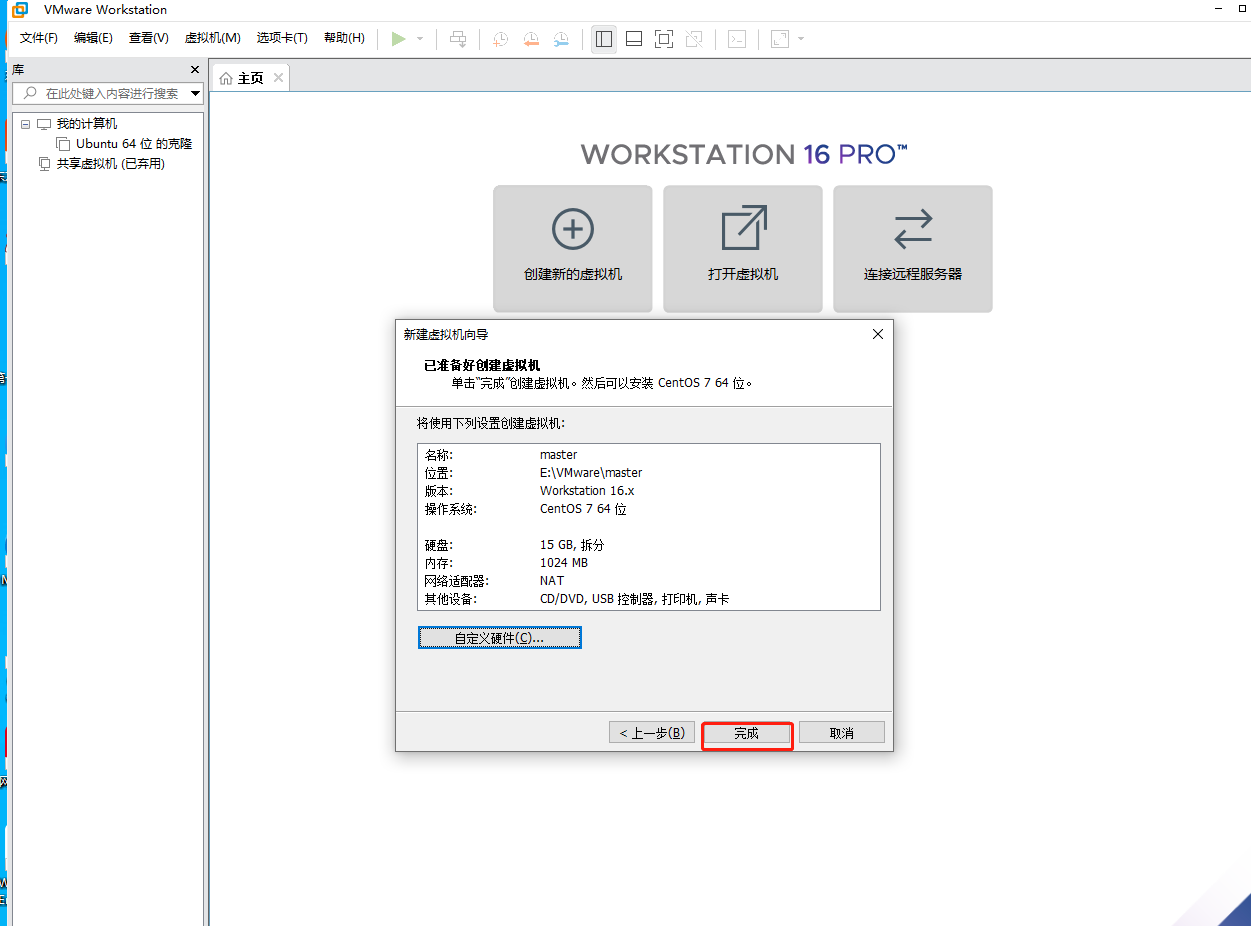
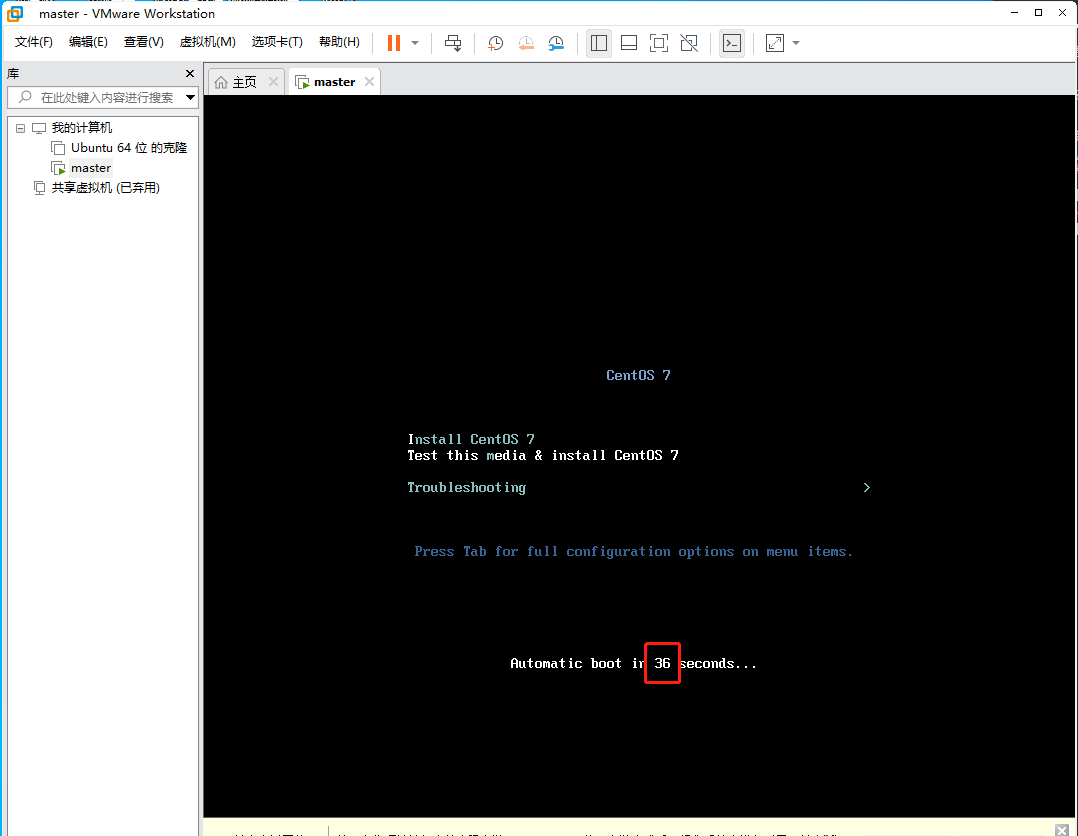
来到这个界面可以等待60秒,也可以按下tab键下一步。
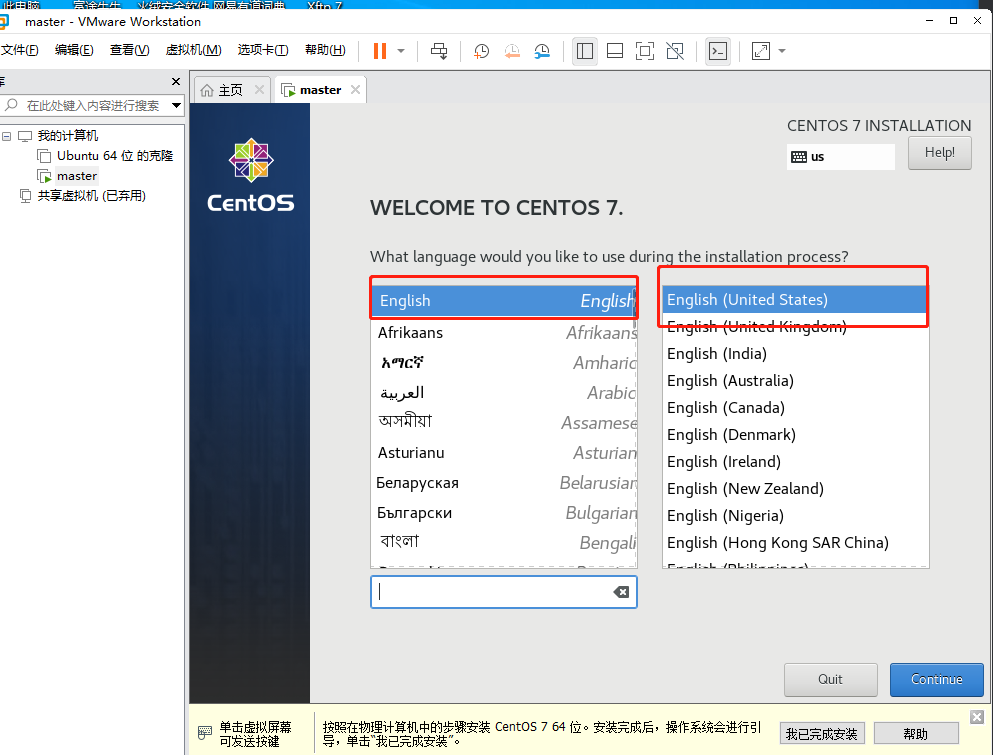
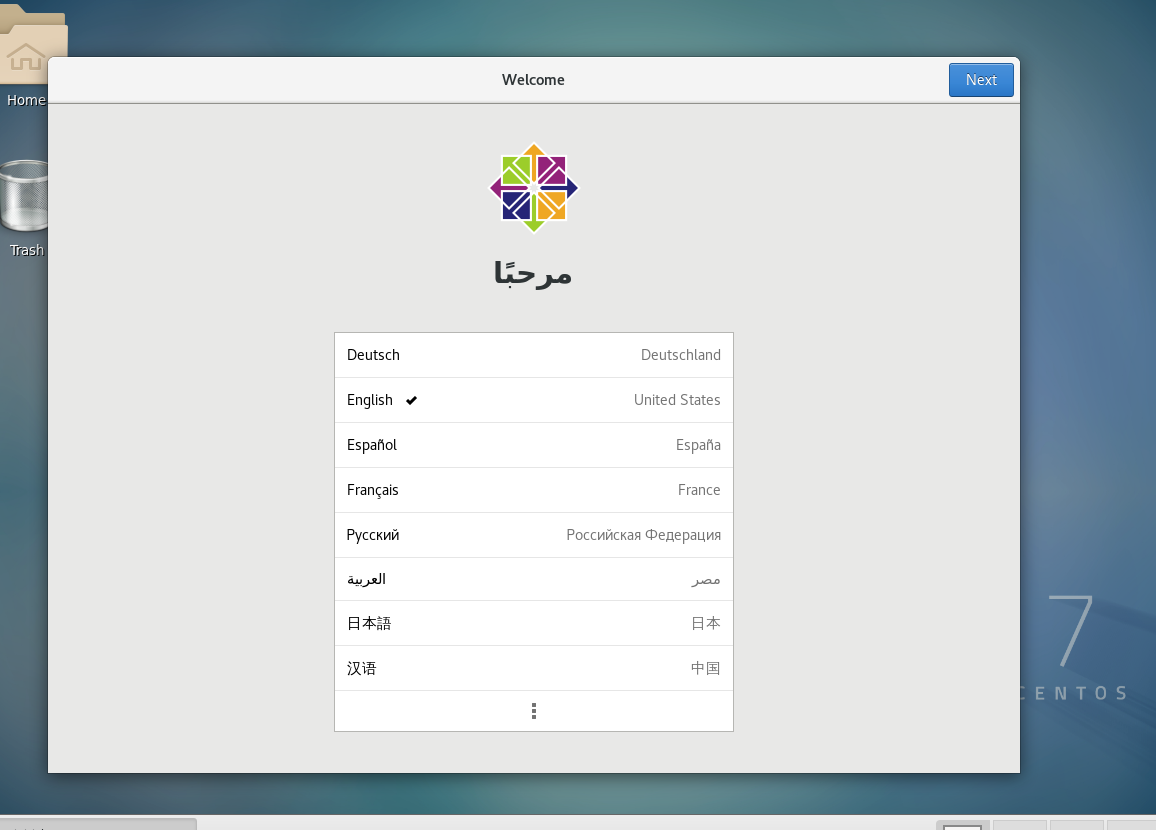
我这里选择英文,各位可以选择中文。

继续添加
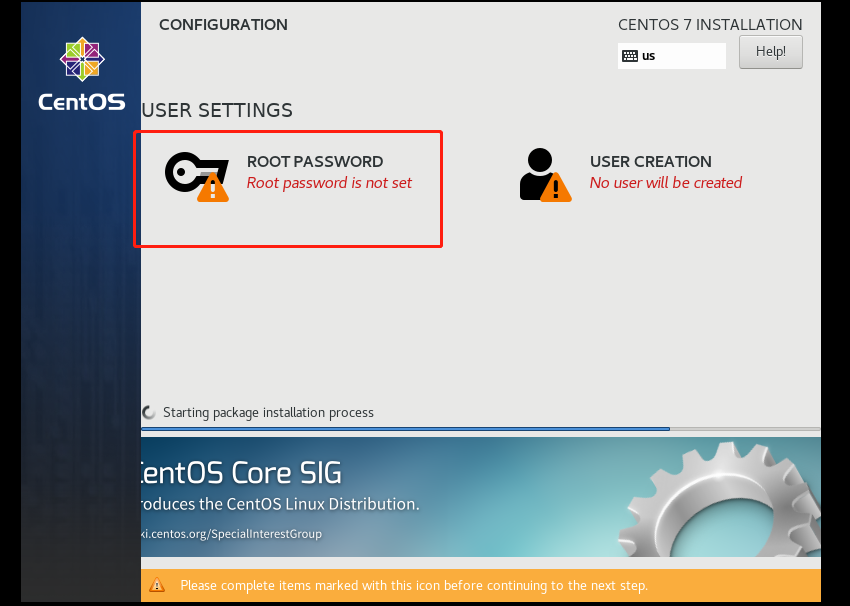
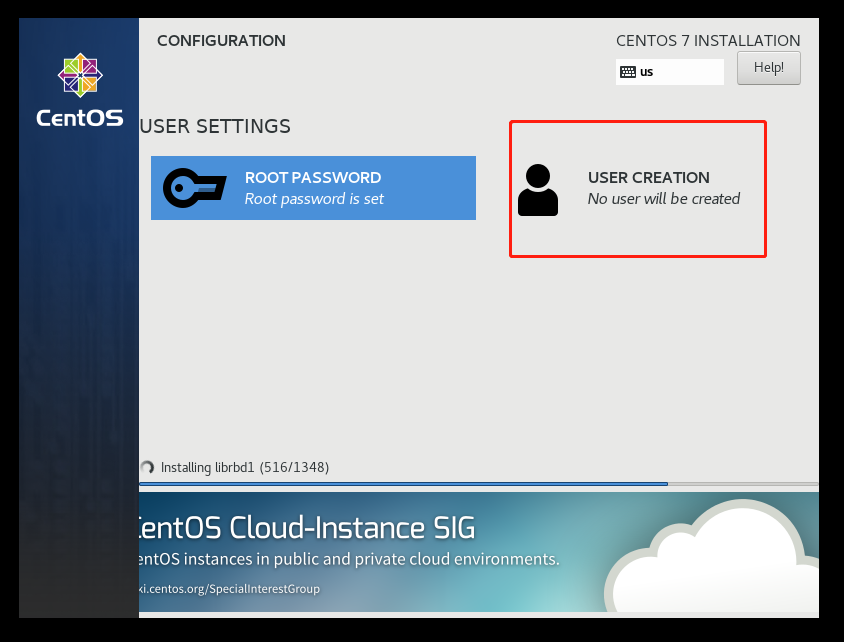
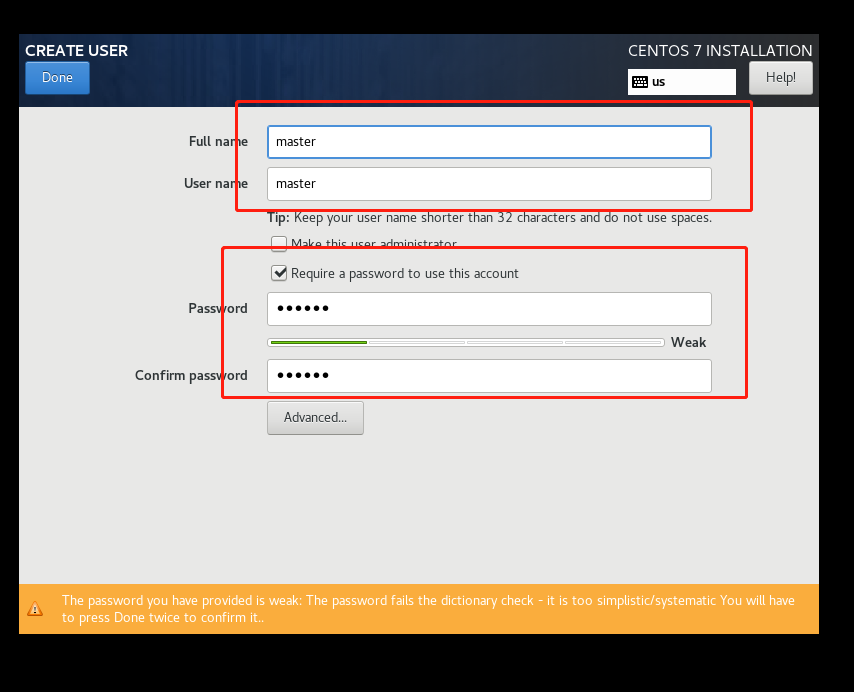
设置密码

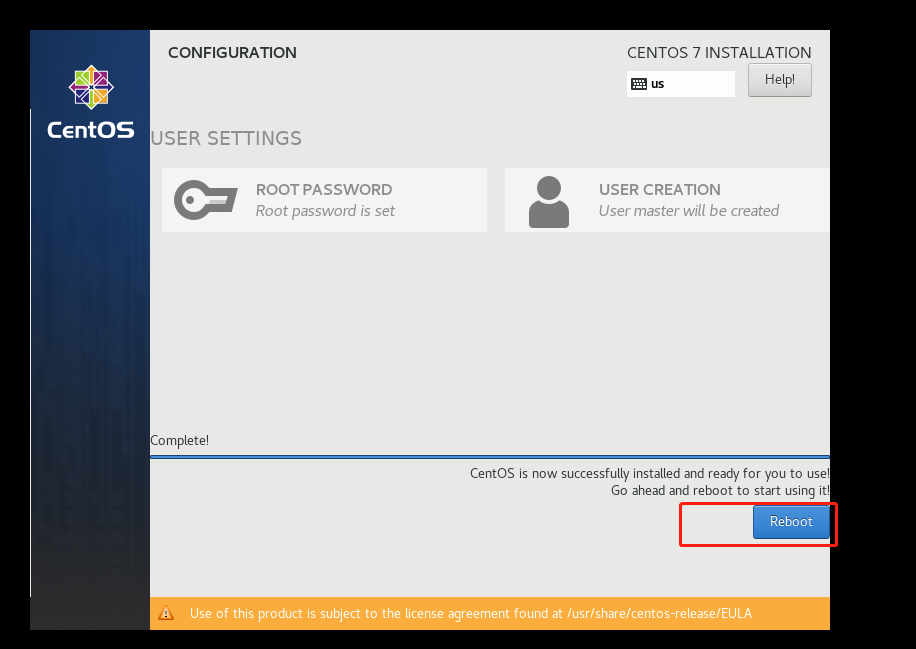

到这里就安装好啦
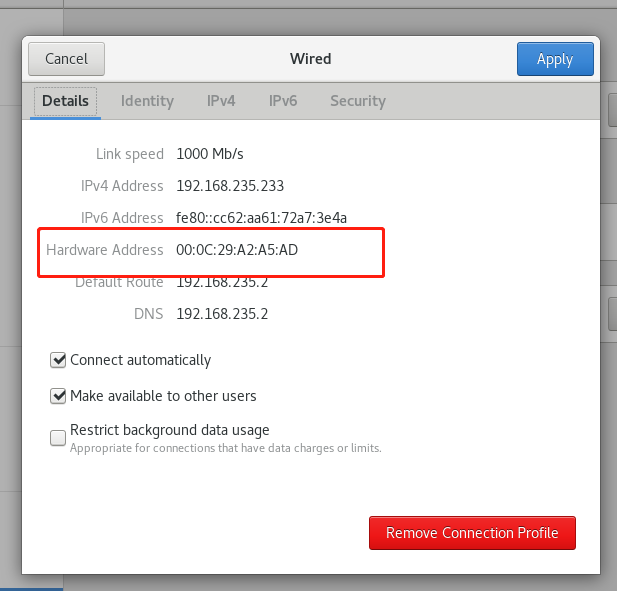
四、ping本地与百度的设置
1.重启服务
service network restart2.修改配置文件
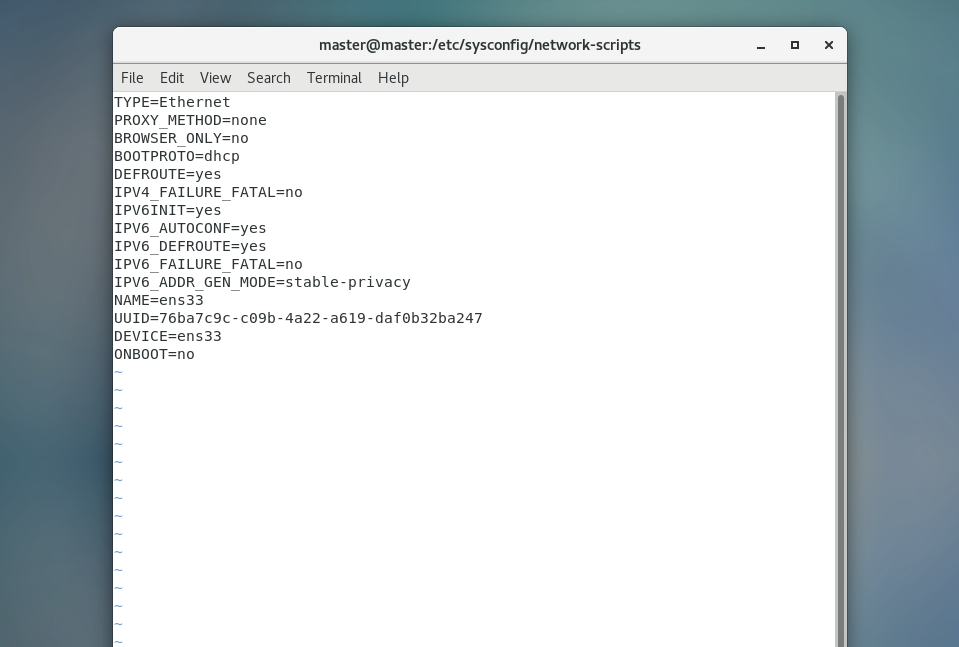
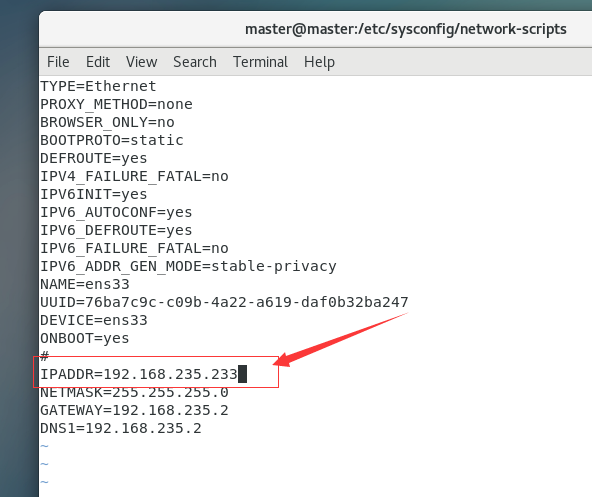
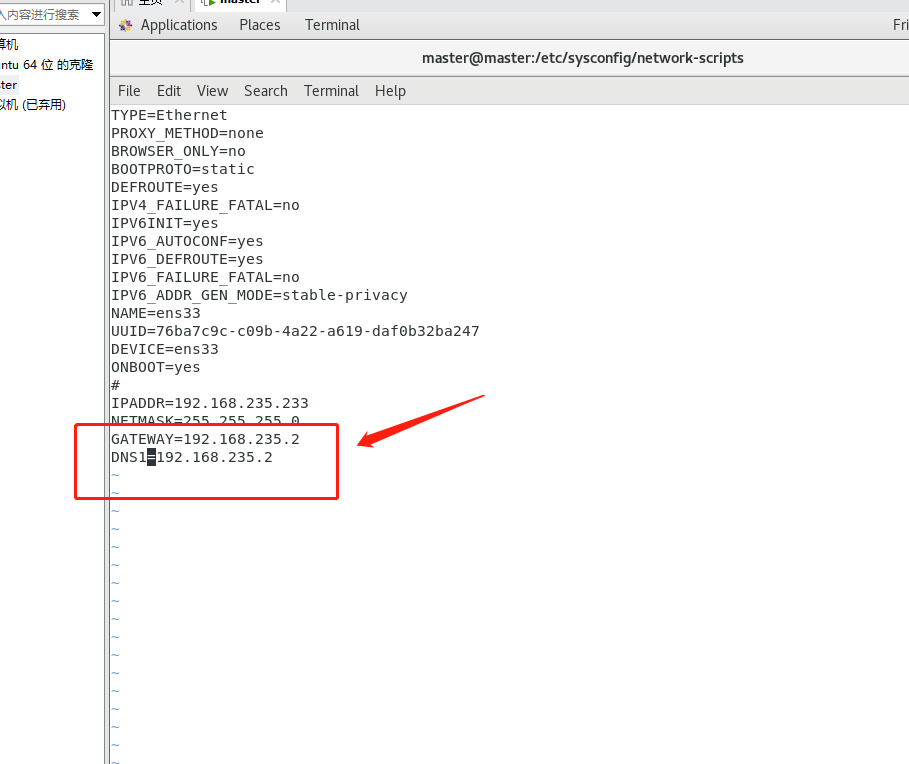
vi /etc/sysconfig/network-scripts/ifcfg-eth0如果进入的是空表,用cd进入这里,然后用“ll”查看那个带ifcfg的文件,进入编辑
我这里是ifcfg-ens33
cd /etc/sysconfig/network-scriptsll
如果你这里是$符号请用这个命令,使用超级用户,变成#


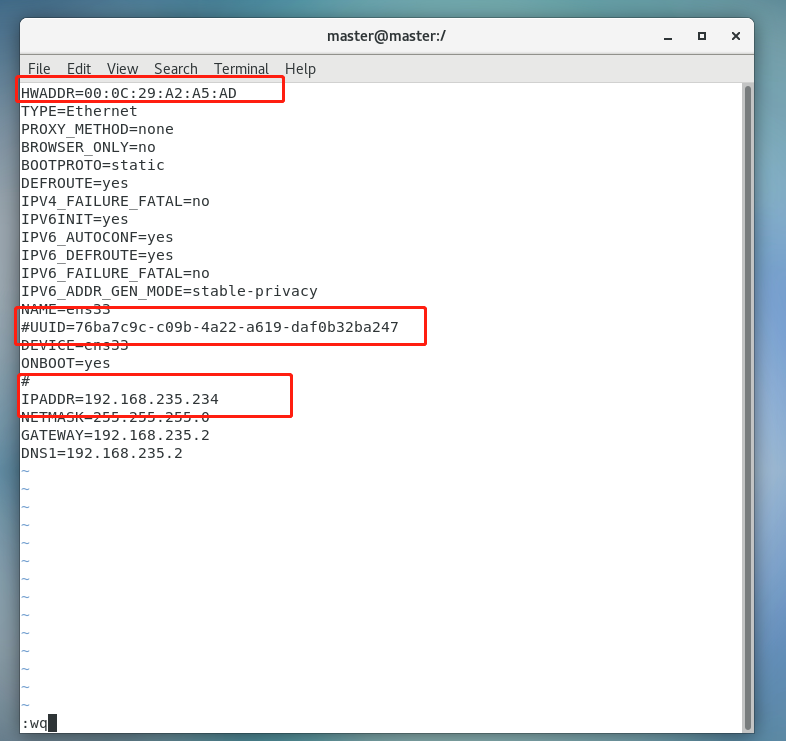
DEVICE是指设备名
HWADDR是指网卡地址
ONBOOT是设置系统启动时是否激活网卡
BOOTPROTO的值可以设置为dhcp、none、bootp、static
dhcp 设置网卡绑定的时候通过DHCP协议的方法来获得地址
none 设置网卡绑定的时候不使用任何协议
bootp 设置网卡绑定的时候使用BOOTP协议
static 设置网卡绑定的时候使用静态协议
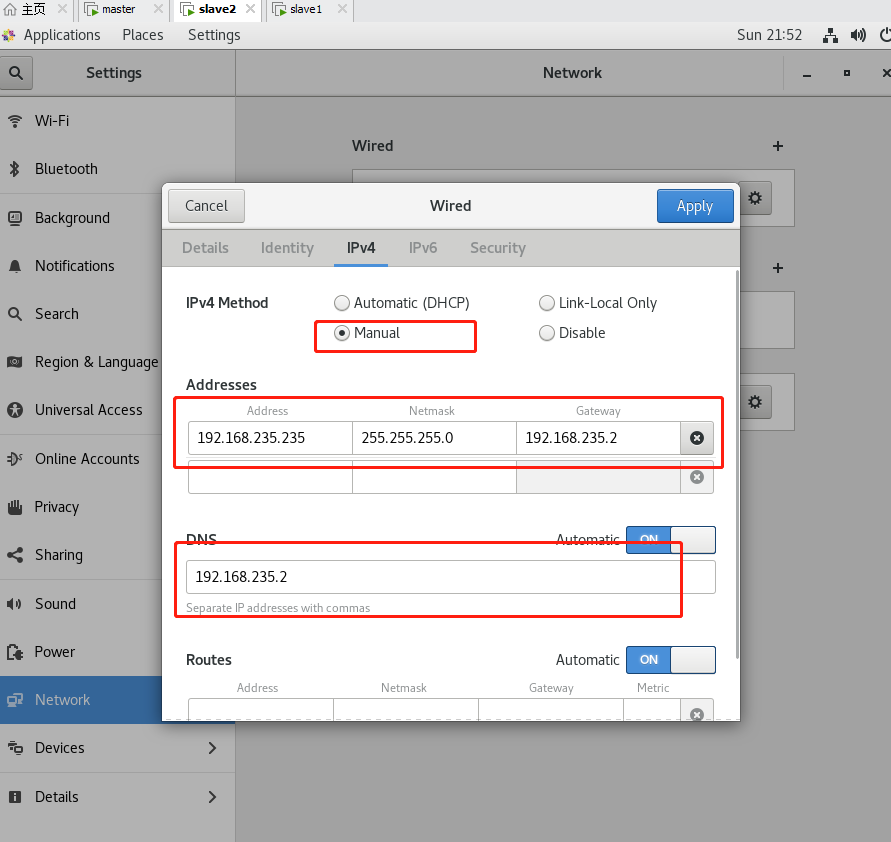
将该文件的ONBOOT=no改为ONBOOT=yes,将BOOTPROTO=dhcp改为BOOTPROTO=static
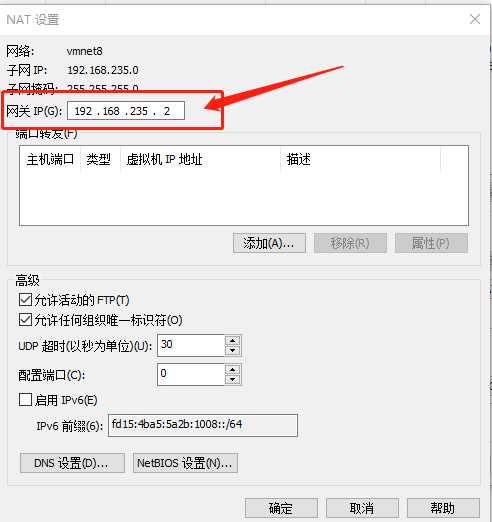
添加IP地址IPADDR、子网掩码NETMASK、网关GATEWAY以及DNS1等信息
这是我未修改的样子(不会如何修改的跟保存的请百度)

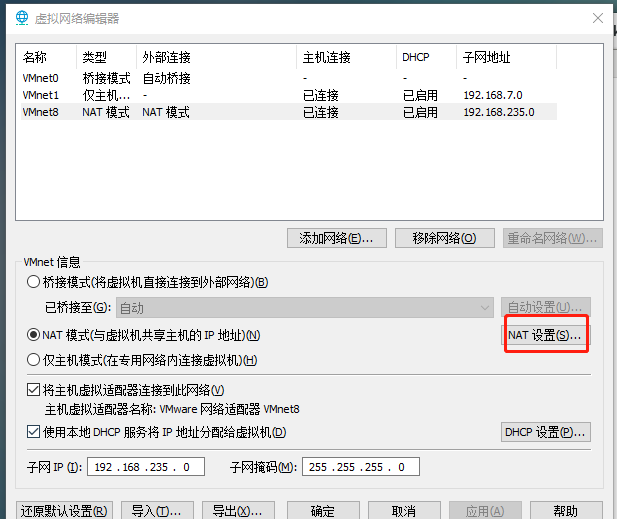
点击编辑里面的虚拟网络编辑器

要用管理员身份使用软件才能更改设置
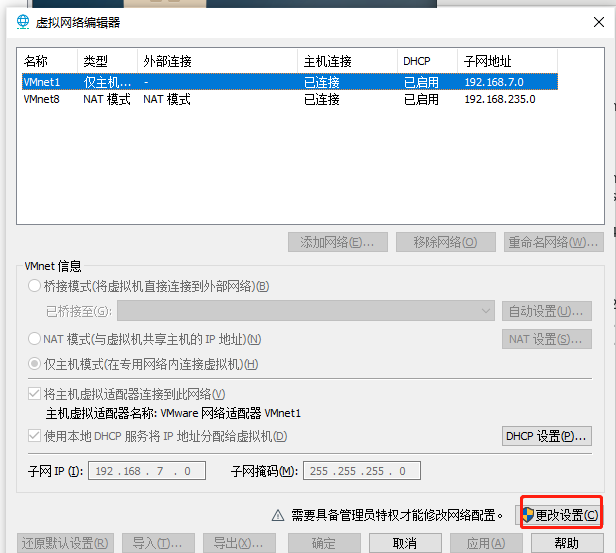
当使用管理员身份后这里会有三个,选NAT模式
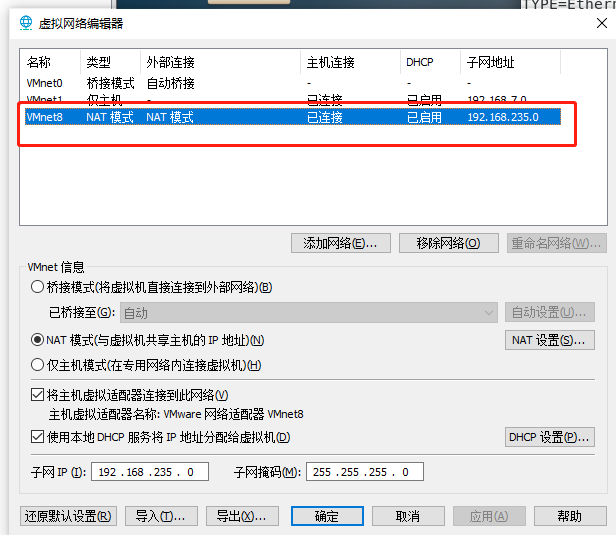
这里最后一段要选不一样的,最好是3位数
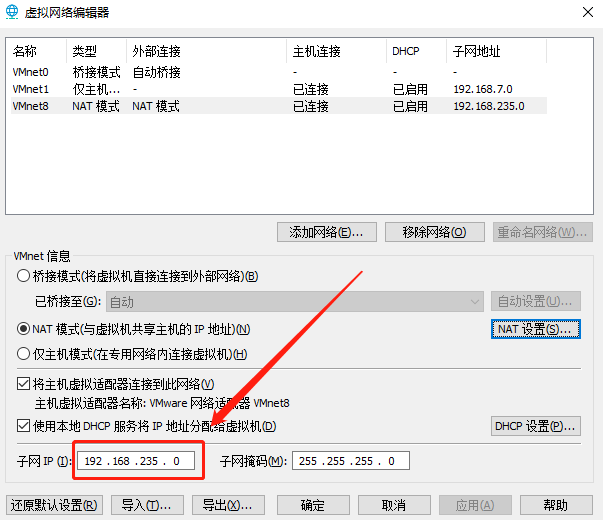
这里两个要一样
修改完保存退出后重启一下服务
service network restart
查看IP
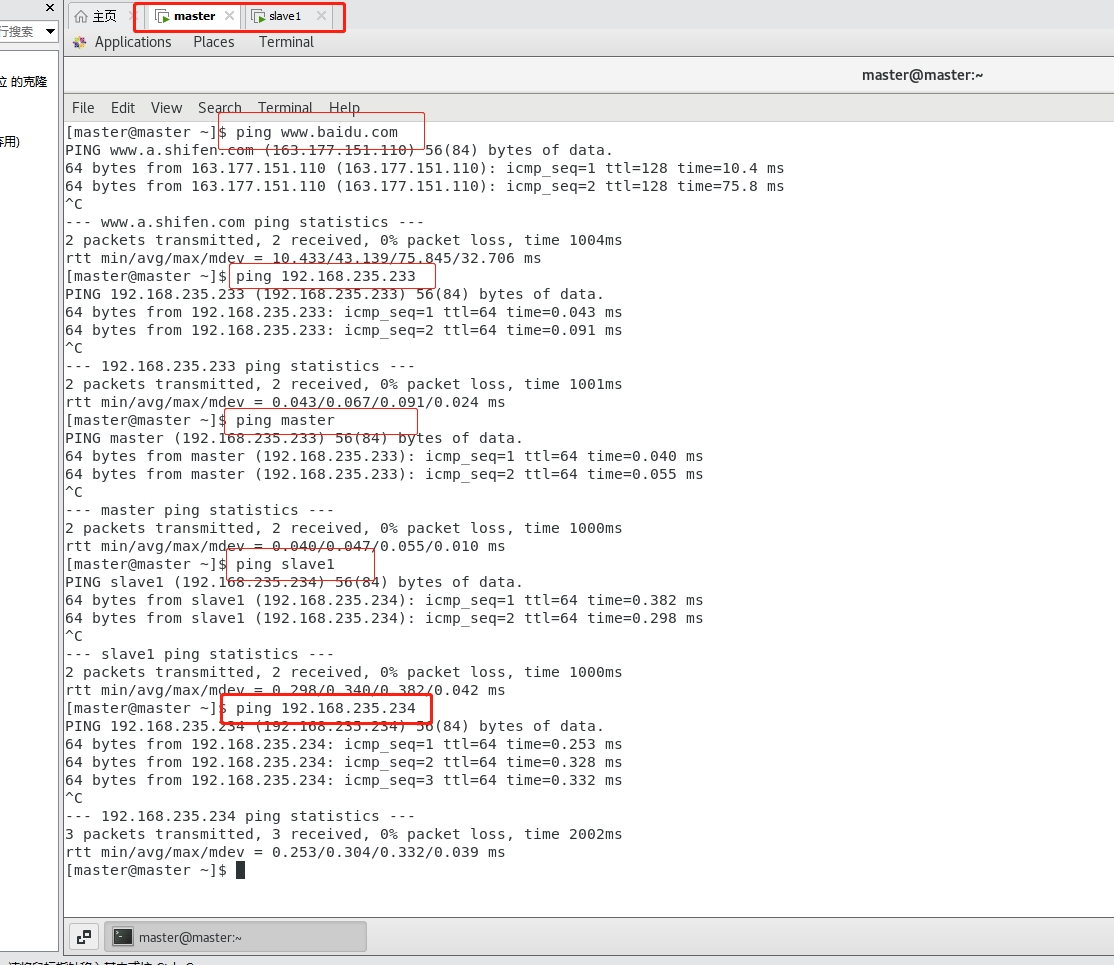
ifconfig3.ping一下百度跟本地,看一下连接是否通畅
ping www.baidu.comping 192.168.235.233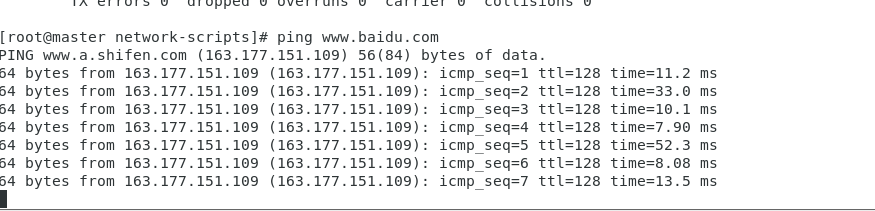

ctel+c退出ping
4.安装yum源
执行cd /etc/yum.repos.d 进入etc/yum.repos.d目录
cd /etc/yum.repos.d查看yum.repos.d目录下的文件
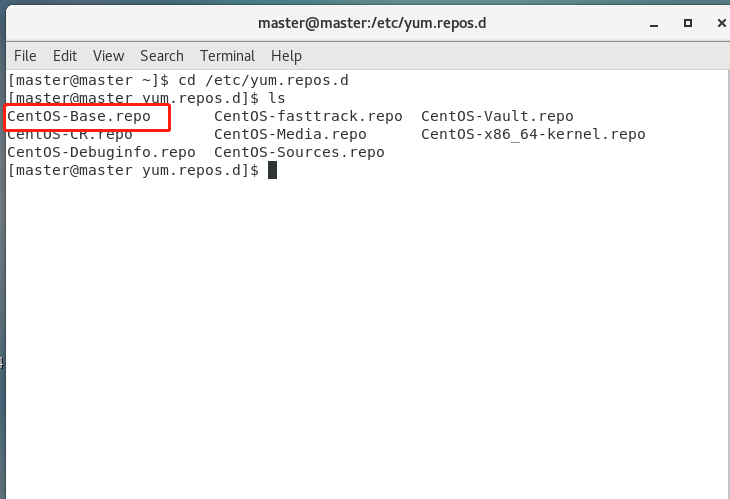
CentOS-Base.repo 是网络的
CentOS-Media.repo是本地的
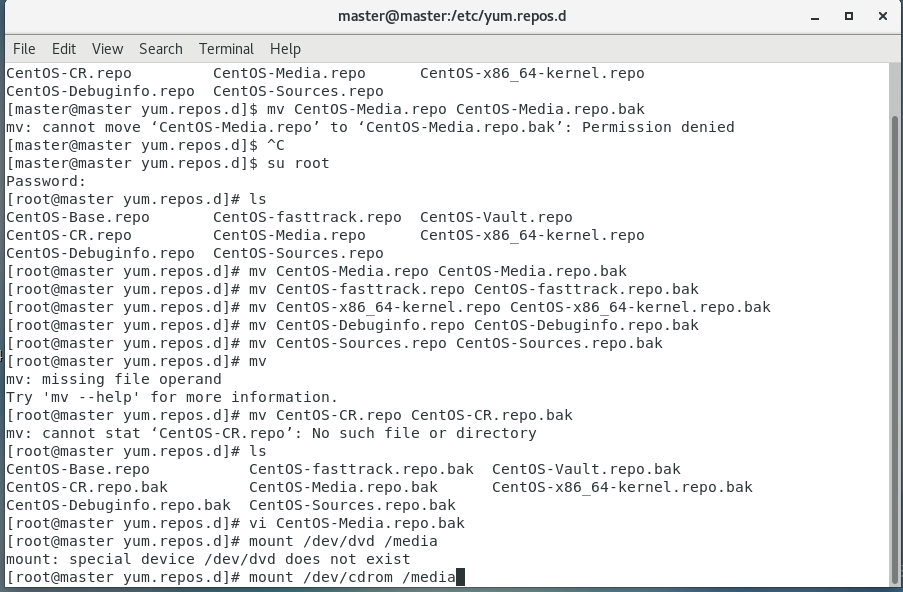
5.执行重命名命令
如果要用网络下载,就改名全部(改名是为了禁用,需要用的话就把名字改回去)
CentOS-Base.repo CentOS-Debuginfo.repo CentOS-fasttrack.repo CentOS-Vault.repo CentOS-Media.repo
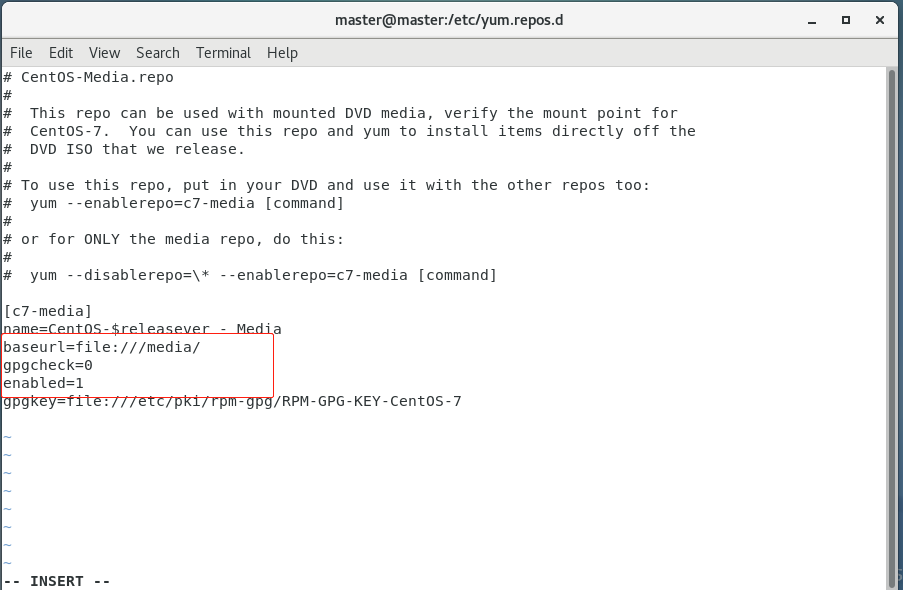
mv CentOS-Media.repo CentOS-Media.repo.bakvi CentOS-Media.repo.bak将baseurl的值修改为:file:///media/ ,将gpgcheck的值改为0 ,将enabled的值修改为 1
修改前:
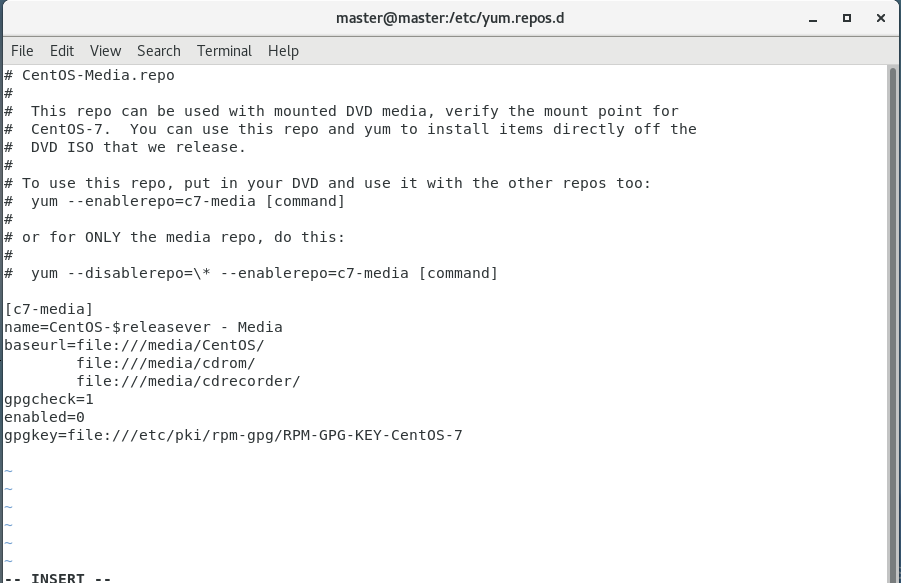
修改后
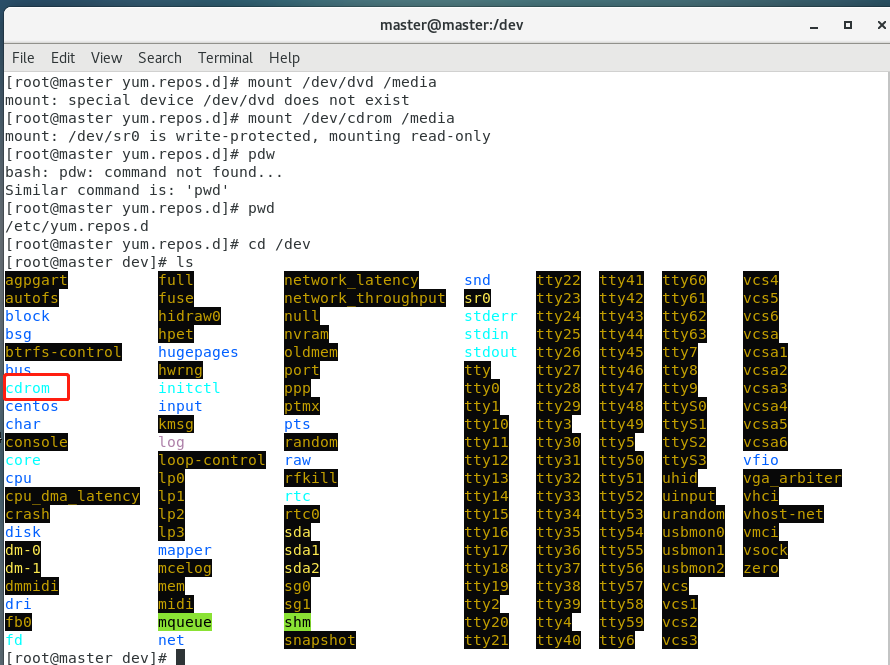
6.挂载
执行以下命令进行挂载
mount /dev/dvd /media #6.8版本mount /dev/cdrom /media #7版本如果没有第一条的话,修改第二条
7.更新yum源。
yum clean all
8.用阿里云安装软件
打开阿里云登录


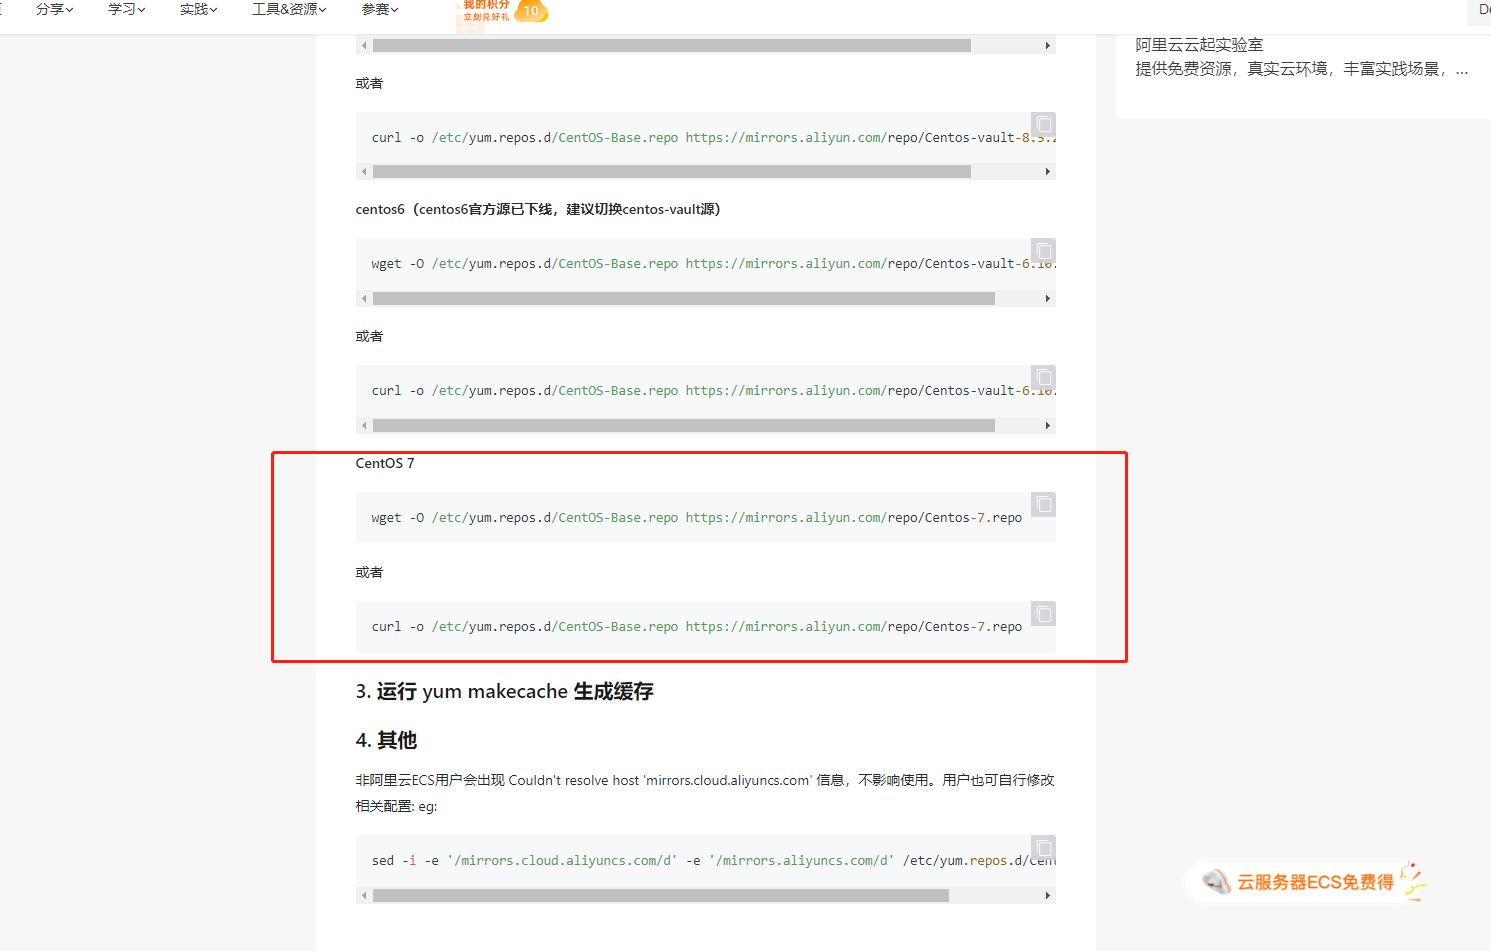
curl -o /etc/yum.repos.d/CentOS-Base.repo https://mirrors.aliyun.com/repo/Centos-7.repowget -O /etc/yum.repos.d/CentOS-Base.repo https://mirrors.aliyun.com/repo/Centos-7.repo9.安装Java
使用xshell7
使用ctel+alt+f打开共享文件
放到opt目录下

在命令行安装Java
进入opt目录安装
rpm -ivh jdk-7u80-linux-x64.rpm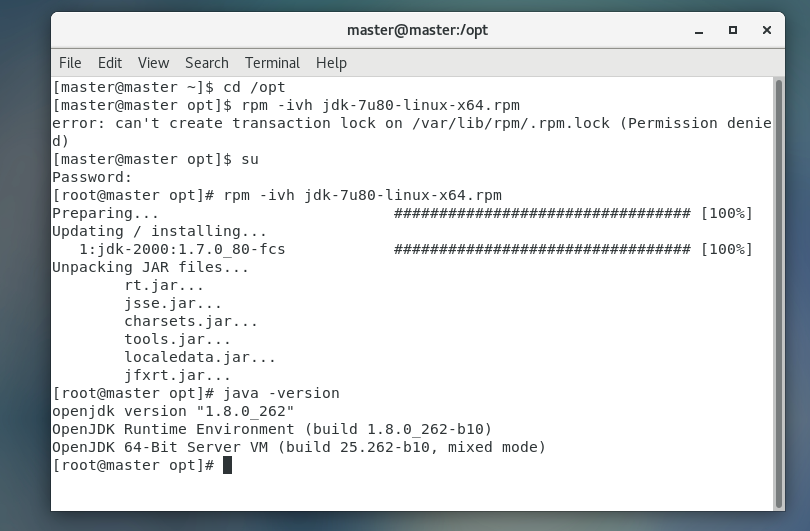
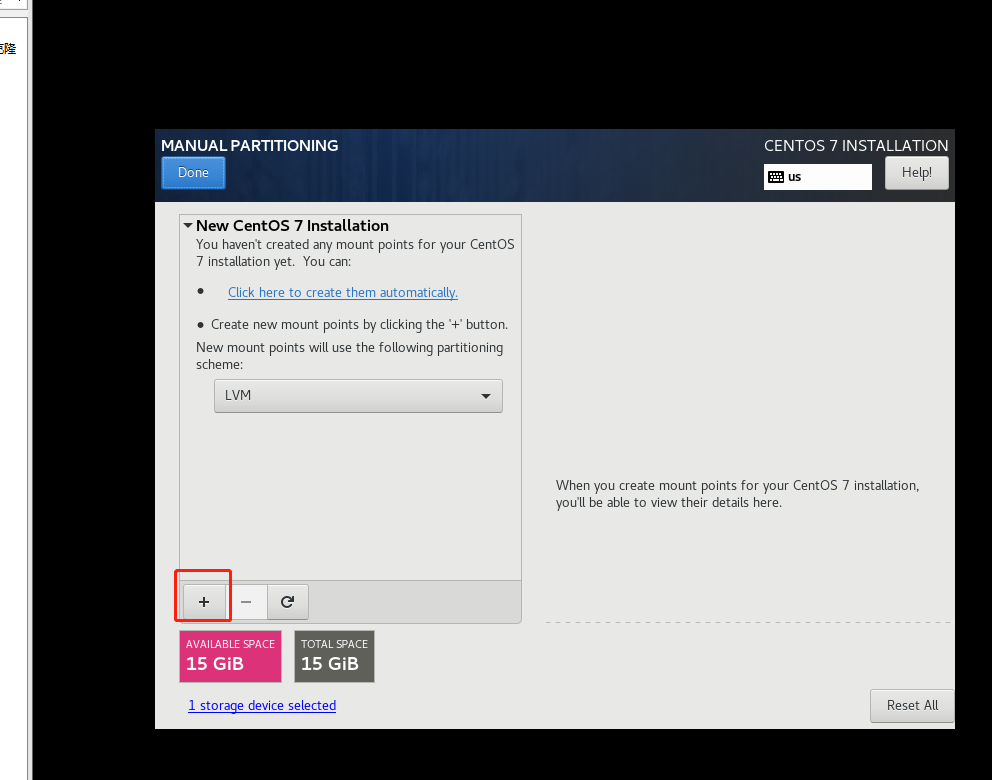
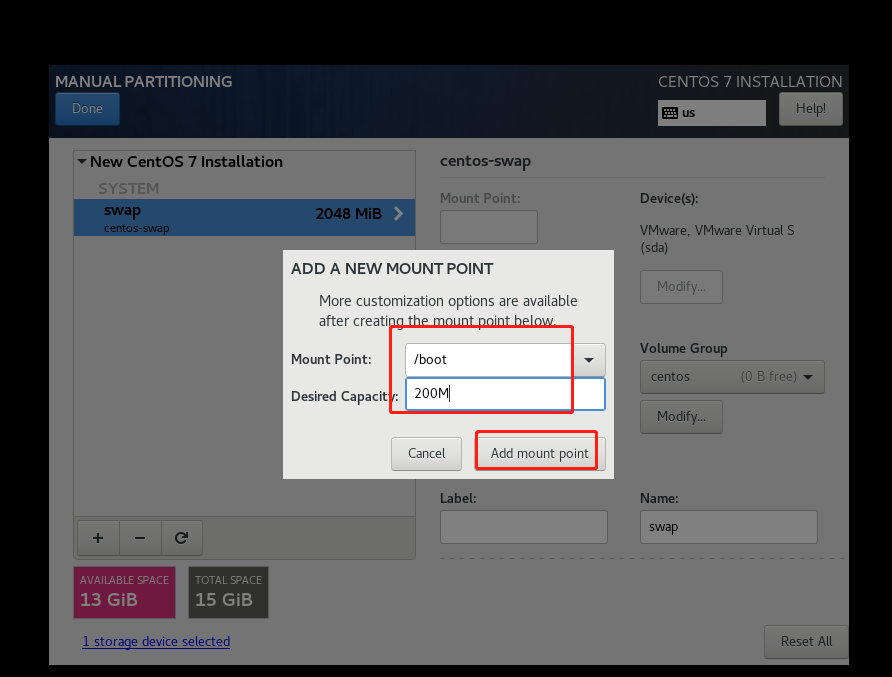
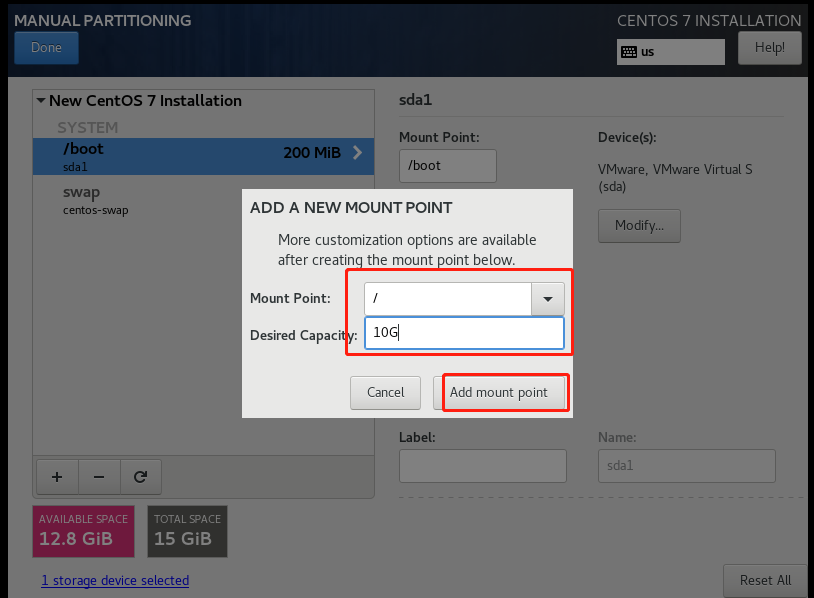
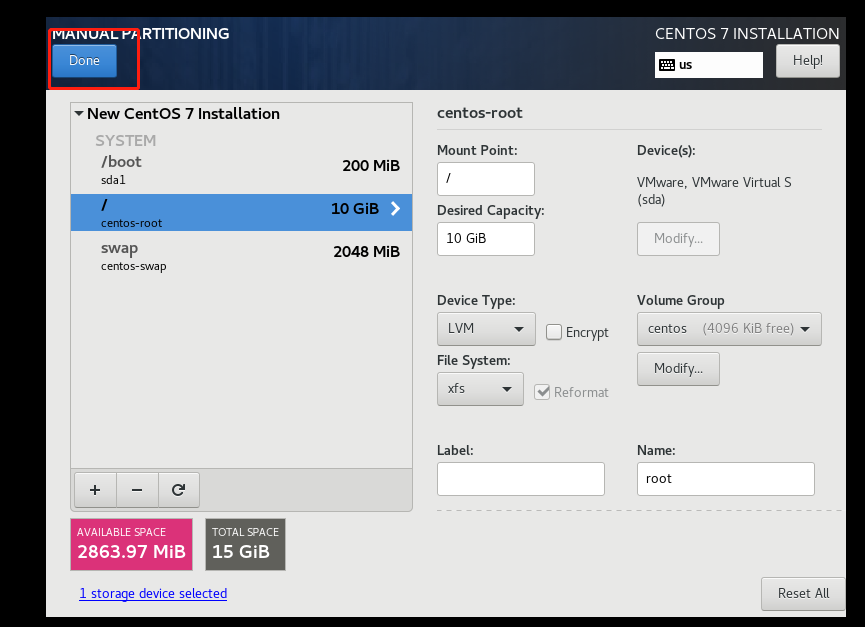
五.搭建Hadoop完全分布式集群
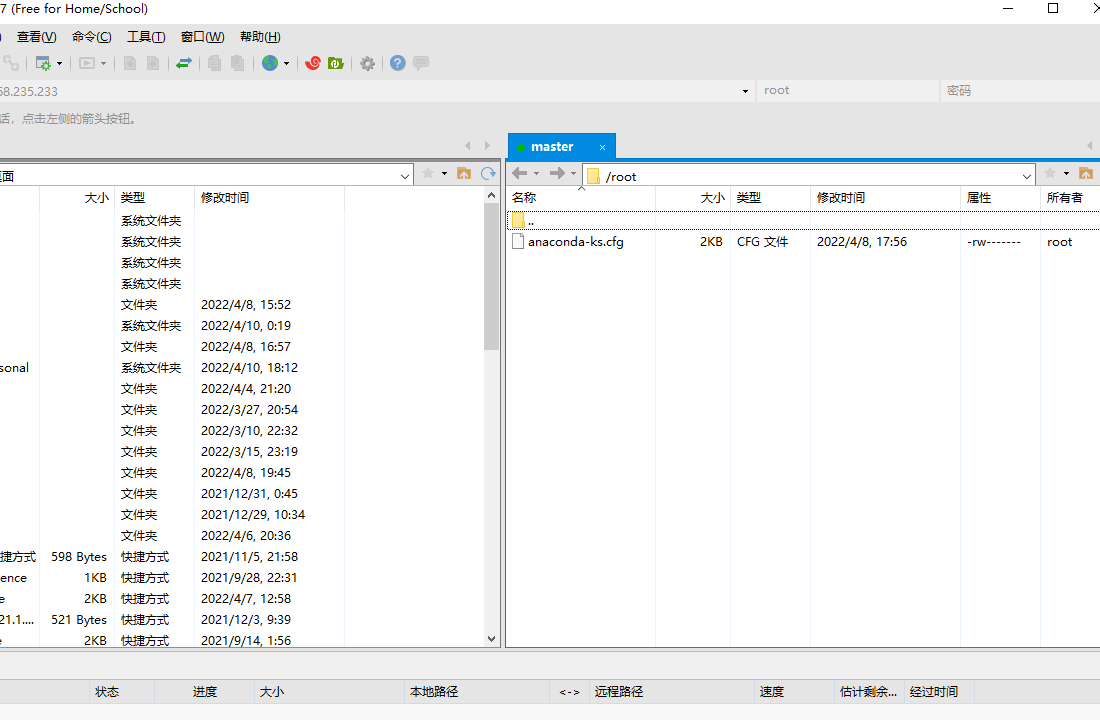
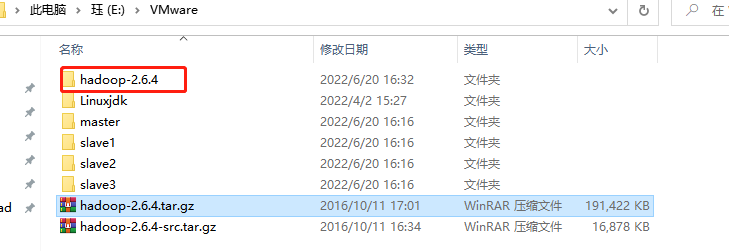
1.把Hadoop安装包hadoop-xxxxx / 上传到虚拟机master的/opt目录下
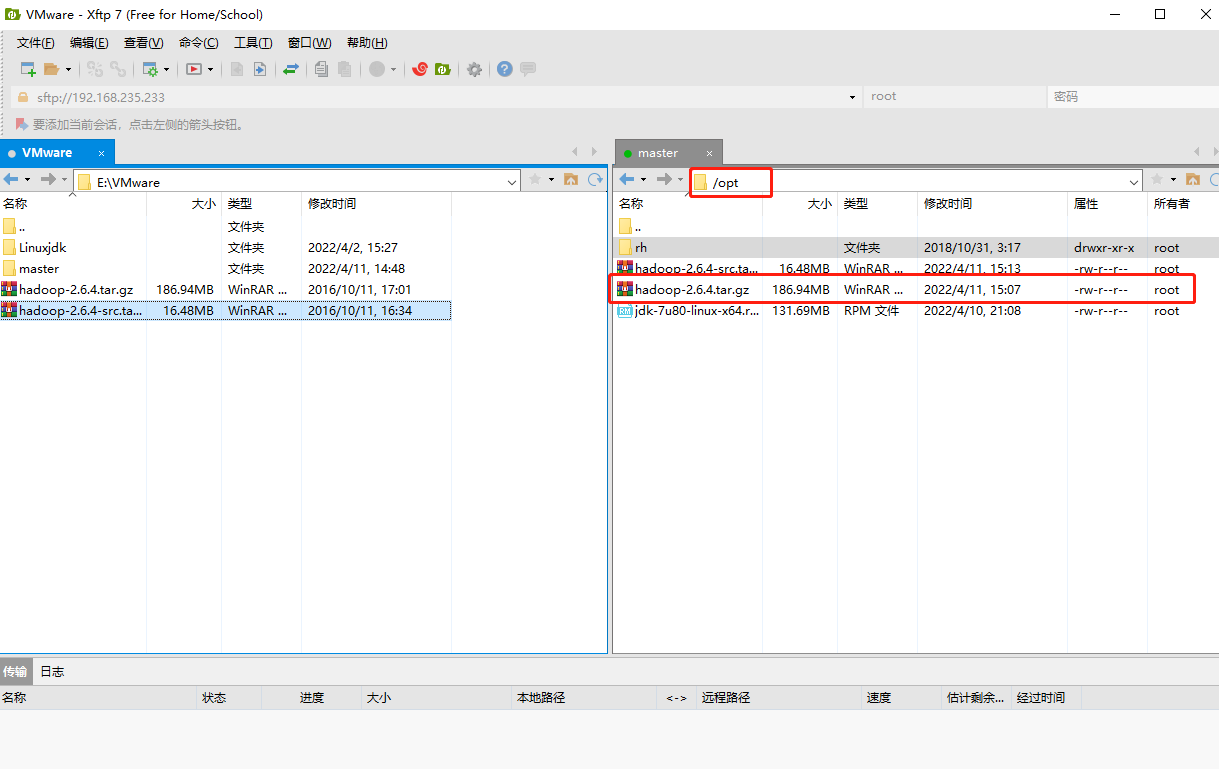
然后进入opt目录下输入下面语句,将hadoop安装包解压到虚拟机上
tar -zxf hadoop-xxxx -C /usr/localHadoop配置涉及的文件都在/usr/local/hadoop-2.6.4/etc/hadoop/目录下
2.修改core-site.xml文件
vi core-site.xml<configuration>
<property>
<name>fs.defaultFS</name>
<value>hdfs://master:8020</value>
</property>
<property>
<name>hadoop.tmp.dir</name>
<value>/var/log/hadoop/tmp</value>
</property>
</configuration>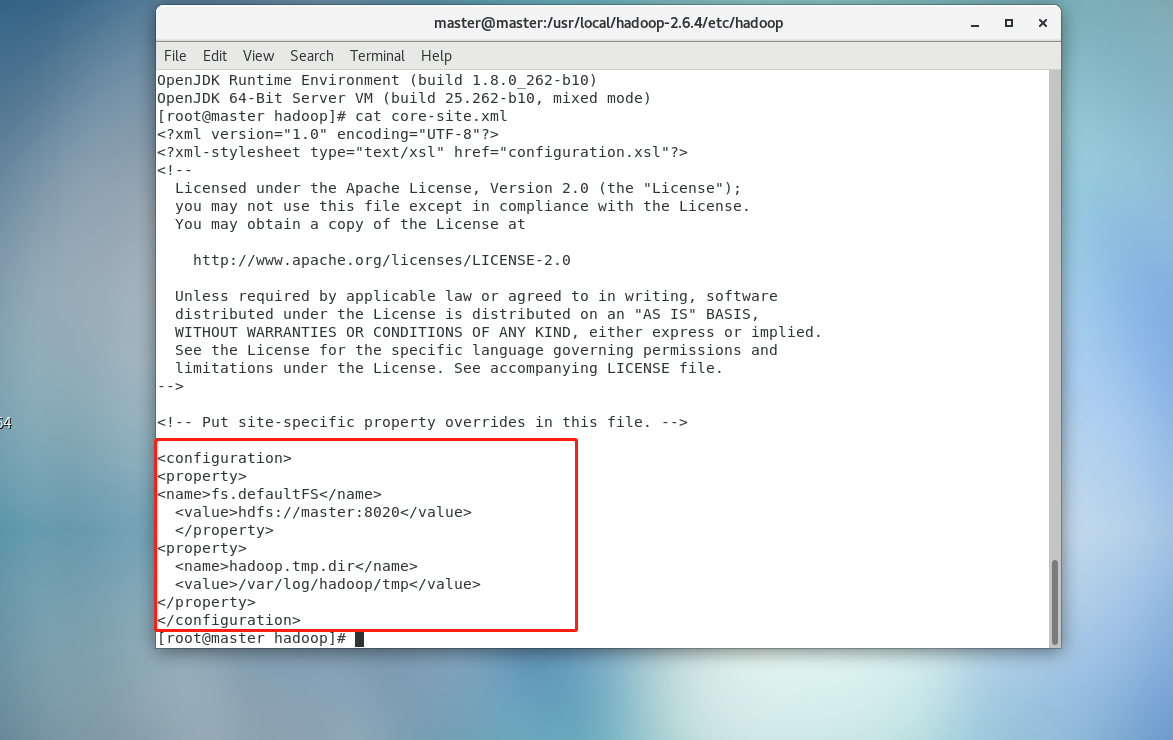
然后在hadoop目录下创建一个tmp文件夹

mkdir tmp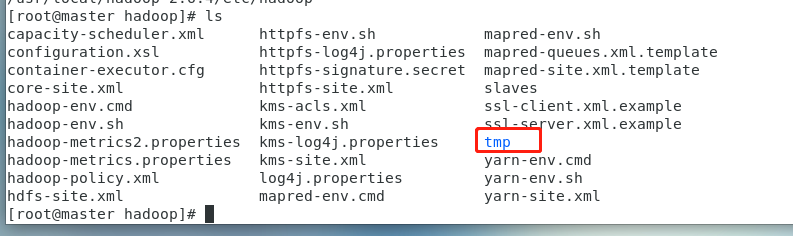
3.修改hadoop-env.sh
vi hadoop-env.sh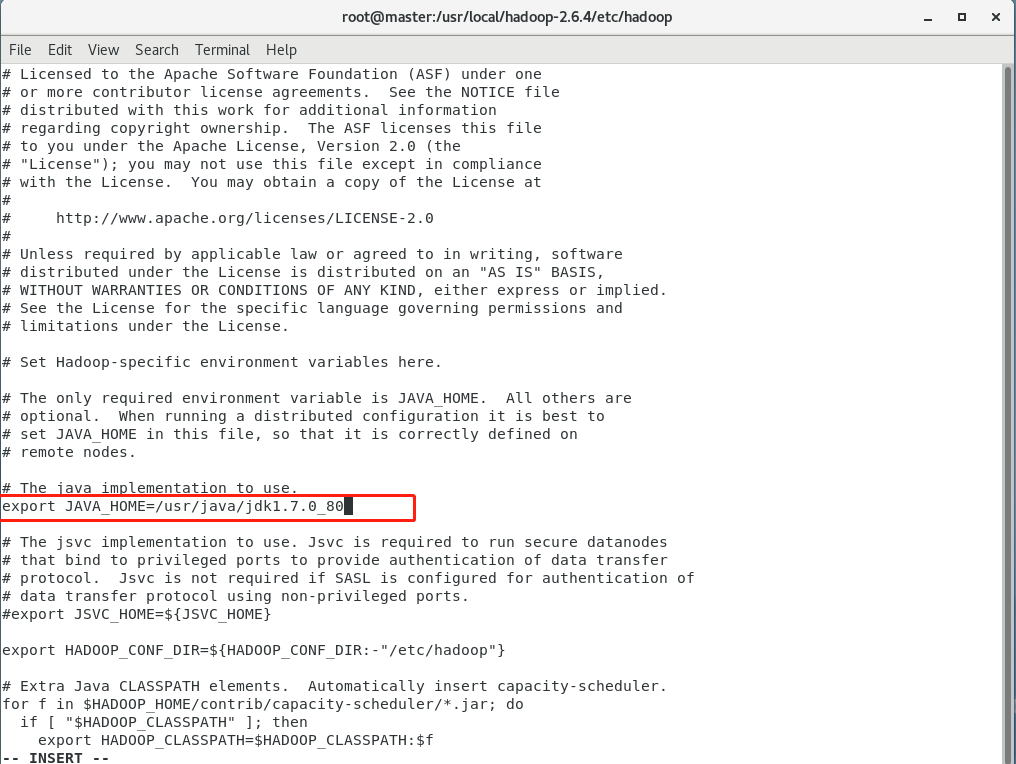
4.修改yarn-env.sh文件
vi yarn-env.sh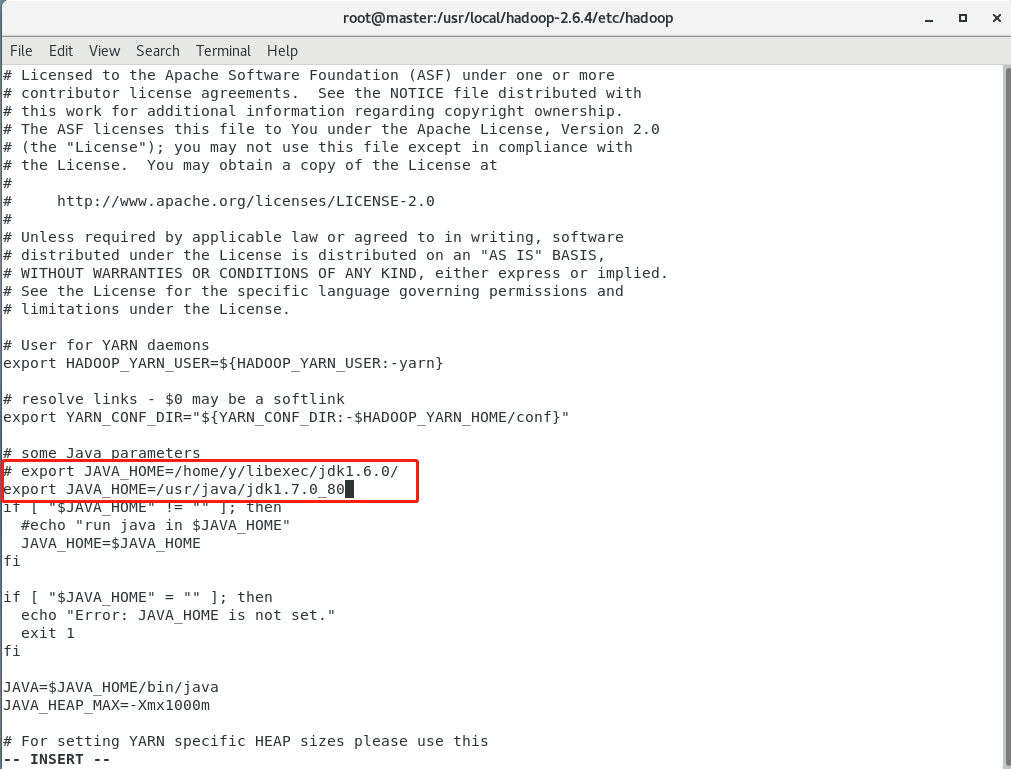
5.复制mapred-site.xml.template 并命名为mapred-site.xml并修改
cp mapred-site.xml.template mapred-site.xml
修改mapred-site.xml文件
vi mapred-site.xml<configuration>
<property>
<name>mapreduce.framework.name</name>
<value>yarn</value>
</property>
<!-- jobhistory properties -->
<property>
<name>mapreduce.jobhistory.address</name>
<value>master:10020</value>
</property>
<property>
<name>mapreduce.jobhistory.webapp.address</name>
<value>master:19888</value>
</property>
</configuration>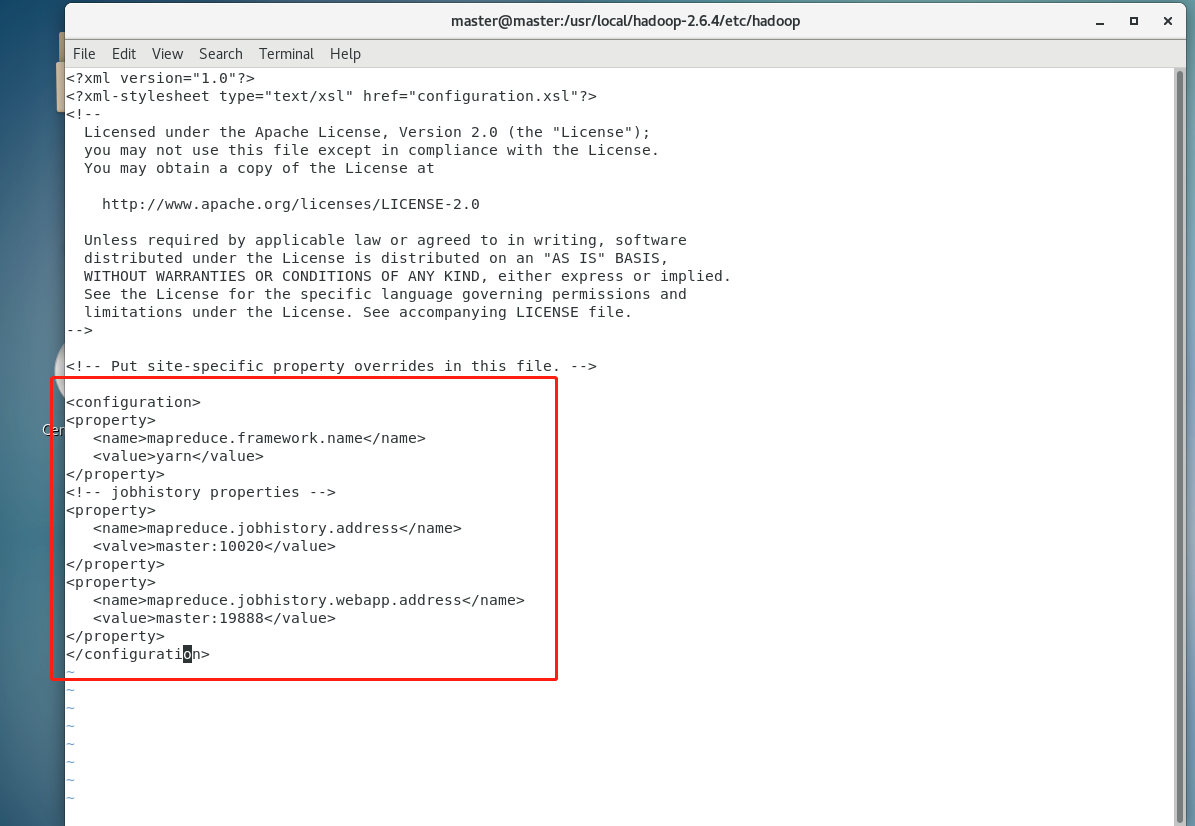
6.修改yarn-site.xml文件
vi yarn-site.xml<configuration>
<!-- Site specific YARN configuration properties -->
<property>
<name>yarn.resourcemanager.hostname</name>
<value>master</value>
</property>
<property>
<name>yarn.resourcemanager.address</name>
<value>${yarn.resourcemanager.hostname}:8032</value>
</property>
<property>
<name>yarn.resourcemanager.scheduler.address</name>
<value>${yarn.resourcemanager.hostname}:8030</value>
</property>
<property>
<name>yarn.resourcemanager.webapp.address</name>
<value>${yarn.resourcemanager.hostname}:8088</value>
</property>
<property>
<name>yarn.resourcemanager.webapp.https.address</name>
<value>${yarn.resourcemanager.hostname}:8090</value>
</property>
<property>
<name>yarn.resourcemanager.resource-tracker.address</name>
<value>${yarn.resourcemanager.hostname}:8031</value>
</property>
<property>
<name>yarn.resourcemanager.admin.address</name>
<value>${yarn.resourcemanager.hostname}:8033</value>
</property>
<property>
<name>yarn.nodemanager.local-dirs</name>
<value>/data/hadoop/yarn/local</value>
</property>
<property>
<name>yarn.log-aggregation-enable</name>
<value>true</value>
</property>
<property>
<name>yarn.nodemanager.remote-app-log-dir</name>
<value>/data/tmp/logs</value>
</property>
<property>
<name>yarn.log.server.url</name>
<value>http://master:19888/jobhistory/logs/</value>
<description>URL for job history server</description>
</property>
<property>
<name>yarn.nodemanager.vmem-check-enabled</name>
<value>false</value>
</property>
<property>
<name>yarn.nodemanager.aux-services</name>
<value>mapreduce_shuffle</value>
</property>
<property>
<name>yarn.nodemanager.aux-services.mapreduce.shuffle.class</name>
<value>org.apache.hadoop.mapred.ShuffleHandler</value>
</property>
<property>
<name>yarn.nodemanager.resource.memory-mb</name>
<value>2048</value>
</property>
<property>
<name>yarn.scheduler.minimum-allocation-mb</name>
<value>512</value>
</property>
<property>
<name>yarn.scheduler.maximum-allocation-mb</name>
<value>4096</value>
</property>
<property>
<name>mapreduce.map.memory.mb</name>
<value>2048</value>
</property>
<property>
<name>mapreduce.reduce.memory.mb</name>
<value>2048</value>
</property>
<property>
<name>yarn.nodmanager.resource.cpu-vcores</name>
<value>1</value>
</property>
</configuration>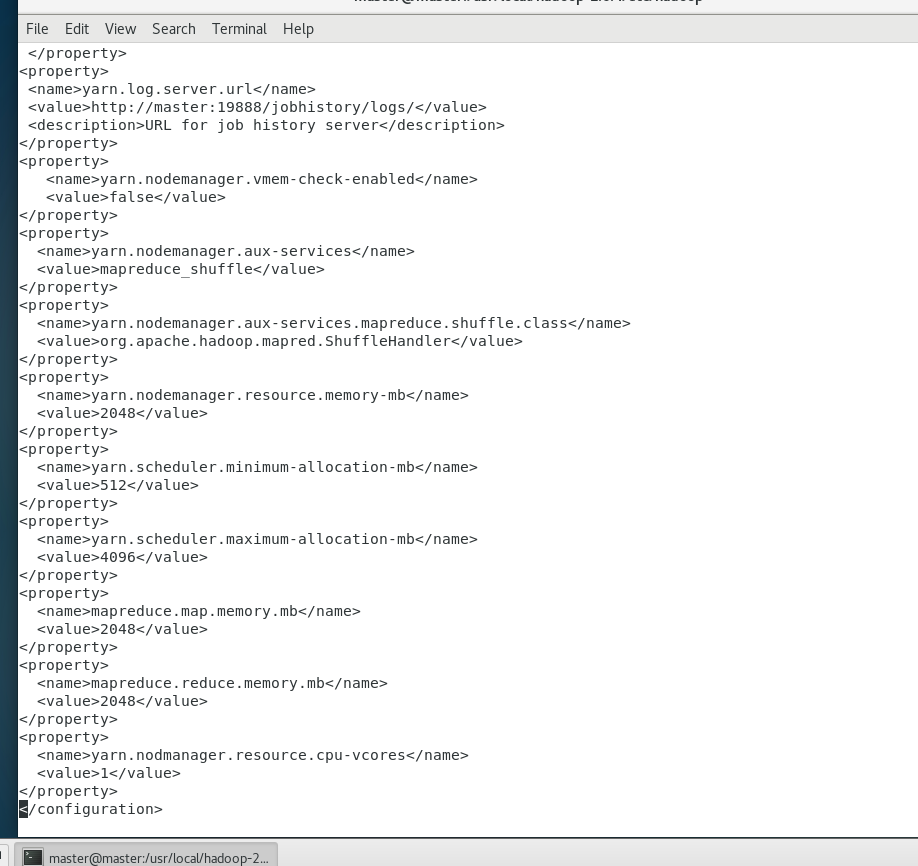
7.修改slaves文件
vi slavesslave1
slave2
slave3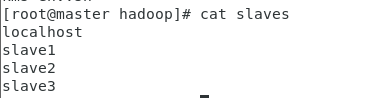
8.修改hdfs-site.xml文件
vi hdfs-site.xml<configuration>
<property>
<name>dfs.namenode.name.dir</name>
<value>file:///data/hadoop/hdfs/name</value>
</property>
<property>
<name>dfs.datanode.data.dir</name>
<value>file:///data/hadoop/hdfs/data</value>
</property>
<property>
<name>dfs.namenode.secondary.http-address</name>
<value>master:50090</value>
</property>
<property>
<name>dfs.replication</name>
<value>3</value>
</property>
</configuration>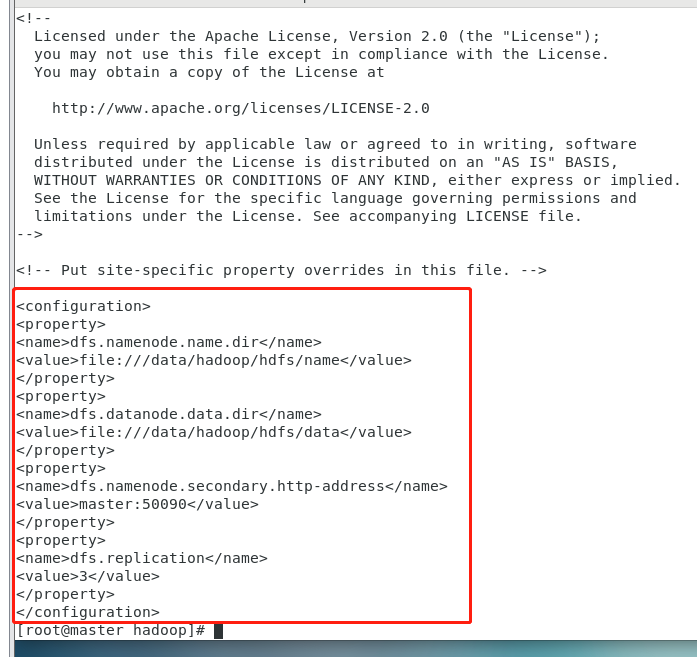
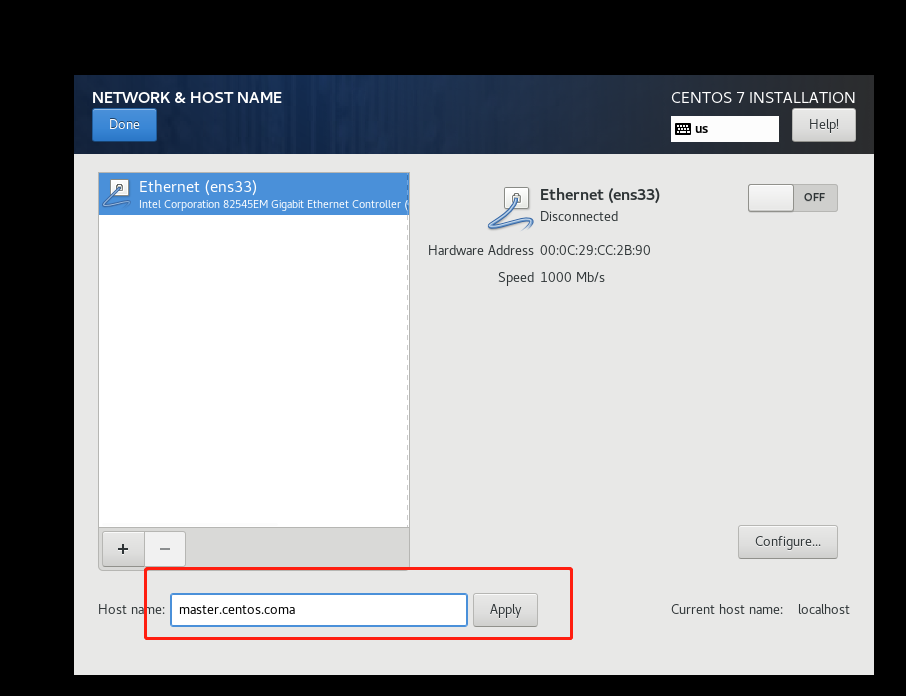
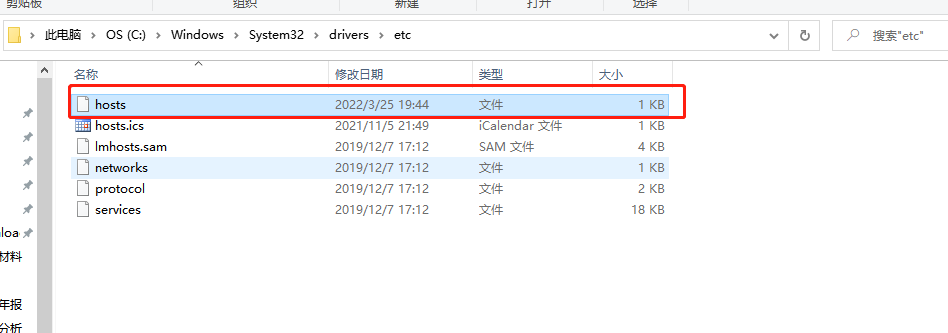
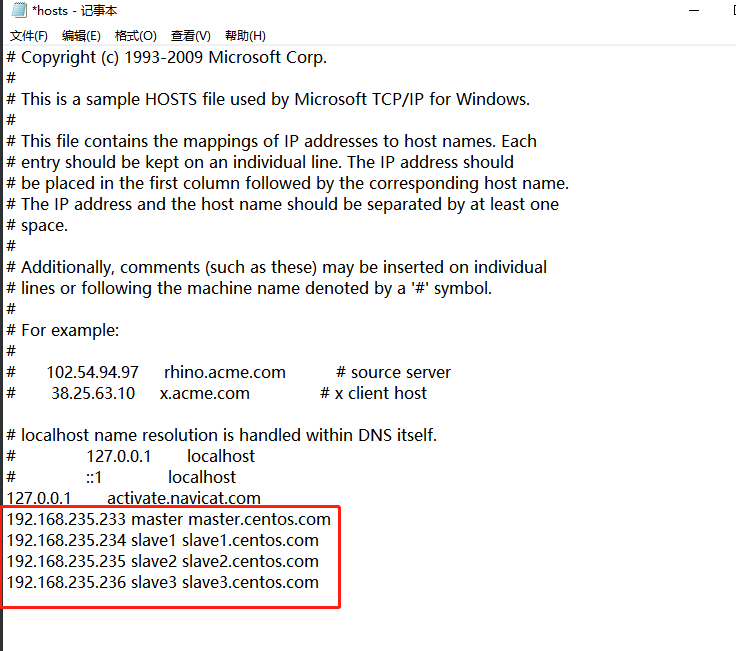
9.返回最初目录,进入/etc,修改hosts文件
在最后面添加以下代码,主要符合自己的ip跟主机名
192.168.235.233 master master.centos.com
192.168.235.234 slave1 slave1.centos.com
192.168.235.235 slave2 slave2.centos.com
192.168.235.236 slave3 slave3.centos.com在自己的电脑上hosts也添加
·
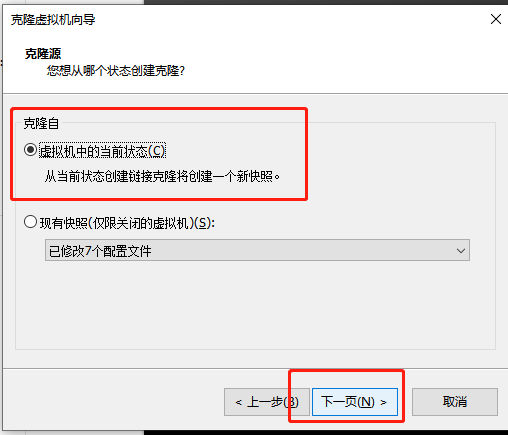
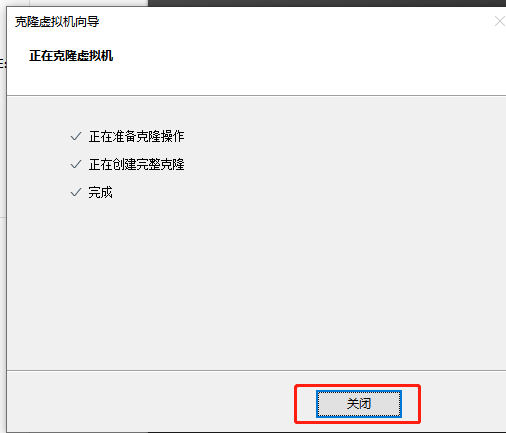
10.修改完后关机,进行克隆。
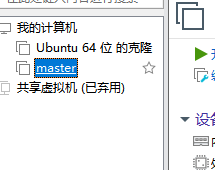
右击master,管理,克隆


11.打开虚拟机slave1
(1)执行以下命令,删除70-persistent-net.rules
rm -rf /etc/udev/rules.d/70-persistent-net.rules
(2)执行命令:
ifconfig -a 查看HWADDR,记录HWADDR(每个机器的此值是不一样的)
找不到另一种方法(如果是可视化的)
(3)修改/etc/sysconfig/network-scripts/ifcfg-eth0文件,修改HWADDR、IPADDR以及注释掉UUID开头的一行代码,并修改HWADDR的内容为实际的地址
vi /etc/sysconfig/network-scripts/ifcfg-eth0如果进入的是空表,用cd进入这里,然后用“ll”查看那个带ifcfg的文件,进入编辑
我这里是ifcfg-ens33
cd /etc/sysconfig/network-scriptsll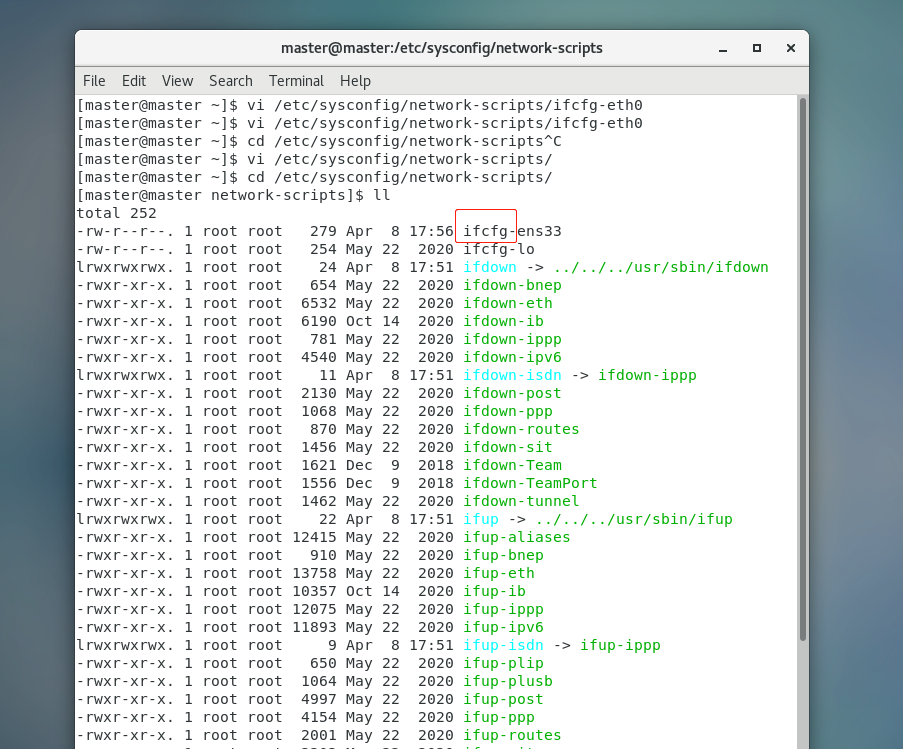
如果你这里是$符号请用这个命令,使用超级用户,变成#


图形化界面也可以在这里修改
修改后重启服务:
service network restart(4)修改主机名,执行命令
6版本的:
vi /etc/sysconfig/network修改机器名为 slave1.centos.com
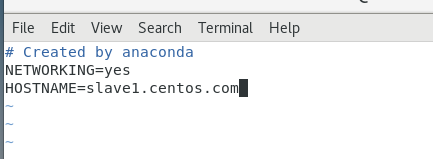
7版本的:
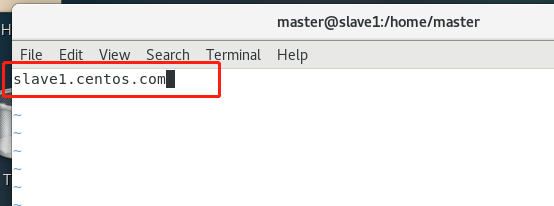
vi /etc/hostname修改为 slave1.centos.com
修改用户名:
(5)使用reboot命令重启虚拟机。
(6)验证slave1是否配置成功。在master下执行ping slave1 如果ping得通,说明配置成功。
注意要master跟slave1两个虚拟机都打开才能互ping
12.重复(1)~(5)的相关步骤,克隆master到slave2、slave3,并修改slave2、slave3的相关配置。
13.配置SSH免密登录
(1)在master虚拟机上使用ssh-keygen产生公钥(id_rsa.pub)与私钥(id_rsa)两个文件
输入以下命令执行后,接着按三次‘Enter’
ssh-keygen -t rsassh-keygen用来生成RSA类型的密钥以及管理该密钥,参数“ -t ”用于指定要创建的SSH密钥类型为RSA
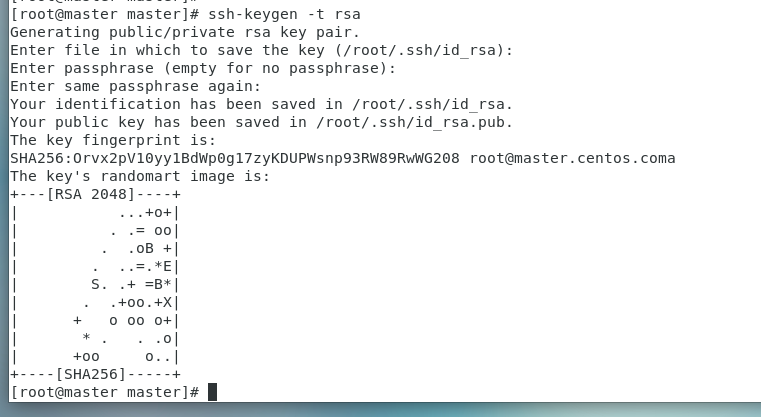
三次回车
1.保存密钥
2.不对私钥设口令
3.确认不设口令
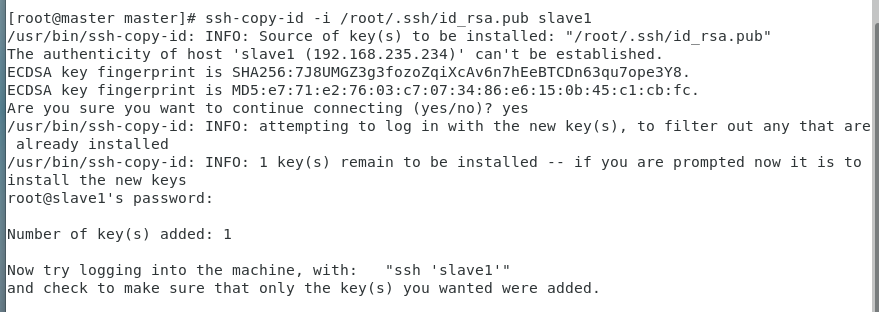
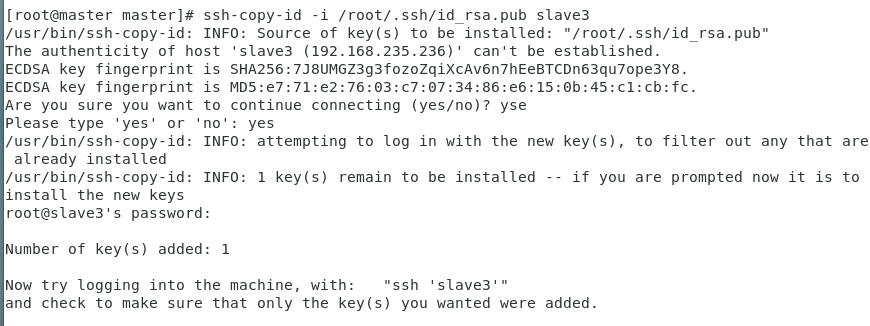
(2)用ssh-copy-id将公钥复制到远程机器中(4个都要)
ssh-copy-id -i /root/.ssh/id_rsa.pub master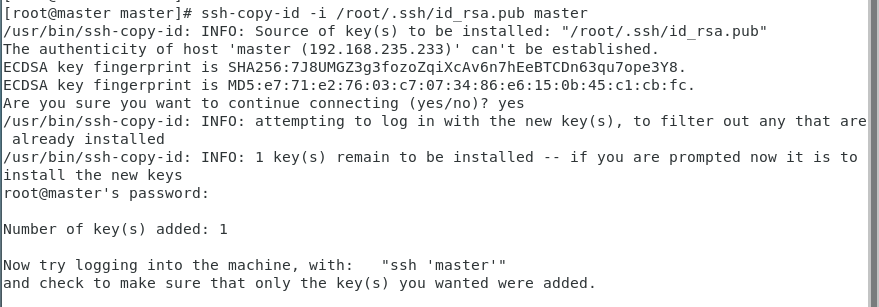
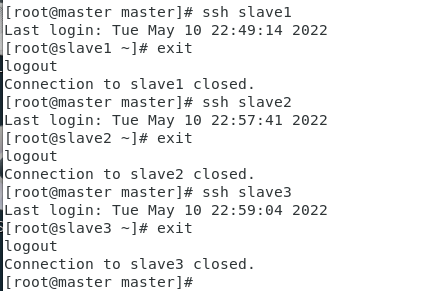
(3)验证SSH是否能够无密钥登录
在master下分别输入ssh slave1、ssh slave2、ssh slave3,exit 退出
14.时间同步
(1)在每个节点输入以下代码安装NTP
yum install -y ntp
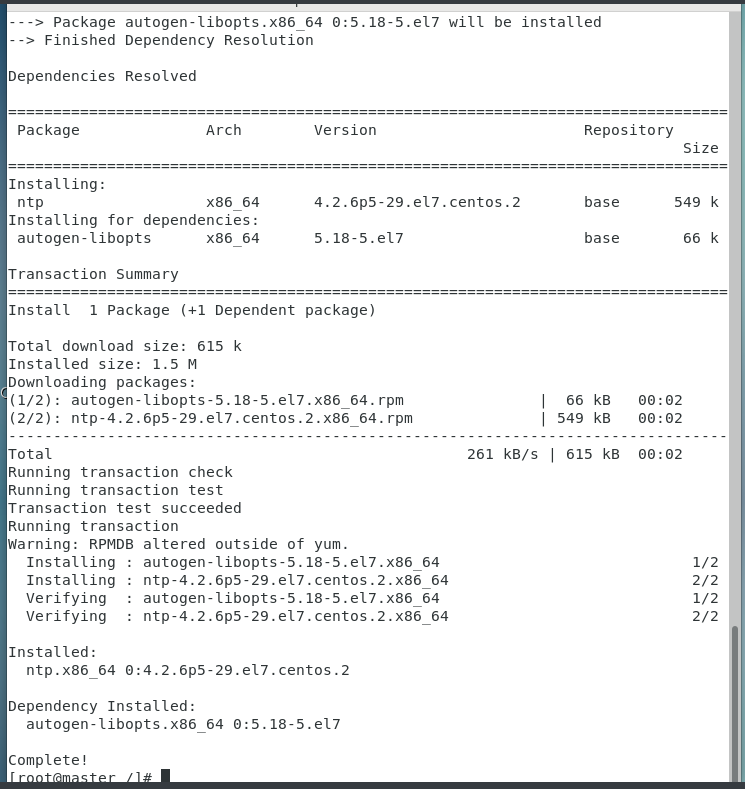
安装成功
(2)设置master节点为NTP服务主节点,那么配置如下
使用如下命令来打开/etc/ntp.conf文件,注释掉server开头的就行,并添以下内容。
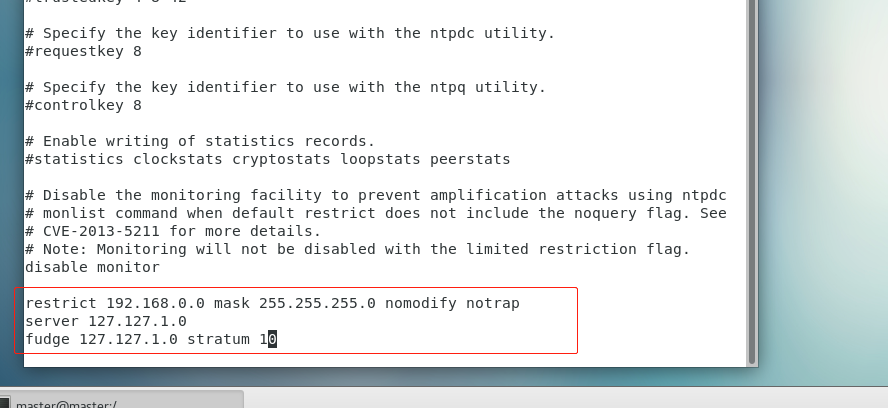
vim /etc/ntp.confrestrict 192.168.0.0 mask 255.255.255.0 nomodify notrap
server 127.127.1.0
fudge 127.127.1.0 stratum 10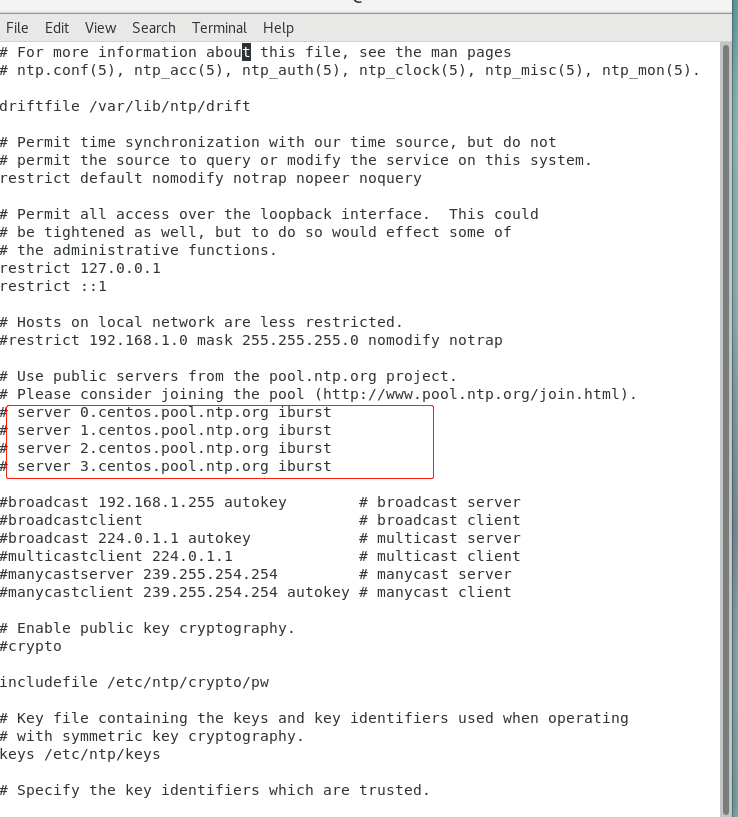
(3)分别在slave1 slave2 slave3 中配置NTP,同样修改/etc/ntp.conf文件,注释掉server开头的,并添加以下内容
server master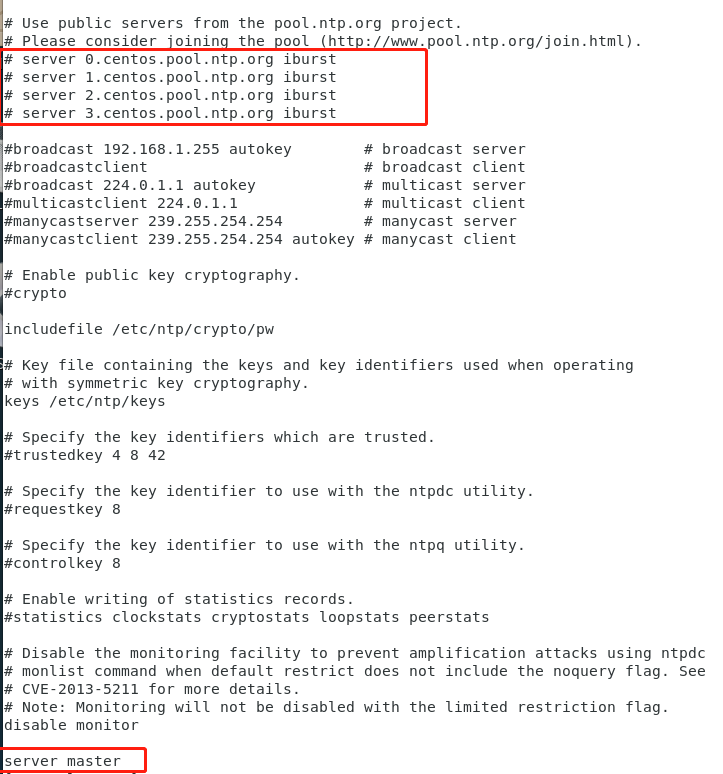
(4)执行命令,永久性关闭防火墙,主从节点都要关闭
6版本:
service iptables stop & chkconfig iptables off7版本:
查看防火墙状态
systemctl status firewalld.service绿的running表示防火墙开启
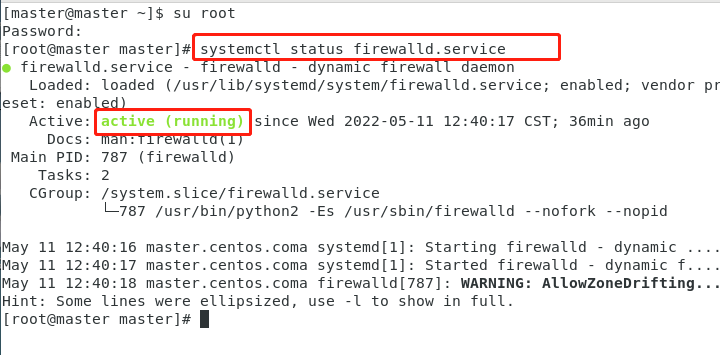
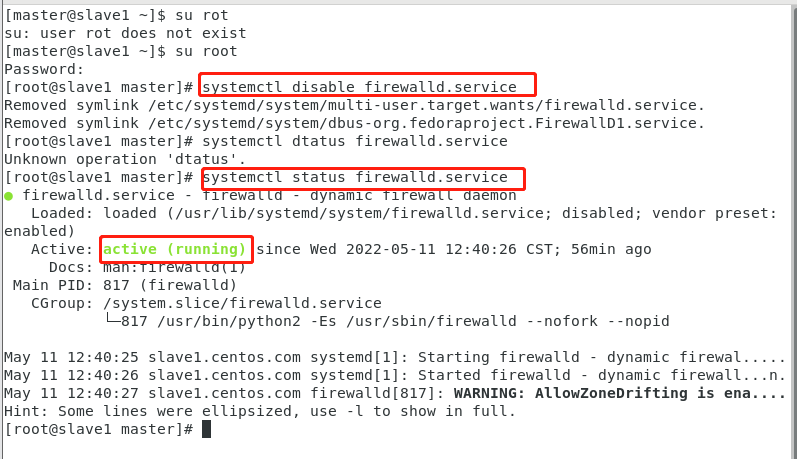
执行开机禁用防火墙自启命令 :
systemctl disable firewalld.service 执行后当前状态下还是启动的,需要重启才永久关闭。
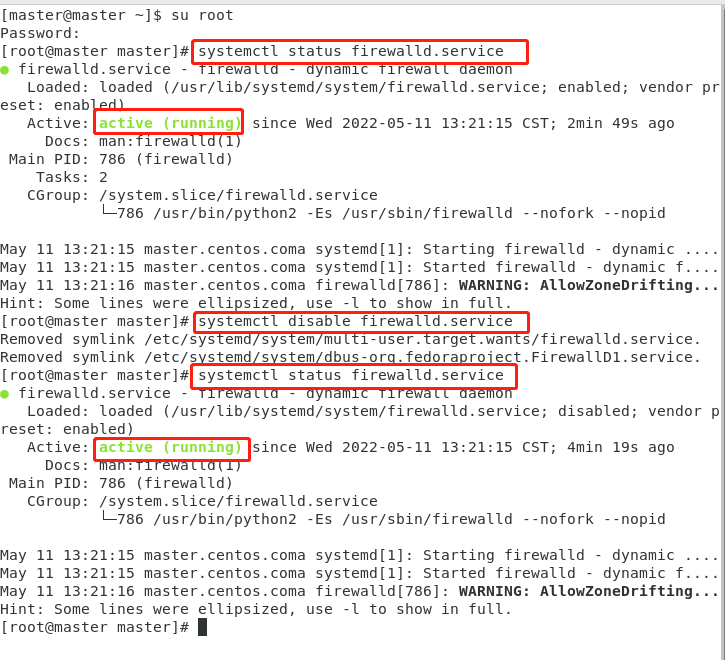
重启后查看
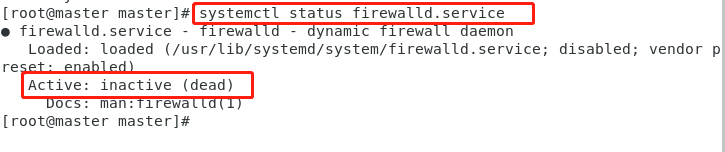
注意:主从节点都要关闭
slave1
关机后重启查看slave1:

重复上面步骤把slave2、slave3的防火墙也永久关闭
关于防火墙的其他命令:
执行关闭命令: systemctl stop firewalld.service (开机启动)
再次执行查看防火墙命令:systemctl status firewalld.service
执行开机禁用防火墙自启命令 : systemctl disable firewalld.service (开机不启动)
启动:systemctl start firewalld.service
防火墙随系统开启启动 : systemctl enable firewalld.service
(5)启动ntp服务
①.在master结点执行命令
service ntpd start & chkconfig ntpd on
查看是否启动成功
systemctl status ntpd
重启后查看
systemctl status ntpd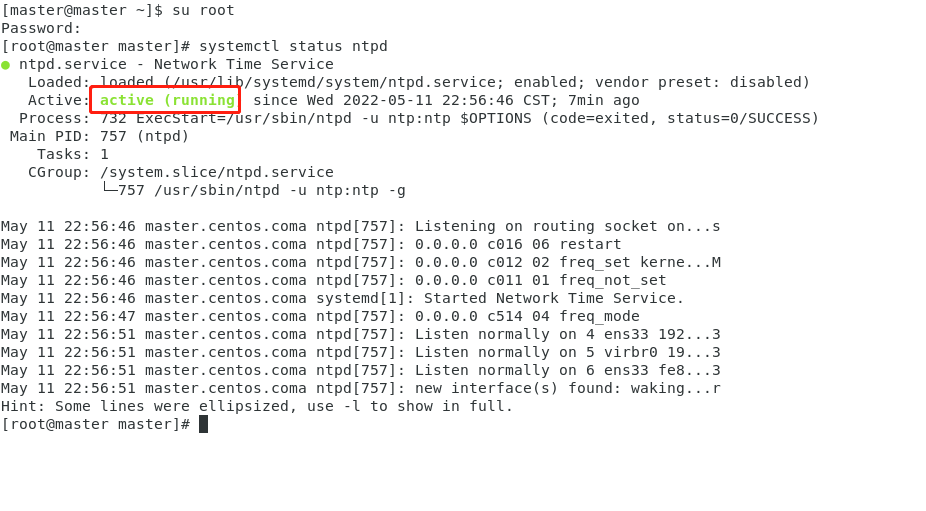
②.在slave1、slave2、slave3上分别执行下面代码,即可同步时间
ntpdate masterslave1:

slave2:

slave3:

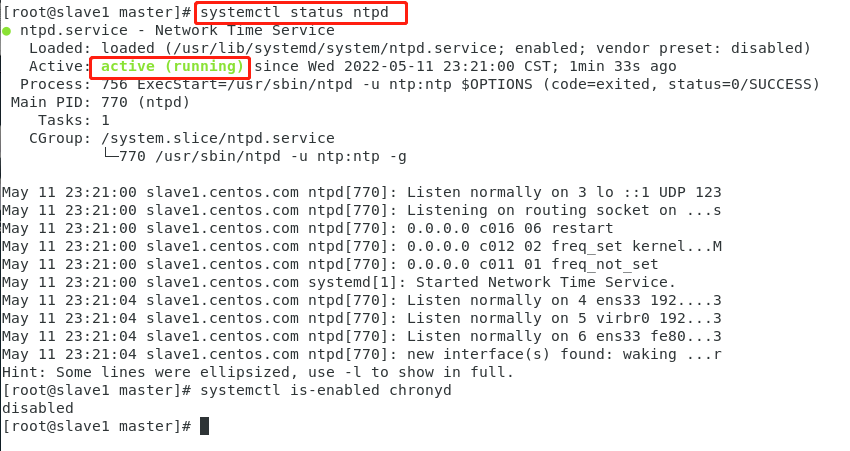
③.在slave1、slave2、slave3上分别执行下面命令,即可永久启动NTP服务。
service ntpd start & chkconfig ntpd on
重启后查看
15.启动关闭集群
做完Hadoop的所有配置后,即可执行格式化NameNode操作,该操作会在NameNode所在机器初始化一些HDFS的相关配置,并且该操作在集群搭建过程中只需执行一次,执行格式化之前可以先配置环境变量。
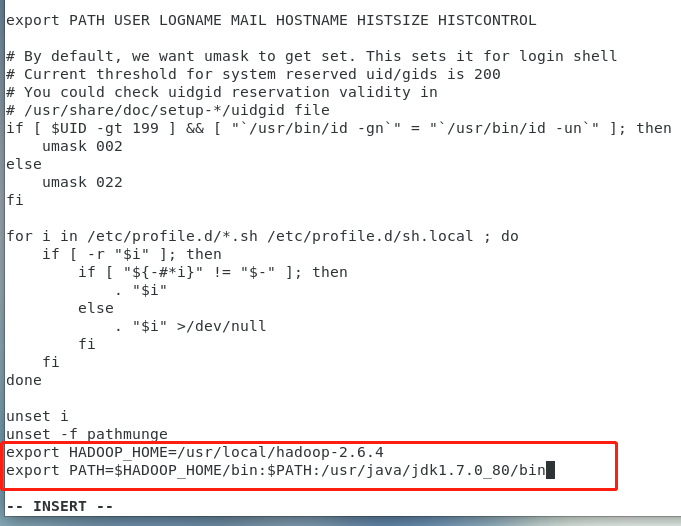
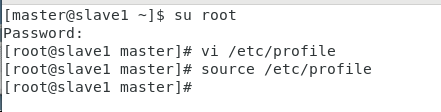
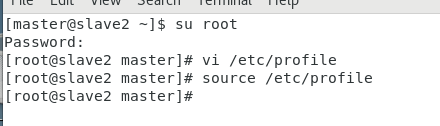
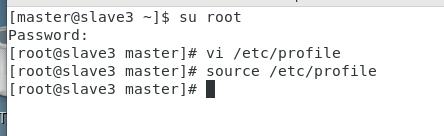
(1)配置环境变量,在master、slave1、slave2、slave3上修改 文件,添加以下内容,保存退出后执行source /etc/profile来使配置生效
export HADOOP_HOME=/usr/local/hadoop-2.6.4
export PATH=$HADOOP_HOME/bin:$PATH:/usr/java/jdk1.7.0_80/binmaster:

slave1:
slave2:
slave3:
格式化只需执行命令 hdfs namenode -format ,若出现 Storage directory /data/hadoop/hdfs/name has been successfully formatted 提示,则格式化成功。
hdfs namenode -format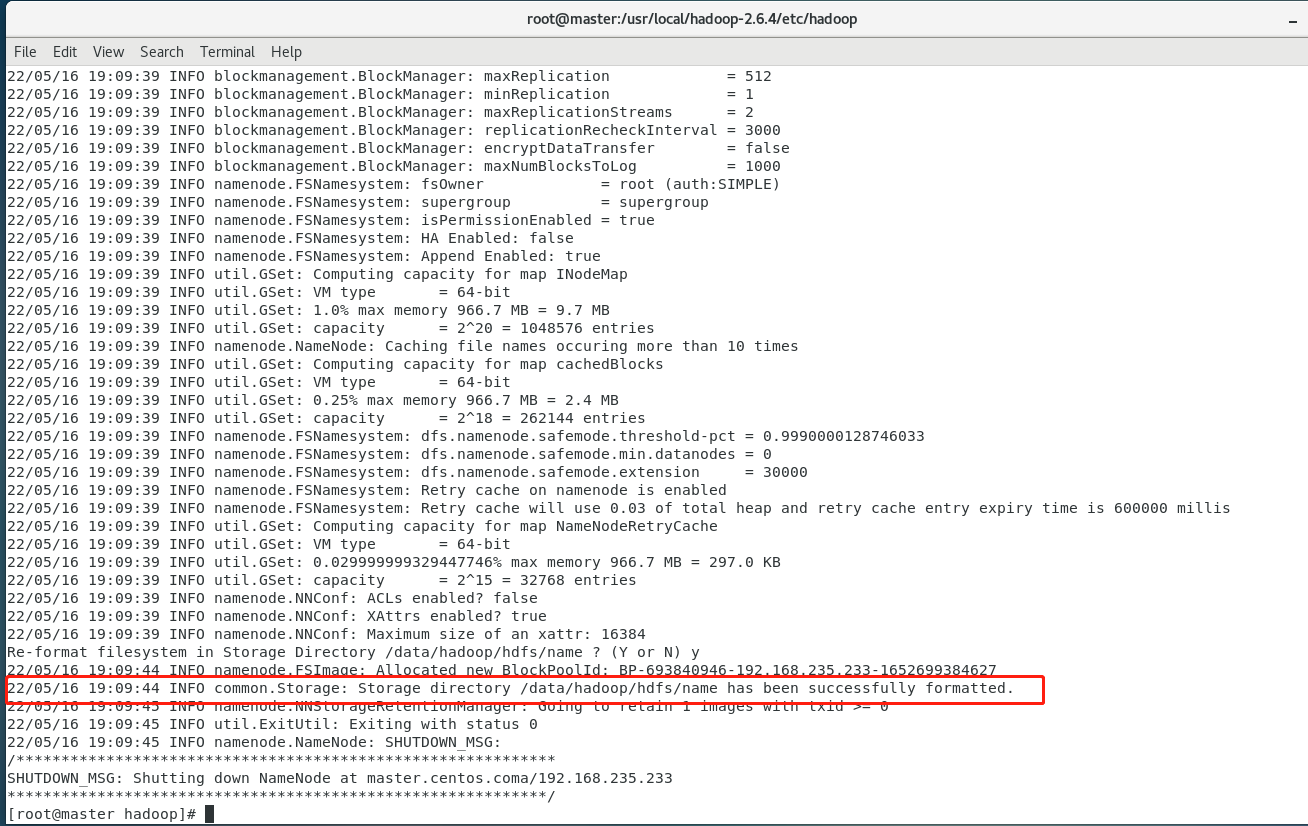
格式化完成之后即可启动集群,启动集群只需要在master节点直接进入Hadoop安装目录,分别执行以下命令即可。
(2)启动命令集群
进入Hadoop安装目录
cd $HADOOP_HOME
启动HDFS相关服务
sbin/start-dfs.sh
启动YARN相关服务
sbin/start-yarn.sh
启动日志相关服务
sbin/mr-jobhistory-daemon.sh start historyserver
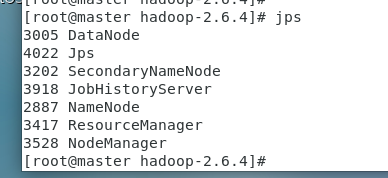
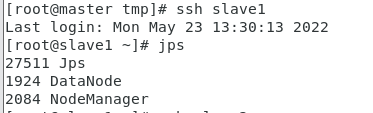
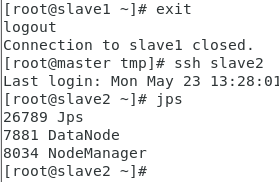
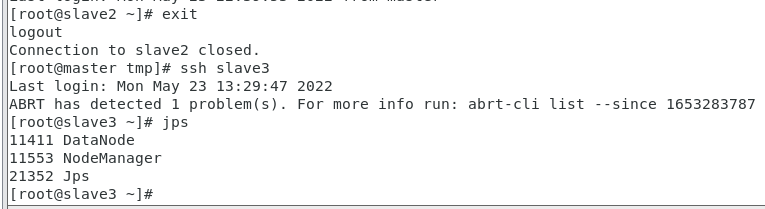
集群启动之后,在主节点master,子节点slave1、slave2、slave3分别执行 jps 命令,出现以下信息,表示集群启动成功。
slave1
slave2
slave3
(3)关闭集群命令
同理,关闭集群只需要在master节点直接进入Hadoop安装目录,分别执行下面命令即可。
进入Hadoop安装目录
cd $HADOOP_HOME
关闭YARN相关服务
sbin/stop-yarn.sh
关闭HDFS相关服务
sbin/stop-dfs.sh
关闭日志相关服务
sbin/mr-jobhistory-deamon.sh stop historyserver
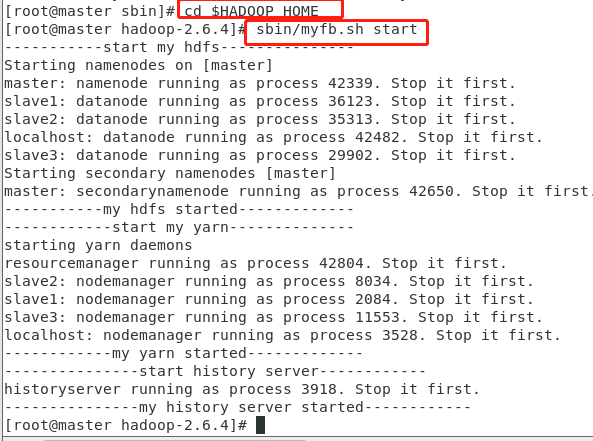
(4)创建一键启动程序
(hadoop自带的一键启动关闭)

在/usr/local/hadoop-2.6.4/sbin 目录下创建一个脚本
vi myfb.sh里面填写
#!/bin/bash
case $1 in
"start"){
echo "-----------start my hdfs---------------"
$HADOOP_HOME/sbin/start-dfs.sh
echo "-----------my hdfs started-------------"
echo "------------start my yarn--------------"
$HADOOP_HOME/sbin/start-yarn.sh
echo "------------my yarn started-------------"
echo "---------------start history server------------"
$HADOOP_HOME/sbin/mr-jobhistory-daemon.sh start historyserver
echo "---------------my history server started------------"
};;
"stop"){
echo "--------------stop my dfs-----------------"
$HADOOP_HOME/sbin/stop-dfs.sh
echo "--------------my dfs stopped-----------------"
echo "-------------stop yarn---------------"
$HADOOP_HOME/sbin/stop-yarn.sh
echo "-------------my yarn stopped---------------"
echo "-------------------stop history server------------- "
$HADOOP_HOME/sbin/mr-jobhistory-daemon.sh stop historyserver
echo "-------------------my history server stopped------------- "
};;
esac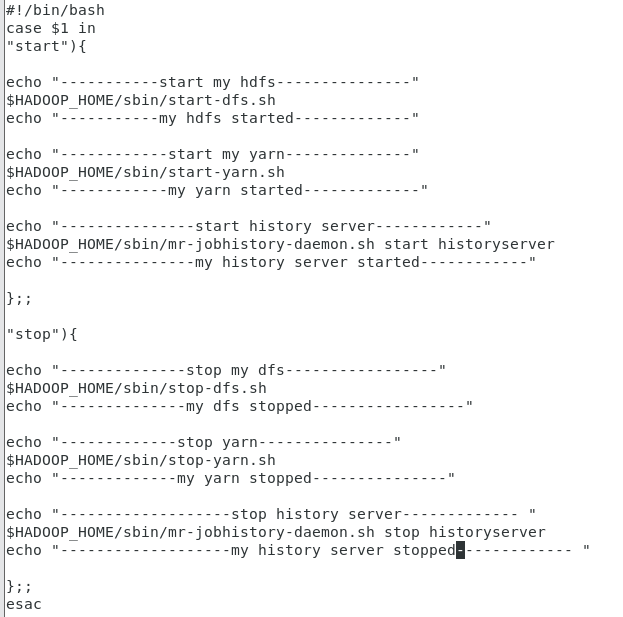

给权限(给到权限后会变颜色)

一键启动集群
一键关闭集群

16.监控集群
服务 Web接口 默认端口 NameNode http://namenode_host:port/ 50070 ResourceManager http://resourcemanager_host:port/ 8088 MapReduce JobHistory Server http://jobhistoryserver_host:port/ 19888
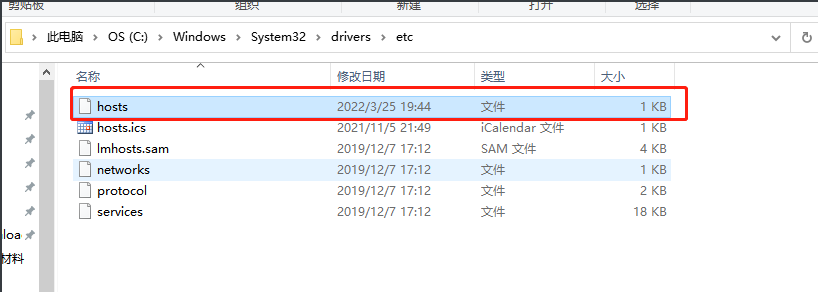
为了能够顺利在浏览器打开Hadoop集群相关服务的监控界面,需要朽败本地hosts文件。hosts是一个没有扩展名的系统文件,其作用就是将一些常用的网址域名与其对应的IP地址建立一个关联“数据库”,当用户在浏览器中输入一个网址时,系统会首先自动从hosts文件中寻找对应的IP地址。一旦找到,系统会立即打开对应网页。添加下面内容。
192.168.235.233 master master.centos.com
192.168.235.234 slave1 slave1.centos.com
192.168.235.235 slave2 slave2.centos.com
192.168.235.236 slave3 slave3.centos.com
(1)HDFS监控
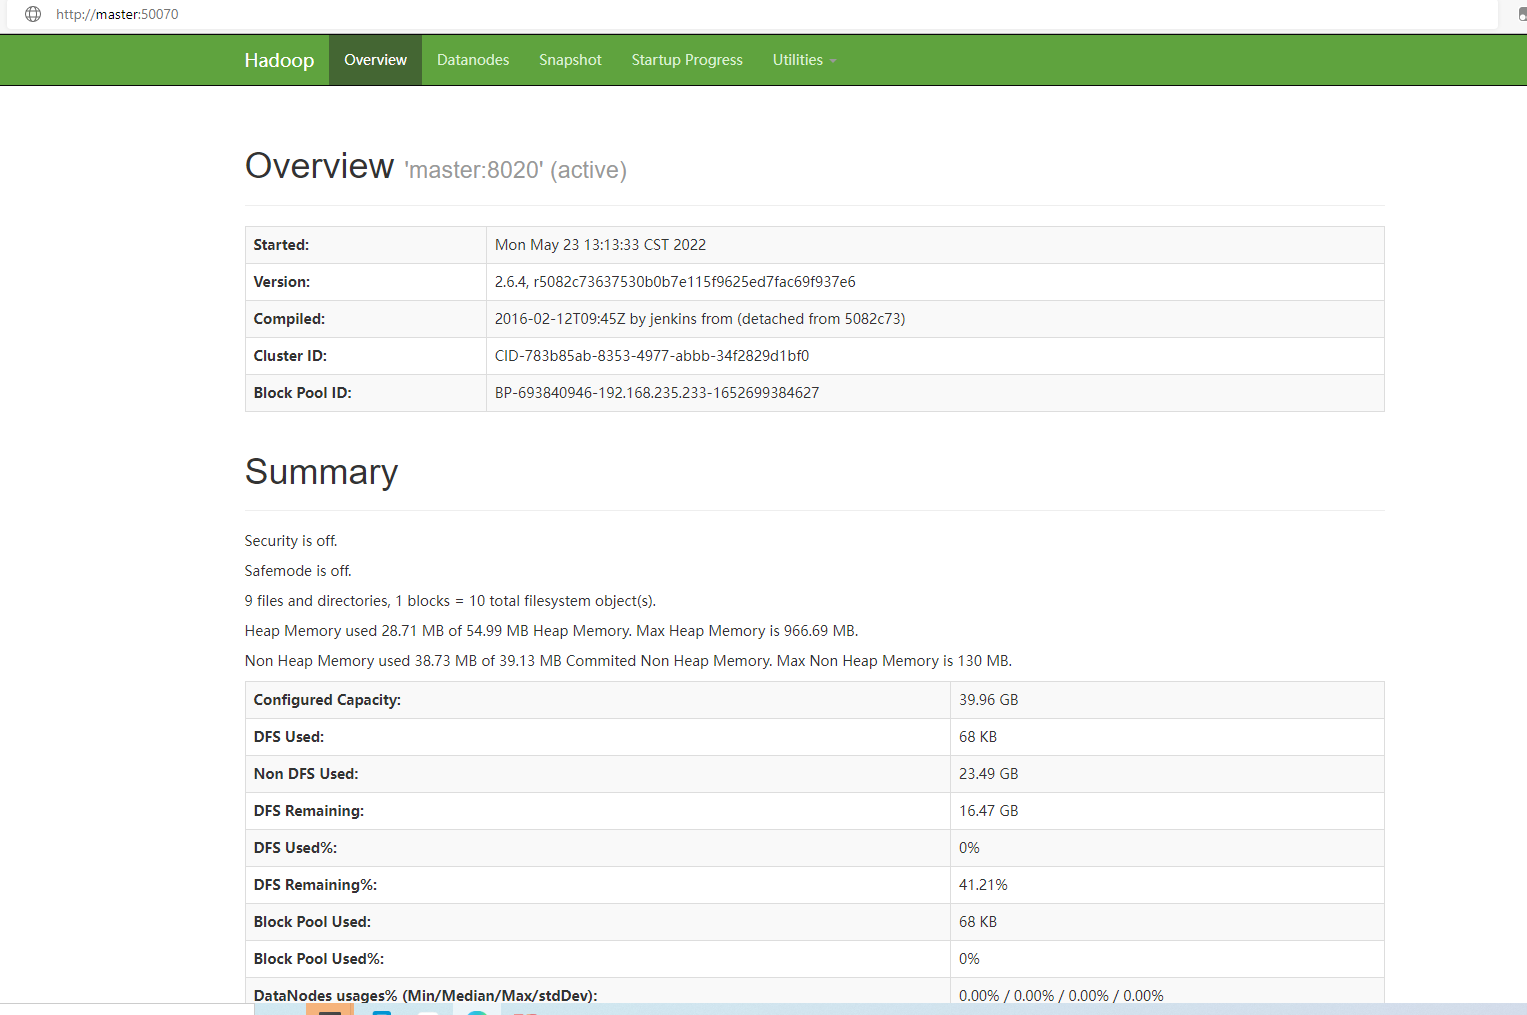
在浏览器的地址栏输入“http://master:50070”,按回车键即可看到HDFS的监控界面(需要先启动集群)
http://master:50070
#或者192.168.235.233:50070
①Overview记录了NameNode的启动时间、版本号、编译版本等一些信息。
②Summary是集群信息,提供了当前集群环境的一些有用信息,从图中可知所有DataNode节点的基本存储信息,例如硬盘大小以及有多少被HDFS使用等一些数据信息,同时还标注了当前集群环境中DataNode的信息,对活动状态的DataNode也专门做了记录。
③NameNode Storage提供了NameNode的信息,最后的State标示此节点为活动节点,可正常提供服务。
http://master:50070 HDFS监控1
如上图所示,选择Utilities >> Browse the file system 菜单命令可以查看HDFS上的文件信息

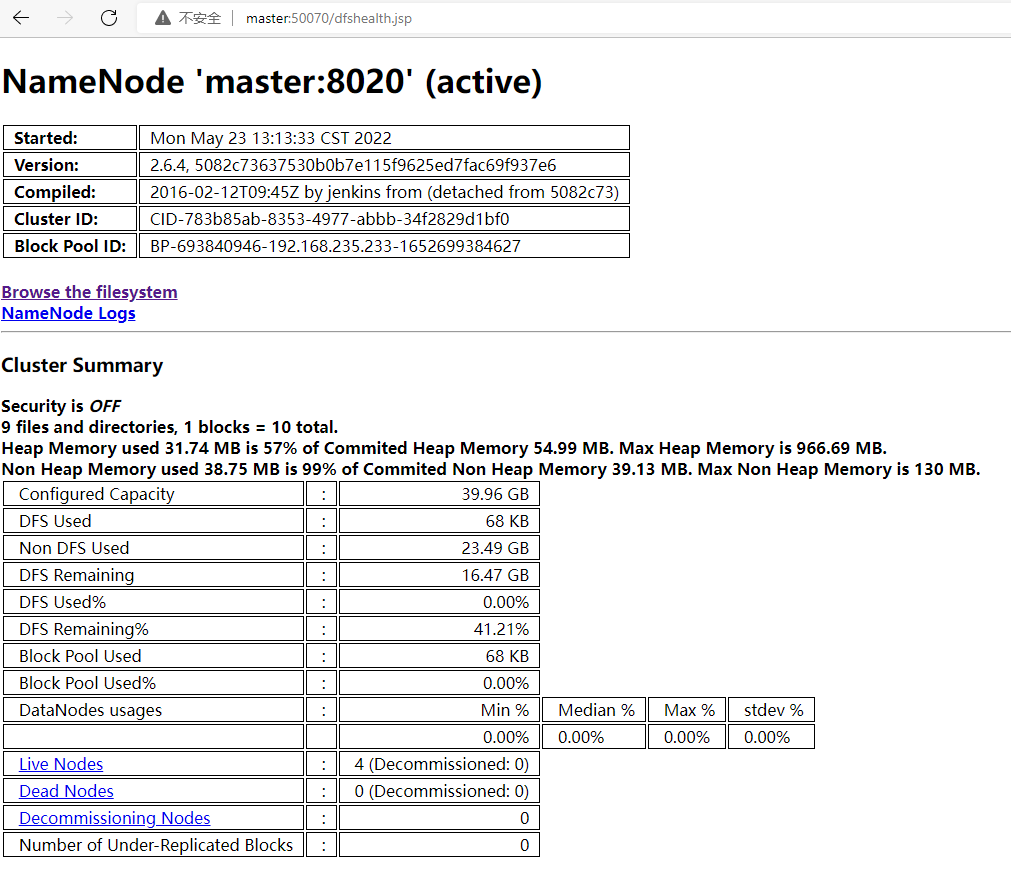
在浏览器中访问“http://master:50070/dfshealth.jsp”得到下图所示的页面,
http://master:50070/dfshealth.jsp
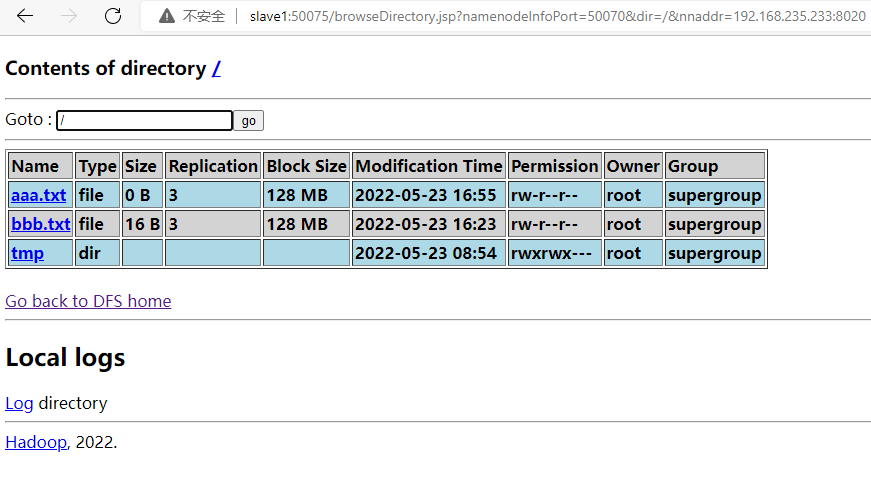
单击“Browse the filesystem”超链接可以打开文件存储目录,如下图所示。
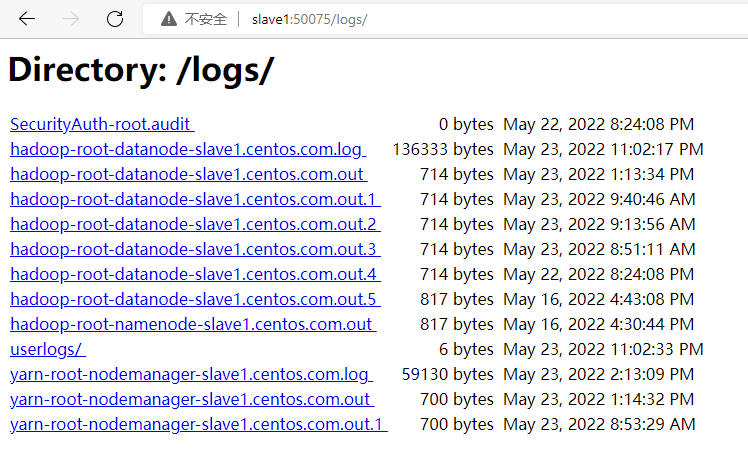
“NameNode Logs”为用户提供NameNode节点的log信息,如下图所示。
(2)YARN监控
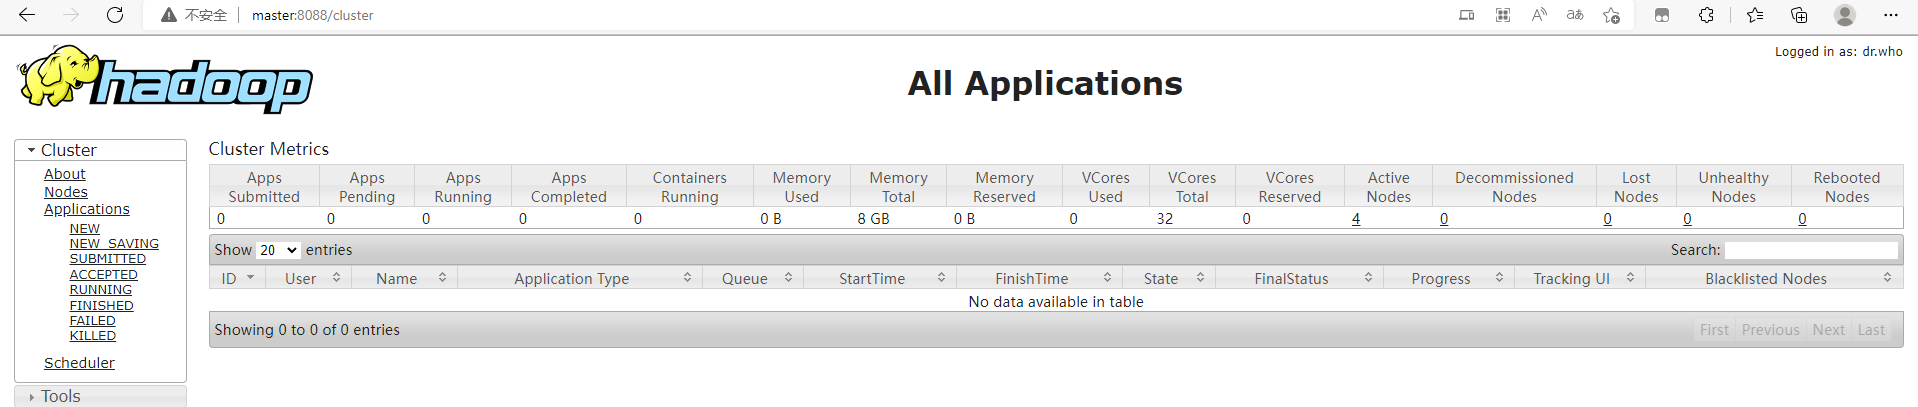
在浏览器的地址栏输入“http://master:8088”,即可看到YARN的监控界面,如下图所示。
http://master:8088
(3)日志监控
在浏览器的地址栏输入“http://master:19888”,即可看到日志的监控界面,如下图所示。
http://master:19888

17HDFS文件处理
可以通过Hadoop dfs –help命令来查看HDFS Shell命令的说明。大部分的HDFS Shell和Linux的shell相似。
一般的shell命令格式为:
bin/hadoop commandgenericOptions
command 是命令
genericOptions 是一般的参数
commandOptions 是命令参数
在hadoop dfs –ls /input 这条命令中,command是dfs,genericOptions对应-ls等参数,commandOptions对应于/input 这个路径参数。
更多相关命令如下:
1.-appendToFile
(1)将本地文件附加到集群 本地文件一一定要存在 集群上可以没有 集群帮用户创建,在/usr/local/hadoop-2.6.4/etc/hadoop路径下编辑一个文件vi bbb.txt 并写下面内容“this is bbb.txt”,然后使用下面命令上传到集群(前提是已启动了集群)。
hdfs dfs -appendToFile /bbb.txt /bbb.txt
(2)将多个本地文件附加到集群文件

最后一个路径 是集群文件的路径 其他前面的都是本地文件
查看结果

2.-cat
查看刚刚上传到集群的文件
hdfs dfs -cat /bbb.txt
4.-Chmod
修改权限

4.-copyFromLocal
从本地复制一份到集群上

5.-copyFromLocal
从集群复制到本地

6.-get
从集群上获得到本地

7.-cp
复制

8.-count
查看文件数量

9.-df
查看使用空间

10.-du
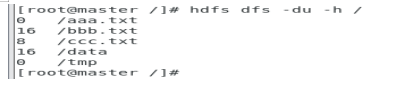
查看文件长度(显示hdfs对应路径下每个文件夹和文件的大小)
11.-moveFromLocal
从本地移动到集群
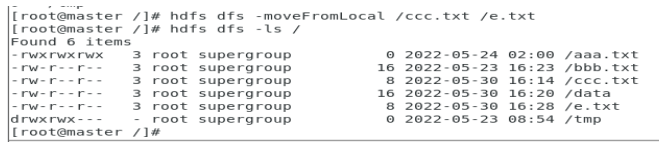
12.-rm /-rmdir(删除空文件夹)
删除集群上的文件

13.- tail
显示文件最后1k内容

14.-test -d/-e
查看文件或者目录的反馈(这里能正常执行,说明命令是正确的)

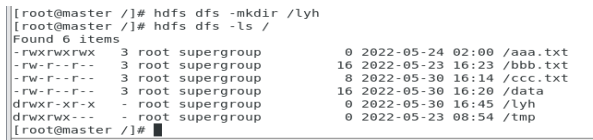
15.-mkdir
创建文件夹
16.-mv
移动文件

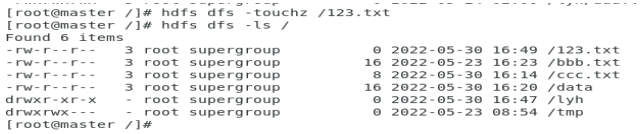
17.touchz
创建文件
18.-text
将文本文件或某些格式的非文本文件通过文本格式输出

19.-stat
返回对应路径的状态信息
%b(文件大小),%o(Block大小),%n(文件名),%r(副本个数),%y(最后一次修改日期和时间)

20.-put
将本地文件放到hdfs某个目录

21.-getmerge
把两个文件的内容合并起来(注:合并后的文件位于当前目录,不在hdfs中,是本地文件)

22.-grep
从hdfs上过滤包含某个字符的行内容

六、Hadoop实现MapReduce执行wordcount与使用Eclipse创建MapReduce工程执行wordcount
1.Hadoop实现MapReduce执行wordcount
(1)VMware里面启动集群,在根目录下面创建一个文本,里面填写一些文本

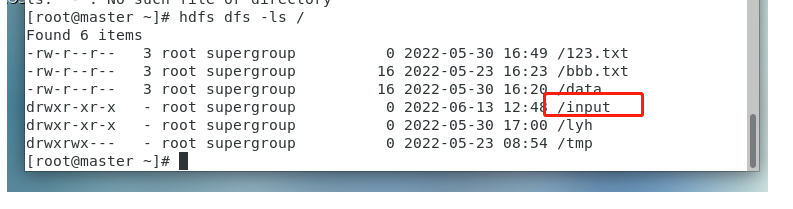
(2)在集群里面创建一个input文件夹
(3)然后把本地的a.txt文本上传到集群上的input文件夹里面
hdfs dfs -put /a.txt /input/a.txt(4)输入命令进行词频统计
hadoop jar $HADOOP_HOME/share/hadoop/mapreduce/hadoop-mapreduce-examples-2.6.4.jar wordcount /input /output
(5)然后就会在集群里面产生一个output文件,里面有两个文本

(6)执行命令查看词频统计结果
hdfs dfs -cat /output/part-r-00000注意:误删了output里面的文本的话的不能恢复的,可以删掉原来的output文件,重新创建一个,重新进行词频统计即可。
(7)如果想要做另一个文本的词频统计,需要把后面的output改个名字,就是从新统计的意思
hadoop jar $HADOOP_HOME/share/hadoop/mapreduce/hadoop-mapreduce-examples-2.6.4.jar wordcount /input /output1
2.使用Eclipse创建MapReduce工程执行wordcount
(1)添加Hadoop插件

找到eclipse的安装路径,然后将插件移动到这个路径下

(2)增加Map/Reduce功能区
打开eclipse进行以下操作
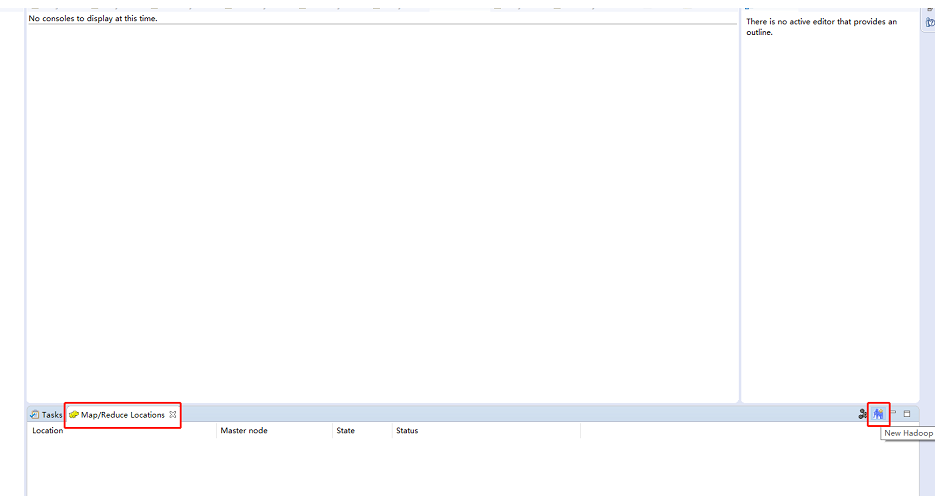
(3)增加Hadoop集群的连接
单击下图所示界面右下方的蓝色小象图标(其右上方右+号),就会弹出连接Hadoop集群的配置窗口。
在VMware的Hadoop集群里输入以下代码,查看hdfs端口号(先启动集群)
hdfs getconf -confKey fs.default.name
配置namenode节点的ip(自己的虚拟机IP)地址及端口。
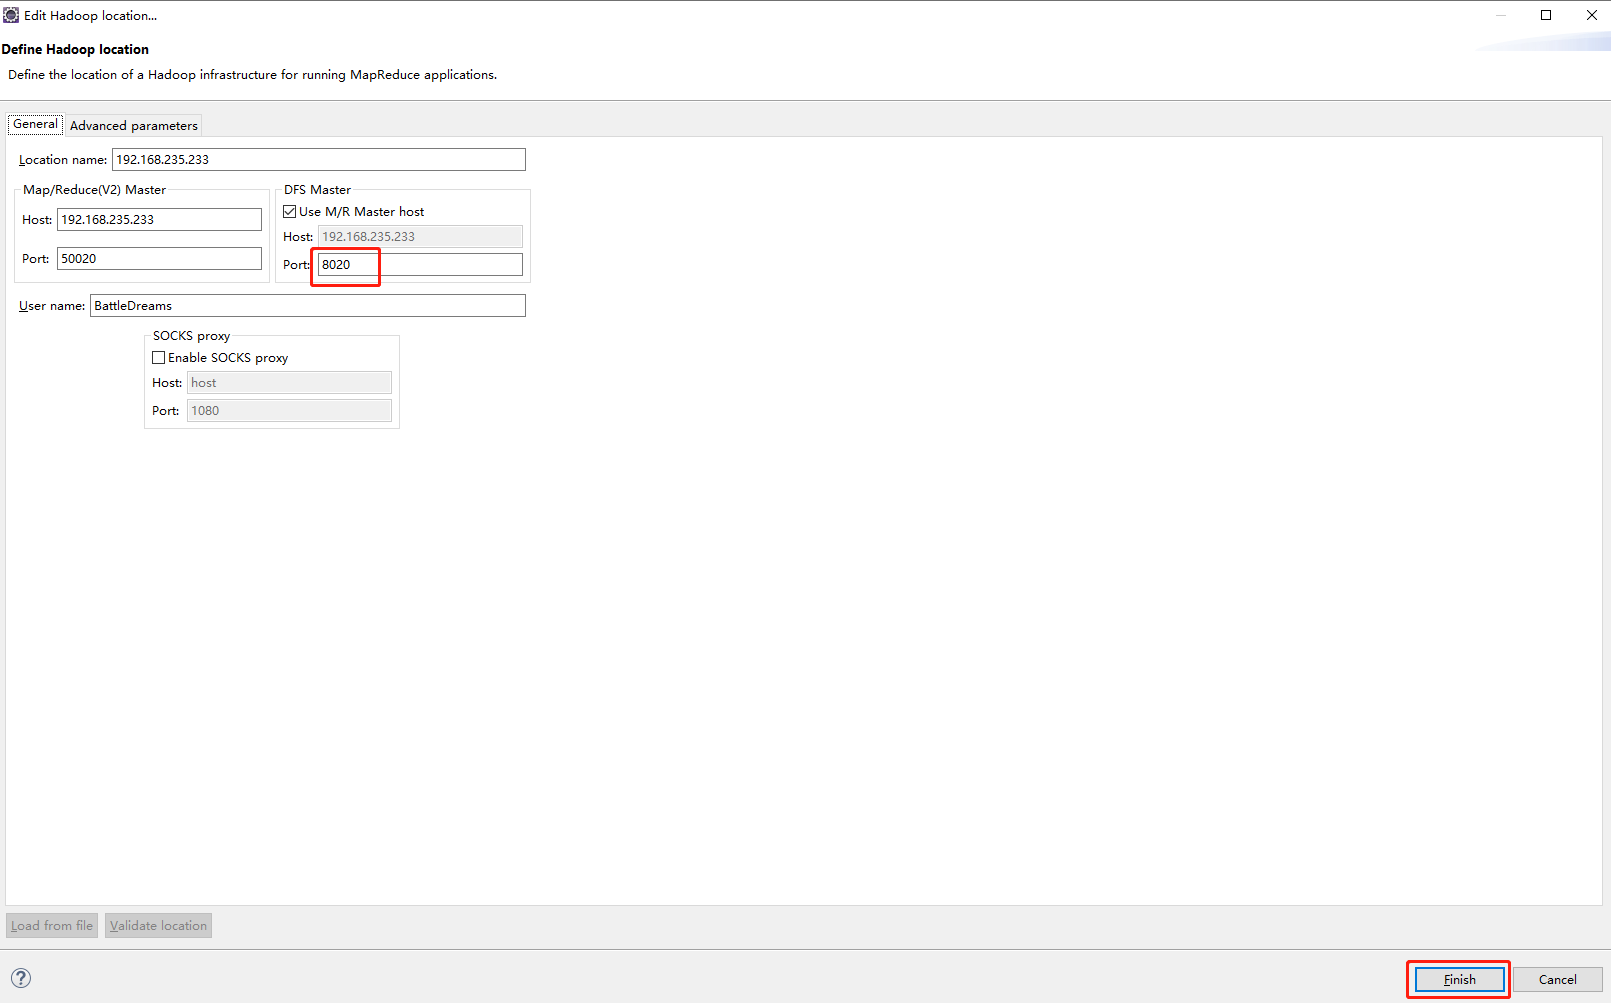
相关的Hadoop集群的连接信息有以下各项。
Location name:命名新建的Hadoop连接名称,如Hadoop Cluster。
Map/Reduce Master:填写Hadoop集群的ResourceManager的IP和端口。
DFS Master:填写Hadoop集群的NameNode的IP地址和连接端口。
填写完以上信息后,单击“Finish”按钮。
(4)浏览HDFS上的目录及文件
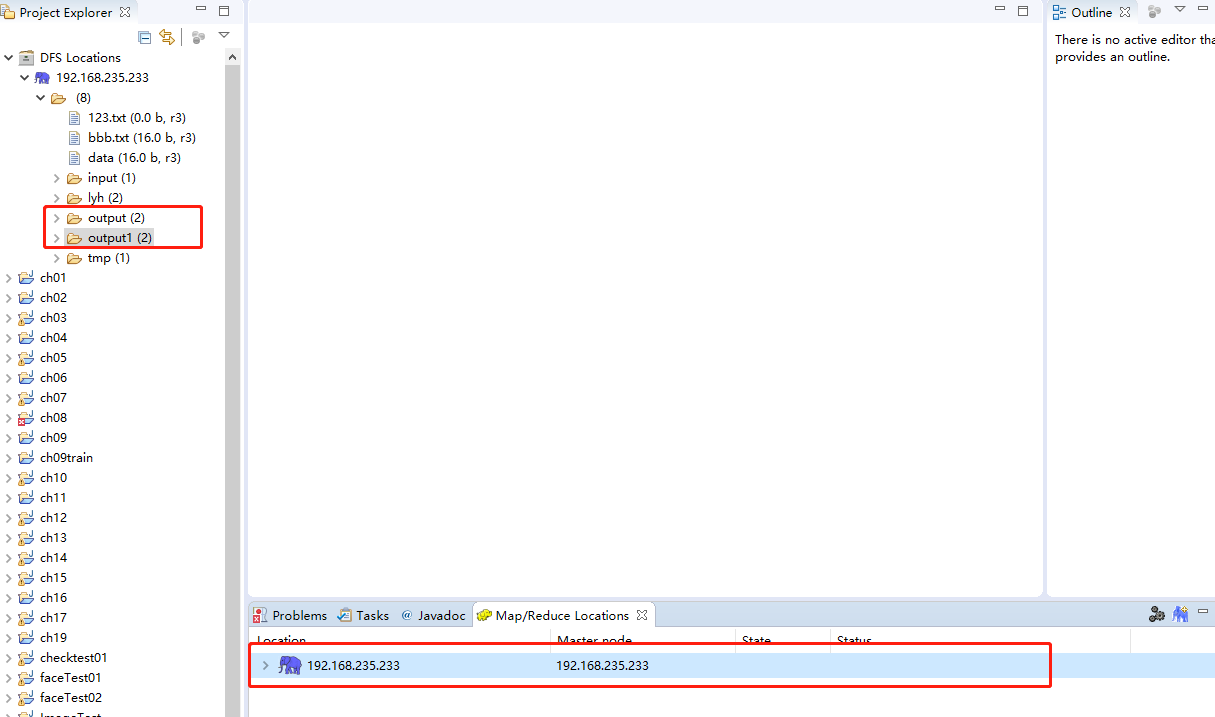
在配置完Hadoop集群连接后,确认Hadoop集群已经启动,就可以在Eclipse界面浏览HDFS上的目录及文件,如下图所示。还可以通过鼠标来执行文件操作,例如文件的上传和删除等。需要注意的事,每次执行操作后,需要刷新HDFS列表,从而获得文件目录的最新状态。
3.新建MapReduce工程
(1)导入MapReduce运行依赖的相关JAR包
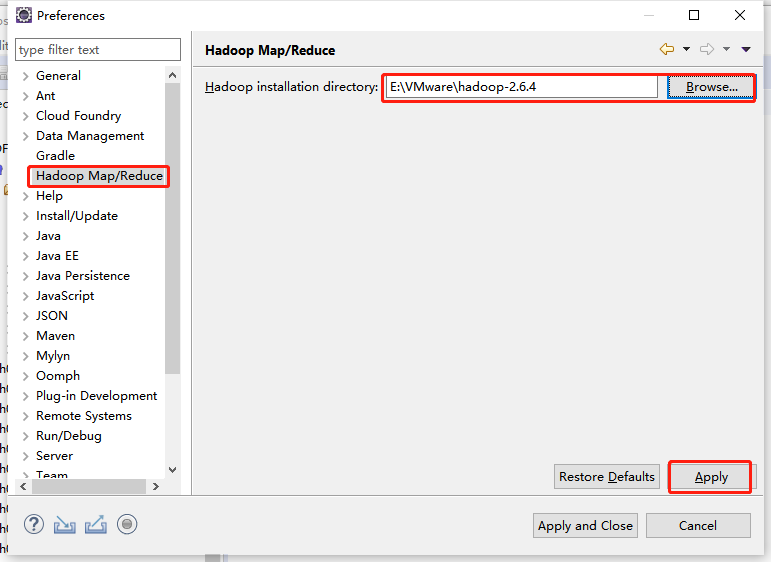
在主菜单上单击“Window”并选择“Preferences”,例如下图所示Preference界面中,选择“Hadoop Map/Reduce”,单击“Browse...”按钮,再选中Hadoop的安装文件夹路径(相应版本的Hadoop安装包需要预先解压再本地电脑上)。最后单击“Apply”按钮并单击确定。
(2)创建MapReduce工程
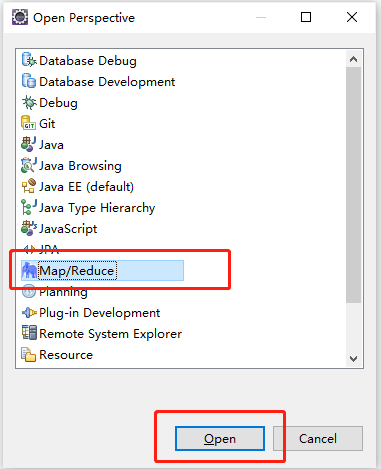
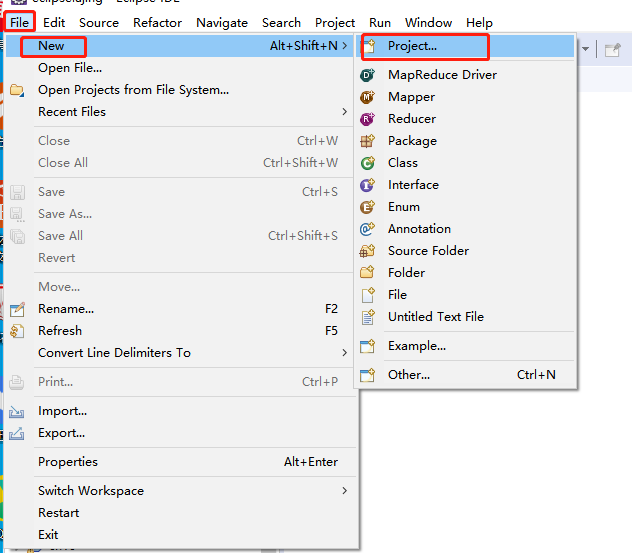
从菜单栏开始,单击“File”菜单,选择“New”命令,在出现的选项中单击“Project”项,再选择“Map/Reduce Project”选项。

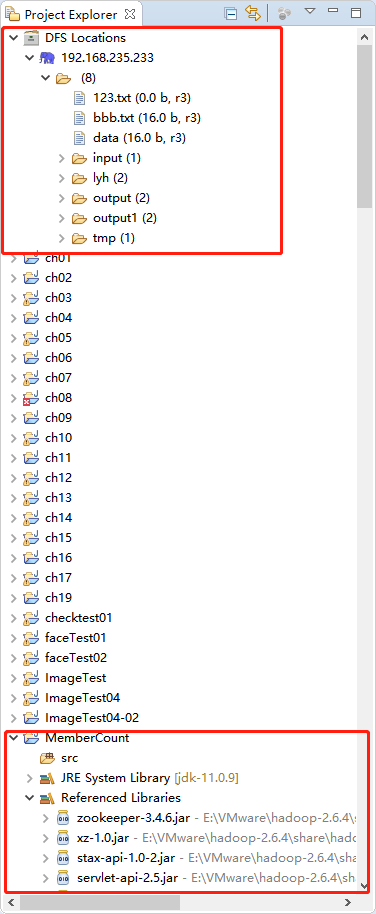
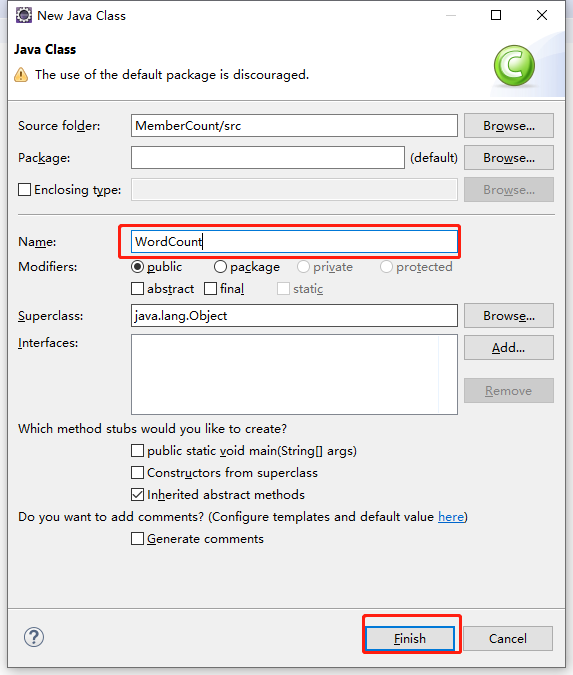
在"MapReduce Project"的创建界面中,填写工程名“MemberCount”,然后单击“Finish”按钮。

在主界面左侧的“Project Explorer”栏,可以看到已经创建好的工程MemberCount,Map Reduce编程所需要的JAR包已经全部自动导入。新工程已创建完成,接下来就可以正式进行MapReduce编程工作了。
创建完成MapReduce工程
4.编写wordcount的代码 ,描述他是怎么工作的。并且上传到集群完成一次完整的Wordcount
(1)创建一个class文件并命名为WordCount
(2)内容代码与解析如下
①应用程序Driver分析
这里的Driver程序主要指的是main函数,在main函数里面进行MapReduce程序的一些初始化设置,并提交任务,等待程序运行完成。总结为MapReduce任务初始化的通用代码。
  public static void main(String[] args) throws Exception {
    Configuration conf = new Configuration();
    String[] otherArgs = new GenericOptionsParser(conf, args).getRemainingArgs();
    if (otherArgs.length < 2) {
      System.err.println("Usage: wordcount <in> [<in>...] <out>");
      System.exit(2);
    }
    Job job = new Job(conf, "word count");
    job.setJarByClass(WordCount.class);
    job.setMapperClass(TokenizerMapper.class);
    job.setCombinerClass(IntSumReducer.class);
    job.setReducerClass(IntSumReducer.class);
    job.setOutputKeyClass(Text.class);
    job.setOutputValueClass(IntWritable.class);
    for (int i = 0; i < otherArgs.length - 1; ++i) {
      FileInputFormat.addInputPath(job, new Path(otherArgs[i]));
    }
    FileOutputFormat.setOutputPath(job,
      new Path(otherArgs[otherArgs.length - 1]));
    System.exit(job.waitForCompletion(true) ? 0 : 1);
  }
②Mapper模式分析
在MapReduce程序中,最重要的代码实现就是Mapper模块中的map函数以及Reducer模块中的reduce函数。这里先看Mapper,也就是源码中的TokenizerMapper
  public static class TokenizerMapper
       extends Mapper<Object, Text, Text, IntWritable>{

    private final static IntWritable one = new IntWritable(1);
    private Text word = new Text();

    public void map(Object key, Text value, Context context
                    ) throws IOException, InterruptedException {
      StringTokenizer itr = new StringTokenizer(value.toString());
      while (itr.hasMoreTokens()) {
        word.set(itr.nextToken());
        context.write(word, one);
      }
    }
  }
③Reducer模式分析
继续分析Reduce,即源码中的IntSumReducer
public static class IntSumReducer
       extends Reducer<Text,IntWritable,Text,IntWritable> {
    private IntWritable result = new IntWritable();

    public void reduce(Text key, Iterable<IntWritable> values,
                       Context context
                       ) throws IOException, InterruptedException {
      int sum = 0;
      for (IntWritable val : values) {
        sum += val.get();
      }
      result.set(sum);
      context.write(key, result);
    }
  }
这是wordcount的完整代码
/**
 * Licensed to the Apache Software Foundation (ASF) under one
 * or more contributor license agreements.  See the NOTICE file
 * distributed with this work for additional information
 * regarding copyright ownership.  The ASF licenses this file
 * to you under the Apache License, Version 2.0 (the
 * "License"); you may not use this file except in compliance
 * with the License.  You may obtain a copy of the License at
 *
 *     http://www.apache.org/licenses/LICENSE-2.0
 *
 * Unless required by applicable law or agreed to in writing, software
 * distributed under the License is distributed on an "AS IS" BASIS,
 * WITHOUT WARRANTIES OR CONDITIONS OF ANY KIND, either express or implied.
 * See the License for the specific language governing permissions and
 * limitations under the License.
 */

import java.io.IOException;
import java.util.StringTokenizer;
import org.apache.hadoop.conf.Configuration;
import org.apache.hadoop.fs.Path;
import org.apache.hadoop.io.IntWritable;
import org.apache.hadoop.io.Text;
import org.apache.hadoop.mapreduce.Job;
import org.apache.hadoop.mapreduce.Mapper;
import org.apache.hadoop.mapreduce.Reducer;
import org.apache.hadoop.mapreduce.lib.input.FileInputFormat;
import org.apache.hadoop.mapreduce.lib.output.FileOutputFormat;
import org.apache.hadoop.util.GenericOptionsParser;

public class WordCount {

  public static class TokenizerMapper
       extends Mapper<Object, Text, Text, IntWritable>{

    private final static IntWritable one = new IntWritable(1);
    private Text word = new Text();

    public void map(Object key, Text value, Context context
                    ) throws IOException, InterruptedException {
      StringTokenizer itr = new StringTokenizer(value.toString());
      while (itr.hasMoreTokens()) {
        word.set(itr.nextToken());
        context.write(word, one);
      }
    }
  }

  public static class IntSumReducer
       extends Reducer<Text,IntWritable,Text,IntWritable> {
    private IntWritable result = new IntWritable();

    public void reduce(Text key, Iterable<IntWritable> values,
                       Context context
                       ) throws IOException, InterruptedException {
      int sum = 0;
      for (IntWritable val : values) {
        sum += val.get();
      }
      result.set(sum);
      context.write(key, result);
    }
  }

  public static void main(String[] args) throws Exception {
    Configuration conf = new Configuration();
    String[] otherArgs = new GenericOptionsParser(conf, args).getRemainingArgs();
    if (otherArgs.length < 2) {
      System.err.println("Usage: wordcount <in> [<in>...] <out>");
      System.exit(2);
    }
    Job job = new Job(conf, "word count");
    job.setJarByClass(WordCount.class);
    job.setMapperClass(TokenizerMapper.class);
    job.setCombinerClass(IntSumReducer.class);
    job.setReducerClass(IntSumReducer.class);
    job.setOutputKeyClass(Text.class);
    job.setOutputValueClass(IntWritable.class);
    for (int i = 0; i < otherArgs.length - 1; ++i) {
      FileInputFormat.addInputPath(job, new Path(otherArgs[i]));
    }
    FileOutputFormat.setOutputPath(job,
      new Path(otherArgs[otherArgs.length - 1]));
    System.exit(job.waitForCompletion(true) ? 0 : 1);
  }
}
④以下为待会任务需要修改后的完整代码
注意class名称与包名是否一致
import java.io.IOException;
import org.apache.hadoop.conf.Configuration;
import org.apache.hadoop.fs.Path;
import org.apache.hadoop.io.IntWritable;
import org.apache.hadoop.io.Text;
import org.apache.hadoop.mapreduce.Job;
import org.apache.hadoop.mapreduce.Mapper;
import org.apache.hadoop.mapreduce.Reducer;
import org.apache.hadoop.mapreduce.lib.input.FileInputFormat;
import org.apache.hadoop.mapreduce.lib.output.FileOutputFormat;
import org.apache.hadoop.util.GenericOptionsParser;

public class dailyAccessCount {

  public static class MyMapper
       extends Mapper<Object, Text, Text, IntWritable>{

	private final static IntWritable one = new IntWritable(1);

    public void map(Object key, Text value, Context context
                    ) throws IOException, InterruptedException {
    	 String line = value.toString();
         String array[] = line.split(",");  //指定空格为分隔符,组成数组
         String keyOutput = array[1];       //提取数组中的访问日期做为Key
         context.write(new Text(keyOutput), one); //组成键值对
      }
    }

  public static class MyReducer
       extends Reducer<Text,IntWritable,Text,IntWritable> {
    private IntWritable result = new IntWritable();

    public void reduce(Text key, Iterable<IntWritable> values,
                       Context context
                       ) throws IOException, InterruptedException {
      int sum = 0; //定义累加器,初始值为0
      for (IntWritable val : values) {
        sum += val.get(); // 将相同键的所有值进行累加
      }
      result.set(sum);
      context.write(key,result);
    }
  }

  public static void main(String[] args) throws Exception {
    Configuration conf = new Configuration();
    String[] otherArgs = new GenericOptionsParser(conf, args).getRemainingArgs();
    if (otherArgs.length < 2) {
      System.err.println("Usage: wordcount <in> [<in>...] <out>");
      System.exit(2);
    }
    Job job = new Job(conf, "Daily Access Count");
    job.setJarByClass(dailyAccessCount.class);
    job.setMapperClass(MyMapper.class);
    job.setReducerClass(MyReducer.class);
    job.setMapOutputKeyClass(Text.class);
    job.setMapOutputValueClass(IntWritable.class);

    job.setOutputKeyClass(Text.class);
    job.setOutputValueClass(IntWritable.class);
    for (int i = 0; i < otherArgs.length - 1; ++i) {
      FileInputFormat.addInputPath(job, new Path(otherArgs[i]));
    }
    FileOutputFormat.setOutputPath(job,
      new Path(otherArgs[otherArgs.length - 1]));
    System.exit(job.waitForCompletion(true) ? 0 : 1);
  }
}
⑤注意:确保自己电脑上的java版本跟Hadoop上的版本一致,我这里的是jdk-7u80-windows-x64(1.7)
写完代码后,把项目代码调整为1.7版本

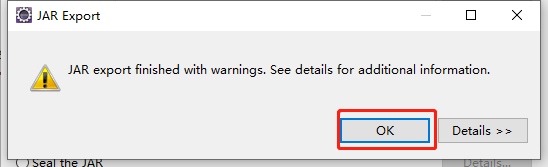
⑥编译生成JAR包文件,并提交Hadoop集群执行


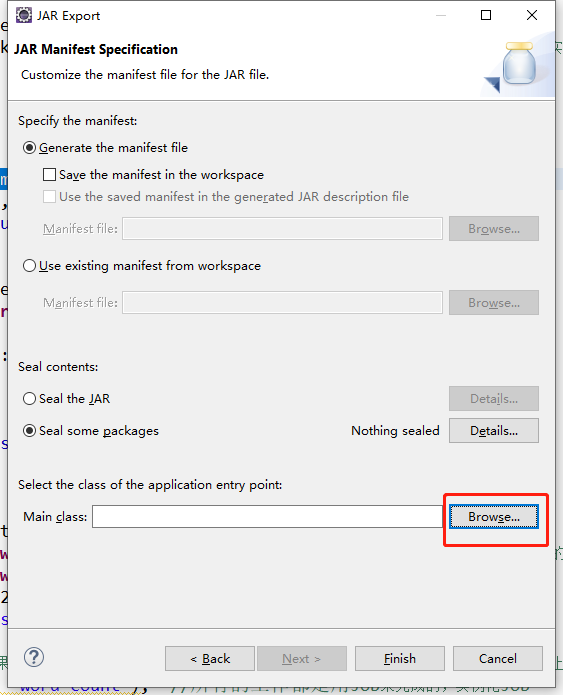
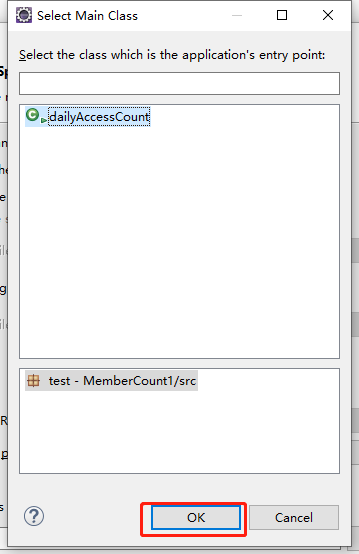
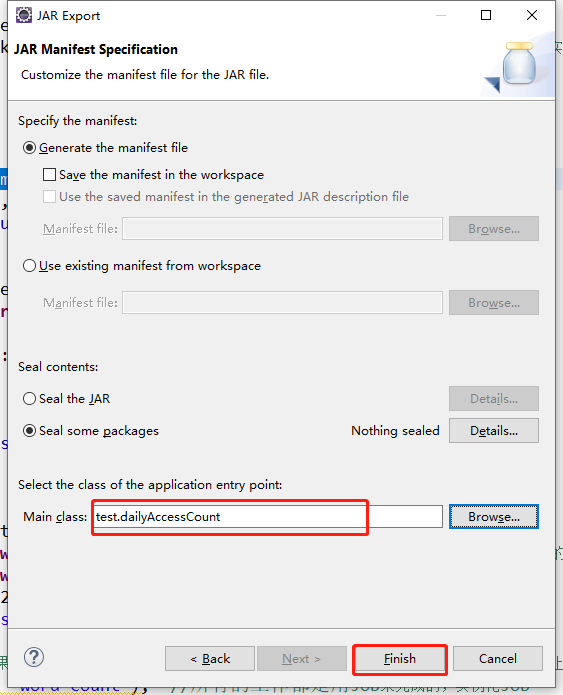

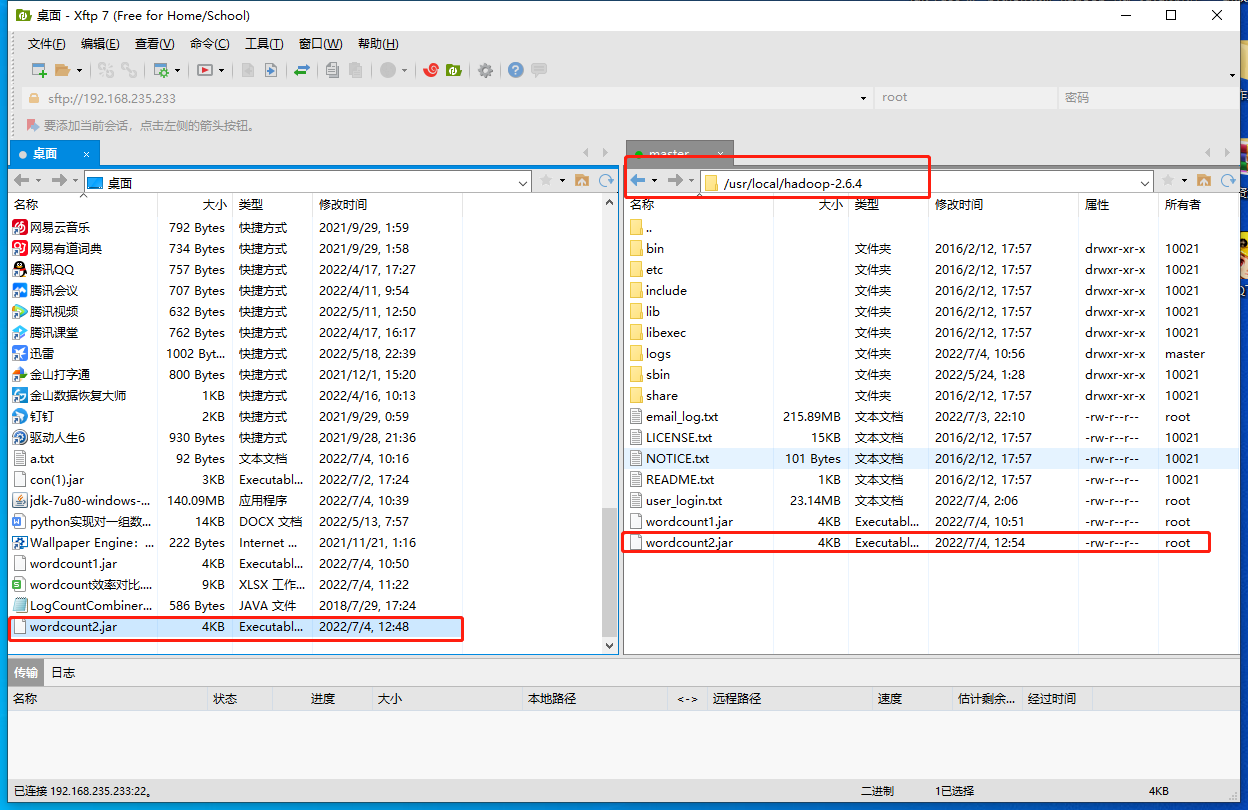
上传到Hadoop集群服务器节点
这里我放到这个路径 /usr/local/hadoop-2.6.4
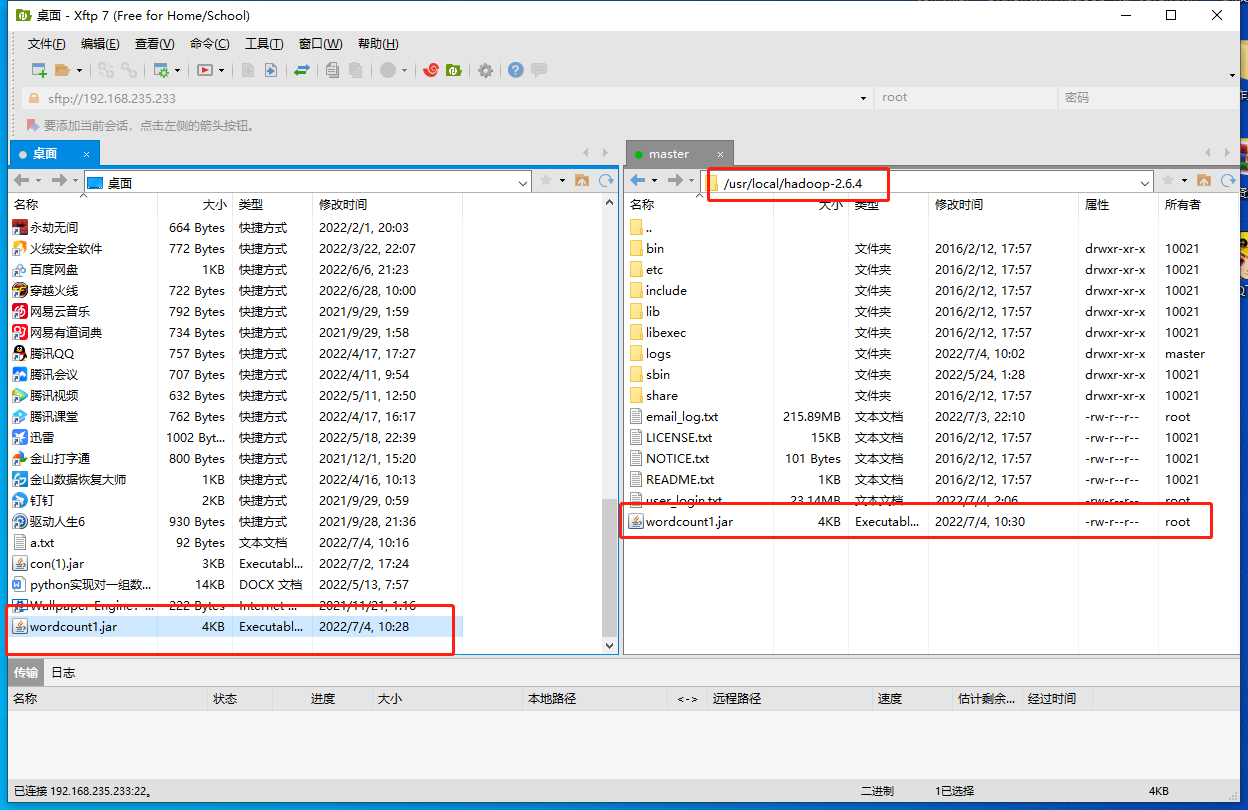
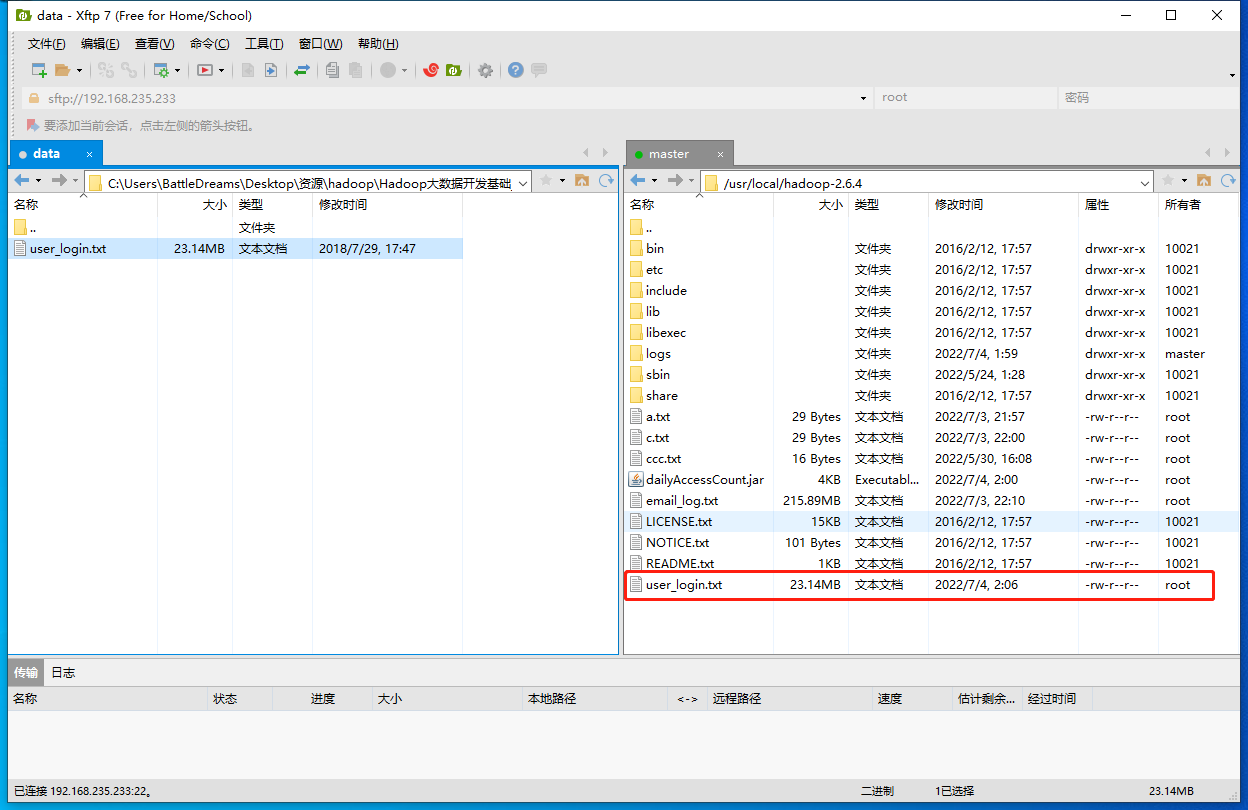
需要做统计的文本也上传到Hadoop,并上传到集群(130万行数据的文本)

在Hadoop集群服务器的终端,以hadoop jar命令提交任务
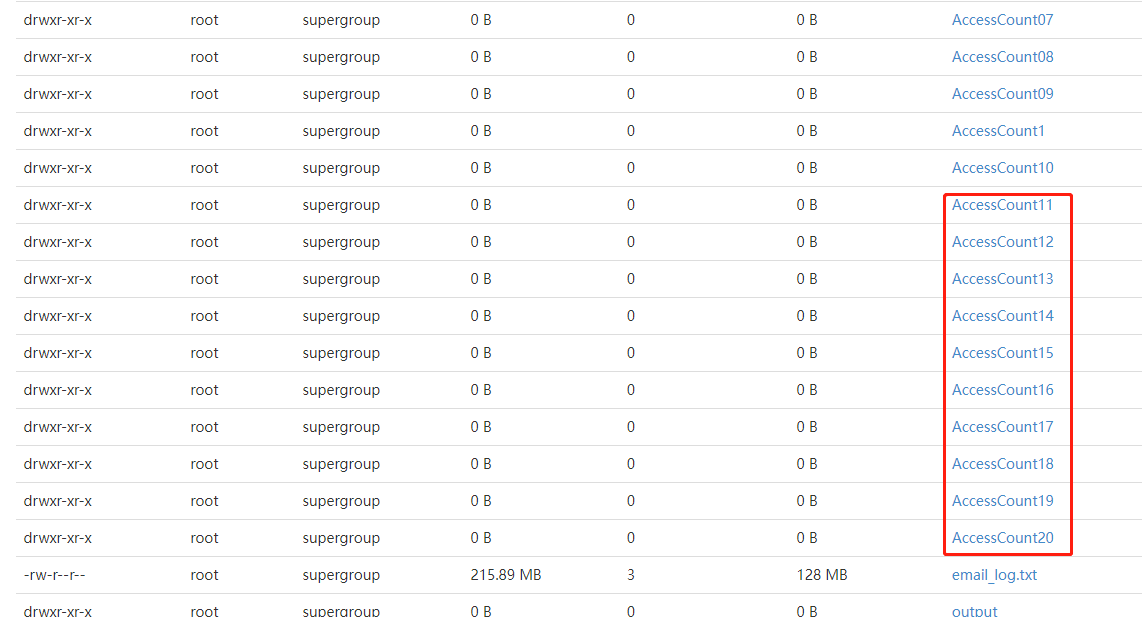
注意输出的文件名每次不能相同
hadoop jar $HADOOP_HOME/wordcount1.jar /user/root/user_login.txt /user/root/AccessCount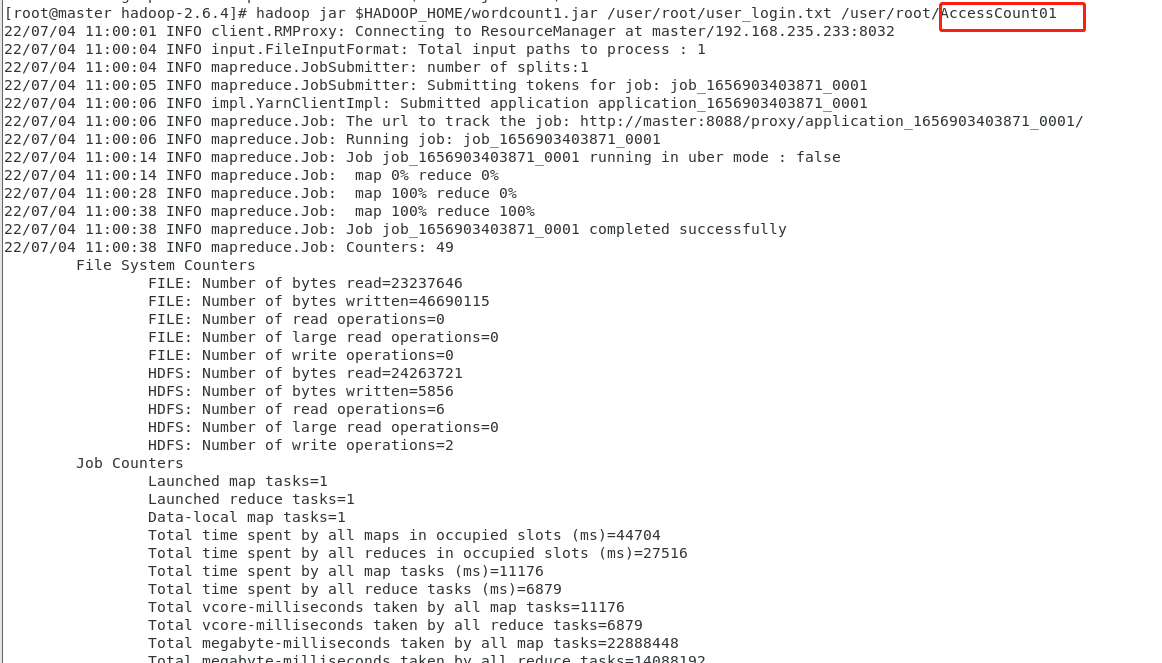
可以看到数据量的达到130万行的量级
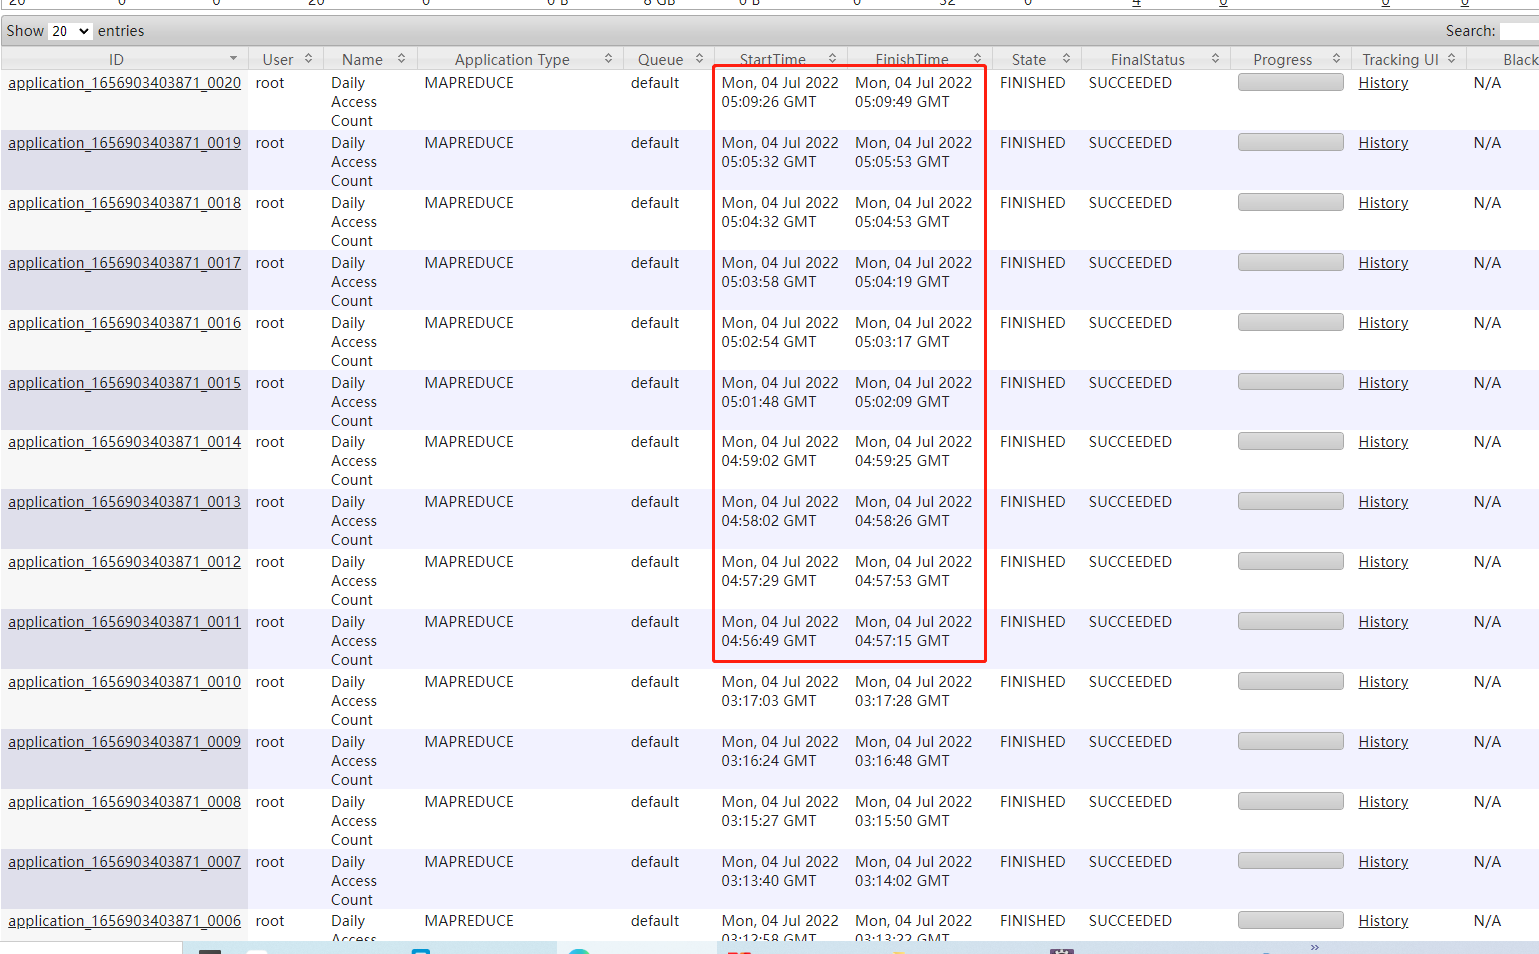
做10次

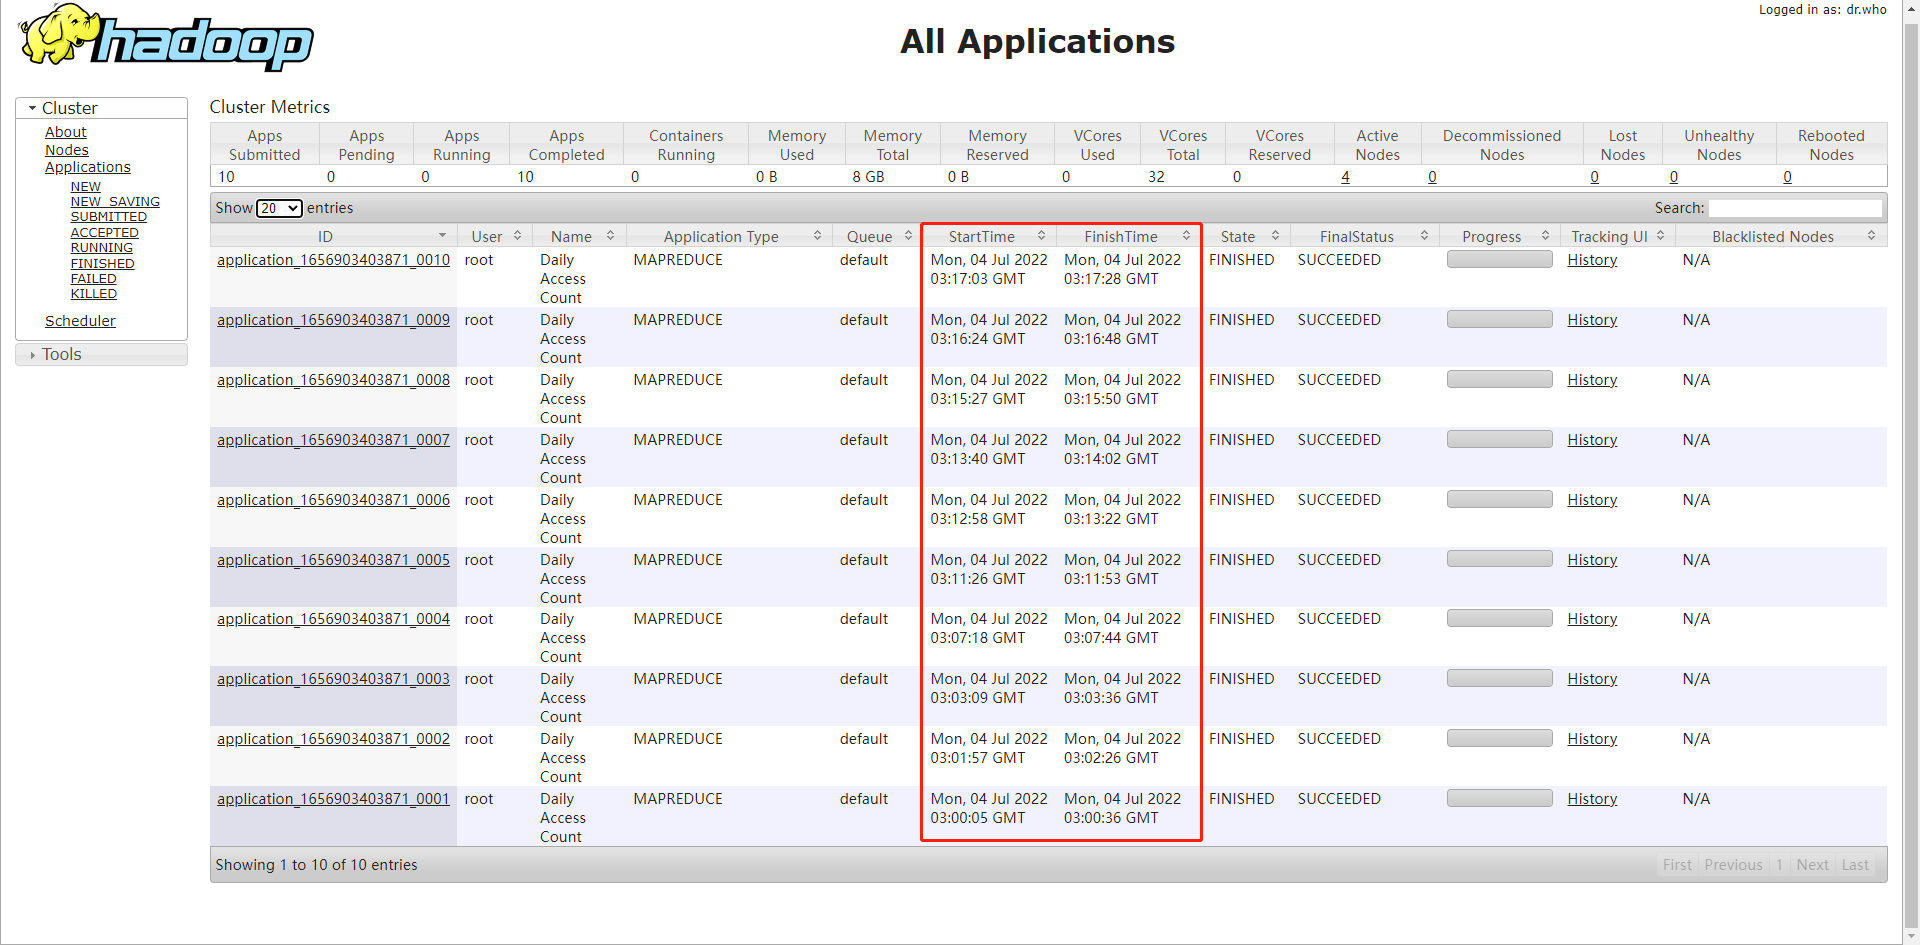

⑦Combiner
Combiner是一个运行在Map端的“迷你Reduce”过程,它只处理单台机器生成的数据。声明的Combiner继承的是Reduce,其方法实现原理和Reduce的实现原理基本相同,不同的是,Combiner操作发生在Map端,或者说Combiner运行在每一个运行Map任务的节点上。它会接收特定节点上的Map输出作为输入,对Map输出的数据先做一次合并,再把结果发送到Reducer。需要注意的是,Combiner的加入不影响原逻辑,即Combiner不影响最终运行结果,影响的只是效率。
值得一提的是,并非所有的MapReduce程序都可以加入Combiner,仅当Reduce输入的键值对类型与Reduce输出的键值对类型一样,并且计算逻辑不影响最终计算结果时,才可以在MapReduce程序中加入Combiner。
前面讲过Combiner继承的是Reducer,所以声明Combiner的时候必须继承Reducer,在Combiner类里面重写Reduce方法。
除了声明Combiner类外,还需要在驱动类里面配置Combiner类
job.setCombinerClass(LogCountCombiner.class);
有时候甚至不必特意声明一个Combiner类。当Combiner和Reduce的实现逻辑相同的时候,可以不用声明Combiner类,而在驱动类里面添加代码
job.setCombinerClass(IntSumReducer.class);
完整代码如下:(注意修改包名和类名是否相同)
package test;
import java.io.IOException;
import org.apache.hadoop.conf.Configuration;
import org.apache.hadoop.fs.Path;
import org.apache.hadoop.io.IntWritable;
import org.apache.hadoop.io.Text;
import org.apache.hadoop.mapreduce.Job;
import org.apache.hadoop.mapreduce.Mapper;
import org.apache.hadoop.mapreduce.Reducer;
import org.apache.hadoop.mapreduce.lib.input.FileInputFormat;
import org.apache.hadoop.mapreduce.lib.output.FileOutputFormat;
import org.apache.hadoop.util.GenericOptionsParser;

public class dailyAccessCount {

  public static class MyMapper
       extends Mapper<Object, Text, Text, IntWritable>{

	private final static IntWritable one = new IntWritable(1);

    public void map(Object key, Text value, Context context
                    ) throws IOException, InterruptedException {
    	 String line = value.toString();
         String array[] = line.split(",");  //指定空格为分隔符,组成数组
         String keyOutput = array[1];       //提取数组中的访问日期做为Key
         context.write(new Text(keyOutput), one); //组成键值对
      }
    }

  public static class MyReducer
       extends Reducer<Text,IntWritable,Text,IntWritable> {
    private IntWritable result = new IntWritable();

    public void reduce(Text key, Iterable<IntWritable> values,
                       Context context
                       ) throws IOException, InterruptedException {
      int sum = 0; //定义累加器,初始值为0
      for (IntWritable val : values) {
        sum += val.get(); // 将相同键的所有值进行累加
      }
      result.set(sum);
      context.write(key,result);
    }
  }

  public static void main(String[] args) throws Exception {
    Configuration conf = new Configuration();
    String[] otherArgs = new GenericOptionsParser(conf, args).getRemainingArgs();
    if (otherArgs.length < 2) {
      System.err.println("Usage: wordcount <in> [<in>...] <out>");
      System.exit(2);
    }
    Job job = new Job(conf, "Daily Access Count");
    job.setJarByClass(dailyAccessCount.class);
    job.setMapperClass(MyMapper.class);
    job.setReducerClass(MyReducer.class);
    job.setMapOutputKeyClass(Text.class);
    job.setMapOutputValueClass(IntWritable.class);
    job.setCombinerClass(MyReducer.class); //Combiner逻辑与Reducer相同时配置Combiner类
    job.setOutputKeyClass(Text.class);
    job.setOutputValueClass(IntWritable.class);
    for (int i = 0; i < otherArgs.length - 1; ++i) {
      FileInputFormat.addInputPath(job, new Path(otherArgs[i]));
    }
    FileOutputFormat.setOutputPath(job,
      new Path(otherArgs[otherArgs.length - 1]));
    System.exit(job.waitForCompletion(true) ? 0 : 1);
  }
}
或者
/**
* Licensed to the Apache Software Foundation (ASF) under one
* or more contributor license agreements. See the NOTICE file
* distributed with this work for additional information
* regarding copyright ownership. The ASF licenses this file
* to you under the Apache License, Version 2.0 (the
* "License"); you may not use this file except in compliance
* with the License. You may obtain a copy of the License at
*
* http://www.apache.org/licenses/LICENSE-2.0
*
* Unless required by applicable law or agreed to in writing, software
* distributed under the License is distributed on an "AS IS" BASIS,
* WITHOUT WARRANTIES OR CONDITIONS OF ANY KIND, either express or implied.
* See the License for the specific language governing permissions and
* limitations under the License.
*/
package org.apache.hadoop.examples; //包
import java.io.IOException; //数据的输入与输出
import java.util.StringTokenizer; //对String字符处理
import org.apache.hadoop.conf.Configuration; //基础conf
import org.apache.hadoop.fs.Path; //文件系统
import org.apache.hadoop.io.IntWritable;
import org.apache.hadoop.io.Text; //数据输入输出(IO)
import org.apache.hadoop.mapreduce.Job;
import org.apache.hadoop.mapreduce.Mapper;
import org.apache.hadoop.mapreduce.Reducer; //MapReduce(对数据的拆分,对数据的归类)
import org.apache.hadoop.mapreduce.lib.input.FileInputFormat;
import org.apache.hadoop.mapreduce.lib.output.FileOutputFormat;
import org.apache.hadoop.util.GenericOptionsParser;
public class WordCount {
public static class TokenizerMapper
extends Mapper /*泛型类*/
<Object, Text, Text, IntWritable>{
private final static IntWritable one = new IntWritable(1); //写整型的时候,初值为1
private Text word = new Text(); //文本对象word
public void map(Object key, Text value, Context context
) throws IOException, InterruptedException {
StringTokenizer itr = new StringTokenizer(value.toString());
/*字符串分隔,把单词拆出来
Hello Hadoop Hello world
hello 1 hadoop 1 hello 1 world 1
(用空格替换逗号跟句号)或者重写Tokenizer,把逗号句号替换添加进去
*/
while (itr.hasMoreTokens()) { //做一个循环判断,是否还有Token(分隔符)
word.set(itr.nextToken()); //如果有,就再读一个,从当前分隔符读到下一个分//隔符,实际就是读了一个单词
context.write(word, one); //输出这个单词
}
}
}
public static class IntSumReducer
extends Reducer<Text,IntWritable,Text,IntWritable> {
private IntWritable result = new IntWritable();
public void reduce(Text key, Iterable<IntWritable> values,
Context context
) throws IOException, InterruptedException {
int sum = 0;
for (IntWritable val : values) {
sum += val.get();
}
result.set(sum);
context.write(key, result); //输出结果 hello 2 hadoop 1 world 1
}
}
public static void main(String[] args) throws Exception {
Configuration conf = new Configuration(); //实例化conf(读取命令行的命令,以数组的方式返回路径)
String[] otherArgs = new GenericOptionsParser(conf, args).getRemainingArgs();
if (otherArgs.length < 2) {
System.err.println("Usage: wordcount <in> [<in>...] <out>");
System.exit(2);
} //判断IO的路径,如果只有一个路径,长度是小于2的,你的输出(1)包含两//个(输入和输出IO),防止出现读取的异常。
Job job = new Job(conf, "word count"); //所有的工作都是用Job来完成的,实例化Job
job.setJarByClass(WordCount.class); //打jar包
job.setMapperClass(TokenizerMapper.class); //指定Map类型
job.setCombinerClass(IntSumReducer.class); //指定Combiner
job.setReducerClass(IntSumReducer.class); //指定Reduce的类型
job.setOutputKeyClass(Text.class); //设置最终key的类型
job.setOutputValueClass(IntWritable.class); //设置最终value的类型
for (int i = 0; i < otherArgs.length - 1; ++i) {
FileInputFormat.addInputPath(job, new Path(otherArgs[i]));
}
FileOutputFormat.setOutputPath(job,
new Path(otherArgs[otherArgs.length - 1]));
System.exit(job.waitForCompletion(true) ? 0 : 1);
} //任务提交
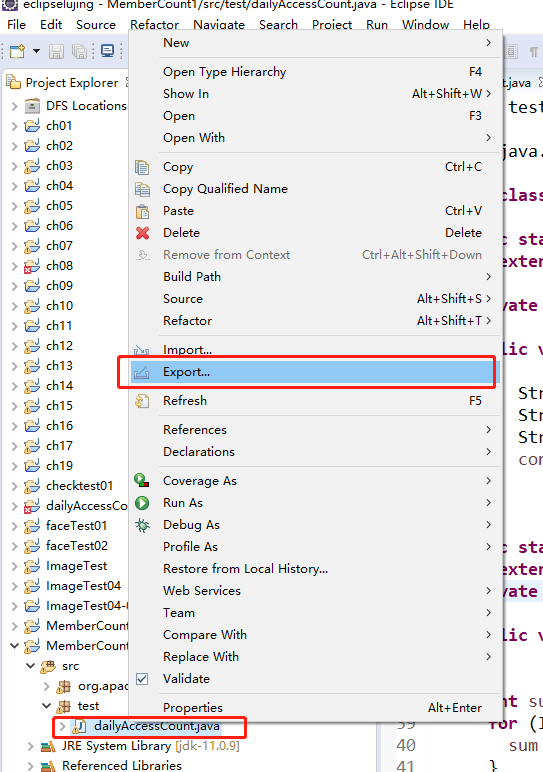
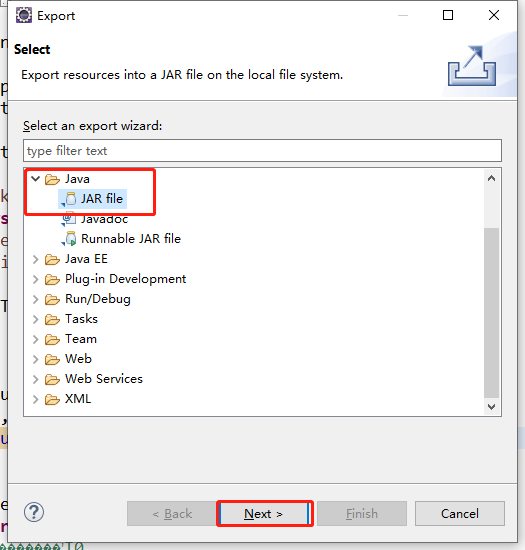
}同样需要进行打包
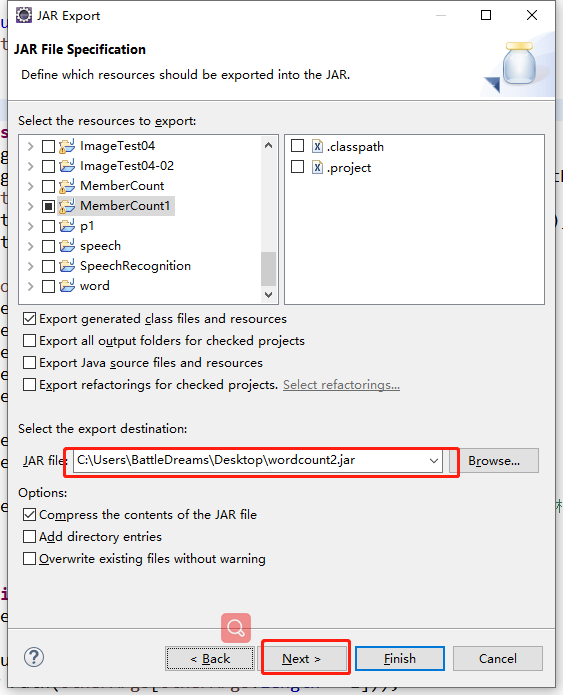
设置接口
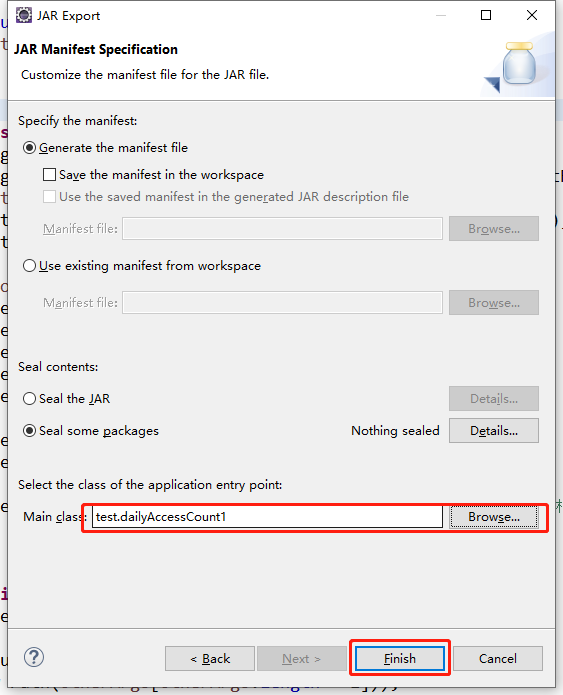

上传到集群
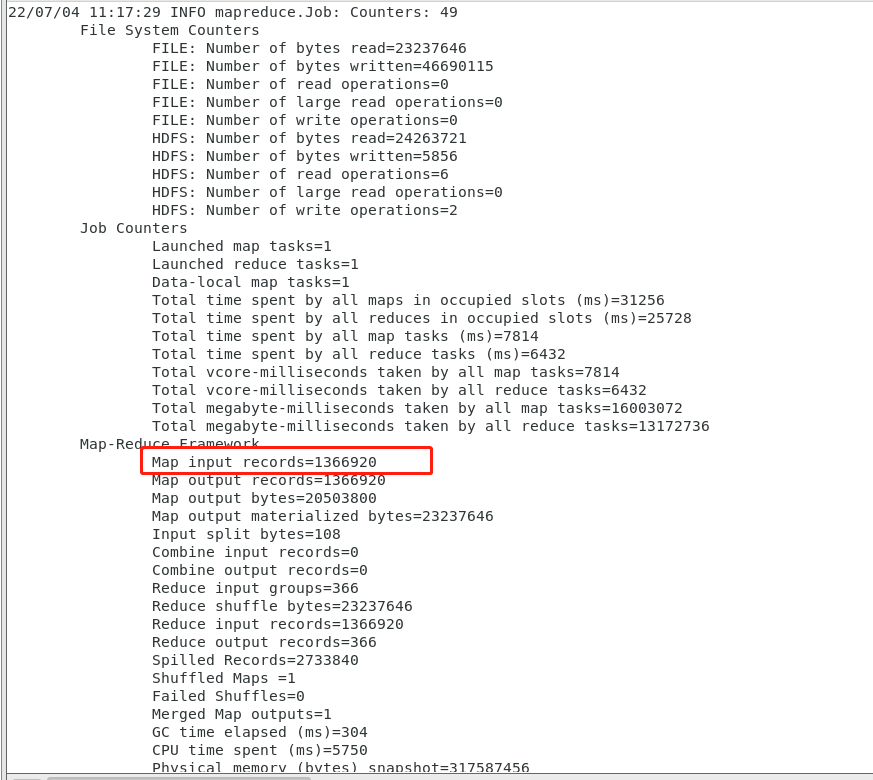
继续做在Hadoop集群服务器的终端,以hadoop jar命令提交任务(本次添加了Combiner)
注意输出的文件名每次不能相同
做10次
hadoop jar $HADOOP_HOME/wordcount2.jar /user/root/user_login.txt /user/root/AccessCount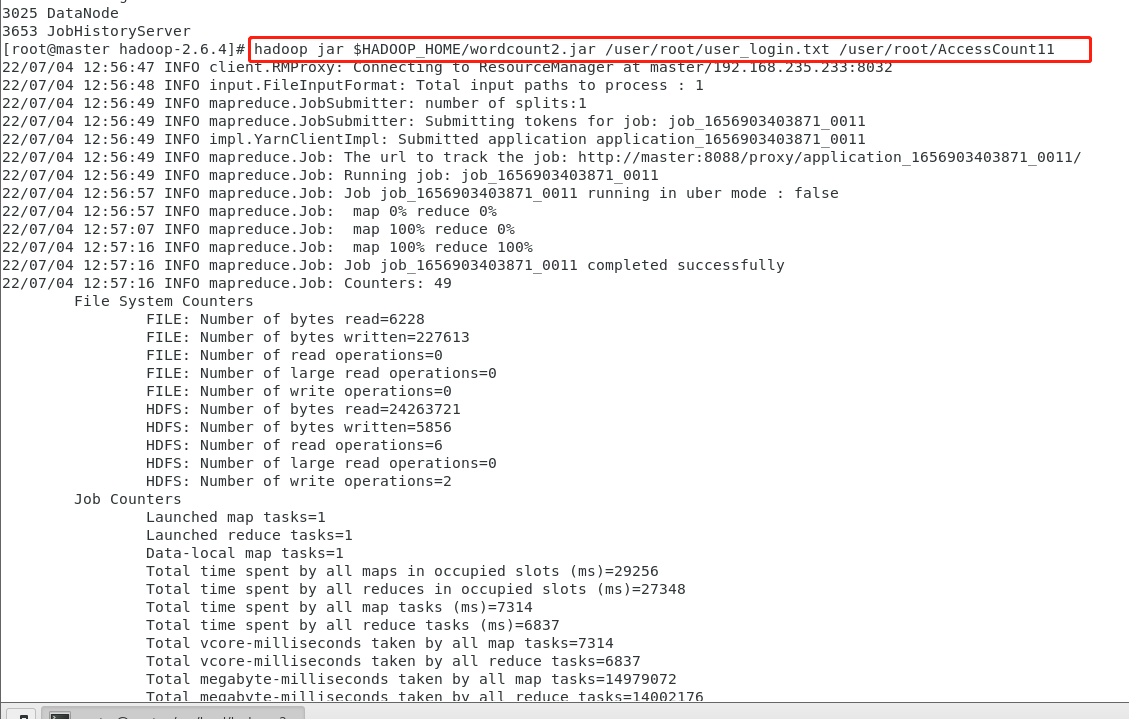
这里可以看到所使用的文本跟上面没加Combiner的文本是同一个,所以数据量是130万行
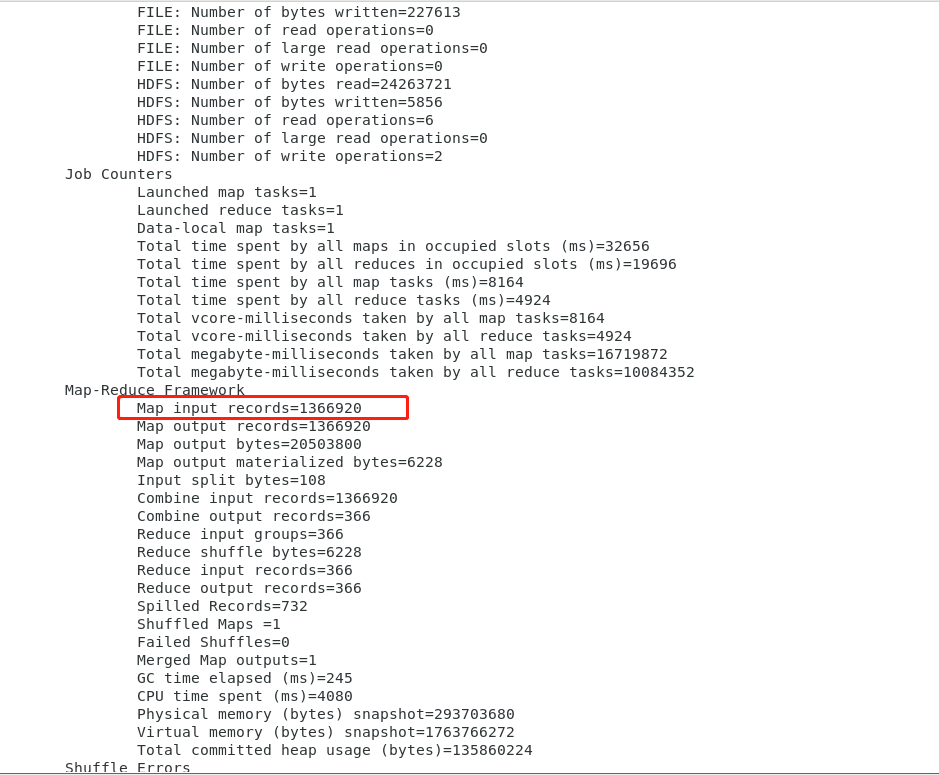

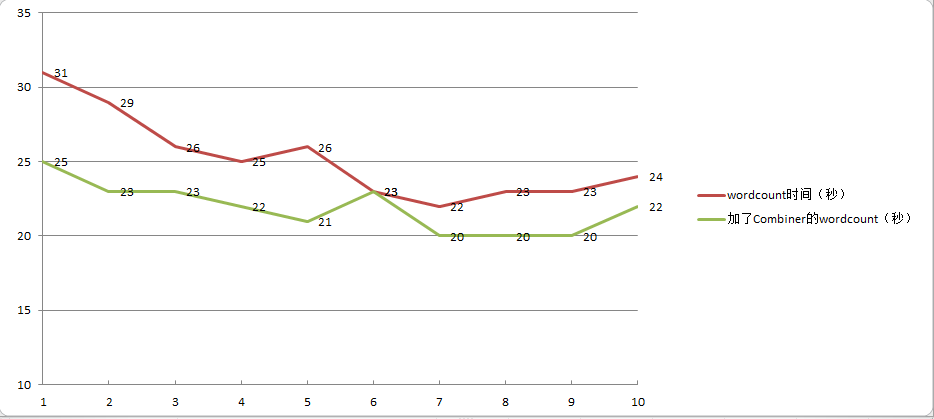
总结:wordcount加了combiner的代码后,运行效率提高了。
代码总结:
/**
 * Licensed to the Apache Software Foundation (ASF) under one
 * or more contributor license agreements.  See the NOTICE file
 * distributed with this work for additional information
 * regarding copyright ownership.  The ASF licenses this file
 * to you under the Apache License, Version 2.0 (the
 * "License"); you may not use this file except in compliance
 * with the License.  You may obtain a copy of the License at
 *
 *     http://www.apache.org/licenses/LICENSE-2.0
 *
 * Unless required by applicable law or agreed to in writing, software
 * distributed under the License is distributed on an "AS IS" BASIS,
 * WITHOUT WARRANTIES OR CONDITIONS OF ANY KIND, either express or implied.
 * See the License for the specific language governing permissions and
 * limitations under the License.
 */
package org.apache.hadoop.examples;      //包

import java.io.IOException;               //数据的输入与输出
import java.util.StringTokenizer;           //对String字符处理

import org.apache.hadoop.conf.Configuration;     //基础conf
import org.apache.hadoop.fs.Path;              //文件系统
import org.apache.hadoop.io.IntWritable;
import org.apache.hadoop.io.Text;              //数据输入输出(IO)
import org.apache.hadoop.mapreduce.Job;
import org.apache.hadoop.mapreduce.Mapper;
import org.apache.hadoop.mapreduce.Reducer;     //MapReduce(对数据的拆分,对数据的归类)
import org.apache.hadoop.mapreduce.lib.input.FileInputFormat;
import org.apache.hadoop.mapreduce.lib.output.FileOutputFormat;
import org.apache.hadoop.util.GenericOptionsParser;

public class WordCount {

//在MapReduce程序中,最重要的代码实现就是Mapper模块中的map函数以及Reducer模块中的reduce函数。这里先看Mapper,也就是源码中的TokenizerMapper
  public static class TokenizerMapper
       extends Mapper  /*泛型类*/
<Object, Text, Text, IntWritable>{

    private final static IntWritable one = new IntWritable(1); //写整型的时候,初值为1
    private Text word = new Text();  //文本对象word

    public void map(Object key, Text value, Context context
                    ) throws IOException, InterruptedException {
      StringTokenizer itr = new StringTokenizer(value.toString());

/*字符串分隔,把单词拆出来
Hello	Hadoop	Hello	world

hello 1 hadoop 1 hello 1 world 1
(用空格替换逗号跟句号)或者重写Tokenizer,把逗号句号替换添加进去
*/

      while (itr.hasMoreTokens()) {   //做一个循环判断,是否还有Token(分隔符)
        word.set(itr.nextToken());      //如果有,就再读一个,从当前分隔符读到下一个分//隔符,实际就是读了一个单词
        context.write(word, one);   //输出这个单词
      }
    }
  }

 //继续分析Reduce,即源码中的IntSumReducer
  public static class IntSumReducer
       extends Reducer<Text,IntWritable,Text,IntWritable> {
    private IntWritable result = new IntWritable();

    public void reduce(Text key, Iterable<IntWritable> values,
                       Context context
                       ) throws IOException, InterruptedException {
      int sum = 0;
      for (IntWritable val : values) {
        sum += val.get();
      }
      result.set(sum);
      context.write(key, result);   //输出结果   hello 2 hadoop 1 world 1
    }
  }

//这里的Driver程序主要指的是main函数,在main函数里面进行MapReduce程序的一些初始化设置,并提交任务,等待程序运行完成。总结为MapReduce任务初始化的通用代码。
  public static void main(String[] args) throws Exception {
    Configuration conf = new Configuration();      //实例化conf(读取命令行的命令,以数组的方式返回路径)
    String[] otherArgs = new GenericOptionsParser(conf, args).getRemainingArgs();
    if (otherArgs.length < 2) {
      System.err.println("Usage: wordcount <in> [<in>...] <out>");
      System.exit(2);
    }      //判断IO的路径,如果只有一个路径,长度是小于2的,你的输出(1)包含两//个(输入和输出IO),防止出现读取的异常。
    Job job = new Job(conf, "word count");  //所有的工作都是用Job来完成的,实例化Job
job.setJarByClass(WordCount.class);    //打jar包
    job.setMapperClass(TokenizerMapper.class);     //指定Map类型

    //有时候甚至不必特意声明一个Combiner类。当Combiner和Reduce的实现逻辑相同的时候,可以不用声明Combiner类,而在驱动类里面添加代码
    job.setCombinerClass(IntSumReducer.class);     //指定Combiner

    job.setReducerClass(IntSumReducer.class);      //指定Reduce的类型
    job.setOutputKeyClass(Text.class);             //设置最终key的类型
    job.setOutputValueClass(IntWritable.class);     //设置最终value的类型

    for (int i = 0; i < otherArgs.length - 1; ++i) {
      FileInputFormat.addInputPath(job, new Path(otherArgs[i]));
    }
    FileOutputFormat.setOutputPath(job,
      new Path(otherArgs[otherArgs.length - 1]));
    System.exit(job.waitForCompletion(true) ? 0 : 1);
  }     //任务提交
}
/***
 *             ,%%%%%%%%,
 *           ,%%/\%%%%/\%%
 *          ,%%%\c "" J/%%%
 * %.       %%%%/ o  o \%%%
 * `%%.     %%%%    _  |%%%
 *  `%%     `%%%%(__Y__)%%'
 *  //       ;%%%%`\-/%%%'
 * ((       /  `%%%%%%%'
 *  \\    .'          |
 *   \\  /       \  | |
 *    \\/         ) | |
 *     \         /_ | |__
 *     (___________))))))) 攻城湿
 */

为开发者提供学习成长、分享交流、生态实践、资源工具等服务,帮助开发者快速成长。
更多推荐


 19
19 0
0- 0


 已为社区贡献1条内容

所有评论(0)