重装Linux系统初始化步骤
重装Linux系统初始化步骤,个人笔记
【仅作为个人笔记】
1、设置root密码:sudo passwd
2、更改源:/etc/apt/sources.list
3、更新软件:sudo apt-get update、sudo apt-get upgrade
4、vim配置:
set number "显示行号,复制代码的时候可以直接运行:set nonumber暂时去掉行号
set encoding=utf-8 "utf-8编码
set autoindent "自动缩进
set shiftwidth=4 "一级缩进4个空格的长度
set tabstop=4 "tab键的空格数
set cursorline "光标行高亮
set vb t_vb= "出错不发出响声
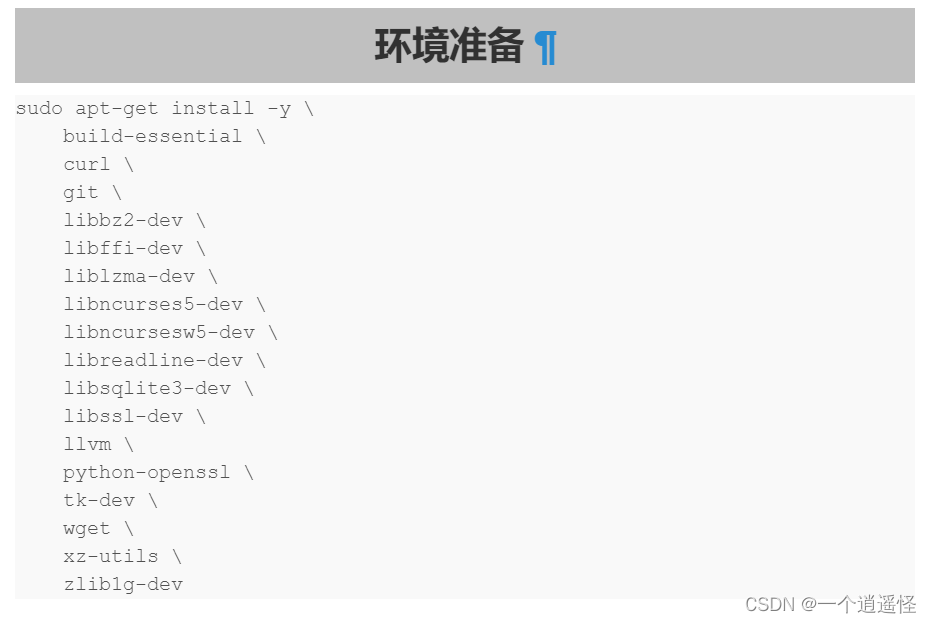
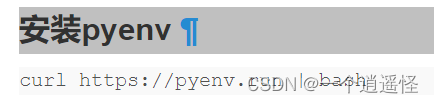
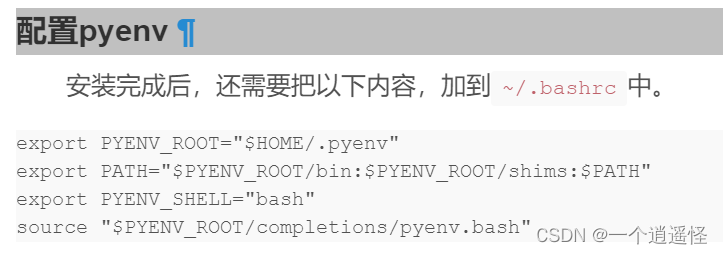
5、python环境配置(方法1):pyenv和virtualenv
(需要用到GitHub,设置代理方法:
安装pyenv步骤(博客中截取的,这三步就够了)
安装virtualenv步骤:
pip install virtualenv
(可能需要安装pip:sudo apt-get install python3-pip)
(安装之后可能没有加入到path中,在.bashrc中手动加一下
export PATH="/home/xiaogao/.local/bin:$PATH")
5'、python环境配置(方法2):anaconda
官网获得安装脚本链接,wget下来:
wget https://repo.anaconda.com/archive/Anaconda3-2022.05-Linux-x86_64.shbash 运行脚本:
bash Anaconda3-2022.05-Linux-x86_64.sh

中间ENTER或输入yes即可

最后source ~/.bashrc激活即可

然后退出base环境:conda deactivate
检测更新:conda update --all
虚拟环境操作:
conda activate myenv#切换到myenv环境
conda create -n myenv python=3.5 # 创建一个名为myenv的环境并指定python版本为3.5(的最新版本)
conda env list # 列出所有环境
conda list # 列出当前环境的所有包
conda install pandas # 安装包
conda remove pandas # 卸载包
conda remove -n myenv --all # 删除环境及下属所有包
conda update pandas # 更新包
6、其他的日后想起来再更新........
参考文章:

为开发者提供学习成长、分享交流、生态实践、资源工具等服务,帮助开发者快速成长。
更多推荐


 0
0 0
0- 0


 已为社区贡献1条内容

所有评论(0)