gcc 版本升级详细记录
gcc 升级前言Redis是C语言开发,安装Redis需要先将Redis的源码进行编译,编译依赖gcc环境。CentOS7安装有默认GCC环境,默认4.8.5版本!编译 redis-6.x,要求 C5.3以上 编译器,否则会遇到大量的错误。主要原因是从 redis-6.x 开始的多线程代码依赖C标准库中的新增类型 _Atomic 。但是注意 gcc 从 4.9 版本才开始正式和完整地支持 stda
gcc 升级
前言
Redis是C语言开发,安装Redis需要先将Redis的源码进行编译,编译依赖gcc环境。
CentOS7安装有默认GCC环境,默认4.8.5版本!编译redis-6.x,要求C5.3以上 编译器,否则会遇到大量的错误。
主要原因是从redis-6.x开始的多线程代码依赖C标准库中的新增类型 _Atomic 。
但是注意gcc从 4.9 版本才开始正式和完整地支持stdatomic(gcc-4.8.5 部分支持)。centos7默认的gcc版本为:4.8.5 < 5.3无法编译
因此需要升级gcc,内容主要是根据网上的帖子来的,鉴于那些帖子可能没写的那么详细或者下载包的地址已被更新,我就当作更新,记录一下。
一、查看当前gcc版本
[root@VM-16-13-centos ~]# gcc -v

Using built-in specs.
COLLECT_GCC=gcc
COLLECT_LTO_WRAPPER=/usr/libexec/gcc/x86_64-redhat-linux/4.8.5/lto-wrapper
Target: x86_64-redhat-linux
Configured with: ../configure --prefix=/usr --mandir=/usr/share/man --infodir=/usr/share/info --with-bugurl=http://bugzilla.redhat.com/bugzilla --enable-bootstrap --enable-shared --enable-threads=posix --enable-checking=release --with-system-zlib --enable-__cxa_atexit --disable-libunwind-exceptions --enable-gnu-unique-object --enable-linker-build-id --with-linker-hash-style=gnu --enable-languages=c,c++,objc,obj-c++,java,fortran,ada,go,lto --enable-plugin --enable-initfini-array --disable-libgcj --with-isl=/builddir/build/BUILD/gcc-4.8.5-20150702/obj-x86_64-redhat-linux/isl-install --with-cloog=/builddir/build/BUILD/gcc-4.8.5-20150702/obj-x86_64-redhat-linux/cloog-install --enable-gnu-indirect-function --with-tune=generic --with-arch_32=x86-64 --build=x86_64-redhat-linux
Thread model: posix
# 版本号
gcc version 4.8.5 20150623 (Red Hat 4.8.5-44) (GCC)
二、安装gcc
[root@VM-16-13-centos install-package]# wget -P /home/common/install-package/ https://mirrors.aliyun.com/gnu/gcc/gcc-10.1.0/gcc-10.1.0.tar.gz
[root@VM-16-13-centos install-package]# ls
gcc-10.1.0.tar.gz
[root@VM-16-13-centos install-package]# tar -xvf gcc-10.1.0.tar.gz -C /opt
[root@VM-16-13-centos install-package]# cd /opt/gcc-10.1.0
[root@VM-16-13-centos gcc-10.1.0]# mkdir build/
[root@VM-16-13-centos gcc-10.1.0]# cd build/
[root@VM-16-13-centos build]#../configure --prefix=/opt/gcc-10.1.0/ --enable-checking=release --enable-languages=c,c++ --disable-multilib
从日志中可以看出有如下报错,故下面每个都安装
configure: error: Building GCC requires GMP 4.2+, MPFR 3.1.0+ and MPC 0.8.0+.
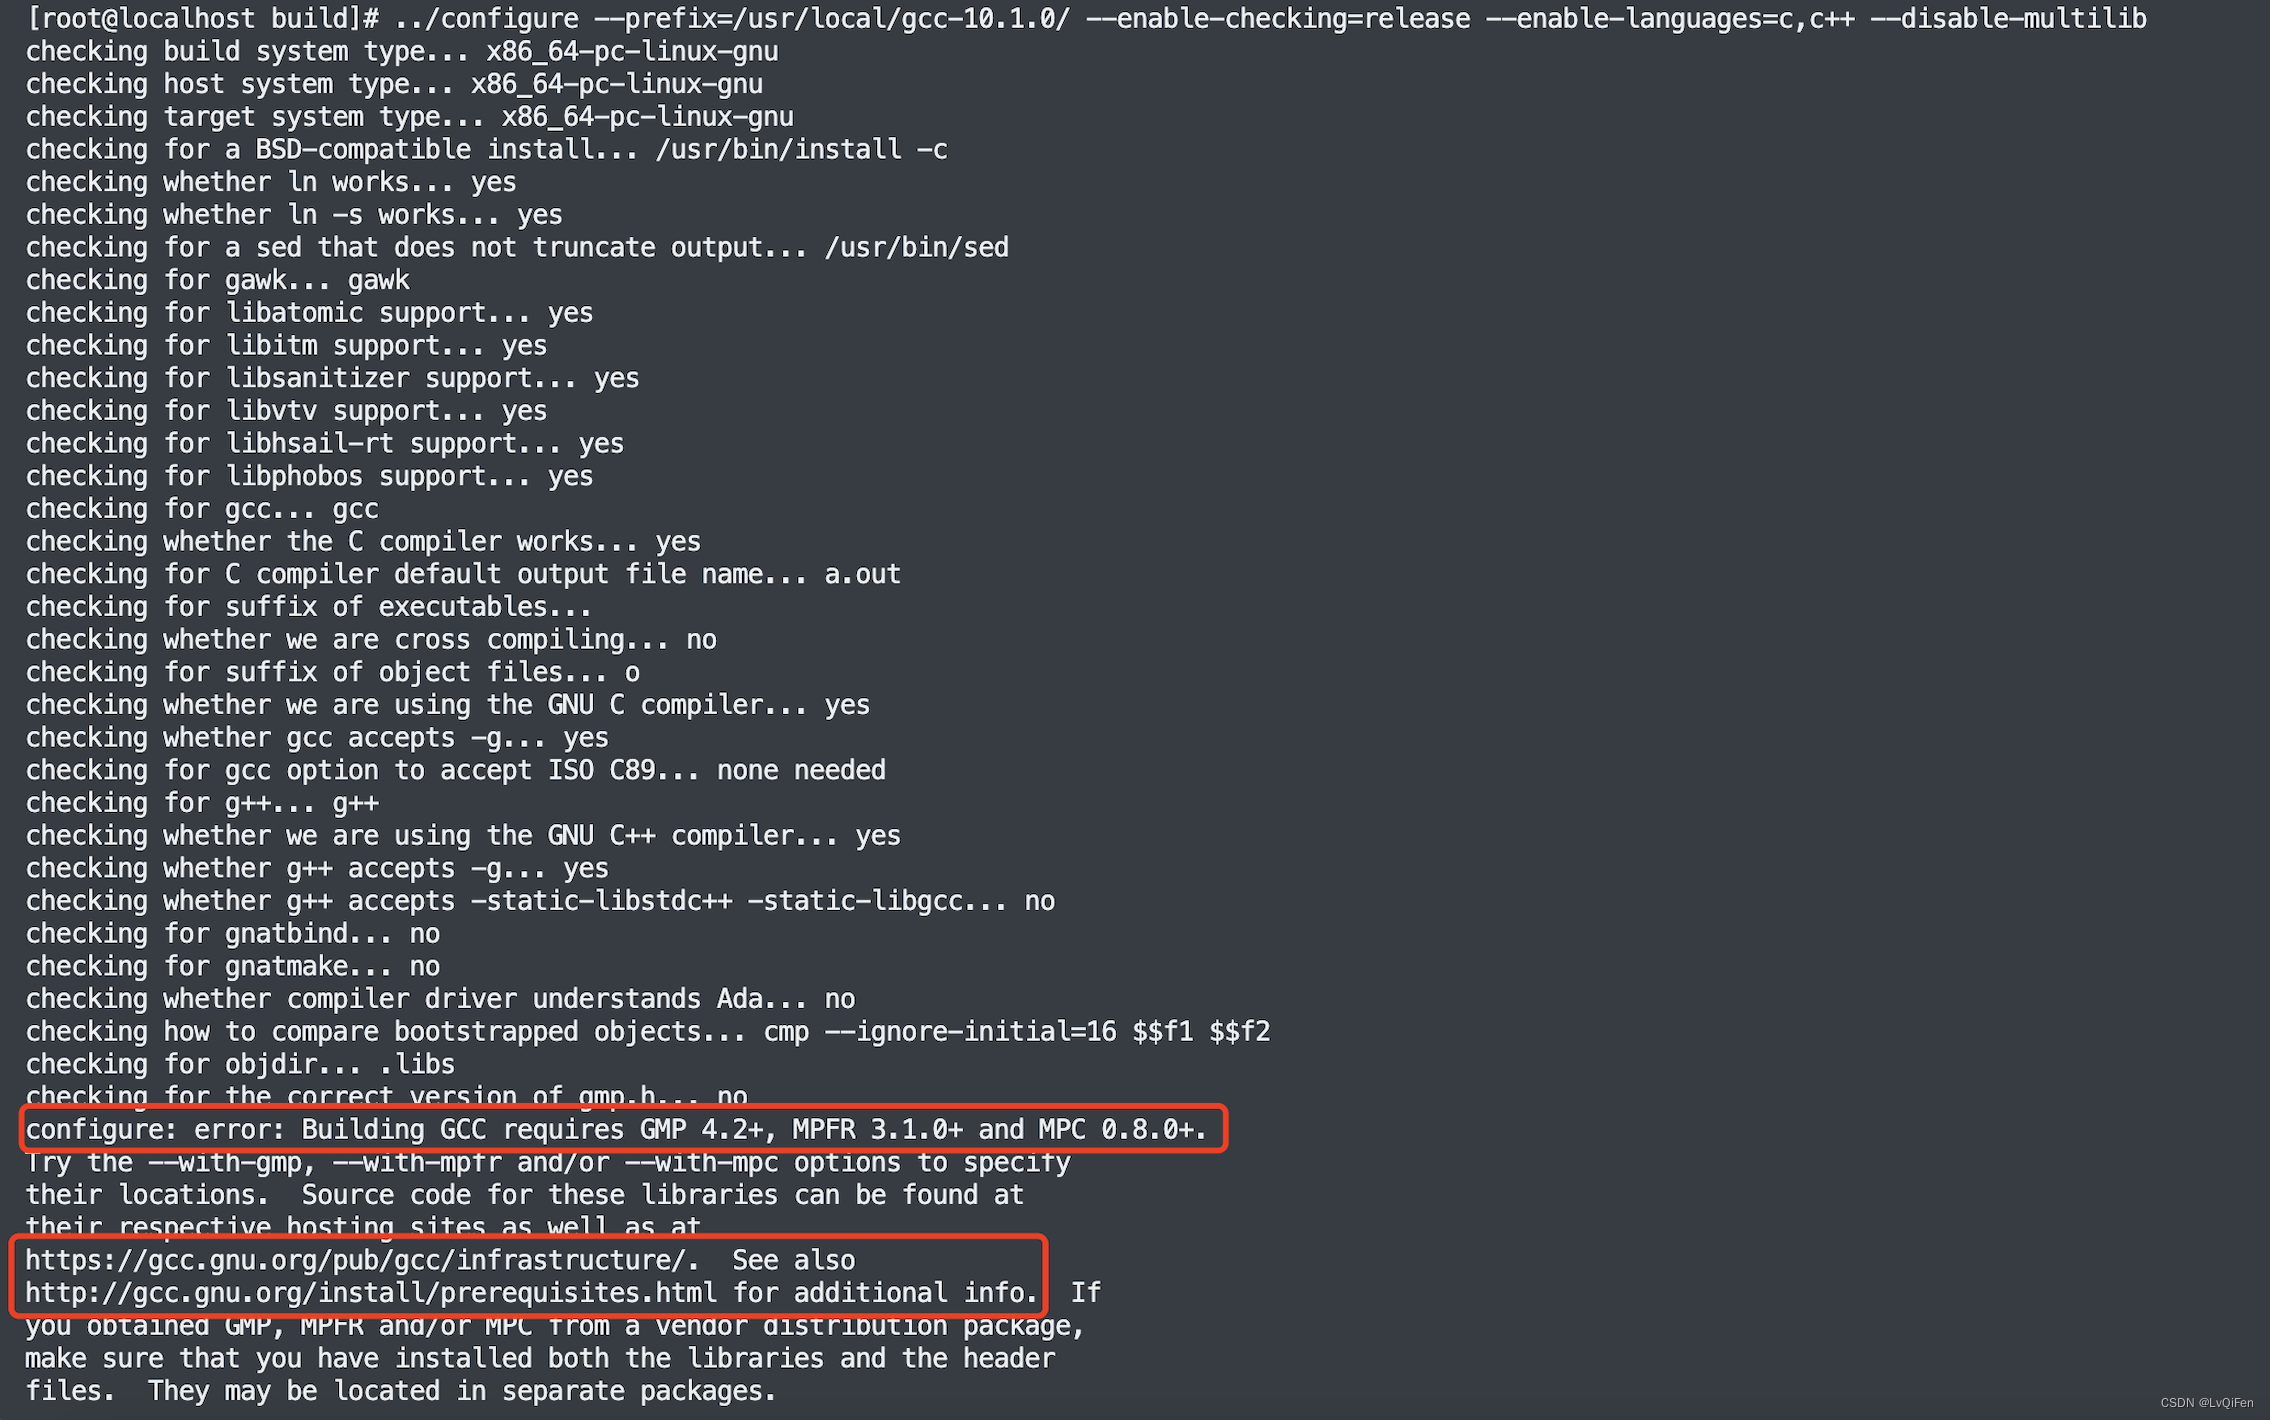
(一)解决报错的问题 安装gmp
[root@VM-16-13-centos install-package]# wget -P /home/common/install-package/ https://gcc.gnu.org/pub/gcc/infrastructure/gmp-6.2.1.tar.bz2
[root@VM-16-13-centos install-package]# tar -vxf gmp-6.2.1.tar.bz2 -C /opt
[root@VM-16-13-centos install-package]# cd /opt/gmp-6.2.1
[root@VM-16-13-centos gmp-6.2.1]# ./configure --prefix=/opt/gmp-6.2.1
......
checking whether sscanf needs writable input... no
checking for struct pst_processor.psp_iticksperclktick... no
......
[root@VM-16-13-centos gmp-6.2.1]# make
[root@VM-16-13-centos gmp-6.2.1]# make install
(二)MPFR编译
[root@VM-16-13-centos install-package]# wget -P /home/common/install-package/ https://gcc.gnu.org/pub/gcc/infrastructure/mpfr-4.1.0.tar.bz2
[root@VM-16-13-centos install-package]# tar -vxf mpfr-4.1.0.tar.bz2 -C /opt

[root@VM-16-13-centos install-package]# cd /opt/mpfr-4.1.0/
[root@VM-16-13-centos mpfr-4.1.0]#./configure --prefix=/opt/mpfr-4.1.0 --with-gmp=/opt/gmp-6.2.1
[root@VM-16-13-centos mpfr-4.1.0]# make
[root@VM-16-13-centos mpfr-4.1.0]# make install
(三)MPC编译
[root@VM-16-13-centos install-package]# wget -P /home/common/install-package/ https://gcc.gnu.org/pub/gcc/infrastructure/mpc-1.2.1.tar.gz
[root@VM-16-13-centos install-package]# tar -zvxf mpc-1.2.1.tar.gz -C /opt
[root@VM-16-13-centos install-package]# cd /opt/mpc-1.2.1
[root@VM-16-13-centos mpc-1.2.1]# ./configure --prefix=/opt/mpc-1.2.1 --with-gmp=/opt/gmp-6.2.1 --with-mpfr=/opt/mpfr-4.1.0
[root@VM-16-13-centos mpc-1.2.1]# make
[root@VM-16-13-centos mpc-1.2.1]# make install
三、gcc配置
[root@VM-16-13-centos install-package]# cd /opt/gcc-10.1.0
[root@VM-16-13-centos gcc-10.1.0]# cd build

[root@VM-16-13-centos build]# ../configure --prefix=/opt/gcc-10.1.0/ --enable-checking=release --enable-languages=c,c++ --disable-multilib --with-gmp=/opt/gmp-6.2.1 --with-mpfr=/opt/mpfr-4.1.0 --with-mpc=/opt/mpc-1.2.1

# 编译  这里执行完make -j4 会报一个错误 见下面
[root@VM-16-13-centos build]# make -j4 # 时间很长很长 耐心等待 也可以使用make -j8
[root@VM-16-13-centos build]# make install
执行
make -j4时间会很长很长 大概1个半小时到2个小时之间的样子,而且执行完后会报一个下图的错误:
error while loading shared libraries: libmpfr.so.6: cannot open shared object file
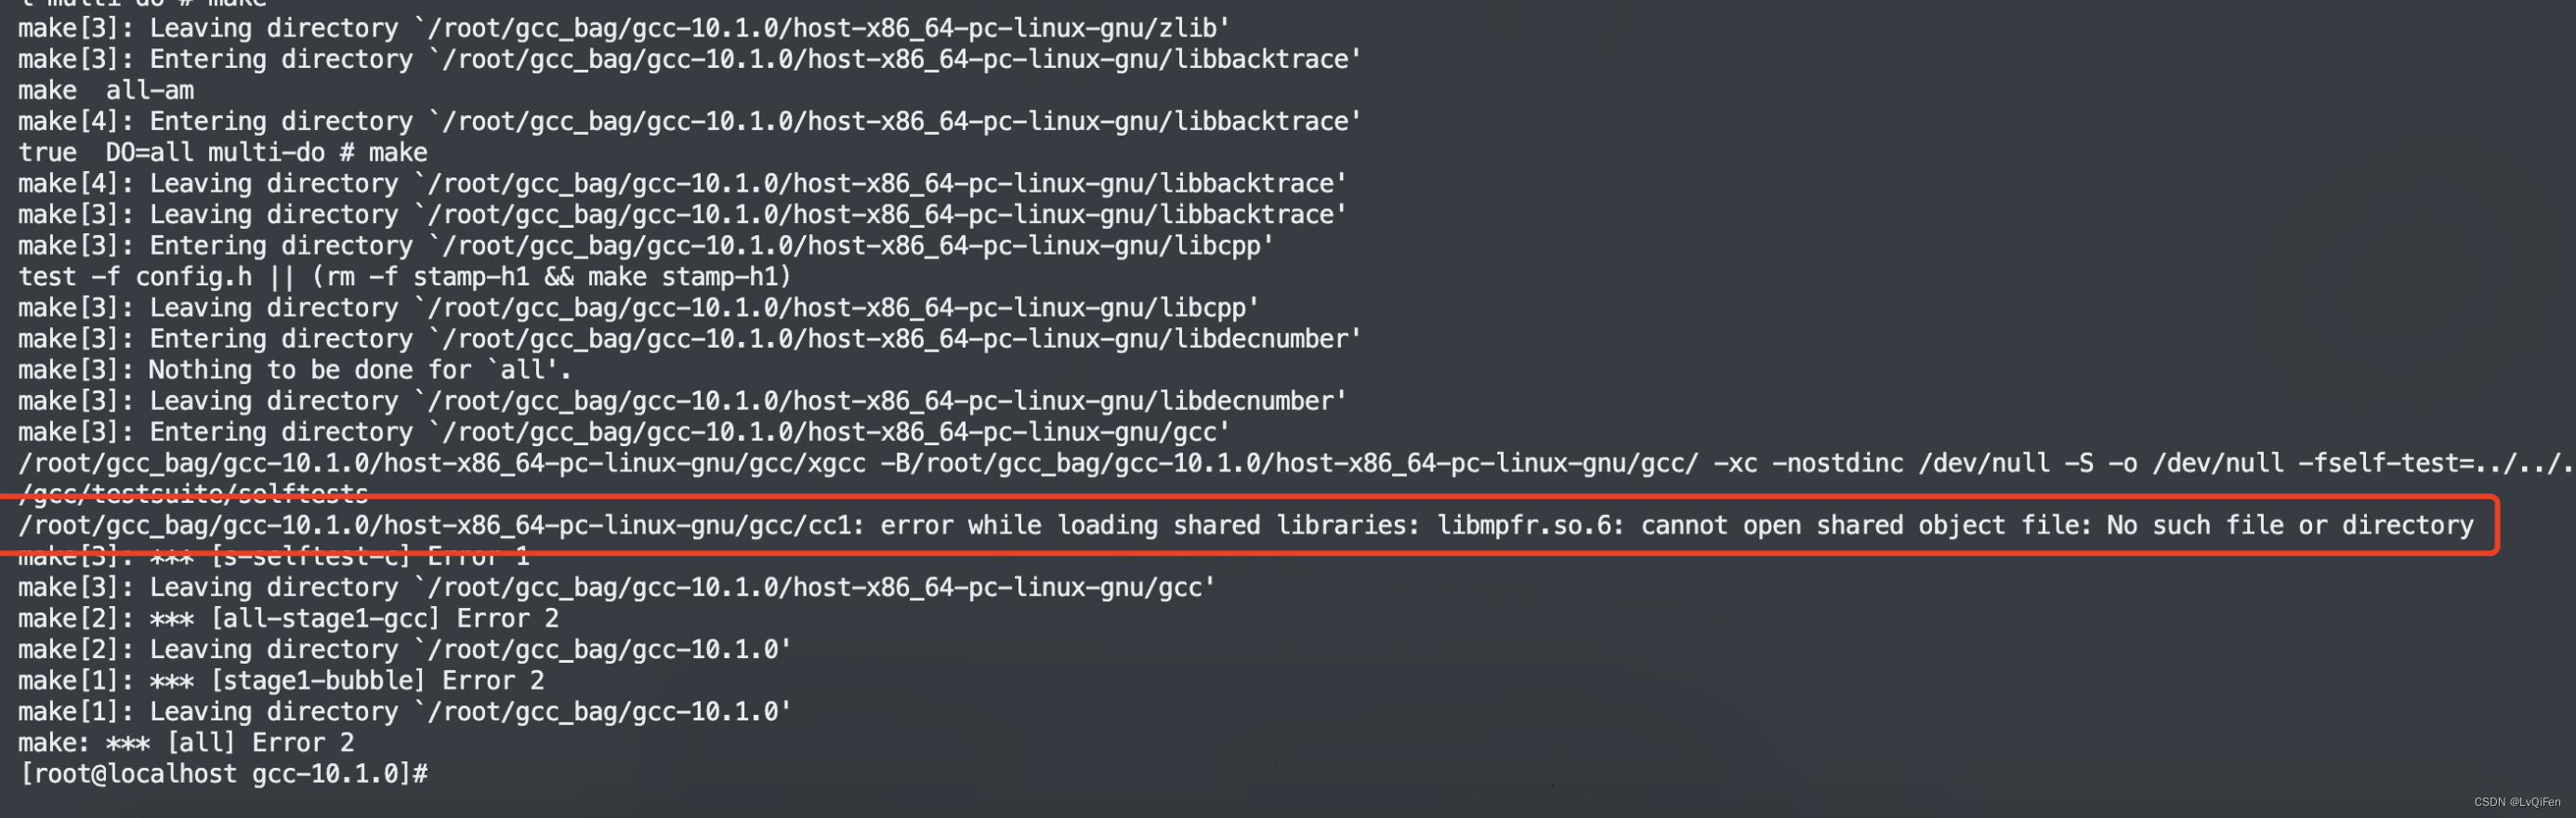
解决错误 error while loading shared libraries: libmpfr.so.6: cannot open shared object file
[root@VM-16-13-centos install-package]# wget -P /home/common/install-package/ https://distrib-coffee.ipsl.jussieu.fr/pub/linux/altlinux/p10/branch/x86_64/RPMS.classic/libmpfr6-4.1.0-alt1.x86_64.rpm
[root@VM-16-13-centos install-package]# rpm2cpio libmpfr6-4.1.0-alt1.x86_64.rpm | cpio -div
[root@VM-16-13-centos install-package]# rpm2cpio libmpfr6-4.1.0-alt1.x86_64.rpm | cpio -div
./usr/lib64/libmpfr.so.6
./usr/lib64/libmpfr.so.6.1.0
./usr/share/doc/mpfr-4.1.0
./usr/share/doc/mpfr-4.1.0/AUTHORS
./usr/share/doc/mpfr-4.1.0/BUGS
./usr/share/doc/mpfr-4.1.0/NEWS
5494 blocks

[root@VM-16-13-centos install-package]# ls
libmpfr6-4.1.0-alt1.x86_64.rpm usr

[root@VM-16-13-centos install-package]# mv  ./usr/lib64/libmpfr.so.6 /usr/lib64/
[root@VM-16-13-centos install-package]# mv  ./usr/lib64/libmpfr.so.6.1.0 /usr/lib64/
[root@VM-16-13-centos install-package]# cd /opt/gcc-10.1.0
[root@VM-16-13-centos gcc-10.1.0]# cd build
[root@VM-16-13-centos build]# make -j4 # 时间很长很长 耐心等待 也可以使用make -j8
[root@VM-16-13-centos build]# make install
四、gcc 版本更新
[root@VM-16-13-centos install-package]# mv /usr/bin/gcc /usr/bin/gcc485
[root@VM-16-13-centos install-package]# mv /usr/bin/g++ /usr/bin/g++485
[root@VM-16-13-centos install-package]# mv /usr/bin/c++ /usr/bin/c++485
[root@VM-16-13-centos install-package]# mv /usr/bin/cc /usr/bin/cc485


[root@VM-16-13-centos install-package]# ln -s /opt/gcc-10.1.0/bin/gcc /usr/bin/gcc
[root@VM-16-13-centos install-package]# ln -s /opt/gcc-10.1.0/bin/g++ /usr/bin/g++
[root@VM-16-13-centos install-package]# ln -s /opt/gcc-10.1.0/bin/c++ /usr/bin/c++
[root@VM-16-13-centos install-package]# ln -s /opt/gcc-10.1.0/bin/gcc /usr/bin/cc


[root@VM-16-13-centos install-package]# mv /usr/lib64/libstdc++.so.6 /usr/lib64/libstdc++.so.6.bak
[root@VM-16-13-centos install-package]# ln -s /opt/gcc-10.1.0/lib64/libstdc++.so.6.0.28 /usr/lib64/libstdc++.so.6


脚本执行成功之后就可以查看当前使用的gcc版本了  查看的命令:gcc -v

[root@VM-16-13-centos install-package]# gcc -v
Using built-in specs.
COLLECT_GCC=gcc
COLLECT_LTO_WRAPPER=/opt/gcc-10.1.0/libexec/gcc/x86_64-pc-linux-gnu/10.1.0/lto-wrapper
Target: x86_64-pc-linux-gnu
Configured with: ../configure --prefix=/opt/gcc-10.1.0/ --enable-checking=release --enable-languages=c,c++ --disable-multilib --with-gmp=/opt/gmp-6.2.1 --with-mpfr=/opt/mpfr-4.1.0 --with-mpc=/opt/mpc-1.2.1
Thread model: posix
Supported LTO compression algorithms: zlib
gcc version 10.1.0 (GCC)
升级完毕!
参考资料

为开发者提供学习成长、分享交流、生态实践、资源工具等服务,帮助开发者快速成长。
更多推荐


 2
2 0
0- 0


 已为社区贡献5条内容

所有评论(0)