gitlab+Jenkins自动化搭建部署
查看Jenkins启动状态是这种时候,表示Jenkins正在启动中,比较慢。私钥id_rsa公钥 id_rsa.pub 配置在gitlab里。选择下面地址复制到URL下添加国内插件地址。然后我们的项目构建成功在Jenkins的。华为云下载稳定版或者阿里云下载都可以。添加如下的,然后重启Jenkins。1、添加个项目描述,选择git构建。安装完插件重启Jenkins。2、源码管理URL地址添加。如果
目录
或者防火墙设置,开启gitlab和Jenkins要用的端口和http服务
6、打开网页界面 http://192.168.100.11:8080/ Jenkins正在配置启动中,比较慢
10、选择安装插件路径Manage Jenkins—Manage Plugins—Plugin Manager—Advanced然后下拉到底
12,生成公钥私钥对出来,命令:ssh-keygen 私钥id_rsa 公钥 id_rsa.pub
7、登录gitlab 网页 http://192.168.100.12/ 账号密码为
也可以配置一个ssh秘钥的模式。如下 key 是私钥id_rsa 开始生成的
3、打开Jenkins服务器,添加gitlab的ip域名解析配置
3,然后我们的项目构建成功在Jenkins的/var/lib/jenkins/workspace/demo路径,查看下 已经有demo项目了
部署环境
| Centos7版本 | CentOS Linux release 7.9.2009 (Core) | |
| Jenkins版本 | jenkins-2.346.3-1.1.noarch.rpm | |
| Jenkins服务器_IP | 192.168.100.11 | |
| gitlab版本 | gitlab-ce-15.2.0-ce.0.el7.x86_64.rpm | |
| gitlab服务器_IP | 192.168.100.12 | |
关闭selinux和防火墙
setenforce 0
sed -ri '/^[^#]*SELINUX=/s#=.+$#=disabled#' /etc/selinux/config
systemctl stop firewalld
systemctl disable firewalld
reboot  重启系统
或者防火墙设置,开启gitlab和Jenkins要用的端口和http服务
命令:
sudo firewall-cmd --permanent --add-service=http
sudo firewall-cmd --permanent --add-service=https
sudo firewall-cmd --permanent --zone=public --add-port=80/tcp
sudo firewall-cmd --permanent --zone=public --add-port=8080/tcp
sudo firewall-cmd --reload
安装依赖包 (Jenkins和gitlab都装)
yum -y install curl git vim policycoreutils openssh-server openssh-clients postfix
一,开始Jenkins安装配置
1、Java包安装
卸载以前旧的Java 安装Java-11版本的
yum remove  java*   -y
yum install fontconfig java-11-openjdk  -y
2、安装Jenkins
华为云下载稳定版或者阿里云下载都可以
阿里云Jenkins下载
 wget https://mirrors.aliyun.com/jenkins/redhat-stable/jenkins-2.346.3-1.1.noarch.rpm

华为云Jenkins下载
 wget  https://repo.huaweicloud.com/jenkins/redhat-stable/jenkins-2.346.3-1.1.noarch.rpm
安装Jenkins
rpm -ivh   jenkins-2.346.3-1.1.noarch.rpm

[root@localhost ~]# rpm -ivh   jenkins-2.346.3-1.1.noarch.rpm
警告:jenkins-2.346.3-1.1.noarch.rpm: 头V4 RSA/SHA512 Signature, 密钥 ID 45f2c3d5: NOKEY
准备中...                          ################################# [100%]
正在升级/安装...
   1:jenkins-2.346.3-1.1              ################################# [100%]
[root@localhost ~]#
3、启动Jenkins服务
systemctl start jenkins.service
systemctl restart jenkins.service
systemctl status jenkins.service
查看Jenkins启动状态是这种时候,表示Jenkins正在启动中,比较慢
[root@localhost ~]# systemctl status jenkins.service
● jenkins.service - Jenkins Continuous Integration Server
   Loaded: loaded (/usr/lib/systemd/system/jenkins.service; disabled; vendor preset: disabled)
   Active: activating (start) since 日 2022-08-14 14:16:27 CST; 58s ago
 Main PID: 1630 (java)
   CGroup: /system.slice/jenkins.service
           └─1630 /usr/bin/java -Djava.awt.headless=true -jar /usr/share/java/jenkins.war --webroot=%C/jenkins/war --httpPort=8080

8月 14 14:16:30 localhost.localdomain jenkins[1630]: *************************************************************
8月 14 14:16:30 localhost.localdomain jenkins[1630]: *************************************************************
8月 14 14:16:30 localhost.localdomain jenkins[1630]: *************************************************************
8月 14 14:16:30 localhost.localdomain jenkins[1630]: Jenkins initial setup is required. An admin user has been created and a password generated.
8月 14 14:16:30 localhost.localdomain jenkins[1630]: Please use the following password to proceed to installation:
8月 14 14:16:30 localhost.localdomain jenkins[1630]: e4a67c389b6f4deeb2fc2bdf58e1dd52
8月 14 14:16:30 localhost.localdomain jenkins[1630]: This may also be found at: /var/lib/jenkins/secrets/initialAdminPassword
8月 14 14:16:30 localhost.localdomain jenkins[1630]: *************************************************************
8月 14 14:16:30 localhost.localdomain jenkins[1630]: *************************************************************
8月 14 14:16:30 localhost.localdomain jenkins[1630]: *************************************************************
[root@localhost ~]#
4、修改jenkins配置文件
将默认Jenkins用户名修改用户名为root 因为不改的话后期Jenkins目录没有权限
vim /etc/sysconfig/jenkins

JENKINS_USER="root"
vim /usr/lib/systemd/system/jenkins.service
User=jenkins 改为root
Group=jenkins 改为root
如果想改Jenkins的端口号在这改
Environment="JENKINS_PORT=8080" 将8080端口更改其他的
#更改完成后加载下配置文件重启Jenkins服务
5、重启Jenkins服务 查看端口是否起来
[root@localhost ~]# systemctl daemon-reload         ##加载服务配置
[root@localhost ~]# systemctl restart jenkins.service    ##重启Jenkins服务

[root@localhost ~]# netstat -lnput      #8080的Java端口服务已启动
Active Internet connections (only servers)
Proto Recv-Q Send-Q Local Address           Foreign Address         State       PID/Program name
tcp        0      0 0.0.0.0:22              0.0.0.0:*               LISTEN      825/sshd
tcp        0      0 127.0.0.1:25            0.0.0.0:*               LISTEN      984/master
tcp6       0      0 :::8080                 :::*                    LISTEN      3128/java
tcp6       0      0 :::22                   :::*                    LISTEN      825/sshd
tcp6       0      0 ::1:25                  :::*                    LISTEN      984/master
udp        0      0 127.0.0.1:323           0.0.0.0:*                           563/chronyd
udp6       0      0 ::1:323                 :::*                                563/chronyd
[root@localhost ~]# ps -aux | grep jenkins   ##查看Jenkins路径服务已经为root下
root       2047  0.0  0.1 149592  5240 pts/0    T    14:21   0:00 vim /etc/sysconfig/jenkins
root       2150  0.0  0.1 149592  5152 pts/0    T    14:24   0:00 vim /usr/lib/systemd/system/jenkins.service
root       2446  0.0  0.1 149608  5300 pts/0    T    14:26   0:00 vim /etc/sysconfig/jenkins
root       3232  145  6.4 3780292 248704 ?      Ssl  14:36   0:05 /usr/bin/java -Djava.awt.headless=true -jar /usr/share/java/jenkins.war --webroot=%C/jenkins/war --httpPort=8080
root       3324  0.0  0.0 112824   980 pts/0    S+   14:36   0:00 grep --color=auto jenkins
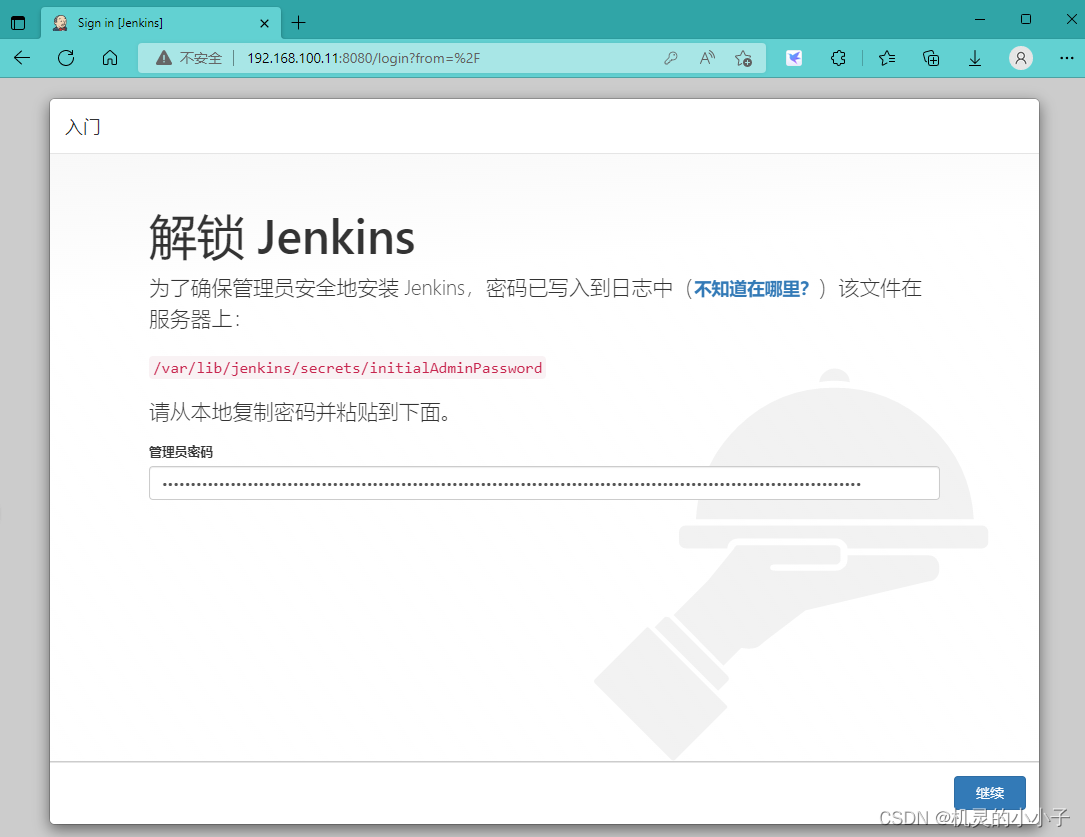
6、打开网页界面 http://192.168.100.11:8080/ Jenkins正在配置启动中,比较慢

[root@localhost ~]# cat /var/lib/jenkins/secrets/initialAdminPassword   ##输入初始密码
e4a67c389b6f4deeb2fc2bdf58e1dd52

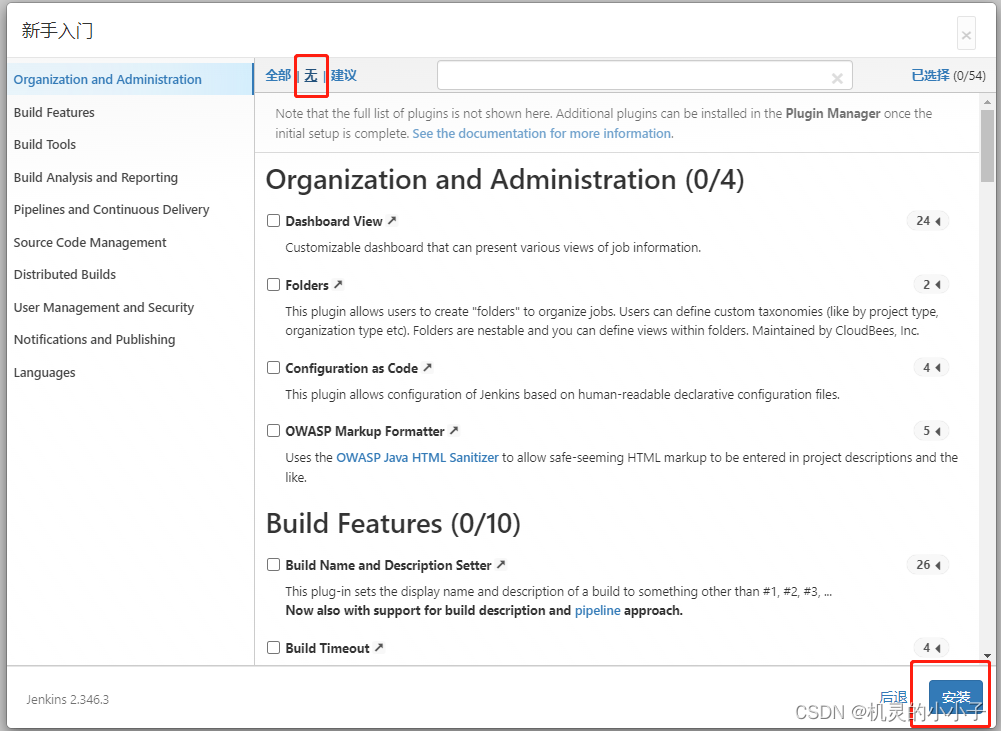
7、 选择插件来安装

8、选择“无”
9、创建管理员用户

10、选择安装插件路径Manage Jenkins—Manage Plugins—Plugin Manager—Advanced然后下拉到底

选择下面地址复制到URL下 添加国内插件地址
https://mirrors.tuna.tsinghua.edu.cn/jenkins/updates/update-center.json

添加如下的,然后重启Jenkins
[root@localhost ~]# cd /var/lib/jenkins/updates
[root@localhost updates]# ls
default.json  hudson.tasks.Maven.MavenInstaller
[root@localhost updates]# sed -i 's/http:\/\/updates.jenkinsci.org\/download/https:\/\/mirrors.tuna.tsinghua.edu.cn\/jenkins/g' default.json && sed -i 's/http:\/\/www.google.com/https:\/\/www.baidu.com/g' default.json
11、安装插件
安装jenkins所需插件
  Credentials                # 签名证书管理插件
  Gitlab                     # 安装后从 GitLab 获取代码
  Git    和 Git Client       # 用于 Jenkins 在 GitLab 中拉取源码
  Gitlab Authentication      # GitLab 和 Jenkins 认证插件
  SSH Plugin                 # 进程执行 Shell 脚本
  Publish Over SSH           # 用于通过 SSH 部署应用
  maven
  chinese                    #中文插件
安装完插件重启Jenkins

12,生成公钥私钥对出来,命令:ssh-keygen 私钥id_rsa 公钥 id_rsa.pub
[root@localhost ~]# ssh-keygen
Generating public/private rsa key pair.
Enter file in which to save the key (/root/.ssh/id_rsa):
Created directory '/root/.ssh'.
Enter passphrase (empty for no passphrase):
Enter same passphrase again:
Your identification has been saved in /root/.ssh/id_rsa.
Your public key has been saved in /root/.ssh/id_rsa.pub.
The key fingerprint is:
SHA256:W/rjnD6edi3oRra8qwqD3b8K5UJ01R5MS3/7XZAKIhA root@localhost.localdomain
The key's randomart image is:
+---[RSA 2048]----+
|    E.  .+o      |
|     . . .+o   . |
|    . o ..o.. +  |
|   . . . ... o o |
|    . . S . . . .|
|   + +   +o    .o|
|  . * o o+ o .  o|
|     = . oOoo .  |
|      oo+X%* .   |
+----[SHA256]-----+
[root@localhost ~]# cd /root/.ssh/
[root@localhost .ssh]# ls
id_rsa  id_rsa.pub
[root@localhost .ssh]# cat id_rsa
-----BEGIN RSA PRIVATE KEY-----
MIIEowIBAAKCAQEAzPgvjaV586kIg+A3gBggcxhs6OvCJwGGLLZrwvTunqmESEdi
pMg9sxbePTmflh9jVQfrglfcusYGLybZVVrIH/1Q77v1GXSOCSISe8XArV1gKGx2
651X8L+MDw7TYtvUD6cYSjtezA4JEyjwpWEhi95K9sQLRqQRmW/RmwoO9bSqF3p0
SMJMjjUPNWtDeg2p3jN86QNrZjmxxP6sf+PrETAOxv3RsmYcKfyr/WsvNfnTujJh
eiYq2M3hJvL4Jl94GZ//zU05bYhVLI3a9jcIz7FYreO/oIy+dbsr91scReqh6WCL
KBdiCvwGrJatnZmVNFpZH6H+2upyq6hqGN7eowIDAQABAoIBAA4uJWwRRKycxyAI
hQ5xnN0ZlX9PwDDepB+3xyDHvTJw29v8RFDOIaagMGPf9rB2H3MkhyCPX4/0Xz0n
3OVQ0IOWDOFpCX3nWGQ9XTX+6mOUEDD7wAZw7kKTneb0yZ8PQk6K6t1H2jkXx3zx
2iQ24hFBIcKMsZMDiswotkGZootRApMx8ehsQlSO+0hA1V4WuXf0V0wyM8D81hLr
iPXKKrpMUL7St8Bpf0Z6JY4ReB4AvgaXeviQby4cbfOcK3wUXe4cdINTYhW+rN8b
mtYG/myT7KyXDWJvJuhUXnemZEzGNFPx+Ggj76b1UWQIGq/n/WKEyEt9ZJy+ekkS
g1hS6JECgYEA/GsxgCfIQ89J3uXy8d1ViBtLi4xUN4ZHiHOwZrQ3e+HLOzx9CGEo
QCHp4kekQaOWZYy1wD2VsyTEcc2ARTYlqFTXnqeb7EpdQJvzmOoyS2geIgvsCDAX
HyPWMTDKEKSRpGsB2SizwJrgZSM2iKb0gKmlJUsR59GuRJvCHV5m5icCgYEAz+Cn
Egh2bzww30YXOZ6/KH+dHbYJNNLtIf3Dfr9qAWVtAsrJlx1zoRYb0fEBL8aC0mEf
CkEAgNHCECbZ2ahNHwPF3CJsc1ro/BKNRlvdpHjyHL5wqQOR5AHfLOnAI0dReZbb
keu4j8VslAW76Va0l0efBfezNCmyIMMtweWXbSUCgYB7CKSwGrP6mWcgRmUMjx3J
ocRI2LWT+teTIxCwftcsgvpUfT9UfkboO5+Ms+7UL7B2/wb4FQyKrTkzXz9OfP4N
9ozCwF+35OdfPqSVvFGXf8BwR+9cblRW0Vjt0SIsyopS4fWcq8Ix90u5AFjscrRq
okXkz5qCrCmNN35+Yi01sQKBgCuCVNWkac2MZppE3FWWEWKTmzn9wN2KjFGCAKoF
vFVAelmMQjdb1bjQnNALRnlOblFEPK/zvPw5awngZ9ZzsHieXIpfth1K2NrxsxoX
3kMvgVVc0s29TorPjXukDTAVHEt7tMdM9Bs7cidlL9h96lyDhBhGqP5w/7R1xZ0A
xfn1AoGBAMrdTW5qwhQ2ABLMxGryakUFB2COv1wKstfXA41lzrZvdtArwzxfk43S
YZzE2aKGnaPAIPzdjBiJ2FBpmA0M/GjEDaaqIBhETNNTfm8Lase4j2LXls2rJmgH
wG6QqSFkTBVXrm9QB6xduwxcezbN3HCkVNrlKwWiNdnlG8F9zOwK
-----END RSA PRIVATE KEY-----
[root@localhost .ssh]# cat id_rsa.pub
ssh-rsa AAAAB3NzaC1yc2EAAAADAQABAAABAQDM+C+NpXnzqQiD4DeAGCBzGGzo68InAYYstmvC9O6eqYRIR2KkyD2zFt49OZ+WH2NVB+uCV9y6xgYvJtlVWsgf/VDvu/UZdI4JIhJ7xcCtXWAobHbrnVfwv4wPDtNi29QPpxhKO17MDgkTKPClYSGL3kr2xAtGpBGZb9GbCg71tKoXenRIwkyONQ81a0N6DaneM3zpA2tmObHE/qx/4+sRMA7G/dGyZhwp/Kv9ay81+dO6MmF6JirYzeEm8vgmX3gZn//NTTltiFUsjdr2NwjPsVit47+gjL51uyv3WxxF6qHpYIsoF2IK/Aaslq2dmZU0Wlkfof7a6nKrqGoY3t6j root@localhost.localdomain
[root@localhost .ssh]#
二,开始gitlab的部署
1、配置yum源地址
vim /etc/yum.repos.d/gitlab-ce.repo
[gitlab-ce]
name=Gitlab CE Repository
baseurl=https://mirrors.tuna.tsinghua.edu.cn/gitlab-ce/yum/el$releasever/
gpgcheck=0
enabled=1
或者用wget安装
wget https://mirrors.tuna.tsinghua.edu.cn/gitlab-ce/yum/el7/gitlab-ce-15.2.0-ce.0.el7.x86_64.rpm
2、配置 hosts及改主机域名
[root@localhost ~]# hostnamectl set-hostname gitlab.example.com
[root@localhost ~]# bash
[root@gitlab ~]# vim /etc/hosts
[root@gitlab ~]# cat /etc/hosts
192.168.100.12   gitlab.example.com
3、启动postfix邮件服务
systemctl start postfix
systemctl enable  postfix
4、安装gitlab
yum -y install gitlab-ce
5、加载初始化命令执行
[root@gitlab ~]# gitlab-ctl
[root@gitlab ~]# gitlab-ctl reconfigure  ##出现以下代表安装成功
....
....
Running handlers:
[2022-08-14T16:33:17+08:00] INFO: Running report handlers
Running handlers complete
[2022-08-14T16:33:17+08:00] INFO: Report handlers complete
Infra Phase complete, 604/1618 resources updated in 03 minutes 19 seconds

Notes:
Default admin account has been configured with following details:
Username: root
Password: You didn't opt-in to print initial root password to STDOUT.
Password stored to /etc/gitlab/initial_root_password. This file will be cleaned up in first reconfigure run after 24 hours.

NOTE: Because these credentials might be present in your log files in plain text, it is highly recommended to reset the password following https://docs.gitlab.com/ee/security/reset_user_password.html#reset-your-root-password.

gitlab Reconfigured!

[root@gitlab ~]# gitlab-ctl status
run: alertmanager: (pid 12914) 298s; run: log: (pid 12682) 352s
run: gitaly: (pid 12904) 299s; run: log: (pid 12022) 464s
run: gitlab-exporter: (pid 12875) 300s; run: log: (pid 12529) 371s
run: gitlab-kas: (pid 12851) 302s; run: log: (pid 12281) 449s
run: gitlab-workhorse: (pid 12862) 302s; run: log: (pid 12411) 394s
run: grafana: (pid 13005) 297s; run: log: (pid 12800) 317s
run: logrotate: (pid 11941) 479s; run: log: (pid 11949) 478s
run: nginx: (pid 12423) 391s; run: log: (pid 12434) 388s
run: node-exporter: (pid 12870) 301s; run: log: (pid 12470) 379s
run: postgres-exporter: (pid 12961) 298s; run: log: (pid 12720) 347s
run: postgresql: (pid 12146) 456s; run: log: (pid 12157) 455s
run: prometheus: (pid 12887) 300s; run: log: (pid 12650) 359s
run: puma: (pid 12340) 409s; run: log: (pid 12354) 406s
run: redis: (pid 11971) 473s; run: log: (pid 11979) 472s
run: redis-exporter: (pid 12878) 300s; run: log: (pid 12617) 365s
run: sidekiq: (pid 12358) 403s; run: log: (pid 12378) 400s
6、启动gitlab服务
[root@gitlab ~]# gitlab-ctl start
ok: run: alertmanager: (pid 12914) 382s
ok: run: gitaly: (pid 12904) 383s
ok: run: gitlab-exporter: (pid 12875) 384s
ok: run: gitlab-kas: (pid 12851) 386s
ok: run: gitlab-workhorse: (pid 12862) 386s
ok: run: grafana: (pid 13005) 381s
ok: run: logrotate: (pid 11941) 563s
ok: run: nginx: (pid 12423) 475s
ok: run: node-exporter: (pid 12870) 385s
ok: run: postgres-exporter: (pid 12961) 382s
ok: run: postgresql: (pid 12146) 540s
ok: run: prometheus: (pid 12887) 384s
ok: run: puma: (pid 12340) 493s
ok: run: redis: (pid 11971) 557s
ok: run: redis-exporter: (pid 12878) 384s
ok: run: sidekiq: (pid 12358) 487s
7、登录gitlab 网页 http://192.168.100.12/ 账号密码为
账号root  Password: M8F5dQ8eZd+dJS+8PEJcNdWUFKItE3ZLW6JqPJ+0e5c=        ##密码
[root@gitlab ~]# cat  /etc/gitlab/initial_root_password
# WARNING: This value is valid only in the following conditions
#          1. If provided manually (either via `GITLAB_ROOT_PASSWORD` environment variable or via `gitlab_rails['initial_root_password']` setting in `gitlab.rb`, it was provided before database was seeded for the first time (usually, the first reconfigure run).
#          2. Password hasn't been changed manually, either via UI or via command line.
#
#          If the password shown here doesn't work, you must reset the admin password following https://docs.gitlab.com/ee/security/reset_user_password.html#reset-your-root-password.

Password: M8F5dQ8eZd+dJS+8PEJcNdWUFKItE3ZLW6JqPJ+0e5c=        ##密码

# NOTE: This file will be automatically deleted in the first reconfigure run after 24 hours.

8、更改为中文页面
 9、修改初始化密码

10、创建新的项目


11、选择上传一个文件


12、项目建成功上传

13、 然后就是配合Jenkins部署这个项目

在Jenkins生成的ssh-keygen
私钥id_rsa 公钥 id_rsa.pub 配置在gitlab里

14,在Jenkins配置凭据


也可以配置一个ssh秘钥的模式。如下 key 是私钥id_rsa 开始生成的


15,添加JDK,Git,Maven,路径


查询JDK,Git,Maven,路径
root@localhost ~]# which git
/usr/bin/git
[root@localhost ~]# which java
/usr/bin/java
[root@localhost ~]# mvn -v
Apache Maven 3.0.5 (Red Hat 3.0.5-17)
Maven home: /usr/share/maven
Java version: 1.8.0_332, vendor: Red Hat, Inc.
Java home: /usr/lib/jvm/java-1.8.0-openjdk-1.8.0.332.b09-1.el7_9.x86_64/jre
Default locale: zh_CN, platform encoding: UTF-8
OS name: "linux", version: "3.10.0-1160.71.1.el7.x86_64", arch: "amd64", family: "unix"
三,新建项目

1、添加个项目描述,选择git构建

2、源码管理URL地址添加

如果出现以下错误的话
Failed to connect to repository : Command "/usr/bin/git ls-remote -h http://gitlab.example.com/root/demo.git HEAD" returned status code 128:
stdout:
stderr: fatal: unable to access 'http://gitlab.example.com/root/demo.git/': Could not resolve host: gitlab.example.com; Unknown error

翻译:
无法连接到存储库:命令“/usr/bin/git ls remote-h”http://gitlab.example.com/root/demo.git“头”返回状态代码128:

标准输出:

stderr:致命:无法访问'http://gitlab.example.com/root/demo.git/“:无法解析主机:gitlab.example。通用域名格式;未知错误
3、打开Jenkins服务器,添加gitlab的ip域名解析配置
[root@localhost ~]# cat /etc/hosts
192.168.100.12   gitlab.example.com
更改指定分支

4、项目构建完成


四,项目构建成功
1、变绿色对号代表构建成功

2、查看详细构建 控制台输出

3,然后我们的项目构建成功在Jenkins的/var/lib/jenkins/workspace/demo路径,查看下 已经有demo项目了
[root@localhost ~]# cd /var/lib/jenkins/workspace/
[root@localhost workspace]# ls
demo  demo@tmp
[root@localhost workspace]# cd demo
[root@localhost demo]# ls
1.html
更多推荐
 已为社区贡献2条内容


所有评论(0)