Ubuntu搭建DNS服务器
这里只是初步介绍搭建方法,经过本地测试和客户端测试可以顺利查询其他网站(准确说,写这篇文章时,我就是通过目前搭建的DNS服务器中转DNS查询)。首先是实验环境使用VMware虚拟机和Ubuntu18.04系统建立虚拟机,作为server,网络连接方式使用桥接模式。然后是下载bind9使用指令sudo apt install bind9bind9安装在/etc/bind位置,进入该文件夹,可以查看文
这里只是初步介绍搭建方法,经过本地测试和客户端测试可以顺利查询其他网站(准确说,写这篇文章时,我就是通过目前搭建的DNS服务器中转DNS查询)。
首先是实验环境
使用VMware虚拟机和Ubuntu18.04系统建立虚拟机,作为server,网络连接方式使用桥接模式。
然后是下载bind9
使用指令sudo apt install bind9

bind9安装在/etc/bind位置,进入该文件夹,可以查看文件权限
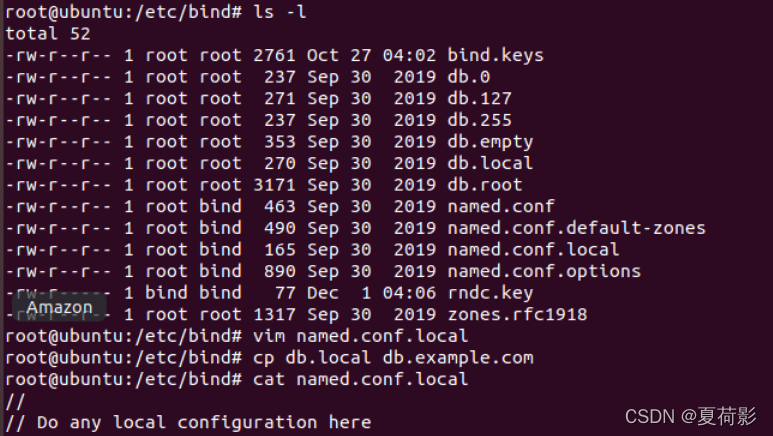
这里首先看到named.conf,named.conf.local,named.conf.options三个文件,首先我们查看named.conf

可以发现里面是引用了named.conf.options, named.conf.local, named.conf.default-zones 三个文件,下面我们DNS服务器的配置主要在这些文件内进行。
首先是配置named.conf.local文件
//
// Do any local configuration here
//

// Consider adding the 1918 zones here, if they are not used in your
// organization
//include "/etc/bind/zones.rfc1918";
zone "test.cn"{
        type master;
        file "/etc/bind/db.test.cn";
};

zone "206.168.192.in-addr.arpa"{
        type master;
        file "/etc/bind/db.192.example.com";
};
这里分别给出了自定义域名及其ip地址,然后具体的正向查询和反向查询的配置文件在file 内
这里给出两个配置文件。
/etc/bind/db.test.cn
$TTL 604800
$ORIGIN test.cn.
@ IN SOA test.cn. root.test.cn. (
2006080401 ; Serial
604800 ; Refresh
86400 ; Retry
2419200 ; Expire
604800 ) ; Negative Cache TTL
;
@ IN NS ns1
@ IN A 192.168.206.130
ns1 IN A 192.168.206.130
www IN A 192.168.206.130
/etc/bind/db.192.example.com
$TTL 604800
@       IN       SOA     test.cn. root.test.cn. (
        20211201;Serial
        604800  ;Refresh
        86400   ;Retry
        2419200 ;Expire
        604800) ;Negative Cache TTL
;
@       IN      NS      test.cn.
130     IN      PTR     www.test.cn.
130     IN      PTR     nsl.test.cn.
~
最后需要配置一下named.conf.options文件
options {
        directory "/var/cache/bind";

        // If there is a firewall between you and nameservers you want
        // to talk to, you may need to fix the firewall to allow multiple
        // ports to talk.  See http://www.kb.cert.org/vuls/id/800113

        /// If your ISP provided one or more IP addresses for stable
        // nameservers, you probably want to use them as forwarders.
        // Uncomment the following block, and insert the addresses replacing
        // the all-0's placeholder.

        forwarders {
                8.8.8.8;
        };

        //========================================================================
        // If BIND logs error messages about the root key being expired,
        // you will need to update your keys.  See https://www.isc.org/bind-keys
        //========================================================================
        dnssec-validation auto;

        auth-nxdomain no;    # conform to RFC1035
        listen-on-v6 { any; };
        listen-on port 53 {192.168.75.129;}; //这一项是填写自己的DNS服务器IP地址
		allow-transfer {any; };
		allow-query{ any; };
  };
这样最基础的就配置完成了,同时,forward后面跟的域名是在无法查到域名IP时,转发向的公共DNS服务器IP
下面是进行的测试
首先启动bind9

进行本地查询

然后在另一台机器上将DNS服务器指向该虚拟机IP
然后使用python进行查询

问题记录
1、启动bind9之后,无法查询到配置的A记录。
对于该问题,我进行了以下几步尝试。
首先是查看启动日志文献 tail /var/log/syslog
在bind配置没用问题的情况下,输出应当型如下方所示:
Mar 19 22:43:14 ubuntu named[61378]: managed-keys-zone: loaded serial 3

Mar 19 22:43:14 ubuntu named[61378]: zone 0.in-addr.arpa/IN: loaded serial 1

Mar 19 22:43:14 ubuntu named[61378]: zone 255.in-addr.arpa/IN: loaded serial 1

Mar 19 22:43:14 ubuntu named[61378]: zone 127.in-addr.arpa/IN: loaded serial 1

Mar 19 22:43:14 ubuntu named[61378]: zone localhost/IN: loaded serial 2

Mar 19 22:43:14 ubuntu named[61378]: zone smart-clouds.cn/IN: loaded serial 2006080401

Mar 19 22:43:14 ubuntu named[61378]: all zones loaded

Mar 19 22:43:14 ubuntu named[61378]: running

Mar 19 22:43:14 ubuntu named[61378]: zone smart-clouds.cn/IN: sending notifies (serial 2006080401)
在检查完启动项,确定配置无问题之后,再次尝试查询,如果还没有的话,问题可能是出在虚拟机默认的DNS服务器上。我这边是将/etc/resolv.conf的内容全部删除。原因是该文件内配置的DNS服务器优先级要高于bind中配置的服务器。

为开发者提供学习成长、分享交流、生态实践、资源工具等服务,帮助开发者快速成长。
更多推荐


 7
7 0
0- 0


 已为社区贡献4条内容

所有评论(0)