常用命令之思科常用基础配置
思科就是数通界的NO1,老一辈网络工程师都是从学习思科开始的。此博文是介绍思科的基础命令,包括如何配置主机名、IP地址、telnet、ssh远程登录等常用基础命令。博文的初衷是作为一篇备忘录,在长时间不配置思科设备,临时要用时候的备查,可以可以作为新手入门必备命令,必须要熟悉和掌握的。思科模拟器有GNS3、CiscoPacketTracer等。此博文实验环境为:- 模拟器:CiscoPacketT
一、前言
思科就是数通界的NO1,老一辈网络工程师都是从学习思科开始的。此博文是介绍思科的基础命令,包括如何配置主机名、IP地址、telnet、ssh远程登录等常用基础命令。博文的初衷是作为一篇备忘录,在长时间不配置思科设备,临时要用时候的备查,可以可以作为新手入门必备命令,必须要熟悉和掌握的。思科模拟器有GNS3、CiscoPacketTracer等。此博文实验环境为:
- 模拟器:CiscoPacketTracer8.1
- 设备:CISCO2911
- IOS版本:Version 15.1(4)M4
二、常用基础配置
1、进入全局配置模式
router#configure terminal
Enter configuration commands, one per line. End with CNTL/Z.
router(config)#
2、配置主机名
router(config)#hostname s1
s1(config)#
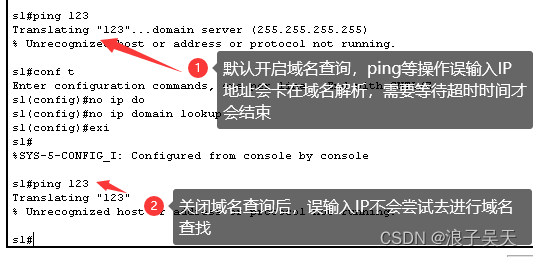
3、关闭域名查询
s1(config)#no ip domain lookup
4、配置同步日志输出

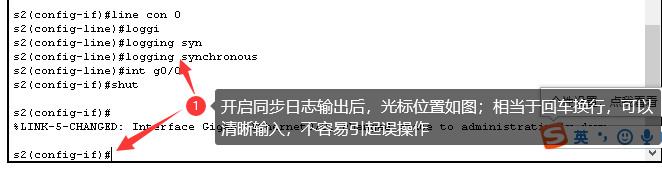
s1(config)#line con 0
s1(config-line)#logging synchronous
5、配置console
配置console密码后下次登录需要输入console密码,console登录特权级别为15,登录后直接进入特权模式;登录级别为小于15则进入普通用户模式,需要输入enable密码才可以进入特权模式。

s1(config)#line con 0
s1(config-line)#exec-timeout 30 0
s1(config-line)#password cisco
s1(config-line)#privilege level 15
s1(config-line)#login
6、配置vty
思科网络设备默认使用telnet方式远程管理,配置vty和IP地址后可以实现远程访问和管理。
s1(config)#line vty 0 15
s1(config-line)#exec-timeout 15 0
s1(config-line)#privilege level 1
s1(config-line)#password cisco
s1(config-line)#login
7、保存配置
思科网络设备可以使用wr或者copy running-config startup-config保存配置。
s1#wr
Building configuration…
[OK]
s1#copy running-config startup-config
Destination filename [startup-config]?
Building configuration…
[OK]
8、一步退回到特权模式
s1(config-line)#end
s1#
9、配置特权密码
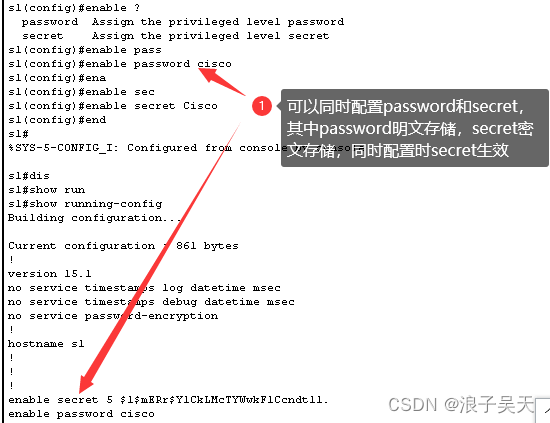
s1(config)#enable password cisco
s1(config)#enable secret Cisco
10、开启ip路由功能
#ip routing功能默认开启
s1(config)#ip routing
11、查看running配置
running-config是当前配置,配置模式下的任何操作会写入running-config,执行保存命令后写入startup-config。
s1#show running-config
12、查启动配置
startup-config是设备开启启动时自动加载的配置。
s1#show startup-config
13、配置模式下强制执行show
Cisco设备配置模式下只能执行配置操作,如果要执行show查看配置操作需要退到用户模式或者特权模式下;配置模式下可以使用do show方式强制执行show。
s1(config)#do show ip int bri
Interface IP-Address OK? Method Status Protocol
GigabitEthernet0/0 unassigned YES unset administratively down down
…
14、取消配置
思科设置取消某配置在命令前加no,例如开启端口使用no shutdown,取消ip routing功能使用命令no ip routing。
s1(config-if)#no shutdown
15、接口下配置IP地址
s1(config-if)#int g0/0
s1(config-if)#ip add 192.168.1.1 255.255.255.252
16、配置loopback地址
loopback接口只要配置了状态始终是up状态,一般用于动态路由协议的routerID。
s1(config)#int loop 0
s1(config-if)#
%LINK-5-CHANGED: Interface Loopback0, changed state to up
%LINEPROTO-5-UPDOWN: Line protocol on Interface Loopback0, changed state to up
s1(config-if)#ip add 172.16.1.1 255.255.255.0
17、配置静态路由
通过ip route 网络地址 掩码 next-hop的方式配置静态路由,next-hop可以是IP地址,接口等。如果网络地址和掩码均为0.0.0.0则配置的是默认路由。
s1(config)#ip route 172.16.2.0 255.255.255.0 192.168.1.2
18、查看ip接口状态
s1#show ip int bri
19、查看路由表
s1#show ip route
20、配置telnet登录
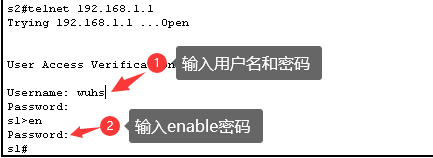
配置telnet需要本地账户和vty下的登录指定本地认证。
s1(config)#username wuhs secret cisco
s1(config)#line vty 0 15
s1(config-line)#login local
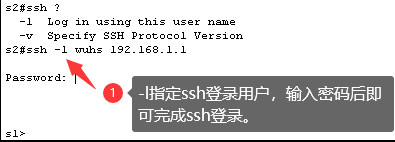
21、配置ssh登录
#配置ssh登录需要首先定义一个域名;
s1(config)#ip domain-name cisco.com
#然后生成key;
s1(config)#crypto key generate rsa general-keys
The name for the keys will be: s1.cisco.com
Choose the size of the key modulus in the range of 360 to 2048 for your
General Purpose Keys. Choosing a key modulus greater than 512 may take
a few minutes.
How many bits in the modulus [512]:
% Generating 512 bit RSA keys, keys will be non-exportable…[OK]
#定义远程登录用户
s1(config)#username wuhs secret cisco
#设置vty登录协议为ssh,默认是telnet,如果设置为all则运行ssh和telnet双协议。
s1(config)#line vty 0 15
s1(config-line)#transport input ssh
s1(config-line)#login local
22、查看ios版本
show version命令可以查看设备型号,软件版本和设备uptime时间等等。
s1#show version
Cisco IOS Software, C2900 Software (C2900-UNIVERSALK9-M), Version 15.1(4)M4, RELEASE SOFTWARE (fc2)
Technical Support: http://www.cisco.com/techsupport
Copyright © 1986-2012 by Cisco Systems, Inc.
Compiled Thurs 5-Jan-12 15:41 by pt_team
23、查看cdp邻居
cdp协议是思科的私有协议,可以查看与此设备直连的思科设备。
s1#show cdp nei
Capability Codes: R - Router, T - Trans Bridge, B - Source Route Bridge
S - Switch, H - Host, I - IGMP, r - Repeater, P - Phone
Device ID Local Intrfce Holdtme Capability Platform Port ID
s2 Gig 0/0 123 R C2900 Gig 0/0
24、日志打印到远程终端
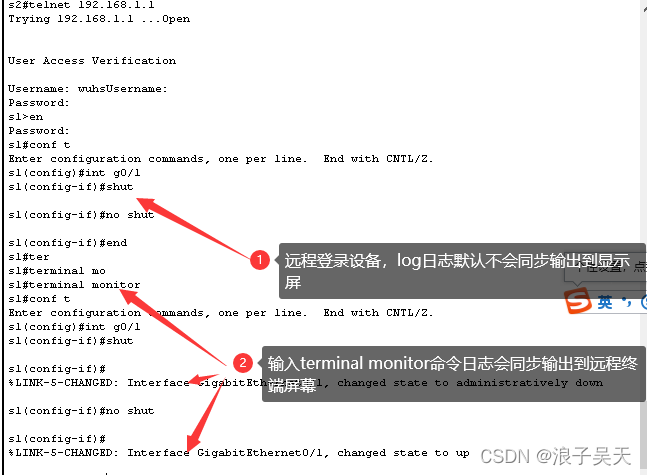
s1#terminal monitor

为开发者提供学习成长、分享交流、生态实践、资源工具等服务,帮助开发者快速成长。
更多推荐


 13
13 0
0- 0


 已为社区贡献64条内容

所有评论(0)