Wazuh从入门到上线
Wazuh从入门到上线
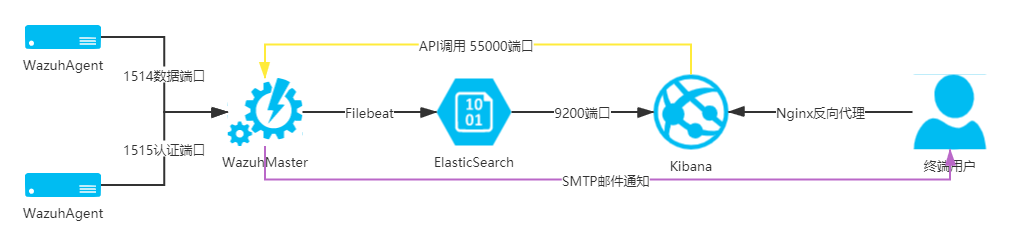
[Wazuh](Wazuh · The Open Source Security Platform)是一整套基于ossec安全检测工具和EFK日志工具构成的终端安全管理工具。不管是将其分类至HIDS,还是EDR,它都是一套通过监控主机日志行为,提供安全检测、分析和完整报告的开源、免费利器。Wazuh基于C/S架构,它的Agent支持Windows、MacOS、Linux、HP-UX、AIX等主流操作系统。其服务端负责提供认证和数据收集,然后通过filebeat进行日志清洗,最后导入ElasticSearch,通过Kinbana进行展示和输出日志。它不仅可以收集主机的事件日志进行一般的入侵检测功能,还可以通过第三方提供的系统漏洞检测feed文件,来实现主机的漏洞扫描和合规检查。
基本概念
功能示例
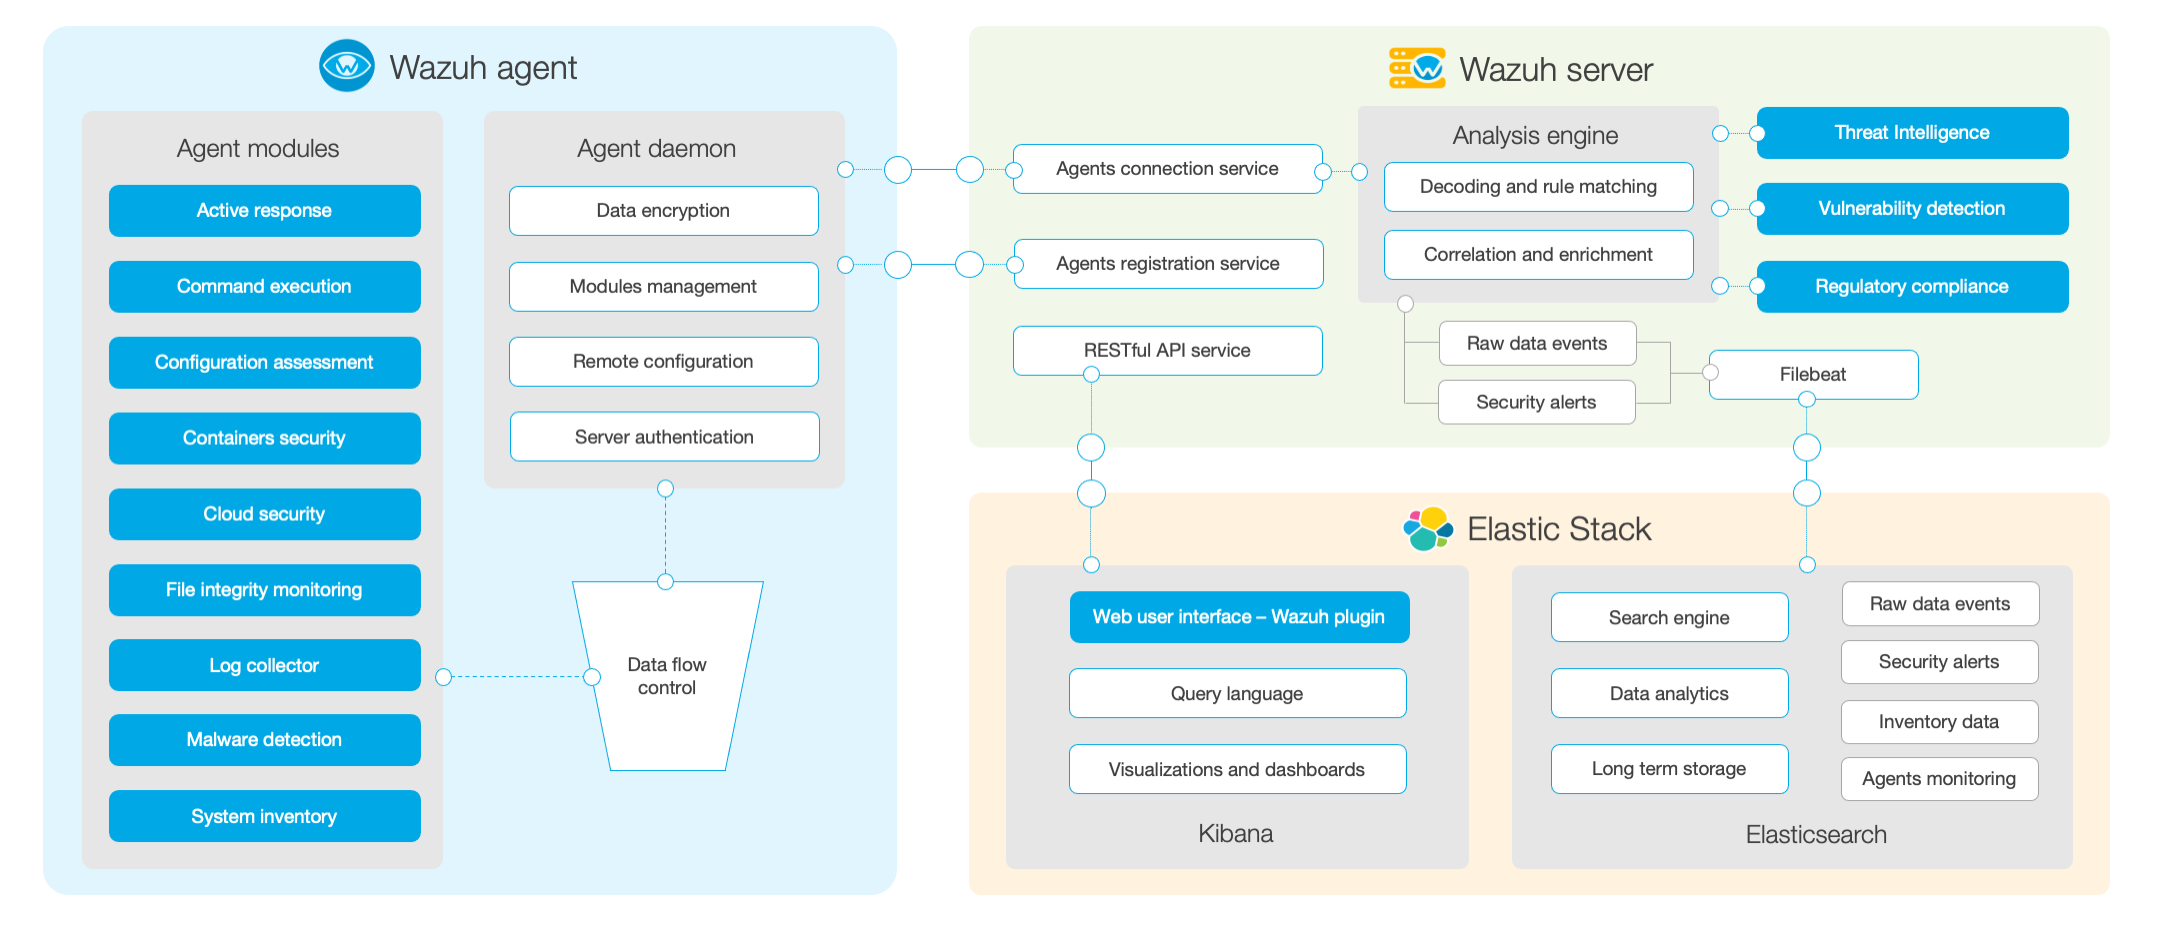
组件模块
Wazuh的组件分为三部分:
-
客户端的功能

- 收集日志和事件日志;
- 文件和注册表的监控;
- 运行进程和安装软件的信息收集;
- 监控系统端口和网络配置;
- 检测恶意软件;
- 配置管理和策略监控
- 检测主机响应
-
服务端
- 客户端的服务器注册;
- 实现客户端的连接服务;
- 根据各项规则实现事件日志的分析引擎;
- 提供RESTful API;
- 实现服务端的群集化;
- 使用Filebeat将日志文件吐给ES存储
-
Elastic Stack
- 事件日志的收集存储;
- 日志的分析和提供搜索功能;
- 展示和分析事件日志;
单点部署
安装要求
-
端口要求
Component Software Port Protocol Purpose Wazuh server Wazuh manager 1514 TCP (default) Agents connection service 1514 UDP Agents connection service 1515 TCP Agents registration service 1516 TCP Wazuh cluster daemon Wazuh API 55000 TCP Wazuh RESTful API Elastic Stack Elasticsearch 9200 TCP Elasticsearch RESTful API 9300-9400 TCP Elasticsearch cluster communication Kibana 5601 TCP Kibana web interface -
系统要求
- 服务端只能部署到Linux主机上
- 建议使用RHEL/CentOS 6.x、Ubuntu 12、Debian 7 版本以上
-
硬件要求
最小配置 建议配置 组件 RAM (GB) CPU (cores) RAM (GB) CPU (cores) Wazuh server 2 2 8 4 Elastic Stack 4 2 16 8 -
存储配置
- 需要单独配置wazuh server的日志存储分区;
- 需要按当前月度日志量x6的最低要求配置,实际运行建议至少每台Wazuh Server配置100G日志存储;
- Elastic存储需要汇总多台Wazuh Server日志,至少需要保留半年日志量,建议配置1T存储。
-
部署拓扑
部署方案
-
部署拓扑
-
网络地址
系统角色 版本 网络地址 ElasticSearch 7.11.2 172.31.101.63 Kibana 7.11.2 172.31.101.57 WazuhMaster 4.1.5 172.31.101.57 WazuhAgent 4..0.3
部署实施
-
ElasticSearch的安装
SHELL
# 安装前置软件 yum install -y zip unzip curl # 导入秘钥 rpm --import https://artifacts.elastic.co/GPG-KEY-elasticsearch # 增加官方源 cat > /etc/yum.repos.d/elastic.repo << EOF [elasticsearch-7.x] name=Elasticsearch repository for 7.x packages baseurl=https://artifacts.elastic.co/packages/7.x/yum gpgcheck=1 gpgkey=https://artifacts.elastic.co/GPG-KEY-elasticsearch enabled=1 autorefresh=1 type=rpm-md EOF # 安装软件 yum makecache yum upgrade -y yum install -y elasticsearch-7.11.2 # 导入配置文件 mv /etc/elasticsearch/elasticsearch.yml /etc/elasticsearch/elasticsearch.yml-bak touch /etc/elasticsearch/elasticsearch.yml cat > /etc/elasticsearch/elasticsearch.yml << EOF cluster.name: elastic node.name: elasticnode1 network.host: 172.31.101.63 cluster.initial_master_nodes: ["elasticnode1"] path.data: /var/lib/elasticsearch path.logs: /var/log/elasticsearch EOF # 开通防火墙 firewall-cmd --permanent --add-service=elasticsearch firewall-cmd --reload # 启动服务 systemctl daemon-reload systemctl enable elasticsearch systemctl start elasticsearch # 校验服务 # 使用其他主机访问es环境 curl -XGET http://172.31.101.63:9200 { "name" : "elasticnode1", "cluster_name" : "elastic", "cluster_uuid" : "ahjxhVEHREKNmBAfjcuyNw", "version" : { "number" : "7.11.2", "build_flavor" : "default", "build_type" : "rpm", "build_hash" : "3e5a16cfec50876d20ea77b075070932c6464c7d", "build_date" : "2021-03-06T05:54:38.141101Z", "build_snapshot" : false, "lucene_version" : "8.7.0", "minimum_wire_compatibility_version" : "6.8.0", "minimum_index_compatibility_version" : "6.0.0-beta1" }, "tagline" : "You Know, for Search" } # 禁用软件源,避免非控升级组件 sed -i "s/^enabled=1/enabled=0/" /etc/yum.repos.d/elastic.repo -
Kibana的安装
SHELL
# 安装前置软件 yum install -y zip unzip curl # 导入源秘钥 rpm --import https://artifacts.elastic.co/GPG-KEY-elasticsearch # 增加官方源 cat > /etc/yum.repos.d/elastic.repo << EOF [elasticsearch-7.x] name=Elasticsearch repository for 7.x packages baseurl=https://artifacts.elastic.co/packages/7.x/yum gpgcheck=1 gpgkey=https://artifacts.elastic.co/GPG-KEY-elasticsearch enabled=1 autorefresh=1 type=rpm-md EOF # 安装软件 yum makecache yum upgrade -y yum install -y kibana-7.11.2 # 修改配置文件 cp /etc/kibana/kibana.yml /etc/kibana/kibana.yml-bak cat >> /etc/kibana/kibana.yml << EOF server.port: 5601 server.host: "localhost" server.name: "kibana" i18n.locale: "zh-CN" elasticsearch.hosts: ["http://172.31.101.63:9200"] kibana.index: ".kibana" kibana.defaultAppId: "home" server.defaultRoute : "/app/wazuh" EOF # 创建数据目录 mkdir /usr/share/kibana/data chown -R kibana:kibana /usr/share/kibana # 离线安装插件 wget https://packages.wazuh.com/4.x/ui/kibana/wazuh_kibana-4.1.5_7.11.2-1.zip cp ./wazuh_kibana-4.1.5_7.11.2-1.zip /tmp cd /usr/share/kibana sudo -u kibana /usr/share/kibana/bin/kibana-plugin install file:///tmp/wazuh_kibana-4.1.5_7.11.2-1.zip # 配置服务 systemctl daemon-reload systemctl enable kibana systemctl start kibana # 禁用软件源,避免非控升级组件 sed -i "s/^enabled=1/enabled=0/" /etc/yum.repos.d/elastic.repo # 配置反向代理 yum install -y nginx systemctl enable --now nginx vim /etc/ngix/nginx.conf.default # 在server{}中添加配置项 ``` proxy_redirect off; proxy_set_header X-Real-IP $remote_addr; proxy_set_header X-Forwarded-For $proxy_add_x_forwarded_for; proxy_set_header Host $http_host; location / { proxy_pass http://localhost:5601/; } ``` nginx -s reload # 登录kibana之后选择wazuh插件 # 返回控制台修改插件配置文件 sed -i ‘:s/localhost/172.31.101.57/g’ /usr/share/kibana/data/wazuh/config/wazuh.yml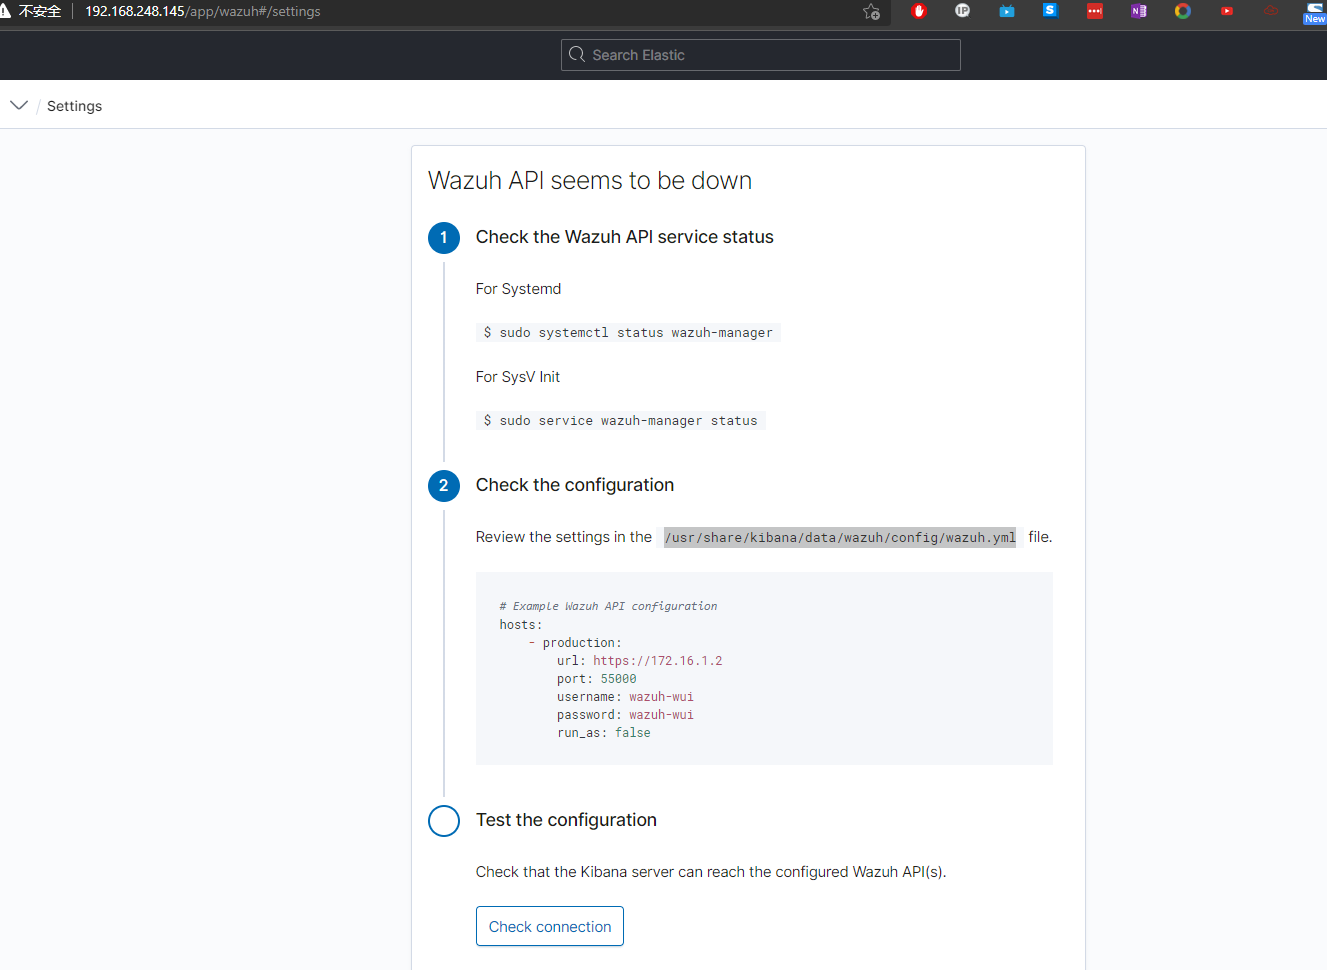
-
WazuhMaster的安装
SHELL
# 安装前置软件 yum install -y zip unzip curl # 导入秘钥 rpm --import https://packages.wazuh.com/key/GPG-KEY-WAZUH rpm --import https://artifacts.elastic.co/GPG-KEY-elasticsearch # 配置官方软件源 cat > /etc/yum.repos.d/wazuh.repo << EOF [wazuh] gpgcheck=1 gpgkey=https://packages.wazuh.com/key/GPG-KEY-WAZUH enabled=1 name=EL-$releasever - Wazuh baseurl=https://packages.wazuh.com/4.x/yum/ protect=1 EOF cat > /etc/yum.repos.d/elastic.repo << EOF [elasticsearch-7.x] name=Elasticsearch repository for 7.x packages baseurl=https://artifacts.elastic.co/packages/7.x/yum gpgcheck=1 gpgkey=https://artifacts.elastic.co/GPG-KEY-elasticsearch enabled=1 autorefresh=1 type=rpm-md EOF # 安装软件 yum makecache yum upgrade -y yum install -y wazuh-manager yum install filebeat-7.11.2 # 配置Filebeat mv /etc/filebeat/filebeat.yml /etc/filebeat/filebeat.yml-bak touch /etc/filebeat/filebeat.yml cat > /etc/filebeat/filebeat.yml<<EOF filebeat.modules: - module: wazuh alerts: enabled: true archives: enabled: false setup.template.json.enabled: true setup.template.json.path: '/etc/filebeat/wazuh-template.json' setup.template.json.name: 'wazuh' setup.template.overwrite: true setup.ilm.enabled: false output.elasticsearch.hosts: ['http://172.31.101.63:9200'] EOF # 导入filebeat的wazuh日志模板 curl -so /etc/filebeat/wazuh-template.json https://raw.githubusercontent.com/wazuh/wazuh/4.1/extensions/elasticsearch/7.x/wazuh-template.json chmod go+r /etc/filebeat/wazuh-template.json # 导入filebeat的wazuh日志模型 curl -s https://packages.wazuh.com/4.x/filebeat/wazuh-filebeat-0.1.tar.gz | tar -xvz -C /usr/share/filebeat/module # 配置防火墙规则 firewall-cmd --permanent --add-port={1514/tcp,1515/tcp,55000/tcp} firewall-cmd --reload # 禁用软件源,避免非控升级组件 sed -i "s/^enabled=1/enabled=0/" /etc/yum.repos.d/elastic.repo sed -i "s/^enabled=1/enabled=0/" /etc/yum.repos.d/wazuh.repo # 启动服务 systemctl daemon-reload systemctl enable --now wazuh-manager systemctl enable --now filebeat # 验证Filebeat filebeat test output ··· elasticsearch: http://172.31.101.63:9200... parse url... OK connection... parse host... OK dns lookup... OK addresses: 172.31.101.63 dial up... OK TLS... WARN secure connection disabled talk to server... OK version: 7.11.2 ··· # 刷新kibana -
WazuhAgent的安装(Linux)
SHELL
# 在es节点和kibana节点上安装 sudo WAZUH_MANAGER='172.31.101.57' WAZUH_AGENT_GROUP='default' yum install -y https://packages.wazuh.com/4.x/yum/wazuh-agent-4.1.5-1.x86_64.rpm # 启动服务 sudo systemctl daemon-reload sudo systemctl enable wazuh-agent sudo systemctl start wazuh-agent -
WazuhAgent的安装(Windows)
POWERSHELL
# 使用管理员权限打开powershell控制台
Invoke-WebRequest -Uri https://packages.wazuh.com/4.x/windows/wazuh-agent-4.1.5-1.msi -OutFile wazuh-agent.msi; ./wazuh-agent.msi /q WAZUH_MANAGER='172.31.101.57' WAZUH_REGISTRATION_SERVER='172.31.101.57' WAZUH_AGENT_GROUP='default'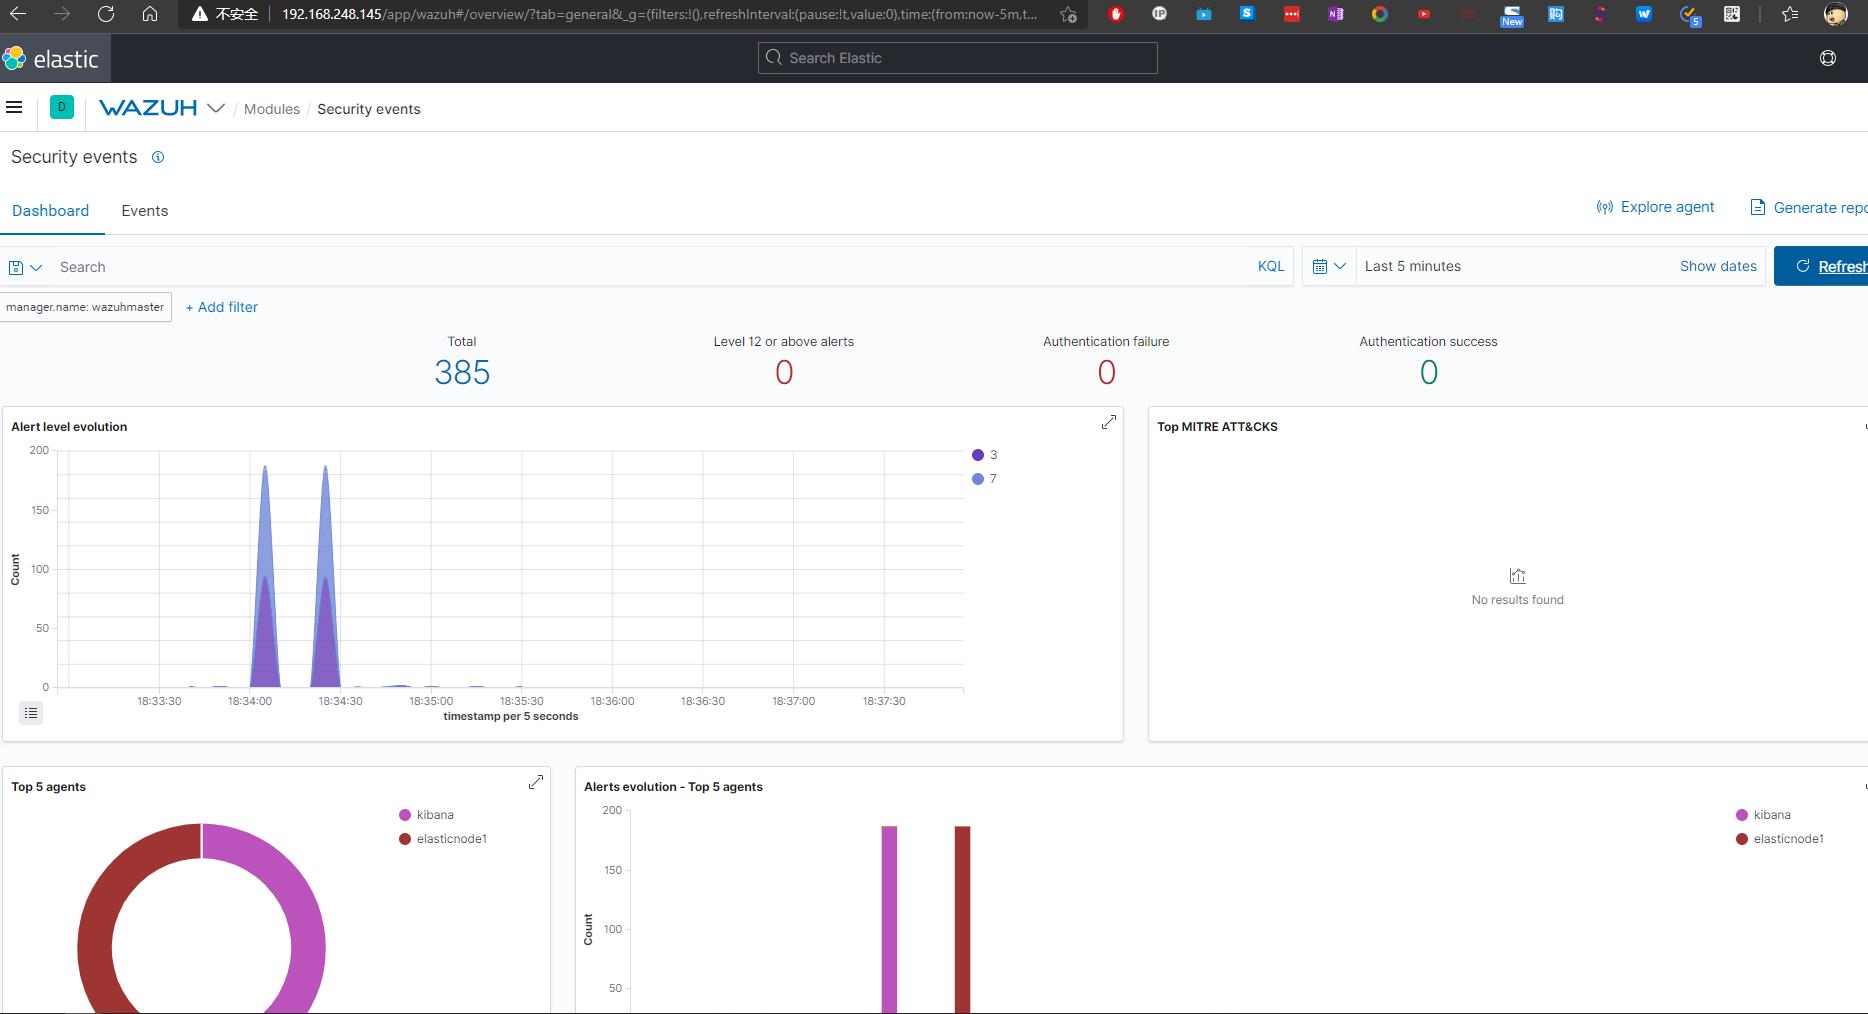
漏洞扫描
漏扫原理
- Wazuh不是一个漏洞扫描工具,它只是借助本身的功能模块来实现对操作系统的漏洞监控;
- Wazuh的漏扫依赖于Agent的对系统软件版本的扫描,上传至Master节点之后,通过在线或者离线加载的各个操作系统官方发布的CVE数据库以及美国政府发布的NVD数据库来进行对比,从而实现漏洞的检查和告警;
- Wazuh不使用爬虫、端口扫描等传统漏扫技术路径,所以对客户端主机的性能影响极小;
- Wazuh官方支持对数据库、中间件等软件进行漏洞扫描,但只支持操作系统发行官方库中的包,因为它是简单的按照软件包名来进行对比的;
- Wazuh可以对接Clamav、Suricata等其他安全系统。
应用模块
- 配置离线文件
SHELL
# 在wazuh-master上安装Nginx yum install -y nginx mkdir -p /var/www/wazuh/os chown -R nginx:nginx /var/www/wazuh # 下载离线文件 cd /var/www/wazuh/ # 下载RHEL 7 8的漏洞种子文件 wget https://www.redhat.com/security/data/oval/v2/RHEL7/rhel-7-including-unpatched.oval.xml.bz2 wget https://www.redhat.com/security/data/oval/v2/RHEL8/rhel-8-including-unpatched.oval.xml.bz2 # 下载微软漏洞文件 wget https://feed.wazuh.com/vulnerability-detector/windows/msu-updates.json.gz # 下载Redhat的安全数据Json文件 wget https://raw.githubusercontent.com/wazuh/wazuh/master/tools/vulnerability-detector/rh-generator.sh chmod +x ./*.sh mkdir redhat ./rh-generator.sh redhat/ # 下载NVD的安全数据库(CVE) wget https://raw.githubusercontent.com/wazuh/wazuh/master/tools/vulnerability-detector/nvd-generator.sh chmod +x ./*.sh mkdir nvd ./nvd-generator.sh 2010 nvd/ # 配置nginx文件 vim /etc/nginx/nginx.conf # 在server{}中修改增补如下配置 root /var/www/wazuh; location / { autoindex on; autoindex_exact_size off; autoindex_localtime on; } - 配置漏洞扫描模块
vim /var/ossec/etc/ossec.confSHELL
<vulnerability-detector> <enabled>yes</enabled> <interval>5m</interval> <ignore_time>6h</ignore_time> <run_on_start>yes</run_on_start> <!-- RedHat OS vulnerabilities --> <provider name="redhat"> <enabled>yes</enabled> <os url="http://172.31.101.57/rhel-7-including-unpatched.oval.xml.bz2">7</os> <os url="http://172.31.101.57/rhel-8-including-unpatched.oval.xml.bz2">8</os> <url start="1" end="25">http://172.31.101.57/redhat/redhat-feed[-].json</url> <update_interval>1h</update_interval> </provider> <!-- Windows OS vulnerabilities --> <provider name="msu"> <enabled>yes</enabled> <url>http://172.31.101.57/msu-updates.json.gz</url> <update_interval>1h</update_interval> </provider> <!-- Aggregate vulnerabilities --> <provider name="nvd"> <enabled>yes</enabled> <url start="2010" end="2021">http://172.31.101.57/nvd/nvd-feed[-].json.gz</url> <update_interval>1h</update_interval> </provider> </vulnerability-detector> - 配置定期更新漏洞文件
BASH
#!/bin/bash cd /var/www/wazuh/ # 下载Ubuntu 20.04的漏洞种子 wget -N https://people.canonical.com/~ubuntu-security/oval/com.ubuntu.focal.cve.oval.xml.bz2 # 下载RHEL 6/7/8的漏洞种子 wget -N https://www.redhat.com/security/data/oval/v2/RHEL6/rhel-6-including-unpatched.oval.xml.bz2 wget -N https://www.redhat.com/security/data/oval/v2/RHEL7/rhel-7-including-unpatched.oval.xml.bz2 wget -N https://www.redhat.com/security/data/oval/v2/RHEL8/rhel-8-including-unpatched.oval.xml.bz2 # 下载微软漏洞文件 wget -N https://feed.wazuh.com/vulnerability-detector/windows/msu-updates.json.gz #下载Redhat的安全数据Json文件 /bin/bash /var/www/wazuh/rh-generator.sh /var/www/wazuh/redhat # 下载NVD的安全数据库(CVE) /bin/bash /var/www/wazuh/nvd-generator.sh 2010 /var/www/wazuh/nvd # 更新文件权限 chown -R nginx:nginx /var/www/wazuh # 重启服务,更新数据库 systemctl restart wazuh-manager.service - 查询漏扫情况

-
邮件告警
SHELL
# 开启全局邮件通知 # Wazuh本身没有邮件功能,它依赖系统的邮件投递 <global> <email_notification>yes</email_notification> <email_to>sujx@live.cn</email_to> <smtp_server>exmail.qq.com</smtp_server> <email_from>i@sujx.net</email_from> <email_maxperhour>12</email_maxperhour> </global> # 定义邮件告警级别,设定事件级别>=12级即发送邮件告警 <alerts> <log_alert_level>3</log_alert_level> <email_alert_level>12</email_alert_level> </alerts> # 定义每日高危漏洞通知(>=13级漏洞) <reports> <level>13</level> <title>Daily report: Alerts with level higher than 13</title> <email_to>sujx@live.cn</email_to> </reports> # 强制发送告警邮件,即不管上述如何设定一定要发邮件告警,是配置在rule上,而不是全局conf中 <rule id="502" level="3"> <if_sid>500</if_sid> <options>alert_by_email</options> <match>Ossec started</match> <description>Ossec server started.</description> </rule> -
邮件投递
SHELL
yum install -y mailx # 使用mailx发送内部邮件 cat >> /etc/mail.rc<<EOF # 设定内部匿名邮件服务器 set smtp=smtp.example.com EOF # 使用公共邮箱发送邮件 yum install -y postfix mailx cyrus-sasl cyrus-sasl-plain # 建立邮件中继 cat >> /etc/postfix/main.cf<<EOF relayhost = [smtp.exmail.qq.com]:587 smtp_sasl_auth_enable = yes smtp_sasl_password_maps = hash:/etc/postfix/sasl_passwd smtp_sasl_security_options = noanonymous smtp_tls_CAfile = /etc/ssl/certs/ca-bundle.crt smtp_use_tls = yes EOF # 设定使用i@sujx.net发送邮件给指定接收方 echo [smtp.exmail.qq.com]:587 i@sujx.net:PASSWORD > /etc/postfix/sasl_passwd postmap /etc/postfix/sasl_passwd chmod 400 /etc/postfix/sasl_passwd chown root:root /etc/postfix/sasl_passwd /etc/postfix/sasl_passwd.db chmod 0600 /etc/postfix/sasl_passwd /etc/postfix/sasl_passwd.db # 重置服务 systemctl reload postfix # 邮件测试 echo "Test mail from postfix" | mail -s "Test Postfix" -r "i@sujx.net" sujx@live.cn # 邮件告警 Wazuh Notification. 2021 Jul 03 23:21:09 Received From: (server002.sujx.net) any->syscheck Rule: 550 fired (level 7) -> "Integrity checksum changed." Portion of the log(s): File '/etc/sysconfig/iptables.save' modified Mode: scheduled Changed attributes: mtime,md5,sha1,sha256 ………… --END OF NOTIFICATION # 邮件报告 Report 'Daily report: Alerts with level higher than 13.' completed. ------------------------------------------------ ->Processed alerts: 481384 ->Post-filtering alerts: 1953 ->First alert: 2021 Jun 29 00:06:08 ->Last alert: 2021 Jun 29 23:59:17 Top entries for 'Level': ------------------------------------------------ Severity 13 |1953 | Top entries for 'Group': ------------------------------------------------ gdpr_IV_35.7.d |1953 | pci_dss_11.2.1 |1953 | pci_dss_11.2.3 |1953 | tsc_CC7.1 |1953 | tsc_CC7.2 |1953 | vulnerability-detector |1953 | Top entries for 'Location': …… -
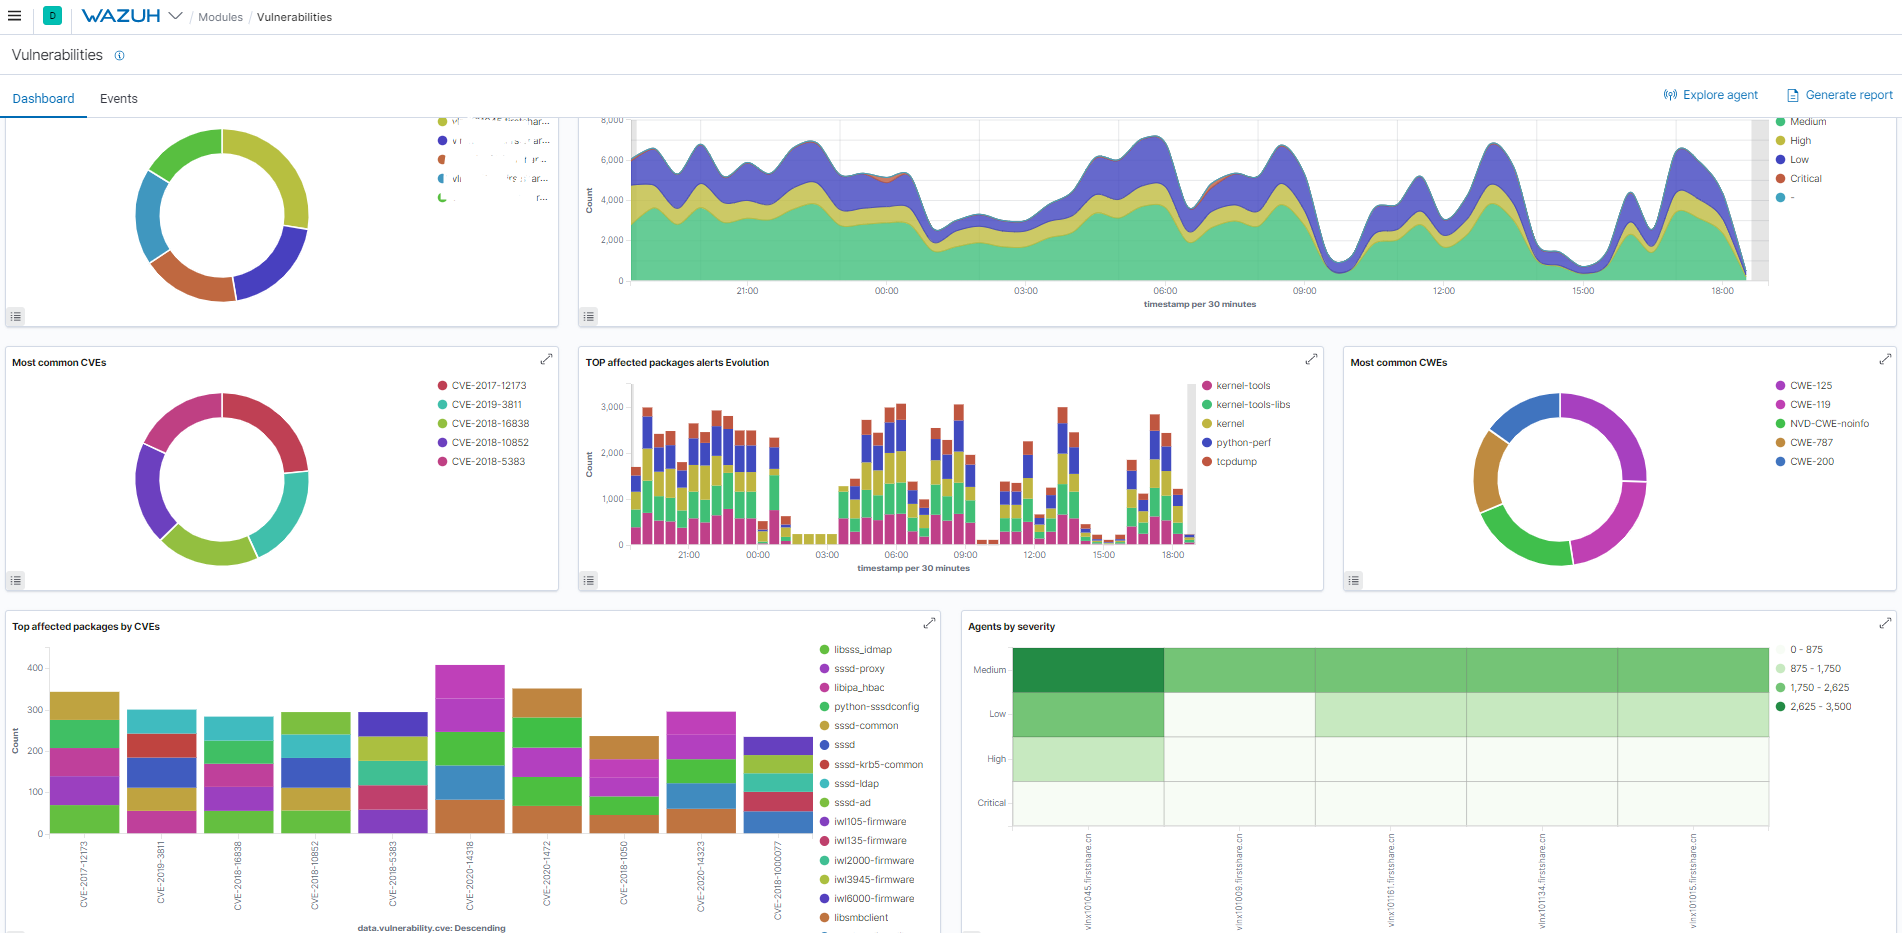
使用Kibana产生PDF版本的漏洞报告

生产建议
- 由于Wazuh的漏扫模块很容易将CPU资源打满,建议使用wazuh的群集模式部署相应数量的worker来承担漏扫功能。
- Wazuh的worker建议使用4核4G的配置进行部署,其内存占用2G左右,但CPU占用较高,且多核性能不理想。官方回复是以后版本会改进。
- 如果要求每天(24hour)产生一次全网漏扫报告的话,建议使用200:1的比例部署worker;
- 由于Wazuh的多线程优化以及Cluster模式下worker管理的优化存在问题,在面对>1000台以上的agent环境中,建议使用高配物理机部署。
使用案例
使用系统官方库
-
安装数据库
SHELL
yum makecache # 系统自带版本为10 yum install -y postgresql postgresql-server -
启动数据库
SHELL
# 启动服务 postgresql-setup initdb systemctl enable postgresql.service --now -
执行漏洞检测

使用软件官方库
- 安装数据库
SHELL
# 安装PG官方源 yum install -y https://download.postgresql.org/pub/repos/yum/reporpms/EL-8-x86_64/pgdg-redhat-repo-latest.noarch.rpm # 添加更新源,安装版本以12版本为例 yum makecache # 安装数据库 yum install -y postgresql12 postgresql12-server - 启动数据库
SHELL
# 创建目录 mkdir -p /var/lib/pgsql/12/data/ chown postgres:postgres /var/lib/pgsql/12/ -R # 启动服务 postgresql-12-setup initdb systemctl enable postgresql-12.service --now - 执行漏洞检测
- 无检测结果
问题所在
Wazuh使用软件包名或者KB名来进行对比,对于RPM系发行版就是访问rpminfo数据库来进行对比。
以postgresql为例
-
Redhat官方漏洞库
BASH
# redhat官方的漏洞库中是有postgresql12的漏洞的
 <criterion comment="Module postgresql:12 is enabled" test_ref="oval:com.redhat.cve:tst:202120229037"/>
         <criterion comment="postgresql-plperl is installed" test_ref="oval:com.redhat.cve:tst:202120229001"/>
         <criterion comment="postgresql-plperl is signed with Red Hat redhatrelease2 key" test_ref="oval:com.redhat.cve:tst:202120229002"/>
         <criterion comment="postgresql-server-devel is installed" test_ref="oval:com.redhat.cve:tst:202120229007"/>
         <criterion comment="postgresql-server-devel is signed with Red Hat redhatrelease2 key" test_ref="oval:com.redhat.cve:tst:202120229008"/>
         <criterion comment="postgresql-plpython3 is installed" test_ref="oval:com.redhat.cve:tst:202120229009"/>
         <criterion comment="postgresql-plpython3 is signed with Red Hat redhatrelease2 key" test_ref="oval:com.redhat.cve:tst:202120229010"/>
         <criterion comment="postgresql is installed" test_ref="oval:com.redhat.cve:tst:202120229011"/>
         <criterion comment="postgresql is signed with Red Hat redhatrelease2 key" test_ref="oval:com.redhat.cve:tst:202120229012"/>
         <criterion comment="postgresql-static is installed" test_ref="oval:com.redhat.cve:tst:202120229013"/>
         <criterion comment="postgresql-static is signed with Red Hat redhatrelease2 key" test_ref="oval:com.redhat.cve:tst:202120229014"/>
         <criterion comment="postgresql-upgrade is installed" test_ref="oval:com.redhat.cve:tst:202120229015"/>
         <criterion comment="postgresql-upgrade is signed with Red Hat redhatrelease2 key" test_ref="oval:com.redhat.cve:tst:202120229016"/>
         <criterion comment="postgresql-docs is installed" test_ref="oval:com.redhat.cve:tst:202120229017"/>
         <criterion comment="postgresql-docs is signed with Red Hat redhatrelease2 key" test_ref="oval:com.redhat.cve:tst:202120229018"/>
         <criterion comment="postgresql-contrib is installed" test_ref="oval:com.redhat.cve:tst:202120229019"/>
         <criterion comment="postgresql-contrib is signed with Red Hat redhatrelease2 key" test_ref="oval:com.redhat.cve:tst:202120229020"/>
         <criterion comment="postgresql-pltcl is installed" test_ref="oval:com.redhat.cve:tst:202120229023"/>
         <criterion comment="postgresql-pltcl is signed with Red Hat redhatrelease2 key" test_ref="oval:com.redhat.cve:tst:202120229024"/>
         <criterion comment="postgresql-test-rpm-macros is installed" test_ref="oval:com.redhat.cve:tst:202120229025"/>
         <criterion comment="postgresql-test-rpm-macros is signed with Red Hat redhatrelease2 key" test_ref="oval:com.redhat.cve:tst:202120229026"/>
         <criterion comment="postgresql-debugsource is installed" test_ref="oval:com.redhat.cve:tst:202120229029"/>
         <criterion comment="postgresql-debugsource is signed with Red Hat redhatrelease2 key" test_ref="oval:com.redhat.cve:tst:202120229030"/>
         <criterion comment="postgresql-server is installed" test_ref="oval:com.redhat.cve:tst:202120229031"/>
         <criterion comment="postgresql-server is signed with Red Hat redhatrelease2 key" test_ref="oval:com.redhat.cve:tst:202120229032"/>
         <criterion comment="postgresql-upgrade-devel is installed" test_ref="oval:com.redhat.cve:tst:202120229033"/>
         <criterion comment="postgresql-upgrade-devel is signed with Red Hat redhatrelease2 key" test_ref="oval:com.redhat.cve:tst:202120229034"/>
-
PG官方包的名称
BASH
[sujx@postgresql ~]$ rpm -qa |grep postgresql
postgresql12-12.7-2PGDG.rhel8.x86_64
postgresql12-libs-12.7-2PGDG.rhel8.x86_64
postgresql12-server-12.7-2PGDG.rhel8.x86_64
结论
postgresql12 ≠ postgresql,所以wazuh使用redhat的OVAL文件可以搜出redhat打包的postgresql的漏洞,其他就不可以。
维护管理
客户端的删除
SHELL
cd /var/ossec/bin/
# 执行管理程序
[root@vlnx101057 bin]# ./manage_agents

****************************************
* Wazuh v4.1.5 Agent manager.          *
* The following options are available: *
****************************************
   (A)dd an agent (A).                手动增加客户端
   (E)xtract key for an agent (E).     提取客户端秘钥
   (L)ist already added agents (L).    列出当前客户端
   (R)emove an agent (R).              删除客户端
   (Q)uit.                             退出
Choose your action: A,E,L,R or Q:R      输入R,确认删除客户端
Provide the ID of the agent to be removed (or '\q' to quit): 180     输入agent id
Confirm deleting it?(y/n):               确认删除
Agent '180' removed.                    完成删除
客户端的离线注册
Wazuh-Manager和Wazuh-Agent之间通过1515/tcp端口来进行认证的,具体实现形式类似CA证书的形式。Manager有自建Key,然后Agent通过注册的形式提交主机名、IP地址获取相应的ID和Key。注册之后,Manager和Agent就不再使用1515端口进行认证,只使用1514/TCP端口进行加密的数据通讯。
在无法开通1515/tcp端口或者其他特定情况下,我们需要离线注册Wazuh-Agent。大体步骤为:
- 在管理端注册Agent主机名和IP地址,并获取相应主机ID;
- 导出客户端注册Key;
- 在Agent上导入上述Key;
- 重启Agent服务。
SHELL
# on the Manger
/var/ossec/bin/manage_agents -a <agent_IP> -n <agent_name>
/var/ossec/bin/manage_agents -l | grep <agent_name>
ID: 001, Name: agent_1, IP: any
/var/ossec/bin/manage_agents -e <agent_id>
Agent key information for '001' is:
MDAxIDE4NWVlNjE1Y2YzYiBhbnkgMGNmMDFiYTM3NmMxY2JjNjU0NDAwYmFhZDY1ZWU1YjcyMGI2NDY3ODhkNGQzMjM5ZTdlNGVmNzQzMGFjMDA4Nw==

# on the Agent
/var/ossec/bin/manage_agents -i <key>
# 修改Agent上的Manager IP
vim /var/ossec/etc/ossec.conf
<client>
  <server>
    <address>MANAGER_IP</address>
    ...
  </server>
</client>
systemctl restart wazuh-agent
其他
此外,Wazuh Manager默认是开放认证的,即只要知道Manager的IP就可直接注册。但它也支持通过密码认证、通过SSL证书认证、通过API认证、通过主机环境认证(限定主机名和主机组来认证)。
以下,仅提供密码认证的配置介绍:
SHELL
# 在Manager主机上打开密码认证选项
# vim /var/ossec/etc/ossec.conf
<auth>
  ...
  <use_password>yes</use_password>
  ...
</auth>

# 添加随机密码
systemctl restart wazuh-manager
grep "Random password" /var/ossec/logs/ossec.log

# 添加指定密码
# 如不进行如下操作,wazuh实际就会产生一个随机密码
echo "<custom_password>" > /var/ossec/etc/authd.pass
systemctl restart wazuh-manager

# 在Agent上开启密码认证并注册
/var/ossec/bin/agent-auth -m <manager_IP> -P "<custom_password>"
systemctl restart wazuh-agent

# 或者将密码注入相应文件
echo "<custom_password>" > /var/ossec/etc/authd.pass
/var/ossec/bin/agent-auth -m <manager_IP>
systemctl restart wazuh-agent
系统调优
wazuh本身是一个对资源要求较低的系统,但长期运行下来,还是会出现各种各样资源使用不足的问题。因此,需要进行一定程度的优化和调整
调整ES参数
开启内存锁定参数
SHELL
# 锁定物理内存地址,防止ES内存被交换出去,避免频繁使用swap分区
cat >> /etc/elasticsearch/elasticsearch.yml <<EOF
bootstrap.memory_lock: true
EOF
限制系统资源
SHELL
# 配置Elasticsearch的systemd调用
mkdir -p /etc/systemd/system/elasticsearch.service.d/

cat > /etc/systemd/system/elasticsearch.service.d/elasticsearch.conf << EOF
[Service]
LimitMEMLOCK=infinity
EOF
调整内核参数
SHELL
cat >> /etc/security/limits.conf <<EOF
elasticsearch soft memlock unlimited
elasticsearch hard memlock unlimited
EOF
调整JVM参数
SHELL
# 在可用内存使用率不超过50%,且使用量不超过32GB内存的情况下,设定Xms和Xmx的值为当年内存总量的一半
# 当前内存总量为8GB
cat >> /etc/elasticsearch/jvm.options <<EOF
-Xms4g
-Xmx4g
EOF
重启服务
SHELL
systemctl daemon-reload
systemctl restart elasticsearch
设置分片和副本数据量
Wazuh设置单节点ES主机
SHELL
# 获取Wazuh ES 模板
curl https://raw.githubusercontent.com/wazuh/wazuh/v4.1.5/extensions/elasticsearch/7.x/wazuh-template.json -o w-elastic-template.json
# 结合实际环境,设置分片数为1,副本数为0

{
  "order": 1,
  "index_patterns": ["wazuh-alerts-4.x-*"],
  "settings": {
    "index.refresh_interval": "5s",
    "index.number_of_shards": "1",
    "index.number_of_replicas": "0",
    "index.auto_expand_replicas": "0-1",
    "index.mapping.total_fields.limit": 2000
  },
  "mappings": {
  "...": "..."
  }
}

# 应用模板
curl -X PUT "http://localhost:9200/_template/wazuh-custom" -H 'Content-Type: application/json' -d @w-elastic-template.json
设置永久分片数
SHELL
# 设置ES的永久分片数为20000
curl -XPUT  "127.0.0.1:9200/_cluster/settings" -H 'Content-Type: application/json' -d '{"persistent":{"cluster":{"max_shards_per_node":20000}}}'
删除过期分片
SHELL
# 删除2021.06所有分片
curl -XDELETE http://127.0.0.1:9200/wazuh-alerts-4.x-2021.06.*
硬件调优
使用固态磁盘
更多的CPU和内存
群集部署
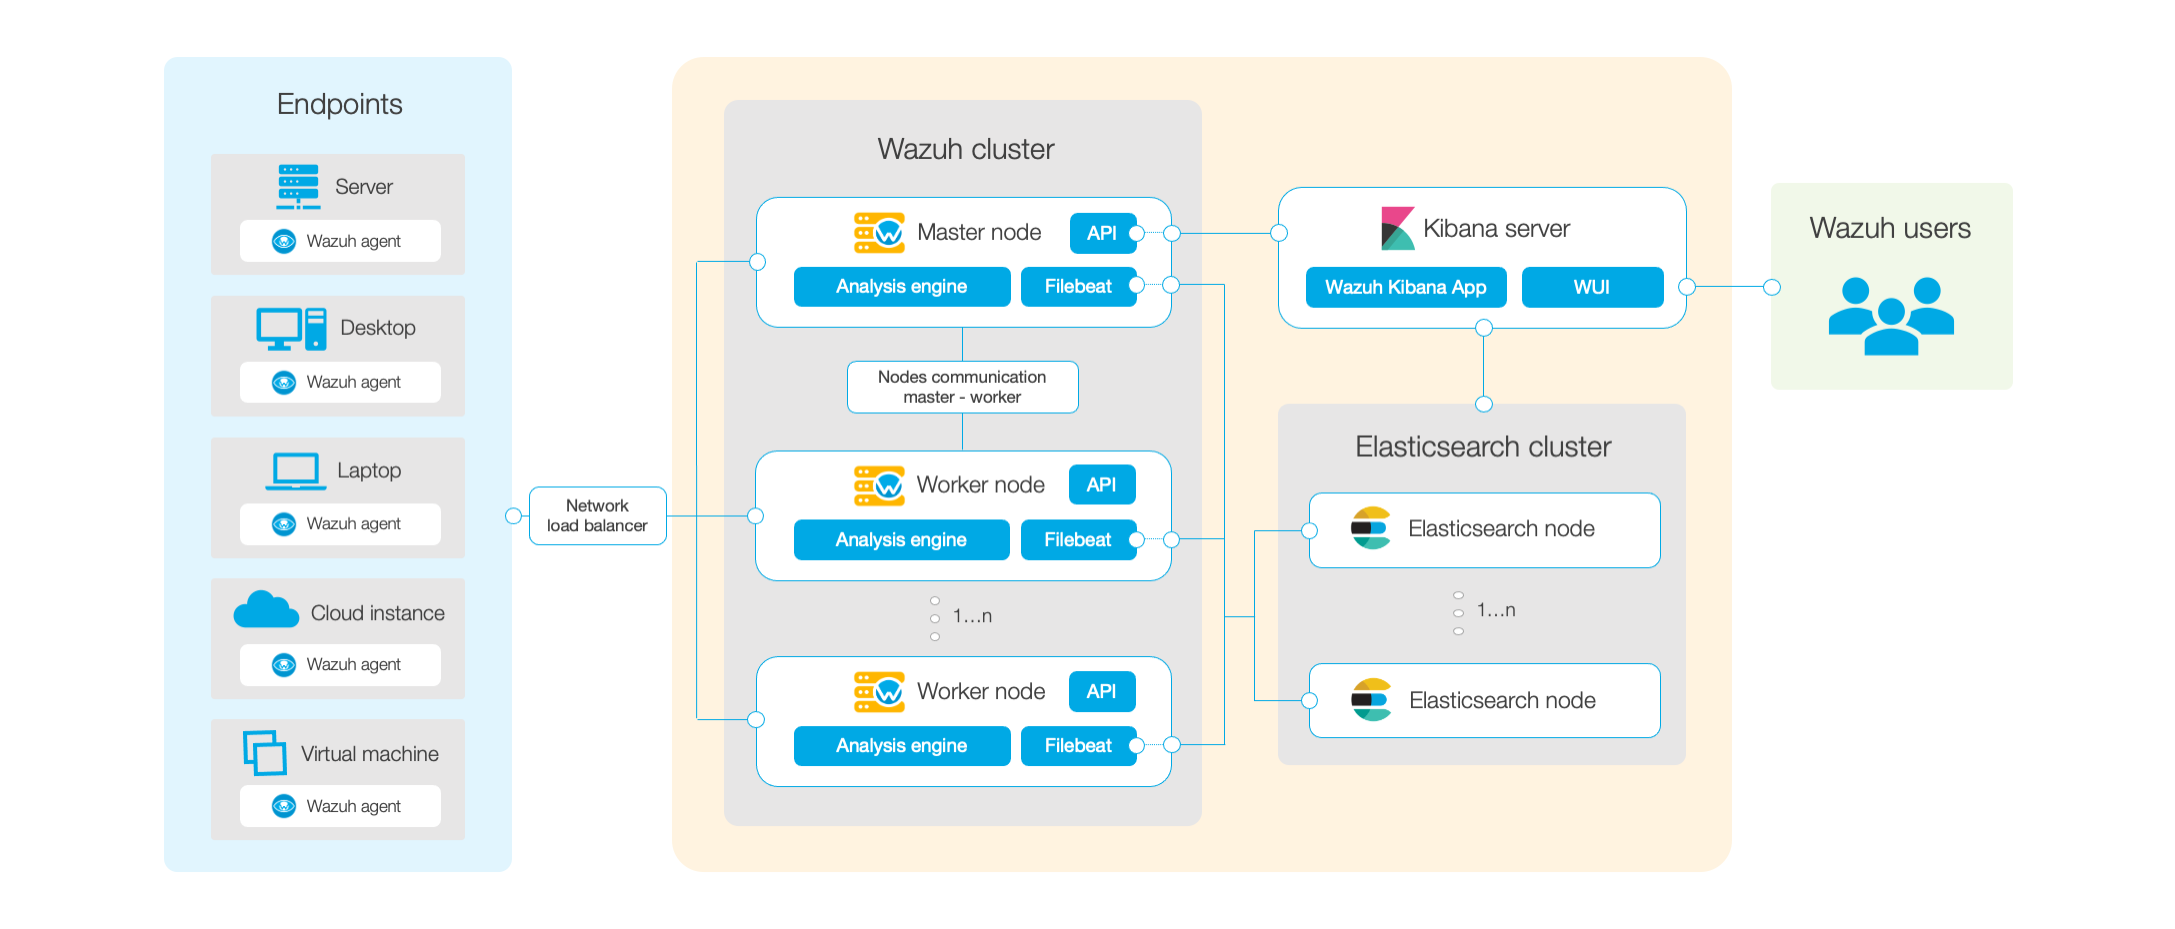
在中大型网络环境中,单台Allinone的Wazuh系统或者单节点的分布式部署Wazuh系统从性能上已经无法满足日志分析和漏洞扫描的需求,因此应当采用高可用、多节点的分布式部署来满足Wazuh对CPU和存储的要求。
| 序号 | 系统描述 | 配置 | 网络地址 | 系统角色 |
|---|---|---|---|---|
| 1 | Lvsnode1 | 1c/1g | 192.168.79.51 | LVS+KeepLived 提供VIP和负载均衡 |
| 2 | Lvsnode2 | 1c/1g | 192.168.79.52 | LVS+KeepLived 提供VIP和负载均衡 |
| 3 | Wazuhnode0 | 2c/2g | 192.168.79.60 | Wazuh主节点,提供认证以及cve库 |
| 4 | Wazuhnode1 | 1c/1g | 192.168.79.61 | WazuhWorker,工作节点,提供事件日志分析和漏洞扫描 |
| 5 | Wazuhnode2 | 1c/1g | 192.168.79.62 | WazuhWorker,工作节点,提供事件日志分析和漏洞扫描 |
| 6 | KibanaNode | 2c/4g | 192.168.79.80 | Kibana展示节点 |
| 7 | ElasticNode1 | 4c/4g | 192.168.79.81 | ElasticSearch 群集节点 |
| 8 | ElasticNode2 | 4c/4g | 192.168.79.82 | ElasticSearch 群集节点 |
| 9 | ElasticNode3 | 4c/4g | 192.168.79.83 | ElasticSearch 群集节点 |
| 10 | UbuntuNode | 1c/1g | 192.168.79.127 | Ubuntu 20.04 LTS 测试机 + Wordpress |
| 11 | CentOSNode | 1c/1g | 192.168.79.128 | CentOS 8.4 测试机 + PostgreSQL |
| 12 | WindowsNode | 2c/2g | 192.168.79.129 | Windows Server 2012R2 测试机+ SQL Server |
| 13 | VIP | ——- | 192.168.79.50 | 前端访问IP |
| 14 | Gateway | 1c/1g | 192.168.79.254 | 使用iKuai提供网关服务和外部DNS服务 |

后端存储群集
-
ElasticSearch三节点部署
CODE
# 安装前置软件 yum install -y zip unzip curl # 导入秘钥 rpm --import https://artifacts.elastic.co/GPG-KEY-elasticsearch # 增加官方源 cat > /etc/yum.repos.d/elastic.repo << EOF [elasticsearch-7.x] name=Elasticsearch repository for 7.x packages baseurl=https://artifacts.elastic.co/packages/7.x/yum gpgcheck=1 gpgkey=https://artifacts.elastic.co/GPG-KEY-elasticsearch enabled=1 autorefresh=1 type=rpm-md EOF # 安装软件 yum makecache yum upgrade -y yum install -y elasticsearch-7.11.2 # 导入配置文件 cp -a /etc/elasticsearch/elasticsearch.yml{,_$(date +%F)} # 依次在各个节点上设置 cat > /etc/elasticsearch/elasticsearch.yml << EOF network.host: 192.168.79.81 node.name: elasticnode1 cluster.name: elastic cluster.initial_master_nodes: - elasticnode1 - elasticnode2 - elasticnode3 discovery.seed_hosts: - 192.168.79.81 - 192.168.79.82 - 192.168.79.83 EOF # 开通防火墙 firewall-cmd --permanent --add-service=elasticsearch firewall-cmd --reload # 启动服务 systemctl daemon-reload systemctl enable elasticsearch systemctl start elasticsearch # 禁用软件源,避免非控升级组件 sed -i "s/^enabled=1/enabled=0/" /etc/yum.repos.d/elastic.repo # 在各个节点上依次部署,注意变更主机名和IP地址 -
ElasticSearch群集验证
CODE
sujx@LEGION:~$ curl http://192.168.79.81:9200/_cluster/health?pretty
{
  "cluster_name" : "elastic",
  "status" : "green",
  "timed_out" : false,
  "number_of_nodes" : 3,
  "number_of_data_nodes" : 3,
  "active_primary_shards" : 0,
  "active_shards" : 0,
  "relocating_shards" : 0,
  "initializing_shards" : 0,
  "unassigned_shards" : 0,
  "delayed_unassigned_shards" : 0,
  "number_of_pending_tasks" : 0,
  "number_of_in_flight_fetch" : 0,
  "task_max_waiting_in_queue_millis" : 0,
  "active_shards_percent_as_number" : 100.0
}

sujx@LEGION:~$ curl http://192.168.79.81:9200/_cat/nodes?v
ip            heap.percent ram.percent cpu load_1m load_5m load_15m node.role  master name
192.168.79.83           10          86   0    0.08    0.08     0.03 cdhilmrstw -      elasticnode3
192.168.79.82           18          97   0    0.01    0.12     0.08 cdhilmrstw *      elasticnode2
192.168.79.81           16          95   0    0.06    0.08     0.08 cdhilmrstw -      elasticnode1
处理系统群集
-
Wazuh Master的部署
CODE
# 安装前置软件 yum install -y zip unzip curl # 导入秘钥 rpm --import https://packages.wazuh.com/key/GPG-KEY-WAZUH rpm --import https://artifacts.elastic.co/GPG-KEY-elasticsearch # 配置官方软件源 cat > /etc/yum.repos.d/wazuh.repo << EOF [wazuh] gpgcheck=1 gpgkey=https://packages.wazuh.com/key/GPG-KEY-WAZUH enabled=1 name=EL-$releasever - Wazuh baseurl=https://packages.wazuh.com/4.x/yum/ protect=1 EOF cat > /etc/yum.repos.d/elastic.repo << EOF [elasticsearch-7.x] name=Elasticsearch repository for 7.x packages baseurl=https://artifacts.elastic.co/packages/7.x/yum gpgcheck=1 gpgkey=https://artifacts.elastic.co/GPG-KEY-elasticsearch enabled=1 autorefresh=1 type=rpm-md EOF # 安装软件 yum makecache yum upgrade -y yum install -y wazuh-manager yum install -y filebeat-7.11.2 # 配置Filebeat cp -a /etc/filebeat/filebeat.yml{,_$(date +%F)} cat > /etc/filebeat/filebeat.yml<<EOF filebeat.modules: - module: wazuh alerts: enabled: true archives: enabled: false setup.template.json.enabled: true setup.template.json.path: '/etc/filebeat/wazuh-template.json' setup.template.json.name: 'wazuh' setup.template.overwrite: true setup.ilm.enabled: false output.elasticsearch.hosts: ['http://192.168.79.81:9200','http://192.168.79.82:9200','http://192.168.79.83:9200'] EOF # 导入filebeat的wazuh日志模板 curl -so /etc/filebeat/wazuh-template.json https://raw.githubusercontent.com/wazuh/wazuh/4.1/extensions/elasticsearch/7.x/wazuh-template.json chmod go+r /etc/filebeat/wazuh-template.json # 导入filebeat的wazuh日志模型 curl -s https://packages.wazuh.com/4.x/filebeat/wazuh-filebeat-0.1.tar.gz | tar -xvz -C /usr/share/filebeat/module # 配置防火墙规则 firewall-cmd --permanent --add-port={1514/tcp,1515/tcp,1516/tcp,55000/tcp} firewall-cmd --reload # 禁用软件源,避免非控升级组件 sed -i "s/^enabled=1/enabled=0/" /etc/yum.repos.d/elastic.repo sed -i "s/^enabled=1/enabled=0/" /etc/yum.repos.d/wazuh.repo # 启动服务 systemctl daemon-reload systemctl enable --now wazuh-manager systemctl enable --now filebeat # 测试filebeat [root@WazuhNode0 wazuh]# filebeat test output elasticsearch: http://192.168.79.81:9200... parse url... OK connection... parse host... OK dns lookup... OK addresses: 192.168.79.81 dial up... OK TLS... WARN secure connection disabled talk to server... OK version: 7.11.2 elasticsearch: http://192.168.79.82:9200... parse url... OK connection... parse host... OK dns lookup... OK addresses: 192.168.79.82 dial up... OK TLS... WARN secure connection disabled talk to server... OK version: 7.11.2 elasticsearch: http://192.168.79.83:9200... parse url... OK connection... parse host... OK dns lookup... OK addresses: 192.168.79.83 dial up... OK TLS... WARN secure connection disabled talk to server... OK version: 7.11.2 -
Wazuh worker的部署
CODE
# 同Master部署一致 # 安装软件 yum install -y wazuh-manager yum install -y filebeat-7.11.2 # 配置Filebeat cp -a /etc/filebeat/filebeat.yml{,_$(date +%F)} cat > /etc/filebeat/filebeat.yml<<EOF filebeat.modules: - module: wazuh alerts: enabled: true archives: enabled: false setup.template.json.enabled: true setup.template.json.path: '/etc/filebeat/wazuh-template.json' setup.template.json.name: 'wazuh' setup.template.overwrite: true setup.ilm.enabled: false output.elasticsearch.hosts: ['http://192.168.79.81:9200','http://192.168.79.82:9200','http://192.168.79.83:9200'] EOF # 导入filebeat的wazuh日志模板 curl -so /etc/filebeat/wazuh-template.json https://raw.githubusercontent.com/wazuh/wazuh/4.1/extensions/elasticsearch/7.x/wazuh-template.json chmod go+r /etc/filebeat/wazuh-template.json # 导入filebeat的wazuh日志模型 curl -s https://packages.wazuh.com/4.x/filebeat/wazuh-filebeat-0.1.tar.gz | tar -xvz -C /usr/share/filebeat/module # 配置防火墙规则 firewall-cmd --permanent --add-port={1514/tcp,1516/tcp} firewall-cmd --reload # 启动服务 systemctl daemon-reload systemctl enable --now wazuh-manager systemctl enable --now filebeat -
实现wazuh群集
CODE
# 进行群集认证
# Master节点
#生成随机串值
openssl rand -hex 16
d84691d111f86e70e8ed7eff80cde39e

# 编辑ossec.conf的cluster

  <cluster>
    <name>wazuh</name>
    <node_name>wazuhnode0</node_name>
    <node_type>master</node_type>
    <key>d84691d111f86e70e8ed7eff80cde39e</key>
    <port>1516</port>
    <bind_addr>0.0.0.0</bind_addr>
    <nodes>
        <node>192.168.79.60</node>
    </nodes>
    <hidden>no</hidden>
    <disabled>no</disabled>
  </cluster>

# Worker节点
# 编辑ossec.conf的cluster

  <cluster>
    <name>wazuh</name>
    <node_name>wazuhnode1</node_name>
    <node_type>worker</node_type>
    <key>d84691d111f86e70e8ed7eff80cde39e</key>
    <port>1516</port>
    <bind_addr>0.0.0.0</bind_addr>
    <nodes>
        <node>192.168.79.60</node>
    </nodes>
    <hidden>no</hidden>
    <disabled>no</disabled>
  </cluster>

# 验证
[root@WazuhNode0 bin]# ./cluster_control -l
NAME        TYPE    VERSION  ADDRESS
wazuhnode0  master  4.1.5    192.168.79.60
wazuhnode1  worker  4.1.5    192.168.79.61
wauzhnode2  worker  4.1.5    192.168.79.62
-
前端群集
-
前端部署采用Keeplived+Nginx代理的模式,提供一个VIP供Wazuh的agent进行部署。
-
部署Nginx的TCP代理节点
BASH
# 部署第一个节点Node1 # 开放防火墙端口 firewall-cmd --permanent --add-port={1514/tcp,1515/tcp} firewall-cmd --reload # 新增官方源地址 cat > /etc/yum.repos.d/nginx.repo <<\EOF [nginx] name=nginx repo baseurl=http://nginx.org/packages/centos/$releasever/$basearch/ gpgcheck=0 enabled=1 EOF # 安装Nginx yum makecache yum install -y nginx systemctl daemon-reload systemctl enable nginx.service --now # 配置stream cd /etc/nginx cp -a nginx.conf{,_$(date +%F)} cat >> /etc/nginx/nginx.conf <<EOF include /etc/nginx/stream.d/*.conf; EOF mkdir ./stream.d touch /etc/nginx/stream.d/wazuh.conf cat > /etc/nginx/stream.d/wazuh.conf<<EOF stream { upstream cluster { hash $remote_addr consistent; server 192.168.79.61:1514; server 192.168.79.62:1514; } upstream master { server 192.168.79.60:1515; } server { listen 1514; proxy_pass cluster; } server { listen 1515; proxy_pass master; } } EOF # 重启Nginx systemctl restart nginx # 检查端口情况 [root@lvsnode1 nginx]# netstat -tlnp Active Internet connections (only servers) Proto Recv-Q Send-Q Local Address Foreign Address State PID/Program name tcp 0 0 0.0.0.0:1514 0.0.0.0:* LISTEN 1897/nginx: master tcp 0 0 0.0.0.0:1515 0.0.0.0:* LISTEN 1897/nginx: master tcp 0 0 0.0.0.0:80 0.0.0.0:* LISTEN 1897/nginx: master tcp 0 0 0.0.0.0:22 0.0.0.0:* LISTEN 1022/sshd tcp6 0 0 :::80 :::* LISTEN 1897/nginx: master tcp6 0 0 :::22 :::* LISTEN 1022/sshd # 安装Keeplived yum install -y keepalived cd /etc/keepalived/ cp -a keepalived.conf{,_$(date +%F)} # 进行配置 cat > keepalived.conf<<EOF # Configuration File for keepalived # global_defs { router_id nginxnode1 vrrp_mcast_group4 224.0.0.18 lvs_timeouts tcp 900 tcpfin 30 udp 300 lvs_sync_daemon ens160 route_lvs vrrp_skip_check_adv_addr #vrrp_strict vrrp_garp_interval 0 vrrp_gna_interval 0 } vrrp_instance route_lvs { state BACKUP priority 100 virtual_router_id 18 interface ens160 track_interface { ens160 } advert_int 3 authentication { auth_type PASS auth_pass password } virtual_ipaddress { 192.168.79.50/24 dev ens160 label ens160:0 } } EOF systemctl enable keepalived.service --now -
验证服务
SHELL
sujx@LEGION:~$ ping 192.168.79.50
PING 192.168.79.50 (192.168.79.50) 56(84) bytes of data.
64 bytes from 192.168.79.50: icmp_seq=1 ttl=64 time=0.330 ms
64 bytes from 192.168.79.50: icmp_seq=2 ttl=64 time=0.306 ms

--- 192.168.79.50 ping statistics ---
3 packets transmitted, 3 received, 0% packet loss, time 2002ms
rtt min/avg/max/mdev = 0.306/0.430/0.655/0.159 ms

sujx@LEGION:~$ telnet 192.168.79.50 1515
Trying 192.168.79.140...
Connected to 192.168.79.140.
Escape character is '^]'.

sujx@LEGION:~$ telnet 192.168.79.50 1514
Trying 192.168.79.140...
Connected to 192.168.79.140.
Escape character is '^]'.
访问面板
-
部署Elastic协调节点
SHELL
# 如果 Elasticsearch 集群有多个节点,分发 Kibana 节点之间请求的最简单的方法就是在 Kibana 机器上运行一个 Elasticsearch 协调(Coordinating only node) 的节点。Elasticsearch 协调节点本质上是智能负载均衡器,也是集群的一部分,如果有需要,这些节点会处理传入 HTTP 请求,重定向操作给集群中其它节点,收集并返回结果 # 在Kibana节点上安装Elasticsearch # 安装前置软件 yum install -y zip unzip curl # 导入源秘钥 rpm --import https://artifacts.elastic.co/GPG-KEY-elasticsearch # 增加官方源 cat > /etc/yum.repos.d/elastic.repo << EOF [elasticsearch-7.x] name=Elasticsearch repository for 7.x packages baseurl=https://artifacts.elastic.co/packages/7.x/yum gpgcheck=1 gpgkey=https://artifacts.elastic.co/GPG-KEY-elasticsearch enabled=1 autorefresh=1 type=rpm-md EOF # 安装软件 yum makecache yum upgrade -y yum install -y elasticsearch-7.11.2 #配置防火墙 firewall-cmd --permanent --add-service=http firewall-cmd --permanent --add-service=elasticsearch firewall-cmd --reload # 修改配置 # 其他ES节点也需要增加该主机NodeIP,并重启服务 cat >> /etc/elasticsearch/elasticsearch.yml<<EOF node.name: kibananode0 cluster.name: elastic node.master: false node.data: false node.ingest: false network.host: localhost http.port: 9200 transport.host: 192.168.79.80 transport.tcp.port: 9300 discovery.seed_hosts: - 192.168.79.81 - 192.168.79.82 - 192.168.79.83 - 192.168.79.80 EOF # 查看群集信息,只允许本机Kibana访问 [root@kibana wazuh]# curl http://localhost:9200/_cat/nodes?v ip heap.percent ram.percent cpu load_1m load_5m load_15m node.role master name 192.168.79.81 18 96 0 0.04 0.06 0.02 cdhilmrstw - elasticnode1 192.168.79.80 12 97 3 0.01 0.08 0.07 lr - kibananode0 192.168.79.82 23 96 0 0.04 0.09 0.04 cdhilmrstw * elasticnode2 192.168.79.83 23 87 0 0.09 0.11 0.05 cdhilmrstw - elasticnode3 -
配置Kibana
SHELL
yum install -y kibana-7.11.2 # 修改配置文件 cp -a /etc/kibana/kibana.yml{,_$(date +%F)} cat >> /etc/kibana/kibana.yml << EOF server.port: 5601 server.host: "localhost" server.name: "kibana" i18n.locale: "zh-CN" elasticsearch.hosts: ["http://localhost:9200"] kibana.index: ".kibana" kibana.defaultAppId: "home" server.defaultRoute : "/app/wazuh" EOF # 创建数据目录 mkdir /usr/share/kibana/data chown -R kibana:kibana /usr/share/kibana # 离线安装插件 wget https://packages.wazuh.com/4.x/ui/kibana/wazuh_kibana-4.1.5_7.11.2-1.zip cp ./wazuh_kibana-4.1.5_7.11.2-1.zip /tmp cd /usr/share/kibana sudo -u kibana /usr/share/kibana/bin/kibana-plugin install file:///tmp/wazuh_kibana-4.1.5_7.11.2-1.zip # 配置服务 systemctl daemon-reload systemctl enable kibana systemctl start kibana # 禁用软件源,避免非控升级组件 sed -i "s/^enabled=1/enabled=0/" /etc/yum.repos.d/elastic.repo # 配置反向代理 yum install -y nginx systemctl enable --now nginx vim /etc/ngix/nginx.conf # 在server{}中添加配置项 ``` proxy_redirect off; proxy_set_header X-Real-IP $remote_addr; proxy_set_header X-Forwarded-For $proxy_add_x_forwarded_for; proxy_set_header Host $http_host; location / { proxy_pass http://localhost:5601/; } ``` nginx -s reload # 登录kibana之后选择wazuh插件 # 返回控制台修改插件配置文件 sed -i "s/localhost/192.168.79.60/g" /usr/share/kibana/data/wazuh/config/wazuh.yml客户端验证
-
部署Wazuh-Agent
SHELL
# CentOS主机 sudo WAZUH_MANAGER='192.168.79.50' WAZUH_AGENT_GROUP='default' yum install https://packages.wazuh.com/4.x/yum/wazuh-agent-4.1.5-1.x86_64.rpm -y # Ubuntu主机 curl -so wazuh-agent.deb https://packages.wazuh.com/4.x/apt/pool/main/w/wazuh-agent/wazuh-agent_4.1.5-1_amd64.deb && sudo WAZUH_MANAGER='192.168.79.60' WAZUH_AGENT_GROUP='default' dpkg -i ./wazuh-agent.deb # 启动服务 systemctl daemon-reload systemctl enable wazuh-agent systemctl start wazuh-agent # Windows主机 Invoke-WebRequest -Uri https://packages.wazuh.com/4.x/windows/wazuh-agent-4.1.5-1.msi -OutFile wazuh-agent.msi; ./wazuh-agent.msi /q WAZUH_MANAGER='192.168.79.50' WAZUH_REGISTRATION_SERVER='192.168.79.50' WAZUH_AGENT_GROUP='default' start-service wazuh -
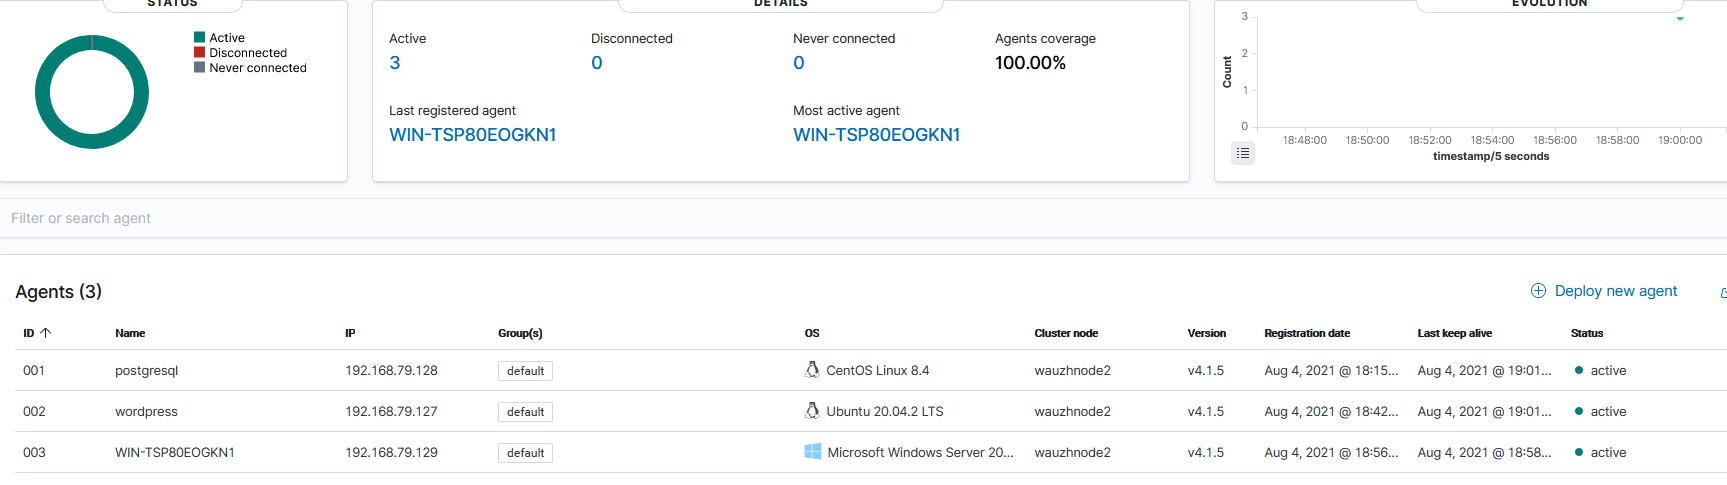
验证客户端所在管理节点
更新数据
相比较单机版本,群集化的Wazuh需要处理的第一个问题就是如何保证ossec.conf文件和漏洞库的统一配置、统一更新、统一下发。以下将使用简单的Ansible命令和Shell脚本实现前述功能。
建立共享
-
部署Nginx
SHELL
# 在wazuh-master上安装Nginx yum install -y nginx mkdir -p /var/www/wazuh chown -R nginx:nginx /var/www/wazuh -
下载更新
SHELL
# 下载离线文件 cd /var/www/wazuh/ # 下载Ubuntu 20.04的漏洞种子 wget -N https://people.canonical.com/~ubuntu-security/oval/com.ubuntu.focal.cve.oval.xml.bz2 # 下载RHEL 7 8的漏洞种子文件 wget https://www.redhat.com/security/data/oval/v2/RHEL6/rhel-6-including-unpatched.oval.xml.bz2 wget https://www.redhat.com/security/data/oval/v2/RHEL7/rhel-7-including-unpatched.oval.xml.bz2 wget https://www.redhat.com/security/data/oval/v2/RHEL8/rhel-8-including-unpatched.oval.xml.bz2 # 下载微软CVE文件 wget https://feed.wazuh.com/vulnerability-detector/windows/msu-updates.json.gz # 下载Redhat的安全数据Json文件 wget https://raw.githubusercontent.com/wazuh/wazuh/master/tools/vulnerability-detector/rh-generator.sh chmod +x ./*.sh mkdir redhat ./rh-generator.sh redhat/ # 下载NVD的安全数据库(CVE) wget https://raw.githubusercontent.com/wazuh/wazuh/master/tools/vulnerability-detector/nvd-generator.sh chmod +x ./*.sh mkdir nvd ./nvd-generator.sh 2010 nvd/ -
页面发布
SHELL
# 配置nginx文件
vim /etc/nginx/nginx.conf
# 在server{}中修改增补如下配置
        root         /var/www/wazuh;

        location / {
                autoindex on;
                autoindex_exact_size off;
                autoindex_localtime on;
        }
定时更新
-
在/opt/wazuh/目录下建立wazuhupdate.sh文件
SHELL
#!/bin/bash cd /var/www/wazuh/ # 下载Ubuntu 20.04的漏洞种子 wget -N https://people.canonical.com/~ubuntu-security/oval/com.ubuntu.focal.cve.oval.xml.bz2 # 下载RHEL 6/7/8的漏洞种子 wget -N https://www.redhat.com/security/data/oval/v2/RHEL6/rhel-6-including-unpatched.oval.xml.bz2 wget -N https://www.redhat.com/security/data/oval/v2/RHEL7/rhel-7-including-unpatched.oval.xml.bz2 wget -N https://www.redhat.com/security/data/oval/v2/RHEL8/rhel-8-including-unpatched.oval.xml.bz2 # 下载微软漏洞文件 wget -N https://feed.wazuh.com/vulnerability-detector/windows/msu-updates.json.gz #下载Redhat的安全数据Json文件 /bin/bash /var/www/wazuh/rh-generator.sh /var/www/wazuh/redhat # 下载NVD的安全数据库(CVE) /bin/bash /var/www/wazuh/nvd-generator.sh 2010 /var/www/wazuh/nvd # 更新文件权限 chown -R nginx:nginx /var/www/wazuh # 重启服务,更新数据库 systemctl restart wazuh-manager.service -
建立定时文件
SHELL
#检查crond.service运行状态
systemctl status crond.service
crontab -e
# 每周一、四下午6点半执行脚本进行升级
30 18 * * 1,4 /bin/bash /opt/wazuh/wazuhupdate.sh
批量下发
-
安装配置Ansbile
SHELL
yum install -y centos-release-ansible-29.noarch yum install -y ansible # 因主机默认设置不允许root使用ssh登录,需要切换到普通用户目录 cd ~ mkdir ansible cd ansible touch .inventory cat > .inventory <<EOF [master] 192.168.79.60 [worker] 192.168.79.61 192.168.79.62 EOF ssh-keygen ssh-copy-id sujx@192.168.79.60 ssh-copy-id sujx@192.168.79.61 ssh-copy-id sujx@192.168.79.62 ansible all -m ping [sujx@WazuhNode0 ansible]$ ansible worker -m ping 192.168.79.62 | SUCCESS => { "ansible_facts": { "discovered_interpreter_python": "/usr/libexec/platform-python" }, "changed": false, "ping": "pong" } 192.168.79.61 | SUCCESS => { "ansible_facts": { "discovered_interpreter_python": "/usr/libexec/platform-python" }, "changed": false, "ping": "pong" } -
建立批量更新脚本
SHELL
# 在每台Worker主机上建立相应脚本 mkdir /opt/wazuh touch /opt/wazuh/cluster.sh cat > /opt/wazuh/cluster.sh <<EOF #!/bin/bash cd ~ # 配置文件 wget http://192.168.79.60/conf/ossec.conf # 自定义规则文件 # wget http://192.168.79.60/conf/0015-ossec_rules.xml # 替换主机名 workername=$(hostname -s) sed -i "s/vlnx000000/$workername/g" ~/ossec.conf # 替换配置文件 rm -Rf /var/ossec/etc/ossec.conf mv ~/ossec.conf /var/ossec/etc/ chown root:ossec /var/ossec/etc/ossec.conf # 更新自定义文件 # rm -Rf /var/ossec/ruleset/rules/0015-ossec_rules.xml # mv ~/0015-ossec_rules.xml /var/ossec/ruleset/rules/ # chown root:ossec /var/ossec/ruleset/rules/0015-ossec_rules.xml # Reset The Service systemctl restart wazuh-manager.service EOF chmod +x /opt/wazuh/cluster.sh -
建立worker配置文件
SHELL
<vulnerability-detector> <enabled>no</enabled> <interval>5m</interval> <ignore_time>6h</ignore_time> <run_on_start>yes</run_on_start> <!-- Ubuntu OS vulnerabilities --> <provider name="canonical"> <enabled>yes</enabled> <os url="http://192.168.79.60/com.ubuntu.focal.cve.oval.xml.bz2">focal</os> <update_interval>1d</update_interval> </provider> <!-- Debian OS vulnerabilities --> <provider name="debian"> <enabled>no</enabled> <os>stretch</os> <os>buster</os> <update_interval>1d</update_interval> </provider> <!-- RedHat OS vulnerabilities --> <provider name="redhat"> <enabled>yes</enabled> <os url="http://192.168.79.60/rhel-6-including-unpatched.oval.xml.bz2">6</os> <os url="http://192.168.79.60/rhel-7-including-unpatched.oval.xml.bz2">7</os> <os url="http://192.168.79.60/rhel-8-including-unpatched.oval.xml.bz2">8</os> <url start="1" end="25">http://192.168.79.60/redhat/redhat-feed[-].json</url> <update_interval>1d</update_interval> </provider> <!-- Windows OS vulnerabilities --> <provider name="msu"> <enabled>yes</enabled> <url>http://192.168.79.60/msu-updates.json.gz</url> <update_interval>1d</update_interval> </provider> <!-- Aggregate vulnerabilities --> <provider name="nvd"> <enabled>yes</enabled> <url start="2010" end="2021">http://192.168.79.60/nvd/nvd-feed[-].json.gz</url> <update_interval>1d</update_interval> </provider> </vulnerability-detector> <cluster> <name>wazuh</name> <node_name>vln000000</node_name> <node_type>worker</node_type> <key>d84691d111f86e70e8ed7eff80cde39e</key> <port>1516</port> <bind_addr>0.0.0.0</bind_addr> <nodes> <node>192.168.79.60</node> </nodes> <hidden>no</hidden> <disabled>no</disabled> </cluster> …… 略 -
使用Ansible触发更新
SHELL
# 每个Worker上创建目录
ansible worker -a 'mkdir /opt/wazuh'
# 复制脚本到worker上
ansible worker -m copy -a "src=/opt/wazuh/cluster.sh dest=/opt/wazuh owner=root group=root mode=0744"
# 每个worker执行脚本
ansible worker -a '/bin/sh /opt/wazuh/cluster.sh'

华为开发者空间,是为全球开发者打造的专属开发空间,汇聚了华为优质开发资源及工具,致力于让每一位开发者拥有一台云主机,基于华为根生态开发、创新。
更多推荐


 15
15 1
1- 0


 已为社区贡献1条内容

所有评论(0)