
关于ansible自动化运维超级详细
首先什么是ansible呢?前言Ansible是一个开源 的基于openssh的自动化配置管理工具。可以用它来配置系统,部署软件和编排更高级的IT任务,比如持续部署或零停机更新。Ansible的主要目标是简单和易用,通过Ansible可以批量管理大型运维环境。Ansible 是一个用 Python 开发的自动化运维工具,它能执行批量系统配置、批量程序部署、批量运行命令等任务,还能执行如零宕机时间的
什么是ansible呢?
目录
前言
实验环境
一、实验准备
二、安装下载
三、实验准备
四、实验测试
五、使用ansible模块下载和卸载软件
六、模块以及yanl语法补充
七、总结
前言
Ansible是一个开源 的基于openssh的自动化配置管理工具。可以用它来配置系统,部署软件和编排更高级的IT任务,比如持续部署或零停机更新。Ansible的主要目标是简单和易用,通过Ansible可以批量管理大型运维环境。
Ansible 是一个用 Python 开发的自动化运维工具,它能执行批量系统配置、批量程序部署、批量运行命令等任务,还能执行如零宕机时间的滚动更新等高级任务。Ansible 本身是一个执行框架,真正执行运维任务的是它的诸多模块。
简单来说,当我们每天重复去对受管主机进行多项维护时,在shall里使用命令行的操作方式会很繁琐,使用playbook就会大大减小运维人员的工作量。
实验环境
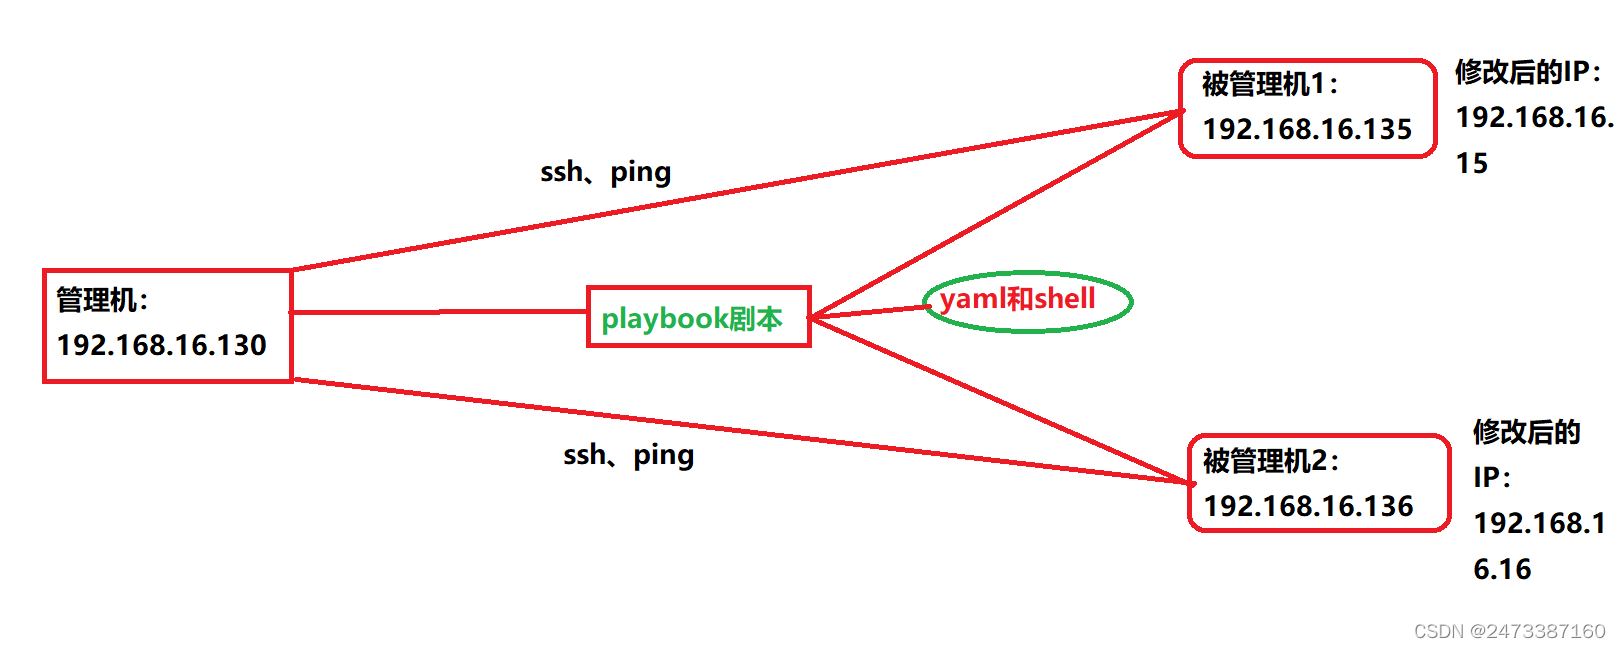
一、实验准备(准备两台或者两台以上的虚拟机)
建议初学者还是先从两到三台虚拟机做起
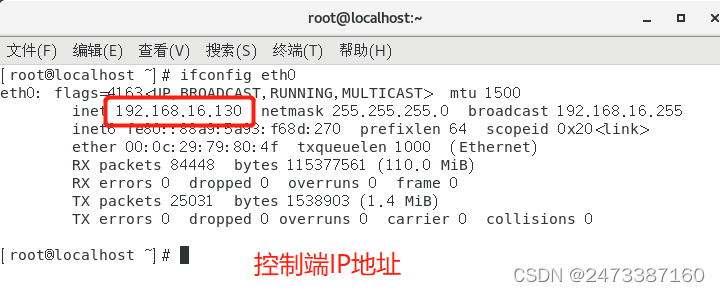
1、查看管理机(控制端)的IP地址、这里的eth0代表第一块网卡名称
[root@localhost ~] ifconfig eth0
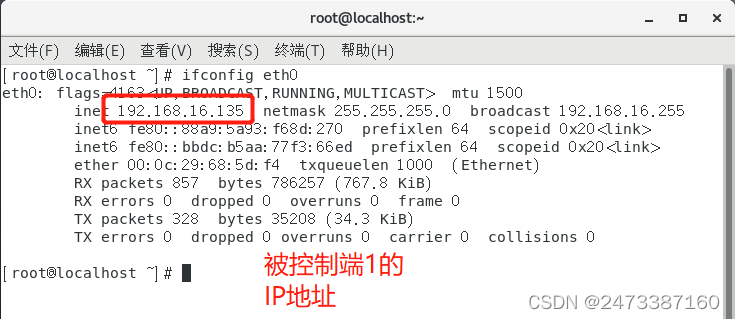
2、查看被管理机1(被控制端1)的IP地址
[root@localhost ~] ifconfig eth0
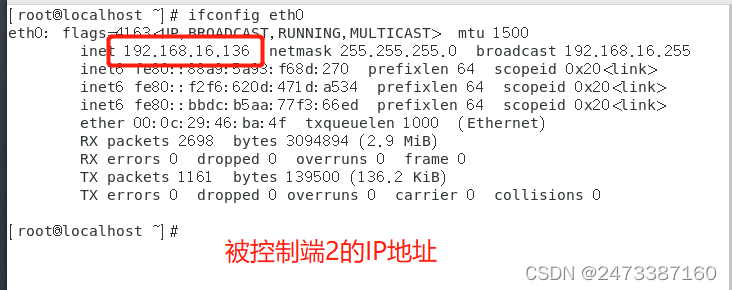
3、查看被管理机2(被控制端2)的IP地址
[root@localhost ~] ifconfig eth0
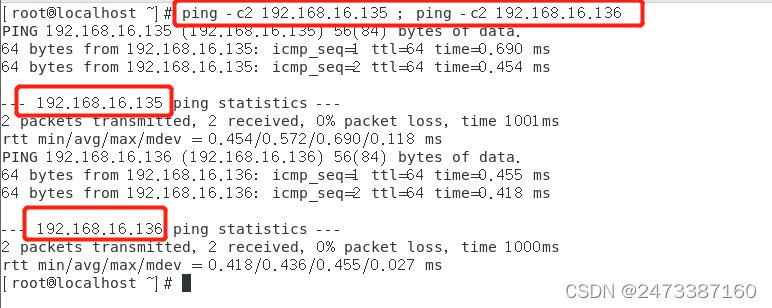
4、管理机ping两台被管理机的IP,测试是否能够相互通信
[root@localhost ~] ping -c2 192.168.16.135 ; ping -c2 192.168.16.136
解释:-c代表指定发包数量,“;”中间用分号隔开代表这是两条执行的命令
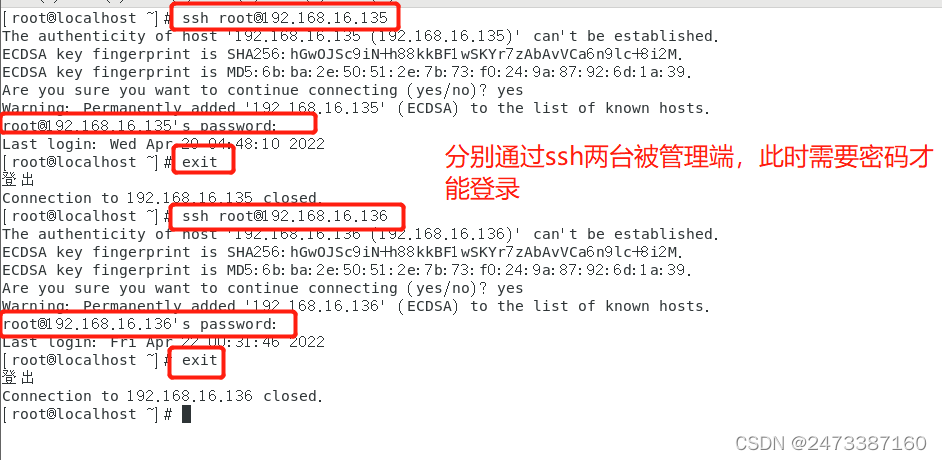
5、在管理机里使用系统自带的ssh连接两台被管理机、测试是否能够连接
[root@localhost ~] ssh root@192.168.16.135
root@192.168.16.135‘s password:输入192.168.16.135的密码即可
[root@localhost ~] exit
[root@localhost ~] ssh root@192.168.16.136
root@192.168.16.136's password:输入192.168.16.136的密码即可
[root@localhost ~] exit
解释: SSH 为建立在应用层基础上的安全协议。ssh连接时需要输入密码,现在连接的是谁,输入exit即可退出连接,连接另一个也是如此。
6、设置免密登录,这里说一下为什么需要设置免密登录呢?因为 Ansible 是通过 SSH 连接到目标主机执行配置任务的,所以我们需要先配置 Ansible 控制器到被管理节点的 SSH 免密登录。不然很容易系统报错,无法连接到目标主机。**
[root@localhost ~] ssh-keygen  #生成密钥,默认回车即可
[root@localhost ~] ssh-copy-id root@192.168.16.135   #拷贝密钥至主机
[root@localhost ~] ssh-copy-id root@192.168.16.136   #拷贝密钥至主机
好了,这些都是准备工作,进入正题吧,不过准备工作也是很重要的。例如:是否是同一段网络?是否能够相互通信?
二、安装下载ansible
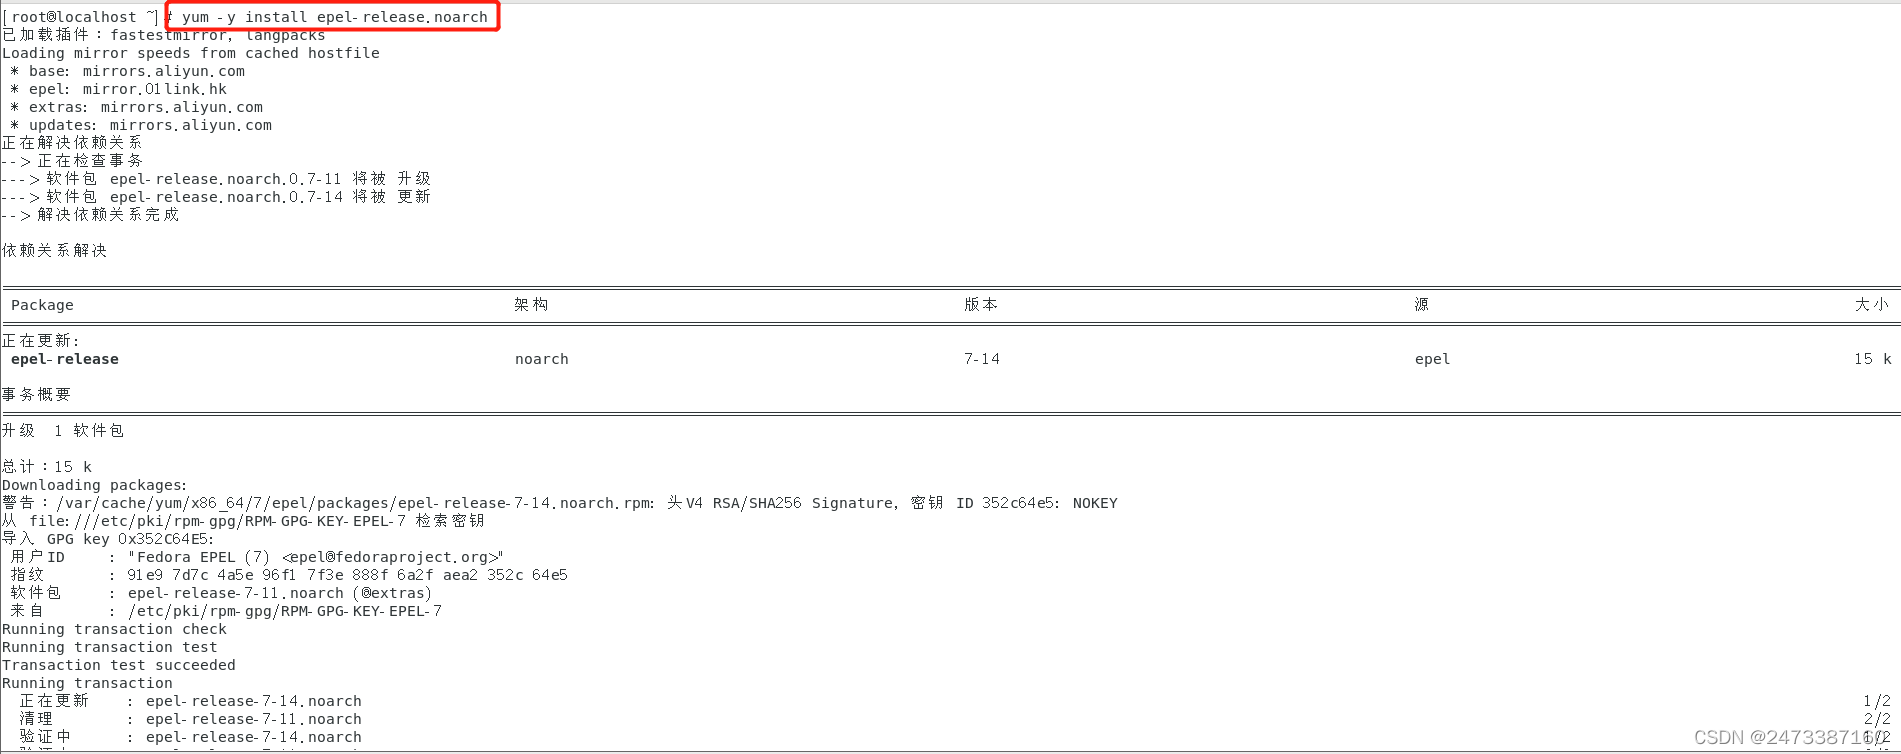
1、更新配置 EPEL 源,当然如果已经有其他源了则不需要更新下载。
[root@localhost ~] yum -y install epel-release.noarch
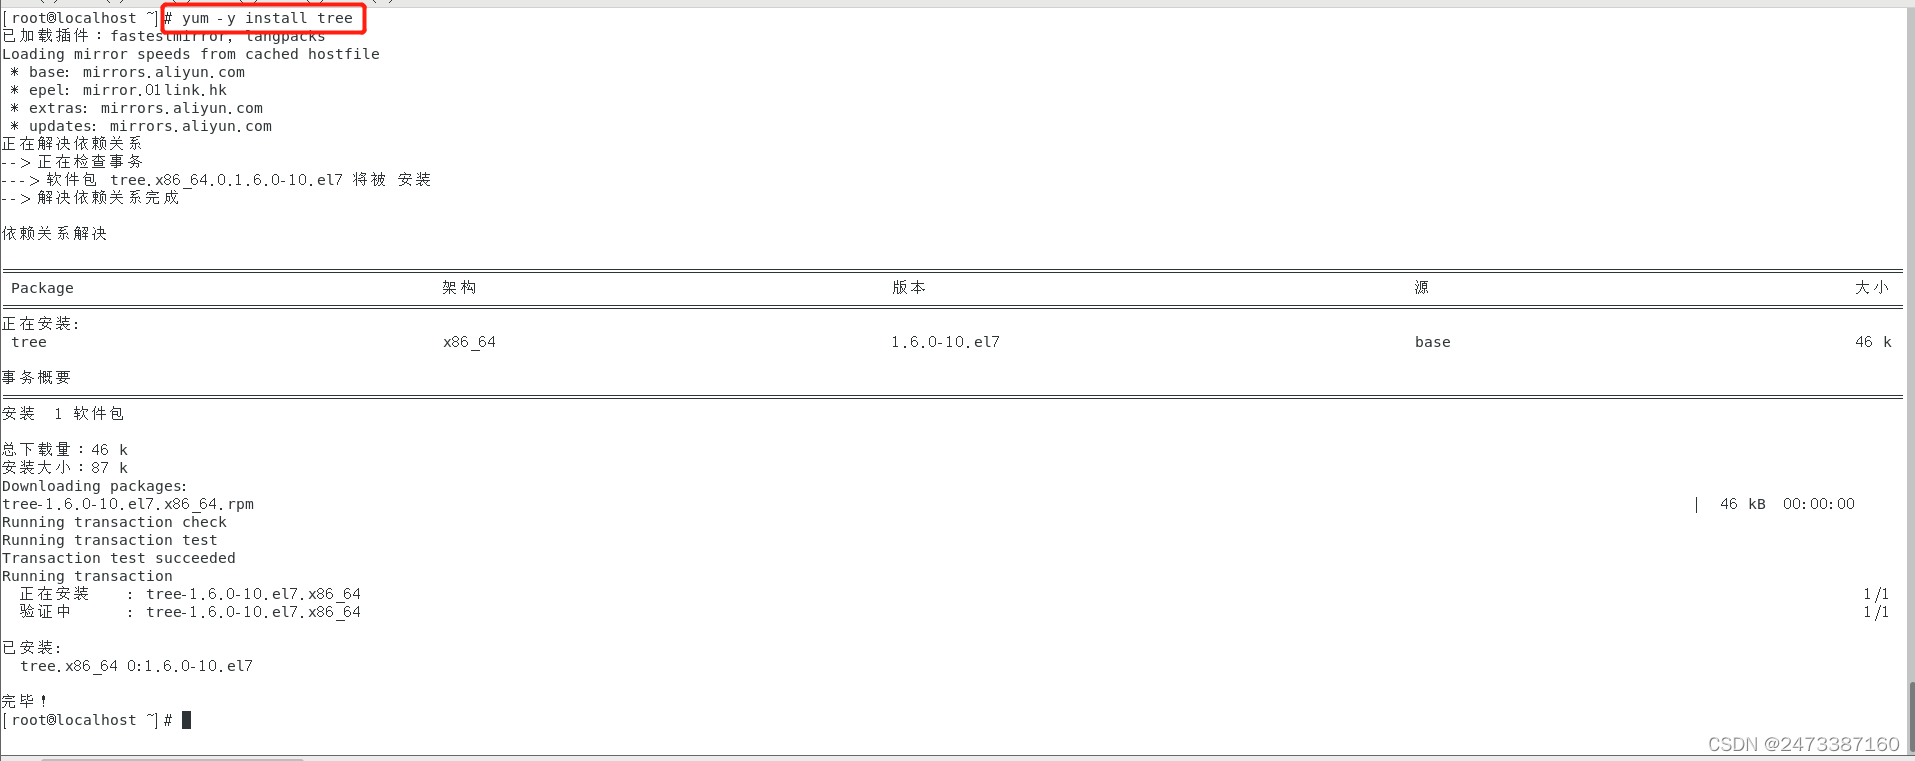
2、下载tree,这一步有需要可以下载也可以不用下载,linux一切皆文件,下载tree主要是能够看得更清楚该软件包含哪些文件
[root@localhost ~] yum -y install tree
3、下载安装ansible
[root@localhost ~] yum -y install ansible
#使用的是yum源,-y表示自动回答yes,install安装的意思,后面接软件名即可

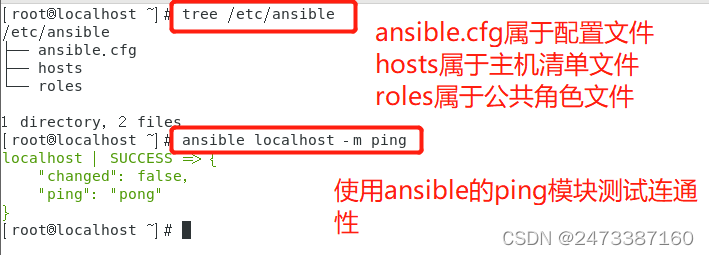
4、通过tree查看ansible有哪些文件,当然还有很多文件没有列举出来
root@localhost ~] tree /etc/ansible/
/etc/ansible/
├── ansible.cfg    #配置文件
├── hosts        #主机清单文件
└── roles        #公共角色文件
三、在管理机里通过ansible修改两台被管理机的IP地址以及编写相应功能的脚本
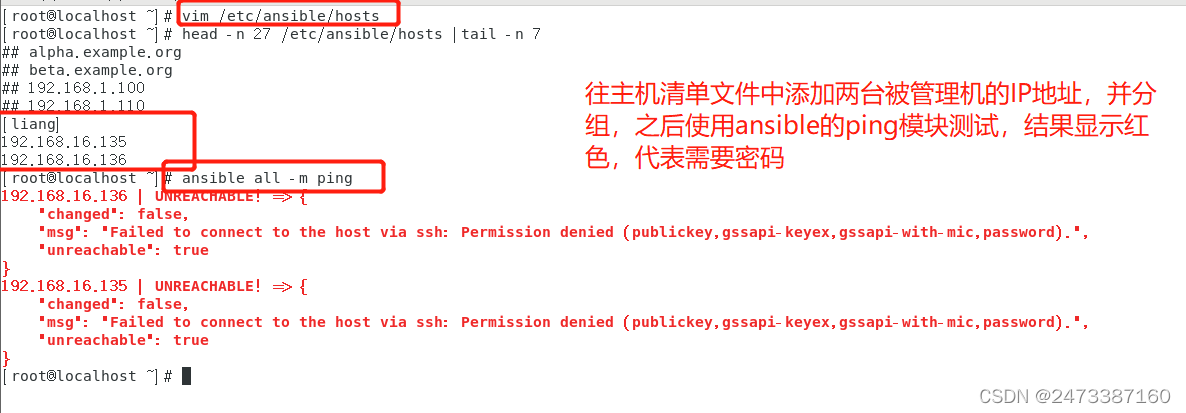
1、修改ansible的主机清单文件,往里面添加两台被管理机的IP
[root@localhost ~] vim /etc/ansible/hosts
[liang]   #组中两个被管理机的IP以及组名(相当于组长),组名名字可以随便取
192.168.16.135
192.168.16.136
[root@localhost ~] ansible all -m ping
#解释:用于测试远程主机是否在线,回复pong表示在线
#ping模块用于检查指定节点机器(被管理主机)是否还能连通,
#用法简单,不涉及参数,主机如果在线,则回复pong
2、设置免密登录,这里说一下为什么需要设置免密登录呢?因为 Ansible 是通过 SSH 连接到目标主机执行配置任务的,所以我们需要先配置 Ansible 控制器到被管理节点的 SSH 免密登录。不然很容易系统报错,无法连接到目标主机。
[root@localhost ~] ssh-keygen  #生成密钥,默认回车即可
[root@localhost ~] ssh-copy-id root@192.168.16.135   #拷贝密钥至主机
[root@localhost ~] ssh-copy-id root@192.168.16.136   #拷贝密钥至主机
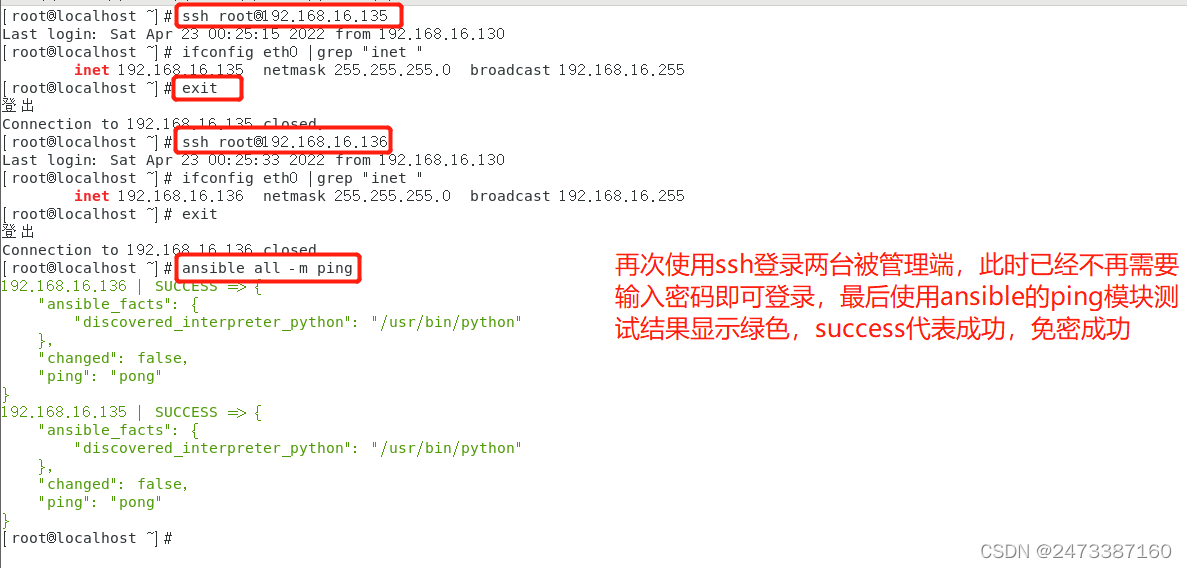
3、再次通过ssh连接,发现这时候是不需要密码的,这足以证明免密成功
[root@localhost ~] ssh root@192.168.16.135
[root@localhost ~] exit
[root@localhost ~] ssh root@192.168.16.136
[root@localhost ~] exit
#解释:通过ssh连接、并使用root账户登录该主机,exit表示退出连接
[root@centos7-1 ~] ansible -h
#结果显示了 ansible 命令的使用帮助信息,表明 Ansible 可以使用了。另外需要记住几个有用的命令:
(1)ansible-doc –l #列出所有模块;
(2)ansible-doc ping #查看指定模块帮助用法;
(3)ansible-doc –s ping #查看指定模块帮助用法。
下面来个最简单的任务:使用 Ansible 的 ping 模块 ping 一下本机。
[root@centos7-1 ~] ansible localhost -m ping
结果显示:
localhost | SUCCESS => {
 "changed": false,
 "ping": "pong"
}
#ansible 是命令,localhost 表示本机,-m ping 表示使用 ping 模块。从结果看,“SUCCESS”表示命令的成功执行,没有发生错误,"changed": false 表示未改变任何东西,"ping": "pong"表示能 ping 通。为了使用 Ansible 命令补全 shell completion 功能,需要安装 Python 的插件 python-argcomplete。
4、编写shell脚本,其中包括firewalld.sh、selinux.sh、hostname.sh、ip1.sh、ip2.sh、aliyun和epel源.sh
[root@localhost ~] vim firewalld.sh  #编辑该脚本内容
[root@localhost ~] chmod +x firewalld.sh   #赋予该脚本执行权限
[root@localhost ~] cat firewalld.sh  #查看该脚本内容
#!/bin/bash
a=$(systemctl start firewalld)
b=$(systemctl enable firewalld)
echo $a && echo $b
echo "状态玛:" $?
[root@localhost ~]
[root@localhost ~] vim selinux.sh
[root@localhost ~] chmod +x selinux.sh
[root@localhost ~] cat selinux.sh
#!/bin/bash
echo `setenforce 0`
echo `sed -i 's/SELINUX=disabled/SELINUX=permissive/' /etc/selinux/config`
echo "状态玛:" $?
[root@localhost ~]
[root@localhost ~] vim hostname.sh
[root@localhost ~] chmod +x hostname.sh
[root@localhost ~] cat hostname.sh
#/bin/bash
#调用bash编译器
a=$(ifconfig eth0 |grep "inet " |awk '{print $2}')  #查看ip最后搜索inet这一行,注意inet后有个空格,再通过awk截取第二列输出在屏幕上,最后将这些赋予a
b=$(hostname)
c=$(date)
echo "主机名:" $b
echo "主机ip:" $a
echo "当前时间:" $c
echo "状态码:" $?
[root@localhost ~]
[root@localhost ~] vim ip1.sh
[root@localhost ~] chmod +x ip1.sh
[root@localhost ~] cat ip1.sh
#!/bin/bash
sed -i 's/dhcp/static/' /etc/sysconfig/network-scripts/ifcfg-eth0
#根据网卡名称修改,如果虚拟机的网卡名称是 ensXX,则要将命令中的 eth0 修改为 ensXX
echo "IPADDR=192.168.16.15" >> /etc/sysconfig/network-scripts/ifcfg-eth0 #通过echo往网卡配置文件里追加(添加)ip
#要根据虚拟机的网络环境来修改网段,比如实际的虚拟机仅主机模式网络是 192.168.16.0/24
echo "NETMASK=255.255.255.0" >> /etc/sysconfig/network-scripts/ifcfg-eth0
echo "GATEWAY=192.168.16.2" >> /etc/sysconfig/network-scripts/ifcfg-eth0        #添加网关
echo "DNS1=192.168.16.130" >> /etc/sysconfig/network-scripts/ifcfg-eth0        #添加dns1,我这里的dns1设置为管理机的ip地址
echo "DNS2=114.114.114.114" >> /etc/sysconfig/network-scripts/ifcfg-eth0        #添加dns2
echo "DNS3=8.8.8.8" >> /etc/sysconfig/network-scripts/ifcfg-eth0        #添加dns3
systemctl restart network.service
echo "状态码:" $?
[root@localhost ~]
[root@localhost ~] vim ip2.sh
[root@localhost ~] chmod +x ip2.sh
[root@localhost ~] cat ip2.sh
#!/bin/bash
sed -i 's/dhcp/static/' /etc/sysconfig/network-scripts/ifcfg-eth0
#根据网卡名称修改,如果虚拟机的网卡名称是 ensXX,则要将命令中的 eth0 修改为 ensXX
echo "IPADDR=192.168.16.16" >> /etc/sysconfig/network-scripts/ifcfg-eth0 #通过echo往网卡配置文件里追加(添加)ip
#要根据虚拟机的网络环境来修改网段,比如实际的虚拟机仅主机模式网络是 192.168.16.0/24
echo "NETMASK=255.255.255.0" >> /etc/sysconfig/network-scripts/ifcfg-eth0
systemctl restart network.service  #重启网卡
echo "状态码:" $?
[root@localhost ~]
[root@localhost ~] vim aliyum和epel源.sh
[root@localhost ~] chmod +x aliyun和epel源.sh
[root@localhost ~] cat aliyun和epel源.sh
#!/bin/bash
#下载阿里云yum源
a=$(cd /etc/yum.repos.d/ && mkdir backup1 && mv *repo backup1/)
b=$(wget -O /etc/yum.repos.d/CentOS-Base.repo http://mirrors.aliyun.com/repo/Centos-7.repo)
#更新epel源
c=$(cd /etc/yum.repos.d/ && mkdir backup2 && mv *.repo backup2/)
d=$(wget https://mirrors.aliyun.com/epel/epel-release-latest-7.noarch.rpm ; rpm -i epel-release-latest-7.noarch.rpm)
#清除缓存、生成新的缓存
e=$(yum clean all ; yum makecache)
echo $a && echo $b ; echo $c && echo $d ;echo $e
echo "状态码:" $?
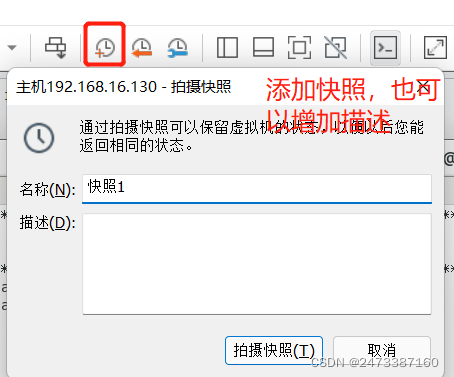
5、在控制端里试着执行这些编写好的脚本,执行之前最好保存当前快照,如果出现错误恢复快照即可
6、在管理机上执行这些脚本,检查哪些脚本出现错误需要修改的
[root@localhost ~] ./firewalld.sh
Created symlink from /etc/systemd/system/dbus-org.fedoraproject.FirewallD1.service to /usr/lib/systemd/system/firewalld.service.
Created symlink from /etc/systemd/system/multi-user.target.wants/firewalld.service to /usr/lib/systemd/system/firewalld.service.

状态玛: 0
[root@localhost ~] ./selinux.sh

状态玛: 0
[root@localhost ~] ./hostname.sh
主机ip: 192.168.16.130
主机名: localhost.localdomain
当前时间: 2022年 04月 24日 星期日 12:52:53 GMT
状态玛: 0
[root@localhost ~] ./aliyun和epel源.sh
--2022-04-24 12:53:00--  http://mirrors.aliyun.com/repo/Centos-7.repo
正在解析主机 mirrors.aliyun.com (mirrors.aliyun.com)... 211.103.105.110, 211.103.105.112, 211.103.105.115, ...
正在连接 mirrors.aliyun.com (mirrors.aliyun.com)|211.103.105.110|:80... 已连接。
已发出 HTTP 请求,正在等待回应... 200 OK
长度:2523 (2.5K) [application/octet-stream]
正在保存至: “/etc/yum.repos.d/CentOS-Base.repo”

100%[=========================================================================================================================================================================>] 2,523       --.-K/s 用时 0s

2022-04-24 12:53:01 (338 MB/s) - 已保存 “/etc/yum.repos.d/CentOS-Base.repo” [2523/2523])

--2022-04-24 12:53:01--  https://mirrors.aliyun.com/epel/epel-release-latest-7.noarch.rpm
正在解析主机 mirrors.aliyun.com (mirrors.aliyun.com)... 211.103.105.110, 211.103.105.112, 211.103.105.115, ...
正在连接 mirrors.aliyun.com (mirrors.aliyun.com)|211.103.105.110|:443... 已连接。
已发出 HTTP 请求,正在等待回应... 200 OK
长度:15608 (15K) [application/octet-stream]
正在保存至: “epel-release-latest-7.noarch.rpm”

100%[=========================================================================================================================================================================>] 15,608      --.-K/s 用时 0s

2022-04-24 12:53:01 (76.7 MB/s) - 已保存 “epel-release-latest-7.noarch.rpm” [15608/15608])

	file /etc/yum.repos.d/epel-testing.repo from install of epel-release-7-14.noarch conflicts with file from package epel-release-7-11.noarch
	file /etc/yum.repos.d/epel.repo from install of epel-release-7-14.noarch conflicts with file from package epel-release-7-11.noarch
	file /usr/lib/systemd/system-preset/90-epel.preset from install of epel-release-7-14.noarch conflicts with file from package epel-release-7-11.noarch
There are no enabled repos.
 Run "yum repolist all" to see the repos you have.
 To enable Red Hat Subscription Management repositories:
     subscription-manager repos --enable <repo>
 To enable custom repositories:
     yum-config-manager --enable <repo>
There are no enabled repos.
 Run "yum repolist all" to see the repos you have.
 To enable Red Hat Subscription Management repositories:
     subscription-manager repos --enable <repo>
 To enable custom repositories:
     yum-config-manager --enable <repo>

已加载插件:fastestmirror, langpacks Loading mirror speeds from cached hostfile 已加载插件:fastestmirror, langpacks Loading mirror speeds from cached hostfile
状态玛: 0
[root@localhost ~] cd /etc/yum.repos.d/
[root@localhost yum.repos.d] ls
backup1  backup2  repo_bak
[root@localhost yum.repos.d] ll backup1
总用量 12
-rw-r--r--. 1 root root 2523 12月 26 2020 CentOS-Base.repo
-rw-r--r--. 1 root root  951 10月  2 2017 epel.repo
-rw-r--r--. 1 root root 1050 10月  2 2017 epel-testing.repo
[root@localhost yum.repos.d] ll backup2
总用量 4
-rw-r--r--. 1 root root 2523 12月 26 2020 CentOS-Base.repo
[root@localhost yum.repos.d] ll repo_bak/
总用量 40
-rw-r--r--. 1 root root 1664 11月 23 2020 CentOS-Base.repo
-rw-r--r--. 1 root root 1309 11月 23 2020 CentOS-CR.repo
-rw-r--r--. 1 root root  649 11月 23 2020 CentOS-Debuginfo.repo
-rw-r--r--. 1 root root  314 11月 23 2020 CentOS-fasttrack.repo
-rw-r--r--. 1 root root  630 11月 23 2020 CentOS-Media.repo
-rw-r--r--. 1 root root 1331 11月 23 2020 CentOS-Sources.repo
-rw-r--r--. 1 root root 8515 11月 23 2020 CentOS-Vault.repo
-rw-r--r--. 1 root root  616 11月 23 2020 CentOS-x86_64-kernel.repo
[root@localhost yum.repos.d] cd
[root@localhost ~] ./ip1.sh
状态玛: 0
[root@localhost ~] ./ip2.sh
状态玛: 0
[root@localhost ~] 这里提一句,两个ip脚本必须放在最后执行,因为修改IP之后可能上不了网,导致后面的也执行不了
7、上面测试是没有问题的,接下使用yaml编写playbook剧本
[root@localhost ~] vim palybook剧本.sh
---
#这里是语法开头,表示文档开始。注意顶行写。开头格式可写可不写
- name: 第一个palybook剧本
  hosts: 192.168.16.135  #这代表当前使用的角色,可以写主机清单里的组名、也可以写被管理端的ip地址、还可以写all代表ansible中所有主机
  gather_facts: yes   #是否收集该主机信息
  tasks:   #该角色的任务列表
    - name: 启用防火墙    #在前面的基础上缩进
      script: /root/firewalld.sh

    - name: 关闭selinux
      script: /root/selinux.sh

    - name: 修改主机名
      raw: hostnamectl set-hostname "liang1"

    - name: 安装阿里云的yum源和epel源
      script: /root/aliyun和epel源.sh

    - name: 收集该主机信息
      script: /root/hostname.sh

- name: 第二个palybook剧本
  hosts: 192.168.16.136  #这代表当前使用的角色,可以写主机清单里的组名、也可以写被管理端的ip地址、还可以写all代表ansible中所有主机
  gather_facts: yes   #是否收集该主机信息
  tasks:   #该角色的任务列表

    - name: 启用防火墙
      script: /root/firewalld.sh

    - name: 关闭selinux
      script: /root/selinux.sh

    - name: 修改主机名
      raw: hostnamectl set-hostname "liang2"

    - name: 安装阿里云的yum源和epel源
      script: /root/aliyun和epel源.sh

    - name: 收集该主机信息
      script: /root/hostname.sh
8、使用ansible执行一下用yaml语法编写更换ip的playbook剧本
[root@localhost ~]# ansible-playbook ip1.yml

PLAY [第一个playbook剧本] **********************************************************************************************************************************************************************************************

TASK [Gathering Facts] ********************************************************************************************************************************************************************************************
ok: [192.168.16.135]

TASK [引用脚本文件修改被管理机1的ip地址] *****************************************************************************************************************************************************************************************
^C [ERROR]: User interrupted execution
[root@localhost ~]# ansible-playbook ip2.yml

PLAY [第一个playbook剧本] **********************************************************************************************************************************************************************************************

TASK [Gathering Facts] ********************************************************************************************************************************************************************************************
ok: [192.168.16.136]

TASK [引用脚本文件修改被管理机2的ip地址] *****************************************************************************************************************************************************************************************
^C [ERROR]: User interrupted execution
[root@localhost ~]#
9、查看两台被管理机的ip
被管理机1修改后的IP地址
[root@localhost ~] ifconfig eth0
eth0: flags=4163<UP,BROADCAST,RUNNING,MULTICAST>  mtu 1500
        inet 192.168.16.15  netmask 255.255.255.0  broadcast 192.168.16.255
        inet6 fe80::88a9:5a93:f68d:270  prefixlen 64  scopeid 0x20<link>
        inet6 fe80::bbdc:b5aa:77f3:66ed  prefixlen 64  scopeid 0x20<link>
        ether 00:0c:29:f6:a9:ef  txqueuelen 1000  (Ethernet)
        RX packets 52572  bytes 62645906 (59.7 MiB)
        RX errors 0  dropped 0  overruns 0  frame 0
        TX packets 15700  bytes 2260821 (2.1 MiB)
        TX errors 0  dropped 0 overruns 0  carrier 0  collisions 0
被管理机2修改后的IP地址
[root@localhost ~]# ifconfig eth0
eth0: flags=4163<UP,BROADCAST,RUNNING,MULTICAST>  mtu 1500
        inet 192.168.16.15  netmask 255.255.255.0  broadcast 192.168.16.255
        inet6 fe80::88a9:5a93:f68d:270  prefixlen 64  scopeid 0x20<link>
        inet6 fe80::bbdc:b5aa:77f3:66ed  prefixlen 64  scopeid 0x20<link>
        ether 00:0c:29:f6:a9:ef  txqueuelen 1000  (Ethernet)
        RX packets 52572  bytes 62645906 (59.7 MiB)
        RX errors 0  dropped 0  overruns 0  frame 0
        TX packets 15700  bytes 2260821 (2.1 MiB)
        TX errors 0  dropped 0 overruns 0  carrier 0  collisions 0
10、在管理机的ansible主机清单文件里新增两台被管理机的IP

11、在管理机中使用ping模块检测主机是否存活
四、在管理机端通过ansible修改两台被管理机的主机名、防火墙状态、selinux状态、安装阿里云的yum源和epel源、收集信息
1、使用ansible自带的语句模拟运行
[root@localhost ~] ansible-playbook  playbook剧本.yml -C

PLAY [第一个palybook剧本] **********************************************************************************************************************************************************************************************

TASK [Gathering Facts] ********************************************************************************************************************************************************************************************
ok: [192.168.16.15]

TASK [启用防火墙] ******************************************************************************************************************************************************************************************************
changed: [192.168.16.15]

TASK [关闭selinux] **************************************************************************************************************************************************************************************************
changed: [192.168.16.15]

TASK [修改主机名] ******************************************************************************************************************************************************************************************************
changed: [192.168.16.15]

TASK [安装阿里云的yum源和epel源] *******************************************************************************************************************************************************************************************
changed: [192.168.16.15]

TASK [收集该主机信息] ****************************************************************************************************************************************************************************************************
changed: [192.168.16.15]

PLAY [第二个palybook剧本] **********************************************************************************************************************************************************************************************

TASK [Gathering Facts] ********************************************************************************************************************************************************************************************
ok: [192.168.16.16]

TASK [启用防火墙] ******************************************************************************************************************************************************************************************************
changed: [192.168.16.16]

TASK [关闭selinux] **************************************************************************************************************************************************************************************************
changed: [192.168.16.16]

TASK [修改主机名] ******************************************************************************************************************************************************************************************************
changed: [192.168.16.16]

TASK [安装阿里云的yum源和epel源] *******************************************************************************************************************************************************************************************
changed: [192.168.16.16]

TASK [收集该主机信息] ****************************************************************************************************************************************************************************************************
changed: [192.168.16.16]

PLAY RECAP ********************************************************************************************************************************************************************************************************
192.168.16.15              : ok=6    changed=5    unreachable=0    failed=0    skipped=0    rescued=0    ignored=0
192.168.16.16              : ok=6    changed=5    unreachable=0    failed=0    skipped=0    rescued=0    ignored=0

[root@localhost ~]  测试结果是没问题的,下面来正式测试
2、在管理机正式测试
[root@localhost ~] ansible-playbook  playbook剧本.yml

PLAY [第一个palybook剧本] **********************************************************************************************************************************************************************************************

TASK [Gathering Facts] ********************************************************************************************************************************************************************************************
ok: [192.168.16.15]

TASK [启用防火墙] ******************************************************************************************************************************************************************************************************
changed: [192.168.16.15]

TASK [关闭selinux] **************************************************************************************************************************************************************************************************
changed: [192.168.16.15]

TASK [修改主机名] ******************************************************************************************************************************************************************************************************
changed: [192.168.16.15]

TASK [安装阿里云的yum源和epel源] *******************************************************************************************************************************************************************************************
changed: [192.168.16.15]

TASK [收集该主机信息] ****************************************************************************************************************************************************************************************************
changed: [192.168.16.15]

PLAY [第二个palybook剧本] **********************************************************************************************************************************************************************************************

TASK [Gathering Facts] ********************************************************************************************************************************************************************************************
ok: [192.168.16.16]

TASK [启用防火墙] ******************************************************************************************************************************************************************************************************
changed: [192.168.16.16]

TASK [关闭selinux] **************************************************************************************************************************************************************************************************
changed: [192.168.16.16]

TASK [修改主机名] ******************************************************************************************************************************************************************************************************
changed: [192.168.16.16]

TASK [安装阿里云的yum源和epel源] *******************************************************************************************************************************************************************************************
changed: [192.168.16.16]

TASK [收集该主机信息] ****************************************************************************************************************************************************************************************************
changed: [192.168.16.16]

PLAY RECAP ********************************************************************************************************************************************************************************************************
192.168.16.15              : ok=6    changed=5    unreachable=0    failed=0    skipped=0    rescued=0    ignored=0
192.168.16.16              : ok=6    changed=5    unreachable=0    failed=0    skipped=0    rescued=0    ignored=0


[root@localhost ~]
3、登录两台被管理机查看结果
登陆被管理机1查看结果:
[root@localhost ~] ifconfig eth0
eth0: flags=4163<UP,BROADCAST,RUNNING,MULTICAST>  mtu 1500
        inet 192.168.16.15  netmask 255.255.255.0  broadcast 192.168.16.255
        inet6 fe80::88a9:5a93:f68d:270  prefixlen 64  scopeid 0x20<link>
        inet6 fe80::bbdc:b5aa:77f3:66ed  prefixlen 64  scopeid 0x20<link>
        ether 00:0c:29:f6:a9:ef  txqueuelen 1000  (Ethernet)
        RX packets 44135  bytes 54175092 (51.6 MiB)
        RX errors 0  dropped 0  overruns 0  frame 0
        TX packets 12616  bytes 1880722 (1.7 MiB)
        TX errors 0  dropped 0 overruns 0  carrier 0  collisions 0
[root@localhost ~] hostname
liang1
[root@localhost ~] getenforce
Disabled
[root@localhost ~] cd /etc/yum.repos.d/
[root@localhost yum.repos.d] ls
backup1  backup2  repo_bak
[root@localhost yum.repos.d] ll backup1
总用量 12
-rw-r--r--. 1 root root 2523 12月 26 2020 CentOS-Base.repo
-rw-r--r--. 1 root root  951 10月  2 2017 epel.repo
-rw-r--r--. 1 root root 1050 10月  2 2017 epel-testing.repo
[root@localhost yum.repos.d] ll backup2
总用量 0
-rw-r--r-- 1 root root 0 4月  24 13:39 CentOS-Base.repo
[root@localhost yum.repos.d] ll repo_bak/
总用量 40
-rw-r--r--. 1 root root 1664 11月 23 2020 CentOS-Base.repo
-rw-r--r--. 1 root root 1309 11月 23 2020 CentOS-CR.repo
-rw-r--r--. 1 root root  649 11月 23 2020 CentOS-Debuginfo.repo
-rw-r--r--. 1 root root  314 11月 23 2020 CentOS-fasttrack.repo
-rw-r--r--. 1 root root  630 11月 23 2020 CentOS-Media.repo
-rw-r--r--. 1 root root 1331 11月 23 2020 CentOS-Sources.repo
-rw-r--r--. 1 root root 8515 11月 23 2020 CentOS-Vault.repo
-rw-r--r--. 1 root root  616 11月 23 2020 CentOS-x86_64-kernel.repo
[root@localhost yum.repos.d] systemctl status firewalld
● firewalld.service - firewalld - dynamic firewall daemon
   Loaded: loaded (/usr/lib/systemd/system/firewalld.service; enabled; vendor preset: enabled)
   Active: active (running) since 日 2022-04-24 13:39:34 GMT; 13min ago
     Docs: man:firewalld(1)
 Main PID: 10914 (firewalld)
    Tasks: 2
   CGroup: /system.slice/firewalld.service
           └─10914 /usr/bin/python2 -Es /usr/sbin/firewalld --nofork --nopid

4月 24 13:39:34 localhost.localdomain systemd[1]: Starting firewalld - dynamic firewall daemon...
4月 24 13:39:34 localhost.localdomain systemd[1]: Started firewalld - dynamic firewall daemon.
4月 24 13:39:34 localhost.localdomain firewalld[10914]: WARNING: AllowZoneDrifting is enabled. This is considered an insecure configuration option. It will be removed in a future release. Please...bling it now.
Hint: Some lines were ellipsized, use -l to show in full.
[root@localhost yum.repos.d]
登陆被管理机2查看结果
[root@localhost ~] ifconfig eth0
eth0: flags=4163<UP,BROADCAST,RUNNING,MULTICAST>  mtu 1500
        inet 192.168.16.16  netmask 255.255.255.0  broadcast 192.168.16.255
        inet6 fe80::88a9:5a93:f68d:270  prefixlen 64  scopeid 0x20<link>
        inet6 fe80::bbdc:b5aa:77f3:66ed  prefixlen 64  scopeid 0x20<link>
        ether 00:0c:29:f6:a9:ef  txqueuelen 1000  (Ethernet)
        RX packets 44135  bytes 54175092 (51.6 MiB)
        RX errors 0  dropped 0  overruns 0  frame 0
        TX packets 12616  bytes 1880722 (1.7 MiB)
        TX errors 0  dropped 0 overruns 0  carrier 0  collisions 0
[root@localhost ~] hostname
liang2
[root@localhost ~] getenforce
Disabled
[root@localhost ~] cd /etc/yum.repos.d/
[root@localhost yum.repos.d] ls
backup1  backup2  repo_bak
[root@localhost yum.repos.d] ll backup1
总用量 12
-rw-r--r--. 1 root root 2523 12月 26 2020 CentOS-Base.repo
-rw-r--r--. 1 root root  951 10月  2 2017 epel.repo
-rw-r--r--. 1 root root 1050 10月  2 2017 epel-testing.repo
[root@localhost yum.repos.d] ll backup2
总用量 0
-rw-r--r-- 1 root root 0 4月  24 13:40 CentOS-Base.repo
[root@localhost yum.repos.d] ll repo_bak/
总用量 40
-rw-r--r--. 1 root root 1664 11月 23 2020 CentOS-Base.repo
-rw-r--r--. 1 root root 1309 11月 23 2020 CentOS-CR.repo
-rw-r--r--. 1 root root  649 11月 23 2020 CentOS-Debuginfo.repo
-rw-r--r--. 1 root root  314 11月 23 2020 CentOS-fasttrack.repo
-rw-r--r--. 1 root root  630 11月 23 2020 CentOS-Media.repo
-rw-r--r--. 1 root root 1331 11月 23 2020 CentOS-Sources.repo
-rw-r--r--. 1 root root 8515 11月 23 2020 CentOS-Vault.repo
-rw-r--r--. 1 root root  616 11月 23 2020 CentOS-x86_64-kernel.repo
[root@localhost yum.repos.d] systemctl status firewalld
● firewalld.service - firewalld - dynamic firewall daemon
   Loaded: loaded (/usr/lib/systemd/system/firewalld.service; enabled; vendor preset: enabled)
   Active: active (running) since 日 2022-04-24 13:40:11 GMT; 13min ago
     Docs: man:firewalld(1)
 Main PID: 10914 (firewalld)
    Tasks: 2
   CGroup: /system.slice/firewalld.service
           └─10914 /usr/bin/python2 -Es /usr/sbin/firewalld --nofork --nopid

4月 24 13:40:11 localhost.localdomain systemd[1]: Starting firewalld - dynamic firewall daemon...
4月 24 13:40:11 localhost.localdomain systemd[1]: Started firewalld - dynamic firewall daemon.
4月 24 13:40:11 localhost.localdomain firewalld[10914]: WARNING: AllowZoneDrifting is enabled. This is considered an insecure configuration option. It will be removed in a future release. Please...bling it now.
Hint: Some lines were ellipsized, use -l to show in full.
[root@localhost yum.repos.d]
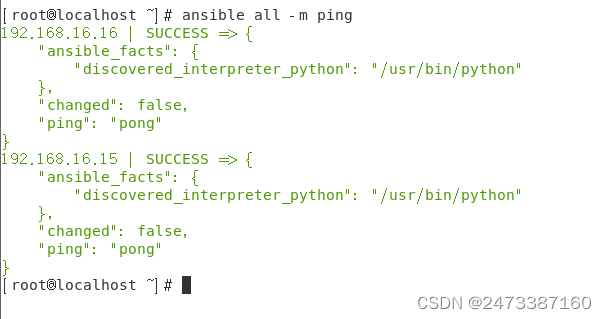
4、使用ansible的yum模块下载软件
首先使用ansible测试与两台被管理机的连通性
[root@localhost ~] ansible all -m ping
192.168.16.15 | SUCCESS => {
    "ansible_facts": {
        "discovered_interpreter_python": "/usr/bin/python"
    },
    "changed": false,
    "ping": "pong"
}
192.168.16.16 | SUCCESS => {
    "ansible_facts": {
        "discovered_interpreter_python": "/usr/bin/python"
    },
    "changed": false,
    "ping": "pong"
}
[root@localhost ~]#
五、使用anseble模块下载和卸载软件
1、在管理机上使用yum模块控制两台被管理机安装tree和httpd软件
[root@localhost ~]下载tree
[root@localhost ~] ansible liang -m yum -a 'name=tree state=installed'
192.168.16.141 | SUCCESS => {
    "ansible_facts": {
        "discovered_interpreter_python": "/usr/bin/python"
    },
    "changed": false,
    "msg": "",
    "rc": 0,
    "results": [
        "tree-1.6.0-10.el7.x86_64 providing tree is already installed"
    ]
}
192.168.16.140 | SUCCESS => {
    "ansible_facts": {
        "discovered_interpreter_python": "/usr/bin/python"
    },
    "changed": false,
    "msg": "",
    "rc": 0,
    "results": [
        "tree-1.6.0-10.el7.x86_64 providing tree is already installed"
    ]
}
[root@localhost ~]下载httpd
[root@localhost ~] ansible liang -m yum -a 'name=httpd state=installed'
192.168.16.141 | CHANGED => {
    "ansible_facts": {
        "discovered_interpreter_python": "/usr/bin/python"
    },
    "changed": true,
    "changes": {
        "installed": [
            "httpd"
        ]
    },
    "msg": "",
    "rc": 0,
    "results": [
        "Loaded plugins: fastestmirror, langpacks\nLoading mirror speeds from cached hostfile\n * base: mirrors.aliyun.com\n * extras: mirrors.aliyun.com\n * updates: mirrors.aliyun.com\nResolving Dependencies\n--> Running transaction check\n---> Package httpd.x86_64 0:2.4.6-97.el7.centos.5 will be installed\n--> Finished Dependency Resolution\n\nDependencies Resolved\n\n================================================================================\n Package      Arch          Version                        Repository      Size\n================================================================================\nInstalling:\n httpd        x86_64        2.4.6-97.el7.centos.5          updates        2.7 M\n\nTransaction Summary\n================================================================================\nInstall  1 Package\n\nTotal download size: 2.7 M\nInstalled size: 9.4 M\nDownloading packages:\nRunning transaction check\nRunning transaction test\nTransaction test succeeded\nRunning transaction\n  Installing : httpd-2.4.6-97.el7.centos.5.x86_64                           1/1 \n  Verifying  : httpd-2.4.6-97.el7.centos.5.x86_64                           1/1 \n\nInstalled:\n  httpd.x86_64 0:2.4.6-97.el7.centos.5                                          \n\nComplete!\n"
    ]
}
192.168.16.140 | CHANGED => {
    "ansible_facts": {
        "discovered_interpreter_python": "/usr/bin/python"
    },
    "changed": true,
    "changes": {
        "installed": [
            "httpd"
        ]
    },
    "msg": "",
    "rc": 0,
    "results": [
        "Loaded plugins: fastestmirror, langpacks\nLoading mirror speeds from cached hostfile\n * base: mirrors.aliyun.com\n * extras: mirrors.aliyun.com\n * updates: mirrors.aliyun.com\nResolving Dependencies\n--> Running transaction check\n---> Package httpd.x86_64 0:2.4.6-97.el7.centos.5 will be installed\n--> Finished Dependency Resolution\n\nDependencies Resolved\n\n================================================================================\n Package      Arch          Version                        Repository      Size\n================================================================================\nInstalling:\n httpd        x86_64        2.4.6-97.el7.centos.5          updates        2.7 M\n\nTransaction Summary\n================================================================================\nInstall  1 Package\n\nTotal download size: 2.7 M\nInstalled size: 9.4 M\nDownloading packages:\nRunning transaction check\nRunning transaction test\nTransaction test succeeded\nRunning transaction\n  Installing : httpd-2.4.6-97.el7.centos.5.x86_64                           1/1 \n  Verifying  : httpd-2.4.6-97.el7.centos.5.x86_64                           1/1 \n\nInstalled:\n  httpd.x86_64 0:2.4.6-97.el7.centos.5                                          \n\nComplete!\n"
    ]
}
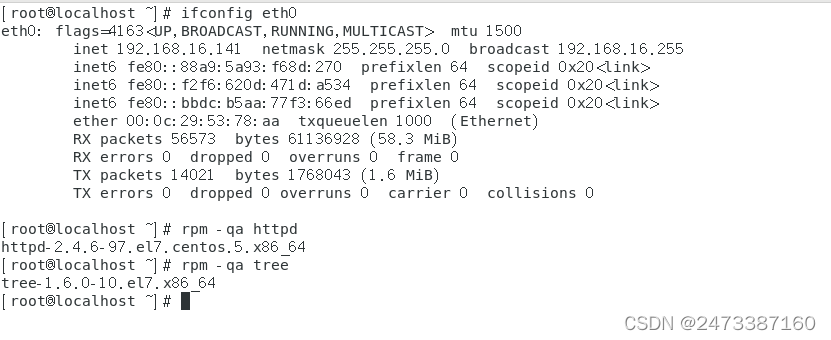
2、查看两台被管理机是否成功安装
被管理机1验证查看是否安装
被管理机2验证查看是否安装
3、在管理机上使用yum模块控制两台被管理机卸载tree和httpd软件
[root@localhost ~] ansible liang -m yum -a 'name=tree state=absent'
192.168.16.140 | CHANGED => {
    "ansible_facts": {
        "discovered_interpreter_python": "/usr/bin/python"
    },
    "changed": true,
    "changes": {
        "removed": [
            "tree"
        ]
    },
    "msg": "",
    "rc": 0,
    "results": [
        "已加载插件:fastestmirror, langpacks\n正在解决依赖关系\n--> 正在检查事务\n---> 软件包 tree.x86_64.0.1.6.0-10.el7 将被 删除\n--> 解决依赖关系完成\n\n依赖关系解决\n\n================================================================================\n Package        架构             版本                     源               大小\n================================================================================\n正在删除:\n tree           x86_64           1.6.0-10.el7             @base            87 k\n\n事务概要\n================================================================================\n移除  1 软件包\n\n安装大小:87 k\nDownloading packages:\nRunning transaction check\nRunning transaction test\nTransaction test succeeded\nRunning transaction\n  正在删除    : tree-1.6.0-10.el7.x86_64                                    1/1 \n  验证中      : tree-1.6.0-10.el7.x86_64                                    1/1 \n\n删除:\n  tree.x86_64 0:1.6.0-10.el7                                                    \n\n完毕!\n"
    ]
}
192.168.16.141 | CHANGED => {
    "ansible_facts": {
        "discovered_interpreter_python": "/usr/bin/python"
    },
    "changed": true,
    "changes": {
        "removed": [
            "tree"
        ]
    },
    "msg": "",
    "rc": 0,
    "results": [
        "已加载插件:fastestmirror, langpacks\n正在解决依赖关系\n--> 正在检查事务\n---> 软件包 tree.x86_64.0.1.6.0-10.el7 将被 删除\n--> 解决依赖关系完成\n\n依赖关系解决\n\n================================================================================\n Package        架构             版本                     源               大小\n================================================================================\n正在删除:\n tree           x86_64           1.6.0-10.el7             @base            87 k\n\n事务概要\n================================================================================\n移除  1 软件包\n\n安装大小:87 k\nDownloading packages:\nRunning transaction check\nRunning transaction test\nTransaction test succeeded\nRunning transaction\n  正在删除    : tree-1.6.0-10.el7.x86_64                                    1/1 \n  验证中      : tree-1.6.0-10.el7.x86_64                                    1/1 \n\n删除:\n  tree.x86_64 0:1.6.0-10.el7                                                    \n\n完毕!\n"
    ]
}
[root@localhost ~]
[root@localhost ~] ansible liang -m yum -a 'name=httpd state=absent'
192.168.16.140 | CHANGED => {
    "ansible_facts": {
        "discovered_interpreter_python": "/usr/bin/python"
    },
    "changed": true,
    "changes": {
        "removed": [
            "httpd"
        ]
    },
    "msg": "",
    "rc": 0,
    "results": [
        "已加载插件:fastestmirror, langpacks\n正在解决依赖关系\n--> 正在检查事务\n---> 软件包 httpd.x86_64.0.2.4.6-97.el7.centos.5 将被 删除\n--> 解决依赖关系完成\n\n依赖关系解决\n\n================================================================================\n Package      架构          版本                          源               大小\n================================================================================\n正在删除:\n httpd        x86_64        2.4.6-97.el7.centos.5         @updates        9.4 M\n\n事务概要\n================================================================================\n移除  1 软件包\n\n安装大小:9.4 M\nDownloading packages:\nRunning transaction check\nRunning transaction test\nTransaction test succeeded\nRunning transaction\n  正在删除    : httpd-2.4.6-97.el7.centos.5.x86_64                          1/1 \n  验证中      : httpd-2.4.6-97.el7.centos.5.x86_64                          1/1 \n\n删除:\n  httpd.x86_64 0:2.4.6-97.el7.centos.5                                          \n\n完毕!\n"
    ]
}
192.168.16.141 | CHANGED => {
    "ansible_facts": {
        "discovered_interpreter_python": "/usr/bin/python"
    },
    "changed": true,
    "changes": {
        "removed": [
            "httpd"
        ]
    },
    "msg": "",
    "rc": 0,
    "results": [
        "已加载插件:fastestmirror, langpacks\n正在解决依赖关系\n--> 正在检查事务\n---> 软件包 httpd.x86_64.0.2.4.6-97.el7.centos.5 将被 删除\n--> 解决依赖关系完成\n\n依赖关系解决\n\n================================================================================\n Package      架构          版本                          源               大小\n================================================================================\n正在删除:\n httpd        x86_64        2.4.6-97.el7.centos.5         @updates        9.4 M\n\n事务概要\n================================================================================\n移除  1 软件包\n\n安装大小:9.4 M\nDownloading packages:\nRunning transaction check\nRunning transaction test\nTransaction test succeeded\nRunning transaction\n  正在删除    : httpd-2.4.6-97.el7.centos.5.x86_64                          1/1 \n  验证中      : httpd-2.4.6-97.el7.centos.5.x86_64                          1/1 \n\n删除:\n  httpd.x86_64 0:2.4.6-97.el7.centos.5                                          \n\n完毕!\n"
    ]
}
[root@localhost ~]
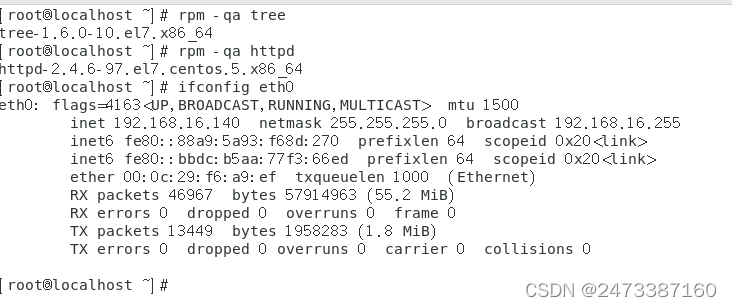
4、查看两台被管理机是否已经卸载
被管理机1验证查看是否已经卸载
[root@localhost ~] ifconfig eth0
eth0: flags=4163<UP,BROADCAST,RUNNING,MULTICAST>  mtu 1500
        inet 192.168.16.140  netmask 255.255.255.0  broadcast 192.168.16.255
        inet6 fe80::88a9:5a93:f68d:270  prefixlen 64  scopeid 0x20<link>
        inet6 fe80::bbdc:b5aa:77f3:66ed  prefixlen 64  scopeid 0x20<link>
        ether 00:0c:29:f6:a9:ef  txqueuelen 1000  (Ethernet)
        RX packets 49485  bytes 59714921 (56.9 MiB)
        RX errors 0  dropped 0  overruns 0  frame 0
        TX packets 14627  bytes 2128358 (2.0 MiB)
        TX errors 0  dropped 0 overruns 0  carrier 0  collisions 0

[root@localhost ~] rpm -qa httpd
[root@localhost ~] rpm -qa tree
[root@localhost ~]没有任何结果返回,代表已经卸载
被管理机2验证查看是否已经卸载
[root@localhost ~] ansible 192.168.16.141 -m yum -a 'name=httpd state=absent'
192.168.16.141 | SUCCESS => {
    "ansible_facts": {
        "discovered_interpreter_python": "/usr/bin/python"
    },
    "changed": false,
    "msg": "",
    "rc": 0,
    "results": [
        "httpd is not installed"
    ]
}
[root@localhost ~] rpm -qa httpd
[root@localhost ~] rpm -qa tree
[root@localhost ~] 没有任何结果返回,代表已经卸载
中间插一段,下载ansible一个检查语法的工具,这个可以下载,也可不下载,因为使用ansible自带的模拟执行语句效果也是一样的
[root@localhost ~] yum -y install search ansible-lint.noarch
已加载插件:fastestmirror, langpacks
Loading mirror speeds from cached hostfile
epel/x86_64/metalink                                                             |  11 kB  00:00:02
 * base: mirrors.aliyun.com
 * epel: mirror.01link.hk
 * extras: mirrors.aliyun.com
 * updates: mirrors.aliyun.com
base                                                                             | 3.6 kB  00:00:00
extras                                                                           | 2.9 kB  00:00:00
updates                                                                          | 2.9 kB  00:00:00
没有可用软件包 search。
正在解决依赖关系
--> 正在检查事务
---> 软件包 ansible-lint.noarch.0.3.5.1-1.el7 将被 安装
--> 解决依赖关系完成

依赖关系解决

========================================================================================================
 Package                     架构                  版本                       源                   大小
========================================================================================================
正在安装:
 ansible-lint                noarch                3.5.1-1.el7                epel                 54 k

事务概要
========================================================================================================
安装  1 软件包

总下载量:54 k
安装大小:151 k
Downloading packages:
ansible-lint-3.5.1-1.el7.noarch.rpm                                              |  54 kB  00:00:00
Running transaction check
Running transaction test
Transaction test succeeded
Running transaction
  正在安装    : ansible-lint-3.5.1-1.el7.noarch                                                     1/1
  验证中      : ansible-lint-3.5.1-1.el7.noarch                                                     1/1

已安装:
  ansible-lint.noarch 0:3.5.1-1.el7

完毕!
[root@localhost ~]
[root@localhost ~] ansible-lint ip.yml
#ansible-lint + yaml脚本检测该脚本语句是否存在问题
Couldn't parse task at ip.yml:5 (unexpected parameter type in action: <type 'bool'>

The error appears to be in '<unicode string>': line 5, column 7, but may
be elsewhere in the file depending on the exact syntax problem.

(could not open file to display line))
{ u'gather_facts': True,
  u'name': u'\u7b2c\u4e00\u4e2apalybook\u5267\u672c,\u4fee\u6539\u88ab\u7ba1\u7406\u673a1\u7684ip\u5730\u5740',
  u'shell': u'echo $(./ip1.sh)'}
 **ansible-lint.noarch xxx.yml(使用yaml语法编辑的某某某playbook剧本)的用法其实和ansible-playbook -C xxx.yml一样的**
[root@localhost ~] ansible-playbook ip.yml -C
ERROR! unexpected parameter type in action: <type 'bool'>

The error appears to be in '/root/ip.yml': line 5, column 7, but may
be elsewhere in the file depending on the exact syntax problem.

The offending line appears to be:

  tasks:
    - name: 第一个palybook剧本,修改被管理机1的ip地址    #名字随便取,不脱离主题即可
      ^ here
六、模块以及yaml语法补充
通过 Ansible 提供的用于远程执行命令的 command、shell、raw、script 模块,我们可以将被管理节点的 IP/计算机名信息写入 Ansible 的“演员”inventory——/etc/ansbile/hosts,将要执行的命令编排成 Ansible 的 playbook,然后运行这个 playbook 就可以达到远程配置的目的了。
command、shell、raw、script 模块有什么区别呢?command 和 shell 模块都依赖 Python 解析器,
而 raw、script 这两个模块不依赖 Python,直接调用目标客户端的/bin/sh 来执行命令。如果目标客户端
安装了 Python,而且要执行的命令很简单,不涉及特殊的 shell 符号,可以考虑 command 模块,如果涉及重定向等特殊 shell 符号则要用 shell 模块;如果目标客户端没有安装 Python,就只能考虑用 raw 或者script 模块,如果临时组装 shell 命令清单,则使用 raw 模块,如果在 Ansible 控制器上已经编写好 shell
脚本文件,需要发送到客户端去执行,则应该使用 script 模块。
playbook 又是什么?playbook 字母意思是剧本,剧本里写清楚了哪个演员什么时候应该说什么台词、
做什么动作、展现什么神情等,电影、电视剧是按照剧本来拍摄的。Ansible 里的 playbook 作用就跟拍
电影的剧本一样,把要执行的命令、任务在 playbook 里编排好,然后 Ansible 执行这个 playbook,Ansible
的“电影”就这样“拍摄”完成了。由此可见,掌握 playbook 的编排对于掌握 Ansible 的应用有多重要!
电影剧本有分幕、场(景)、镜等结构,Ansible 的 playbook 也分结构,类似于:
playbook #相当于总剧本
|----play #相当于场景剧本
 |----tasks #相当于分镜头剧本
 |----pre_tasks #相当于拍摄前准备工作:布置场景,演员化妆等,执行环境的准备
 |----tasks #相当于开始拍摄,要执行的命令清单
 |----post_tasks #相当于拍摄完清场工作:撤换场景,演员卸/换妆等,执行环境的清理
**Ansible playbook 遵循 YAML 语法,其格式大致如下:**
--- #开头,非必需
- name: Network Getting Started First Playbook #play 名称,冒号后必须有一个空格
connection: network_cli #连接方式
gather_facts: false #是否收集被管理节点的信息
hosts: all #针对哪些被管理节点
tasks: #接下来是详细的任务清单
- name: Get config for VyOS devices #任务名称
 vyos_facts: #模块
 gather_subset: all #收集信息子集
- name: Display the config
 debug:
 msg: "The hostname is {{ ansible_net_hostname }} and the OS is {{ ansible_net_version }}" #输出到控制节点的 shell
playbook 以“---”开头,以“...”结束。
play 和 task 以“- ”(一个-和一个空格)开头,并列的元素应在垂直方向对齐,被包含的应缩进两个空格。
内容太长可以用“|”或者“>”换行,两者的区别是“|”会保留换行符,而“>”会把换行符变成空格。
键(key)后面是一个冒号和一个空格“: ”,值可以用单引号或双引号包含起来,两者的区别是双引号里面可以使用转义,如 foo: "a \t TAB and a \n NEWLINE",\t 表示一个 Tab,\n 表示一个换行符。
变量的引用需要使用双引号和双大括号包含变量名,即"{{ var }}",如
foo: "{{ variable }}"。
foo: "{{ variable }}/additional/string/literal"
foo2: "{{ variable }}\\backslashes\\are\\also\\special\\characters"
foo3: "even if it's just a string literal it must all be quoted"
关于更多的语法信息可以参考文档:
https://docs.ansible.com/ansible/latest/reference_appendices/YAMLSyntax.html
YAML 1.1:https://yaml.org/spec/1.1/
YAML 1.2:https://yaml.org/spec/1.2/spec.html
Ansible playbook 的样例:https://github.com/ansible/ansible-examples
常用模块
Command 模块
功能:在远程主机执行命令,此为默认模块,可忽略-m选项
注意:此命令不支持 $VARNAME < > | ; & 等,用shell模块实现
范例:
[root@ansible ~] ansible websrvs -m command -a 'chdir=/etc cat centos-release'
10.0.0.7 | CHANGED | rc=0 >>
CentOS Linux release 7.7.1908 (Core)
10.0.0.8 | CHANGED | rc=0 >>
CentOS Linux release 8.1.1911 (Core)

[root@ansible ~] ansible websrvs -m command -a 'chdir=/etc creates=/data/f1.txt cat centos-release'
10.0.0.7 | CHANGED | rc=0 >>
CentOS Linux release 7.7.1908 (Core)
10.0.0.8 | SUCCESS | rc=0 >>
skipped, since /data/f1.txt exists

[root@ansible ~] ansible websrvs -m command -a 'chdir=/etc removes=/data/f1.txt cat centos-release'
10.0.0.7 | SUCCESS | rc=0 >>
skipped, since /data/f1.txt does not exist
10.0.0.8 | CHANGED | rc=0 >>
CentOS Linux release 8.1.1911 (Core)
ansible websrvs -m command -a ‘service vsftpd start’
ansible websrvs -m command -a ‘echo magedu |passwd --stdin wang’
ansible websrvs -m command -a 'rm -rf /data/'
ansible websrvs -m command -a 'echo hello > /data/hello.log'
ansible websrvs -m command -a "echo $HOSTNAME"
Shell模块
功能:和command相似,用shell执行命令
范例:
[root@ansible ~] ansible websrvs -m shell -a "echo HOSTNAME"
10.0.0.7 | CHANGED | rc=0 >>
ansible
10.0.0.8 | CHANGED | rc=0 >>
ansible
[root@ansible ~] ansible websrvs -m shell -a 'echoHOSTNAME'
10.0.0.7 | CHANGED | rc=0 >>
centos7.wangxiaochun.com
10.0.0.8 | CHANGED | rc=0 >>
centos8.localdomain

[root@ansible ~] ansible websrvs -m shell -a 'echo centos | passwd --stdin wang'
10.0.0.7 | CHANGED | rc=0 >>
Changing password for user wang.
passwd: all authentication tokens updated successfully.
10.0.0.8 | CHANGED | rc=0 >>
Changing password for user wang.
passwd: all authentication tokens updated successfully.

[root@ansible ~] ansible websrvs -m shell -a 'ls -l /etc/shadow'
10.0.0.7 | CHANGED | rc=0 >>
---------- 1 root root 889 Mar  2 14:34 /etc/shadow
10.0.0.8 | CHANGED | rc=0 >>
---------- 1 root root 944 Mar  2 14:34 /etc/shadow

[root@ansible ~] ansible websrvs -m shell -a 'echo hello > /data/hello.log'
10.0.0.7 | CHANGED | rc=0 >>

10.0.0.8 | CHANGED | rc=0 >>

[root@ansible ~] ansible websrvs -m shell -a 'cat  /data/hello.log'
10.0.0.7 | CHANGED | rc=0 >>
hello
10.0.0.8 | CHANGED | rc=0 >>
hello
Bash
注意:调用bash执行命令 类似 cat /tmp/test.md | awk -F‘|’ ‘{print 1,1,2}’ &> /tmp/example.txt 这些复杂命令,即使使用shell也可能会失败,解决办法:写到脚本时,copy到远程,执行,再把需要的结果拉回执行命令的机器
范例:将shell模块代替command,设为模块
[root@ansible ~] vim /etc/ansible/ansible.cfg
#修改下面一行
module_name = shell
Script模块
功能:在远程主机上运行ansible服务器上的脚本
范例:
[root@ansible ~] ansible websrvs  -m script -a /data/test.sh
Copy模块
功能:从ansible服务器主控端复制文件到远程主机
#如目标存在,默认覆盖,此处指定先备份
[root@ansible ~] ansible websrvs -m copy -a “src=/root/test1.sh dest=/tmp/test2.sh    owner=wang  mode=600 backup=yes”
#指定内容,直接生成目标文件
[root@ansible ~] ansible websrvs -m copy -a "content='test line1\ntest line2' dest=/tmp/test.txt"
#复制/etc/下的文件,不包括/etc/目录自身
[root@ansible ~] ansible websrvs -m copy -a “src=/etc/ dest=/backup”
Fetch模块
功能:从远程主机提取文件至ansible的主控端,copy相反,目前不支持目录
范例:
[root@ansible ~] ansible websrvs -m fetch -a ‘src=/root/test.sh dest=/data/scripts’
范例:
[root@ansible ~] ansible   all -m  fetch -a 'src=/etc/redhat-release dest=/data/os'
[root@ansible ~] tree /data/os/
/data/os/
├── 10.0.0.6
│   └── etc
│       └── redhat-release
├── 10.0.0.7
│   └── etc
│       └── redhat-release
└── 10.0.0.8
    └── etc
        └── redhat-release
6 directories, 3 files
File模块
功能:设置文件属性
范例:
#创建空文件
[root@ansible ~] ansible all -m  file  -a 'path=/data/test.txt state=touch'
[root@ansible ~] ansible all -m  file  -a 'path=/data/test.txt state=absent'
[root@ansible ~] ansible all -m file -a "path=/root/test.sh owner=wang mode=755“
#创建目录
[root@ansible ~] ansible all -m file -a "path=/data/mysql state=directory owner=mysql group=mysql"
#创建软链接
[root@ansible ~] ansible all -m file -a ‘src=/data/testfile  dest=/data/testfile-link state=link’
unarchive模块
功能:解包解压缩
实现有两种用法:
1、将ansible主机上的压缩包传到远程主机后解压缩至特定目录,设置copy=yes
2、将远程主机上的某个压缩包解压缩到指定路径下,设置copy=no
常见参数:
copy:默认为yes,当copy=yes,拷贝的文件是从ansible主机复制到远程主机上,如果设置为copy=no,会在远程主机上寻找src源文件
remote_src:和copy功能一样且互斥,yes表示在远程主机,不在ansible主机,no表示文件在ansible主机上
src:源路径,可以是ansible主机上的路径,也可以是远程主机上的路径,如果是远程主机上的路径,则需要设置copy=no
dest:远程主机上的目标路径
mode:设置解压缩后的文件权限
范例:
[root@ansible ~] ansible all -m unarchive -a 'src=/data/foo.tgz dest=/var/lib/foo'
[root@ansible ~] ansible all -m unarchive -a 'src=/tmp/foo.zip dest=/data copy=no mode=0777'
[root@ansible ~] ansible all -m unarchive -a 'src=https://example.com/example.zip dest=/data copy=no'
Archive模块
功能:打包压缩
范例:
[root@ansible ~] ansible websrvs -m archive  -a 'path=/var/log/ dest=/data/log.tar.bz2 format=bz2  owner=wang mode=0600'
Hostname模块
功能:管理主机名
范例:
[root@ansible ~] ansible node1 -m hostname -a “name=websrv”
[root@ansible ~] ansible 192.168.100.18 -m hostname -a 'name=node18.magedu.com'
Cron模块
功能:计划任务
支持时间:minute,hour,day,month,weekday
范例:
#备份数据库脚本
[root@centos8 ~] cat mysql_backup.sh
mysqldump -A -F --single-transaction --master-data=2 -q -uroot |gzip > /data/mysql_date +%F_%T.sql.gz
#创建任务
[root@ansible ~] ansible 10.0.0.8 -m cron -a 'hour=2 minute=30 weekday=1-5 name="backup mysql" job=/root/mysql_backup.sh'
[root@ansible ~] ansible websrvs   -m cron -a "minute=*/5 job='/usr/sbin/ntpdate 172.20.0.1 &>/dev/null' name=Synctime"
#禁用计划任务
[root@ansible ~] ansible websrvs   -m cron -a "minute=*/5 job='/usr/sbin/ntpdate 172.20.0.1 &>/dev/null' name=Synctime disabled=yes"
#启用计划任务
[root@ansible ~] ansible websrvs   -m cron -a "minute=*/5 job='/usr/sbin/ntpdate 172.20.0.1 &>/dev/null' name=Synctime disabled=no"
#删除任务
[root@ansible ~] ansible websrvs -m cron -a "name='backup mysql' state=absent"
[root@ansible ~] ansible websrvs -m cron -a 'state=absent name=Synctime'
Yum模块
功能:管理软件包,只支持RHEL,CentOS,fedora,不支持Ubuntu其它版本
范例:
[root@ansible ~] ansible websrvs -m yum -a ‘name=httpd state=present’  #安装
[root@ansible ~] ansible websrvs -m yum -a ‘name=httpd state=absent’  #删除
Service模块
功能:管理服务
范例:
[root@ansible ~] ansible all -m service -a 'name=httpd state=started enabled=yes'
[root@ansible ~] ansible all -m service -a 'name=httpd state=stopped'
[root@ansible ~] ansible all -m service -a 'name=httpd state=reloaded’
[root@ansible ~] ansible all -m shell -a "sed -i 's/^Listen 80/Listen 8080/' /etc/httpd/conf/httpd.conf"
[root@ansible ~] ansible all -m service -a 'name=httpd state=restarted'
User模块
功能:管理用户
范例:
#创建用户
[root@ansible ~] ansible all -m user -a 'name=user1 comment=“test user” uid=2048 home=/app/user1 group=root'
[root@ansible ~] ansible all -m user -a 'name=nginx comment=nginx uid=88 group=nginx groups="root,daemon" shell=/sbin/nologin system=yes create_home=no  home=/data/nginx non_unique=yes'
#删除用户及家目录等数据
[root@ansible ~] ansible all -m user -a 'name=nginx state=absent remove=yes'
Group模块
功能:管理组
范例:
#创建组
[root@ansible ~] ansible websrvs -m group  -a 'name=nginx gid=88 system=yes'
#删除组
[root@ansible ~] ansible websrvs -m group  -a 'name=nginx state=absent'
Lineinfile模块
ansible在使用sed进行替换时,经常会遇到需要转义的问题,而且ansible在遇到特殊符号进行替换时,存在问题,无法正常进行替换 。其实在ansible自身提供了两个模块:lineinfile模块和replace模块,可以方便的进行替换
功能:相当于sed,可以修改文件内容
范例:
[root@ansible ~] ansible all -m   lineinfile -a "path=/etc/selinux/config regexp='^SELINUX=' line='SELINUX=enforcing'"
[root@ansible ~] ansible all -m lineinfile  -a 'dest=/etc/fstab state=absent regexp="^#"'
Replace模块
该模块有点类似于sed命令,主要也是基于正则进行匹配和替换
范例:
[root@ansible ~] ansible all -m replace -a "path=/etc/fstab regexp='^(UUID.*)' replace='#\1'"
[root@ansible ~] ansible all -m replace -a "path=/etc/fstab regexp='^#(.*)' replace='\1'"
Setup模块
功能: setup 模块来收集主机的系统信息,这些 facts 信息可以直接以变量的形式使用,但是如果主机较多,会影响执行速度,可以使用
gather_facts: no
来禁止 Ansible 收集 facts 信息
范例:
[root@ansible ~] ansible all -m setup
[root@ansible ~] ansible all -m setup -a "filter=ansible_nodename"
[root@ansible ~] ansible all -m setup -a "filter=ansible_hostname"
[root@ansible ~] ansible all -m setup -a "filter=ansible_domain"
[root@ansible ~] ansible all -m setup -a "filter=ansible_memtotal_mb"
[root@ansible ~] ansible all -m setup -a "filter=ansible_memory_mb"
[root@ansible ~] ansible all -m setup -a "filter=ansible_memfree_mb"
[root@ansible ~] ansible all -m setup -a "filter=ansible_os_family"
[root@ansible ~] ansible all -m setup -a "filter=ansible_distribution_major_version"
[root@ansible ~] ansible all -m setup -a "filter=ansible_distribution_version"
[root@ansible ~] ansible all -m setup -a "filter=ansible_processor_vcpus"
[root@ansible ~] ansible all -m setup -a "filter=ansible_all_ipv4_addresses"
[root@ansible ~] ansible all -m setup -a "filter=ansible_architecture"
[root@ansible ~] ansible all -m  setup  -a "filter=ansible_processor*"
范例:
[root@ansible ~] ansible all  -m  setup -a 'filter=ansible_python_version'
10.0.0.7 | SUCCESS => {
    "ansible_facts": {
        "ansible_python_version": "2.7.5",
        "discovered_interpreter_python": "/usr/bin/python"
    },
    "changed": false
}
10.0.0.6 | SUCCESS => {
    "ansible_facts": {
        "ansible_python_version": "2.6.6",
        "discovered_interpreter_python": "/usr/bin/python"
    },
    "changed": false
}
10.0.0.8 | SUCCESS => {
    "ansible_facts": {
        "ansible_python_version": "3.6.8",
        "discovered_interpreter_python": "/usr/libexec/platform-python"
    },
    "changed": false
}
[root@ansible ~]
七、总结
管理机使用ansible修改被管理机的ip,如果没有必要修改就不要修改, 如果需要修改,修改IP和执行其他任务这两者必须要分开执行,修改后要确保能够上网且正常通信,并且修改ansible的主机清单文件
ansible playbook 默认第一个 task 是 Gathering Facts 收集各主机的 facts 信息,以方便我们在 paybook 中直接引用 facts 里的信息。
简单来说:gatheer_facts:的选项有两个值,true和false,true代表真的、相当于yes,false代表假的、相当于no;综合一下,该选项使用true和yes、false和no是一样的效果,本人验证过
综合以上结论:修改ip是不可以和其他任务放在一起的,
因为放在一起只成功修改了前面管理机1的IP,而就一直卡在那不动,
所以先修改ip,在ansible的主机清单里面更新主机IP后,
再来执行其他任务,当然任务里面是需要更新修改后的IP。
更改被管理机的IP地址,还是老样子,首先在管理机的终端模拟执行测试一遍
**这里稍微补充一下,相信很多人是看不太懂的,多多尝试、遇错纠错,会学到更多!用心写了很久,如果本文对您有一点点帮助,可以点赞、关注、收藏一下吧 **

为开发者提供学习成长、分享交流、生态实践、资源工具等服务,帮助开发者快速成长。
更多推荐


 39
39 1
1- 0


 已为社区贡献3条内容

所有评论(0)