Ubuntu终端配置oh-my-zsh(详细配置ohmyzsh步骤)
安装oh my zshoh my zsh的github地址:oh my zsh以Ubuntu 20.04为例。安装教程和文件已上传到gitee:安装oh my zsh预准备安装Zsh、curl、wget、git、vim。sudo apt install zsh curl wget git vim -y安装oh my zsh# 通过wget安装sh -c "$(wget -O- https://ra
安装oh my zsh
oh my zsh的github地址:oh my zsh
以Ubuntu 20.04为例。
安装教程和文件已上传到gitee:安装oh my zsh
测试如下

预准备
安装Zsh、curl、wget、git、vim。
sudo apt install zsh curl wget git vim -y
安装oh my zsh
# 通过wget安装

sh -c "$(wget -O- https://raw.githubusercontent.com/ohmyzsh/ohmyzsh/master/tools/install.sh)"
修改终端登录默认shell为zsh
chsh -s $(which zsh)
修改后需要注销或重启系统才能生效。
# 重启zsh
exec zsh
配置oh my zsh
主题
Powerlevel10k
-
安装
powerlevel10k推荐的字体MesloLGS NF Regular.ttf MesloLGS NF Bold.ttf MesloLGS NF Italic.ttf MesloLGS NF Bold Italic.ttf-
安装方法1:
参考官网,下载字体后,打开字体所在目录,双击字体文件,之后单击安装
-
安装方法2:命令行安装
-
将推荐字体下载到本地目录
字体已上传到gitee:字体
# 我的目录如下 ➜ myfonts pwd /home/king/software-pkg/myfonts ➜ myfonts ls -l total 4992 -rw-rw-r-- 1 king king 1260156 12月 25 17:41 'MesloLGS NF Bold Italic.ttf' -rw-rw-r-- 1 king king 1301900 12月 25 17:41 'MesloLGS NF Bold.ttf' -rw-rw-r-- 1 king king 1251424 12月 25 17:41 'MesloLGS NF Italic.ttf' -rw-rw-r-- 1 king king 1292408 12月 25 17:40 'MesloLGS NF Regular.ttf'- 在
/usr/share/fonts目录下创建存储字体的目录
# 进入/usr/share/fonts ➜ fonts pwd /usr/share/fonts # 创建powerlevel10k目录 ➜ fonts sudo mkdir powerlevel10k ➜ fonts cd powerlevel10k ➜ powerlevel10k pwd /usr/share/fonts/powerlevel10k- 拷贝下载的字体到
/usr/share/fonts/powerlevel10k/
# 将字体拷贝到powerlevel10k目录下 ➜ myfonts pwd /home/king/software-pkg/myfonts ➜ myfonts sudo cp ./* /usr/share/fonts/powerlevel10k/ # 赋予字体文件执行权限 ➜ powerlevel10k sudo chmod +x *.ttf ➜ powerlevel10k ls -l total 4.9M -rwxr-xr-x 1 root root 1.3M 12月 25 22:37 'MesloLGS NF Bold Italic.ttf' -rwxr-xr-x 1 root root 1.3M 12月 25 22:37 'MesloLGS NF Bold.ttf' -rwxr-xr-x 1 root root 1.2M 12月 25 22:37 'MesloLGS NF Italic.ttf' -rwxr-xr-x 1 root root 1.3M 12月 25 22:37 'MesloLGS NF Regular.ttf'- 安装字体
sudo mkfontscale
sudo mkfontdir
sudo fc-cache -fv
如果提示命令不存在,请安装下面两个软件
# 使mkfontscale和mkfontdir命令正常运行
sudo apt-get install ttf-mscorefonts-installer
# 使fc-cache命令正常运行
sudo apt-get install fontconfig
# fc-list查看系统上安装的字体 ➜ powerlevel10k fc-list | grep "MesloLGS NF" -
-
-
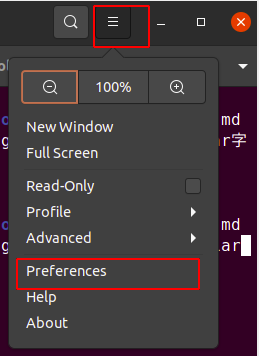
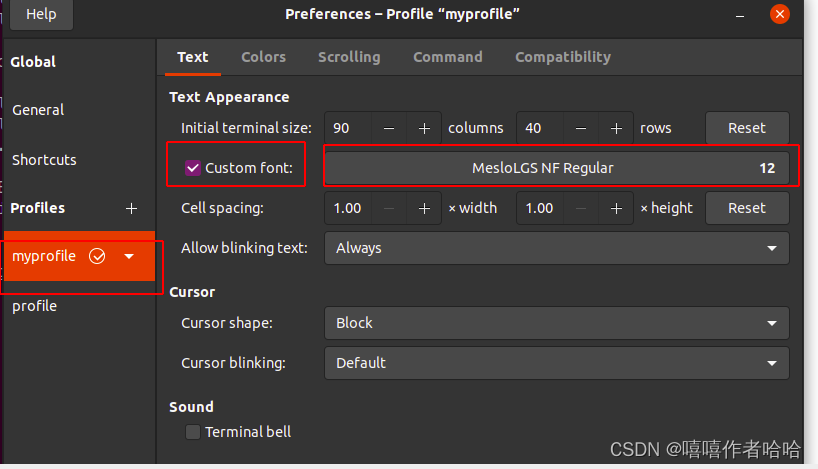
设置终端字体为推荐字体
Open Terminal → Preferences and click on the selected profile under Profiles. Check Custom font under Text Appearance and select
MesloLGS NF Regular.- 打开配置项

- 自定义配置

- 打开配置项
-
安装
powerlevel10k主题- 添加仓库
# 码云 git clone --depth=1 https://gitee.com/romkatv/powerlevel10k.git ${ZSH_CUSTOM:-$HOME/.oh-my-zsh/custom}/themes/powerlevel10k # github git clone --depth=1 https://github.com/romkatv/powerlevel10k.git ${ZSH_CUSTOM:-$HOME/.oh-my-zsh/custom}/themes/powerlevel10k- 修改
~/.zshrc
vim ~/.zshrc注释掉默认的主题,添加如下
ZSH_THEME=“powerlevel10k/powerlevel10k”
本人的zsh配置文件.zshrc 文件已经上传。
- 配置自定义风格的主题
# 命令行执行
source ~/.zshrc
或者
p10k configure
执行
p10k configure之后,Powerlevel10k最后会在$HOME下生成配置文件~/.p10k.zsh,可通过修改~/.p10k.zsh来配置终端状态栏和颜色。p10k官方配色方法github:配色方法
# 配色之前在命令行执行如下脚本查看p10k颜色 for i in {0..255}; do print -Pn "%K{$i} %k%F{$i}${(l:3::0:)i}%f " ${${(M)$((i%6)):#3}:+$'\n'}; done- 通过修改
~/.p10k.zsh实现个性化配置
❯ vim ~/.p10k.zsh
❯ source ~/.p10k.zsh
我的主题配置文件.p10k.zsh也上传到gitee,可以自行下载替换。
-
修改终端颜色外观
Open *Terminal → Preferences* and click on the selected profile under *Profiles*.

oh my zsh更多主题
https://github.com/ohmyzsh/ohmyzsh/wiki/Themes
https://github.com/ohmyzsh/ohmyzsh/wiki/External-themes
欢迎大佬补充更多主题。
插件
https://github.com/zsh-users
https://github.com/ohmyzsh/ohmyzsh/tree/master/plugins
https://github.com/ohmyzsh/ohmyzsh/wiki/Plugins
zsh自带的插件也提供了很多快捷操作的功能,可以细细研究使用。
配置zsh-autosuggestions
- 下载源码到oh my zsh 的plugins目录下,即
~/.oh-my-zsh/custom/plugins
git clone https://github.com/zsh-users/zsh-autosuggestions ${ZSH_CUSTOM:-~/.oh-my-zsh/custom}/plugins/zsh-autosuggestions
- 修改
~/.zshrc,添加插件
plugins=(
    # other plugins...
    zsh-autosuggestions
)
- 立即生效
source ~/.zshrc
配置zsh-syntax-highlighting
- 操作步骤同上。
git clone https://github.com/zsh-users/zsh-syntax-highlighting.git ${ZSH_CUSTOM:-~/.oh-my-zsh/custom}/plugins/zsh-syntax-highlighting
plugins=(
	# other plugins...
	zsh-syntax-highlighting
)
source ~/.zshrc
-
自定义命令行高亮显示的颜色
-
如果采用了xterm终端仿真器,可开启xterm256-color
# 修改~/.zshrc,加入如下代码 [[ "$TERM" == "xterm" ]] && export TERM=xterm-256color -
查询颜色
在线查看网址:xterm256-color-picker
命令行查看:
for code in {000..255}; do print -P -- "$code: %F{$code}Color%f"; done
# 或
for code in {0..255}; do echo -e "\e[38;05;${code}m $code: Color"; done
-
配置zsh-history-substring-search
- 操作步骤同上
git clone https://github.com/zsh-users/zsh-history-substring-search ${ZSH_CUSTOM:-~/.oh-my-zsh/custom}/plugins/zsh-history-substring-search
 plugins=(
 	# other plugins...
 	zsh-history-substring-search
 )
source ~/.zshrc
本人的zsh配置文件.zshrc 文件已经上传到gitee,可自行下载替换。
配置git-open
git clone https://github.com/paulirish/git-open.git ${ZSH_CUSTOM:-~/.oh-my-zsh/custom}/plugins/git-open
plugins=(
 	# other plugins...
   	git-open
)
source ~/.zshrc
配置incr
git clone https://github.com/makeitjoe/incr.zsh ${ZSH_CUSTOM:-~/.oh-my-zsh/custom}/plugins/incr
plugins=(
 	# other plugins...
   	incr
)
source ~/.zshrc
目前已配置插件
plugins=(
	git
    gitfast
    vi-mode
    sudo
    colored-man-pages
    autojump
    web-search
   	command-not-found
   	safe-paste

    #zsh-vi-mode
    git-open
    zsh-autosuggestions
    zsh-syntax-highlighting
    zsh-history-substring-search
    incr
)
GitHub加速
如果命令行访问github很慢的,可以把https改为git试试,或者找其他加速访问的方法。
该文提供修改IP和主机名映射的方法加速:
-
通过查找
github.global.ssl.fastly.net和github.com的IP,查找网站如下:https://www.ipaddress.com/
-
修改
/etc/hosts文件,添加IP与主机的映射关系
199.232.69.194 github.global.ssl.fastly.net
140.82.114.4    github.com
- 重启网络服务
# Ubuntu 20.04
sudo systemctl restart NetworkManager.service
更多推荐
 已为社区贡献4条内容


所有评论(0)