【重要】黑苹果安装之 BIOS 设置篇
【重要】黑苹果安装之 BIOS 设置篇
安装黑苹果关键性因素:BIOS 的设置
下面是我搜集给大家的关于 BIOS 设置的教程方法,大家一定要在安装黑苹果之前仔细的去设置,不要有遗漏。
若果你的 BIOS 里面没有其中一项设置的话,可以忽略。

图片来自网络|各品牌进入BIOS快捷键
01. Intel 桌面端
① Ivy Bridge(桌面端,第三代酷睿)
BIOS 设置
-
关闭
-
Fast Boot
-
Secure Boot
-
VT-d(可以开启,前提是 DisableIoMapper 设置为 Yes)
-
CSM
-
Thunderbolt(建议安装完成后再开启调试)
-
Intel SGX Intel Platform Trust
-
CFG Lock(MSR 0xE2 写保护)此项必须关闭,如果你的 BIOS 里没有此项,注意设置 AppleCpuPmCfgLock 和 Apple XcpmCfgLock 为 Yes。
-
-
开启
-
VT-x
-
Above 4G decoding
-
Hyper-Threading
-
Execute Disable Bit
-
EHCI/XHCI Hand-off
-
OS type:Other(如果你选择 Other 会导致 CSM 联动开启,选择 Windows 8.1/10 UEFI Mode)
-
DVMT Pre-Allocated:32MB 及以上
-
② Haswell 和 Broadwell(桌面端,第四、五代酷睿)
BIOS 设置
-
关闭
-
Fast Boot
-
Secure Boot
-
VT-d(可以开启,前提是 DisableIoMapper 设置为 Yes)
-
CSM
-
Thunderbolt(建议安装完成后再开启调试)
-
Intel SGX Intel Platform Trust
-
CFG Lock(MSR 0xE2 写保护)此项必须关闭,如果你的 BIOS 里没有此项,注意设置 AppleCpuPmCfgLock 和 Apple XcpmCfgLock 为 Yes。
-
-
开启
-
VT-x
-
Above 4G decoding
-
Hyper-Threading
-
Execute Disable Bit
-
EHCI/XHCI Hand-off
-
OS type:Other(如果你选择 Other 会导致 CSM 联动开启,选择 Windows 8.1/10 UEFI Mode)
-
DVMT Pre-Allocated:64MB 及以上
-
③ Skylake(桌面端,第六代酷睿)
BIOS 设置
-
关闭
-
Fast Boot
-
Secure Boot
-
VT-d(可以开启,前提是 DisableIoMapper 设置为 Yes)
-
CSM
-
Thunderbolt(建议安装完成后再开启调试)
-
Intel SGX Intel Platform Trust
-
Intel Platform Trust
-
CFG Lock(MSR 0xE2 写保护)此项必须关闭,如果你的 BIOS 里没有此项,注意设置 AppleCpuPmCfgLock 和 Apple XcpmCfgLock 为 Yes。
-
-
开启
-
VT-x
-
Above 4G decoding
-
Hyper-Threading
-
Execute Disable Bit
-
EHCI/XHCI Hand-off
-
OS type:Other(如果你选择 Other 会导致 CSM 联动开启,选择 Windows 8.1/10 UEFI Mode)
-
DVMT Pre-Allocated:64MB 及以上
-
④ Kabylake(桌面端,第七代酷睿)
BIOS 设置
-
关闭
-
Fast Boot
-
Secure Boot
-
VT-d(可以开启,前提是 DisableIoMapper 设置为 Yes)
-
CSM
-
Thunderbolt(建议安装完成后再开启调试)
-
Intel SGX Intel Platform Trust
-
Intel Platform Trust
-
CFG Lock(MSR 0xE2 写保护)此项必须关闭,如果你的 BIOS 里没有此项,注意设置 AppleCpuPmCfgLock 和 Apple XcpmCfgLock 为 Yes。
-
-
开启
-
VT-x
-
Above 4G decoding
-
Hyper-Threading
-
Execute Disable Bit
-
EHCI/XHCI Hand-off
-
OS type:Other(如果你选择 Other 会导致 CSM 联动开启,选择 Windows 8.1/10 UEFI Mode)
-
DVMT Pre-Allocated:64MB 及以上
-
⑤ Comet Lake(桌面端,第十代酷睿)
BIOS 设置(Comet Lake 平台建议安装 macOS 10.15.5 及以上)
-
关闭
-
Fast Boot
-
Secure Boot
-
VT-d(可以开启,前提是 DisableIoMapper 设置为 Yes)
-
CSM
-
Thunderbolt(建议安装完成后再开启调试)
-
Intel SGX Intel Platform Trust
-
Intel Platform Trust
-
CFG Lock(MSR 0xE2 写保护)此项必须关闭,如果你的 BIOS 里没有此项,注意设置 AppleCpuPmCfgLock 和 Apple XcpmCfgLock 为 Yes。
-
-
开启
-
VT-x
-
Above 4G decoding
-
Hyper-Threading
-
Execute Disable Bit
-
EHCI/XHCI Hand-off
-
OS type:Other(如果你选择 Other 会导致 CSM 联动开启,选择 Windows 8.1/10 UEFI Mode)
-
DVMT Pre-Allocated:64MB 及以上
-
02.Intel HEDT 平台
① Haswell-E(第五代酷睿 X99 平台)
BIOS 设置
-
关闭
-
Fast Boot
-
Secure Boot
-
VT-d(可以开启,前提是 DisableIoMapper 设置为 Yes)
-
CSM
-
Thunderbolt(建议安装完成后再开启调试)
-
Intel SGX Intel Platform Trust
-
Intel Platform Trust
-
CFG Lock(MSR 0xE2 写保护)此项必须关闭,如果你的 BIOS 里没有此项,注意设置 AppleCpuPmCfgLock 和 Apple XcpmCfgLock 为 Yes。
-
-
开启
-
VT-x
-
Above 4G decoding
-
Hyper-Threading
-
Execute Disable Bit
-
EHCI/XHCI Hand-off
-
OS type:Other(如果你选择 Other 会导致 CSM 联动开启,选择 Windows 8.1/10 UEFI Mode)
-
② Broadwell-E(第六代酷睿 X99 平台)
BIOS 设置
-
关闭
-
Fast Boot
-
Secure Boot
-
VT-d(可以开启,前提是 DisableIoMapper 设置为 Yes)
-
CSM
-
Thunderbolt(建议安装完成后再开启调试)
-
Intel SGX Intel Platform Trust
-
Intel Platform Trust
-
CFG Lock(MSR 0xE2 写保护)此项必须关闭,如果你的 BIOS 里没有此项,注意设置 AppleCpuPmCfgLock 和 Apple XcpmCfgLock 为 Yes。
-
-
开启
-
VT-x
-
Above 4G decoding
-
Hyper-Threading
-
Execute Disable Bit
-
EHCI/XHCI Hand-off
-
OS type:Other(如果你选择 Other 会导致 CSM 联动开启,选择 Windows 8.1/10 UEFI Mode)
-
③ Skylake-X/W 和 Cascade Lake-X/W(第7、8、10代酷睿 X 和 Xeon)
BIOS 设置
-
关闭
-
Fast Boot
-
Secure Boot
-
VT-d(可以开启,前提是 DisableIoMapper 设置为 Yes)
-
CSM
-
Thunderbolt(建议安装完成后再开启调试)
-
Intel SGX Intel Platform Trust
-
Intel Platform Trust
-
CFG Lock(MSR 0xE2 写保护)此项必须关闭,如果你的 BIOS 里没有此项,注意设置 AppleCpuPmCfgLock 和 Apple XcpmCfgLock 为 Yes。
-
-
开启
-
VT-x
-
Above 4G decoding
-
Hyper-Threading
-
Execute Disable Bit
-
EHCI/XHCI Hand-off
-
OS type:Other(如果你选择 Other 会导致 CSM 联动开启,选择 Windows 8.1/10 UEFI Mode)
-
03. AMD平台
① Ryzen 锐龙 和 Threadripper 线程撕裂者
BIOS 设置
-
关闭
-
必须关闭此项,如不关闭将导致 GPU 错误
-
Fast Boot
-
Secure Boot
-
Compatibility Support Module(CSM)
-
-
开启
-
此项必须打开,如果 BIOS 里没有此选项,则添加 npci=0x2000 添加到启动参数。二者不要同时启用使用。)
-
Above 4G decoding
-
EHCI/XHCI Hand-off
-
OS type:Other
-
04. 笔记本
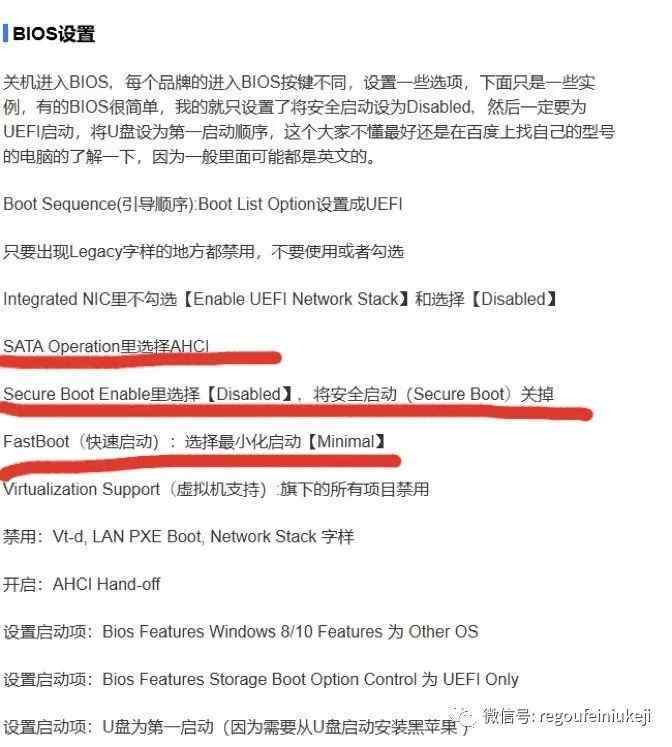
P.s:画红线的必须设置一下,其他的选项只要找到也设置,找不到可以忽略。
写在最后
根据我自己以前的装机经验,没有设置 BIOS 的机子和设置了 BIOS 的机子最大的区别就是装不上去系统。
除个别品牌电脑的 BIOS 默认设置和上述的一样。

为开发者提供学习成长、分享交流、生态实践、资源工具等服务,帮助开发者快速成长。
更多推荐


 0
0 0
0- 0


 已为社区贡献10条内容

所有评论(0)