SpringBoot实现MySQL读写分离
在高并发下,需要对应用进行读写分离,配置多数据源,即写操作走主库,读操作则走从库,主从数据库负责各自的读和写,缓解了锁的争用,提高了读取性能。实现读写分离有多种方式,如使用中间件MyCat、Sharding-JDBC等,这里我们使用Aop的方式在代码层面实现读写分离。实现原理实现读写分离,首先要对Mysql做主从复制,即搭建一个主数据库,以及一个或多个从数据库。具体实现主从复制,可参照前一篇博客《
在高并发下,需要对应用进行读写分离,配置多数据源,即写操作走主库,读操作则走从库,主从数据库负责各自的读和写,缓解了锁的争用,提高了读取性能。
实现读写分离有多种方式,如使用中间件MyCat、Sharding-JDBC等,这里我们使用Aop的方式在代码层面实现读写分离。
实现原理
实现读写分离,首先要对Mysql做主从复制,即搭建一个主数据库,以及一个或多个从数据库。
具体实现主从复制,可参照前一篇博客《基于docker配置MySQL主从复制》
使用Aop的方式,当调用业务层方法前,判断请求是否是只读操作,动态切换数据源,如果是只读操作,则切换从数据库的数据源,否则使用主数据库的数据源。
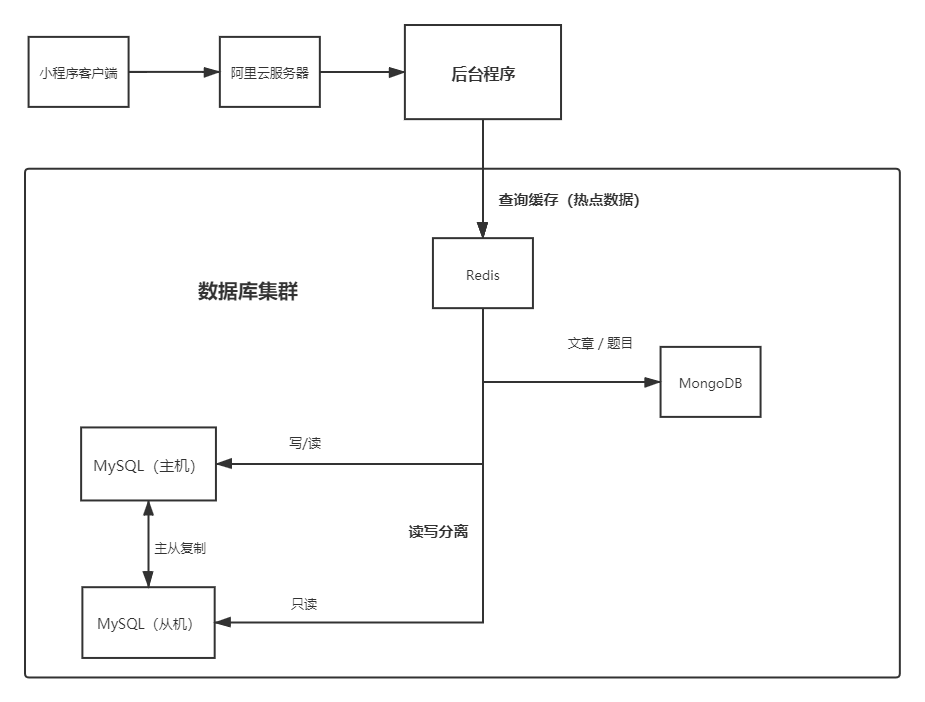
系统架构
这是我之前写的一个项目,项目就是使用了本文章介绍的读写分离方式,架构图大概如下:

代码实现
在application.yml配置MySQL
spring:
  datasource:
    type: com.alibaba.druid.pool.DruidDataSource
    #主机
    master:
      username: root
      password: 123456
      url: jdbc:mysql://服务器ip:3306/letfit?useSSL=false&useUnicode=true&characterEncoding=utf8&serverTimezone=GMT
      driver-class-name: com.mysql.cj.jdbc.Driver
    #从机
    slave:
      username: root
      password: 123456
      url: jdbc:mysql://服务器ip:3307/letfit?useSSL=false&useUnicode=true&characterEncoding=utf8&serverTimezone=GMT
      driver-class-name: com.mysql.cj.jdbc.Driver
    #连接池
    druid:
      initialSize: 5
      minIdle: 5
      maxActive: 20
      maxWait: 60000
      timeBetweenEvictionRunsMillis: 60000
      minEvictableIdleTimeMillis: 300000
      validationQuery: SELECT 1 FROM DUAL
      testWhileIdle: true
      testOnBorrow: false
      testOnReturn: false
      poolPreparedStatements: true
      filters: stat,wall
      maxPoolPreparedStatementPerConnectionSize: 20
      useGlobalDataSourceStat: true
      connectionProperties: druid.stat.mergeSql=true;druid.stat.slowSqlMillis=500
创建 ReadOnly 注解
在业务层的方法上使用该注解,使用 ReadOnly 注解的方法只处理读操作,会切换到从机的数据源
package com.letfit.aop.annotation;

/**
 * 只读注解
 */
@Target({ElementType.METHOD, ElementType.TYPE})
@Retention(RetentionPolicy.RUNTIME)
public @interface ReadOnly {
}
创建枚举类
定义两个枚举类型 MASTER、slave分别代表数据库类型
package com.letfit.common;

/**
 * 数据库类型
 */
public enum DBTypeEnum {
    /**
     * 主数据库
     */
    MASTER,

    /**
     * 从数据库
     */
    SLAVE;
}
编写动态切换数据源的工具类
package com.letfit.util;

/**
 * 动态切换数据源工具类
 */
@Slf4j
public class DynamicDbUtil {

    /**
     * 用来存储代表数据源的对象
     */
    private static final ThreadLocal<DBTypeEnum> CONTEXT_HAND = new ThreadLocal<>();

    /**
     * 切换当前线程要使用的数据源
     * @param dbTypeEnum
     */
    public static void set(DBTypeEnum dbTypeEnum){
        CONTEXT_HAND.set(dbTypeEnum);
        log.info("切换数据源:{}", dbTypeEnum);
    }

    /**
     * 切换到主数据库
     */
    public static void master(){
        set(DBTypeEnum.MASTER);
    }

    /**
     * 切换到从数据库
     */
    public static void slave(){
        set(DBTypeEnum.SLAVE);
    }

    /**
     * 移除当前线程使用的数据源
     */
    public static void remove(){
        CONTEXT_HAND.remove();
    }

    /**
     * 获取当前线程使用的枚举类
     * @return
     */
    public static DBTypeEnum get(){
        return CONTEXT_HAND.get();
    }

}
编写 AbstractRoutingDataSource的实现类
Spring boot提供了AbstractRoutingDataSource 根据用户定义的规则选择当前的数据源,这样我们可以在执行查询之前,设置使用的数据源。实现可动态路由的数据源,在每次数据库查询操作前执行。它的抽象方法 determineCurrentLookupKey() 决定使用哪个数据源。
AbstractRoutingDataSource 的部分源码如下
public abstract class AbstractRoutingDataSource extends AbstractDataSource implements InitializingBean {
    /*
     * 用来存储多个数据源
     */
    @Nullable
    private Map<Object, Object> targetDataSources;

    /*
     * 默认数据源
     */
    @Nullable
    private Object defaultTargetDataSource;

    @Nullable
    private Map<Object, DataSource> resolvedDataSources;

    @Nullable
    private DataSource resolvedDefaultDataSource;

    public AbstractRoutingDataSource() {
    }

    /*
     * 设置多数据源,最终使用哪个数据源由determineTargetDataSource()返回决定
     */
    public void setTargetDataSources(Map<Object, Object> targetDataSources) {
        this.targetDataSources = targetDataSources;
    }

    /*
     * 设置默认数据源
     */
    public void setDefaultTargetDataSource(Object defaultTargetDataSource) {
        this.defaultTargetDataSource = defaultTargetDataSource;
    }

    /*
     * 决定使用的数据源,选择的策略需要我们自己去定义
     */
    protected DataSource determineTargetDataSource() {
        Assert.notNull(this.resolvedDataSources, "DataSource router not initialized");
        //调用determineCurrentLookupKey()获取数据源的key
        Object lookupKey = this.determineCurrentLookupKey();
        //根据key获取对应数据源
        DataSource dataSource = (DataSource)this.resolvedDataSources.get(lookupKey);
        if (dataSource == null && (this.lenientFallback || lookupKey == null)) {
            dataSource = this.resolvedDefaultDataSource;
        }

        if (dataSource == null) {
            throw new IllegalStateException("Cannot determine target DataSource for lookup key [" + lookupKey + "]");
        } else {
            return dataSource;
        }
    }

    /*
     * 抽象方法,需要我们自己去实现
     */
    @Nullable
    protected abstract Object determineCurrentLookupKey();
}
编写 DynamicDataSource继承 AbstractRoutingDataSource
package com.letfit.common;

public class DynamicDataSource extends AbstractRoutingDataSource {

    /**
     * 返回当前线程正在使用代表数据库的枚举对象
     * @return
     */
    @Override
    protected Object determineCurrentLookupKey() {
        return DynamicDbUtil.get();
    }

}
流程步骤:
1、重写数据源选择策略determineCurrentLookupKey()。
2、数据源配置类将数据源存放在AbstractRoutingDataSource的 targetDataSources和defaultTargetDataSource中,然后通过afterPropertiesSet()方法将数据源分别进行复制到resolvedDataSources和resolvedDefaultDataSource中。
3、进行数据库连接时,调用AbstractRoutingDataSource的getConnection()的方法,此时会先调用determineTargetDataSource()方法返回DataSource再进行getConnection()。
编写多数据源配置类
package com.letfit.config;

import com.alibaba.druid.spring.boot.autoconfigure.DruidDataSourceBuilder;
import com.letfit.common.DBTypeEnum;
import com.letfit.common.DynamicDataSource;
import org.springframework.beans.factory.annotation.Qualifier;
import org.springframework.boot.context.properties.ConfigurationProperties;
import org.springframework.context.annotation.Bean;
import org.springframework.context.annotation.Configuration;
import org.springframework.context.annotation.Primary;

import javax.sql.DataSource;
import java.util.HashMap;
import java.util.Map;

@Configuration
public class DataSourceConfig {

    /**
     * 主数据库数据源,存入Spring容器
     * 注解@Primary表示主数据源
     * @return
     */
    @ConfigurationProperties(prefix = "spring.datasource.master")
    @Primary
    @Bean
    public DataSource masterDataSource(){
        return DruidDataSourceBuilder.create().build();
    }

    /**
     * 从数据库数据源,存入Spring容器
     * @return
     */
    @ConfigurationProperties(prefix = "spring.datasource.slave")
    @Bean
    public DataSource slaveDataSource(){
        return DruidDataSourceBuilder.create().build();
    }

    /**
     * 决定最终数据源
     * @param masterDataSource
     * @param slaveDataSource
     * @return
     */
    @Bean
    public DataSource targetDataSource(@Qualifier("masterDataSource") DataSource masterDataSource, @Qualifier("slaveDataSource") DataSource slaveDataSource){
        //存放主从数据源
        Map<Object,Object> targetDataSource = new HashMap<>(2);
        //主数据源
        targetDataSource.put(DBTypeEnum.MASTER, masterDataSource);
        //从数据源
        targetDataSource.put(DBTypeEnum.SLAVE, slaveDataSource);
        //实现动态切换
        DynamicDataSource dynamicDataSource = new DynamicDataSource();
        //绑定所有数据源
        dynamicDataSource.setTargetDataSources(targetDataSource);
        //设置默认数据源
        dynamicDataSource.setDefaultTargetDataSource(masterDataSource);
        return dynamicDataSource;
    }

}
配置Mybatis
当我们只有一个数据源时,SpringBoot会默认配置Mybatis,现在我们有多个数据源,就需要手动配置Mybatis的SqlSessionFactory
package com.letfit.config;

import org.apache.ibatis.session.SqlSessionFactory;
import org.mybatis.spring.SqlSessionFactoryBean;
import org.mybatis.spring.SqlSessionTemplate;
import org.springframework.beans.factory.annotation.Qualifier;
import org.springframework.context.annotation.Bean;
import org.springframework.context.annotation.Configuration;
import org.springframework.core.io.support.PathMatchingResourcePatternResolver;
import org.springframework.jdbc.datasource.DataSourceTransactionManager;
import org.springframework.transaction.PlatformTransactionManager;
import org.springframework.transaction.annotation.EnableTransactionManagement;

import javax.annotation.Resource;
import javax.sql.DataSource;
import java.util.Objects;

/**
 * 多数据源需要手动配置SqlSessionFactory
 */
@Configuration
@EnableTransactionManagement
public class MybatisConfig {

    @Resource(name = "targetDataSource")
    private DataSource dataSource;

    /**
     * 配置SqlSessionFactory
     * @return
     * @throws Exception
     */
    @Bean
    public SqlSessionFactory sqlSessionFactory() throws Exception {
        SqlSessionFactoryBean factoryBean = new SqlSessionFactoryBean();
        factoryBean.setDataSource(dataSource);
        //配置映射文件路径
        factoryBean.setMapperLocations(new PathMatchingResourcePatternResolver().getResources("classpath:mapper/*.xml"));
        //配置别名
        factoryBean.setTypeAliasesPackage("com.letfit.pojo");
        //设置驼峰命名
        Objects.requireNonNull(factoryBean.getObject()).getConfiguration().setMapUnderscoreToCamelCase(true);
        return factoryBean.getObject();
    }

    /**
     * 配置事务管理
     * @return
     */
    @Bean
    public PlatformTransactionManager transactionManager(){
        return new DataSourceTransactionManager(dataSource);
    }

    @Bean
    public SqlSessionTemplate sqlSessionTemplate(@Qualifier("sqlSessionFactory") SqlSessionFactory sqlSessionFactory){
        return new SqlSessionTemplate(sqlSessionFactory);
    }

}
配置Aop
package com.letfit.aop;

@Component
@Aspect
@Slf4j
public class DataSourceAop {

    @Pointcut("@annotation(com.letfit.aop.annotation.ReadOnly)")
    public void readPointcut(){}

    /**
     * 配置前置通知,切换数据源为从数据库
     */
    @Before("readPointcut()")
    public void readAdvise(){
        log.info("切换数据源为从数据库");
        DynamicDbUtil.slave();
    }

}
业务层方法上使用 ReadOnly 注解
/**
 * 根据标题关键字模糊查询资源
 * @param title
 * @return
 */
@ReadOnly
@Override
public ResultInfo<List<Source>> searchSource(String title) {
    if(!ValiDateUtil.isLegalString(title)){
        return ResultInfo.error(CodeEnum.PARAM_NOT_IDEAL, null);
    }
    List<Source> sourceList = sourceMapper.searchSource(title);
    return ResultInfo.success(CodeEnum.SUCCESS, sourceList);
}

- 至此,读写分离的工作就完成了!

为开发者提供学习成长、分享交流、生态实践、资源工具等服务,帮助开发者快速成长。
更多推荐


 11
11 0
0- 0


 已为社区贡献4条内容

所有评论(0)